
Complete high end system install


Thread Starter
|
Member
Joined: Aug 2014
Posts: 179
From: Some where

Complete high end system install
Build Log by Simplicity in Sound
Sometime i look at the cars that we work on with regularity, and realize that there seems to be some
peculiarity with the selection. Namely, there are a lot of very popular platforms that we hardly ever
see...cars such as civics, camrys, audis, are few and far in between. The Honda fit, is just such an
example..this spacious econohatch runs amok here in norcal, yet we have never ever worked on one
before.
So it was actually quite exciting for me to book a new, 3rd generation Fit for a full on SQ build.
The customer had a previous system installed and he was looking for more, so he gathered up some
very high end gear and brought it all to us for the build. Everything other than the Mosconi mini
controller was supplied by the customer.
goals:
1. achieve a high level of sound quality utilizing customer supplied equipment
2. integrate the midrange and rather large tweeter into the A pillar window
3. integrate the Mosconi AMAS HD BT streaming device and the Mosconi controller into the interior
4. maintain a fully stealth and usable hatch area capable of supporting a lot of weight that the customer
will be loading on a daily basis due to work
lets get started...first up the car. I kinda dig the third generation fit, kinda sporty looking in a futuristic
way, a bit more smooth than the 2nd gen and less boring than the first:


the previous isntall was completed removed other than some speaker wires and of course the original
sound proofing. I performed most of the build while Jesse did the mosconi dsp controller mount.
speaking of which, here is the mosconi RC-mini integrated into the pocket behind the shifter. Jesse has
really gotten good at doing small detailed fab work like this, and he did imo a great job with this one as
well. it puts the controls and preset changing at the finger tips of the customer:


a coupla build pics of the controller mount, which is 100 percent acrylic. it consists of a top plate that is
meticulously sanded, backfilled and shaped to fit the opening, and several pieces of acrylic tabs that are
bonded together, they interlock into each other with bolts and inturn bolts into the mosconi controller.
the top was painted black to match the interior:


this piece was then secured to the car using more little bolts, and then the entire console was put back
into the car:


For the front stage, the customer supplied me with a full 3 way set of Audison Thesis component
set...naturally, the only place to mount them was the A pillar windows. At first, this seemed like plenty
of space, but after taking the pillars off, i realized that with the sheer size of the Thesis tweeter, and the
fact that the top of the pillar protrudes out more than the bottom, there was basically only one way to
do the speakers that still allow the pods to go into the drivers side dash. (due to the protruding driver
side dash AC vents). this isnt the most ideal angle to me, but i was confident i can tune around it. so
this is what i ended up with.
the 3" thesis mid is back and at the top corner of the window, with the oversized tweeter towards the
front of the car and aimed more back. each is recessed and flush mounted, showcasing the trade mark
audison grille. the pod itself is finished in graphite vinyl to match the dash, and the out side surface is
also vinyled as you will see in later pics so you dont see any raw fiberglass from the outside of the car.
if you look at the driver side dash vents, you will see what i mean about doing it this way to ensure that
the pods can still fit into the windows and it can all go back into the car...even with this it was quite a
struggle


here are some build pods. first, the areas of the window were tapped off and 3 layers of fiberglass laid
down:


when they cured, they were popped out, trimmed, and some CLD damper were laid on the inside:


then, after literally spending an hour trying to figure out how i can arrange the drivers and still be able to
get them into the window, i aimed and secured the mounting rings:

then mold cloth was pulled, resin applied, allowed to cure, and then a milkshake of filler and resin was
poured into the pods to reinforce them from the inside:

then a few layers of filler and sanding got them to be smooth and ready for upholstery:

and finally, they were wrapped in graphite/black vinyl. the backside of the pods were also smoothed
out and wrapped in the same vinyl to present a clean surface from the outside of the car:


these were then secured to the factory a pillar with 6-32 machine screws and nuts:


the Thesis mid was then secured, while the tweeter will need to go on after to allow wire routing:

moving onto the Thesis midbass located in the stock lower door location. the door had already been
sound proofed from the earlier installation:

we basically added a layer of metra ballstic foam barrier to the entire door to separate the plastic from
the CLD:


and then also covered the door card with more CLD damper:

the same procedure was done to the passenger side:


and that completes the front stage.
next are a series of pics that show the new wiring bundle as it travesl down the sides of the to the rear,
ziptied and secured every few inches:


moving onto the hatch area. as mentioned, the goal was to be simple, stealthy, and most importantly,
to be sturdy and support a lot of weight.
so here is the view with everything covered up and the cargo mat in place, for a 100 percent oem look:

take off the cargo mat and you see a new floor panel that covers most of the space over the spare tire
well. with a center large cutout:

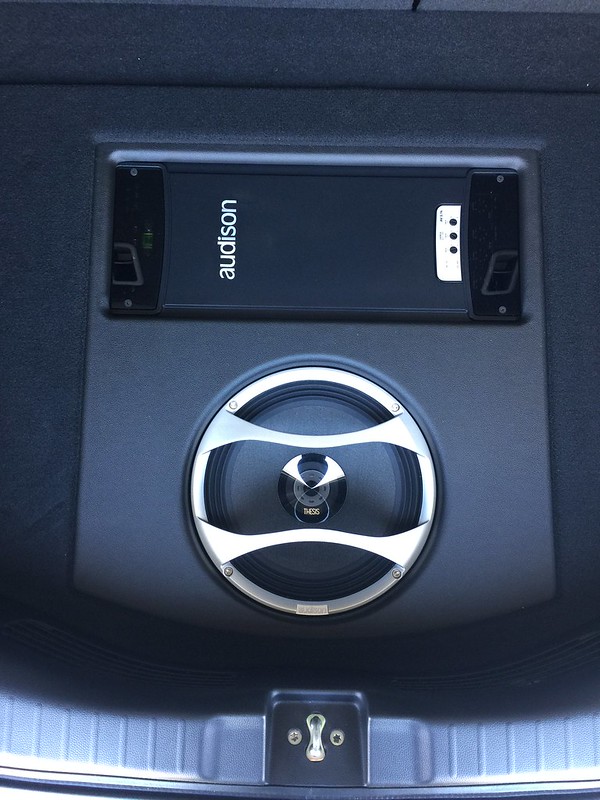
pop off the breathable grille from the cutout and you see a simple layout showing a Thesis 10"
subwoofer and a Audison Voce 5.1k. all trimmed int he same graphite vinyl as the pods. again, nothing
fancy but functional and clean:


now some of you may wonder why the sub is recessed so much. well actually, it is barely recessed
enough i wanted to maintain the cosmetic look of the audison grilles from the front stage, so i made
sure the sub grille is in place. what is deceiving is just how far the center of the sub grille rises. here you
can see it is barely even 1/4" below the opening of the cutout

so lets go on to the build pics.
again, spare tire well was already fully sound proofed from the previous install. so i tapped off the area i
wanted the sub enclosure to be, and laid down 5 layers of fiberglass mat:


when that cured, i popped the mold out, trimmed it, and molded in a front and top board to form the
enclosure. i then attached a spacer board over where the sub will be. as i needed the depth around the
sub to mount other things:

i then installed a single 1/4" rivet nut to the floor of the well, and after wiring the subbox and painting
the top baffle black so no raw wood would show through, i bolted the enclosure to the floor with a 1/4-
20 bolt:


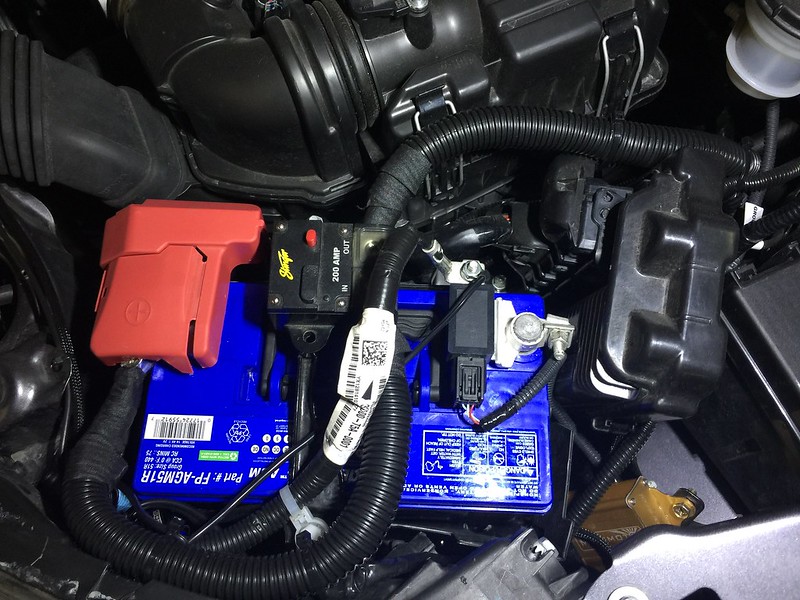
by now, astute readers will realize that a single audison AV5.1k is not enough to drive the entire system
fully active. thats where the customer supplied mosconi zero 3 came in. it is located in its own
rack,secured to the subbox and the side walls using bolts and rivetnuts. to ensure that everything is
very strong and can withstand a lot of weight, all the supports in this car were done with double 3/4"
supports. here is the zero3 in its rack, pre-wired:


the amprack was then secured to the well and wired up:


this is the top rack that houses the AV5.1k, the dsp and various other gadgets, before it is secured to the
car:


and finally, after about 6 hours of wiring. everything is now fully secured and hooked up. the mosconi
6to8v8 dsp, loaded with the AMAS BT streaming hardware is on the passenger side, while all the
distribution and barrier strips is to the left of the sub. the customer supplied me with a cross flow fan,
which i wired in to the left of the 5.1K as well. pretty darn crowded if you ask me


and to ensure that i can access the gain control on the zero 3, i had a slot cutout above it that is
reachable with a longer screw driver without having to disturb the 5.1k above it:

here is the main trim panel before and after vinyl, note the tall flush mount walls around the sub to clear
the grille:


and here it is secured to the car:

here are the top two pieces, before and after carpet, and i also dyed them slightly to better match the
oem honda carpet:


so thats it...lets talk about how it sounds. but before that. a quick gander at the oem signal that i was
working with.
so here is the stock oem signal, unprocessed. you can see it is fairly flat, but the major thing to note is
what appears to be a filter at the bottom end of the frequency below 45-50hz range. this i am fairly
sure is a highpass, as boosting those frequencies with the mosconi input eq did virtually nothing to the
signal. so i think maybe a bass restoration circuit of some type will help with that:

here is the same signal at hi, mid, and low volumes kn the stock headunit, and as you can see, not a
whole ton of dynamic equalization:

and here is the signal after i went through it with the mosconi input eq. didnt take a whole lot of work,
but again, couldnt do much about the high passed filter:

so...how does it sound.
i have to say i am very impressed with the entire thesis setup.
the relatively odd mounting position of the front stage require me to do play with the left and right
gains of the tweeter a bit to get a solid center image. surprisingly, tonality wasnt too bad on the left
side both with rta measurements and by ear.
once i got the center imaging for the tweeter dialed in, it was very solid and anchored. stage width is
pillar to pillar, with good depth and height.
the thesis tweeter and midrange was able to convey a lot of detail without being harsh, and created a
very airy feeling when listening, especially with the AMAS. a lot of great resolution yet it was never
offensive, even at high volumes.
but the thesis midbass REALLY impressed me. going off a recomendation by an audison expert, they
were high passed fairly low at around 55hz. they were able to dish out a ton of clean impactful midbass
without any hint of distortion. they also naturally extended down with any struggle. truly impressive for
sure...and could be one of the most impressive 6.5" midbasses i have ever heard. bravo!
the sub also is very excellent. it is very transparent and just dissapeared into the music. and unlike
some other sq specific subs, it was also to dish out a lot of output and extension when pushed.
again, i would characterize the entire thesis set as very refined yet muscular...they can do the delicate
stuff very well but if you just get up and push them, they seem to be able to absorb a lot of power with
virtually no distortion. easily the most impressive audison/hertz speakers i have ever heard...and its
shame they are no longer available for sale.
on AMAS compared to the stock source, everything just sounds a bit more open and airy, but by far the
biggest difference in sound is on the sub. as mentioned above, the stock signal seems to have a drastic
high pass below 45hz, this translated to plenty of upper range bass but a definite depreciation in the
ultra low stuff. hwere as the AMAS signal is flat all the way down, and truly allowed the sub to do its
thing. the difference is very noticible on songs with big, low bass notes...and it is perhaps even more
dramatic on the rta, playing the same pink noise, sub channel on only:

on a lot of songs, this difference isnt audible, but yeah on big bass notes, the amas really shines.
so thats it for this...just happy that the customer got a car that he is really happy with to listen to on a
daily basis, and opened my eyes to some high end equipment that i normally dont get to play with.
Cheers,
Bing
Sometime i look at the cars that we work on with regularity, and realize that there seems to be some
peculiarity with the selection. Namely, there are a lot of very popular platforms that we hardly ever
see...cars such as civics, camrys, audis, are few and far in between. The Honda fit, is just such an
example..this spacious econohatch runs amok here in norcal, yet we have never ever worked on one
before.
So it was actually quite exciting for me to book a new, 3rd generation Fit for a full on SQ build.
The customer had a previous system installed and he was looking for more, so he gathered up some
very high end gear and brought it all to us for the build. Everything other than the Mosconi mini
controller was supplied by the customer.
goals:
1. achieve a high level of sound quality utilizing customer supplied equipment
2. integrate the midrange and rather large tweeter into the A pillar window
3. integrate the Mosconi AMAS HD BT streaming device and the Mosconi controller into the interior
4. maintain a fully stealth and usable hatch area capable of supporting a lot of weight that the customer
will be loading on a daily basis due to work
lets get started...first up the car. I kinda dig the third generation fit, kinda sporty looking in a futuristic
way, a bit more smooth than the 2nd gen and less boring than the first:
the previous isntall was completed removed other than some speaker wires and of course the original
sound proofing. I performed most of the build while Jesse did the mosconi dsp controller mount.
speaking of which, here is the mosconi RC-mini integrated into the pocket behind the shifter. Jesse has
really gotten good at doing small detailed fab work like this, and he did imo a great job with this one as
well. it puts the controls and preset changing at the finger tips of the customer:
a coupla build pics of the controller mount, which is 100 percent acrylic. it consists of a top plate that is
meticulously sanded, backfilled and shaped to fit the opening, and several pieces of acrylic tabs that are
bonded together, they interlock into each other with bolts and inturn bolts into the mosconi controller.
the top was painted black to match the interior:
this piece was then secured to the car using more little bolts, and then the entire console was put back
into the car:
For the front stage, the customer supplied me with a full 3 way set of Audison Thesis component
set...naturally, the only place to mount them was the A pillar windows. At first, this seemed like plenty
of space, but after taking the pillars off, i realized that with the sheer size of the Thesis tweeter, and the
fact that the top of the pillar protrudes out more than the bottom, there was basically only one way to
do the speakers that still allow the pods to go into the drivers side dash. (due to the protruding driver
side dash AC vents). this isnt the most ideal angle to me, but i was confident i can tune around it. so
this is what i ended up with.
the 3" thesis mid is back and at the top corner of the window, with the oversized tweeter towards the
front of the car and aimed more back. each is recessed and flush mounted, showcasing the trade mark
audison grille. the pod itself is finished in graphite vinyl to match the dash, and the out side surface is
also vinyled as you will see in later pics so you dont see any raw fiberglass from the outside of the car.
if you look at the driver side dash vents, you will see what i mean about doing it this way to ensure that
the pods can still fit into the windows and it can all go back into the car...even with this it was quite a
struggle
here are some build pods. first, the areas of the window were tapped off and 3 layers of fiberglass laid
down:
when they cured, they were popped out, trimmed, and some CLD damper were laid on the inside:
then, after literally spending an hour trying to figure out how i can arrange the drivers and still be able to
get them into the window, i aimed and secured the mounting rings:
then mold cloth was pulled, resin applied, allowed to cure, and then a milkshake of filler and resin was
poured into the pods to reinforce them from the inside:
then a few layers of filler and sanding got them to be smooth and ready for upholstery:
and finally, they were wrapped in graphite/black vinyl. the backside of the pods were also smoothed
out and wrapped in the same vinyl to present a clean surface from the outside of the car:
these were then secured to the factory a pillar with 6-32 machine screws and nuts:
the Thesis mid was then secured, while the tweeter will need to go on after to allow wire routing:
moving onto the Thesis midbass located in the stock lower door location. the door had already been
sound proofed from the earlier installation:
we basically added a layer of metra ballstic foam barrier to the entire door to separate the plastic from
the CLD:
and then also covered the door card with more CLD damper:
the same procedure was done to the passenger side:
and that completes the front stage.
next are a series of pics that show the new wiring bundle as it travesl down the sides of the to the rear,
ziptied and secured every few inches:
moving onto the hatch area. as mentioned, the goal was to be simple, stealthy, and most importantly,
to be sturdy and support a lot of weight.
so here is the view with everything covered up and the cargo mat in place, for a 100 percent oem look:
take off the cargo mat and you see a new floor panel that covers most of the space over the spare tire
well. with a center large cutout:
pop off the breathable grille from the cutout and you see a simple layout showing a Thesis 10"
subwoofer and a Audison Voce 5.1k. all trimmed int he same graphite vinyl as the pods. again, nothing
fancy but functional and clean:
now some of you may wonder why the sub is recessed so much. well actually, it is barely recessed
enough
i wanted to maintain the cosmetic look of the audison grilles from the front stage, so i made sure the sub grille is in place. what is deceiving is just how far the center of the sub grille rises. here you
can see it is barely even 1/4" below the opening of the cutout
so lets go on to the build pics.
again, spare tire well was already fully sound proofed from the previous install. so i tapped off the area i
wanted the sub enclosure to be, and laid down 5 layers of fiberglass mat:
when that cured, i popped the mold out, trimmed it, and molded in a front and top board to form the
enclosure. i then attached a spacer board over where the sub will be. as i needed the depth around the
sub to mount other things:
i then installed a single 1/4" rivet nut to the floor of the well, and after wiring the subbox and painting
the top baffle black so no raw wood would show through, i bolted the enclosure to the floor with a 1/4-
20 bolt:
by now, astute readers will realize that a single audison AV5.1k is not enough to drive the entire system
fully active. thats where the customer supplied mosconi zero 3 came in. it is located in its own
rack,secured to the subbox and the side walls using bolts and rivetnuts. to ensure that everything is
very strong and can withstand a lot of weight, all the supports in this car were done with double 3/4"
supports. here is the zero3 in its rack, pre-wired:
the amprack was then secured to the well and wired up:
this is the top rack that houses the AV5.1k, the dsp and various other gadgets, before it is secured to the
car:
and finally, after about 6 hours of wiring. everything is now fully secured and hooked up. the mosconi
6to8v8 dsp, loaded with the AMAS BT streaming hardware is on the passenger side, while all the
distribution and barrier strips is to the left of the sub. the customer supplied me with a cross flow fan,
which i wired in to the left of the 5.1K as well. pretty darn crowded if you ask me
and to ensure that i can access the gain control on the zero 3, i had a slot cutout above it that is
reachable with a longer screw driver without having to disturb the 5.1k above it:
here is the main trim panel before and after vinyl, note the tall flush mount walls around the sub to clear
the grille:
and here it is secured to the car:
here are the top two pieces, before and after carpet, and i also dyed them slightly to better match the
oem honda carpet:
so thats it...lets talk about how it sounds. but before that. a quick gander at the oem signal that i was
working with.
so here is the stock oem signal, unprocessed. you can see it is fairly flat, but the major thing to note is
what appears to be a filter at the bottom end of the frequency below 45-50hz range. this i am fairly
sure is a highpass, as boosting those frequencies with the mosconi input eq did virtually nothing to the
signal. so i think maybe a bass restoration circuit of some type will help with that:
here is the same signal at hi, mid, and low volumes kn the stock headunit, and as you can see, not a
whole ton of dynamic equalization:
and here is the signal after i went through it with the mosconi input eq. didnt take a whole lot of work,
but again, couldnt do much about the high passed filter:
so...how does it sound.
i have to say i am very impressed with the entire thesis setup.
the relatively odd mounting position of the front stage require me to do play with the left and right
gains of the tweeter a bit to get a solid center image. surprisingly, tonality wasnt too bad on the left
side both with rta measurements and by ear.
once i got the center imaging for the tweeter dialed in, it was very solid and anchored. stage width is
pillar to pillar, with good depth and height.
the thesis tweeter and midrange was able to convey a lot of detail without being harsh, and created a
very airy feeling when listening, especially with the AMAS. a lot of great resolution yet it was never
offensive, even at high volumes.
but the thesis midbass REALLY impressed me. going off a recomendation by an audison expert, they
were high passed fairly low at around 55hz. they were able to dish out a ton of clean impactful midbass
without any hint of distortion. they also naturally extended down with any struggle. truly impressive for
sure...and could be one of the most impressive 6.5" midbasses i have ever heard. bravo!
the sub also is very excellent. it is very transparent and just dissapeared into the music. and unlike
some other sq specific subs, it was also to dish out a lot of output and extension when pushed.
again, i would characterize the entire thesis set as very refined yet muscular...they can do the delicate
stuff very well but if you just get up and push them, they seem to be able to absorb a lot of power with
virtually no distortion. easily the most impressive audison/hertz speakers i have ever heard...and its
shame they are no longer available for sale.
on AMAS compared to the stock source, everything just sounds a bit more open and airy, but by far the
biggest difference in sound is on the sub. as mentioned above, the stock signal seems to have a drastic
high pass below 45hz, this translated to plenty of upper range bass but a definite depreciation in the
ultra low stuff. hwere as the AMAS signal is flat all the way down, and truly allowed the sub to do its
thing. the difference is very noticible on songs with big, low bass notes...and it is perhaps even more
dramatic on the rta, playing the same pink noise, sub channel on only:
on a lot of songs, this difference isnt audible, but yeah on big bass notes, the amas really shines.
so thats it for this...just happy that the customer got a car that he is really happy with to listen to on a
daily basis, and opened my eyes to some high end equipment that i normally dont get to play with.
Cheers,
Bing
Last edited by payluder; Aug 17, 2015 at 02:32 PM.
Thread Starter
|
Member
Joined: Aug 2014
Posts: 179
From: Some where
I totally agree with you on this one but with the speaker option I gave to the installer this was the best they can do. So far Ive been adjusting to the change and Ive been moving my body to see the blind spots with no problems. The trade off is well worth it.
My initial question would be is blocking off windows legal. Placing speakers covering over windows is the same as paint your windows black. Windows are for making things outside more visible for the driver. Just something that could come up if you have inspection in your state. It wont pass with windows obstructed.
Nice build. I never thought of using the A pillar windows as a mounting location but good place for them. I honestly don't think I even look out of those windows anyway.
So I assume you had to sacrifice your spare tire? Better carry a can of fix o flat with you then. You never really know when you'll get a flat.
I once got a huge gash in my rear tire going down a country road one day, probably something that fell off a piece of farming equipment. Went flat in seconds. That's why I never go anywhere without my spare.
However I have thought about creating a raised false floor on top of the spare tire floor level to where it can be lifted and held up so as to access the spare tire itself but realistically it's probably easier to just mount an amp to a sub box and merely shove it out of the way or pull it out if space is needed.
I created a quick release box log in an older thread. Worked out really well but was heavy as sin.
Thread Starter
|
Member
Joined: Aug 2014
Posts: 179
From: Some where
Nice build. I never thought of using the A pillar windows as a mounting location but good place for them. I honestly don't think I even look out of those windows anyway.
So I assume you had to sacrifice your spare tire? Better carry a can of fix o flat with you then. You never really know when you'll get a flat.
I once got a huge gash in my rear tire going down a country road one day, probably something that fell off a piece of farming equipment. Went flat in seconds. That's why I never go anywhere without my spare.
However I have thought about creating a raised false floor on top of the spare tire floor level to where it can be lifted and held up so as to access the spare tire itself but realistically it's probably easier to just mount an amp to a sub box and merely shove it out of the way or pull it out if space is needed.
I created a quick release box log in an older thread. Worked out really well but was heavy as sin.
So I assume you had to sacrifice your spare tire? Better carry a can of fix o flat with you then. You never really know when you'll get a flat.
I once got a huge gash in my rear tire going down a country road one day, probably something that fell off a piece of farming equipment. Went flat in seconds. That's why I never go anywhere without my spare.
However I have thought about creating a raised false floor on top of the spare tire floor level to where it can be lifted and held up so as to access the spare tire itself but realistically it's probably easier to just mount an amp to a sub box and merely shove it out of the way or pull it out if space is needed.
I created a quick release box log in an older thread. Worked out really well but was heavy as sin.
Thank you for your comments. I cant relay 100% of those windows so I just force myself to move around more to check the blind spots anyways. For the flat tire problem if I ever go on a long road trip I can just throw my spare tire in the trunk but besides that I can always call AAA for a tow and fix. Funny thing is before this build one shop actually put the amp on the floor and made a rise platform so the spare tire sits over the amp. and I was able to retain the spare but I wasn't comfortable with that and wasn't sure if it can withstand heavy weight overtime.


Mind sharing yours to compare? Hell I thought my Infinity Kappa Perfect 6.1 components in front and changed rear to Kappa Perfect 6.1 components powered by a Coustic 320QE 80x4 (@2ohm), and followed by a Alpine Type-E 10" (low-end sub but enough for R&B and Trance which are more mid-bass to the point I normally use an 8") is high-end but it's high-end on a budget... :-)
Thread Starter
|
Member
Joined: Aug 2014
Posts: 179
From: Some where
Thank you very much. Im still breaking them in and will be meeting with a well known tuner to fine tune the entire system. The cool thing is that he is actually blind and is very good at tuning and was recommended by many.
Please share your system Im glad there is other as crazy as I am in the fit forum.
Please share your system Im glad there is other as crazy as I am in the fit forum.

New Member
Joined: Nov 2014
Posts: 19
From: Or
I am putting in a Full Alpine F1 Status system. Currently making a fiberglass
speaker box in the rear driver side of the trunk for 10"JL audio TW5. Also tweeter pot in the front window, but just the tweeter as they are 3" pods already. I wanted to still see through it. I angled toward the passenger head rest. I'll post some pictures once complete.
speaker box in the rear driver side of the trunk for 10"JL audio TW5. Also tweeter pot in the front window, but just the tweeter as they are 3" pods already. I wanted to still see through it. I angled toward the passenger head rest. I'll post some pictures once complete.
Last edited by Sqeclipse; Oct 2, 2015 at 11:21 AM.
Thread Starter
|
Member
Joined: Aug 2014
Posts: 179
From: Some where
I am putting in a Full Alpine F1 Status system. Currently making a fiberglass
speaker box in the rear driver side of the trunk for 10"JL audio TW5. Also tweeter pot in the front window, but just the tweeter as they are 3" pods already. I wanted to still see through it. I angled toward the passenger head rest. I'll post some pictures once complete.
speaker box in the rear driver side of the trunk for 10"JL audio TW5. Also tweeter pot in the front window, but just the tweeter as they are 3" pods already. I wanted to still see through it. I angled toward the passenger head rest. I'll post some pictures once complete.
Thread Starter
|
Member
Joined: Aug 2014
Posts: 179
From: Some where
Here is the link to my box I had before this system
https://www.fitfreak.net/forums/3rd-...ml#post1289259
https://www.fitfreak.net/forums/3rd-...ml#post1289259
New Member
Joined: Nov 2014
Posts: 19
From: Or
Here is the link to my box I had before this system
https://www.fitfreak.net/forums/3rd-...ml#post1289259
https://www.fitfreak.net/forums/3rd-...ml#post1289259
Thread Starter
|
Member
Joined: Aug 2014
Posts: 179
From: Some where
That is a good looking sub enclosure. I went with a different approach, I wanted to still access the spare. I drag the box forward near the rear wheel and the back seat. why I needed the thin JL sub. Only got a couple of inches for the sub clearance. Might need to add in another ring just to allow the sub to fit. Still waiting for the sub to arrive. last weekend, Got the 7" speakers in the door, and the mid bass was very nice during testing. Had to chop up the door a little to fit.