
seat track extenders


Thread Starter
|
New Member
Joined: Sep 2006
Posts: 9
From: parisville,Qu�bec, Canada
seat track extenders
Hi everybody!
Do you know if somebody have made this modification for the driver seat?
I want have more confortable position for long drive.I'm tall, 6'3" and when i purchase my fit sport, i dont make a long drive test. Now It's a problem for me, I'm not reelly confortable for a long drive and i want keep my FIT for long time.
Does anybody have same problem of me?
Do you have picture for this modification?
Thank's
Dan-bou
Do you know if somebody have made this modification for the driver seat?
I want have more confortable position for long drive.I'm tall, 6'3" and when i purchase my fit sport, i dont make a long drive test. Now It's a problem for me, I'm not reelly confortable
for a long drive and i want keep my FIT for long time.Does anybody have same problem of me?
Do you have picture for this modification?
Thank's
Dan-bou

Member
Joined: Jan 2006
Posts: 56
From: Washington, USA
I'm 6' 2" but not particularly "leggy". I did look into seat mods but didn't find anything that seemed reasonable without changing out the entire seat. You might, however, spend some time deciding what is the real problem for you on long drives. For me, the seat position seems less an issue then foot fatigue... the gas pedal is so "light" that my foot & ankle gets sore trying to hold my foot up off the gas. One of the folks here actually jammed some foam (carpet backing) under the pedal to improve the stiffness although it would be nice to find a more elegant approach. I also raised the rear-view mirror a bit because it typically was sitting directly in my line of vision out the front windshield. I also installed the Zeta dead-pedal so that my left foot has a place to rest.
The things we will do to make a small car fit a big driver :-)
The things we will do to make a small car fit a big driver :-)

Member

Joined: Nov 2006
Posts: 44
From: Wallingford, PA (Philly area)
I'm 6' 2" but not particularly "leggy". I did look into seat mods but didn't find anything that seemed reasonable without changing out the entire seat. You might, however, spend some time deciding what is the real problem for you on long drives. For me, the seat position seems less an issue then foot fatigue... the gas pedal is so "light" that my foot & ankle gets sore trying to hold my foot up off the gas. One of the folks here actually jammed some foam (carpet backing) under the pedal to improve the stiffness although it would be nice to find a more elegant approach. I also raised the rear-view mirror a bit because it typically was sitting directly in my line of vision out the front windshield. I also installed the Zeta dead-pedal so that my left foot has a place to rest.
The things we will do to make a small car fit a big driver :-)
The things we will do to make a small car fit a big driver :-)
Thread Starter
|
New Member
Joined: Sep 2006
Posts: 9
From: parisville,Qu�bec, Canada
I have do my modification on that.Home made modification. Dont ask for any picture, it's my responsability for that because the seat it 2 inch more up and 3 inch more back. I never cut the original track, because if someone in the futur want purchase my car, it's very easy to replace in original position.By the way, i can use the magic seat if i place my driver seat enough in foward position without any poblem.
NOW i like not i LOVE drive my car. I'm confortable for long distance, my children have enough place behind me.
The only problem now is FUEL consume, nothing better under 6 liter per 100 kilometer.
NOW i like not i LOVE drive my car. I'm confortable for long distance, my children have enough place behind me.
The only problem now is FUEL consume, nothing better under 6 liter per 100 kilometer.


Member
Joined: Mar 2008
Posts: 45
From: NJ
moving seat back 1-2" more
I should have taken pictures, but didn't think about it. it's as easy as drilling 4 holes to get an extra inch and a half travel.
Flip the seat upside down and look at the track. You will see dimples in the seat rail that acts as a stop for the slider/track. Each track has 2 stops that keep it from going backwards, and 2 more that keep it from going forwards too far. What you are going to do is remove the two that stop the seat from going backwards (2 per rail, which is 4 per seat). Since there are 2 dimples pretty close together in the middle of teh track, you will see the front one of teh two prevents the seat from going backwards, and the rear of the two keeps it from going forwards. You are going to remove the first one which means the second will now be rearward stop adding about 1.5" of rearward travel. the one dimple left will act as both the forward and rearward stop when you are done. But there is also a second rearward stop at the back of teh track that also needs to be removed. Do that one first because you can get to both sides and you will be able to catch the drill chips and see that the dimple you are going to drill out will come out as a larger peice.
Move the seat all the way forward on the track so the tracks sticks out the back and you can see both sides of the rear most dimple. Drill out the dimble with a 5/16" drill, then go back and drill it again with a 3/8". If you do it all in one pass with a 3/8" the center of the dimple will come out in one peice and fold under the track making it harder to get out. Try it on the dimple you can get at from both sides first. Then do the dimple you can't get at from both sides (i.e. the forward one near the middle of the track). Also, the 5/16" drill will leave a bits you can get out of the track from a hole in the side when you do the forward one. I use a vacuum while drilling, and grease the drill bit to hold the metal chips.
There is a steel roller that hits the dimples to stop the seat travel. it's very tight clearance. once you drill the two stops out on a slide, it will be hard to get the slide to pass the drill holes, but light persuasion the first couple passes will flatten any raised edge around teh drill hole and it will then slide just as well as anywhere else in the range, but go back close to 1.5" further than it did before. Even the locks in the track continue past where the track goes today.


Member
Joined: Mar 2008
Posts: 59
From: 408
I should have taken pictures, but didn't think about it. it's as easy as drilling 4 holes to get an extra inch and a half travel.
Flip the seat upside down and look at the track. You will see dimples in the seat rail that acts as a stop for the slider/track. Each track has 2 stops that keep it from going backwards, and 2 more that keep it from going forwards too far. What you are going to do is remove the two that stop the seat from going backwards (2 per rail, which is 4 per seat). Since there are 2 dimples pretty close together in the middle of teh track, you will see the front one of teh two prevents the seat from going backwards, and the rear of the two keeps it from going forwards. You are going to remove the first one which means the second will now be rearward stop adding about 1.5" of rearward travel. the one dimple left will act as both the forward and rearward stop when you are done. But there is also a second rearward stop at the back of teh track that also needs to be removed. Do that one first because you can get to both sides and you will be able to catch the drill chips and see that the dimple you are going to drill out will come out as a larger peice.
Move the seat all the way forward on the track so the tracks sticks out the back and you can see both sides of the rear most dimple. Drill out the dimble with a 5/16" drill, then go back and drill it again with a 3/8". If you do it all in one pass with a 3/8" the center of the dimple will come out in one peice and fold under the track making it harder to get out. Try it on the dimple you can get at from both sides first. Then do the dimple you can't get at from both sides (i.e. the forward one near the middle of the track). Also, the 5/16" drill will leave a bits you can get out of the track from a hole in the side when you do the forward one. I use a vacuum while drilling, and grease the drill bit to hold the metal chips.
There is a steel roller that hits the dimples to stop the seat travel. it's very tight clearance. once you drill the two stops out on a slide, it will be hard to get the slide to pass the drill holes, but light persuasion the first couple passes will flatten any raised edge around teh drill hole and it will then slide just as well as anywhere else in the range, but go back close to 1.5" further than it did before. Even the locks in the track continue past where the track goes today.
Flip the seat upside down and look at the track. You will see dimples in the seat rail that acts as a stop for the slider/track. Each track has 2 stops that keep it from going backwards, and 2 more that keep it from going forwards too far. What you are going to do is remove the two that stop the seat from going backwards (2 per rail, which is 4 per seat). Since there are 2 dimples pretty close together in the middle of teh track, you will see the front one of teh two prevents the seat from going backwards, and the rear of the two keeps it from going forwards. You are going to remove the first one which means the second will now be rearward stop adding about 1.5" of rearward travel. the one dimple left will act as both the forward and rearward stop when you are done. But there is also a second rearward stop at the back of teh track that also needs to be removed. Do that one first because you can get to both sides and you will be able to catch the drill chips and see that the dimple you are going to drill out will come out as a larger peice.
Move the seat all the way forward on the track so the tracks sticks out the back and you can see both sides of the rear most dimple. Drill out the dimble with a 5/16" drill, then go back and drill it again with a 3/8". If you do it all in one pass with a 3/8" the center of the dimple will come out in one peice and fold under the track making it harder to get out. Try it on the dimple you can get at from both sides first. Then do the dimple you can't get at from both sides (i.e. the forward one near the middle of the track). Also, the 5/16" drill will leave a bits you can get out of the track from a hole in the side when you do the forward one. I use a vacuum while drilling, and grease the drill bit to hold the metal chips.
There is a steel roller that hits the dimples to stop the seat travel. it's very tight clearance. once you drill the two stops out on a slide, it will be hard to get the slide to pass the drill holes, but light persuasion the first couple passes will flatten any raised edge around teh drill hole and it will then slide just as well as anywhere else in the range, but go back close to 1.5" further than it did before. Even the locks in the track continue past where the track goes today.
Member
Joined: Mar 2008
Posts: 45
From: NJ
I think I took one picture when I had the seat entirely torn apart during the investigative stage, maybe even before I figured it out. I made it far more complicated than it needed to be. Once I figured it out, it was done and back together in no time. I'll see if I can find that picture and load it to photobucket.
Member
Joined: Mar 2008
Posts: 45
From: NJ
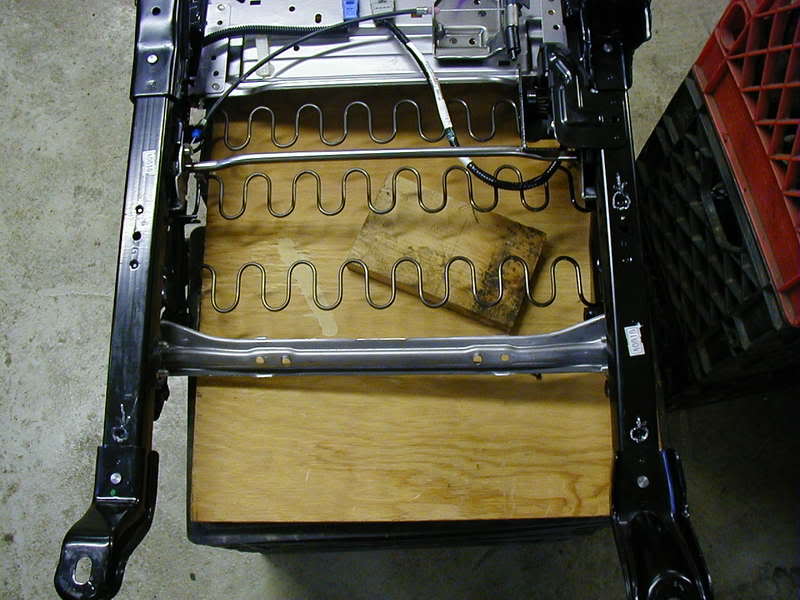
I did take one photo for where to drill to extend the tracks. You do not need to take apart the seat to do this even though the photo shows only the frame. On the right side you can see two white circles around dimples, and those are the ones to drill out. On the left side the flash obscures the ciricles, but hilights the dimples better. Use a new drill bit to avoid a ridge on the inside of the hole. the magic seat functionaility still works with this, but you may have to move the seat up just a tad. The next thing I did after this, was to fit a MINI Cooper seat, and that did mess with the magic seat functionaility because the track stuck back too far, but I'll get around that somehow.
Last edited by dacollier1; Jul 21, 2008 at 07:20 AM.

Member
Joined: Jul 2008
Posts: 27
From: Houston, TX
I did the drillout of the rail dimples, and have good and bad news. It worked just like you said, the seat goes back an extra 1 1/2 inches on the first try, smooth and no problems. However, it won't lock back there - I had to do a sudden stop this morning on the way to work and it jumped forward to the old seat position and clicked into lock there! Did I miss something to get it to lock at the full new back position?
Thanks in advance...
Rannous
Thanks in advance...
Rannous
Member
Joined: Mar 2008
Posts: 45
From: NJ
I haven't had that experience, but this weekend I put the stock seat back in, and yesterday got in the back seat and forcebly pushed the front seat forward. It did move up, but not far before the seat caught and locked in place, but still back from the stock location by more than half the distance gained by drilling out the dimples. So safely, i guess this buys about 3/4 to 1 inch, or pin the seat in place (like a roll pin or hardened steel pin....smaller but similar in concept to a hood pin so it could be removed easily for short drivers to move the seat up.
I'm working on getting the Mini Cooper seat sorted out now. Had that in and out a couple times, but haven't totally sorted out the air bag light... got the side air bag sorted with a 2.2 ohm 2 watt resistor in the plug, but the seat location sensor hasn't yet been overcome, even after installing it on the Mini seat in what I think is the proper location and orientation, and pluging it back in.
I'm working on getting the Mini Cooper seat sorted out now. Had that in and out a couple times, but haven't totally sorted out the air bag light... got the side air bag sorted with a 2.2 ohm 2 watt resistor in the plug, but the seat location sensor hasn't yet been overcome, even after installing it on the Mini seat in what I think is the proper location and orientation, and pluging it back in.


Thank you!
I haven't had that experience, but this weekend I put the stock seat back in, and yesterday got in the back seat and forcebly pushed the front seat forward. It did move up, but not far before the seat caught and locked in place, but still back from the stock location by more than half the distance gained by drilling out the dimples. So safely, i guess this buys about 3/4 to 1 inch, or pin the seat in place (like a roll pin or hardened steel pin....smaller but similar in concept to a hood pin so it could be removed easily for short drivers to move the seat up.
I'm working on getting the Mini Cooper seat sorted out now. Had that in and out a couple times, but haven't totally sorted out the air bag light... got the side air bag sorted with a 2.2 ohm 2 watt resistor in the plug, but the seat location sensor hasn't yet been overcome, even after installing it on the Mini seat in what I think is the proper location and orientation, and pluging it back in.
I'm working on getting the Mini Cooper seat sorted out now. Had that in and out a couple times, but haven't totally sorted out the air bag light... got the side air bag sorted with a 2.2 ohm 2 watt resistor in the plug, but the seat location sensor hasn't yet been overcome, even after installing it on the Mini seat in what I think is the proper location and orientation, and pluging it back in.
MossMotors.com - Restoration Parts And Accessories For British Cars
that I ordered. I hope that goes as smoothly!