
DIY: How to Stiffen a GD3 Drive-by-Wire Gas Pedal

Thread Starter
|
Member
Joined: Jul 2008
Posts: 548
From: USA
DIY: How to Stiffen a GD3 Drive-by-Wire Gas Pedal
Disclaimer: The following is provided as a GUIDE ONLY, and neither myself, nor FITFREAK.NET endorse, recommend, encourage nor take any responsibility for the outcome of someone else doing the following. This is an essential controlling device of the vehicle, and you follow these steps at your own risk!
***
Many of us Fit owners have vocalized our opinions on the low resistance of the go pedal, causing cramps when supporting the weight of the foot to hold speed, or wasted fuel by applying more throttle than intended. Compared with other gas pedals, the pressure required to depress it is actually quite normal; it's the angle that's the problem. Rather than having the foot supported by the floorboard and pivoting to press down, as in most vehicles, the more upright driving position places the foot's center of gravity beyond that of the heel, and that added weight counteracts too much of the pressure of the pedal and makes it seem soft. Adding in the complication that the pedal requires very little movement down from its stationary position to hold the vehicle at any legal speed in the United States, preventing the original spring mechanism from compressing and developing sufficient force to support the foot, the cramping issue becomes a very real traffic hazard by impeding braking reaction time. This modification intends to add enough spring pressure to counteract the weight of the foot so that its neutral position balancing that weight with pedal pressure is at or near the required location for highway cruising speeds without requiring excessive force as the pedal approaches its lowest position.
PARTS REQUIRED
(2) steel s-hooks with a minimum 1/4" inner radius; overall length of approximately 2" preferred for ease of installation
(1) steel tension spring, 5" long x 3/8" dia x 0.047" wire dia, with 3/8" dia loops
(1) tube shrink tubing slightly larger than s-hook (optional)
Total cost for me: 0.49ea for the hooks, 2.29 for the spring, 3.49 for the pack of shrink tubing; grand total $6.76 USD
Time to install: maybe 10 minutes
INSTALLATION
1) Remove the cover under the driver's side dash. A knob next to and above the hood release must be rotated 1/4 turn to unlock; pop off a snap fitting in the center to release. Note the two places towards the firewall where it reattaches.
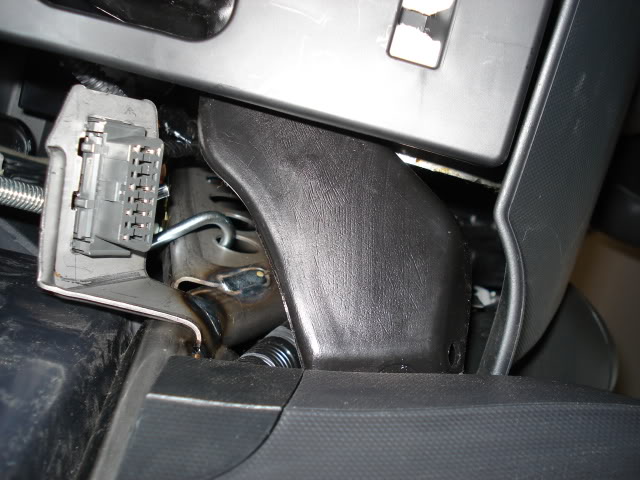
2) Move the driver's seat to its rearmost position and crawl down under the dash with back towards the floor. Looking upwards, find the OBDII diagnostics connector in line with the gas pedal. Above that, there is a metal welded bracket with 4 large holes stamped in it; place one of the s-hooks into the lowest one.
3) Hang spring on the s-hook, and bring it through in a way that it won't touch the OBDII diagnostic port harness.
4) If you wish to put shrink wrap on the pedal end of the other s-hook to protect the paint finish on the pedal post, do it now. Use a lighter or butane torch to shrink it to the hook surface and prevent it from sliding.
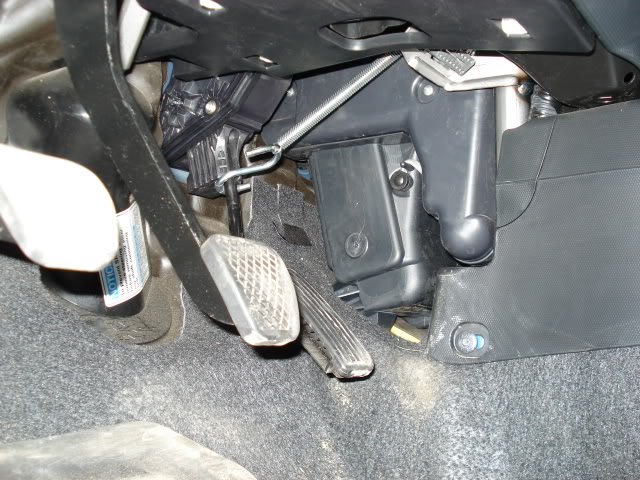
5) Put the metal end of the s-hook on the hanging end of the spring. Twisting the spring as little as possible, stretch by pulling the s-hook and hang on the pedal as high on the metal post as possible. Double check clearances around the spring to make sure nothing rubs or if the upper hook became disconnected. You may have to push the OBDII connector harness a small distance to provide clearance.
6) Sit in the drivers's seat in its normal position and check the feel of the pedal with the engine OFF. Make sure it still feels linear throughout its travel and not too stiff; if it is, you may have to use a small hook or chain link of your choice to place between the spring and the lower s-hook to reduce spring tension, depending on the spring you used. Remember, it will feel heavy at first, but try driving in a low-traffic environment and check where your foot weight balances out; if you have to remind yourself to keep pushing down to maintain speed, it's too tight.
Congratulations, you can now drive without both cruise and cramps.
Pics:
***
Many of us Fit owners have vocalized our opinions on the low resistance of the go pedal, causing cramps when supporting the weight of the foot to hold speed, or wasted fuel by applying more throttle than intended. Compared with other gas pedals, the pressure required to depress it is actually quite normal; it's the angle that's the problem. Rather than having the foot supported by the floorboard and pivoting to press down, as in most vehicles, the more upright driving position places the foot's center of gravity beyond that of the heel, and that added weight counteracts too much of the pressure of the pedal and makes it seem soft. Adding in the complication that the pedal requires very little movement down from its stationary position to hold the vehicle at any legal speed in the United States, preventing the original spring mechanism from compressing and developing sufficient force to support the foot, the cramping issue becomes a very real traffic hazard by impeding braking reaction time. This modification intends to add enough spring pressure to counteract the weight of the foot so that its neutral position balancing that weight with pedal pressure is at or near the required location for highway cruising speeds without requiring excessive force as the pedal approaches its lowest position.
PARTS REQUIRED
(2) steel s-hooks with a minimum 1/4" inner radius; overall length of approximately 2" preferred for ease of installation
(1) steel tension spring, 5" long x 3/8" dia x 0.047" wire dia, with 3/8" dia loops
(1) tube shrink tubing slightly larger than s-hook (optional)
Total cost for me: 0.49ea for the hooks, 2.29 for the spring, 3.49 for the pack of shrink tubing; grand total $6.76 USD
Time to install: maybe 10 minutes
INSTALLATION
1) Remove the cover under the driver's side dash. A knob next to and above the hood release must be rotated 1/4 turn to unlock; pop off a snap fitting in the center to release. Note the two places towards the firewall where it reattaches.
2) Move the driver's seat to its rearmost position and crawl down under the dash with back towards the floor. Looking upwards, find the OBDII diagnostics connector in line with the gas pedal. Above that, there is a metal welded bracket with 4 large holes stamped in it; place one of the s-hooks into the lowest one.
3) Hang spring on the s-hook, and bring it through in a way that it won't touch the OBDII diagnostic port harness.
4) If you wish to put shrink wrap on the pedal end of the other s-hook to protect the paint finish on the pedal post, do it now. Use a lighter or butane torch to shrink it to the hook surface and prevent it from sliding.
5) Put the metal end of the s-hook on the hanging end of the spring. Twisting the spring as little as possible, stretch by pulling the s-hook and hang on the pedal as high on the metal post as possible. Double check clearances around the spring to make sure nothing rubs or if the upper hook became disconnected. You may have to push the OBDII connector harness a small distance to provide clearance.
6) Sit in the drivers's seat in its normal position and check the feel of the pedal with the engine OFF. Make sure it still feels linear throughout its travel and not too stiff; if it is, you may have to use a small hook or chain link of your choice to place between the spring and the lower s-hook to reduce spring tension, depending on the spring you used. Remember, it will feel heavy at first, but try driving in a low-traffic environment and check where your foot weight balances out; if you have to remind yourself to keep pushing down to maintain speed, it's too tight.
Congratulations, you can now drive without both cruise and cramps.
Pics:
Last edited by polaski; May 29, 2009 at 03:33 PM. Reason: I forgot the costs


Thread Starter
|
Member
Joined: Jul 2008
Posts: 548
From: USA
Thanks for the comments.
I'm very happy with it so far, to the point I haven't used the cruise at all since putting it on. Mileage goes up a lot when the computer isn't stomping on the gas to go up a hill!
I'm very happy with it so far, to the point I haven't used the cruise at all since putting it on. Mileage goes up a lot when the computer isn't stomping on the gas to go up a hill!
My wife didn't think that I needed to do this to our Fit, but after her first drive since I put in the super charger she has changed her mind.... She even called from the grocery store to tell me that she wanted me to do it.


Thread Starter
|
Member
Joined: Jul 2008
Posts: 548
From: USA
I picked mine up at the local Ace hardware in the nuts and bolts section. They had a ton of stuff on springs, although that may not be universal to all Ace hardwares.
I highly recommend that 5 x 3/8 x 0.047 spring if you can find it.
edit: It might be good for my mileage, my last tank calculated to 36.9 mpg. That was a 2 week tank driving around town and I commute to work everyday. Much better than the 34-35 it's been getting with more 55 mph highway mileage on it. Time will tell.
Last edited by polaski; May 29, 2009 at 03:34 PM.
I just did this and I'm loving it. Much better control of the throttle and easier on the foot. Thanks polaski!
Something this simple and effective should be stickied so it doesn't get buried.
Something this simple and effective should be stickied so it doesn't get buried.
Last edited by Koi; May 29, 2009 at 06:06 PM.
I told Koi to check this out. We are both suffering from a bad memory problem and forgetting that the accelerator pedal works both ways, since super charging our cars. Whenever I get to town I will get what is needed to do the same.
I did it and love it.... I deviated slightly from from your plans and bought a heavier screen door spring probably 0,52" or a little bigger,and smaller hooks.... I had a rubber padded wiring clamp I used on the pedal rod with one of the hooks through the two holes after clamping the ends together.... I had to cut the spring an inch or two longer than 5 1/2" or it would have been too stiff I covered the one that went in the hole under the dash with clear plastic tubing.... I have to admit that I wish I'd of had a larger hook for under the dash, I couldn't fit under there well enough to see the hole and I spent more time hooking it than anything else..... I am grateful to you for sharing this.
Thread Starter
|
Member
Joined: Jul 2008
Posts: 548
From: USA
38.7 mpg on this two-week tank, with one trip of 35 miles 70+ mph mixed in with my normal 4 minute commute to work. I think this might be a trend.
Those years of driving via a vacuum gauge may be paying off. I know what the intake sounds like when the manifold just gets to atmo pressure and this spring makes hitting that real easy.
Those years of driving via a vacuum gauge may be paying off. I know what the intake sounds like when the manifold just gets to atmo pressure and this spring makes hitting that real easy.
I haven't gone through quite 1/4 tank on the guage and am at 149mile on the odometer on this first tank since the throttle spring fix. Not the best I've ever gotten in the same distance, but I am still doing a lot of fast back road driving with boost from the super charger kicked in full tilt boogy. If I was using the cruise control like I had normally done it wouldn't be nearly as good.
subscribed!
when i've got my pro-c's on a stiff setting it's a little more difficult to modulate the gas pedal on bumpy roads. i'm sure this little trick will do wonders. thanks for sharing! rep for you after i break my 24 hour rep limit
quick question, is there space to move the S-hook further up the bracket if we wanted more spring tension?? is there anything that would be in the way further behind the OBDII harness that would impede the spring's clearance?.... maybe i shouldn't be a lazy nancy-boy and just crawl down there and check for myself
Thread Starter
|
Member
Joined: Jul 2008
Posts: 548
From: USA
I don't see why not, but I'm not crawling down there to find out, especially since I pulled my shoulder at work today. I picked that hole for three reasons: the strength of the bracket, easier to reach, and straightest pull at the lever's motion.
There isn't much else, it's either plastic, blocked by the OBD2 connector, blocked by the heating duct, or not in line with the pedal at all.
Trust me, it doesn't take much spring tension. What seems super weak by hand feels super heavy underfoot. My first guess at spring tension felt right but took well over 30 lbs of force to even start depressing the pedal. It wasn't even driveable.