
valve clearance


Member
Joined: Jun 2006
Posts: 1,710
From: The Twilight Zone

mugen. and i have the t1r test pipe.
everything was fine until i had to remove them for the upgrade now no matter what gasket i use it is leaking where they meet on the top.
i can feel the exhaust coming out when i put my hands near it. some gaskets more than others which is making the car run lean. sorry to get off topic but you asked.
Last edited by leonine; Apr 5, 2009 at 07:19 PM.
Member
Joined: Jun 2006
Posts: 1,710
From: The Twilight Zone
so i got the valve cover off and i have a couple of questions. Hopefully there is someone on who can help.
Looking at the pics below the camshaft sprocket is about halfway before TDC on piston #2.
when i look at the #2 valves they seem to be WAY off from spec in the service manual.
will rotating the crank a tiny bit more make that much of a difference or am i missing something here?
The pics in my service manual seems to indicate that the feeler gauge should go between the bottom of the rocker arm and the top spring retainer.
Again doesn't look like it is anywhere close to .006 - .008 of an inch. More like .25 of an inch.
Could they really be that far out of whack?
Never done this before so don'twant to fu!k anything up. Seems pretty straight forward until i got the cover off.
Any help is mucho appreciated.

Member
Joined: Aug 2008
Posts: 408
From: Los Banos, Ca
I will post this again....follow this to a T or you do damage
Valve Clearance Adjustment
NOTE: Valves should be adjusted only when the cylinder head temperature is less than 38�C (100�F).
1.Remove the cylinder head cover.
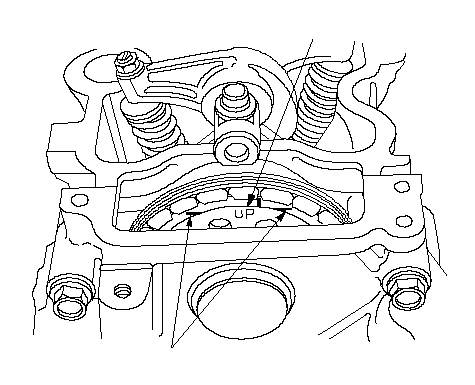
2.Set the No. 1 piston at Top Dead Center (TDC). The ‘‘UP'' mark (A) on the camshaft sprocket should be at the top, and the TDC grooves (B) on the camshaft sprocket should line up with the top edge of the head.
 AB
AB
3.Select the correct thickness feeler gauge for the valves you're going to check.
Intake: 0.15-0.19 mm (0.006-0.007 in.) Exhaust: 0.26-0.30 mm (0.010-0.012 in.)
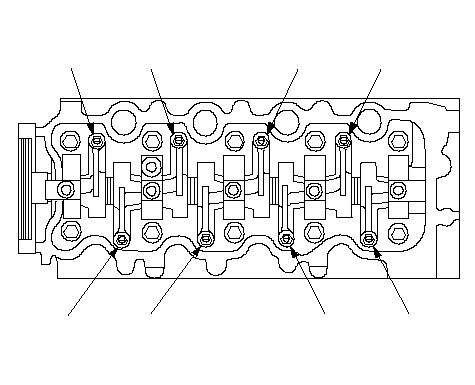
Adjusting screw locations:
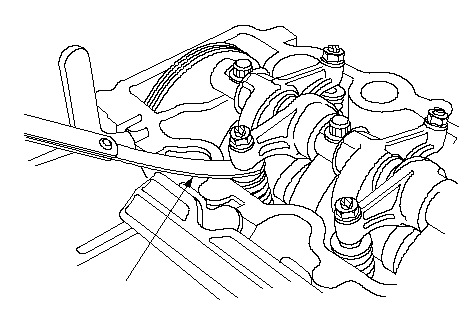
4.Insert the feeler gauge (A) between the adjusting screw and the end of the valve stem and slide it back and forth; you should feel a slight amount of drag.
 A
A
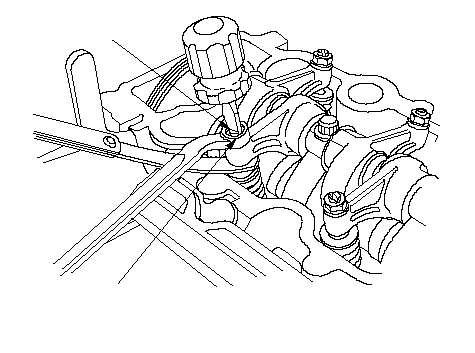
5.If you feel too much or too little drag, loosen the locknut (A), and turn the adjusting screw (B) until the drag on the feeler gauge is correct.
 A
A
14 N�m
(1.4 kgf�m, 10 lbf�ft)B
6.Tighten the locknut and recheck the clearance. Repeat the adjustment if necessary.
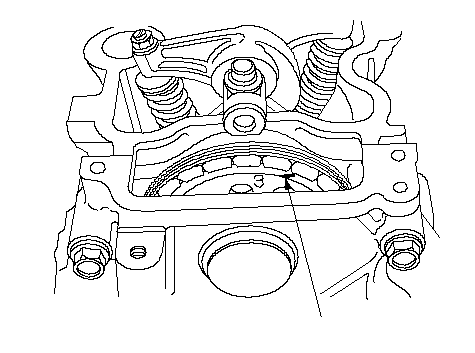
7.Rotate the crankshaft clockwise. Align the No. 3 piston TDC groove (A) on the camshaft sprocket with the top edge of the head.
 A
A
8.Check and if necessary, adjust the valve clearance on No. 3 cylinder.
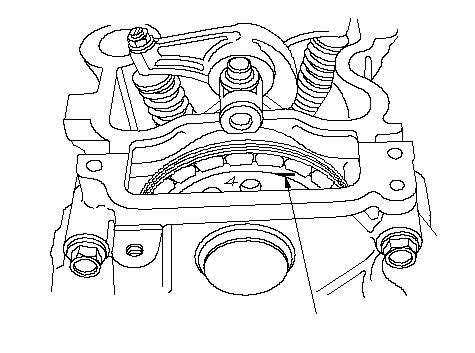
9.Rotate the crankshaft clockwise. Align the No. 4 piston TDC groove (A) on the camshaft sprocket with the top edge of the head.
 A
A
10.Check and if necessary, adjust the valve clearance on No. 4 cylinder.
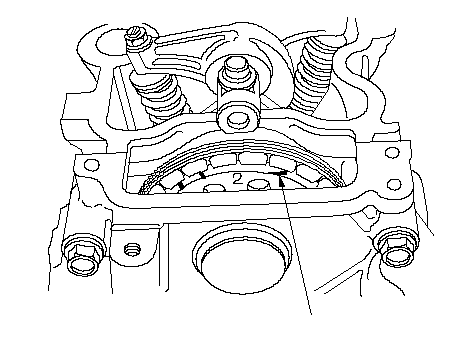
11.Rotate the crankshaft clockwise. Align the No. 2 piston TDC groove (A) on the camshaft sprocket with the top edge of the head.
 A
A
12.Check and if necessary, adjust the valve clearance on No. 2 cylinder.
13.Install the cylinder head cover.
Valve Clearance Adjustment
NOTE: Valves should be adjusted only when the cylinder head temperature is less than 38�C (100�F).
1.Remove the cylinder head cover.
2.Set the No. 1 piston at Top Dead Center (TDC). The ‘‘UP'' mark (A) on the camshaft sprocket should be at the top, and the TDC grooves (B) on the camshaft sprocket should line up with the top edge of the head.
AB3.Select the correct thickness feeler gauge for the valves you're going to check.
Intake: 0.15-0.19 mm (0.006-0.007 in.) Exhaust: 0.26-0.30 mm (0.010-0.012 in.)
Adjusting screw locations:
4.Insert the feeler gauge (A) between the adjusting screw and the end of the valve stem and slide it back and forth; you should feel a slight amount of drag.
A5.If you feel too much or too little drag, loosen the locknut (A), and turn the adjusting screw (B) until the drag on the feeler gauge is correct.
A14 N�m
(1.4 kgf�m, 10 lbf�ft)B
6.Tighten the locknut and recheck the clearance. Repeat the adjustment if necessary.
7.Rotate the crankshaft clockwise. Align the No. 3 piston TDC groove (A) on the camshaft sprocket with the top edge of the head.
A8.Check and if necessary, adjust the valve clearance on No. 3 cylinder.
9.Rotate the crankshaft clockwise. Align the No. 4 piston TDC groove (A) on the camshaft sprocket with the top edge of the head.
A10.Check and if necessary, adjust the valve clearance on No. 4 cylinder.
11.Rotate the crankshaft clockwise. Align the No. 2 piston TDC groove (A) on the camshaft sprocket with the top edge of the head.
A12.Check and if necessary, adjust the valve clearance on No. 2 cylinder.
13.Install the cylinder head cover.
Member
Joined: Jun 2006
Posts: 1,710
From: The Twilight Zone
thanks. I have the service manual so i see the same thing. I answered my own question by trying the feeler gauge. However maybe you can answer the following since your online.
The feeler gauge i bought says it has a .002 step between adjustment thickness. So for example:
feeler1 - .004-.006
feeler2 - .005-.007
feeler3 - .006-.008
the manual says between .006 and -007. maybe i bought the wrong gauge but not sure which one to use being they all seem to be slightly off according to specs and the tolerance needs to be pretty precise.
Member
Joined: Jun 2006
Posts: 1,710
From: The Twilight Zone
anyways just got the valve cover back on. I assumed (hopefully i was right) that on each feeler one side was .005 and the other was .007 (from my previous post).
All of the intake valves were very loose and all of the exhaust valves were too tight. 75k on the engine. adjusted them all within spec.
letting it sit overnight so the hondabond seals. tomorrow i'll hopefully fix my exhaust leak for good then start her up and see how it went.
All of the intake valves were very loose and all of the exhaust valves were too tight. 75k on the engine. adjusted them all within spec.
letting it sit overnight so the hondabond seals. tomorrow i'll hopefully fix my exhaust leak for good then start her up and see how it went.


Member
Joined: Feb 2007
Posts: 548
From: Flint, MI
I just got back inside from adjusting my valves. I went REALLY slow, because I was in no mood to go tear it apart again to readjust the clearances. Took me 3.5 hours start to finish. Yeah, I went THAT slow.
I'd like to meet the engineer who suggested putting the intake manifold on top of the valve cover. I have some words for him.
I adjusted my exhaust valves to .012, but the smallest feeler I had was .008. So I just adjusted the intakes a little tight on the .008 feeler, so there was noticeable drag, but I could still get it in there with a bit of encouragement.
I have just shy of 60,000 miles on my car, and all but one of my exhaust valves were tight as HELL. Couldn't even fit the .008" shim in most of them. That might explain why my car pops out the exhaust at hot idle.
My intake valves, however, were all looser than a highschooler on prom night. The .010" shim was a loose fit. I didn't check with the thicker ones because I really didn't want to know.
Just goes to show you that Honda's recommendation of 100,000 miles for valve adjustments is quite... how should I say this... optimistic. Granted, I've got a pretty heavily modified engine compared to Honda's original specs, but come on. With how tight some of my exhaust valves were I could see cooking a valve if you wait till 100k with any sort of boosted motor.
Keep up on those adjustments kids! It's never too early!
I'd like to meet the engineer who suggested putting the intake manifold on top of the valve cover. I have some words for him.
I adjusted my exhaust valves to .012, but the smallest feeler I had was .008.
So I just adjusted the intakes a little tight on the .008 feeler, so there was noticeable drag, but I could still get it in there with a bit of encouragement. I have just shy of 60,000 miles on my car, and all but one of my exhaust valves were tight as HELL. Couldn't even fit the .008" shim in most of them. That might explain why my car pops out the exhaust at hot idle.
My intake valves, however, were all looser than a highschooler on prom night. The .010" shim was a loose fit. I didn't check with the thicker ones because I really didn't want to know.
Just goes to show you that Honda's recommendation of 100,000 miles for valve adjustments is quite... how should I say this... optimistic. Granted, I've got a pretty heavily modified engine compared to Honda's original specs, but come on. With how tight some of my exhaust valves were I could see cooking a valve if you wait till 100k with any sort of boosted motor.
Keep up on those adjustments kids! It's never too early!
Last edited by explosivpotato; Apr 25, 2009 at 04:52 PM. Reason: clarification
Member
Joined: Feb 2007
Posts: 548
From: Flint, MI
My motor sat overnight too... I just fired her up after ~3 hrs of letting the rtv dry, and I can tell already it's MUCH better. It still pops, but not nearly as much, and it's more of a "puff" than a miss.
Still letting it do it's idle relearn thing. I'll probably take it for a spin here in a few minutes. It's been idling for about 10.
Still letting it do it's idle relearn thing. I'll probably take it for a spin here in a few minutes. It's been idling for about 10.
weve had one smart customer bring their fit in for adjustment, ALL fits including mine needs an adjustment and all i have is 14k on it. i dunno why this is but like said above, its never too soon to adjust
Member
Joined: Feb 2007
Posts: 548
From: Flint, MI
An update -
Since I didn't have the .007" shim required for proper setting of the intake valve lash, they're running ~.001" wide. They DO clatter when the oil is cold. After about 10-12 minutes of driving, however, the valves quiet down and the engine returns to that sweet sewing machine sound it made when I first drove it off the lot.
On a side note, my pop at idle has returned. It's getting on my nerves. Plugs and valve lash are new / recently adjusted, so I guess I'll try some Seafoam this weekend and see if it clears up a little bit.
Member
Joined: Feb 2007
Posts: 548
From: Flint, MI
The clearance being set is that between the rocker arm and the top of the valve. Over time the intake valves get "beat down", or worn on the top, and the clearance tends to increase. Exhaust valves, being hot, tend to stretch from the load of the springs, which decreases the clearance.
With too little clearance, when the valves heat up (especially exhaust valves), they can expand and actually fail to close all the way. This will lead to inconsistent running and eventually ruined valves. Too much clearance causes excessive valvetrain clatter / noise.
With too little clearance, when the valves heat up (especially exhaust valves), they can expand and actually fail to close all the way. This will lead to inconsistent running and eventually ruined valves. Too much clearance causes excessive valvetrain clatter / noise.