
DIY Duckbill Spoiler install

DIY Duckbill Spoiler install
DISCLAIMER... YOU KNOW... ATTEMPT AT YOUR OWN RISK... ITS NOT MY NOR FITFREAKS FAULT IF YOU RUIN YOUR CAR.
I haven't seen a DIY for this yet and I know I could've used this when i did it, but luckily i saw VINNYMAC had the same one so he helped me, now I'm helping you.
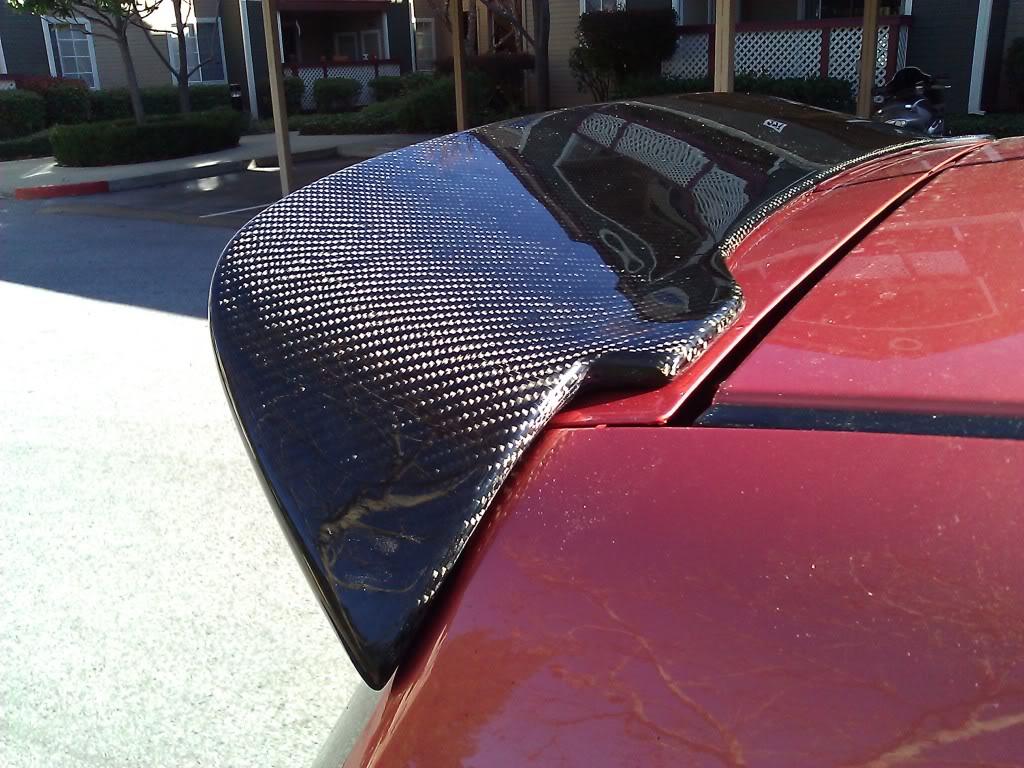
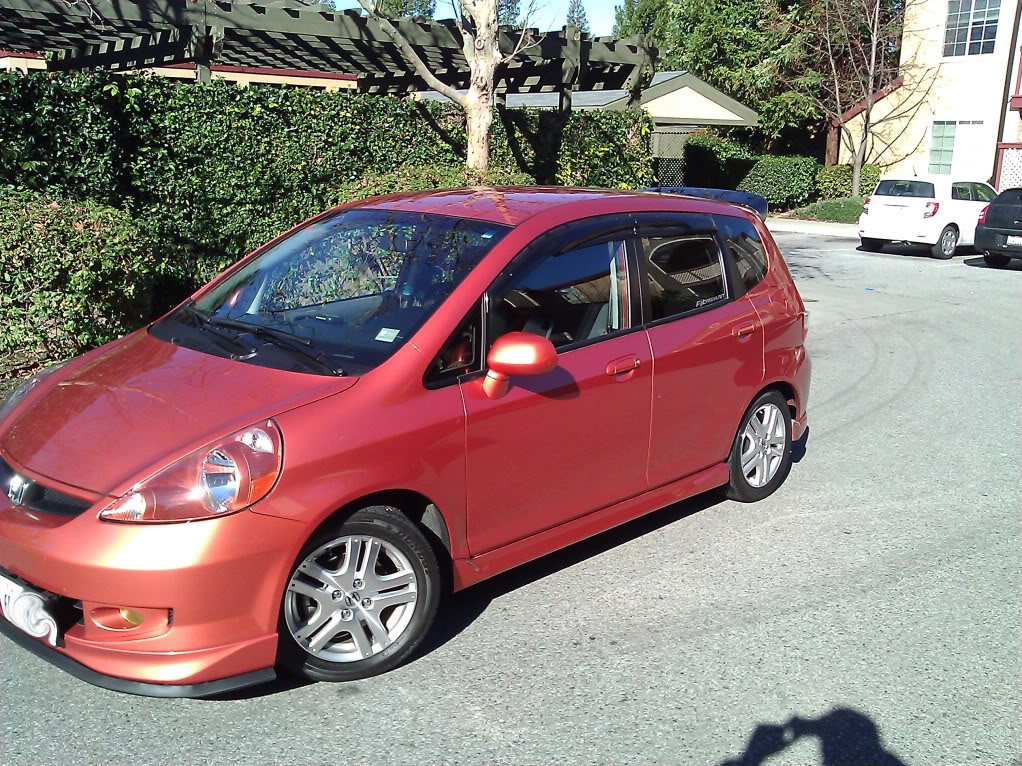
This is for those who have ordered or thought about ordering a Duckbill style wing like N1Concepts CF duckbill, or kenken spoon replica (which are really very similar from what i can tell) or any other for that matter.
A lot of ppl are deterred by the fact that they dont use the OEM hole locations and therefore avoid this easy inexpensive mod. With all mods there are always some customer fabrication to make things work and that's what makes it fun. You learn more about your car that way too.
Any way I did this mod and took some pics to show others where to drill and how to make this a very easy install that might take you an hour if you take your time and have all the parts necessary.
Tools needed/recommended:
-Flat head screwdriver (to remove cover to access OEM spoiler bolts on top)
-10mm socket (duh its a honda)
-power drill of choice
-1/4" drill bit or unibit with multiple step sizes
-nuts to fit on bolts of new wing if they didn't come with it
-5 plugs from lowes in the hardware section in the the "automotive" drawer of plugs
-Locktite glass glue next to the spray paint usually? or some type of water sealant for you plugs and oem holes unless you like water inside your car
-3m doublesided tape, for cushion and adhesion
Okay so onto the project:
First you'll take off your stock wing by using the flathead to remove the two covers on top of the wing. Then you remove the two 10mm bolts and the wing is only held in place with 3 posts that arent bolted down so just pull straight up.
Now is when you will drill your top holes for the bolts.
If you hold your wing up in place you will notice that the bolts on it are just a smidge more narrow than the oem holes.
You'll want to drill your new holes about 1/2" closer to the body and 1/16" in from the oem holes, sorry my paint skills suck
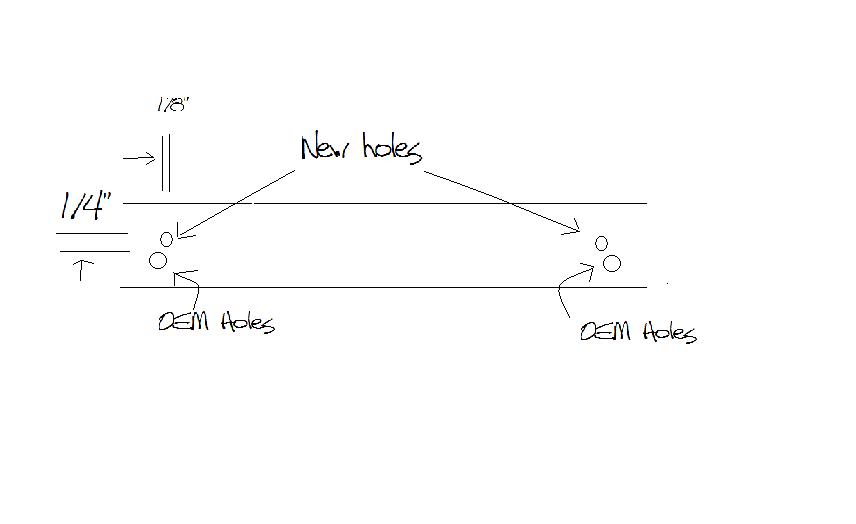
then you will have to drill some access holes on the opposits side of the hatch to put your nuts on. use a unibit or something big enough to get a ratchet in there or like me just do a hand tighten
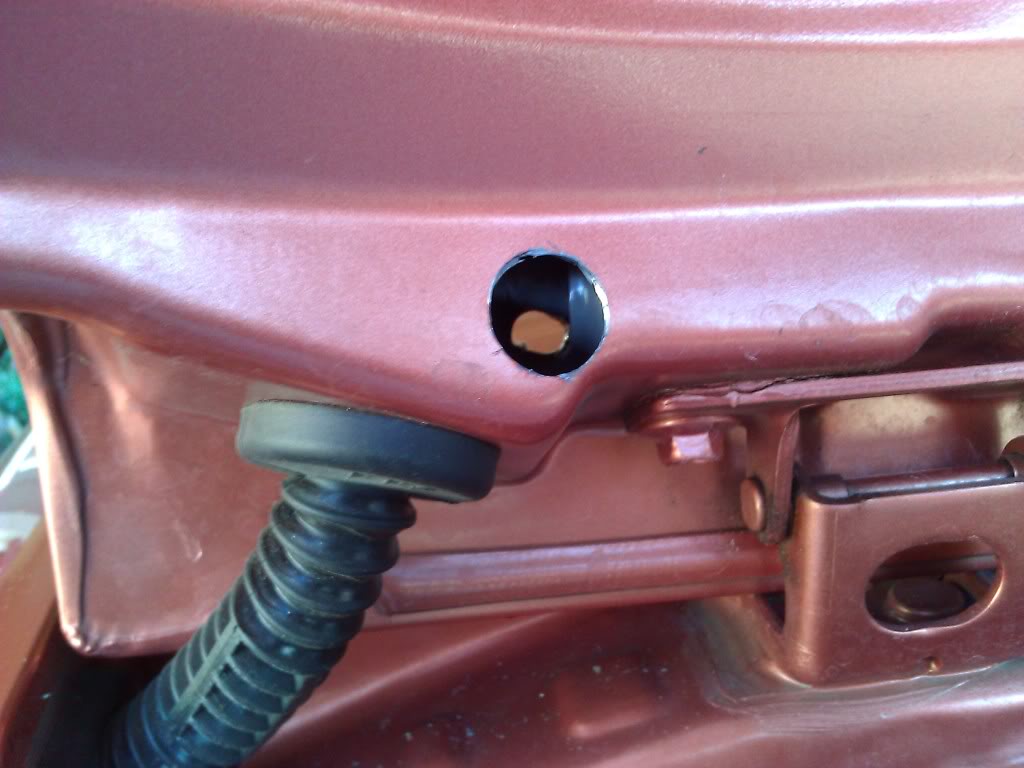
Now you should test fit the wing and see how it lines up and also may need to bore out the holes for better fitment.
once you know the wing is how you like it, remove it so you can cover the holes. all 5 of them. I used plugs and some glass glue on top of that. you can do whatever you like here
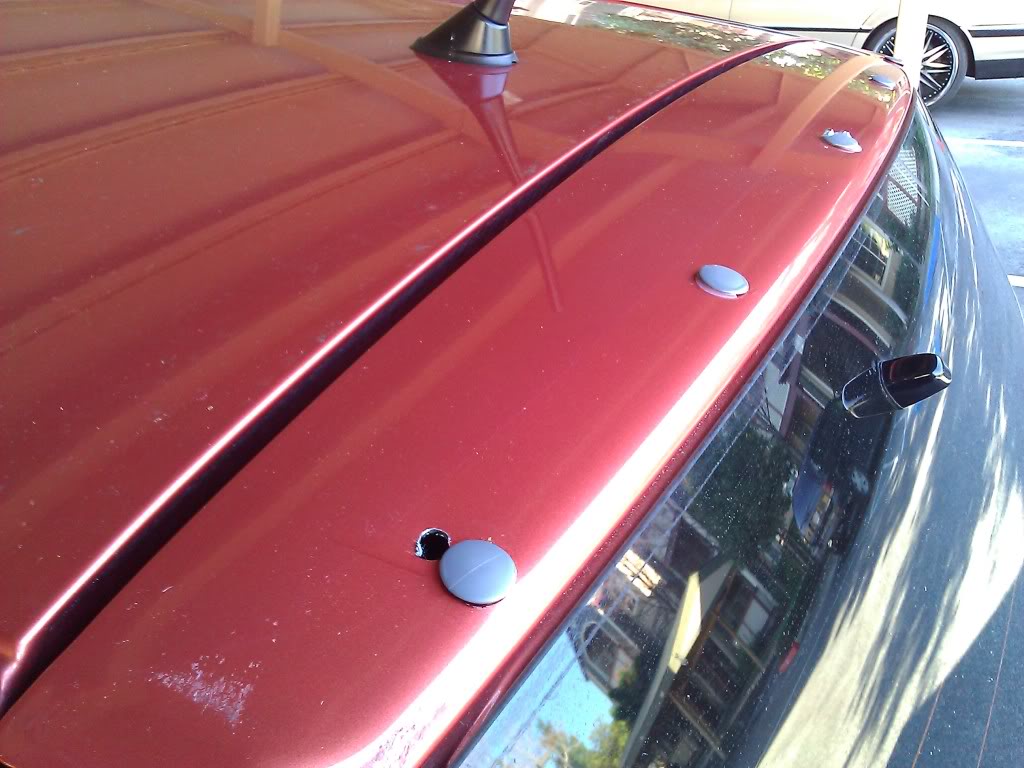
once that dries you can add some 4-6" strips of ds tape between each oem hole for cushion and extra adhesion. I had to double apply the tape so it would make contact with the underside of the wing
Now just put your wind back on and open the hatch and put your nuts on to secure the wing. It might help to take out the rubber grommets so you can have two angles to approach the bolts from. Like i said earlier i just hand tightened mine and its not budging.
Your all done
Feel free to ask about any details i might have not explained well or add to this if you have had success with other options.
I haven't seen a DIY for this yet and I know I could've used this when i did it, but luckily i saw VINNYMAC had the same one so he helped me, now I'm helping you.
This is for those who have ordered or thought about ordering a Duckbill style wing like N1Concepts CF duckbill, or kenken spoon replica (which are really very similar from what i can tell) or any other for that matter.
A lot of ppl are deterred by the fact that they dont use the OEM hole locations and therefore avoid this easy inexpensive mod. With all mods there are always some customer fabrication to make things work and that's what makes it fun. You learn more about your car that way too.
Any way I did this mod and took some pics to show others where to drill and how to make this a very easy install that might take you an hour if you take your time and have all the parts necessary.
Tools needed/recommended:
-Flat head screwdriver (to remove cover to access OEM spoiler bolts on top)
-10mm socket (duh its a honda)
-power drill of choice
-1/4" drill bit or unibit with multiple step sizes
-nuts to fit on bolts of new wing if they didn't come with it
-5 plugs from lowes in the hardware section in the the "automotive" drawer of plugs
-Locktite glass glue next to the spray paint usually? or some type of water sealant for you plugs and oem holes unless you like water inside your car
-3m doublesided tape, for cushion and adhesion
Okay so onto the project:
First you'll take off your stock wing by using the flathead to remove the two covers on top of the wing. Then you remove the two 10mm bolts and the wing is only held in place with 3 posts that arent bolted down so just pull straight up.
Now is when you will drill your top holes for the bolts.
If you hold your wing up in place you will notice that the bolts on it are just a smidge more narrow than the oem holes.
You'll want to drill your new holes about 1/2" closer to the body and 1/16" in from the oem holes, sorry my paint skills suck
then you will have to drill some access holes on the opposits side of the hatch to put your nuts on. use a unibit or something big enough to get a ratchet in there or like me just do a hand tighten
Now you should test fit the wing and see how it lines up and also may need to bore out the holes for better fitment.
once you know the wing is how you like it, remove it so you can cover the holes. all 5 of them. I used plugs and some glass glue on top of that. you can do whatever you like here
once that dries you can add some 4-6" strips of ds tape between each oem hole for cushion and extra adhesion. I had to double apply the tape so it would make contact with the underside of the wing
Now just put your wind back on and open the hatch and put your nuts on to secure the wing. It might help to take out the rubber grommets so you can have two angles to approach the bolts from. Like i said earlier i just hand tightened mine and its not budging.
Your all done
Feel free to ask about any details i might have not explained well or add to this if you have had success with other options.

Member
Joined: Jun 2009
Posts: 137
From: Whiteman AFB
Hey man, that weather strip front lip is SICK! I've never seen anything like that! Do you have a DIY somewhere for that?
BTW: Bad ass DIY for the duckbill I've had mine chillin for a long time, been too scared to try it myself thank you very much for this. I'll be installing ASAP. Rep+ to you my friend!
BTW: Bad ass DIY for the duckbill I've had mine chillin for a long time, been too scared to try it myself thank you very much for this. I'll be installing ASAP. Rep+ to you my friend!
very nice DIY, I should have made one when I installed mine. One thing I did that was very handy was used painters tape and masked off where I would be drilling on both sides. It made it possible to make measurements and markings so there would be no mistakes and when yo drill it helps protect teh paint from the metal shavings.
Thats kind of weird though I dint have to make access holes for the bolts. I have an authentic Spoon Duckbill spoiler
Thats kind of weird though I dint have to make access holes for the bolts. I have an authentic Spoon Duckbill spoiler
Last edited by MNfit; Feb 11, 2011 at 03:39 PM.
Yeah a more experianced person woulda known to tape and measure but mine was more trial and error, but it turned out great. I woulda taken more pics but I was in the zone and forgot


Member
Joined: Jun 2009
Posts: 137
From: Whiteman AFB
It's going to bend the factory antennae a little bit when you open it all the way... As far as I know it's not going to damage the antennae in any way... but spoon makes a short antennae for the specific types of spoilers.
Here's what it looks like:
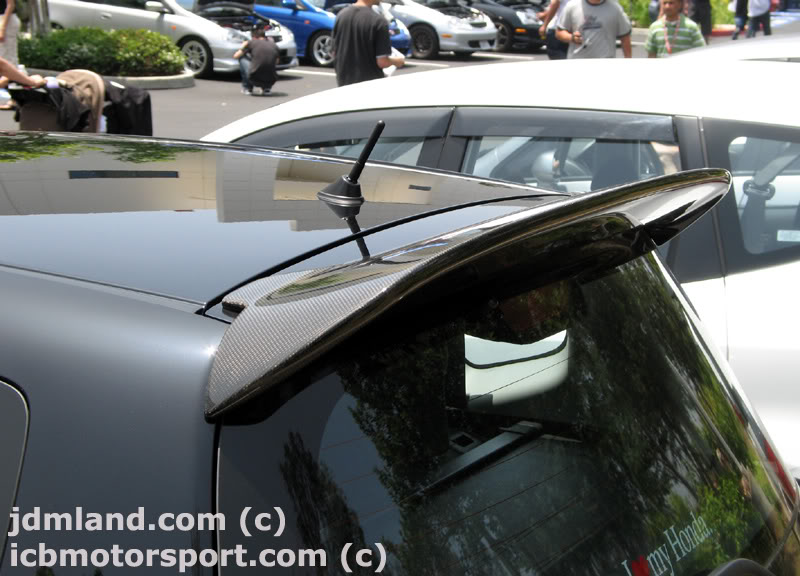
You can find these all over the internet... but here is one place to get it:
SPOON Sports Short Antena for Honda Jazz & EP3 BestJDMParts.Com
Here's what it looks like:
You can find these all over the internet... but here is one place to get it:
SPOON Sports Short Antena for Honda Jazz & EP3 BestJDMParts.Com

Not that I can tell but I only fill up once a month or every other month but i haven't noticed any drop in mileage
Member
Joined: Jun 2009
Posts: 137
From: Whiteman AFB
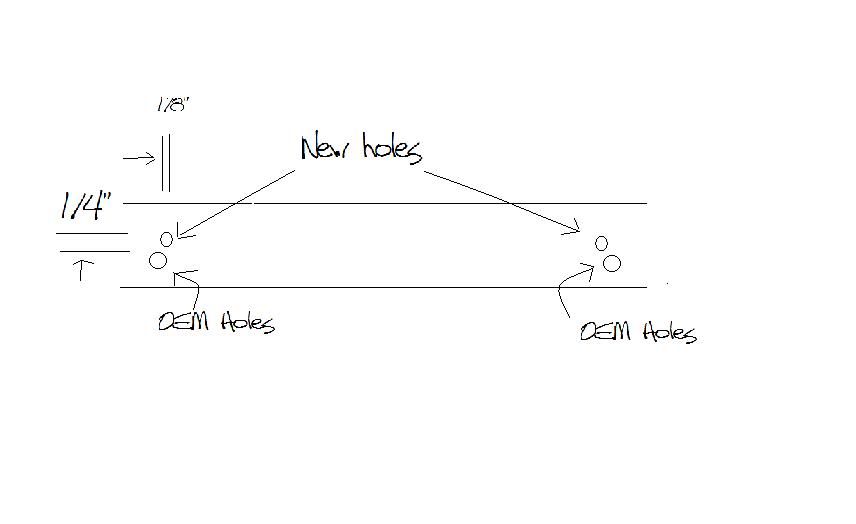
In the text it says "1/2 inch closer to the body and 1/16 inch in from the oem holes" ... but the picture shows "1/4 inch closer to the body and 1/8 inch in from the oem holes" so which is it?
1/2 inch closer to the body? or 1/4 inch closer to the body?
1/16 in from the oem holes? or 1/8 inch in from the oem holes?
Just looking for some clarification... don't want to mess up and put my holes in the wrong place...
Thanks