
DIY: Custom Eye Lids


Thread Starter
|
Member
Joined: Apr 2011
Posts: 36
From: Central New Jersey
Step 0 - Get the materials you need. (Check out my Step 2 pic for the stuff I use)
Materials I get.. before I start.
- Base Color System (Dupont Chromium base color and medium reducer)
- Clear Coat System (House of Color UC35 Clear, Reducer, Catalyst)
- Lacquer Thinner (for cleaning)
- Paint gun (mine is a Sharpe T1, I have a tip for base and another for clear)
- Access to an Air Compressor, Air Line and Fittings for your gun of course and if youre all pro, add an Inline Moisture/Particle Filter.
- Mixing Cup with to measure the right chemical ratios.
- Paint sticks (mixing), paper filters (no dust/dried paint chips get in your spray)
- Respirator (dont want metal flecks and hardening clear coat in your lungs..)
Last edited by DocCCVp; Nov 1, 2011 at 07:12 PM.
Thread Starter
|
Member
Joined: Apr 2011
Posts: 36
From: Central New Jersey
Step 1 - Vinyl Overlay: I got some external windshield visor vinyl stuff and cut out the shape I wanted. This is the best part cause you get to make them however you want! You can see that Ive use little bit of wet sand (600grit) to prep the surface of the vinyl.
Also, for those who worry about one day having to revert back to OEM for one reason or another, this is perfect because if you decide you dont want them anymore or need to trade in, all you have to do it rip off the vinyl and your headlight is 100% untouched. =)

Also, for those who worry about one day having to revert back to OEM for one reason or another, this is perfect because if you decide you dont want them anymore or need to trade in, all you have to do it rip off the vinyl and your headlight is 100% untouched. =)
Thread Starter
|
Member
Joined: Apr 2011
Posts: 36
From: Central New Jersey
Step 2 - Mask: Protect the rest of your headlight from overspray. I used a kitchen garbage bag and modify as needed.
Also in pic: materials you should get.. before start (of course).

Also in pic: materials you should get.. before start (of course).
Last edited by DocCCVp; Nov 1, 2011 at 06:50 PM.
Thread Starter
|
Member
Joined: Apr 2011
Posts: 36
From: Central New Jersey
Step 4 - Clear: Make it shiny.
$$$ Tip: If you want to substitute for spray clear from your local auto parts store, that stuff it pretty good too and cost way less than the full Clear Coat System. Its not as high gloss quality but you can always do a little polish and buff work and get it looking pretty good.

$$$ Tip: If you want to substitute for spray clear from your local auto parts store, that stuff it pretty good too and cost way less than the full Clear Coat System. Its not as high gloss quality but you can always do a little polish and buff work and get it looking pretty good.
Thread Starter
|
Member
Joined: Apr 2011
Posts: 36
From: Central New Jersey
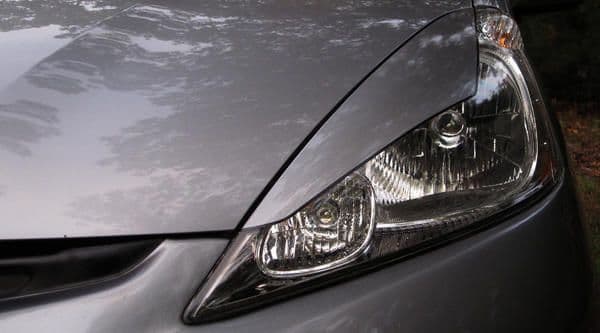
Step 5 - Become memorized by shiny things.. =o
Youll see that my headlight looks slightly wavy. Thats cause I have 3M bumper guard protection covering the headlight.. every bit of protection helps. =)

Youll see that my headlight looks slightly wavy. Thats cause I have 3M bumper guard protection covering the headlight.. every bit of protection helps. =)
Thread Starter
|
Member
Joined: Apr 2011
Posts: 36
From: Central New Jersey
Step 6 - Add detail. Reinstall. Love your Fit.
Tip: I have a thin black pin stripe to edge out the eyelid. Really makes it look like its part of the body instead of the headlight, especially for light colored cars. Few bucks from any local auto parts store.
Questions, comments, requests, details, concerns, props, shout outs.. hate it? Hit me up, Ive got plenty more DIY where with this came from.
Last edited by DocCCVp; Nov 1, 2011 at 07:15 PM.


Member
Joined: Feb 2012
Posts: 103
From: chagrin falls, ohio
Step 6 - Add detail. Reinstall. Love your Fit.
Tip: I have a thin black pin stripe to edge out the eyelid. Really makes it look like its part of the body instead of the headlight, especially for light colored cars. Few bucks from any local auto parts store.
Questions, comments, requests, details, concerns, props, shout outs.. hate it? Hit me up, Ive got plenty more DIY where with this came from.
Tip: I have a thin black pin stripe to edge out the eyelid. Really makes it look like its part of the body instead of the headlight, especially for light colored cars. Few bucks from any local auto parts store.
Questions, comments, requests, details, concerns, props, shout outs.. hate it? Hit me up, Ive got plenty more DIY where with this came from.
I got a few ?'s though. can you post a pic of how they look in a picture with the whole front end of car.please. How does it look on the road at night, I'm guess you have lost some lighting of the road. Have you notice if the lens is any warmer then it was before. just curious if the paint is acting like a insaluting.
I was just quoted 100.00 bucks from a bodyshop,(he said they do it all the time, to paint some rims I just bought, their in flat black. the pervious owner sounded as though he did a good prep of them. Do you think I can produce the same finish as them with spray cans. I seen some very inpressive jobs on motorcycle tanks from a spray can.

Thread Starter
|
Member
Joined: Apr 2011
Posts: 36
From: Central New Jersey
This is a pretty direct front shot.

Ill have to run out and take a pic for you of them at night, but just so you know, it looks major bad ass. The shape is quite defined (not just a light blob or something like that) and gives it a sort of angry eyes look. Ill get a pic up when I get a chance.
I have designed the shape specifically to not interfere with the beam. Basically that edge is as low as I could go before touching the beam output. So for low beams, I have 100% of the light output as before. Now, for hi beams on the other hand, I did take some sacrifice. The lids cut out some of the light cast front and center of the car. I dont use the hi so much, so yeah, lost a little function on the hi beams.
Housing tempurature seems unaffected. There is no measurable difference between with and without lids. My setup does run cooler in general because of the HIDs tho (35watts instead of the halogen's 55watts).
I have HIDs in my head lights and the lids actually help cut the over glare.. one plus, less headlight flashes from other drivers telling me to turn down the awesome.. =)
$100 for this kind of job is a fair price (that's what I would charge) but of course, I have proven the class of my work and nothing but a high quality product leaves my shop. So, if someone else promises the same, then $100 is a good deal.
Spray can paint is not to be underestimated. Ive seen and done great things with such. Usually they get a bad rap cause they are cheap and easy to obtain and youll find everyone and there mother attempting to paint random stuff with a spray can. No prep work, no masking, no wait time between coats, no finishing work, ect.. If someone spraying from a can takes the skills they know from painting with a complete system and apply them similarly, they can get good results at a fraction of the materials cost. It will never look as great as the 'real thing' but you can still get about 90% after some buff and polish.
Hope this helps and good luck. Feel free to keep the questions coming. =)
Member
Joined: Feb 2012
Posts: 103
From: chagrin falls, ohio
where I rent
Where I rent, there alot of merc's,beemers and the like, So I have alot of those fancy headlights in my mirrors. I havent seen one of them on the side of the road in 7 years with a cop behind one.lol, The front-end of that sport is like none I've ever seen before, though I'm not up on my fits, It looks like its after market, I bet it looks wicket at night when its coming at ya. Do you have a picks of an 08 with this on it.
I was also wondering how many days does it take to perform this? You said this was removable are you concerned that washing the car might lift an edge? Or some idiot doing it. Do you think this can be preformed with the light still on the car.
I was also wondering how many days does it take to perform this? You said this was removable are you concerned that washing the car might lift an edge? Or some idiot doing it. Do you think this can be preformed with the light still on the car.
Thread Starter
|
Member
Joined: Apr 2011
Posts: 36
From: Central New Jersey
The front-end of that sport is like none I've ever seen before, though I'm not up on my fits, It looks like its after market..
I was also wondering how many days does it take to perform this? You said this was removable are you concerned that washing the car might lift an edge? Or some idiot doing it. Do you think this can be preformed with the light still on the car.
I was also wondering how many days does it take to perform this? You said this was removable are you concerned that washing the car might lift an edge? Or some idiot doing it. Do you think this can be preformed with the light still on the car.
I did whole headlight process in a couple days. First day was all as you see above and the second to reinstall and buff and polish the finish. I appropriately prepped (as described above) before putting down the paint so no, Im not afraid of lifting an edge or anything. I soap, scrub, towel dry, wax it, ect with no worries of damaging the finish. Ive been using the House of Kolor products and Dupont products for a while and I feel they are excellent quality and last indefinitely with good care.
The reason I mentioned removable is because I know some people(including myself) think about being able to reverse all mods and return the vehicle to a stock condition if need be or say you just want to switch up your style. =) So, by removable, I mean you can rip off it off without damaging your headlight (as long as you use my vinyl tip), restoring it completely the way you got it. If you were to prep and paint directly on the headlight, youll find it not so easy to restore if need be. Basically, I can completely remove the lids while on the car, in less than a minute, with no damage, returning the Fit to its shiny bright eyed self, haha.
Thread Starter
|
Member
Joined: Apr 2011
Posts: 36
From: Central New Jersey
As close as it gets without being real.. Im not ashamed to say it, lol, cause Im not made out of money and dont have a year to accumulate parts and custom fit an entire front end so here it is...
Front end and the GP wheels are replicas.") Only thing that really gives it away for the front end is that the real JDM has a shorter stubby nose. The fake is elongated to fit over the steel bumper underneath.
Only thing that really gives it away for the front end is that the real JDM has a shorter stubby nose. The fake is elongated to fit over the steel bumper underneath.
The rear and sides are official Mugen parts if its any consolation.


Front end and the GP wheels are replicas.
Only thing that really gives it away for the front end is that the real JDM has a shorter stubby nose. The fake is elongated to fit over the steel bumper underneath. The rear and sides are official Mugen parts if its any consolation.
Thread Starter
|
Member
Joined: Apr 2011
Posts: 36
From: Central New Jersey