
Wheel Cancer "Fix"


Wheel Cancer "Fix"
Wasn't sure if this should go into DIY or Wheels sections, admin please move or holler at me if it Fits elsewhere better.
My friend posted this for me on his Subaru forum from our project last weekend. Nothing fancy, but it's surely better than as they were. I apologize for the dirty car, was a disgrace lol Will post updated clean pics soon This will get me through my wedding budget, then will get them powder coated after this fall.
First off, I wasn't exactly sure where to put this... pictures or wheels/tires? Also, I will detail how We did the project but please don't use what I said as hard-methodology... we did a a few things wrong so take what you can from it and leave the rest.
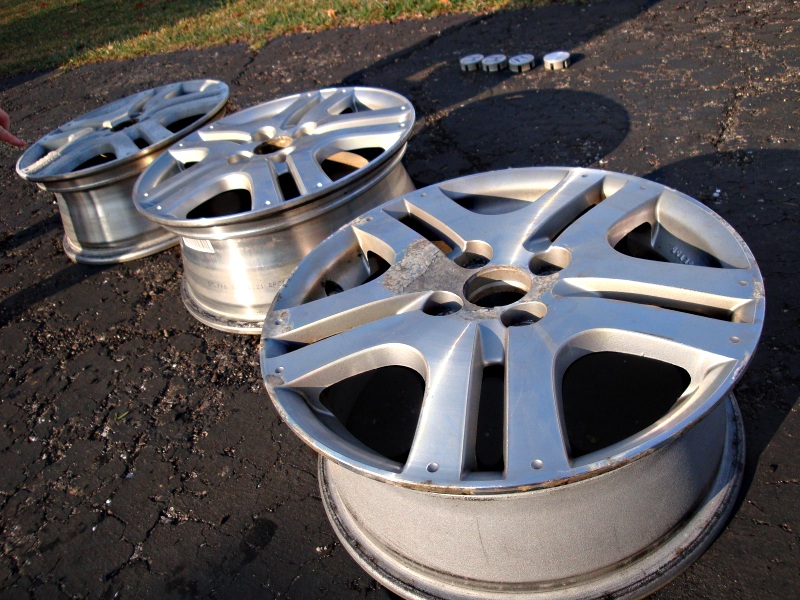
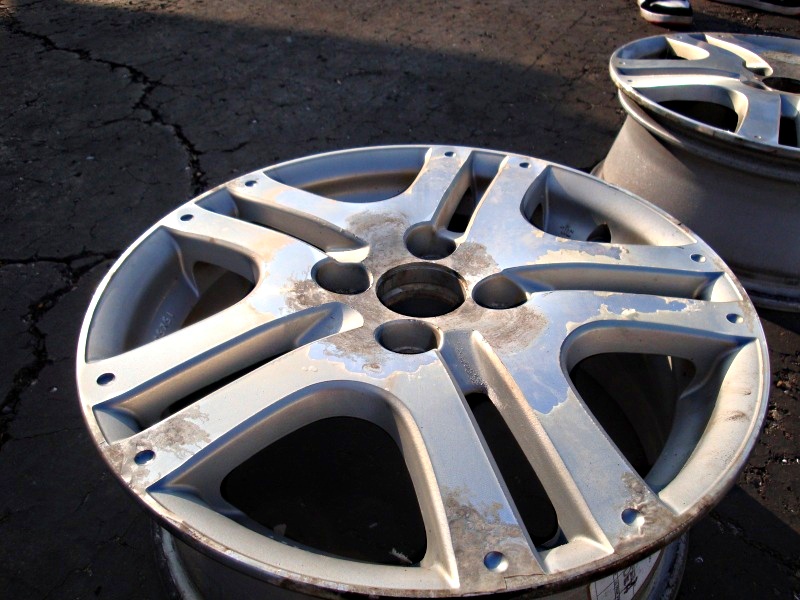
Last weekend a friend and I embarked on an adventure to paint the stock rims from an 08 Honda Fit. Something happened to the driver side rims and the best way we can explain it is "wheel cancer." The wheel cancer pictured below - looks like some sort of corrosion of some sort.
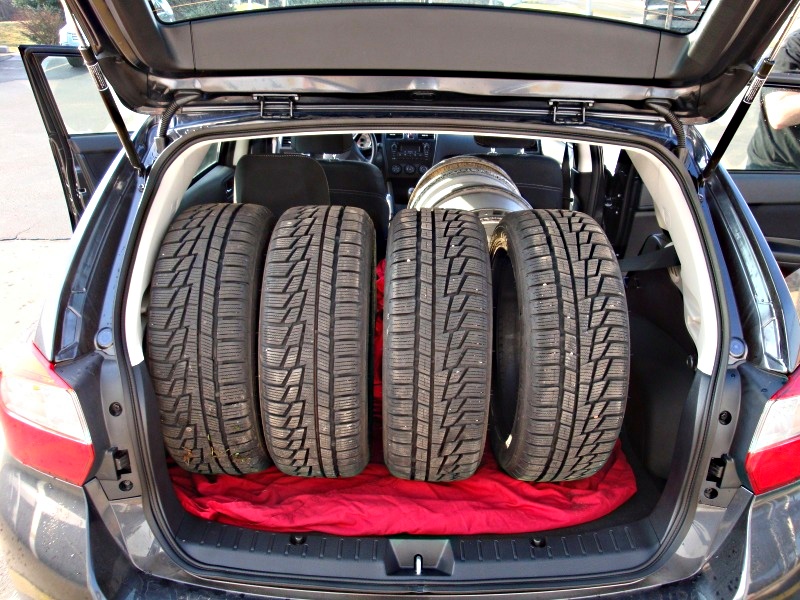
So we pack up the wheels and remove the tires from said rims. 4 tires and rims fit in the back of the 2012 subaru with only one of the rear seats folded forward.
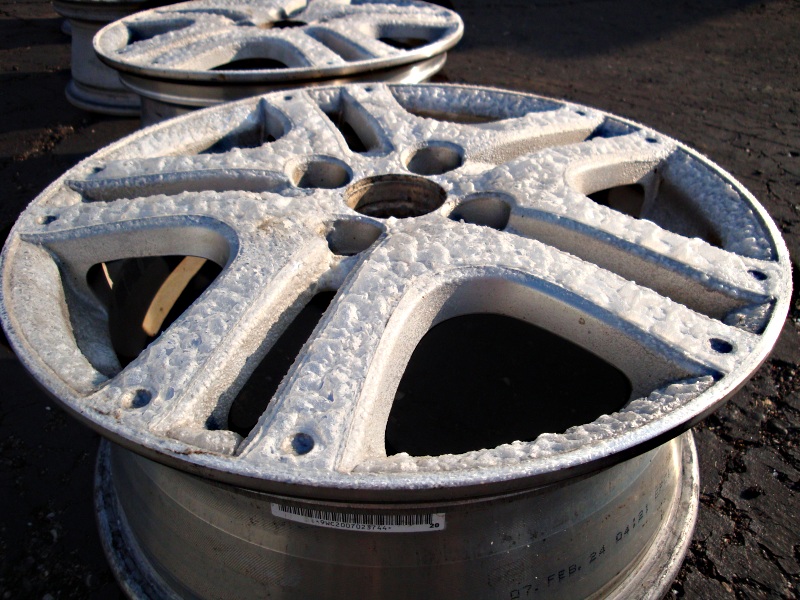
The first step we took to remove any and all coating on the rims is to buy some aircraft grade paint stripper. We have used this before as a paint remover and it worked marvelously. We picked it up at a local store for $7 and one can was enough. PLEASE wear a mask, wear gloves, and safety glasses... this stuff is Very corrosive and carcinogenic, too. Spray the stripper (they come in aerosol now?!) on the rims and let sit for 20-30 minutes. Good time to eat some lunch... Look at the stripper go!
The bubbling or "blistering" as the directions mention is normal. After 30 minutes or so we used a power washer to remove the stripper. Try not to let any of this stuff get on you. Either way, rinse the rims and then use 400 grade and higher sand paper to get in the nooks and crannies as well as scuff up the now bare metal rim. Use acetone to clean off the rims as this will remove any lingering chemicals still on the rim. It is a good idea to rinse the acetone off and go for some more scuffing then rinse and use acetone one last time.
The next step is to use some etching primer on the rims. Etching primer is a primer that is slightly acidic and will help the primer adhere to bare metal. We used two coats of etching primer. Note: Don't sand etching primer, thats not what its for.
You can see in the upper left the bare metal rim and then the etching primer. Yep, its green... make sure to get the inside of the barrel of the rim too (this goes for all subsequent steps)

Next is filler primer. Good old regular filler primer. Two coats of this stuff and if you see any imperfections sand them down. Now is the time!

If you sand make sure you clear off any dust before you start the painting process. We didn't have to sand. Next up is paint. We used 4 coats of paint.
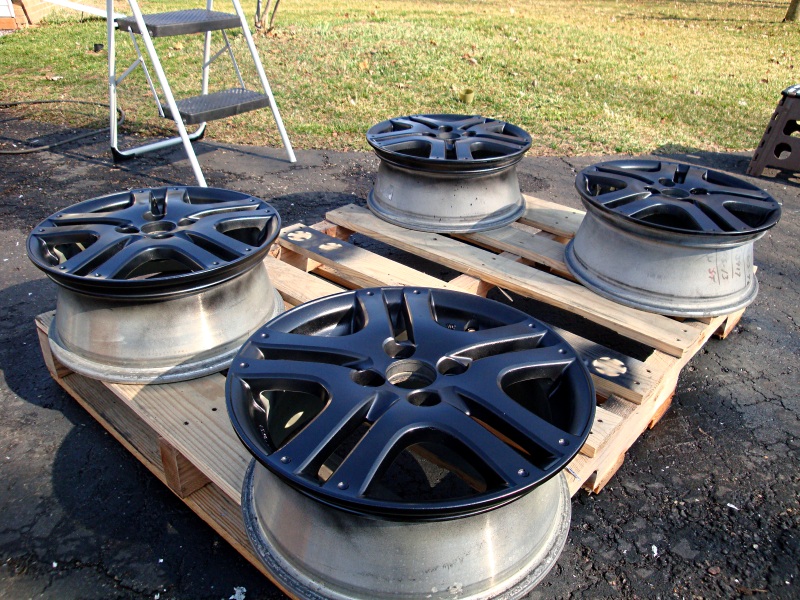
Between each coats give a good solid 30 minutes to let it settle and dry. Some people say less, some people say more... It really depends on the humidity and temperature of the day. Dry and hot you can coat sooner, cooler and humid then let it sit longer - gauge accordingly. Next up is clear! Our previous step used regular duplicolor primer and paint (wheel paint) but the last step we used good old automotive clear. So we bust out the air compressor and paint gun and went at it. 4 or 5 coats we used.
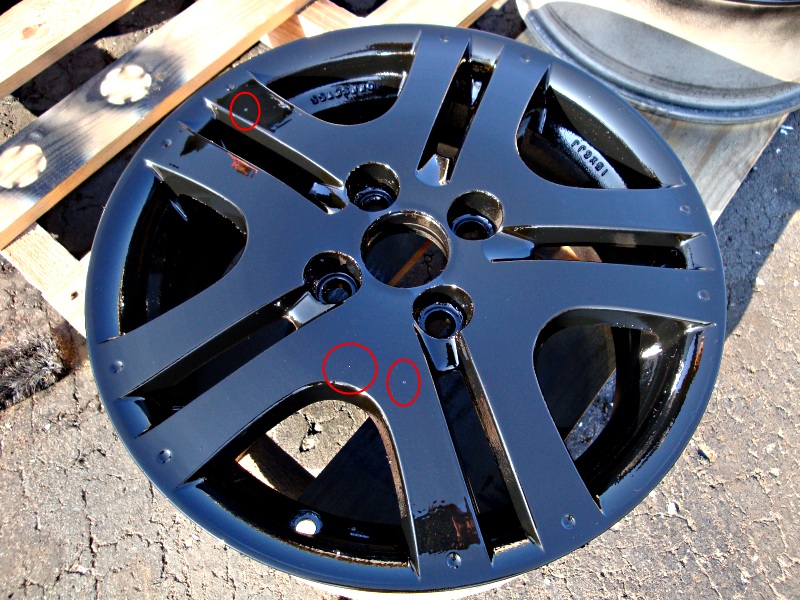
Shiny. Red circles are flaws. We painted outside... knew it would happen so if you follow any of these steps just try to do your spraying inside with as little dust / particulates...
And finally... the rims mated with tires again and on the car:
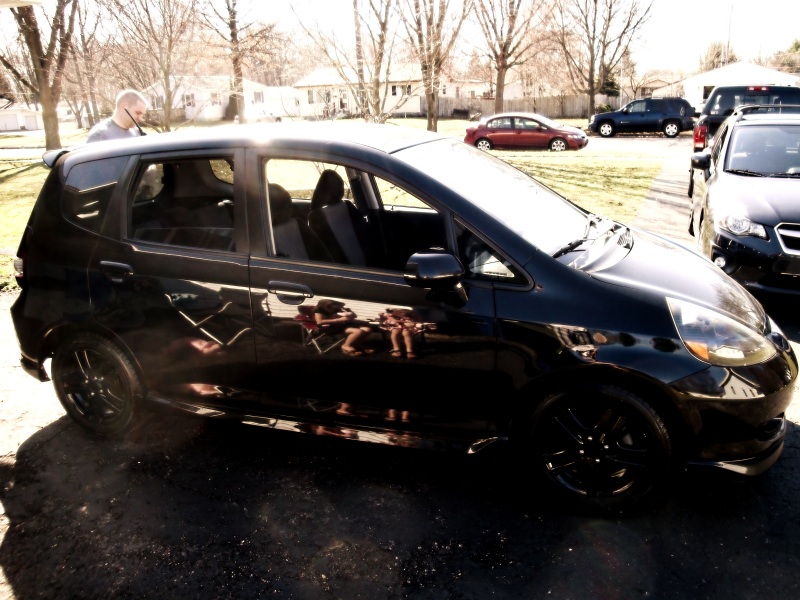
Not bad - certainly better than the wheel cancer.
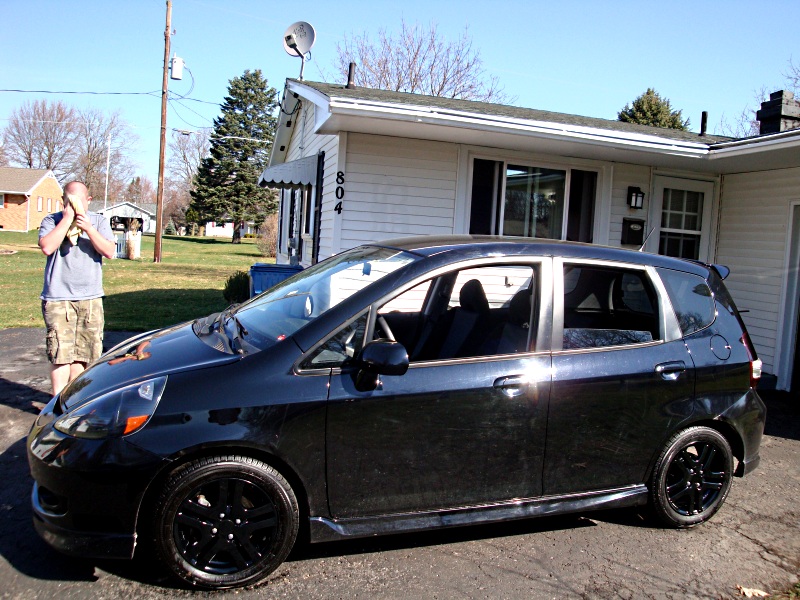
Updated pic of results, not the greatest way to show results since they just blend in with the car lol oh well :

My friend posted this for me on his Subaru forum from our project last weekend. Nothing fancy, but it's surely better than as they were. I apologize for the dirty car, was a disgrace lol Will post updated clean pics soon
This will get me through my wedding budget, then will get them powder coated after this fall.First off, I wasn't exactly sure where to put this... pictures or wheels/tires? Also, I will detail how We did the project but please don't use what I said as hard-methodology... we did a a few things wrong so take what you can from it and leave the rest.
Last weekend a friend and I embarked on an adventure to paint the stock rims from an 08 Honda Fit. Something happened to the driver side rims and the best way we can explain it is "wheel cancer." The wheel cancer pictured below - looks like some sort of corrosion of some sort.
So we pack up the wheels and remove the tires from said rims. 4 tires and rims fit in the back of the 2012 subaru with only one of the rear seats folded forward.
The first step we took to remove any and all coating on the rims is to buy some aircraft grade paint stripper. We have used this before as a paint remover and it worked marvelously. We picked it up at a local store for $7 and one can was enough. PLEASE wear a mask, wear gloves, and safety glasses... this stuff is Very corrosive and carcinogenic, too. Spray the stripper (they come in aerosol now?!) on the rims and let sit for 20-30 minutes. Good time to eat some lunch... Look at the stripper go!
The bubbling or "blistering" as the directions mention is normal. After 30 minutes or so we used a power washer to remove the stripper. Try not to let any of this stuff get on you. Either way, rinse the rims and then use 400 grade and higher sand paper to get in the nooks and crannies as well as scuff up the now bare metal rim. Use acetone to clean off the rims as this will remove any lingering chemicals still on the rim. It is a good idea to rinse the acetone off and go for some more scuffing then rinse and use acetone one last time.
The next step is to use some etching primer on the rims. Etching primer is a primer that is slightly acidic and will help the primer adhere to bare metal. We used two coats of etching primer. Note: Don't sand etching primer, thats not what its for.
You can see in the upper left the bare metal rim and then the etching primer. Yep, its green... make sure to get the inside of the barrel of the rim too (this goes for all subsequent steps)
Next is filler primer. Good old regular filler primer. Two coats of this stuff and if you see any imperfections sand them down. Now is the time!
If you sand make sure you clear off any dust before you start the painting process. We didn't have to sand. Next up is paint. We used 4 coats of paint.
Between each coats give a good solid 30 minutes to let it settle and dry. Some people say less, some people say more... It really depends on the humidity and temperature of the day. Dry and hot you can coat sooner, cooler and humid then let it sit longer - gauge accordingly. Next up is clear! Our previous step used regular duplicolor primer and paint (wheel paint) but the last step we used good old automotive clear. So we bust out the air compressor and paint gun and went at it. 4 or 5 coats we used.
Shiny. Red circles are flaws. We painted outside... knew it would happen so if you follow any of these steps just try to do your spraying inside with as little dust / particulates...
And finally... the rims mated with tires again and on the car:
Not bad - certainly better than the wheel cancer.
Updated pic of results, not the greatest way to show results since they just blend in with the car lol oh well
:
Last edited by JoeLrgr; Mar 25, 2012 at 06:49 PM.


Good work.
The original defect was probably the factory clear coat pealing and oxidizing. Just thought I would also mention the best locally available stripper I have used is 'Kleen Strip: Premium Sprayable Stripper' it comes with a plastic spray bottle.
However, generally the least aggressive product to get the job done is best.
Thanks for the kind words
I don't recall the name of the stripper, but it was a bit aggressive for the job I think, but better than having to sand as much.
The paint was Duplicolor's wheel paint, and the clear was basic production clear from a base coat/clear coat system. Results aren't terrible, i'd do it again in a heartbeat if I had to, but will likely resort to powdercoat next time - spare oven here I come
The best chemical to remove good powder coat is a chemical called B-17. It is expensive and very dangerous. (melts skin on contact)
Otherwise a good blaster can remove it.

New Member
Joined: Dec 2010
Posts: 7
From: Houston,TX
I have a nice scab on my arm right now from some that squirted out of a subframe that I thought I had drained all of the B17 from.DOESN'T feel good man.
Hasn't gotten me yet, but I'm sure the time will come. You on any coating forums?
Haha, me too. I take it you are Alleykat over there too? I am the same username there as well.
Edit: Haha, I have even posted in your thread there before.
Edit: Haha, I have even posted in your thread there before.
Last edited by Funkster; Mar 25, 2012 at 01:51 PM.

Hey guys, I'm preparing to paint my stock 16" wheels using black duplicolor wheel paint. My wheels are still new, only about 2k miles. I just want to confirm the paints I will need; 2 duplicolor primer (adhesion promotor primer) spray cans, 4 black duplicolor wheel paint spray cans and 3 clear duplicolor wheel paint spray cans for the clear coat. <Are these correct and enough? I'll get some degreaser and wax remover from the local auto shop to clean the rims first.. Is there anything else that I would need? TIA!
Hey guys, I'm preparing to paint my stock 16" wheels using black duplicolor wheel paint. My wheels are still new, only about 2k miles. I just want to confirm the paints I will need; 2 duplicolor primer (adhesion promotor primer) spray cans, 4 black duplicolor wheel paint spray cans and 3 clear duplicolor wheel paint spray cans for the clear coat. <Are these correct and enough? I'll get some degreaser and wax remover from the local auto shop to clean the rims first.. Is there anything else that I would need? TIA!
I also cant vouch for the duplicolor clear. Obviously it's supposed to be made for wheels, but I generally don't trust rattle can clears unless it's like a cut-in clear for a very small job.
Truth be told, and I think the others posting so far will agree with me, you're much better off getting them powdercoated if you can afford it. The local shop here was going to dismount tires, strip, coat, re-mount and balance tires for $250 total - I would've gone this route but am on an extreme wedding budget and am making the most of what little DIY projects I can do in the meantime.
Edit: I just read your future plan to powdercoat wheels lol Good luck with the painting for now, maybe holler back at us how the duplicolor clear holds up to road debris.
Thanks JoeLrgr, I'll do a bit more research but i'm also sort of leaning towards getting them powdercoated instead, just for the sake of quality and knowing that its done properly and will, in most cases, last longer..? I'm in Australia and know of a shop that will powdercoat for about $50 each wheel.. however its about a 2 hour drive away and needs to stay at the shop for at least 2 days for them to do everything they need, along with other customers' wheels.. i'll think about which route i'll take, but thanks!

Thread
Thread Starter
Forum
Replies
Last Post
qbmurderer13
Fit DIY: Repair & Maintenance
2
Jan 12, 2009 09:22 PM