
Shift boot and parking brake boot


Thread Starter
|
Former Vendor
Joined: May 2007
Posts: 116
From: Texas
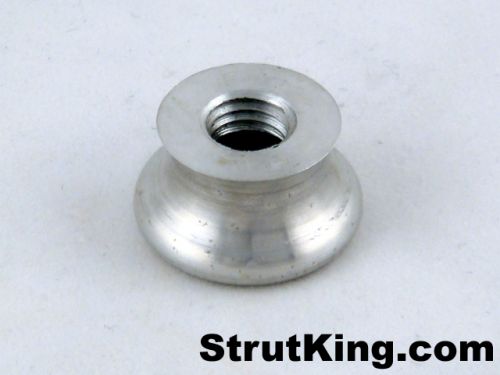
We do have something made. We redesigned our original shift boot adapter to work with the Fit shift boot. The new shift boot adapter will not show once installed unlike the original one. Pictures will be posted later today but they won't be pictures of it on the car as we don't have a Fit to model with right now.

Member
Joined: Apr 2008
Posts: 336
From: Jacksonville, FL USA

Same here. I rather buy them both the same time. I rather feel secure having the shift boot and e-brake boot at the same time than just having the shift boot.
Thread Starter
|
Former Vendor
Joined: May 2007
Posts: 116
From: Texas
ehhh, for 50 bucks im sceptical. espeially on a pretty much 1st gen beta product. I did want to have it nice looking for my friends tuner shop grand opening this weekend, but imma have to pass. t1r is coming out with there GD3 boot as well, i wanna compare my options.
Member

Joined: May 2008
Posts: 107
From: Los Angeles, Ca
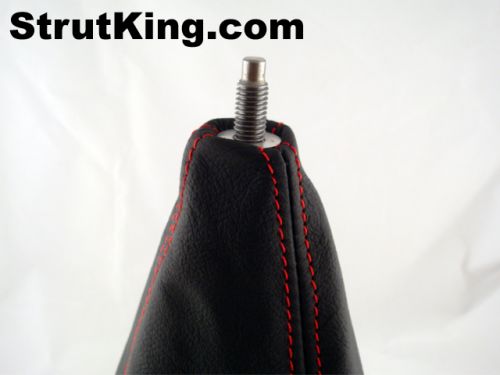
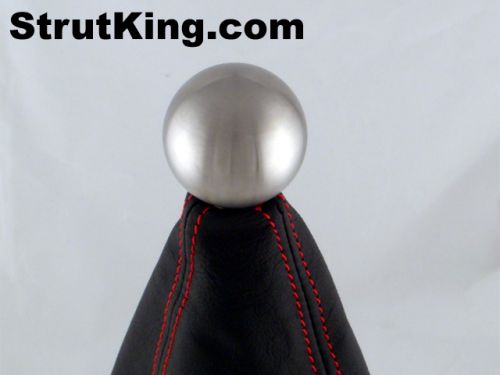
So i recieved my shift boot a week or two ago and i just installed it today. Install was fairly mellow. After some diy fabbing i'm pretty happy with how the boot came out. strutking doesn't send instruction so I'll explain really quick on how to install.
1. remove the two pushpin tabs on the front of the console
2. with a phillips head remove the two screws in the back of the console (you will have to move your seats forward in order to reach them)
3. remove the plastic insert right below your parking brake (don't use a screw driver..the tabs which are located on the bottom of the insert are accessible now and with a little pushing pop the insert right out.)
4. sport model... make sure to unclip the aux input cable and power outlet before yanking out the console
5. remove the console
6. flip the console over and remove the 3 screws holding the shift boot ring in place. then CAREFULLY pull the tabs out of the shiftboot ring...use a flathead screw driver or something to assist getting the tabs out.
7. Next insert the tabs of the new leather shift boot. From here I decided to use a hot glue gun and glued the tabs to the inner side of the shiftboot because after reinstalling everything the tabs slipped out when i didn't glue them.
8. reinstall everything...
Oh and i only paid 30 dollars for mine and that included shipping....not bad at all...It looks a hellofalot cleaner now with the leather shiftboot.
Last edited by R62GD3; Oct 7, 2008 at 06:30 PM.
How did you keep the boot stay up without the adapter?
So i recieved my shift boot a week or two ago and i just installed it today. Install was fairly mellow. After some diy fabbing i'm pretty happy with how the boot came out. strutking doesn't send instruction so I'll explain really quick on how to install.
1. remove the two pushpin tabs on the front of the console
2. with a phillips head remove the two screws in the back of the console (you will have to move your seats forward in order to reach them)
3. remove the plastic insert right below your parking brake (don't use a screw driver..the tabs which are located on the bottom of the insert are accessible now and with a little pushing pop the insert right out.)
4. sport model... make sure to unclip the aux input cable and power outlet before yanking out the console
5. remove the console
6. flip the console over and remove the 3 screws holding the shift boot ring in place. then CAREFULLY pull the tabs out of the shiftboot ring...use a flathead screw driver or something to assist getting the tabs out.
7. Next insert the tabs of the new leather shift boot. From here I decided to use a hot glue gun and glued the tabs to the inner side of the shiftboot because after reinstalling everything the tabs slipped out when i didn't glue them.
8. reinstall everything...
Oh and i only paid 30 dollars for mine and that included shipping....not bad at all...It looks a hellofalot cleaner now with the leather shiftboot.
1. remove the two pushpin tabs on the front of the console
2. with a phillips head remove the two screws in the back of the console (you will have to move your seats forward in order to reach them)
3. remove the plastic insert right below your parking brake (don't use a screw driver..the tabs which are located on the bottom of the insert are accessible now and with a little pushing pop the insert right out.)
4. sport model... make sure to unclip the aux input cable and power outlet before yanking out the console
5. remove the console
6. flip the console over and remove the 3 screws holding the shift boot ring in place. then CAREFULLY pull the tabs out of the shiftboot ring...use a flathead screw driver or something to assist getting the tabs out.
7. Next insert the tabs of the new leather shift boot. From here I decided to use a hot glue gun and glued the tabs to the inner side of the shiftboot because after reinstalling everything the tabs slipped out when i didn't glue them.
8. reinstall everything...
Oh and i only paid 30 dollars for mine and that included shipping....not bad at all...It looks a hellofalot cleaner now with the leather shiftboot.
im talking about 50 bucks with the adapter. I like to make everything tities.

Thread
Thread Starter
Forum
Replies
Last Post
thewatcher101
2nd Generation (GE 08-13)
0
Aug 1, 2010 04:38 PM