LOG IN
REGISTER
Forums
Welcome To FitFreak
Fit Freak Newbie / FAQs
Site Feedback and Suggestions
The Honda Fit and Jazz Forums
General Fit Talk
1st Generation (GD 01-08)
2nd Generation (GE 08-13)
3rd Generation (2015+)
Fit Photos & Videos
Car Shows, Events, and Racing
Other Car Related Discussions
Off Topic Discussion
Buy, Sell, Trade, Product Market Research and Group Buys
For Sale / Want To Buy / Classified Ads for USED Fit Items
FIT-Vendor Sponsored Group Buys and Sales
Gauge Interest in a Fit Product or Group Buy
Merchant Group Buys and New Product Sales
General For Sale Section
Fit Modifications
General Fit Modifications Discussion
Fit DIY: Repair & Maintenance
Fit Engine Modifications, Motor Swaps, ECU Tuning
Fit Exterior Modifications & JDM Styling
Fit Interior Modifications
Fit I.C.E.
Fit Wheels & Tires
Fit Suspension & Brake Modifications
Fit Interior & Exterior Illumination
Honda Dealer and Honda USA Discussions
Honda Fit Dealer Representatives
Honda Fit Dealer Reviews
Vendor Marketplace Forums
FIT Vendor General Discussion Area
FIT-Vendor Sponsored Group Buys
Tire, Wheel, Brake & Suspension
Fit Forums & Clubs
America East
America Central
America West
Canada Fit Forums & Clubs
Mexico Fit Forums & Clubs
European Fit Forums & Clubs
Asia Fit Forums & Clubs
Marketplace
Vendor Directory
Become a Vendor
New Posts
Tools
Car Payment Calculator
Tire Rim Calculator
Recalls
Technical Service Bulletins (TSBs)
Members List
Live Feed
Gallery
View Dark Mode
Please register or login to enable Dark Mode.
Log In
Register
Threads
Google
Threads
Posts
Advanced
Dark Mode
Please register or login to enable Dark Mode.
Log In
Forgot your Password?
By logging into your account, you agree to our
Terms of Use
and
Privacy Policy
, and to the use of cookies as described therein.
Recent
Commented
Albums
My Pictures
Jodele's Photos
View Profile
Sort:
Most Recent
Most Recent
Most Comments
Albums
Photos
Under-dash Fuse/Relay Box for Hands Free Link, Map Light and Garmin Nav System
0
2011/01/03 08:40:27
Jodele
Hands Free Link BlueTooth Module
0
2011/01/03 08:37:54
Jodele
Hands Free Link BlueTooth
0
2011/01/03 08:03:55
Jodele
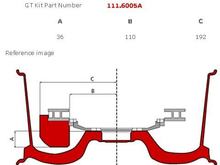
Brembo 111.6002A fitment for 328-mm discs
0
2010/12/13 11:24:00
Jodele
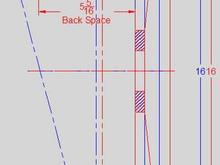
Brembo 111.5002A Fitment 313-mm disc
0
2010/12/13 11:23:00
Jodele
all season tires
0
2010/12/09 03:48:45
Jodele
This is how the suspension geometry changes when you install a 16X7 wheel with a 40-mm offset.
0
2009/10/12 12:34:41
Jodele
16 X 6-1/2 Honda Accessory Wheel with a 55-mm offset.
0
2009/10/12 12:31:09
Jodele
These are the leftover pieces of the frame cut off the right and left sides of the car respectively.
0
2009/09/14 18:01:27
Jodele
This is the left rear corner of the bar installed. Notice that a 10-mm hole needs to be drilled through the frame here on both sides of the car.
0
2009/09/14 18:00:12
Jodele
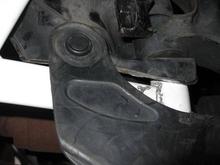
This is the left front corner of the bar installed with the mud flap in place.
0
2009/09/14 17:59:33
Jodele
Again, notice the cut on the frame, right above the bar (aft on the car).
0
2009/09/14 17:58:39
Jodele
This is the left front corner. Notice that the flange bolt comes right to the edge of the cut window. It was a pain to get the socket on the bolt.
0
2009/09/14 17:57:19
Jodele
This is the right side with the plastick mud flap installed over the bar. Right front corner. Down is forward on the car.
0
2009/09/14 17:56:08
Jodele
This is the same right front corner looking straight up. Notice that the frame needs to be trimmed. Just above the bar in the picture (aft on the car). This is the main frame but is only the lip. I cut about 1/2" off.
0
2009/09/14 17:54:06
Jodele
This is how the right front end of the looks like installed.
0
2009/09/14 17:53:16
Jodele
This bolt is snaked into through the hole on the right (aft on the car), drilled a 10-mm hole and bolted it down.
0
2009/09/14 17:51:38
Jodele
For the aft corners of the bar, I had to cut the short bolt side to 3 1/2" as shown.
0
2009/09/14 17:50:28
Jodele
This is the window I cut into the left front end of the bar.
0
2009/09/14 17:49:40
Jodele
This is the window I cut into the right front end of the bar.
0
2009/09/14 17:48:41
Jodele
The forward ends of the bars need to have an window cut in them to clear the flanges of the bolts. And this provides just enough clearance to put the socket on.
0
2009/09/14 17:46:52
Jodele
The left side.
0
2009/09/13 13:39:15
Jodele
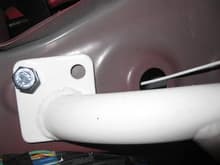
I drilled the far hole with an 8-mm drill through the sheet metal and inserted the nut through an existing body hole like this.
0
2009/09/13 13:37:37
Jodele
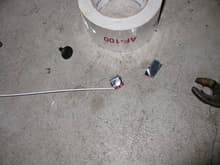
I then taped the nut to the formed coat hanger with aluminum tape. In aviation it is called speed tape. This holds the nut to the coat hanger and when the bolt is screwed in, the tape comes off.
0
2009/09/13 13:35:57
Jodele
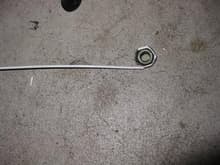
I bent a coat hanger to form a holder for the flange nut.
0
2009/09/13 13:35:01
Jodele
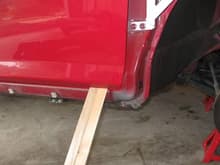
I put shims (gotten at Home Depot) under the closed door to hold the door in place while all four hinge bolts were removed to install the fender bar. I never opened the door after removing the bolts.
0
2009/09/13 13:32:20
Jodele
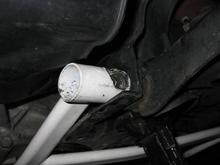
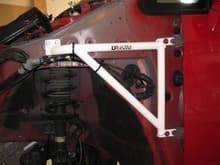
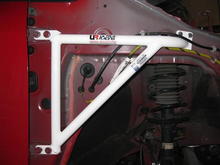
Right Front Fender Bar installed
0
2009/09/13 13:31:38
Jodele
First
Page
2 of 2
Last
Go To
Page
1
2
2 of 2
Go To
GO
Go to page
of 2
pages
1
2