
"How To" install guide for XM / Sirius radio


Thread Starter
|
Member

Joined: Nov 2008
Posts: 20
From: Sault Ste. Marie, MI
"How To" install guide for XM / Sirius radio
Okay, so I just installed my Sirius Sportster in my 2009 Fit Sport. After reading numerous threads and instruction sheets, I decided to create my own little "How To" manual for installing your satellite radio in the Fit.
NOTE: If any of the links or images in this thread are broken, email me at notorious.dds@gmail.com and I'll get you the info.
If you want a clean install with minimum cords hanging out, you'll need to pull the stereo from the dash... at least enough to run cords behind it. The following PDF documents are great for showing how to do this without damaging anything.
2009 (GE model) http://www.collegehillshonda.com/instructions/fit/2009/usbadapter.pdf
2008 and earlier (GD model) http://documents.victorytechnologies.com//documents/product/9496.pdf
2008 and earlier (GD model) http://documents.victorytechnologies.com//documents/product/9496.pdf
One of the steps in removing the stereo involves removing a screw from underneath the stereo. I read a few threads describing this task as a real pain in the rear. I was able to get the screw out (and back in) with little effort using a 10 inch socket extension with a 5/16 socket attached. (The connector between the extension and the socket is just a 3/8 to 1/4 socket adaptor.) See image 1 below.

Image 1
NOTE: You should be able to use this without the ratchet attached. In fact, I think if you do attach the ratchet, you won't be able to fit it between the opening in the panel and the cup holder below.
The PDF document describes use of 2 different Honda trim tools. If you're like me, you won't have access to these. In that case, I recommend that you:
1. Place the masking tape where it's indicated in the PDF document
2. When you start to pull the stereo at the notch found in the upper glove box, use the largest screwdriver that will fit.
3. Once you start to get the stereo moving, use a mini pry bar to complete the job. This pry bar works great for removing trim in all other areas of the job as well. You should be able to get one of these at any hardware. See image 2 below.

image 2
NOTE: I never disconnected any of the wires from the stereo and only worked on the power outlets with the keys out of the ignition. For that reason, I never disconnected the battery. However, if you're concerned about safety (of you or your electronics), you might decided to disconnect the battery.
Once I got the dash opened up, the first thing I did was add an extra power outlet. I actually added 2 because as you can see in image 3, if ever you use the stock outlet, one of your cup holders becomes useless. With this outlet in use, you can't fit a cup under the plug and if you did, you wouldn't be able to get it out of the holder without pulling the plug from the power outlet.

image 3
Since I tend to keep a cell phone charger plugged in most of the time, I figured I take care of both my satellite radio and this outlet/cup holder issue while I had the dash opened up. In image 4 and image 5, #1 indicates the stock outlet, #2 indicates the outlet I plan to leave my cell phone charger plugged into, and #3 is the outlet that I used for the satellite radio.

image 4

image 5
NOTE: I could have actually hard-wired the power for my satellite radio instead of installing outlet #3. However, the newer radios run on 5V and thus have the voltage stepped down from 12V to 5V via a transformer in the power cable. If I ever want/need to upgrade, I'll be glad I have this outlet. More importantly, if the satellite radio you're installing runs on anything other than 12V, you MUST install this outlet OR include a transformer in your wiring.
NOTE: I drilled holes into the console to mount outlet #2. I know most people are anti-drilling and this usually includes me. However, given the location of the holes that I drilled, even if I removed this outlet, you'd have to have your head on the floor to see the holes.
This is the type of outlet I used for #2 because it can be easily mounted. See image 6 below.

image 6
You could use almost any type of outlet for #3 since it's just stuck up in the wiring and not mounted to anything.
If you need help with the wiring, try this link:
http://oreilly.com/pub/h/3611
Because there is almost no slack in the wire connected to outlet #1, I found the easiest approach was to unplug the wire from this outlet and then cut approx 8 inches off both the red and black wires from one of the newly purchased outlets. I then used these two 8 inch pieces of wire to create an extension cord of sorts by connecting an UNinsulated male connector (image 7) to one end of each wire and an INsulated female connector (image 8) on the other end of each wire.
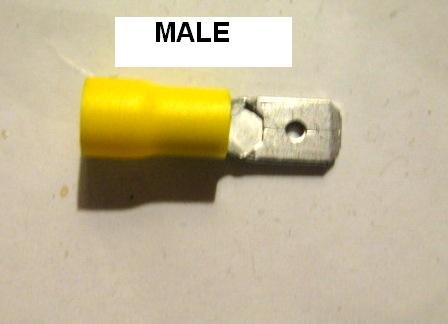
image 7

image 8
I used this "extension cord" to add length to the wire that was originally connected to outlet #1. I then spliced my 2 new outlets from my extension cord (as seen in image 4).
A few notes about image 4:
1. The insulated female connectors attached to outlet #1 are black. For the sake of consistency, you may pretend that they're yellow.
2. The original wire that was connected to outlet #1 is NOT visible.
3. The black cylinder around one of the red wires is a fuse holder for outlet #2. This came with one of the outlets that I bought. If you choose to install outlet #2 as I did, a fuse here is a good idea because the wire attached to outlet #2 may burn at a current lower than that of the fuse for the general power outlet circuit. Since you'll only be attaching a radio to outlet #3, you shouldn't need an additional fuse on that leg of the circuit since most of these satellite radios pull less than 2A. Additionally, assuming that you don't hard wire the power to your satellite radio, there's already a fuse in the radio's power cable.
NOTE: If you can find the correct size connector in blue, they will probably work better as the yellow connectors are intended for a larger gauge wire. However, I made them work in this situation.2. The original wire that was connected to outlet #1 is NOT visible.
3. The black cylinder around one of the red wires is a fuse holder for outlet #2. This came with one of the outlets that I bought. If you choose to install outlet #2 as I did, a fuse here is a good idea because the wire attached to outlet #2 may burn at a current lower than that of the fuse for the general power outlet circuit. Since you'll only be attaching a radio to outlet #3, you shouldn't need an additional fuse on that leg of the circuit since most of these satellite radios pull less than 2A. Additionally, assuming that you don't hard wire the power to your satellite radio, there's already a fuse in the radio's power cable.
NOTE: Make sure that the gauge of wire you use for the extension cord is equal to or heavier than that of the wire you are extending. If not, you could potentially create a fire if the outlets get overloaded.
Next you need to run your antenna cable. "joe FIT" created a thread which explains how to get your antenna run from the roof to the inside of your car. And, although it's a good resource for this portion of the job, I contend that my method was easier and yields the same result.
This is his thread: https://www.fitfreak.net/forums/fit-ice/11692-fit-sirius-radio-questions.html
Joe's method involves removing many of the trim pieces and a bolt for the seat belt. FYI: Given the inherent safety concerns with removing the anchor for a seat belt, I wouldn't do this unless I knew the torque spec on that bolt and had the proper torque wrench to put it back on.
My method went something like this...
You need to mount your antenna on the roof with 2 basic concerns in mind.
1. The flatter the surface, the better the magnetic base will stick. If you put your antenna right at the edge, you'll see that the body of the car is a little more convex in that area and the magnet won't stay put as well.
2. Don't run your wire where it can get damaged. Joe's method had the wire running off the back of the roof approximately 1 foot in from the left edge. This may be fine in So Cal, but where I live, we get a lot of ice. When the hatch is opened, it opens INTO the body of the car along the entire top edge except at the corners. When this area gets filled with ice, you can hear it cracking as it's compressed when the hatch is opened. You can imagine what might happen to the wire if it's caught up in that scenario. So, I recommend that you mount your antenna like this (image 9) and avoid running the wire over any of the areas marked with a red X as seen in image 10.

image 9
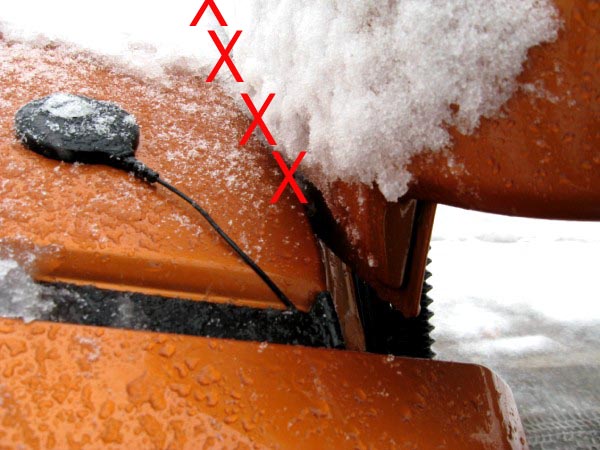
image 10
I'm sure that having the antenna right at the edge of the roof, with minimal wire showing, would be esthetically ideal. But, for the 2 reasons above, I couldn't do this. I do plan on getting the "tail" off of an earlier model of Sirius antenna I have (like the one in Joe's thread). Then I can just use the little tail piece so that the wire will be covered... but it's not necessary.
Here's where there's a big difference between my method and Joe's. To get the wire inside the car, peel back the rubber boot at the upper left of the hatch and the adjacent inside trim panel (image 11). You can then feed a bent coat hanger (indicated by the arrows in image 11) through the hole for the rubber boot and into the car. Use this to pull the rest of your antenna wire into the car.

image 11
NOTE: You can help keep the wire on the roof stabilized by tucking it under the trim (see item 1 on image 12). Also, to prevent water from flow along your wire and into the body of the car, make sure that:
1. your wire enters below the boot and not above.
2. you leave a little "loop" below the boot for the water to drip off (see item 2 on image 12)
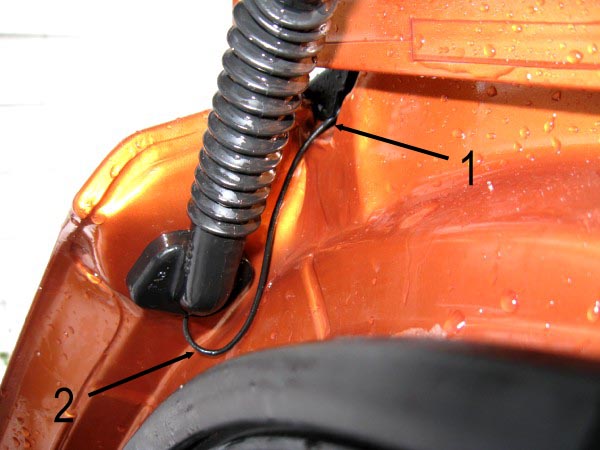
image 12
Once you get all of the wire on the inside, you can run it up to the dash by tucking it between the trim panels and the ceiling (or under the rubber weather striping when passing the rear and front doors) See image 13.
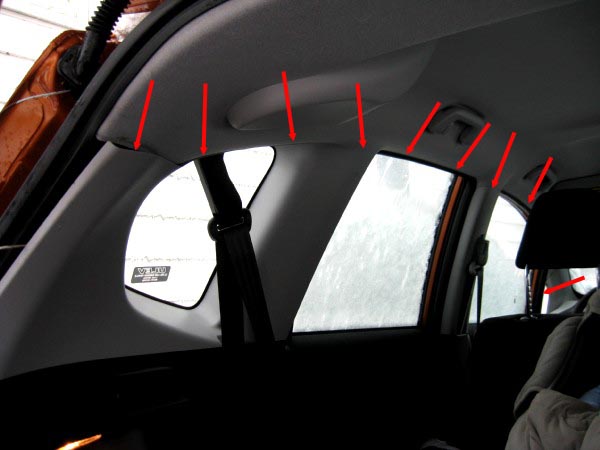
image 13
You can tuck the wire in this method all the way to the lower left corner of the dash (image 14).

image 14
At this point, you want to remove the lower dash panel on the driver's side. Although this panel IS NOT visible in image 14, the red arrow indicates the position of a plastic nob that holds the panel in. Turn the nob 90 degrees to release the left side and pull the panel down and towards the driver's seat to release the right side. There are 2 steel supports exposed by removing the panel. Run your antenna wire over these supports. With the panel for the power outlet open and the stereo pulled out a bit, you can now feed the wire up through the dash and out along the right side of the stereo.
Get your satellite radio mounted and plug in the antenna, power, and audio cables. The mount I used for my Sirius Sportster was the "ARKON Sr-53 14" Windshield S-Pedestal Mount".
NOTE: I found that the suction cup mount that came with my Sirius car kit would not stay attached to the glass very well, especially when it's cold out. This ARKON mount has a suction cup whose diameter is almost twice that of the one that came in the Sirius car kit. Even at 4 degrees Fahrenheit, this mount has yet to come off.
The stereo fits pretty tightly against the dash leaving little room for wires to fit through the gaps, but I found that I could squeeze it back together if I ran the wires back in at the upper right side of the stereo (image 15).

image 15
Wrap up any excess wire and plug the tail end of the audio cable into the AUX outlet. I had tail end of my audio cable exit the dash right below the AUX outlet (image 16).

image 16
(Ideally, I could have obtained an audio cable whose plug was at a right angle instead of straight so that it wouldn't stick out so far from the AUX port. However, Radio Shack didn't have one so I got what I got.) Once you get the cables where you want them and the excess wrapped up, close up the stereo and anything else you took apart.
NOTE: When pushing the stereo back into place, it's easy to get the wires pinched between the stereo and it's housing. Make sure your wires are running somewhere where this won't happen.
Images 17 and 18 show the completed install of my Sirius Sportster and my conveniently placed cell phone plug.

image 17

image 18
Good Luck with your installation!
Last edited by notorious.dds; Nov 25, 2015 at 12:10 AM. Reason: Fixed broken image links


Nice writeup, +rep for you.
I installed my Sirius radio (in my '08) on the little triangular window on the driver's side. I was able to hide the wires by tucking them under the rubber door trim, and it was simple to run them along the bottom of the dash over to the radio.
I also use two power outlet devices regularly, so I got a splitter from Radio Shack. Plug it into the power socket and presto, you have two. It does add a bit of cabling but I just use the front section of the console and stuff it all in there. Your extra outlet installation is definitely cleaner, but mine is lazier.


New Member
Joined: Nov 2008
Posts: 5
From: Los Angeles
A little bit of both
Notorious.dds and WDB, thanks for your efforts. I used a little from each of your work (ok, mostly the "lazy" WDB way) but it worked!
Only problem with placing the suction cup on the side window is that I can't tilt the radio face enough to easily see the radio face.
Only problem with placing the suction cup on the side window is that I can't tilt the radio face enough to easily see the radio face.

New Member
Joined: Nov 2008
Posts: 5
From: Los Angeles
I've got mine on the side window as well. Only problem is that the dock doesn't allow the radio to turn far enough to me so I have to bend forward to see info on the screen.
Mine was like that too until I reversed the arm between the suction cup and the dock. It looks like it arcs the wrong way, but it allows the dock to swivel around further and face the driver. One of these days I have to fix my picture hosting....

New Member
Joined: Sep 2010
Posts: 4
From: Anaheim, California
Thanks to all who have posted on this topic. I have performed a similar installation with the plug going into the "AUX" socket on the face of the radio. Has anyone opened up the radio to wire the lead from the sat. radio directly into the radio so the unsightly plug isn't always sticking out of the front? Thanks!!!

Thread Starter
|
Member
Joined: Nov 2008
Posts: 20
From: Sault Ste. Marie, MI
Thread Starter
|
Member
Joined: Nov 2008
Posts: 20
From: Sault Ste. Marie, MI
I considered doing this when I installed the radio. Assuming that you don't want to loose the functionality of the audio jack on the face of your stock radio, you'd have to open up the radio itself and install a wired relay. I was already being nagged for spending too much time in the driveway, so I went the easier route.

Member
Joined: Apr 2015
Posts: 31
From: Waterloo,Ontario,Canada
Thanks for this thread... I just got through installing my XM module for my Kenwood.
I went through the boot like you did.
The only difference was where I mounted the antenna.
I put it under the hatch... when you open the hatch you can see it just behind the weather stripping. When you close the hatch it is obscured by the hatch.
I tested it out and I am getting very good signal, so it seems to not affect reception. I had 2 bars in the garage and 3 bars once I took the car outside.

New Member
Joined: Feb 2017
Posts: 15
From: Philadelphia
Thanks for this thread... I just got through installing my XM module for my Kenwood.
I went through the boot like you did.
The only difference was where I mounted the antenna.
I put it under the hatch... when you open the hatch you can see it just behind the weather stripping. When you close the hatch it is obscured by the hatch.
I tested it out and I am getting very good signal, so it seems to not affect reception. I had 2 bars in the garage and 3 bars once I took the car outside.
I went through the boot like you did.
The only difference was where I mounted the antenna.
I put it under the hatch... when you open the hatch you can see it just behind the weather stripping. When you close the hatch it is obscured by the hatch.
I tested it out and I am getting very good signal, so it seems to not affect reception. I had 2 bars in the garage and 3 bars once I took the car outside.

New Member
Joined: Mar 2020
Posts: 2
From: Melbourne Beach
I have a 2017 fit ex and it seems that using the opening for the light sensor would be a great place to thread the Sirius XM antenna to the front of the dash next to the window. I've taped the antenna to the location to see if it would work at all points of the compass and it seems to be a good spot .. no fading.
However, after popping the light sensor out of its little square hole I could not find an opening that would allow the antenna wire to pass through to the under side of the dash. I used a remote camera to look into the space but could not find anyway to thread the antenna wire.
Does anyone know where this hole leads and how to access it? Has anyone used it for this purpose?
ANY ASSISTANCE WOULD BE GREATLY APPRECIATED .
.
However, after popping the light sensor out of its little square hole I could not find an opening that would allow the antenna wire to pass through to the under side of the dash. I used a remote camera to look into the space but could not find anyway to thread the antenna wire.
Does anyone know where this hole leads and how to access it? Has anyone used it for this purpose?
ANY ASSISTANCE WOULD BE GREATLY APPRECIATED
.
Thread
Thread Starter
Forum
Replies
Last Post
Perrenoud Fit
Other Car Related Discussions
16
Oct 10, 2011 10:20 PM
09, 2008, 2009, base, battery, disconnected, fit, honda, install, installation, installing, installion, radio, sirius, stereo, xm