When you click on links to various merchants on this site and make a purchase, this can result in this site earning a commission. Affiliate programs and affiliations include, but are not limited to, the eBay Partner Network.
Well about that "fix":
So I'll need to revisit this at some point.
Otherwise all's been well with the car, I've used it a few times for Ikea trips and to haul other crap. Of course that's until I was supposed to take a longer trip with it since the miata was too small (shocking). It's been super hot recently so I scheduled to have the AC refilled the day before the trip. The time comes and I have 30 minutes between meeting to get there and take the call. Get in, crank, it starts, and besides the CEL, the battery light also stays on. And doesn't blink or go away after a while, at any RPM. Fuuuuuck.
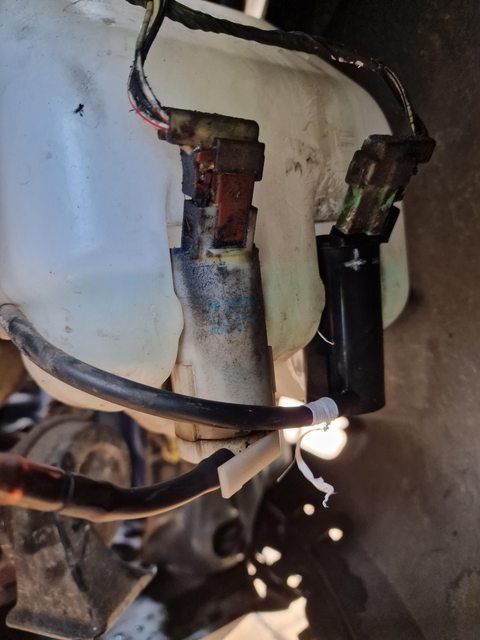
Shut down, check battery terminals (clean but loose), tighten, start, same thing. The belt and pulley spins normally. I have a cigarette lighter USB charger with a voltmeter and it's showing 12.2v when running. At this point it's clear I won't be going anywhere (though the shop is close enough that I might've made it on battery alone) but I want to figure out more about what's going on, so I fetched the multimeter. Barely manage to squeeze my fingers through to remove the rubber boot from the positive terminal, and it also measures battery voltage (12.2 or so) with the car running. That's it, I then have meetings until like 5pm so I had about 30 minutes to find the right part and order it so that it's ready the next morning. Luckily there was store in town that had them at reasonable prices, because I usually have to wait 3+ days to get parts.
Before going to sleep though, I realized it's better to take off as much stuff today as possible, since I'll be installing it in the morning before my normal working time. So there I am, undoing the EGR valve on the street in the middle of the night. There are two rusty studs that needed a bit more leverage so...
One nut came off, and the other stud came out of the head completely, which is even better. But when I removed the EGR valve, I saw that coolant was weeping from some of the passages. I'm sure it wouldn't all just leak out overnight, but I didn't want to risk it so put everything back on.
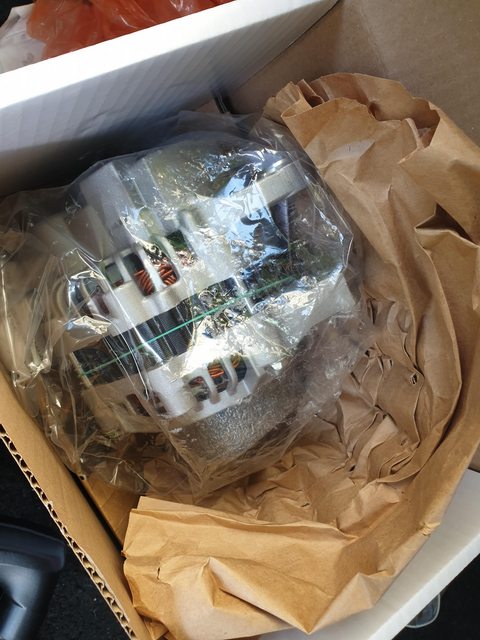
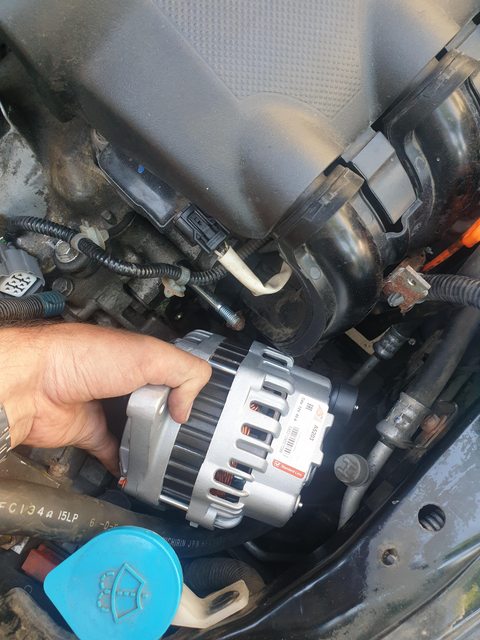
Picked up the new alternator next morning within like 10 minutes of the store opening.
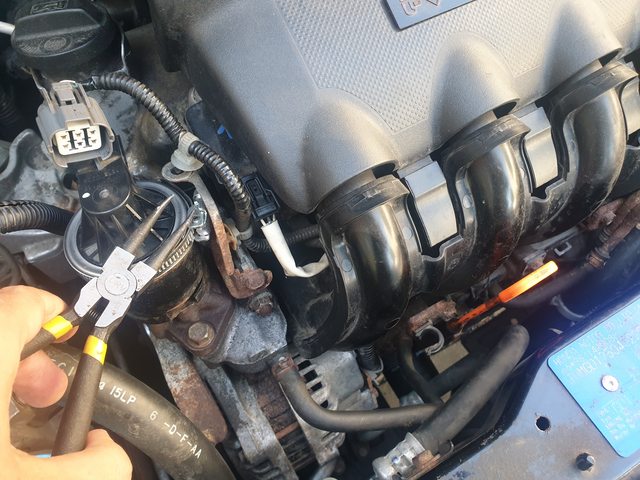
I found the c-clip pliers to be pretty good for undoing the plastic clips holding the EGR wiring to the brackets:
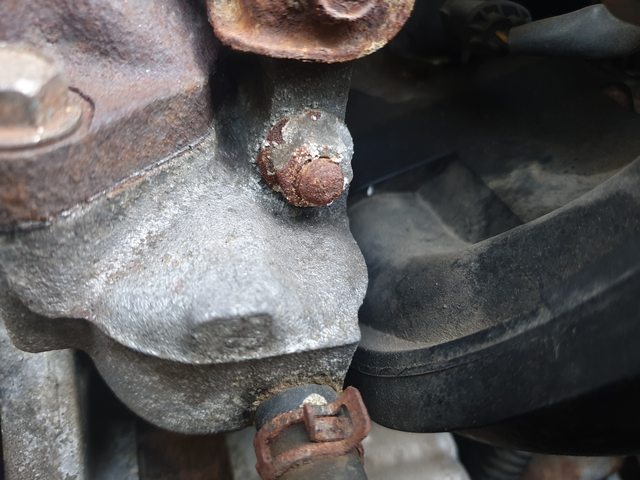
Then there are the two EGR studs, the nut came off this one, the other one isn't visible here
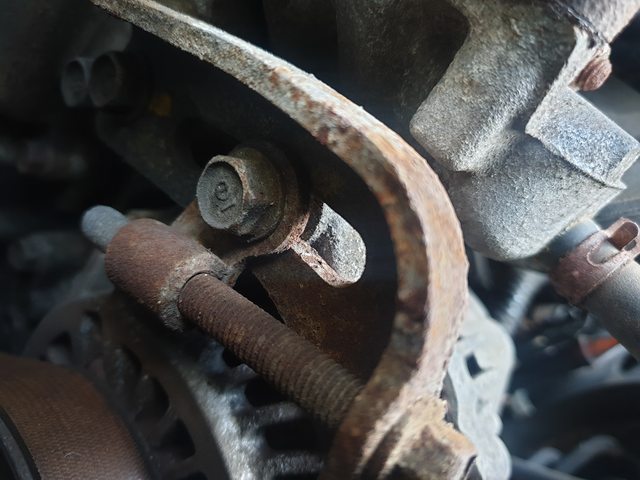
Then loosen the 3 bolts on this bracket to reduce the belt tension, no problems there.
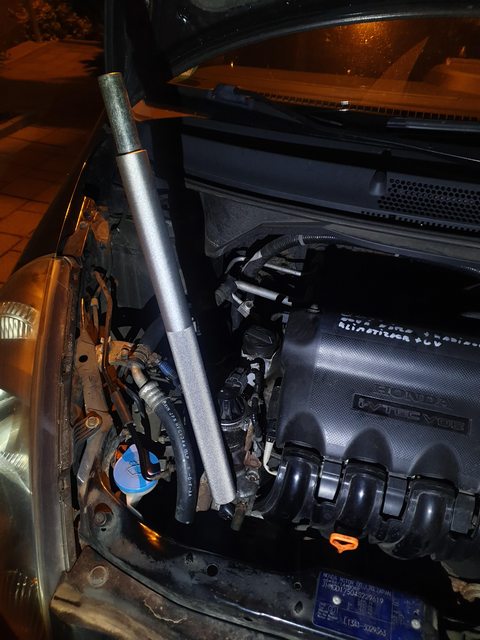
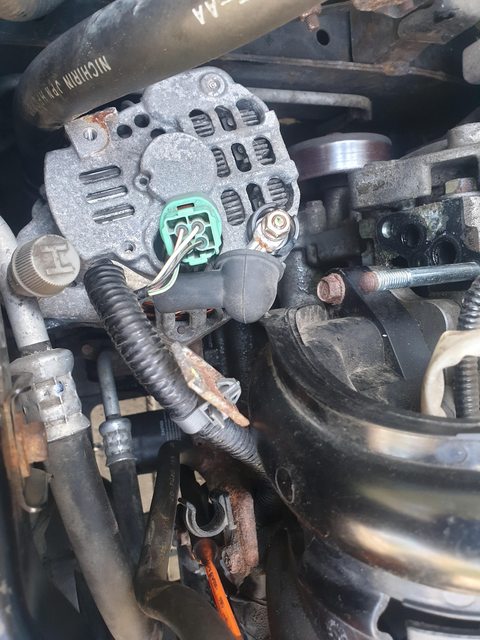
Here's how I moved the EGR valve out of the way without undoing any hoses or clamps. But the fun part is actually getting to the 12mm bolt on bottom of the alternator. It took a long extension, into a short extension, into a u-joint, into a 1/2->3/8th (?) adapter. into a 12mm socket threaded through the various hoses, while reaching with the left hand to guide the socket onto the bolt, but it thankfully came out without too much of a fight.
I suspect if it were any tighter, I would've had to remove the airbox to get a better angle on the u-joint, but thankfully that wasn't needed. It might also be possible to reach it form below, but I was parked on an incline so...
I removed the alternator bracket and belt, and after a lot of fighting with a prybar, the alternator came off its pivot point. It was then possible to rotate it enough to undo the connections.
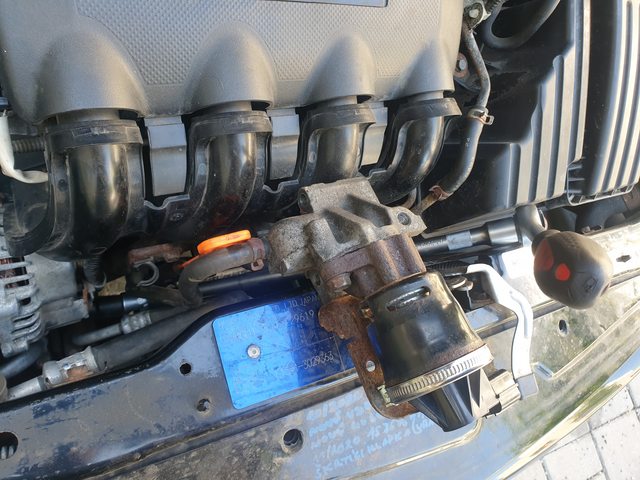
And here's the trick for getting it in/out without removing the intake manifold as the service manual suggest:
The AC hose needs to be tucked in behind the washer filler neck, and at least the bottom EGR stud needs to be removed. The top one is visible here and doesn't get in the way. Then installation is then the opposite of removal.
Tensioned the belt by just returning the tension bolt to the original position based on rust The belt itself had some cracking, and although I actually had a new one, I decided not to mess with it because it wasn't clear how I'd get the new one in properly since there was very little space to access all the other pulleys.
Well that's it. It started fine and without the battery light and then drove perfectly fine about 500km including at v-max on the autobahn, it was just extremely hot. Here are the remaining known issues:
EGR valve, probably potentiometer issue
Rear left brake, possibly stuck caliper or guide pins
Clicking sounds when making tight left-hand turns, possibly cv axle, but don't seem to get worse
A/C not working
Valve lash might need adjusting
Sometimes I wonder why I'm spending time on this car but it's not that much, and is kind of fun without the stress of actually messing something up on the miata.
It's too difficult to find the working promo codes for the Roblox Games and the useful information or tips regarding the Game. Now it's very easy, your all search ends here. On this webpage, snaptubevidmate you will get Lifting Simulator Codes.
Yep it sure is difficult finding a promo code for a stupid game I never heard or cared about. Get lost, dirty spammer!
Anyway.
Car's been fine, but the clicking sounds from the front axle when turning is starting to kind of bother me so I'll probably have to do something before it blows up. Thankfully the ouboard joints seem to be widely available and pretty cheap. 44014-SAB-N21
I also got a coupon to clean and recharge the AC after the last trip which was pretty hellish, but the tech said it's not pressurizing because of the busted condenser. Which, yeah, makes sense. So I have to either replace the condenser or let the coupon go to waste and I'll be damned if I let that happen. I'll probably have the parts Monday or Tuesday so will try to get that stuff installed after work. I'll also try to do the grille mesh mod because I wouldn't want my new $60 condenser destroyed, and might also try to polish the headlights since the bumper cover would be safely out of the way.
Well I ended up wasting that AC recharge coupon because I didn't have the time to get/install the condenser or diagnose any other possible leaks.
Otherwise the car's been doing well, I used it for some road trips when I didn't want to put the wear on the miata for boring highway miles. Saved some on fuel too, got 5.2l/100km vs the 7.2 which is the best I ever got in the miata.
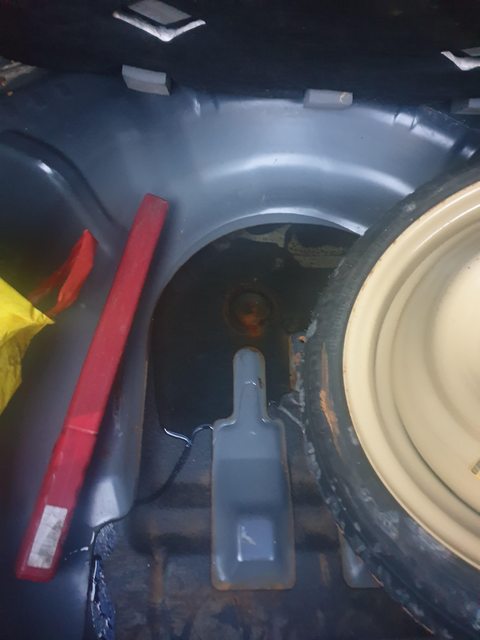
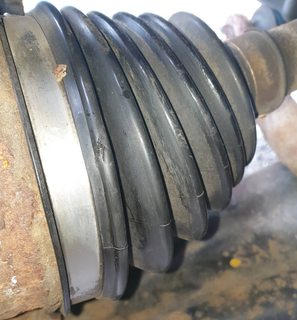
No leaks in the trunk so far. The CV boot ghetto fix is holding up fine.
That said there are still a bunch of issues, some of which I'll need to fix to get the car inspected. Like the rear left brake and EGR valve for emissions. Instead I got these parts off aliexpress!
I'll try to see if the PCV valve will fix the oil consumption issue. It's not a major issue but for a few bucks it's worth seeing if it works, because I don't think a car with 170k km should be using that much oil. And the hatch handle obviously because it's rusted and sticking. Not an issue for me but every time someone else closes it, I have to go and shut it properly again which is annoying. All in all like $15 shipped lol.
One new issue I discovered was the rear left brake. I took of the caliper and it seemed fine, hopefully cleaning everything and applying some grease fixed it. The car brakes fine but I'll need to make sure it works properly before the next inspection is due, so I'll get a rebuild kit if this didn't help.
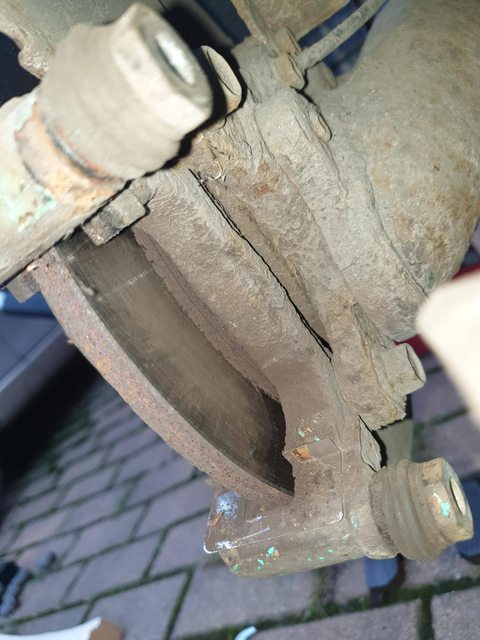
I'll need to get the car inspected by the end of the year so I tried to take care of this while it's not too cold and/or raining. The outside side still looked like this more or less, the inside was fine:
The bottom sliding pin was pretty stuck so I removed, cleaned and greased it as well as the pad hardware. Getting the new boot on was a pain in the ass but everything came together and the car brakes fine and straight without pulling. There was quite a big lip on the inside of the rotor and ideally should've been replaced I suppose but it'll work for now.
The EGR issue persists and continues to piss me off. I don't want to throw parts at it as I suspect it could be a wiring issue but the troubleshooting guides aren't particularly helpful since I don't have the Honda specific tools. It'll have to be fixed too though so I might just get a $20 junkyard EGR and see if that helps.
The EGR is finally fxied! I need to get the car inspected by the end of the month, and although I found a guy who'll get that done for a small fee, it's still better to actually resolve the issue. I also didn't want to just throw new parts at it as I thought it could be a wiring issue.
The original code was P0403 EGR Valve Circuit Malfunction, but as I was fixing it, I also had P0405, P0406 and P0409 at different times.
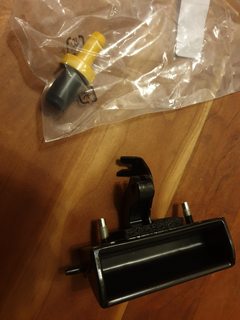
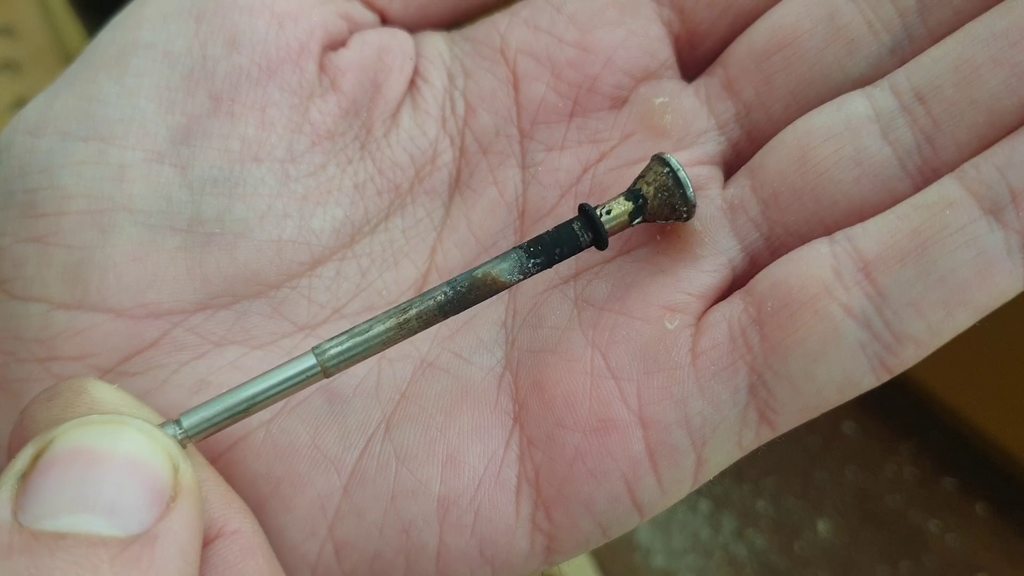
Basically, the initial problem was that the valve was completely seized. No amount of pulling or spraying carb cleanerdid anything, so I had to force it open and hammer the valve out. This process also broke the connection between the valve body and the cap/connector.
The actual reason this repair was still causing other codes is that it doesn't really go back together properly. Maybe because of the new wires I soldered getting in the way, so there was a 1-1.5mm gap or so between the cap and the body. This caused the potentiometer to read values outside the range the car expects. Unfortunately nothing would clearly state what the correct resistance was supposed to be. If you look through the troubleshootign steps, it will tell you to:
"Check the EGR VLS in the DATA LIST with the HDS. Is about 0.1 V or less indicated?" (DTC Troubleshooting: P0405 (12) (With ETCS))
Is this good or bad? What is the acceptable range under these conditions? You can kind of piece it together by going through several of these guides and all the steps, and it seems that with the ignition on and valve closed, the values at pin 3 (vale lift sensor) should be about >0.1v and <1.7v
I measured it with a multimeter at the connector, and got 2.35v, which is too high. Why is it too high? The 5v reference is at 5v and the potentiometer works well since I tested it when I opened the valve, so it's clearly measuring the valve position incorrectly. Well it's because the gap makes it think it's open by about 1-2mm. Duuuuh.
The valve lift sensor is basically just a voltage diver like this, except there's a pot instead of the two resistors. The ratio of the resistor values determines the ouput voltage:
The actual values were 2.73k and 2.46k, which if you plug into the formula results in 2.37v, or almost exactly what I measured. To get about 1.5v output, you'd need about 3.6k and 1.6k, instead.
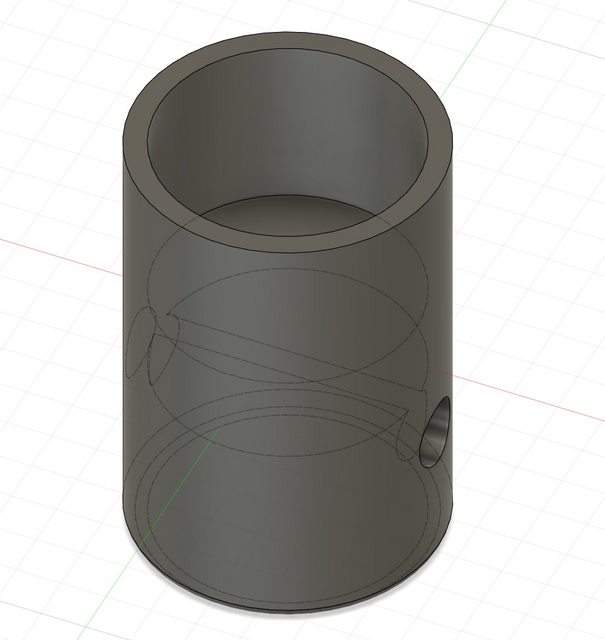
So I also measured that 1mm or pot/valve travel changes the resistance by about 400 ohms, so to get to my desired values I need to make up about 2mm of travel. I still couldn't get rid of the gap in the valve cap entirely, so instead I 3d printed a little spacer that went on the potentiometer and effectively lengthened the valve by 2mm.
Cleared the codes and after a short test drive P0409 came up I think. I checked under the hood and the hose clamp came off so I tightened it better and it's been code-free since.
tl;dr: Trying to fix a sealed EGR valve is in no way worth the time, but can be a fun learning exercise if you're into that sort of thing!
Small update. After fixing the EGR issue I went to do the mandatory tech inspection. I gave the guy some extra cash to make sure it passed but anyway he only had two issues to note: rear brake effectiveness and headlight level adjustment. I knew about the brakes and greased the sliders but the left rotors is rusted and probably below min thickness so that's something to look into. Headlight level is, eh whatever. Overall I'm pretty impressed for a 18 year old $600 car.
I did a long trip, almost 2000km of 50/50 highway and country roads. I filled the oil before leaving and, if the dipstick is roughly linear, lost about 0.2l of oil. I never really tracked the oil consumption but it felt worse than that. Maybe it is on shorter trips. Anyway that brings me to just over 10k km and due for a full oil/filter change.
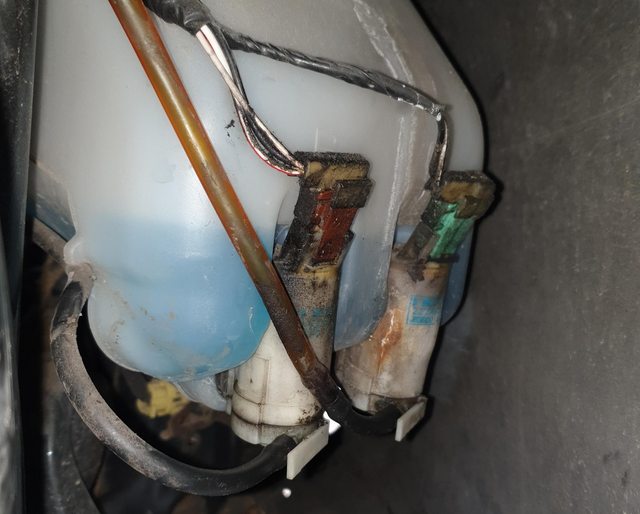
And, ooff, my front washer is dead apparently. No pumping sound, while the rear one works. Looks like Honda, in their infinite winsdom, used different pumps for front and rear so I can't just swap them out (maybe just swap the tubes and use the rear switch?). That's a bummer because the part looks impossible to find and is of course $$$ from the dealer. Does anyone know where I could find a compatible part, ideally in Europe or China? Looks like the part should be
Had some time to mess with the car a bit. Three things were on the agenda:
Oil change. Done. Unsurprisingly, the filter that I installed by hand came off easily with the wrench. Who couldv'e thought!
Replace liftgate handle. Was rusty and wouldn't release by itself, so you had to push it back by hand in order to lock the hatch. Let's say 90% done.
Fix washer pump Ehhh 50% done?
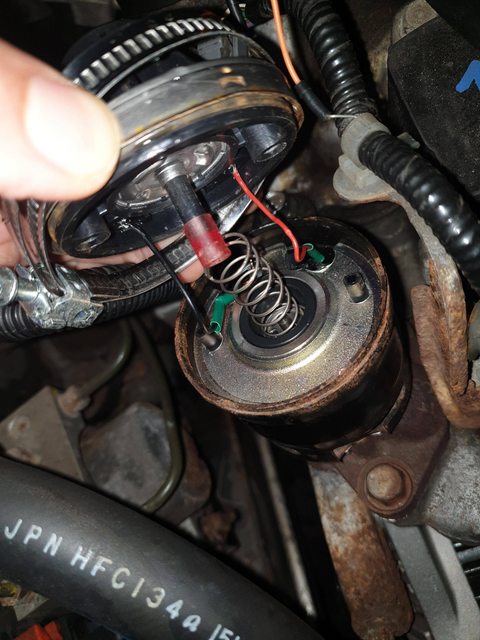
I wanted to first see what was actually the problem before running around to find a pump, which may or may not be even faulty. The pumps aren't accessible from under the hood, but it's not too difficult, just need to remove the fender liner (while breaking some clips of course) and they're right there.
I think that could be the problem right there! No idea how it could exlode like that. I'm pretty much running this blue winter fluid year-round because I don't use that much of it so it always lasts me into the summer.
Anyway, there's no fixing this so I'll need a new pump. Until then, I swapped the tubes, which were just long enough to make that possible. I now have to turn on the rear washer to spray the front windshield, and then manually turn on the front wipers :v:
It turned out to be impossible to find the exact part number, but there was this one on ebay that claims to be compatible. It's not exactly 1:1 match but might work. https://www.ebay.co.uk/itm/165416963...3ABFBM0rr77qJg
Replacing the liftgate handle went according to plan... mostly. The process is: 1. Remove rear wiper 2. Remove liftgate trim by just pulling it off 3. Push out all the clips and one bolt that's holding the panel 4. Replace hande.
The problem, it turned out, was the bolt in step 3. Other than the clips it's the only actual fastener holding this panel down and it's rusted to fuck. When removing it, I just hit it with the impact until it somehow broke free, but on reassembly there's no way to get it back in place. I didn't have a grinder or a saw with me today so the whole thing is just a bit loose on the left side for now :shurg:
Thank you for the detailed information about the EGR valve, struggling with the same issue now. Gonna try to pull out the pin and see how seized it is
Glad you're finding it useful! Post here if you have any questions, I spent way too much time screwing with it
Does anyone know or have the car in the state to check the washer pumps for the OD and connector? The ebay seller said that their part isn't compatible, so I need to eitehr get an new/junkyard OEM, or a universal one. Sadly there seems to be zero information online so I don't want to wait 3 weeks waiting for an aliexpress parts to discover it doesn't fit or requires an hour of messing under the car.
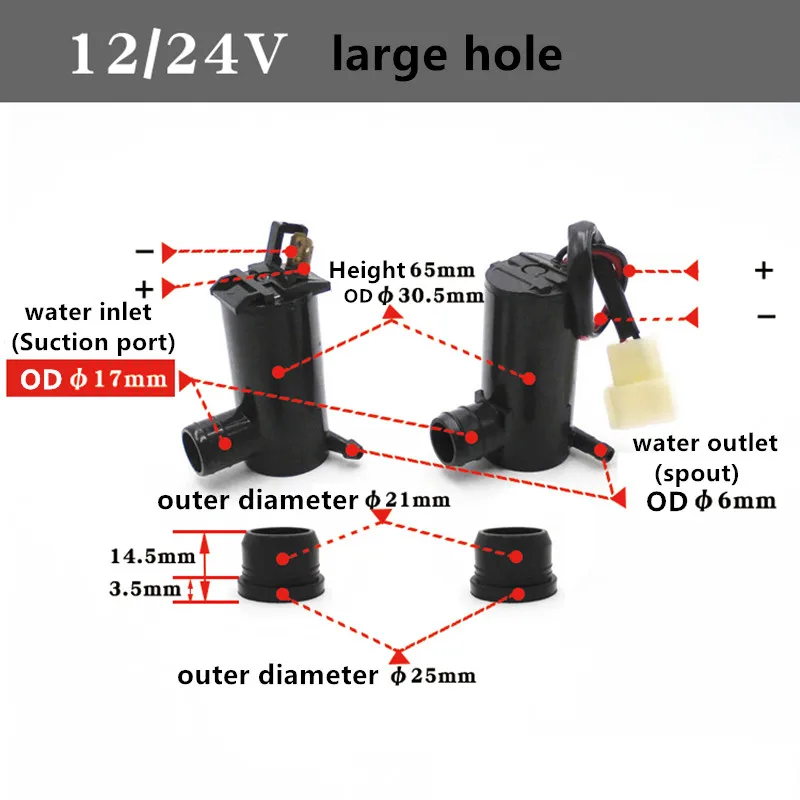
Most universal pumps look like this which seems like they should fit but I've no idea if they would and what kind of mods (if any) they would need.
Update: 15.5mm inlet diameter is what you want. This would've been way too large unless you want to enlarge the hole in the tank. See below.
Last edited by mobby_6kl; Sep 28, 2022 at 03:45 PM.
Well I ordered and already received a universal pump which looked the closet to what I have in the car. Seems like the intake and outputs are in the right place, though no idea if the connectors would even match, but worst case I'll just solder it together somehow. Who cares at this point
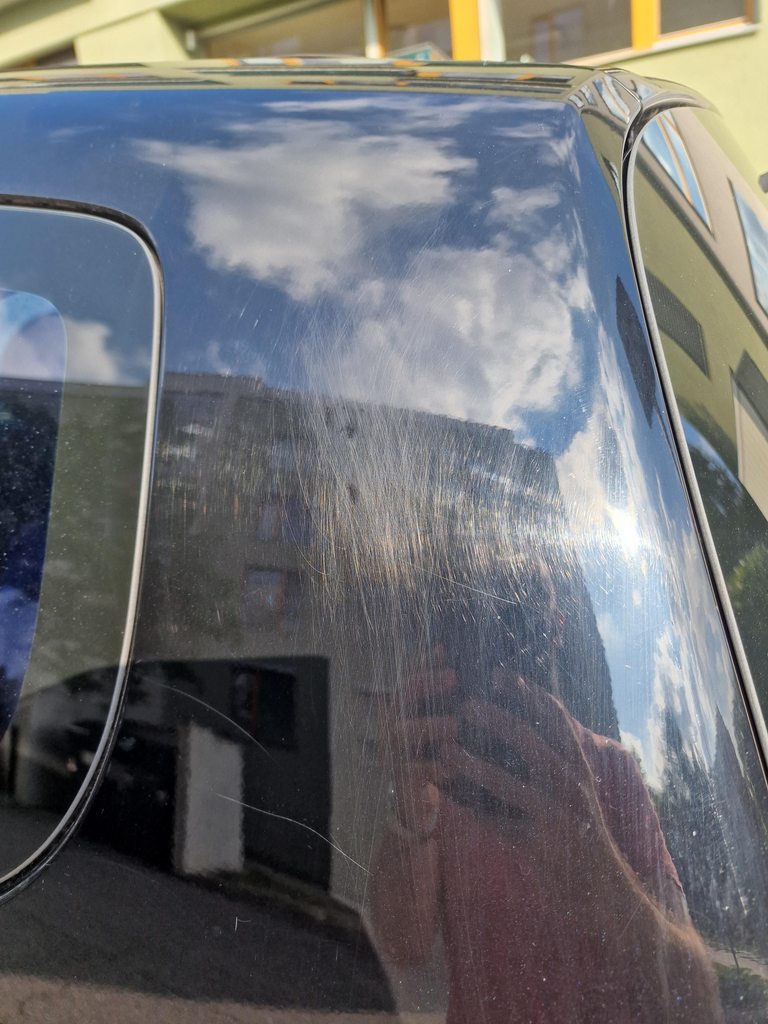
I didn't want to mess with it now since the car was parked on an incline but I had a bit of time to experiment with the cosmetics. It doesn't really matter for the beater (In fact the worse it looks, the better ) but if I were to sell it, cleaning it up would be a good idea. It's got a ton of stone chips and a decent number of scratches of various depths and general swirlies from 20 years of street parking and machine washing I assume.
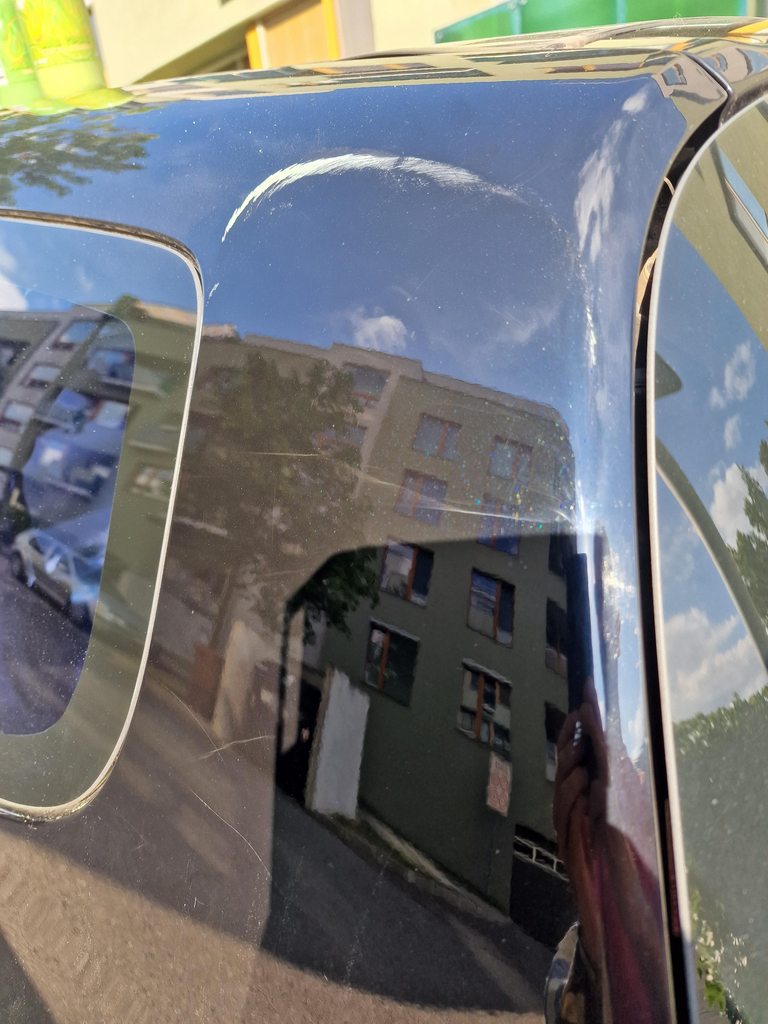
First there's this area on the D pillar, no idea how one gets scratches like that. Seems like someone had a go with pretty fine sandpaper and then just left it there. I had a go at it with a coarser and then finer compound on a foam pad. Took a quite a bit of polishing to get rid of the deeper scratches but it's good now.
It seemed to be also good for the "undamaged" paint, you can see where I stopped polishing near the top sun reflection. I eventually did a bit more of the panel but not too much as I used a cordless drill instead of a DA polisher.
You can see a bunch of other scratches on that panel as well but they were all quite a bit deeper so I left them be for now. The main thing I wanted to finish up were the stone chips. I cleaned and painted in most of the bigger holes a few days ago and now went to finish it.
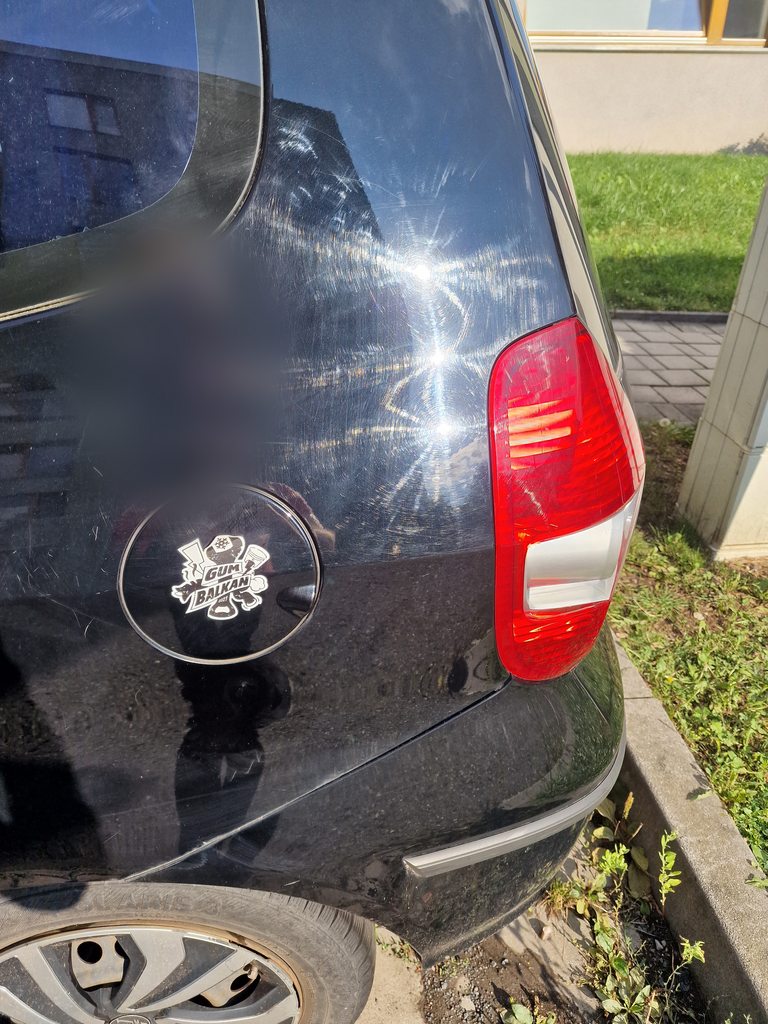
Here's a pretty big one. Looks relatively good but there's a clear low spot and a hole in the top left of the fill.
I probably should've tried to fill the low spot and holes with some more paint at that point, but I didn't want to wait again so I polished it to see how that looked. The little holes and the low spot is still visible of course, but more surprising, I thought that the edge of the chip wouldn't be visible any more. It felt completely smooth to me. And 2000 grit sandpaper isn't fine enough and a pain in the ass to buff out.
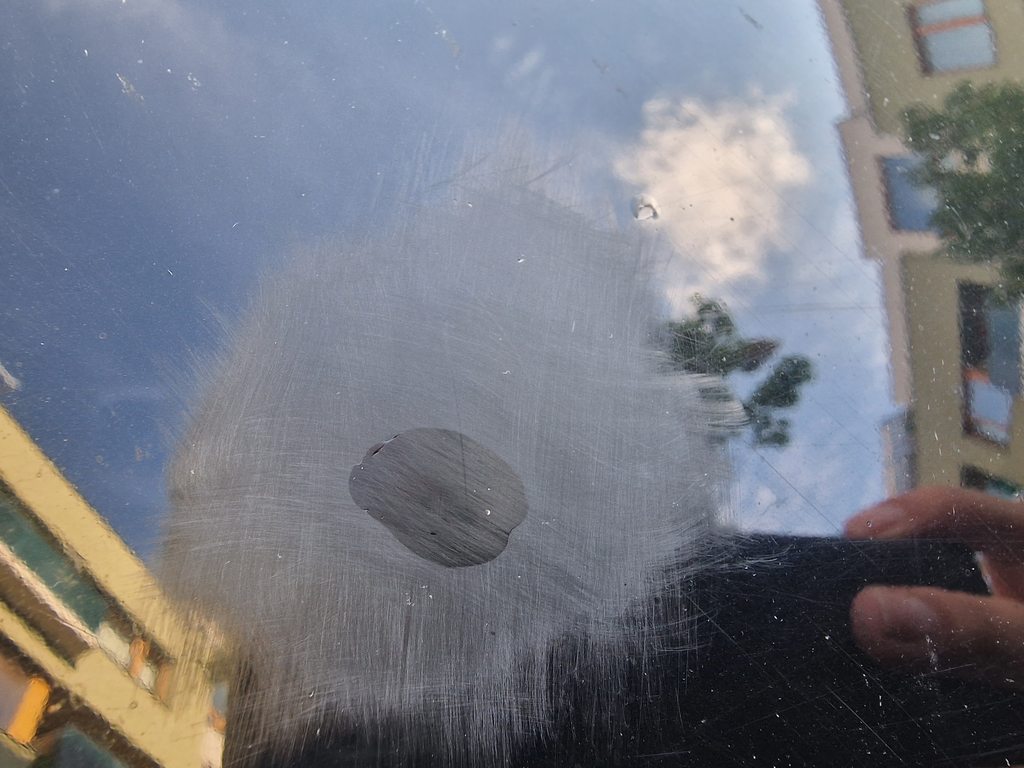
Here's another pretty big one. No idea what's the deal with the right side.
I think it's the same one, just rotated?
This type of repair is never going to be perfect of course, and it doesn't really matter on this car, but I'm curious if you could do better. Feels like there are very specific issues like the bubbles (?) and low spots that could be improved if I knew WTF I was doing. So if anyone has any suggestions, I'd be happy to test them out since there's no risk to messing it up more
Oh I think the battery is kind of toast. I never had issues starting it until I left the headlights on for maybe half an hour while having lunch. It was flat when I got back, that can't be good. That said after push-starting it, I never again had an issue. We'll see.
Last edited by mobby_6kl; Aug 21, 2022 at 03:00 PM.
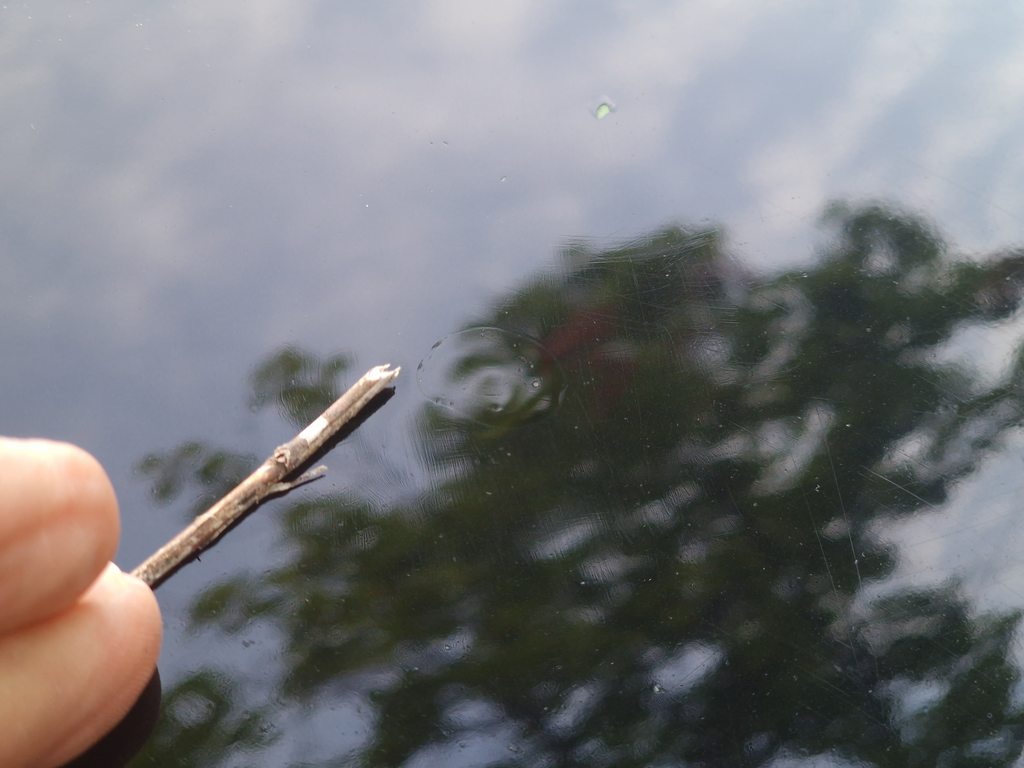
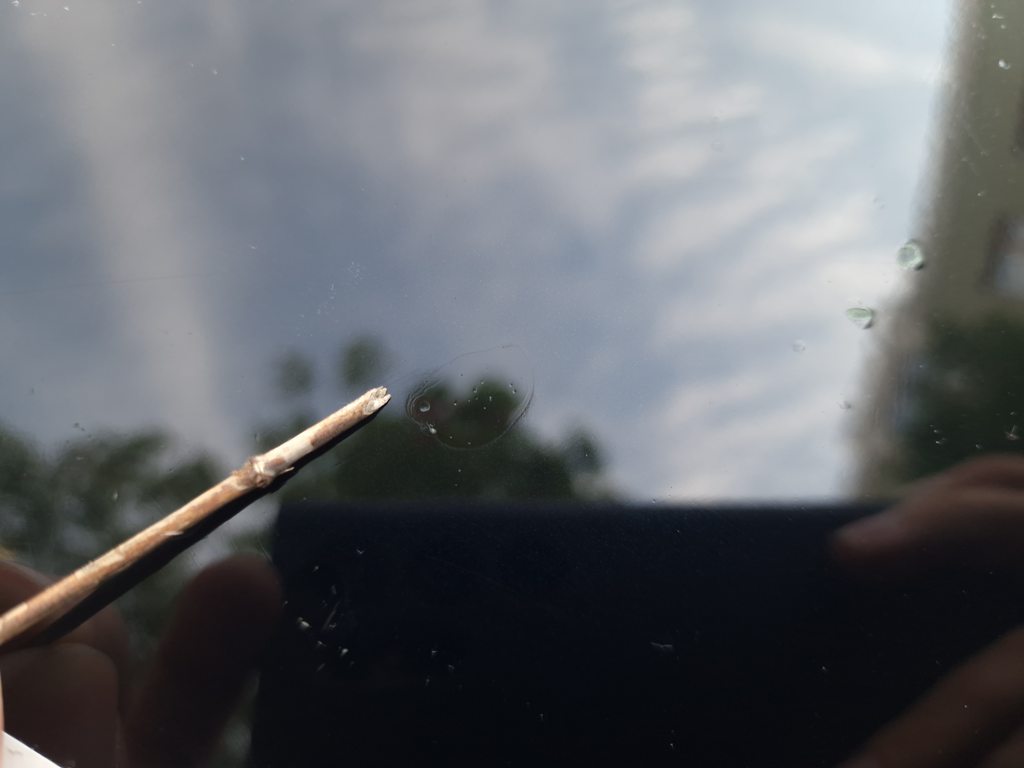
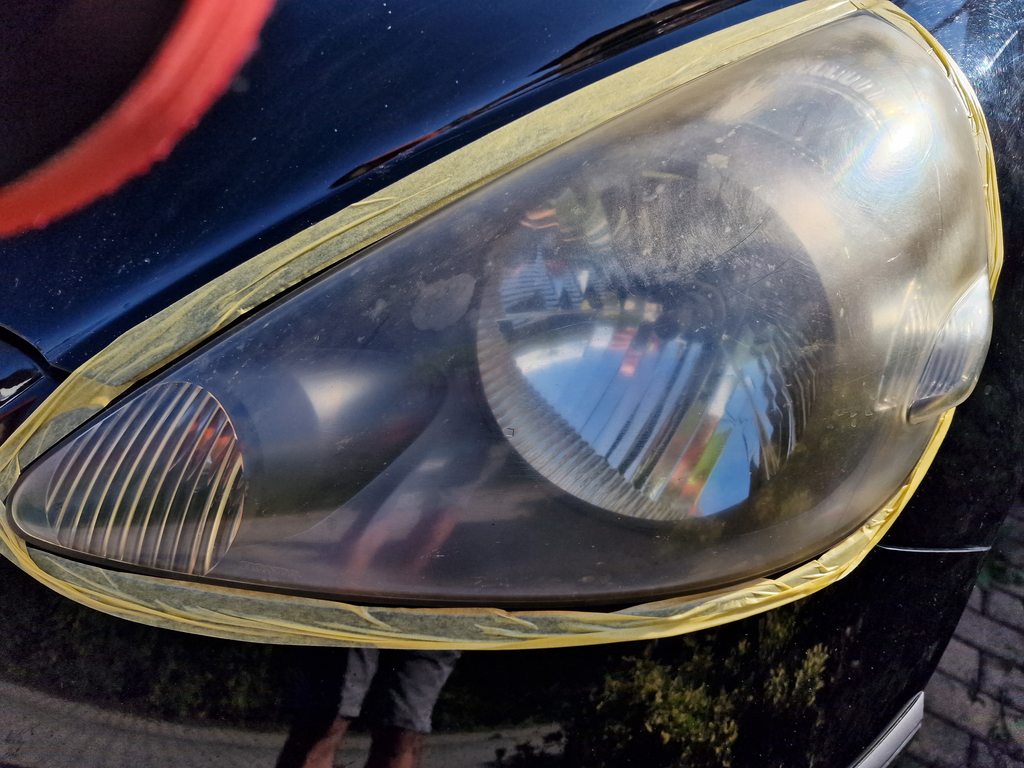
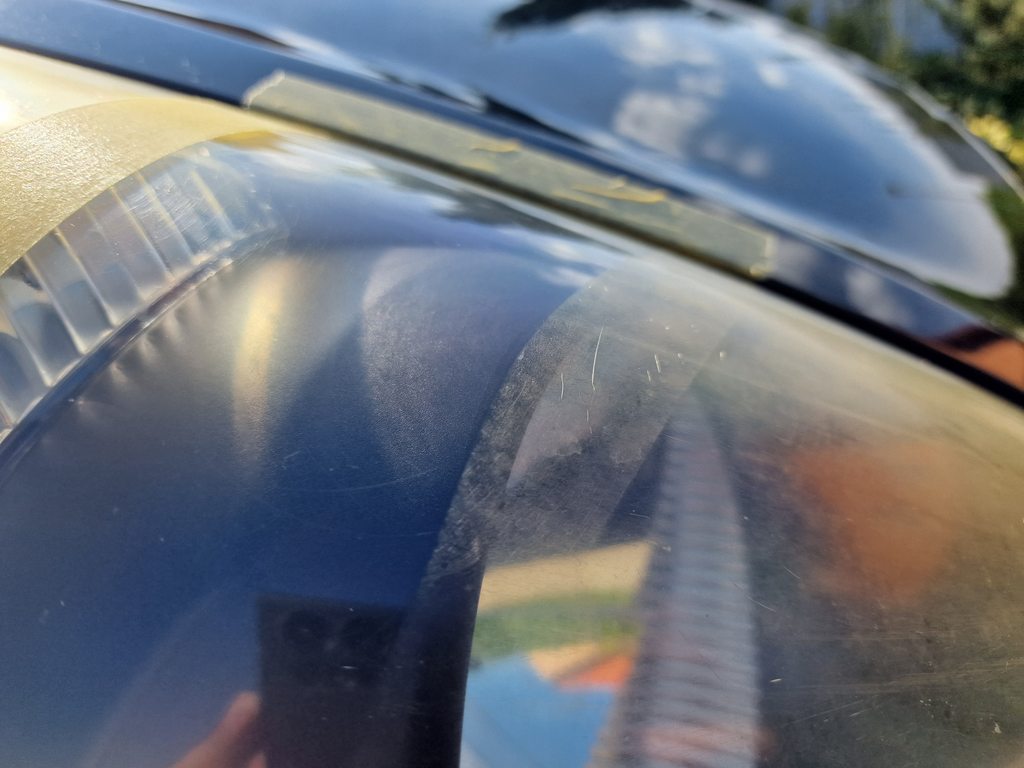
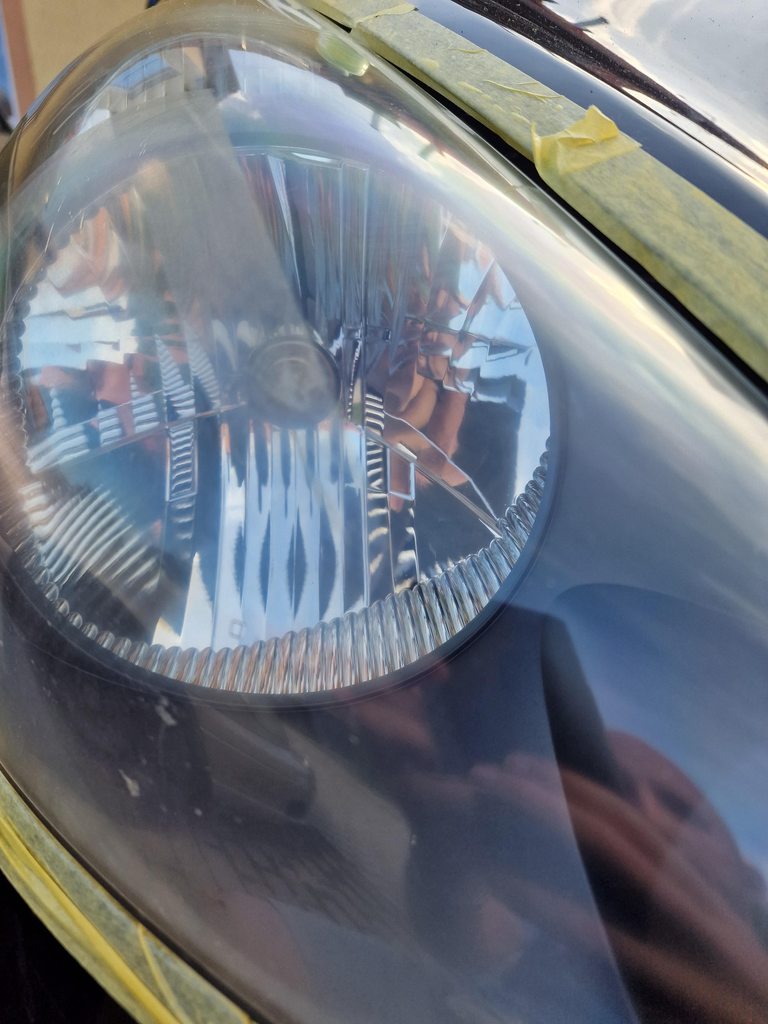
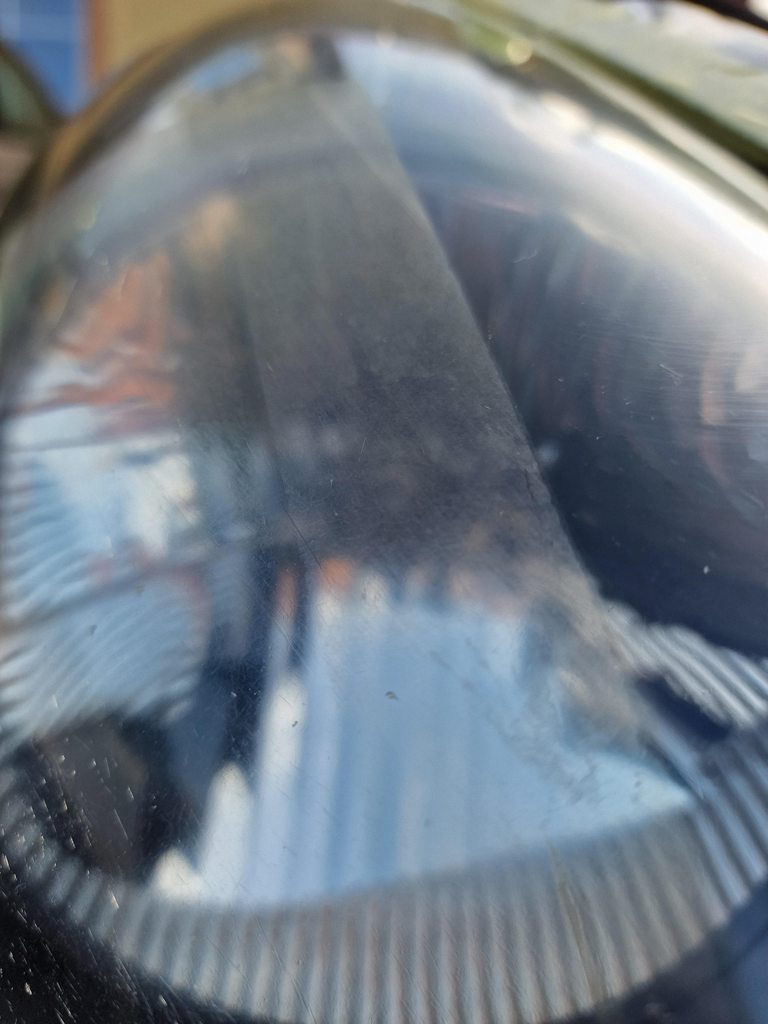
Also did the headlights. People generally suggest like 5 grades of sandpaper, then compounding and polishing with fancy stuff, but... some polishing paste on a kitchen sponge works perfectly fine for a 20 year old beater.
I did a test on an area that wouldn't impact the light output if I messed up
But it turned out pretty well. There's still some weird cracks and crap that seems to be on the inside but
Step 1: Compound with a literal dish sponge on a drill.
Step 2: There is no step 2.
Well it should probably be to apply some protective coating but I had none on hand. But since it takes literally just 5 minutes, I'll gladly do this again as needed.
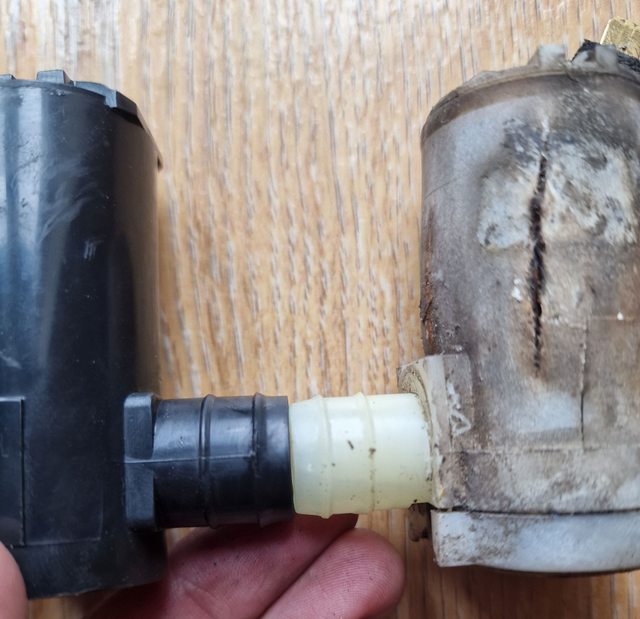
Today looked like it would be a reasonably nice day for the first and maybe last time in weeks so I took some time to replace the windshield washer. Since June I had the front and rear washer swapped because the pump somehow exploded, so to use it I had to turn on the rear wiper and then washer, while simultaneously also turning on the front wipers. Quite a pain in the ass, but I could get away with it during the summer.
I wasn't able to find any specs on the OEM pump so had to kind of wing it. The closest one I could find is this one, intended for various Hondas including the Civic 1988-2004. Close enough, right?
Update: Just got the old pump home and measured it. The OEM inlet diameter is 15.5mm. About 16.5 on the rib.
This aftermarket one works but isn't ideal
There were... some slight issues.
The connector is flipped, with the latch on the right side. Easy to rotate the cable, except it's just barely long enough
The diameter is juuust too large to fit with the original or supplied grommet thing, maybe by like 1mm. It might be possible to sand it down a little, or enlarge the hole in the tank to make it fit. Or use a ton of silicone instead. Or option D, lots of teflon tape, which is what I did because it was the quickest solution. Doesn't seem to be leaking.
What does seem to be leaking is the tube, which might've been damaged when I was taking it off. Just tiny little drops show up from somewhere. I wrapped it in the same tape because that's all I had but I doubt it'll help much. I'll fill it up and see how much is disappearing, probably not much.
Last edited by mobby_6kl; Sep 28, 2022 at 03:47 PM.
The HVAC controls had no backlight since I got the car. It's only three dials but very annoying because the order on the blower direction is different than in the Miata, so I always had to turn on the map light to see it in the dark. Very annoying.
It's #12 here on the part diagram. It's not clear what "Bulb, wedge" is, exactly, but someone here said it's supposed to be T5 / W1.2W /W3W / whatever, so I got these: https://www.aliexpress.com/item/1005003294293483.html
You have to undo the cables 14, 13 and 15 within the glove box and then pop the whole radio/HVAC panel out. I couldn't find where the purple cable goes (below) to unhook it so didn't take the radio out completely and left it hanging a bit. The bulbs are here as indicated, pretty difficult to reach through the available gaps:
Reinstalling them turned out to be a bigger pain in the ass since the little copper tabs apparently were a bit bent, so the plastic bulb holder just refuse to twist in. Ended up bending it with a screwdriver after struggling for like 10 minutes.
The original bulbs were probably more on the amber side, oops. Also not sure if the left one is working, might need to flip the polarity. Already much better anyway though. Or maybe the A/C bulb might be out (which is a different type) but A/C doesn't work anyway so that's ok.
Whoops, forgot to post an update about the two remaining bulbs.
For the A/C and defroster I later got these T3s: https://www.aliexpress.com/item/1005003663553780.html
They don't really fit. The LED is obviously larger than the bulb and the base platform is thinner so I had to file it and then hot glue them in place. I don't know if that's an issue with these specific T3s or they're supposed to be a different type completely.
I used red LEDs and they're very red as you can see. They're probably supposed to be amber or white.
In other news, at aroun 175,000km this happened.
It sounds pretty badass and apparently still quiet enough that I got away with driving like 600km for WRC Central European Rally without the German/Austrian cops giving me trouble, but I ordered a new muffler for like $40 anyway. Can't be very good for you.
In the meantime apparently the clicking sound on left turns fixed itself but now there's a quieter scratching/grinding noise at only very specific (left) steering angles and speeds. It's pretty bizarre and very difficult to track down. I've tried jacking up the wheels before and turning them by hand and there's nothing. I'm guessing something makes light cotact at only specific suspension geometries, I'm hoping it's just something dumb like the dust shield or something.
Glad you find it interesting! Who could've thought that my "project car" will end up being an ancient econobox. I've had my Miata for a decade but it really hasn't needed anything but oil, brakes and tires. And some body/paitn work that I don't want risk messing up. I'll probably do the timing belt and soft top this season though.
Anyway! I replaced all wipers, did an oil change, and finally replaced the muffler a while ago when it got warm enough to roll around on the ground. Didn't take many photos but as you can imagine everything was pretty rusty and I ended up having to cut off the bolts. First with a cutoff wheel where the line indicates:
This sent the spring flying into my goggles somehow, but the other side was still attached to the flange. So then I had to go to the store to buy a grinding wheel to take the remaining part off. Still, an angle grinder is like magic compared to praying that you can actually loosen the stuff. Everything else was easy, the cheapo muffler fit perfectly and easily slid onto the existing hangers. In retrospect the "hack" was probably to just cut off both flanges and join the tubes directly but I don't have a welder so ehhh.
(Un)fortunately while I was there I also noticed that the brake lines were getting pretty corroded. It's visible right at the top-center of the photo, the coating is missing from a section of the hard line and it's pretty badly rusted. Not something I'm particularly looking forward to dealing with, but better than, well, not having brakes. The rusty bits are I think these ones:
No way I'll be able to get the entire complete brake line so I'll probably have to cut it and make new ones myself. Gonna be a new adventure for sure.
After that I'll have to pass the mandatory tech inspection, but it should be fine. Everything else is in decent working order.
Edit: Does anyone know for sure what sizes are the brake lines and various fittings/nuts etc? The "best" info I found is a 15 year old post on honda-tech that says the lines are 3/16ths aka 4.75mm and fittings are 10x1mm, and the very first repy says it's not true for all Hondas and all lines/fittings
I'll try to crawl under the car and check it out/measure but it's all rusty as hell, so that might be inconclusive.
So far I ordered the hoses and a flaring kit as the plan is:
Probably repalce the brake hoses #3 and 4 in case they don't survive the removal/separation attempt
Cut off roughly the highlighted bits of lines
Try to use pre-made segments, seems like 150mm would be more then enough and those are dirt cheap. So I'd have to flare only the original line.
Or make my own connecting bit of line so I'd have to flare 3 ends. Which I've never done but suspect could be a pain in the ass with the cheap flaring kit.
Last edited by mobby_6kl; May 9, 2024 at 12:25 PM.
Between stuff being delayed in shipping (and having to order tools twice, see below) and not having the car at my place this took a while to get to this (just drove the Miata). I broke off the old line with a pair of pliers and then used a cutting tool (like the one in the kit below, though it wasn't in my set) to chop it off cleanly. The old fitting came out pretty easily after torching it and using a socket.
I've heard... bad things about this type of tool but it was usually focused on not getting the perfect flare consistently on first try and so on. So since I only had one line to flare, I thought this wouldn't be too bad, I could just do a couple attempts, nbd. The other tools I've seen is like two hundred dollars and requires a vise which isn't great when working under the car. But I never even got to be disappointed by the flares. Instead, it always just slipped on the line, no matter how I tightened it. I even used a wrench on the wingnuts to get more leverage but no dice. Gave up after like a dozen tries and having to chop off more and more line.
After some research, I tracked down this tool. It's around $40-50 so definitely more than the crappy $20 one, but not that much more, and still way cheaper than the $250 for the fancy one.
It's also way easiter to use. You just stick the tube in until it hits the dummy bolt, tighten it, and then thread in the flaring bolt/die. The built-in handle and using a ratchet is waaaay easier when on a car, and I got a perfectly fine flare on first try. I even forgot the lube. But I did notice some cut marks on the flare mating surface, probably from when I was removing insulation from the tube, so I cut it off and did another one. Only took a few minutes.
I didn't get a great photo of the flare but it looked good and doesn't leak so I'm considering that a success.
I bought a few of the pre-made brake lines (10, 15 and 20cm) since they were cheap and, without measuring anything, the 15cm one just fit perfeclty with what I had left. At first there was a small leak where the copper line joins to the rubber tube (right edge of this photo) but I just needed to tighten it a bit more.
It's a partial success only though because after bleeding the brakes, they're still almost useless. Nothing is leaking but I did all 4 wheels in the suggested order but that only helped a bit, there's maybe like 30% of the stopping power at the very bottom of pedal travel. Maybe there's still air in the lines, or in the master cylinder (as it probably got dry during this process). Unfortunately the car isn't at my home so dealing with this is a bit annoying, but that's the next thing that I'll try to deal with tomorrow.
All right I think it's done. Ended up bleeding the master cylinder and then re-bleeding all the wheels again. Uhg.
To bleed the master cylinder, you pretty much have to remove the battery, and although some of the cabling gets in the way, it's possible to leave everything in place even if it does limit the working space a bit. The fittings are thankfully the same 10x1mm as on the brake lines, so I was able to use one of the pre-made lines I bought with a piece of tube I had laying around. The process is actually pretty simple. Remove the existing brake line, attach your segment, then either bend it into the MC reservoir, or attach a piece of tube and dunk that inside. Then just pump until the bubbles stop.
Both my brake line and tube were too short and weren't submerged in fluid so my first attempt (and several subsequent ones) didn't go well. You can see bubbles coming out, but when I released the pedal, it sucked some of the air back in. It's not really possible to tell how far back the air goes in, maybe eventually it would all bubble out but who knows.
I wasn't going to go searching for a longer tube so I filled the reservoir to the brim and used the brake line bender thing to force the tube under the surface. Waiting for a few seconds with the pedal fully depressed seemed to help the bubbles rise to the top of the line. This did the trick, now some of the bubbles seemed to go back inside, but I did a few cycles and eventually everything came out so I couldn't see any air moving any more.
I repeated this for the second output (which was was more difficult to undo, but seemed to have fewer bubbles) and then re-bled each caliper. Front-left seemed to have some bubbles as did rear-right. Also, what a pain in the ass are the rear bleeders. There's literally just enough space to stick in a wrench and rotate it like 20 degrees, but that's thankfully enough to get the job done. Brakes now work fine. There's a bit of a softer part at the top of the pedal travel but that's probably how it was before too. It'll lock up the brakes if you push more.
Update: after driving it around on the streets a bit, I'd say it's now as good, if not better than it was before, if I may say so myself. Not sure if it was triggering ABS a few times or what but it feels that the softer free play part is smaller and brakes engage firmer. No way to compare directly now of course. Fluid level is staying the same, so that's good.
Last edited by mobby_6kl; May 27, 2024 at 01:43 PM.
You weren't kidding about the T3 LEDs not fitting, they weren't going in without some real bodging so I gave them a pass and just got my HVAC stuff lit again, which is what I really wanted working again anyways. If I care in the future I'll do some more digging to see if I can find T3 replacements that fit.


 The belt itself had some cracking, and although I actually had a new one, I decided not to mess with it because it wasn't clear how I'd get the new one in properly since there was very little space to access all the other pulleys.
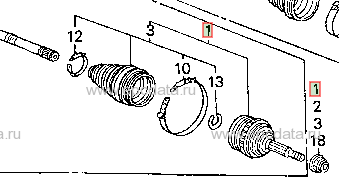


 ) but if I were to sell it, cleaning it up would be a good idea. It's got a ton of stone chips and a decent number of scratches of various depths and general swirlies from 20 years of street parking and machine washing I assume.