
New LeMons/Banger project: fixin' codes, liftin' rides


Thread Starter
|
Member
Joined: Jan 2021
Posts: 297
From: EU
New LeMons/Banger project: fixin' codes, liftin' rides
Hey everyone!
I just discovered that there is going to be a local Banger-type rally in about two months, and since covid makes most other types of fun impossible, I jumped on it immediately. I only had a Miata for my daily driver, and while I'm sure it would do a great job at it, I didn't really want to risk anything happening to it (I do that enough on daily basis). So instead I was looking for something that was cheap to buy and run, light, and reasonably reliable. Basically a Japanese econobox. I also didn't want it to be too crappy to drive outside the rally, so it could also be my backup while the Miata has some rust repair done this winter.
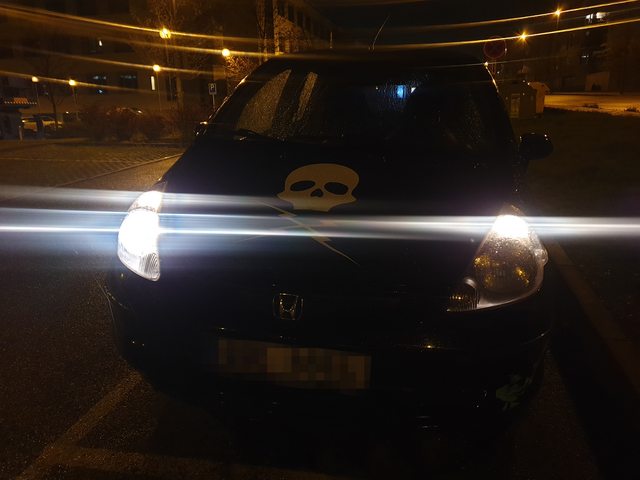
Enter my new 2004 1.3l of fury:
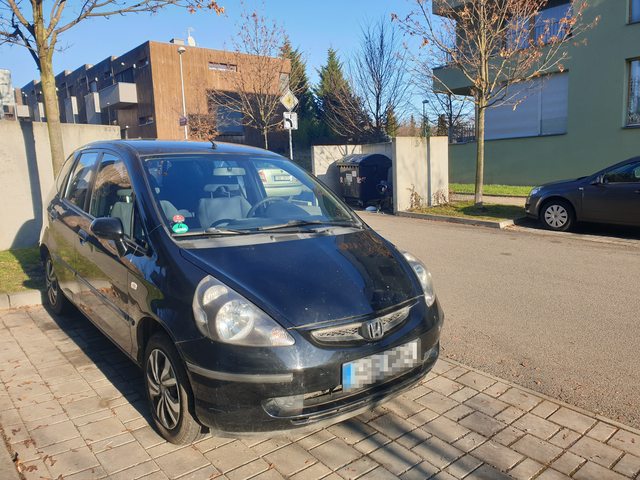
With about 100k miles, it's in pretty good shape for about $600, other than some known issues which allowed me to negotiate on the price:
Number 1 is fixed already, in fact thanks to another thread on this forum. The green/yellow 5V wire was cut clean, as everyone's been saying. I already stripped the insulation in this photo, then soldered it back together and that fixed it.
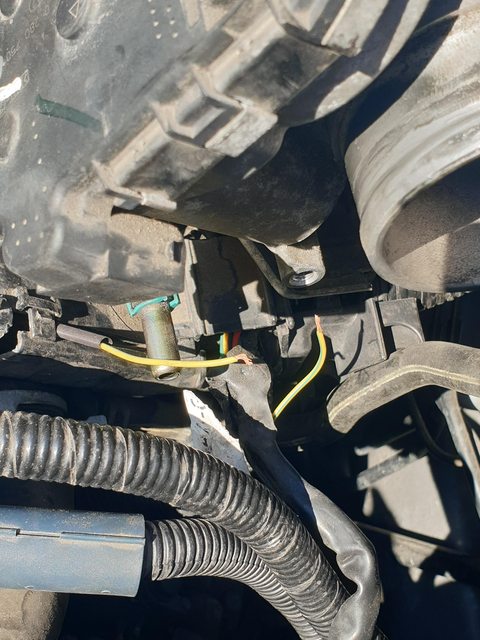
The previous owner couldn't believe his service guy missed it. I guess he didn't visit this forum
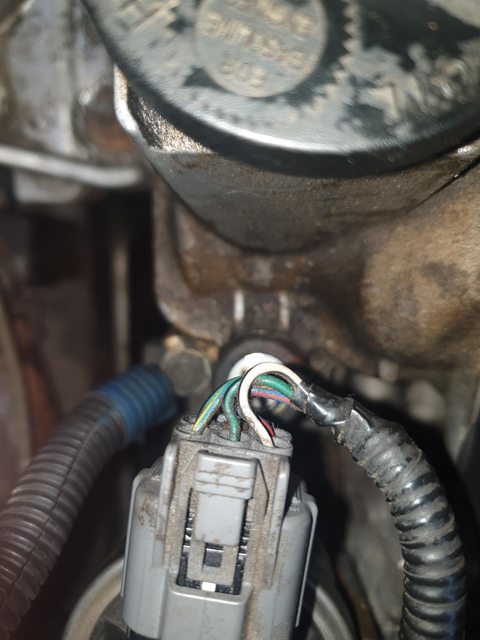
Number 2 I'm working on. The wiring color doesn't seem to match anything I've found on the forums or in diagrams. If anyone could point me to the right document or explain what's supposed to do what, I'd really appreciate it.
Still, by sticking my multimeter into the connector, it seems that Pin 4 is +12V, and Pin 6 is GND. Applying this voltage with a power supply, it draws about 1.5 amps but doesn't do anything, so it might be stuck. It didn't look too dirty, but I'll give cleaning a shot when it's not raining and/or snowing for at least 5 minutes.
Number 3 I'm planning on ignoring until after the rally. Hopefully it's just the pilot bearing, but even if not, a junkyard tranny wouldn't be too expensive/difficult.
I noticed a few other mior issues like the rear window defroster that doesn't seem to be working, driver's seat rocking a bit on the mounts, and no backlight on HVAC controls, but nothing to worry about. So I'm going to focus on preparing it for the rally, in order of importance: . After the rally, which I'm sure it'll survive just fine, I'm thinking of transitioning it into a more LeMons style endurance racer. Unfortunately the 1.3 is legit pretty slow, not like the 1.5 which is more like "slow car-fast", but I'm sure there are ways to deal with that. Anyway, hopefully this thread would also be useful for others with similar issues.
I just discovered that there is going to be a local Banger-type rally in about two months, and since covid makes most other types of fun impossible, I jumped on it immediately. I only had a Miata for my daily driver, and while I'm sure it would do a great job at it, I didn't really want to risk anything happening to it (I do that enough on daily basis). So instead I was looking for something that was cheap to buy and run, light, and reasonably reliable. Basically a Japanese econobox. I also didn't want it to be too crappy to drive outside the rally, so it could also be my backup while the Miata has some rust repair done this winter.
Enter my new 2004 1.3l of fury:
With about 100k miles, it's in pretty good shape for about $600, other than some known issues which allowed me to negotiate on the price:
- Rough idle and limp mode, codes P0122, P0221, and P0638.
- P0403 EGR control circuit
- Some clutch/imput shaft noise when cold
Number 1 is fixed already, in fact thanks to another thread on this forum. The green/yellow 5V wire was cut clean, as everyone's been saying. I already stripped the insulation in this photo, then soldered it back together and that fixed it.
The previous owner couldn't believe his service guy missed it. I guess he didn't visit this forum
Number 2 I'm working on. The wiring color doesn't seem to match anything I've found on the forums or in diagrams. If anyone could point me to the right document or explain what's supposed to do what, I'd really appreciate it.
Still, by sticking my multimeter into the connector, it seems that Pin 4 is +12V, and Pin 6 is GND. Applying this voltage with a power supply, it draws about 1.5 amps but doesn't do anything, so it might be stuck. It didn't look too dirty, but I'll give cleaning a shot when it's not raining and/or snowing for at least 5 minutes.
Number 3 I'm planning on ignoring until after the rally. Hopefully it's just the pilot bearing, but even if not, a junkyard tranny wouldn't be too expensive/difficult.
I noticed a few other mior issues like the rear window defroster that doesn't seem to be working, driver's seat rocking a bit on the mounts, and no backlight on HVAC controls, but nothing to worry about. So I'm going to focus on preparing it for the rally, in order of importance:
- Retrofit an aux input!
- Come up with a cool theme
- Lift by about 30mm
- Figure our the roof rack situation
- Fabricate a skid plate
. After the rally, which I'm sure it'll survive just fine, I'm thinking of transitioning it into a more LeMons style endurance racer. Unfortunately the 1.3 is legit pretty slow, not like the 1.5 which is more like "slow car-fast", but I'm sure there are ways to deal with that. Anyway, hopefully this thread would also be useful for others with similar issues.
Thread Starter
|
Member
Joined: Jan 2021
Posts: 297
From: EU
Thanks! Here's a quick one.
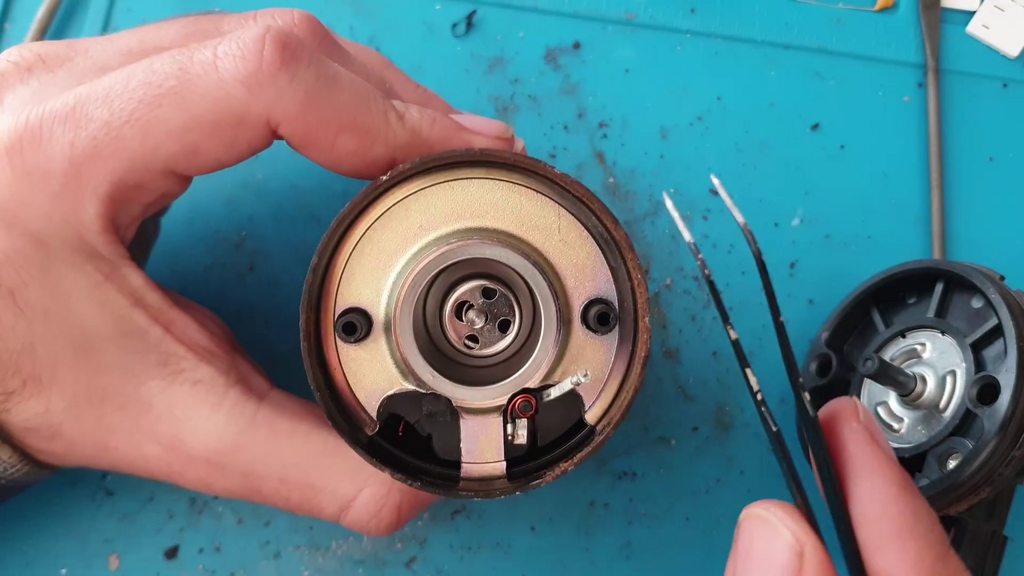
For the EGR valve, I cleaned it with some carb cleaner and brush but it still won't open. Based on some videos, it should be possible to manually pull the plunger out with pliers, but mine wouldn't come out, the pliers just slip off every time before it would move. If 12v is really all it takes normally to open, it's probably well stuck and the coil can't push it through. It looks like it's not suppsoed to be opened for repair, but if it's already dead, I can't really make it any worse, can I?
So on to mods, this'll be kind of my to-do list:
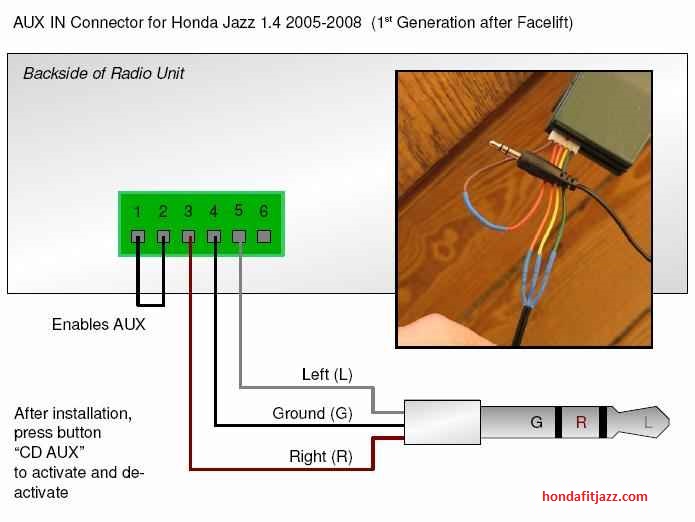
1. Retrofit an aux input!
Ok should be easy enough based on this this diagram I found. Mine is pre-facelift but the stereo looks identical so hopefully it'll work.
I had all the necessary junk in a drawer (of course) so the jumper and cable are ready. It was getting dark by the time I got the HVAC cover off so I'll do the install later.
 .
.
2. Come up with a cool theme
Since it's already black I though about doing dazzle camouflage but that would involve too much actual work, which is the opposite of what is needed. So I think I'll go with the "ironic tough" look based on the Death Proof Nova:

I already 3D printed and painted the Convoy duck, just need to reliably attach it to the car, then get some vinyl and make the sticker. Whether or not that'll be cool is up to debate.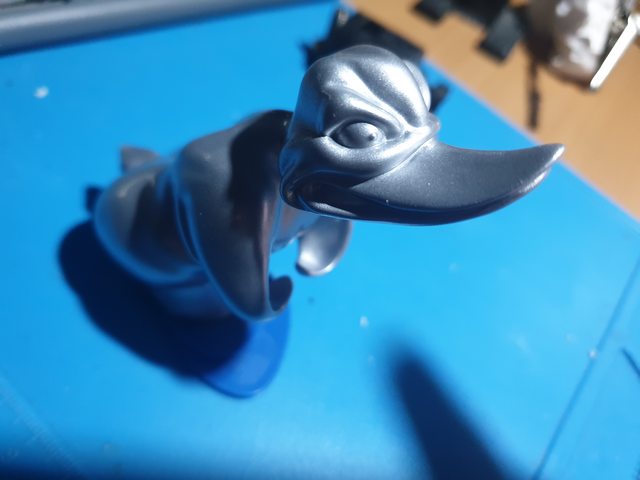
3. Lift by about 30mm
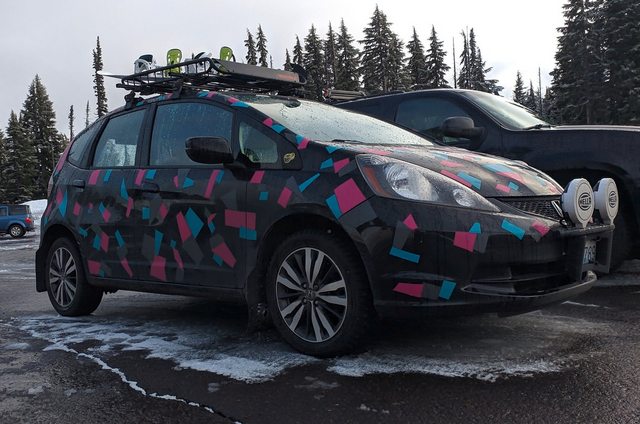
Found a few threads on this forum that discuss lifting the Fit. Here's someone's car which looks almost exactly like what I need to end up with:
As far as I can tell, the options are:
* Insight rear springs. Which isn't really an option because they pretty much don't exist here
* Spacers that go on top of strut tower (front), ordered from Russia (Tema4x4)
* Spacers that go on top of springs
* Inserts that go into the springs
* Airbags
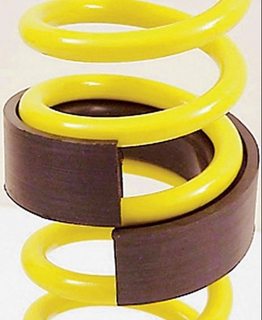
I'm tending towards the inserts, since they're the cheapest, most universal, and least intrusive. Is there any reason not to use this method? Seems that unlike the spacers, these would reduce the range of motion, but I'll only really need this for a week or so, so some sacrifices in comfort or handling are ok. Unfortunately I have no intuition whatsoever as to what it'll do.
4. Figure our the roof rack situation
As far as I could tell, there's nothing on these cars to accomodate a roof rack, so evenually I found this universal one that clamps to the frame on our craigslist equivalent. Of course after I got back, another one popped up for $10 less and much closer, but at least I already have it.
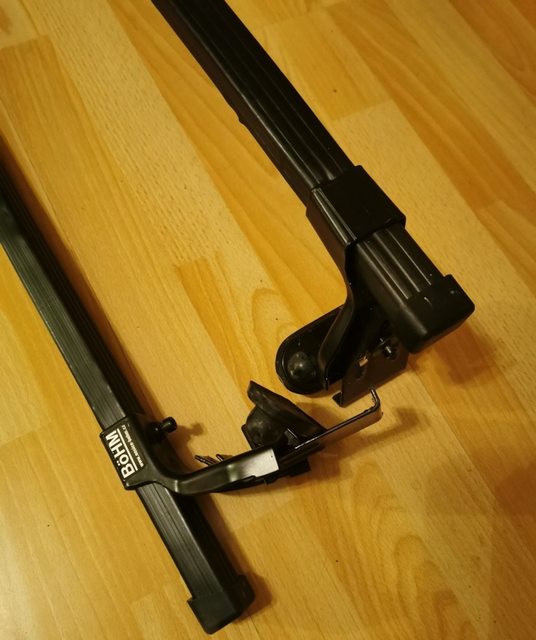
Still need the basket to hold the extra wheels, gas cans, and other crap.
5. Fabricate a skid plate
Haven't really looked into this yet. Since I don't have a shop, this would be more like "get someone to fabricate a skid plate" and that might be $$$ so we'll see.
For the EGR valve, I cleaned it with some carb cleaner and brush but it still won't open. Based on some videos, it should be possible to manually pull the plunger out with pliers, but mine wouldn't come out, the pliers just slip off every time before it would move. If 12v is really all it takes normally to open, it's probably well stuck and the coil can't push it through. It looks like it's not suppsoed to be opened for repair, but if it's already dead, I can't really make it any worse, can I?
So on to mods, this'll be kind of my to-do list:
1. Retrofit an aux input!
Ok should be easy enough based on this this diagram I found. Mine is pre-facelift but the stereo looks identical so hopefully it'll work.
I had all the necessary junk in a drawer (of course) so the jumper and cable are ready. It was getting dark by the time I got the HVAC cover off so I'll do the install later.
.2. Come up with a cool theme
Since it's already black I though about doing dazzle camouflage but that would involve too much actual work, which is the opposite of what is needed. So I think I'll go with the "ironic tough" look based on the Death Proof Nova:
I already 3D printed and painted the Convoy duck, just need to reliably attach it to the car, then get some vinyl and make the sticker. Whether or not that'll be cool is up to debate.
3. Lift by about 30mm
Found a few threads on this forum that discuss lifting the Fit. Here's someone's car which looks almost exactly like what I need to end up with:
As far as I can tell, the options are:
* Insight rear springs. Which isn't really an option because they pretty much don't exist here
* Spacers that go on top of strut tower (front), ordered from Russia (Tema4x4)
* Spacers that go on top of springs
* Inserts that go into the springs
* Airbags
I'm tending towards the inserts, since they're the cheapest, most universal, and least intrusive. Is there any reason not to use this method? Seems that unlike the spacers, these would reduce the range of motion, but I'll only really need this for a week or so, so some sacrifices in comfort or handling are ok. Unfortunately I have no intuition whatsoever as to what it'll do.
4. Figure our the roof rack situation
As far as I could tell, there's nothing on these cars to accomodate a roof rack, so evenually I found this universal one that clamps to the frame on our craigslist equivalent. Of course after I got back, another one popped up for $10 less and much closer, but at least I already have it.
Still need the basket to hold the extra wheels, gas cans, and other crap.
5. Fabricate a skid plate
Haven't really looked into this yet. Since I don't have a shop, this would be more like "get someone to fabricate a skid plate" and that might be $$$ so we'll see.
Thread Starter
|
Member
Joined: Jan 2021
Posts: 297
From: EU
Not much of an update, it's cold as hell so I don't want to freeze my ass off outside if I don't have to. That said, does anyone know if there's a relay for the rear defroster/defogger on the 2004 models? And where is it? This issue is quite annoying now. The wiring diagram in my book says yes, this one online says no: Wiring Diagram
Didn't finish the aux input installation as the radio is pretty well stuck there and for the above reason. I'm rethinking to also change it for bluetooth instead of cable since I have one of those $2 ebay adapters somewhere.
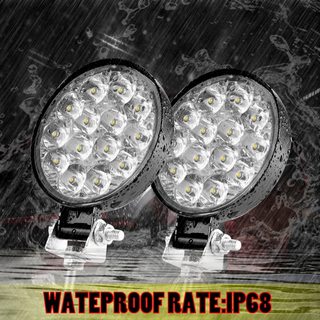
Ordered these lights for my offroad cosplay look, $10 shipped. I was going to get a more proper light bar but at like >$40 for even an ebay one that's more than I want to spend on what's probably going to be a gimmick.
Regarding the skid plate, I was on the internet and I found this:

Hmm. There's actually a yield sign laying on the ground about 1km down the road from me so I might use that if it's still there at night. Otherewise there's this thread: https://www.fitfreak.net/forums/2nd-...ump-guard.html good enough for my purpose.
Didn't finish the aux input installation as the radio is pretty well stuck there and for the above reason. I'm rethinking to also change it for bluetooth instead of cable since I have one of those $2 ebay adapters somewhere.
Ordered these lights for my offroad cosplay look, $10 shipped. I was going to get a more proper light bar but at like >$40 for even an ebay one that's more than I want to spend on what's probably going to be a gimmick.
Regarding the skid plate, I was on the internet and I found this:
Hmm. There's actually a yield sign laying on the ground about 1km down the road from me so I might use that if it's still there at night. Otherewise there's this thread: https://www.fitfreak.net/forums/2nd-...ump-guard.html good enough for my purpose.

Member
Joined: Jan 2011
Posts: 397
From: Omaha, NE

I recommend opening the fuse box located behind the coin tray near the steering wheel. There should be a relay for it, and it should be labeled. Check out this page: https://fusesdiagram.com/honda/fuses...-jazz-fit.html
Thread Starter
|
Member
Joined: Jan 2021
Posts: 297
From: EU
I recommend opening the fuse box located behind the coin tray near the steering wheel. There should be a relay for it, and it should be labeled. Check out this page: https://fusesdiagram.com/honda/fuses...-jazz-fit.html
Looking closely at the elements, every single row has an area of this brighter color, always near the edges. Really weird but I guess this could be some kind of damage. Didn't check further as there's window tint applied so I couldn't get to the strips without damaging something.
I ordered a set of front and rear spacers from Tema4x4, they seem to be the only ones making them for theses cars (not surprising really, how many people would do this). Shiping from Russia cost almsot as much as the spacers but even so I doubt I could get something fabricated locally for less. They're already in the Netherlands apparently so if I get them within a week or two I should have plenty time to install them. Not looking forward to deaing with all the rusty bolts while it's snowing on me.
https://www.aliexpress.com/item/4000...21094c4dBL9yJS
Another nice surprise were these lights, just over two weeks from China. They're 10W each instead of 42W like claimed, but it's not my first rodeo so I already mentally divided the rated number. I thought i'll mount them on the roof track, but since they're pretty small and light, I'll try to see if I can get them mounted directly through the front grille, maybe adding some sort of plates on either side to protect the plastic.
Any ideas for wiring? I looked at the foglight kit and while it would be nice to reuse the existing wiring, it seems like it would require several harnesses, relays, and other stuff that I don't care for. So I'm thinking of just hooking it up to the battery though a switch that I'll just stick somewhere inside. I don't intend to daily it with these lights so that's about as much effort as is appropriate.
Thread Starter
|
Member
Joined: Jan 2021
Posts: 297
From: EU
Yeah the're pulling like 700mA each only. There was a 16A switch in my junk drawer so that's a good start. It looks like the weather should finally cooperate on Thursday so I'll try to figure out where to mount them, and then sort out the wiring.
In the meantime, I did something I could inside the car - just installed a LED in the trunk. Not exactly useful for the purpose but nice for daily driving in the meantime. I stuck the wires through the driver side seatbelt hole, fished it out at the strut mount hatch, and finally pushed it to the stock lamp housing. The strip is glued to the cargo cover and can be disconnected if I need to remove it.
In the meantime, I did something I could inside the car - just installed a LED in the trunk. Not exactly useful for the purpose but nice for daily driving in the meantime. I stuck the wires through the driver side seatbelt hole, fished it out at the strut mount hatch, and finally pushed it to the stock lamp housing. The strip is glued to the cargo cover and can be disconnected if I need to remove it.
Thread Starter
|
Member
Joined: Jan 2021
Posts: 297
From: EU
Thing's been slow as the event was canceled due to covid lockdowns so there was no reason to work on the car outside in the freezing weather.
Before the cancellation though I did manage to ruin something in the suspension when trying to install the lift kit The top sway bar link just wouldn't come off, the nut turns with a lot of initial resistance, but then doesn't actually move on the stud, perhaps the threads are screwed up. Whatever it was, I tried to put everything back together, but now something is clunking when going over bumps.
https://i.imgur.com/cQ5bcwJ.mp4
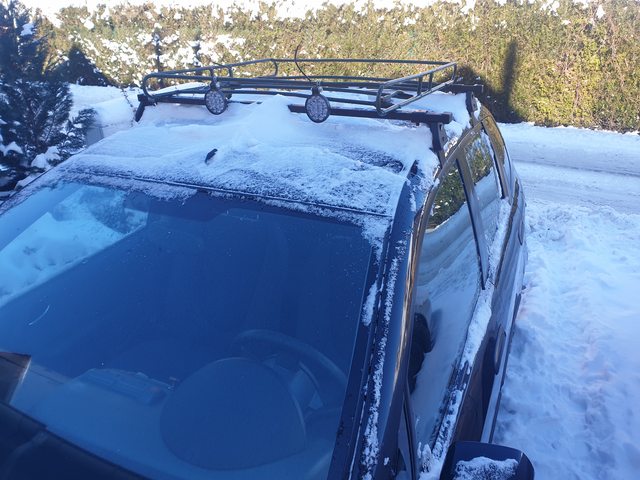
There was some success however, I fabricated the roof rack, mounts and hooked up the lights.
That's a random connector I had that's the exact same shape as the one on the rear defogger. This means I can now turn on the auxillary lights with a button on my dash. Very nice.
https://i.imgur.com/DUMOqml.mp4
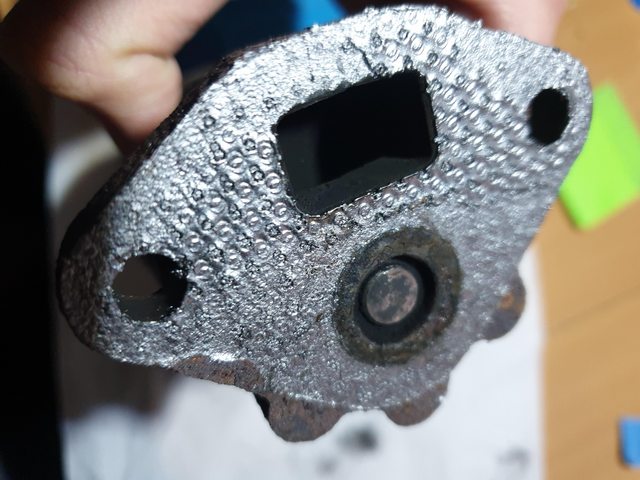
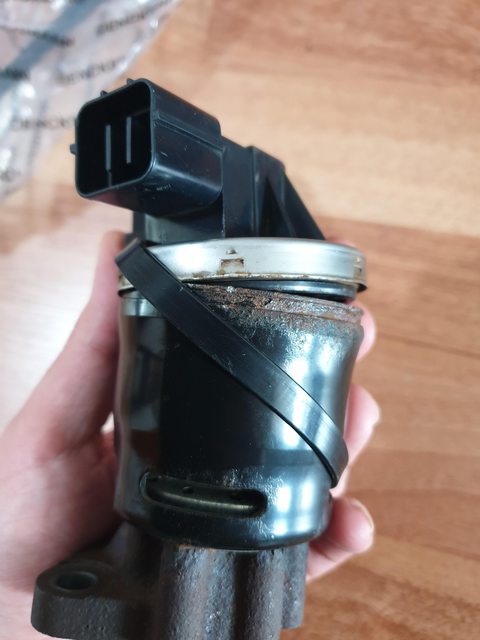
I also popped the EGR valve open, breaking it in the process of course, because it wasn't supposed to be opened.
The valve was extremely stuck, like I had to hit it with a hammer pretty hard for it to come out. The stem was very nasty so I cleaned it up with sandpaper. It then worked smoothly and applying 12V to the bottom two pins opened it. After about 30 minutes of driving though I'm now getting another code, P0405, so I'll have to look into it again.

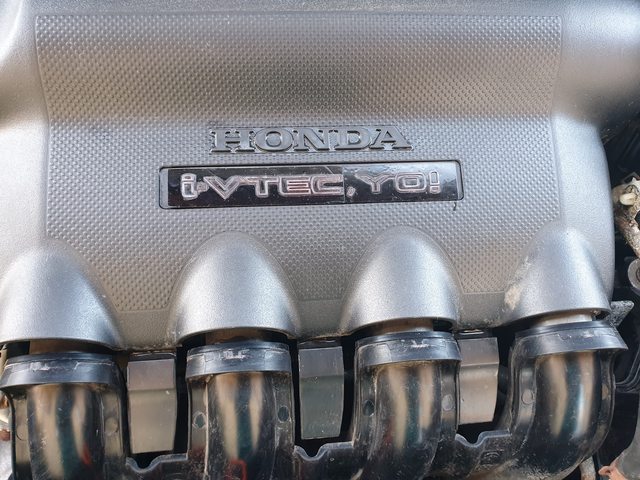
The sticker was missing from the engine cover, so I made one, just need some red paint.
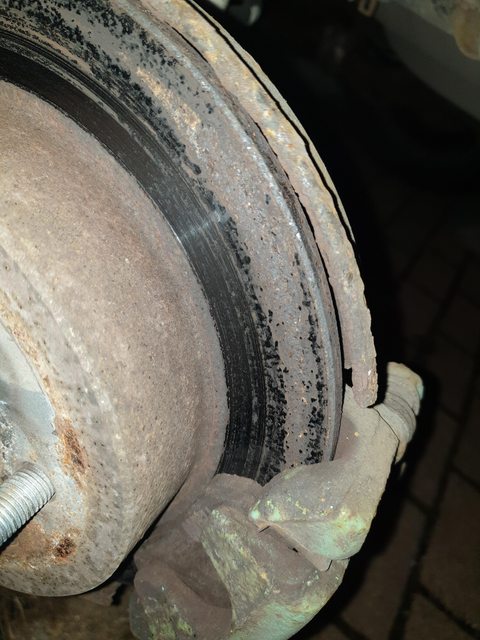
One new issue I discovered was the rear left brake. I took of the caliper and it seemed fine, hopefully cleaning everything and applying some grease fixed it. The car brakes fine but I'll need to make sure it works properly before the next inspection is due, so I'll get a rebuild kit if this didn't help.
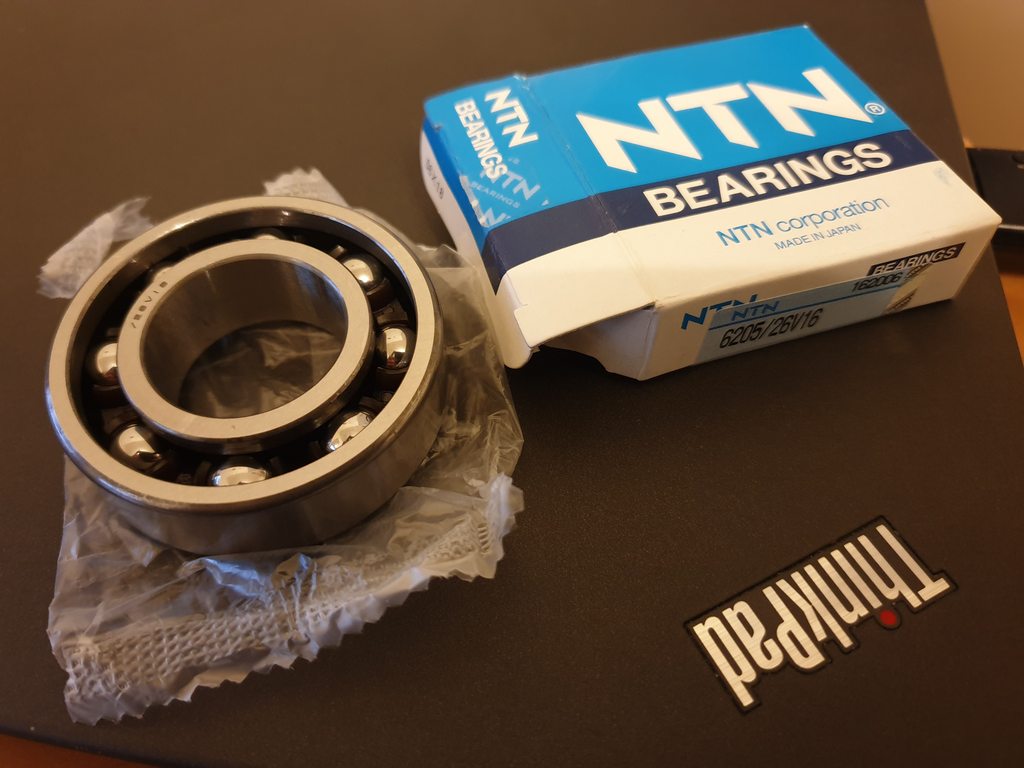
If the weather works out, I'll probably start the input shaft bearing replacement this weekend or next week as there's no reason to put it off any more. There's a good chance it will take a week or more to finish it as this would be by far the biggest DIY job, but it's not like there's anything else to do. I did the research and should have all the tools short of an engine hoist, but I hope to get by with a jack to support the engine from underneath. I also tracked down the OEM bearing - it should be the NTN 6205/26V16, just $10 from a local supplier vs almost $50 from Honda. I won't know if it really fits until I have the gearbox apart, but the sales guy confirmed that it matches the OEM number. Not planning on replacing a clutch, but if it's really worn I'll just order one and wait to install it.
Before the cancellation though I did manage to ruin something in the suspension when trying to install the lift kit
The top sway bar link just wouldn't come off, the nut turns with a lot of initial resistance, but then doesn't actually move on the stud, perhaps the threads are screwed up. Whatever it was, I tried to put everything back together, but now something is clunking when going over bumps.https://i.imgur.com/cQ5bcwJ.mp4
There was some success however, I fabricated the roof rack, mounts and hooked up the lights.
That's a random connector I had that's the exact same shape as the one on the rear defogger. This means I can now turn on the auxillary lights with a button on my dash. Very nice.
https://i.imgur.com/DUMOqml.mp4
I also popped the EGR valve open, breaking it in the process of course, because it wasn't supposed to be opened.
The valve was extremely stuck, like I had to hit it with a hammer pretty hard for it to come out. The stem was very nasty so I cleaned it up with sandpaper. It then worked smoothly and applying 12V to the bottom two pins opened it. After about 30 minutes of driving though I'm now getting another code, P0405, so I'll have to look into it again.
The sticker was missing from the engine cover, so I made one, just need some red paint.
One new issue I discovered was the rear left brake. I took of the caliper and it seemed fine, hopefully cleaning everything and applying some grease fixed it. The car brakes fine but I'll need to make sure it works properly before the next inspection is due, so I'll get a rebuild kit if this didn't help.
If the weather works out, I'll probably start the input shaft bearing replacement this weekend or next week as there's no reason to put it off any more. There's a good chance it will take a week or more to finish it as this would be by far the biggest DIY job, but it's not like there's anything else to do. I did the research and should have all the tools short of an engine hoist, but I hope to get by with a jack to support the engine from underneath. I also tracked down the OEM bearing - it should be the NTN 6205/26V16, just $10 from a local supplier vs almost $50 from Honda. I won't know if it really fits until I have the gearbox apart, but the sales guy confirmed that it matches the OEM number. Not planning on replacing a clutch, but if it's really worn I'll just order one and wait to install it.
Thread Starter
|
Member
Joined: Jan 2021
Posts: 297
From: EU
A few minor things I skipped over.
Here's how the roof rack/basked looked like with the lights. It's kind of small but was $5 from craigslist and is big enouh for spare tires and a gas can, which is all I'd need anyway. The lights are plenty bright, but do look kind of wimpy, I think next time I'll move them to the bumper and get a bigger light bar for the roof.
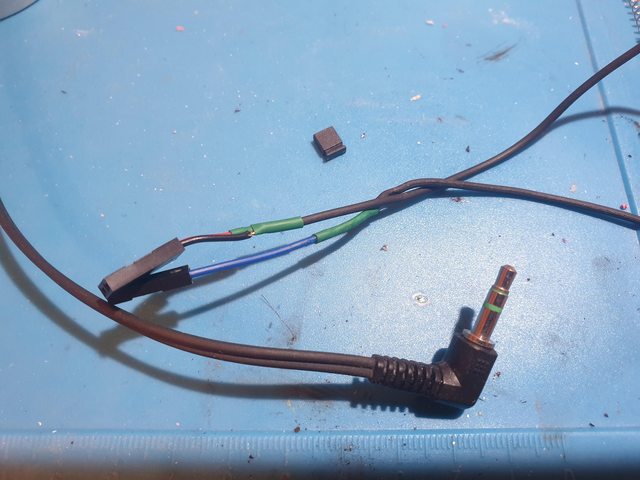
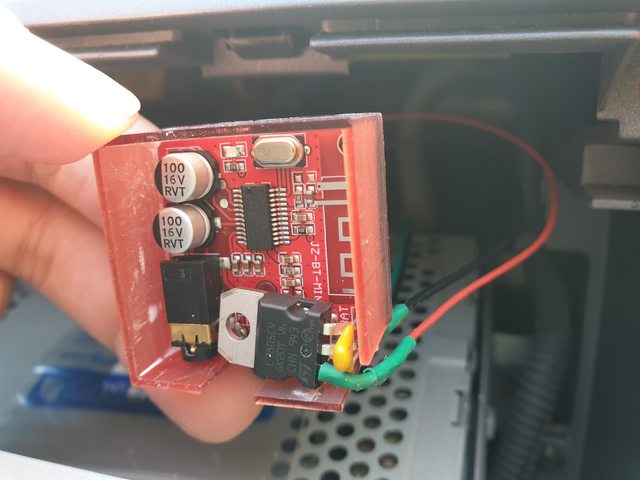
I managed to get the radio out and splice in the bluetooth module. It'sjust a $1 AD2P unit from alixpress I had in my drawer and an 5V linear voltage regulator soldered directly to the board with a capacitor. Audio wired according to the diagram in the first post (though I used a female-female dupont wire to short the pins, they were too recessed to install a jumper wile the radio was mostly still in the dash). Switched 12v and gnd stolen from the main radio harness. Custom 3d printed case.
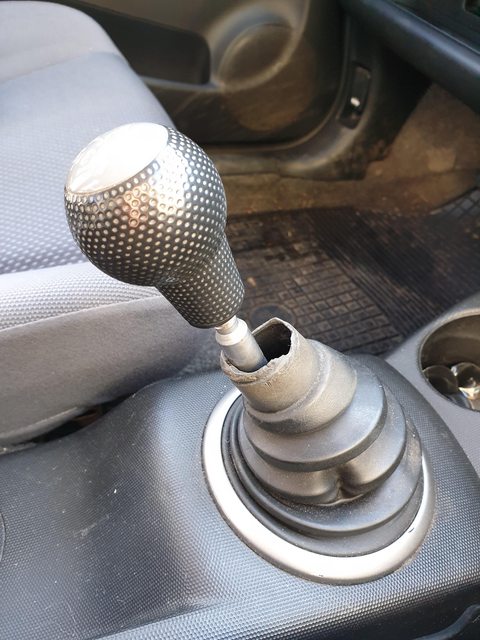
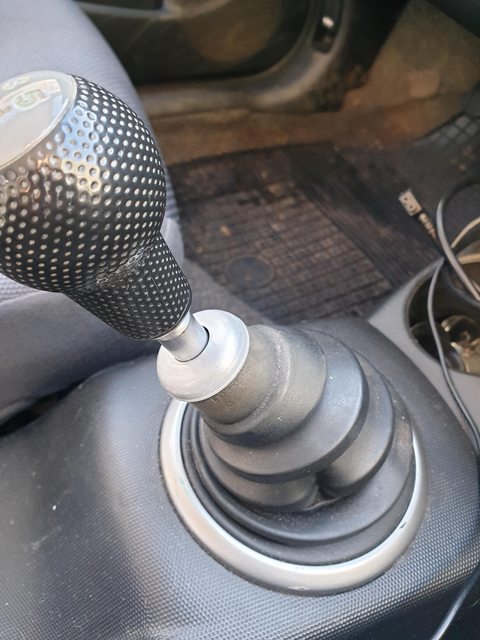
The shift cover boot was torn and had the top cap missing and I definitely wasn't going to spend a whole $5 on a new one from aliexpress.
Today the weather was a bit nicer so I drove around with the window down. It seems that there's a distinct clicking sound coming from the left side when turning, so I guess I'll have to check the CV joints too.
Here's how the roof rack/basked looked like with the lights. It's kind of small but was $5 from craigslist and is big enouh for spare tires and a gas can, which is all I'd need anyway. The lights are plenty bright, but do look kind of wimpy, I think next time I'll move them to the bumper and get a bigger light bar for the roof.
I managed to get the radio out and splice in the bluetooth module. It'sjust a $1 AD2P unit from alixpress I had in my drawer and an 5V linear voltage regulator soldered directly to the board with a capacitor. Audio wired according to the diagram in the first post (though I used a female-female dupont wire to short the pins, they were too recessed to install a jumper wile the radio was mostly still in the dash). Switched 12v and gnd stolen from the main radio harness. Custom 3d printed case.
The shift cover boot was torn and had the top cap missing and I definitely wasn't going to spend a whole $5 on a new one from aliexpress.
Today the weather was a bit nicer so I drove around with the window down. It seems that there's a distinct clicking sound coming from the left side when turning, so I guess I'll have to check the CV joints too.
Thread Starter
|
Member
Joined: Jan 2021
Posts: 297
From: EU
Boring but major update. A friend of mine had an empty garage over the Easter holidays with a fixed scissor lift, so I decided to do the bearing while we're still in lockdown and the weather sucks.
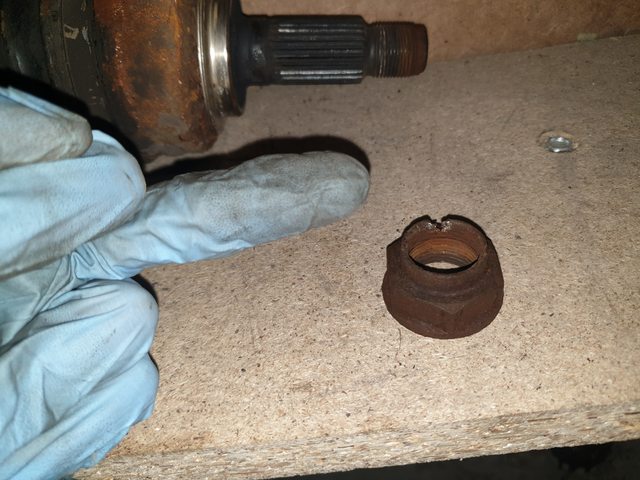
The nuts were almost fused with the driveshaft with rust and I had to mess them up pretty badly, but they came off with a breaker bar and pipe extension. Came out of the hubs pretty easily thankfully.
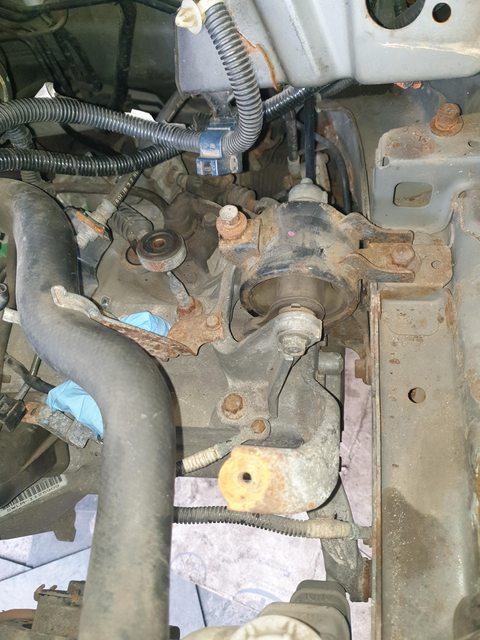
Most instructions call for removing the balljoint but I managed to pull the shafts without removing it or the arb end links by removing the two bolts from the strut and wiggling
Managed to remove everything short of the actual trans mounts and VSS (as always, the connector won't budge no matter how much I press the little tab), and decided to call it a day while My dad volunteered to help which was great but by the time I picked him up, it was almost noon and he wanted to pack it in at around 6.
So tomorrow it should be easy, just remove the mounts and the 5 or so bolts holding it to the engine. Right??
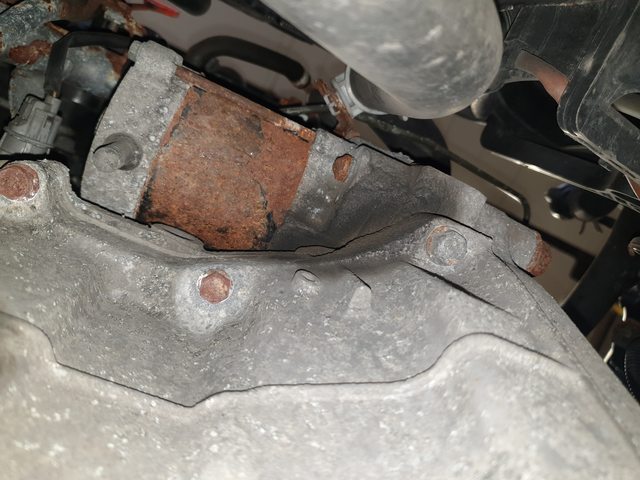
Well, uh, hopefully it'll be ok to do just the 3 not-rusty bolts because I really don't want to touch that mess.
The starter also doesn't look great so hopefully it can stay in place.
The front main seal might be leaking but I don't have a new one, though I de the belt.

This is by far the biggest job I tried to DIY but so far this wasn't too bad. A more powerful impact gun and an electric ratchet could've saved quite a lot of time. Anyway, tomorrow I hope to have it out before noon tomorrow and put everything back by EOD since we won't have to fight rusty fasteners on the way back. Eric the car guy has a video on replacing the main shaft bearing in a civic tranny which looks identical and it seems pretty straightforward (famous last words )
The nuts were almost fused with the driveshaft with rust and I had to mess them up pretty badly, but they came off with a breaker bar and pipe extension. Came out of the hubs pretty easily thankfully.
Most instructions call for removing the balljoint but I managed to pull the shafts without removing it or the arb end links by removing the two bolts from the strut and wiggling
Managed to remove everything short of the actual trans mounts and VSS (as always, the connector won't budge no matter how much I press the little tab), and decided to call it a day while My dad volunteered to help which was great but by the time I picked him up, it was almost noon and he wanted to pack it in at around 6.
So tomorrow it should be easy, just remove the mounts and the 5 or so bolts holding it to the engine. Right??
Well, uh, hopefully it'll be ok to do just the 3 not-rusty bolts because I really don't want to touch that mess.
The starter also doesn't look great so hopefully it can stay in place.
The front main seal might be leaking but I don't have a new one, though I de the belt.
This is by far the biggest job I tried to DIY but so far this wasn't too bad. A more powerful impact gun and an electric ratchet could've saved quite a lot of time. Anyway, tomorrow I hope to have it out before noon tomorrow and put everything back by EOD since we won't have to fight rusty fasteners on the way back. Eric the car guy has a video on replacing the main shaft bearing in a civic tranny which looks identical and it seems pretty straightforward (famous last words )
Thread Starter
|
Member
Joined: Jan 2021
Posts: 297
From: EU
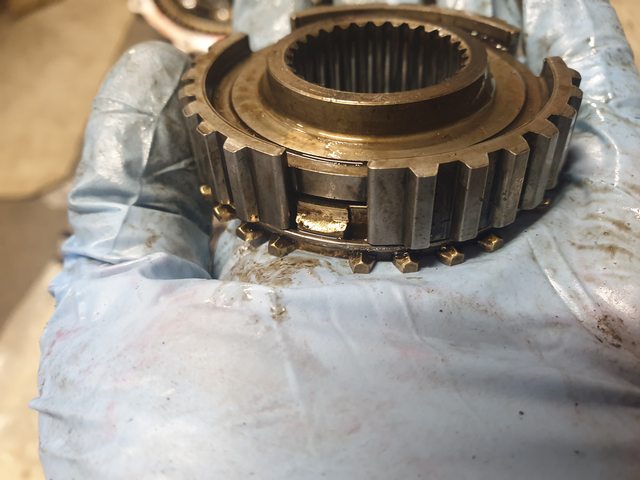
Well I got the tranny out with the help of a friend who's a real-deal mechanic. One of the dowel pins was very rusty and it took many smacks with a giant hammer to get them separated. The transmission disassembly went fairly smoothly and I replaced the known to fail front input shaft bearing without any issues. It was slightly noisy. I then decided to check the other bearing, which I don't have a replacement for since everyone said is usually fine. It's not.
https://i.imgur.com/89kPqbj.mp4
(with grinding sound)
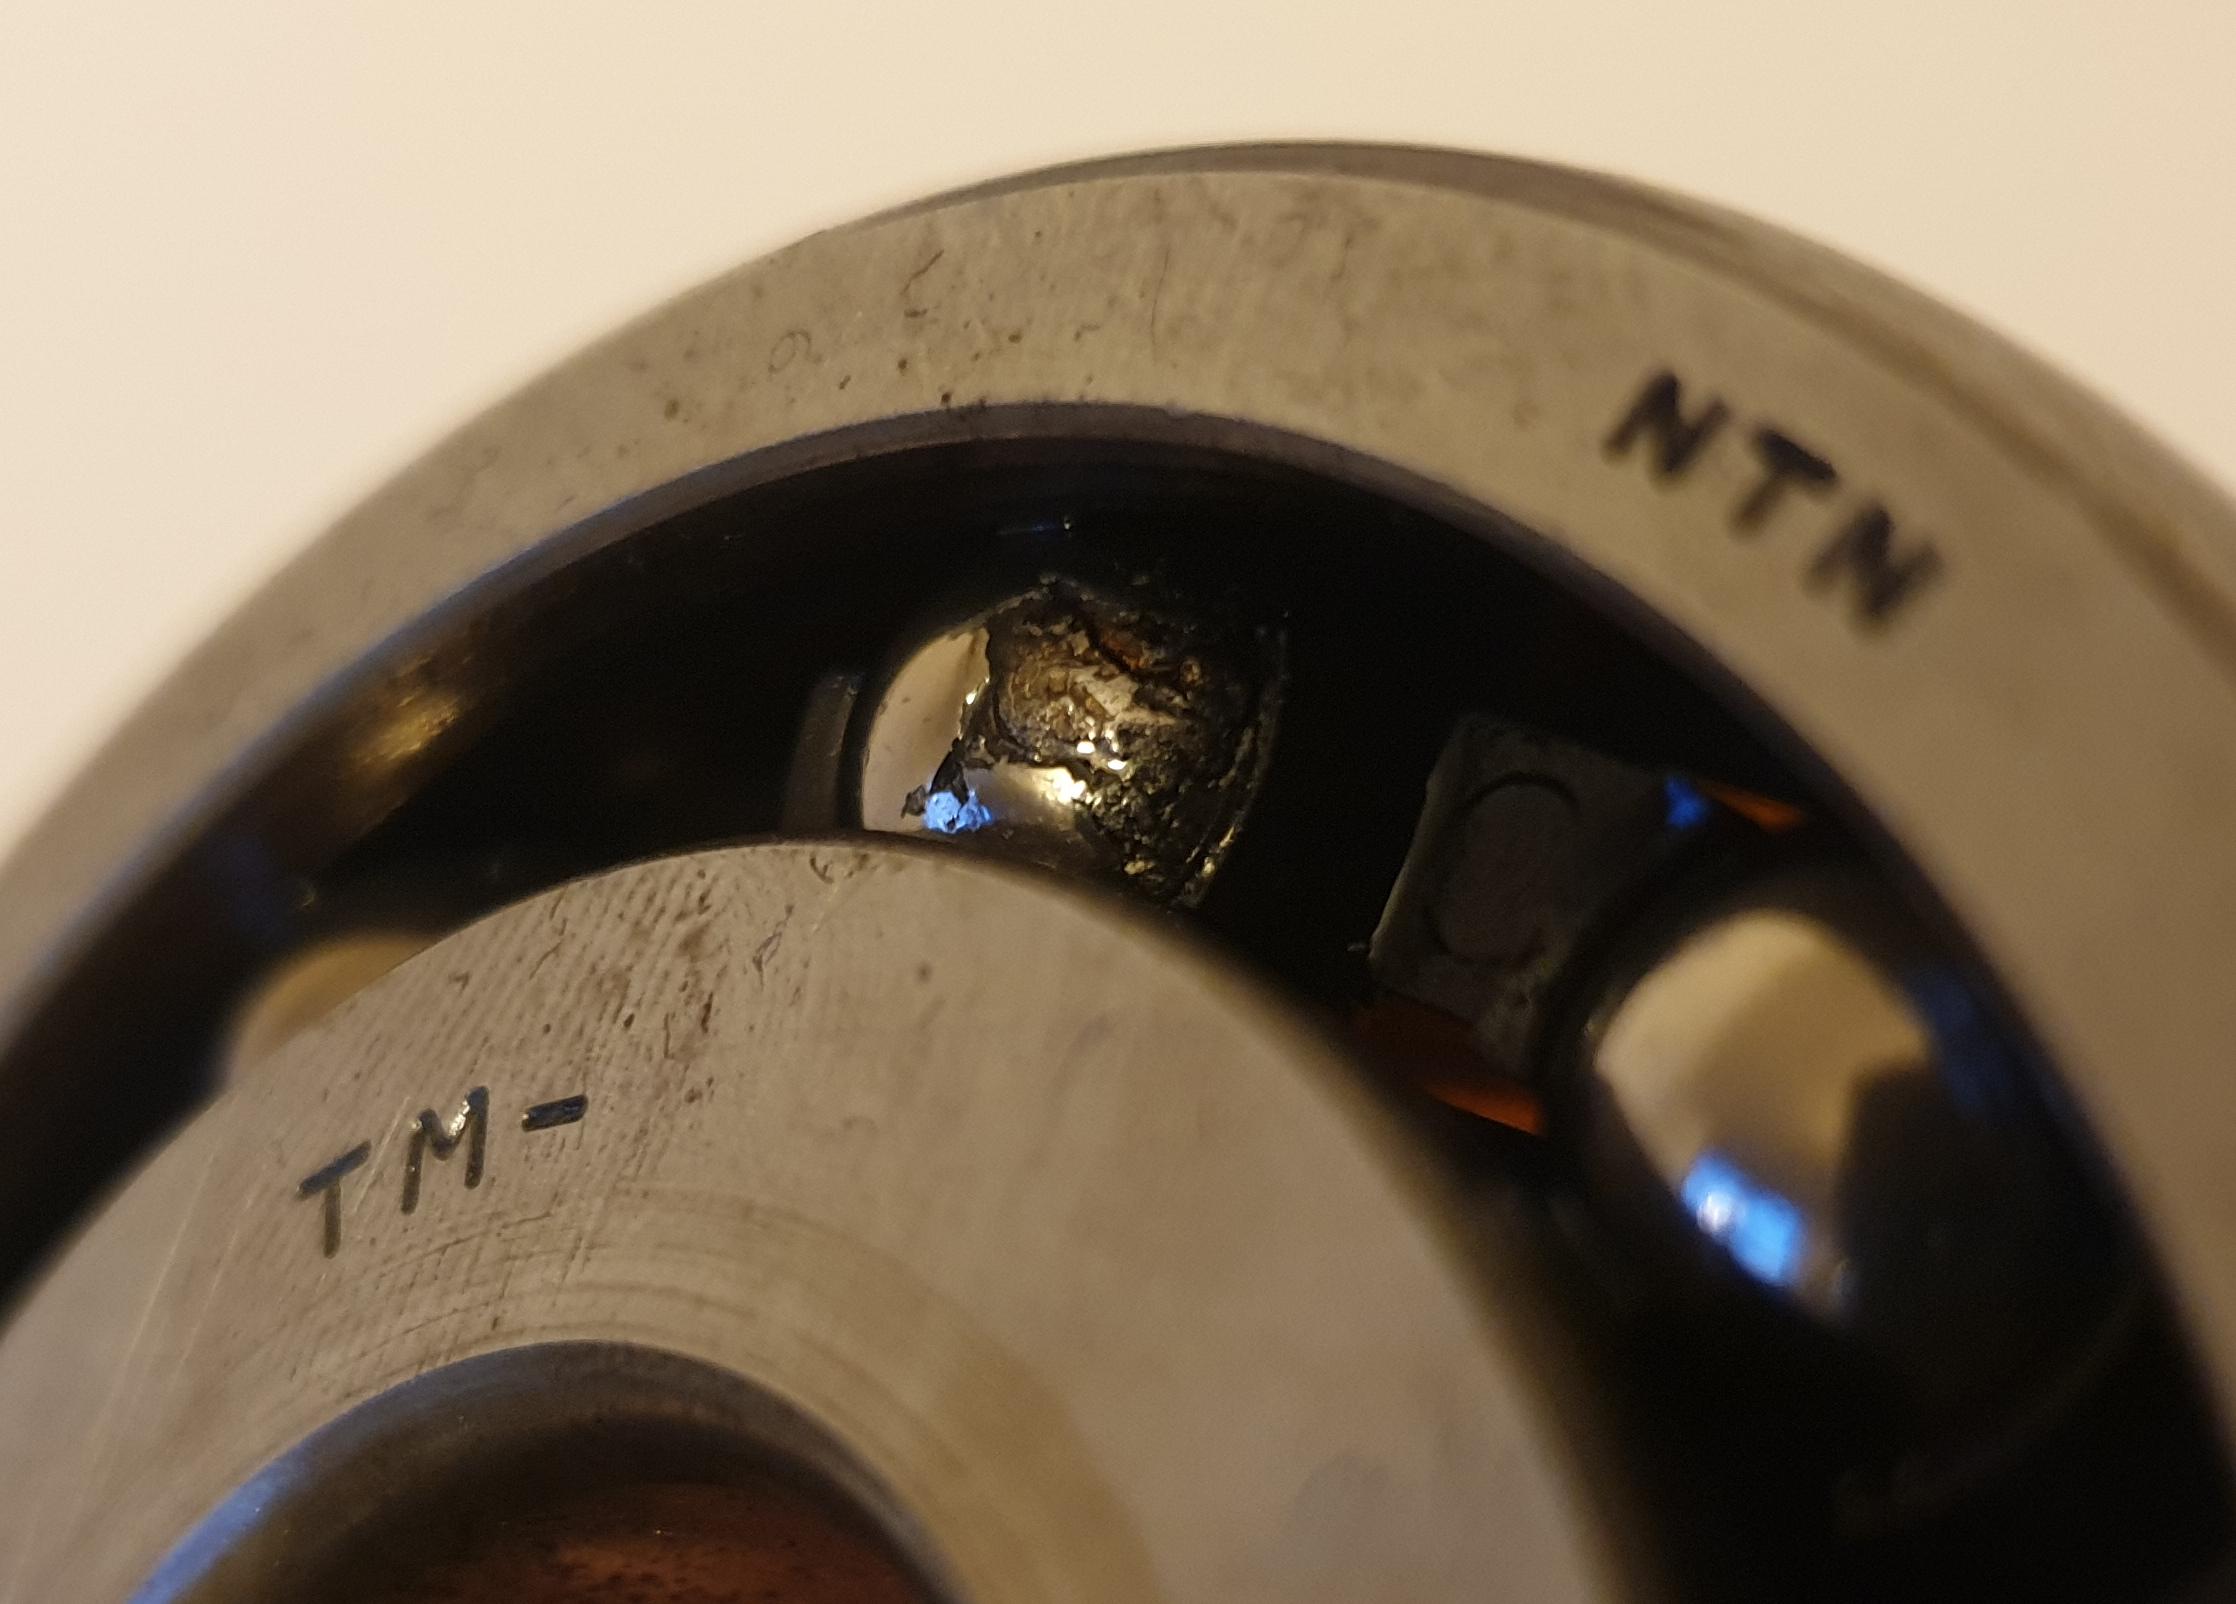
Some of the balls seem to be damaged pretty badly:
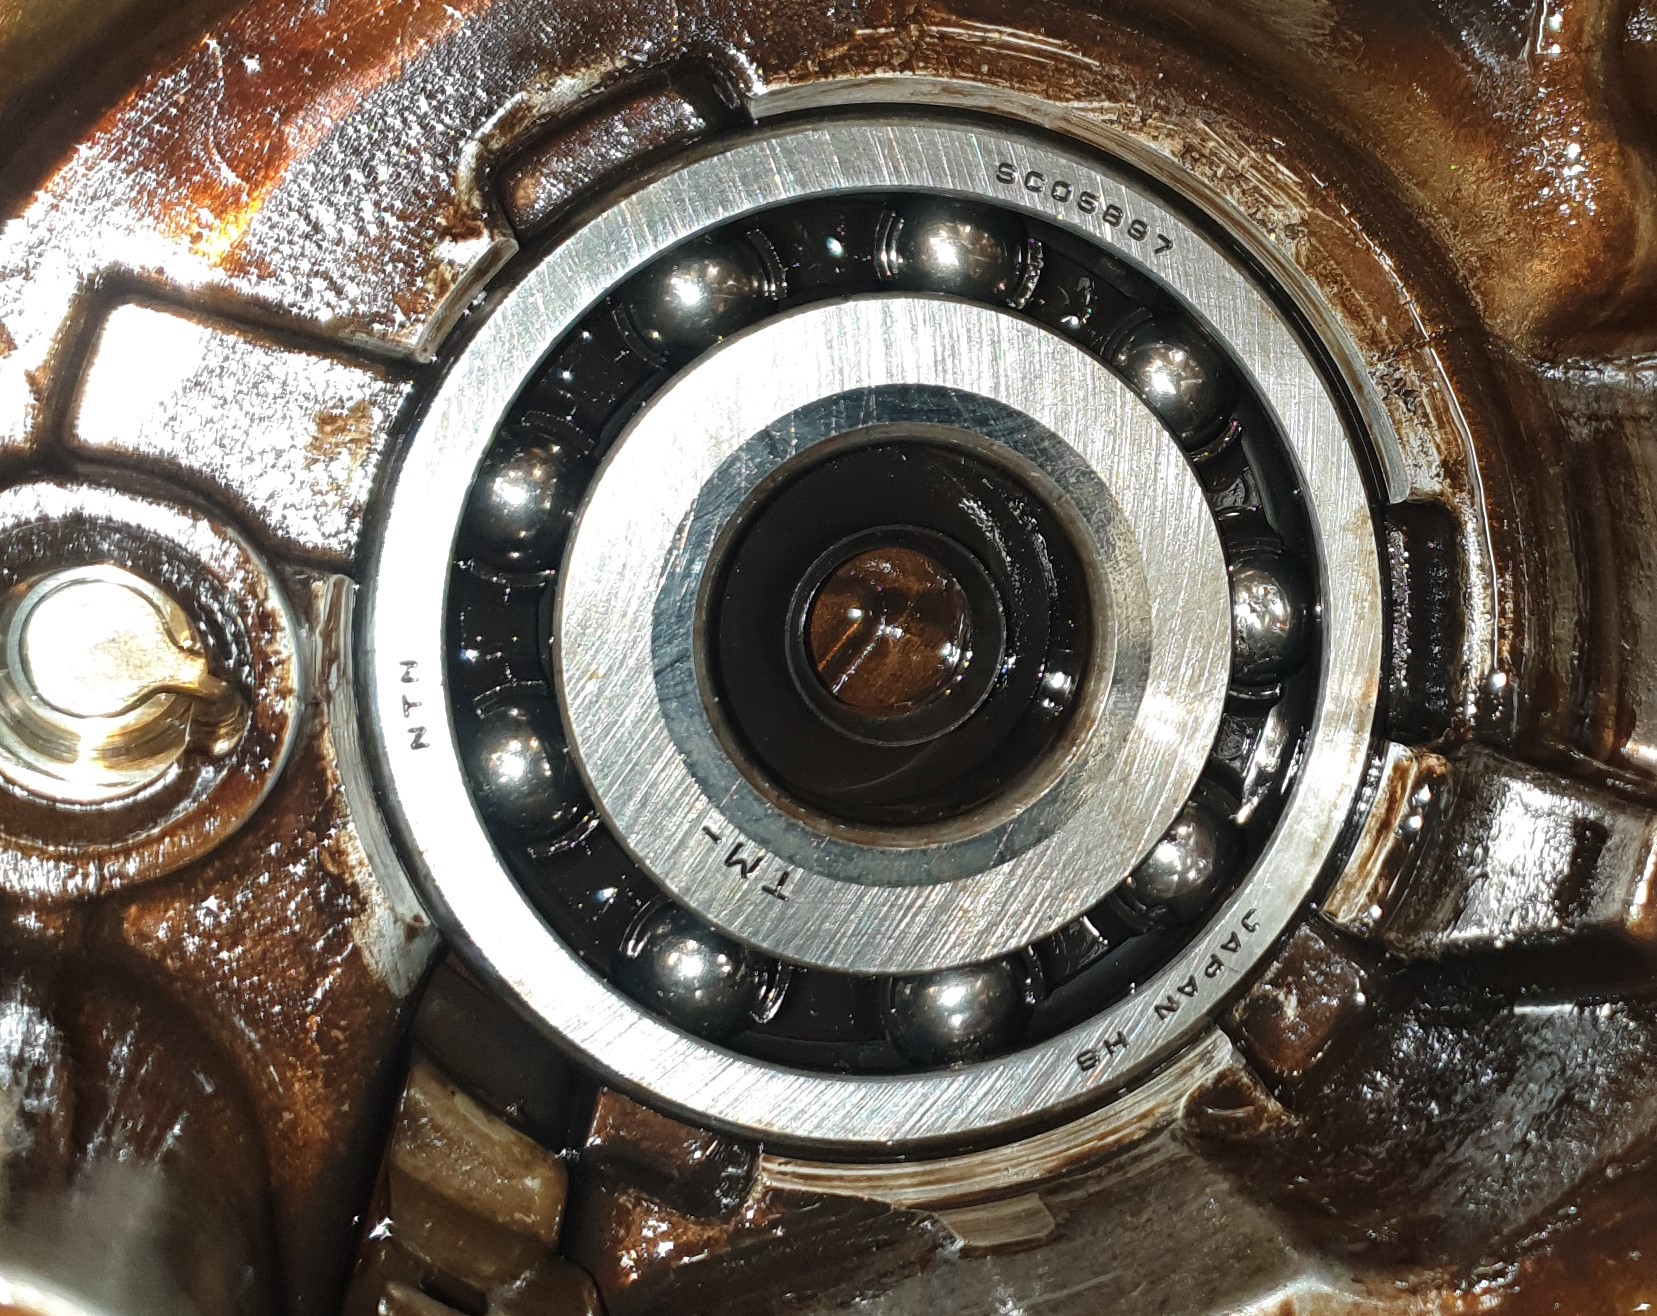
The outside outside of the bearing actually spins within the housing too, so it can't be pressed in too tightly. I ordered the replacement (part number SC05B97 from NTN) and will try just prying it with one of those seal removal hooks. As you can see the casing also pretty nasty, The oil should've been replaced twice by now but I'm guessing it's the original 18 year old stuff.
https://i.imgur.com/89kPqbj.mp4
(with grinding sound)
Some of the balls seem to be damaged pretty badly:
The outside outside of the bearing actually spins within the housing too, so it can't be pressed in too tightly. I ordered the replacement (part number SC05B97 from NTN) and will try just prying it with one of those seal removal hooks. As you can see the casing also pretty nasty, The oil should've been replaced twice by now but I'm guessing it's the original 18 year old stuff.
Last edited by mobby_6kl; Apr 5, 2021 at 07:10 PM.
Thread Starter
|
Member
Joined: Jan 2021
Posts: 297
From: EU
It's goooone. I don't know how much longer it could've lasted before falling apart completely. Probably enough to survive an event but I wouldn't have any confidence left. Every single ball looked like this up close
I had to heat up the casing from the outside and it fell off when I gently pulled it with a seal remover.
Other than that I suppose it was in pretty good condition for the distance it covered. Not much wear visible other than the low gear at the bottom right. This would explain the grinding I heard on the test drive when reversing. It seemed like it was in, but wasn't. I see many people starting reversing before coming to a stop so that's probably how it got so worn. A new gear is pretty expensive to put into a beater so it stays.
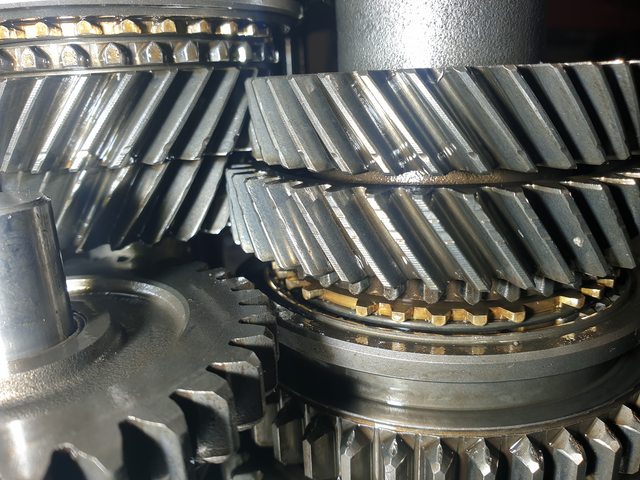
Somewhat surprising amount of wear by the ball detents, but far from actually being a problem.
Unfortunately things went a bit wrong here. Spent like half an hour moving all the syncro collars to make sure they were switching gears correctly. Busted out my priceless loctite 518 sealant and put the case back on. It slid most of the way on, but not enough for the snap ring to go into the groove on the countershaft bearing.
My big new bearing has to be pressed into the housing, right? So I started hammering it through rubber and wooden blocks until it seemed to be mostly seated. Started tightening the bolts a bit and... there's weird crunching sounds. Damn. I removed everything and the transmission was now jammed and 5th/reverse wouldn't switch at all. Shit. Poking at it for a bit, I finally got reverse to engage. This also let me start disassembling the shaft. Eventually I found the issue: somehow the 5th gear synchro hub and ring got misaligned (even though I didn't touch anything on the shafts) and I didn't notice it before the final re-assembly, so it got a bit crushed.
Ooops! Thankfully it seems like there was enough meat left to prevent the ring from spinning so I cleaned everything up, made super-certain that everything was seated properly this time, and easily put the case back together. Huh.
We did the clutch and seal too, though probably unnecessarily, since it was aftermarket LuK (same as what I got) and had 7mm left, which is much closer to new (7.2-7.9) than to dead (5mm) specs. There's $70 down the drain, but then I don't want to do this again ever.
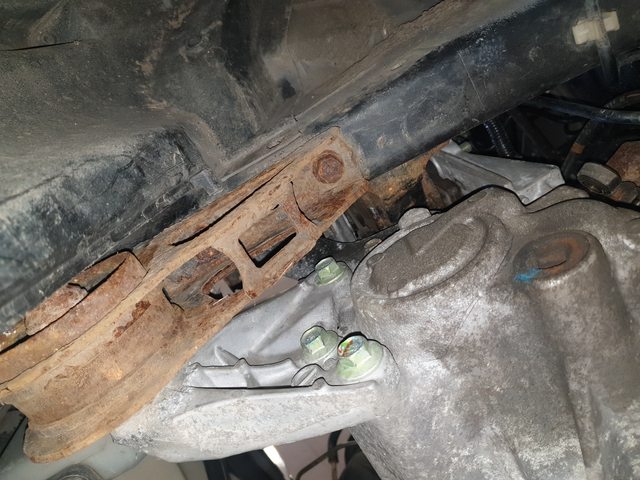
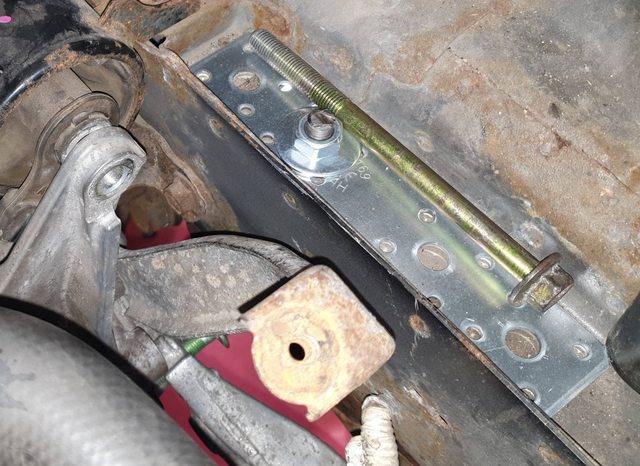
Everything else was the reverse of removal. But first I had to do something with the broken trans mount nut on the rusty bracket. Thankfully the rail to which it was attached had a 10mm hole that matched up with a hole in the mount. $2 of threaded rod and nuts later, the solution is complete. Would TUV approve this? Probably not, but nobody won't see it, and if it's stupid and works, it's not stupid as far as I'm concerned. I did order a new mount from Febi Bilstein ($15) but I'd have to somehow cut out the old bolt and I really didn't want to deal with it now.
Attaching all the bits and pieces took a few hours but the results are nothing short of amazing, if I can say so myself. This is before:
https://i.imgur.com/C40o9Vp.mp4
for after, imagine there's no extra noise when releasing the pedal. Also it seems that some of what I thought was engine noise while driving under lead, disappeared as well.
GD clutch replacement pro-tips
1. Don't DIY unless there's a pandemic lockdown and you can't look at screens any more
2. On the suspension, just undo the two damper pinch bolts, and it will be enough to tilt the hub sufficiently to get the driveshafts out without touching the sway bar end links or ball joints, which are guaranteed to be much more difficult to remove.

3. Leave the subframe alone, there's enough space to slide the transmission in/out. Aligning the transmission is a bit tricky, but not because of the subframe.
So overall got this done in around a week of working in the afternoons, including waiting a day and a half for the new bearing and fixing my transmission screwup. Getting the transmission decoupled was difficult due to rusty dowel pins, and attaching it back was also quite awkward, but otherwise it's not too bad. Some of the videos I've seen make it look way more complicated than needed (removing the starter, intake manifold (???), subframe, making enormous extensions to remove rear mount bolts, etc). If you're curious to DIY or can't afford to pay someone, it's definitely doable. But not a fun/quick job like brakes or something.
There are a couple outstanding issues. the repaired EGR valve isn't sealing properly (I can hear RPM change when touching the cover), left sway bar end link has to be cut off and replaced, and there's a ticking sound when turning left. Could be the CV joint but I noticed one of the cable clips broke and might be causing the cable to rub on the wheel or something. Hopefully it's this.
I had to heat up the casing from the outside and it fell off when I gently pulled it with a seal remover.
Other than that I suppose it was in pretty good condition for the distance it covered. Not much wear visible other than the low gear at the bottom right. This would explain the grinding I heard on the test drive when reversing. It seemed like it was in, but wasn't. I see many people starting reversing before coming to a stop so that's probably how it got so worn. A new gear is pretty expensive to put into a beater so it stays.
Somewhat surprising amount of wear by the ball detents, but far from actually being a problem.
Unfortunately things went a bit wrong here. Spent like half an hour moving all the syncro collars to make sure they were switching gears correctly. Busted out my priceless loctite 518 sealant and put the case back on. It slid most of the way on, but not enough for the snap ring to go into the groove on the countershaft bearing.
My big new bearing has to be pressed into the housing, right? So I started hammering it through rubber and wooden blocks until it seemed to be mostly seated. Started tightening the bolts a bit and... there's weird crunching sounds. Damn. I removed everything and the transmission was now jammed and 5th/reverse wouldn't switch at all. Shit. Poking at it for a bit, I finally got reverse to engage. This also let me start disassembling the shaft. Eventually I found the issue: somehow the 5th gear synchro hub and ring got misaligned (even though I didn't touch anything on the shafts) and I didn't notice it before the final re-assembly, so it got a bit crushed.
Ooops! Thankfully it seems like there was enough meat left to prevent the ring from spinning so I cleaned everything up, made super-certain that everything was seated properly this time, and easily put the case back together. Huh.
We did the clutch and seal too, though probably unnecessarily, since it was aftermarket LuK (same as what I got) and had 7mm left, which is much closer to new (7.2-7.9) than to dead (5mm) specs. There's $70 down the drain, but then I don't want to do this again ever.
Everything else was the reverse of removal. But first I had to do something with the broken trans mount nut on the rusty bracket. Thankfully the rail to which it was attached had a 10mm hole that matched up with a hole in the mount. $2 of threaded rod and nuts later, the solution is complete. Would TUV approve this? Probably not, but nobody won't see it, and if it's stupid and works, it's not stupid as far as I'm concerned. I did order a new mount from Febi Bilstein ($15) but I'd have to somehow cut out the old bolt and I really didn't want to deal with it now.
Attaching all the bits and pieces took a few hours but the results are nothing short of amazing, if I can say so myself. This is before:
https://i.imgur.com/C40o9Vp.mp4
for after, imagine there's no extra noise when releasing the pedal. Also it seems that some of what I thought was engine noise while driving under lead, disappeared as well.
GD clutch replacement pro-tips
1. Don't DIY unless there's a pandemic lockdown and you can't look at screens any more
2. On the suspension, just undo the two damper pinch bolts, and it will be enough to tilt the hub sufficiently to get the driveshafts out without touching the sway bar end links or ball joints, which are guaranteed to be much more difficult to remove.
3. Leave the subframe alone, there's enough space to slide the transmission in/out. Aligning the transmission is a bit tricky, but not because of the subframe.
So overall got this done in around a week of working in the afternoons, including waiting a day and a half for the new bearing and fixing my transmission screwup. Getting the transmission decoupled was difficult due to rusty dowel pins, and attaching it back was also quite awkward, but otherwise it's not too bad. Some of the videos I've seen make it look way more complicated than needed (removing the starter, intake manifold (???), subframe, making enormous extensions to remove rear mount bolts, etc). If you're curious to DIY or can't afford to pay someone, it's definitely doable. But not a fun/quick job like brakes or something.
There are a couple outstanding issues. the repaired EGR valve isn't sealing properly (I can hear RPM change when touching the cover), left sway bar end link has to be cut off and replaced, and there's a ticking sound when turning left. Could be the CV joint but I noticed one of the cable clips broke and might be causing the cable to rub on the wheel or something. Hopefully it's this.
Thread Starter
|
Member
Joined: Jan 2021
Posts: 297
From: EU
Yeah thanks, it really makes an enormous difference when the car doesn't sound like it's eating itself whenever you're driving it.
There is some conflicting information on doing the clutch/gearbox and... I suppose this doesn't help in that regard But I do hope someone will find it useful.
For today, the sway bar end link is off
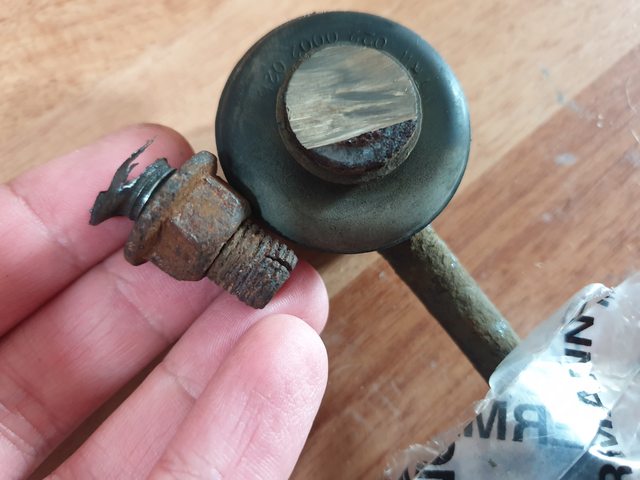
I'm sure you could weld something to the bolt and get it the nut off eventually but considering I got a new end link for like $7, the grinder came out immediately once the bolt broke there and the allen key wouldn't stay inside. The bottom side was pretty well stuck too and didn't budge even after penetrating fluid and enough torch application to make the boot smoke on the other side. The new one is in and the noise is gone.
While in there, I saw some grease on the suspension bits. Seems like the CV boot has a tiny slit somewhere in this area (on the wheel side obviously):
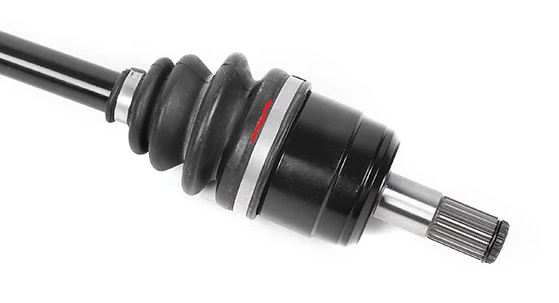
I think it got damaged when I was pushing it into the hub and the sharp edge of the clamp cut through the thick boot somehow. There's no huge gaping hole so hopefully it'll be possible to just glue it shut, because there's no way I'm taking it apart in the near future especially considering that there was some light clicking coming from this side so the whole thing might need to be replaced soon anyway.
Another look at the EGR valve, the zip tie didn't really help keep the cap on, so the next step up is completed. Haven't tested it yet.

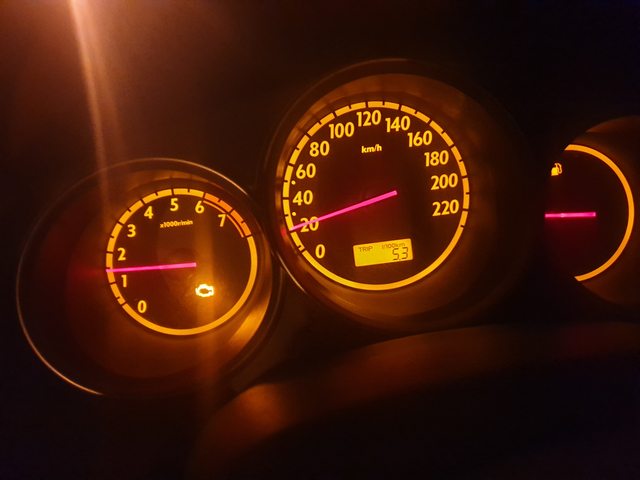
The fuel economy has been disappointing so far, but I chalked it up to winter conditions and driving it like I drive the miata. On the last ~30km trip, driving like a normal person, I hit 5.3l/100km or 44 mpg. The route was country roads through some villages, 50-90km/h, and some highway, staying below the limit at 110-120km/h. Still not amazing by modern standards considering it has like 80hp but better than my previous average of 7.5l or so.
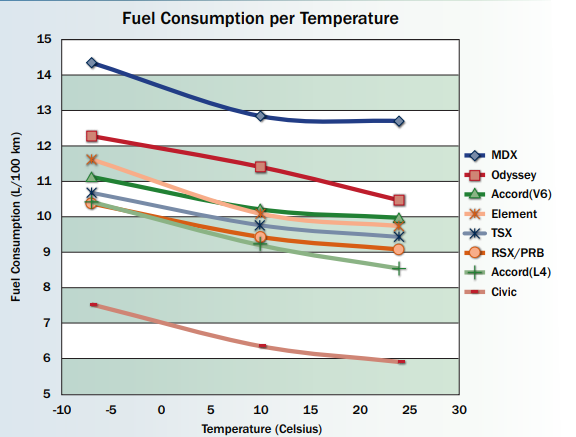
Found this interesting chart which suggests it should get a bit better yet once temperatures are in double digits at least.
There is some conflicting information on doing the clutch/gearbox and... I suppose this doesn't help in that regard
But I do hope someone will find it useful.For today, the sway bar end link is off
I'm sure you could weld something to the bolt and get it the nut off eventually but considering I got a new end link for like $7, the grinder came out immediately once the bolt broke there and the allen key wouldn't stay inside. The bottom side was pretty well stuck too and didn't budge even after penetrating fluid and enough torch application to make the boot smoke on the other side. The new one is in and the noise is gone.
While in there, I saw some grease on the suspension bits. Seems like the CV boot has a tiny slit somewhere in this area (on the wheel side obviously):
I think it got damaged when I was pushing it into the hub and the sharp edge of the clamp cut through the thick boot somehow. There's no huge gaping hole so hopefully it'll be possible to just glue it shut, because there's no way I'm taking it apart in the near future especially considering that there was some light clicking coming from this side so the whole thing might need to be replaced soon anyway.
Another look at the EGR valve, the zip tie didn't really help keep the cap on, so the next step up is completed. Haven't tested it yet.
The fuel economy has been disappointing so far, but I chalked it up to winter conditions and driving it like I drive the miata. On the last ~30km trip, driving like a normal person, I hit 5.3l/100km or 44 mpg. The route was country roads through some villages, 50-90km/h, and some highway, staying below the limit at 110-120km/h. Still not amazing by modern standards considering it has like 80hp but better than my previous average of 7.5l or so.
Found this interesting chart which suggests it should get a bit better yet once temperatures are in double digits at least.
Thread Starter
|
Member
Joined: Jan 2021
Posts: 297
From: EU
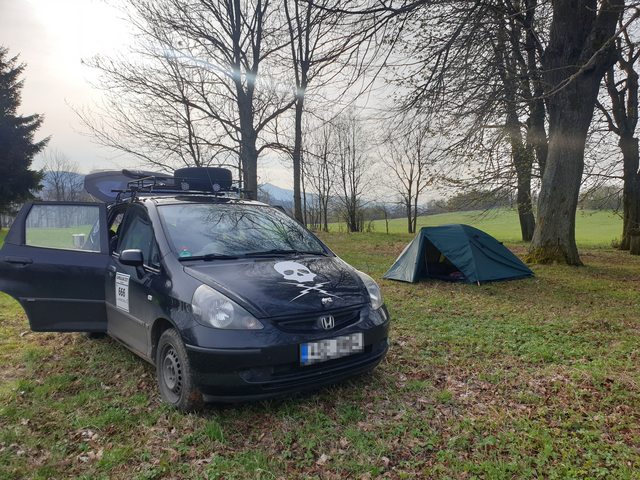
So the covid-safe version of the even took place this week. No real racing, just driving around inappropriate checkpoints all around the country, getting stuck, and camping because all hotels are closed.
But the day before that:
Of course one headlight bulb died. I ordered it but got held up at work until the store closed. Oh well, at least I have time to do a quick oil change, since we'll be driving over 3000km in the coming days. Right?
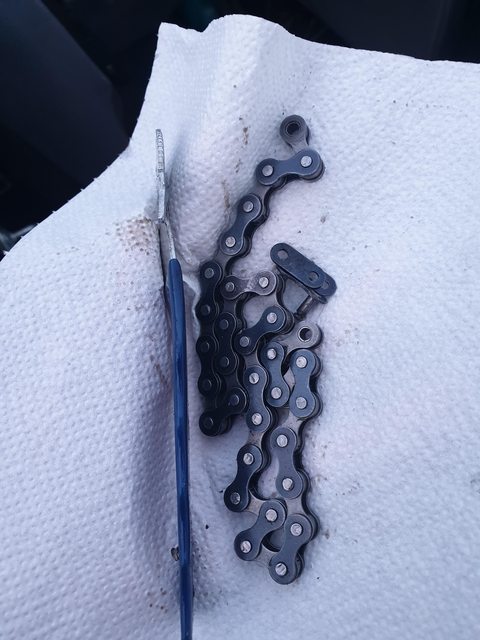
The damn filter just wouldn't come off. Not by hand, of course, it never does, but even this chain type wrench that I've used countless times on my miata before not only bent several times, but eventually just broke apart.
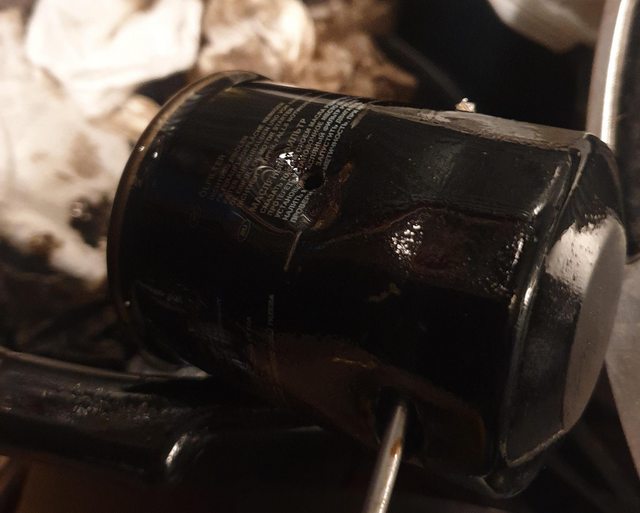
I already drained the oil of course, so screw it, I'll just used the new oil and keep the filter. Except that the wrench did enough damange that some oil seeped through under pressure. Awesome!
In the meantime it got dark and started to rain. I didn't even have a philips screwdriver (that wasn't a bit) so had to hammer first a smaller and then a larger Torx driver in. Even then I just barely got it moving. I was laying in a pretty uncomfortable position due to low car height and spilled oil on the ground, so I just barely managed to get it moving with the larger screwdriver. And even half a revolution didn't loosen it significantly, and since there wasn't any space to keep turning the filter, I had to make another hole.
Fffff. On the upside, at least the replacement filter was the appropriate one. Let the car run for a few minutes and there were no leaks. Neither the filter nor the drain plug came off at any point so I'll count that as a win.
The car did great. No real issues during the period. Here are some findings.
But the day before that:
Of course one headlight bulb died. I ordered it but got held up at work until the store closed. Oh well, at least I have time to do a quick oil change, since we'll be driving over 3000km in the coming days. Right?
The damn filter just wouldn't come off. Not by hand, of course, it never does, but even this chain type wrench that I've used countless times on my miata before not only bent several times, but eventually just broke apart.
I already drained the oil of course, so screw it, I'll just used the new oil and keep the filter. Except that the wrench did enough damange that some oil seeped through under pressure. Awesome!
In the meantime it got dark and started to rain. I didn't even have a philips screwdriver (that wasn't a bit) so had to hammer first a smaller and then a larger Torx driver in. Even then I just barely got it moving. I was laying in a pretty uncomfortable position due to low car height and spilled oil on the ground, so I just barely managed to get it moving with the larger screwdriver. And even half a revolution didn't loosen it significantly, and since there wasn't any space to keep turning the filter, I had to make another hole.
Fffff. On the upside, at least the replacement filter was the appropriate one. Let the car run for a few minutes and there were no leaks. Neither the filter nor the drain plug came off at any point so I'll count that as a win.
The car did great. No real issues during the period. Here are some findings.
- ABS light came on at one point, and later the same day went away after some weird noises from the engine compartment. Has been fine since.
- Might've hit the exhaust somehwere in the mud because it now rattles a bit at idle
- The driver's and rear passenger side footwell are wet after several days of rain. Not sure about the trunk sice it's still full of crap. Something might've spilled in the rear, but definitely not in the front.
- The engine burns some oil, I guess 250-300ml over 3000km or so. Maybe some of that leaks through the valve cover gasket. Nothing terrible.
- With the noisy gearbox fixed, I can definitely hear the valve clicking. I assume the adjustment hasn't been done in the last 60-100k km so I'll give it a shot later.
- Overall fuel economy was around 6.7 l/100 km (~35mpg). Not amazing but I think fairly reasonable considering pretty aggresive driving around mountains and fast highway speeds on the way there and back. Seems to be just over the average on spritmonitor.de.
Last edited by mobby_6kl; May 9, 2021 at 12:46 PM.
Thread Starter
|
Member
Joined: Jan 2021
Posts: 297
From: EU
Yeah it's either carelessness or some poor tech was just more afraid of it coming loose while driving than not at all and went all out on the filter. My fault for leaving this for the last day though
It's suppsoed to rain the next couple of days so I had to solve the leakage issue. Some threads here susggested that there could also be cracks under the rubber gutter cover and indeed there were.
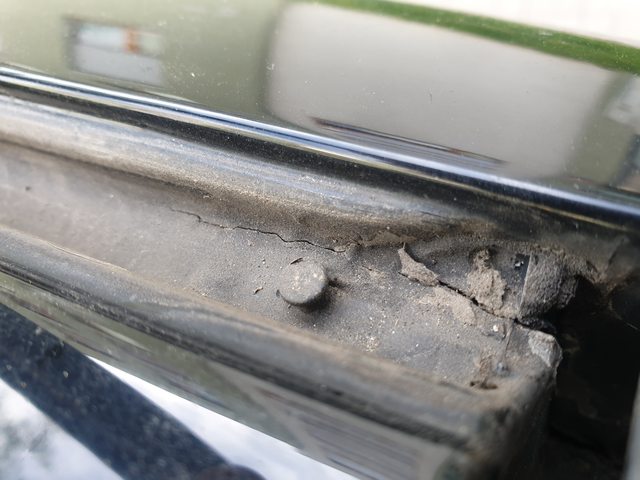

All the gunk and some of the old sealant came off with an old toothbrush. I had some black silicone sealant on hand so a smeared a bunch all over the seams.

Didn't really want to touch the doors today but I left some paper towels in various areas to hopefully help track down the source if anything does leak in.
E: for reference, this thread has a lot more information on leaks so I might need to revisit this depending on the results: https://www.fitfreak.net/forums/1st-...k-trunk-3.html
It's suppsoed to rain the next couple of days so I had to solve the leakage issue. Some threads here susggested that there could also be cracks under the rubber gutter cover and indeed there were.
All the gunk and some of the old sealant came off with an old toothbrush. I had some black silicone sealant on hand so a smeared a bunch all over the seams.
Didn't really want to touch the doors today but I left some paper towels in various areas to hopefully help track down the source if anything does leak in.
E: for reference, this thread has a lot more information on leaks so I might need to revisit this depending on the results: https://www.fitfreak.net/forums/1st-...k-trunk-3.html
Last edited by mobby_6kl; May 11, 2021 at 01:41 PM.