DIY: 11 Pin Door Mirror (Folding, Heated, Smart Key)
#81
 05-27-2013, 12:37 AM


I install the Right Door Mirror today,
and I have a few tips for you,
To open the Plastic Cover that Cover the 3 bolt that hold the Door Mirror,
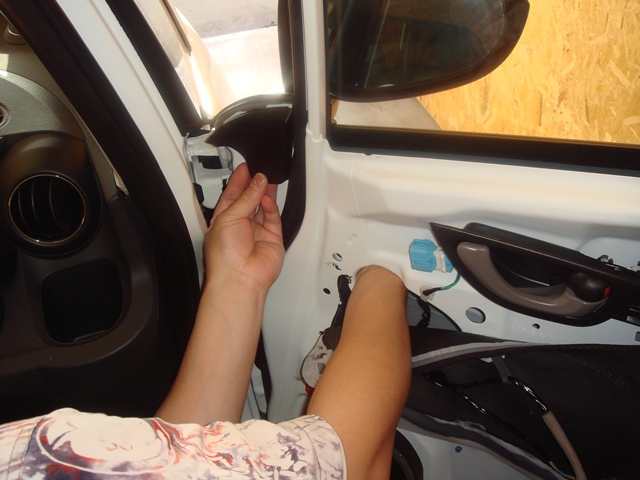
It is best if you unhook the clip from BEHIND,
that mean you got to enter your hand through the Door Metal Sheet Opening and reach behind the Plastic Cover Clips.
Because if you just pry it from the front part, you might risk breaking the
clip, (like I did on the Left Side)...
Here are the pictures, where my Right Arm is going through the Door Metal Sheet to reach behind the BLACK Plastic Cover Clips (that I hold with my left hand after I able to took it out).
I also have another tips to open the door handle part of the door panel,
according to honda factory service guide, we suppose to use flat screwdriver (with the tips wrap with protective tape),
I found it much easier to use door panel prying tools,
I forgot to take pictures of my tools, and it is in the garage below now,
but I found a picture on the internet that looks similar to the tools that I use,
it is the one with 90degree bend tips and in the pictures below is the first one on the left side of the pictures,
(although my prying tools tips is not as wide as this blue tools):

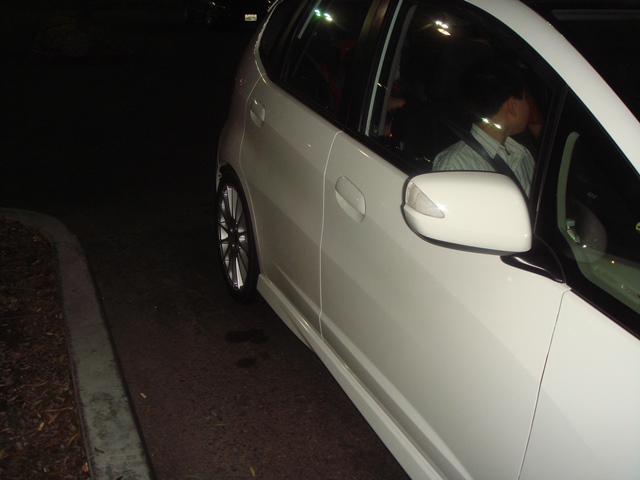
and here are the pictures after both door mirror installed...
I must say that the JDM Door Mirror with LED Blinker do make the car
looks MORE EXPENSIVE

In the next few days, I will begin connecting the Heated Mirror Wire to the fuse box and also assembling that Relay Circuit to make the LED Blinker blink together with the Parking light when we lock/unlock the car with the key remote.
I actually already went to Frys today, but I got there 30 minutes too late,
turn out they close early on Sunday...
oh well, I had to go back tomorrow to buy the Relay and Diode that I need...
I also going to need DOUBLE Relay for this circuit because I need to make sure the LED Blinker going to work with Parking Light only after the Key is at LOCK/OFF position and not going to connect with Parking Brake Circuit when the key is at ACC or ON,
Also I need another relay so the Current that going to power the LED Blinker will came directly from Fuse Box and not Taxing/Parallel with the Parking Light Circuit because I worry if the LED Blinker (and other Turn Signal Blinker on the Front and Rear of the car) were on together with the Parking Light, it will be too much current for the wiring/fuse...
so this mean I need 2 relay !
and I have a few tips for you,
To open the Plastic Cover that Cover the 3 bolt that hold the Door Mirror,
It is best if you unhook the clip from BEHIND,
that mean you got to enter your hand through the Door Metal Sheet Opening and reach behind the Plastic Cover Clips.
Because if you just pry it from the front part, you might risk breaking the
clip, (like I did on the Left Side)...
Here are the pictures, where my Right Arm is going through the Door Metal Sheet to reach behind the BLACK Plastic Cover Clips (that I hold with my left hand after I able to took it out).
I also have another tips to open the door handle part of the door panel,
according to honda factory service guide, we suppose to use flat screwdriver (with the tips wrap with protective tape),
I found it much easier to use door panel prying tools,
I forgot to take pictures of my tools, and it is in the garage below now,
but I found a picture on the internet that looks similar to the tools that I use,
it is the one with 90degree bend tips and in the pictures below is the first one on the left side of the pictures,
(although my prying tools tips is not as wide as this blue tools):
and here are the pictures after both door mirror installed...
I must say that the JDM Door Mirror with LED Blinker do make the car
looks MORE EXPENSIVE
In the next few days, I will begin connecting the Heated Mirror Wire to the fuse box and also assembling that Relay Circuit to make the LED Blinker blink together with the Parking light when we lock/unlock the car with the key remote.
I actually already went to Frys today, but I got there 30 minutes too late,
turn out they close early on Sunday...
oh well, I had to go back tomorrow to buy the Relay and Diode that I need...
I also going to need DOUBLE Relay for this circuit because I need to make sure the LED Blinker going to work with Parking Light only after the Key is at LOCK/OFF position and not going to connect with Parking Brake Circuit when the key is at ACC or ON,
Also I need another relay so the Current that going to power the LED Blinker will came directly from Fuse Box and not Taxing/Parallel with the Parking Light Circuit because I worry if the LED Blinker (and other Turn Signal Blinker on the Front and Rear of the car) were on together with the Parking Light, it will be too much current for the wiring/fuse...
so this mean I need 2 relay !
Last edited by BMW ALPINA; 05-27-2013 at 12:49 AM.
#82
05-29-2013, 12:22 AM
I have another tips for Pushing the Wire through RIGHT (PASSENGER) Door Rubber Boot !
I was able to complete pushing 2 meters, long 8 separate wire through the Right Door Rubber boot in less than 5 minutes !!!
(Last week, The LEFT door rubber boot took me more than 2 hours, I think almost 3 hours, and make some of my finger nail bleeding,...
this RIGHT door rubber boot today, well, I don't even break a sweat !!!, I mean 5 minutes vs. 3 almost hours !!!, experience is very important in life hahaha )
Here is what I did:
Disconnect the Power Window Motor Wire Connector:
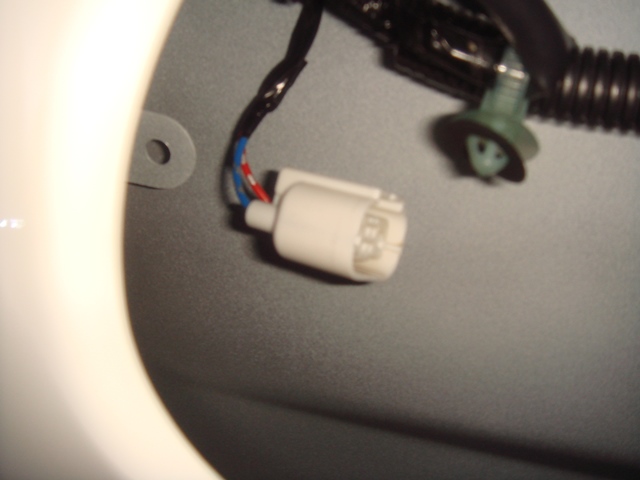
Power Window Motor:
Disconnect all wire clip (that hold the wiring to the door metal panel),
then disconnect the entire door connector inside the right side kick panel,
this connector, (and pull it out with the rubber boot).

The Right door had advantage because we can disconnect the connector above, while the Left door connector were connected to the fuse box (so a bit harder to disconnect).
After you disconnect, we can make a straight path through the rubber boot, and this make it so much easier,
and
as usual the secret ingredient is Silicone Grease, spray a lot of it inside the rubber boot,
Voila, so easy to push the wiring through the rubber boot:
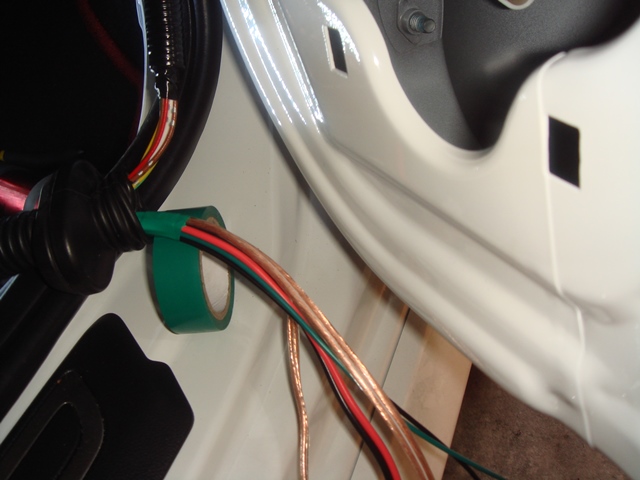
Then I start covering all the wiring with electrical tape and later I cover them with wire hose protector:
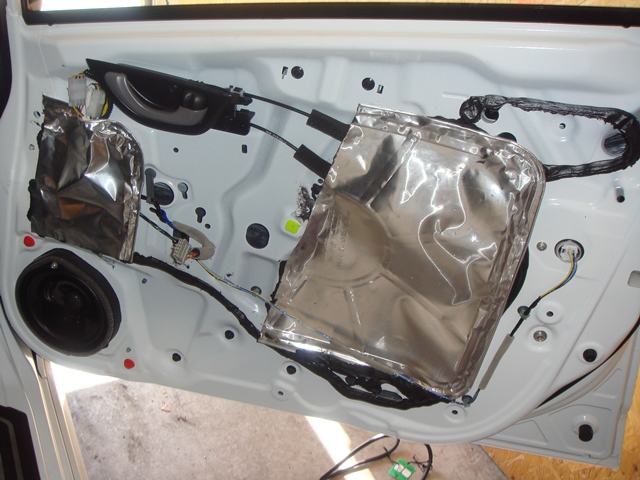
with wiring insider RIGHT door done,
and sounddampening inside RIGHT door done,
now I am going to cover this hole:
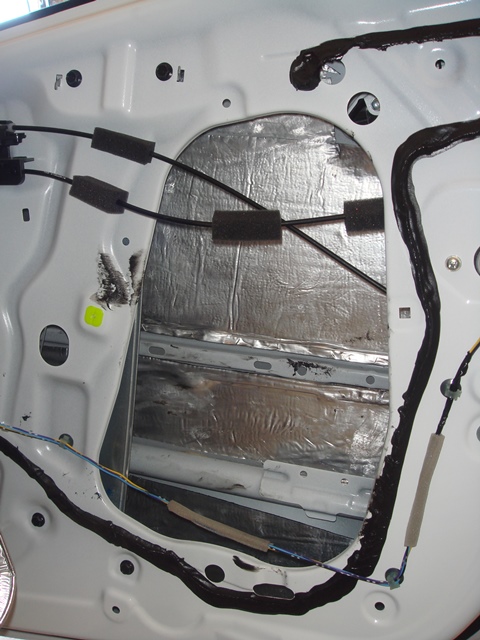
with this aluminum sheet (cut from baking foil bought at Walmart at Cooking equipment section hahaha ):
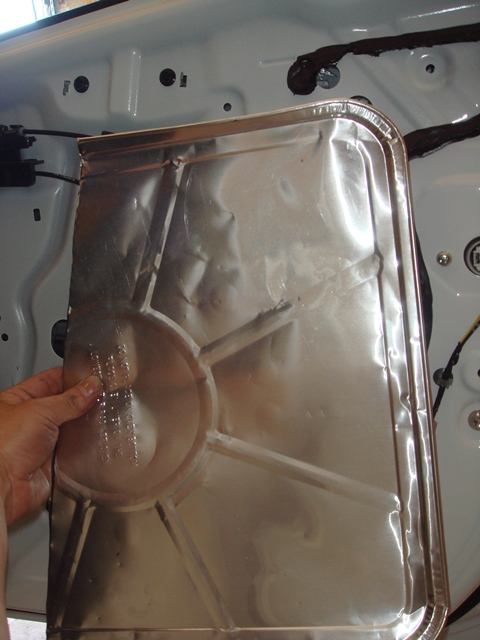
covered both holes with aluminum sheet:
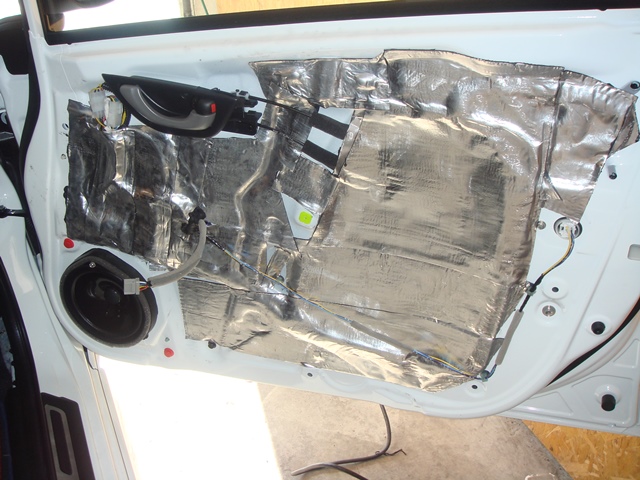
Covered with more CLD Tiles Sound dampening:
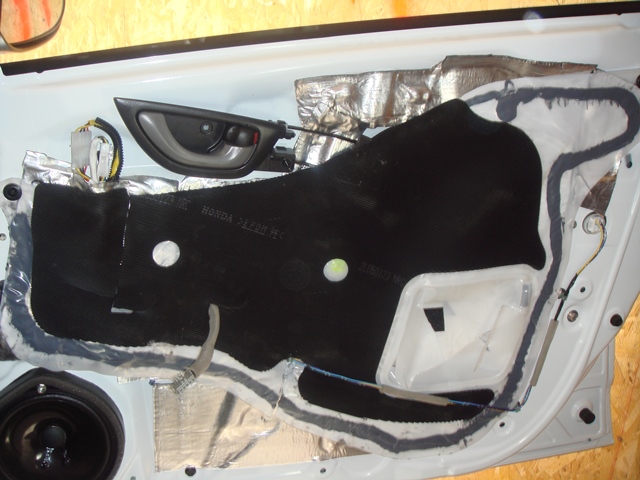
Covered back with Factory original foam:
and I am tired and decide to stop for today...
beside, I have nothing to do because I am waiting for the Relay SOCKET,
that I had to order online since Frys near my place run out...
I did get the relay and other parts (diode) needed though...
hopefully I can continue working on this in the next few days...
I was able to complete pushing 2 meters, long 8 separate wire through the Right Door Rubber boot in less than 5 minutes !!!
(Last week, The LEFT door rubber boot took me more than 2 hours, I think almost 3 hours, and make some of my finger nail bleeding,...
this RIGHT door rubber boot today, well, I don't even break a sweat !!!, I mean 5 minutes vs. 3 almost hours !!!, experience is very important in life hahaha )
Here is what I did:
Disconnect the Power Window Motor Wire Connector:
Power Window Motor:
Disconnect all wire clip (that hold the wiring to the door metal panel),
then disconnect the entire door connector inside the right side kick panel,
this connector, (and pull it out with the rubber boot).
The Right door had advantage because we can disconnect the connector above, while the Left door connector were connected to the fuse box (so a bit harder to disconnect).
After you disconnect, we can make a straight path through the rubber boot, and this make it so much easier,
and
as usual the secret ingredient is Silicone Grease, spray a lot of it inside the rubber boot,
Voila, so easy to push the wiring through the rubber boot:
Then I start covering all the wiring with electrical tape and later I cover them with wire hose protector:
with wiring insider RIGHT door done,
and sounddampening inside RIGHT door done,
now I am going to cover this hole:
with this aluminum sheet (cut from baking foil bought at Walmart at Cooking equipment section hahaha ):
covered both holes with aluminum sheet:
Covered with more CLD Tiles Sound dampening:
Covered back with Factory original foam:
and I am tired and decide to stop for today...
beside, I have nothing to do because I am waiting for the Relay SOCKET,
that I had to order online since Frys near my place run out...
I did get the relay and other parts (diode) needed though...
hopefully I can continue working on this in the next few days...
Last edited by BMW ALPINA; 05-29-2013 at 12:26 AM.
#83
05-29-2013, 12:30 AM
oh, I almost forgot,
I test my front speaker after both door covered with CLD tiles,
and now the midrange is a bit more "muffled" or not as bright as before,
but the midbass is tighter...
still, I think now I need to turn the volume knob higher for the same sound level...
so sensitivity seemed DROPPED when we add CLD tiles...
(more reason to upgrade the speaker and power amplifier, but this got to wait )
I test my front speaker after both door covered with CLD tiles,
and now the midrange is a bit more "muffled" or not as bright as before,
but the midbass is tighter...
still, I think now I need to turn the volume knob higher for the same sound level...
so sensitivity seemed DROPPED when we add CLD tiles...
(more reason to upgrade the speaker and power amplifier, but this got to wait
)
#86
05-29-2013, 02:27 PM
Thanks Wanderer,
but my car still looks "uncomplete" from behind because I still had not put my JDM RS Rear Bumper yet,... I was planning to paint/install the rear bumper this week,
but then I got a PREPAID offer for my stock suspension from another fitfreak member here...,
so I accept that offer and bought Bilstein Coil over
well hopefully from the side view,
my car will look better soon with less gap between that fender and my tire... and it will handle better too (hopefully)...
but that also mean the budget for the RS rear bumper painting is taken out again... sigh...
better not spend too much time far away from your house Wafulz,
remember, your wife might give birth anytime,
you don't want to be caught hanging at my house when your wife want to go to hospital
hahaha
anyway, how's your wife doing, it is now less than a week more right?
wish you luck
#88
05-29-2013, 02:44 PM
i know that would be funny i worry about that when i go places solo : /
she basically got 1 week 2 days left so anyday now hehe im so excited
i got the go pros charged everything pack room set up just waiting my my baby to come out Kenny Ryu
she basically got 1 week 2 days left
so anyday now hehe im so excited i got the go pros charged everything pack room set up just waiting my my baby to come out Kenny Ryu
#89
05-29-2013, 02:50 PM

For real!!!
Alpina's on a rampage... keep the updates coming Alpina...
Wafulz congrats man.. any day now!
Was going to order those Blue heated mirrors, the harness & the last of my Honda access goodies, but had some unexpected expenses so that will have to wait a little more..
Alpina's on a rampage... keep the updates coming Alpina...
Wafulz congrats man.. any day now!
Was going to order those Blue heated mirrors, the harness & the last of my Honda access goodies, but had some unexpected expenses so that will have to wait a little more..
#90
05-29-2013, 06:29 PM
Your Baby Boy name is Kenny Ryu?
Because Ken and Ryu are the Two MAIN characters in STREET FIGHTER Game/Movie (the original version, not that Jean Claude Van Damme version of it)...
Your Baby Boy going to be Great Warrior !
I also name my 2 sons with Warrior name,
I am hoping both of them can be Great Warrior (if possible not in battlefield but in Business Field of course hehehe
)but if they want to joint US Navy and became Real Warrior, I am ok too...
(preferably Navy Seal Team Six though
)
#91
05-29-2013, 06:41 PM

I like the "alum sheet" idea cos I have no clue how to find sound deadening stuff here. Thank you.
#92
05-29-2013, 06:41 PM
Well, some times I think I am really going insane with modifying this car...
I had several much much much better, faster and more expensive car in the past but I never fell in love with a car like I am now with this Honda Fit...
Yeah, there are sentimental reason for it, but that is a long story...
anyway, this must be my Middle Life Crisis,
but good that I INSANELY in Love with a car,
not another woman, so my wife is still OK with this hahaha
For real!!!
Alpina's on a rampage... keep the updates coming Alpina...
Wafulz congrats man.. any day now!
Was going to order those Blue heated mirrors, the harness & the last of my Honda access goodies, but had some unexpected expenses so that will have to wait a little more..
Alpina's on a rampage... keep the updates coming Alpina...
Wafulz congrats man.. any day now!
Was going to order those Blue heated mirrors, the harness & the last of my Honda access goodies, but had some unexpected expenses so that will have to wait a little more..
Can you please share it with us ?
by the way, my OEM Honda JDM Heated Mirror
(the USED one that came with my USED JDM door mirror) looks little bluish around the edge...
wonder if they have different coating than USDM one,
cause the USDM one is just flat (no color bias at all)...
I think the convex (or is it concave) shape is also different than the USDM one...
but for sure there is no "Objects in mirror are closer then they appear" statement on it hahaha
#94
05-29-2013, 06:58 PM
Hi Marty,
The Aluminum Foil (from the backing plate) is just for Backing Plate to cover the holes,
and on top of it, I put the actual sound deadening/CLD Tiles.
The CLD Tiles (the actual sound deadening) had sticky surface
that had to be attached to some hard surface, so the aluminum sheet is acting like the Fiber in Carbon Fiber mixture/composite,...
or like ReBar inside a Concrete mix...
The CLD Tiles it self had 2 surface,
one is the sticky one, and the other is the surface cover with aluminum sheet on it's own. but it is a very thin aluminum sheet so it is not strong enough... that is why I need the aluminum backing plate.
I bought my CLD tiles (popularly known as Dynamat) based from recommendation from another member here name "FIT4SPL".
and this is the place where I order them:
Car Auto Audio Sound Dampening Deadener 1 SQ FT GTmat Pro 80 Mil
I bought the 100 Square Feet Rolls like 3 months ago,
because they have very cheap special at that time,
It was only $139.98 already include shipping cost !!!
so it was very cheap !!!
(but now the price back to regular price of $194.99)
I think 50 Square feet rolls is enough to cover the entire car,
but they have it so cheap, I could not resist buying 100 Square feet...
hopefully I can buy another car before this CLD Tiles adhesive when bad in a few years hahaha
Here is what they looks like:

now they just came out with new CLD tiles, that is even thicker at 110mil...
#95
05-30-2013, 09:22 AM
by the way, my OEM Honda JDM Heated Mirror
(the USED one that came with my USED JDM door mirror) looks little bluish around the edge...
wonder if they have different coating than USDM one,
cause the USDM one is just flat (no color bias at all)...
I think the convex (or is it concave) shape is also different than the USDM one...
but for sure there is no "Objects in mirror are closer then they appear" statement on it hahaha
I figure those blue heated you posted would be a good choice since both sides are wide angle... plus they have that blue tint to cut down on glare from other cars.
^^^

#96
05-30-2013, 11:34 AM
Yeah, I'm not sure on the exact differences between the USDM & JDM, but they're definitely different (convex, I think it is, etc.) and also I think the viewing angles from the actuators/motors from what I take it from the fitfans.br post.
I figure those blue heated you posted would be a good choice since both sides are wide angle... plus they have that blue tint to cut down on glare from other cars.
I figure those blue heated you posted would be a good choice since both sides are wide angle... plus they have that blue tint to cut down on glare from other cars.
ok, on OUR Driver Side (Left Side), the viewing angle is not WIDER than
our standard USDM mirror,
On OUR Passenger Side (Right Side), the mirror it self I think had more viewing angle then our standard USDM mirror (thus the object looks a bit smaller then USDM mirror), BUT
the mirror actuator on the Right Side had to me
Adjusted by pressing the "LEFT" button on the SWITCH to the maximum position so I can get the ideal viewing position.
again, at the maximum LEFT position of the Driver/Right Side, I manage to get the same position as the USDM mirror for my ideal viewing angle, the different is the USDM RIGHT mirror still can have more movement to the LEFT compare to this JDM one.
This won't be a problem unless the driver is shorter person (ie. he/she adjusted the seating position much closer to the steering wheel),
and if you are a tall person (adjust the seat farther from steering wheel),
this JDM mirror will be just fine.
#97
06-02-2013, 02:54 AM
USPS deliver the Relay Socket from FRYS today,
so I decided to start building the relay and diode circuit.
Here it is,
Start by plugging 2 relay on to 2 sockets,
then putting both Relay's into it's own clear plastic packaging.
To route the cable, I cut holes on the clear plastic.
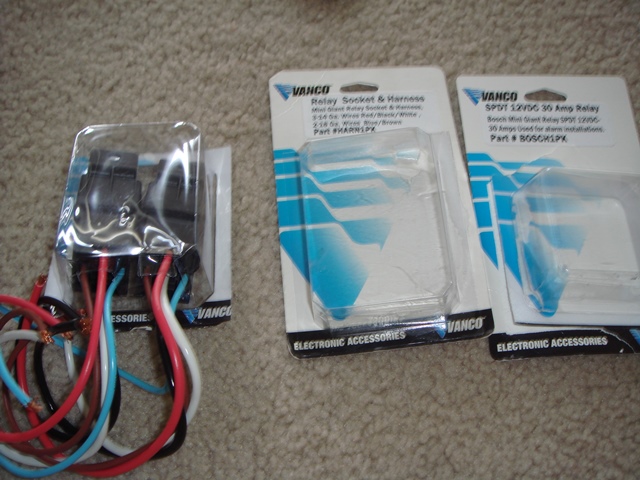
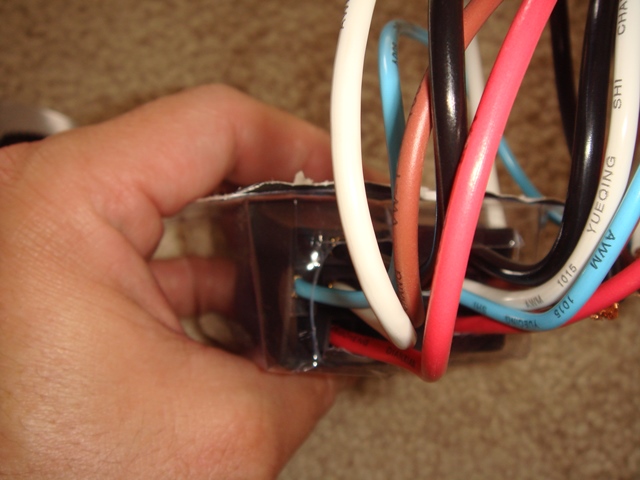
(My nail was still yellow from painting my brake caliper hahaha)...
Ok, here is the schematic:
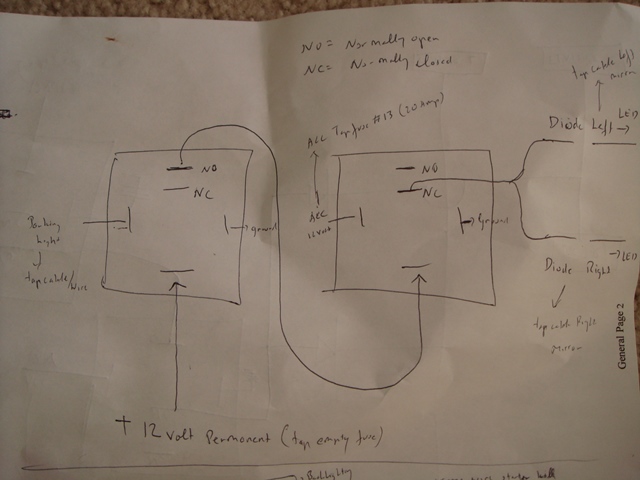
As you can see on the schematic above,
First Relay is the one connected to the 12 volts permanent power that I am going to get from tapping an empty fuse location on fuse box.
The 12 volts will be triggered on (Normally Open) by the Parking Light Wire.
The Second Relay getting the power from the output of the first relay.
and The Second Relay Output wire is connected to Normally Closed position.The Trigger is going to came from Fuse#13 (Accessory),
so when the Key turn to ACC, the Second Relay will NOT have any output,
but when the Key turn to OFF, then the second Relay will allow current from the first relay to pass through into the Diode and later to the Turn Signal LED.
This mean the Turn Signal will only be turn on when key is at off position,
and alarm is triggering the parking light to blink when lock or unlock !
The only weakness is, if you turn the key to OFF position, but you forgot to turn off your parking light before you turn the key to OFF position. this mean the turn signal light will all light up (not blinking) because the parking light were on.
After the second relay, we have Diode for each side (2 diode for left and right), this to prevent the Right Turn Signal from blinking when we just want Left Turn signal turn on (like when we are doing a left turn while driving)
and vice versa. otherwise each time you trigger one side turn signal, both side will be blinking like hazard light mode.
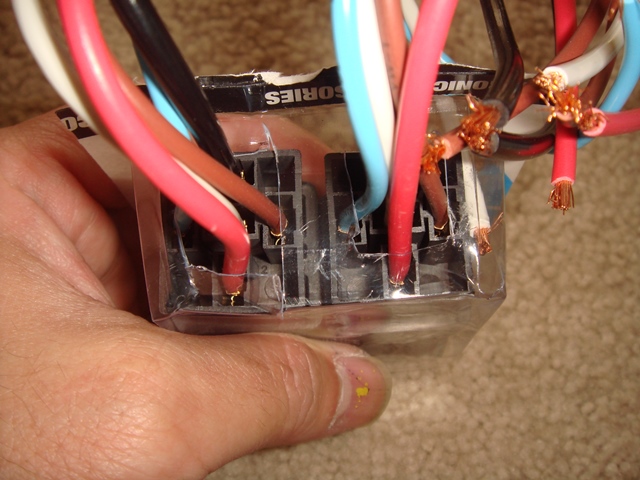
on this picture below, it show I connect output of First Relay to Input of Second Relay:
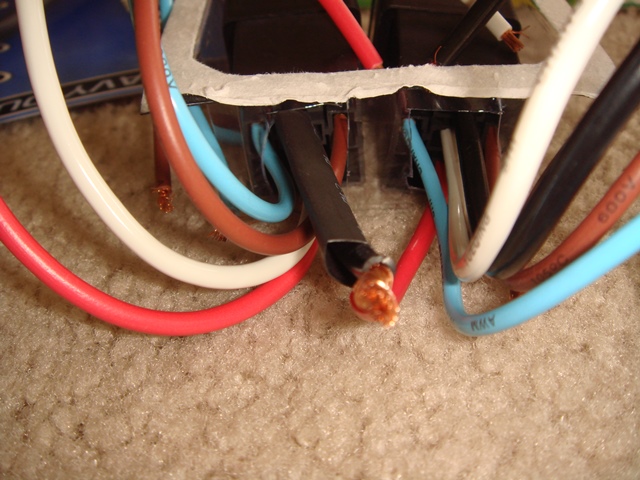
on this picture below it show I soldered each relay Ground (from the Trigger signal) together into just one single ground cable, that later will be connected to the chassis for ground.
This picture below show how I soldered and then shrink warp the diode.
The Right leg is connected to the Second Relay output, and the Left Leg is going to be connected to the turn signal wire (car wire).
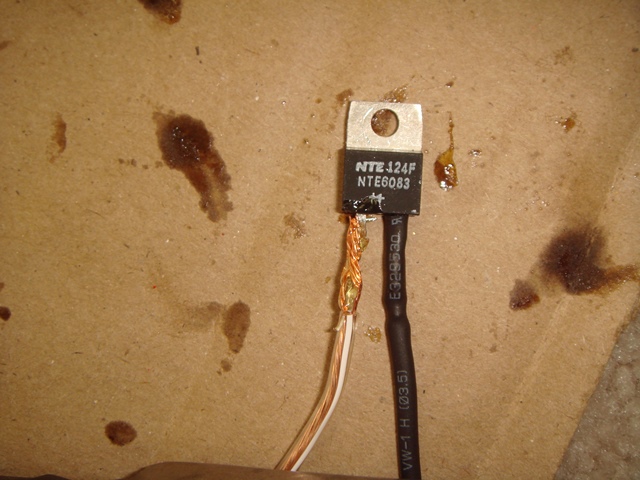
the picture below show how I shrink warp both leg of the diode,
and then cover the heat sink of the diode with shrink wrap too,
cause the heat sink actually connected to the left leg of the diode,
so I don't want the heat sink to ever touch the chassis cause this will
blow the fuse from short circuit. I also think the heat sink will never get warm anyway
since the current that going to pass through is well below the
capability of this diode !
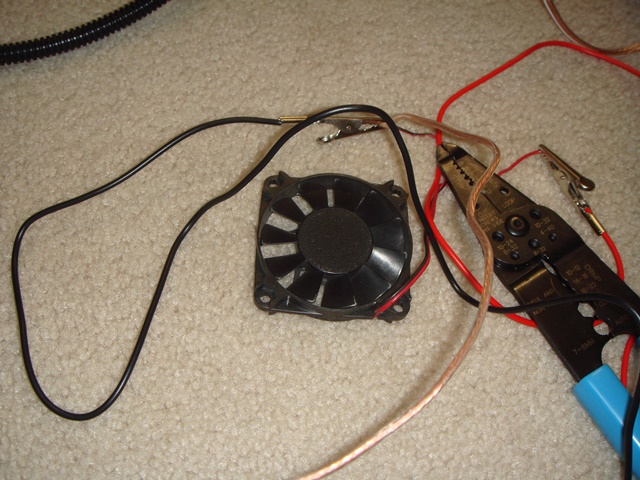
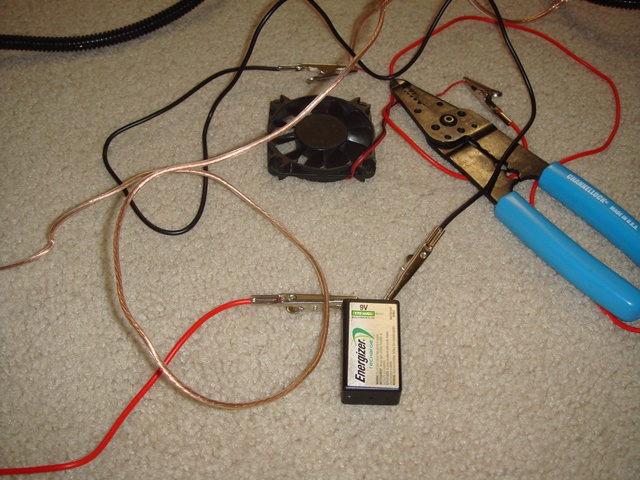
after all wire connected, I do testing with 9 volts battery and small computer fan (to replace the LED since I don't have any LED right now).
everything went well on the test !
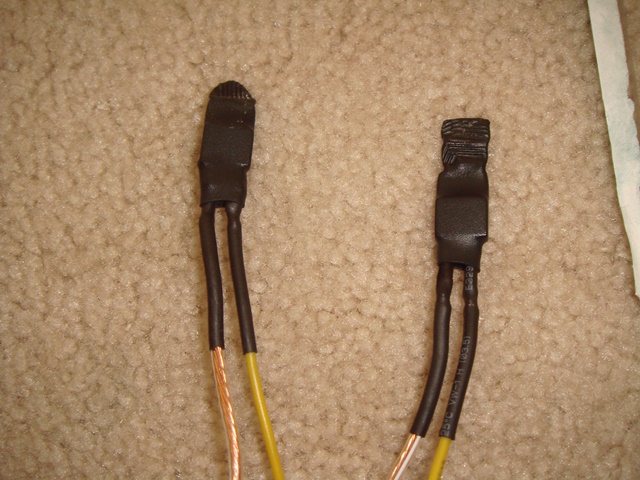
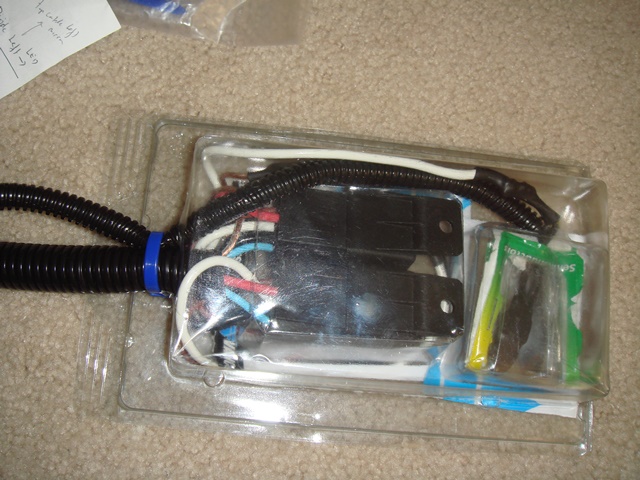
so I start doing the final packaging by putting the diode into it's own clear plastic packaging then combine with the relay packaging into a bigger plastic packaging. This to make them easier to be placed under the dash panel and also safe from any short circuit trouble.
here are the final pictures:
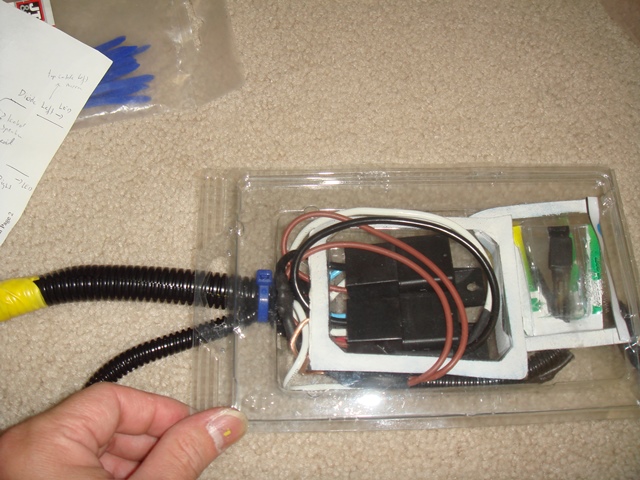
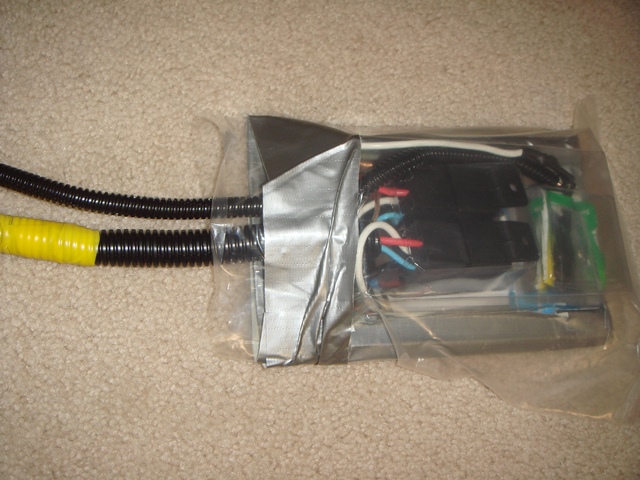
Now they are ready to be installed,
hopefully I will install them on Monday,
together with the heated mirror wiring.
I am sure it would be fun to watch the parking light and the turn signal light all blinking simultaneously when we lock or unlock the car, especially to have the turn signal on the JDM Door Mirror blink too
it would be even better later when the JDM door mirror turn signal blink while they automatically fold (or unfold) when I install the JDM auto folding wiring kit
so I decided to start building the relay and diode circuit.
Here it is,
Start by plugging 2 relay on to 2 sockets,
then putting both Relay's into it's own clear plastic packaging.
To route the cable, I cut holes on the clear plastic.
(My nail was still yellow from painting my brake caliper hahaha)...
Ok, here is the schematic:
As you can see on the schematic above,
First Relay is the one connected to the 12 volts permanent power that I am going to get from tapping an empty fuse location on fuse box.
The 12 volts will be triggered on (Normally Open) by the Parking Light Wire.
The Second Relay getting the power from the output of the first relay.
and The Second Relay Output wire is connected to Normally Closed position.The Trigger is going to came from Fuse#13 (Accessory),
so when the Key turn to ACC, the Second Relay will NOT have any output,
but when the Key turn to OFF, then the second Relay will allow current from the first relay to pass through into the Diode and later to the Turn Signal LED.
This mean the Turn Signal will only be turn on when key is at off position,
and alarm is triggering the parking light to blink when lock or unlock !
The only weakness is, if you turn the key to OFF position, but you forgot to turn off your parking light before you turn the key to OFF position. this mean the turn signal light will all light up (not blinking) because the parking light were on.
After the second relay, we have Diode for each side (2 diode for left and right), this to prevent the Right Turn Signal from blinking when we just want Left Turn signal turn on (like when we are doing a left turn while driving)
and vice versa. otherwise each time you trigger one side turn signal, both side will be blinking like hazard light mode.
on this picture below, it show I connect output of First Relay to Input of Second Relay:
on this picture below it show I soldered each relay Ground (from the Trigger signal) together into just one single ground cable, that later will be connected to the chassis for ground.
This picture below show how I soldered and then shrink warp the diode.
The Right leg is connected to the Second Relay output, and the Left Leg is going to be connected to the turn signal wire (car wire).
the picture below show how I shrink warp both leg of the diode,
and then cover the heat sink of the diode with shrink wrap too,
cause the heat sink actually connected to the left leg of the diode,
so I don't want the heat sink to ever touch the chassis cause this will
blow the fuse from short circuit. I also think the heat sink will never get warm anyway
since the current that going to pass through is well below the
capability of this diode !
after all wire connected, I do testing with 9 volts battery and small computer fan (to replace the LED since I don't have any LED right now).
everything went well on the test !
so I start doing the final packaging by putting the diode into it's own clear plastic packaging then combine with the relay packaging into a bigger plastic packaging. This to make them easier to be placed under the dash panel and also safe from any short circuit trouble.
here are the final pictures:
Now they are ready to be installed,
hopefully I will install them on Monday,
together with the heated mirror wiring.
I am sure it would be fun to watch the parking light and the turn signal light all blinking simultaneously when we lock or unlock the car, especially to have the turn signal on the JDM Door Mirror blink too
it would be even better later when the JDM door mirror turn signal blink while they automatically fold (or unfold) when I install the JDM auto folding wiring kit
Last edited by BMW ALPINA; 06-02-2013 at 03:07 AM.
#98
06-03-2013, 12:39 AM
I was planning to start installing the relay on Monday,
but I could not hold my self, and decide to do it today hahaha
Here it goes,
Usually when you connect the JDM Blinker, you just connect the wire from the LED Blinker to the cable at the fusebox, in my case,
I add/connect one more cable that is the output of the second relay (after the diode).
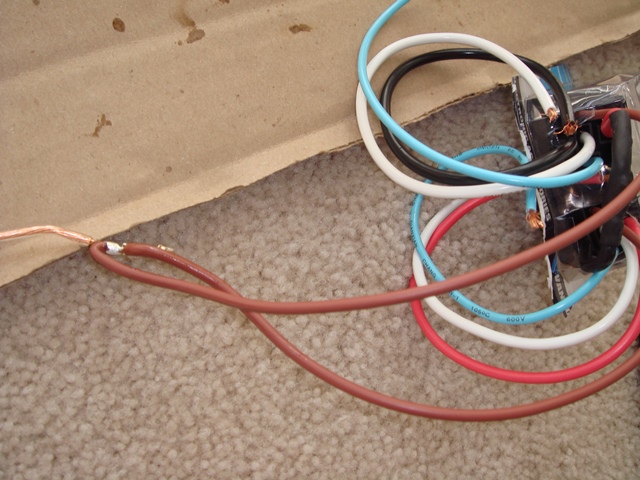
Here you can see below 3 cable joint/soldered into one :
then as usual, I use shrink tube to protect the soldered connection:
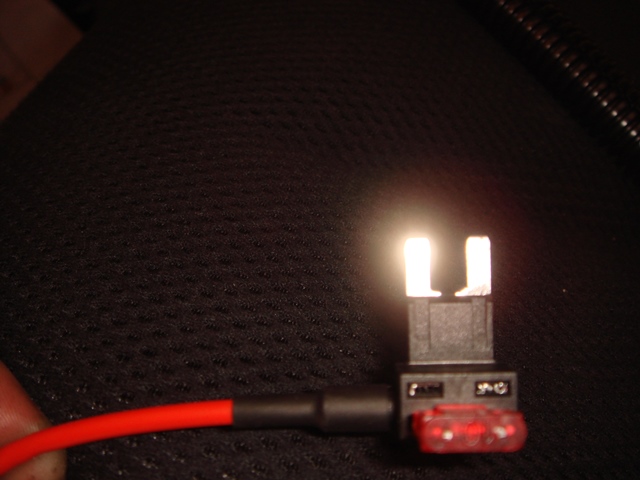
HEATED MIRROR CONNECTION:
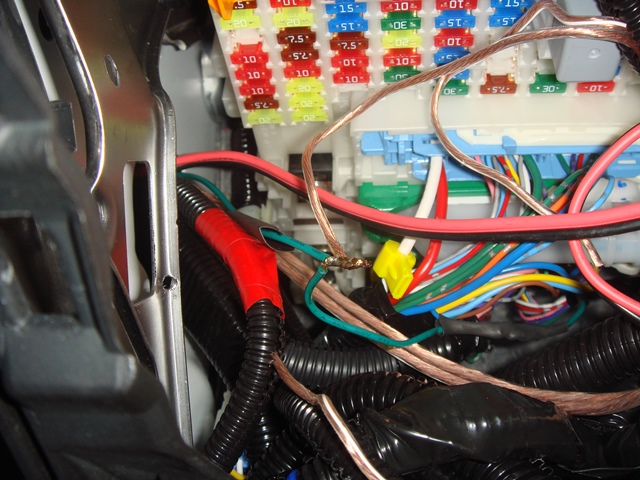
I have not connected the Heated Mirror, so today, I am going to do it,
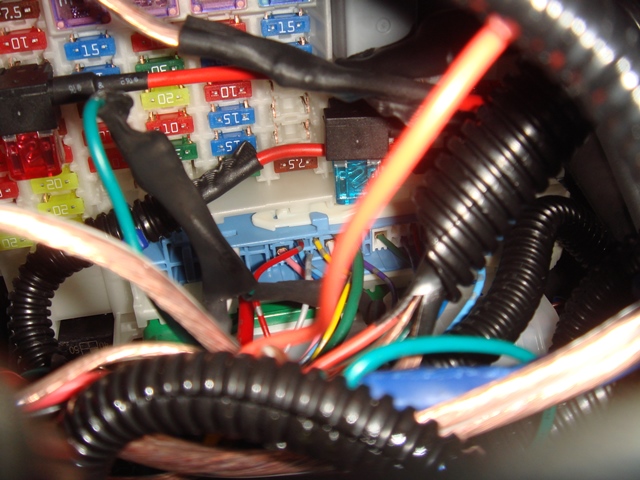
I use TAP A FUSE, and tap Fuse Location #55, shown at the pictures below. Before I connect/soldered the wire, I check and this fuse only have power when I press the Rear Defogger Switch on the dashboard,
so this is the CORRECT one to tap !
Now, the tap a fuse had 2 slot, one for the incumbent connection,
the other for the new connection,
since inside Fuse #55 it only have one pin, that mean it do not have any
incumbent connection going anywhere, so you can just use 1 fuse
for the new connection. (although it is better to put 2 fuse, so you can plug the tap a fuse either way, left or right, this is kinda hard to explain until you plug it in yourself and notice that if you just use 1 fuse, then
the plug can only be plug 1 way (either left or right), the other way will
result in no power).
Take a real close look and you will notice that I just CUT the GREY Wire,
This Grey Wire is the connection to the Parking Light,
and I will use this as the Trigger to Relay#1
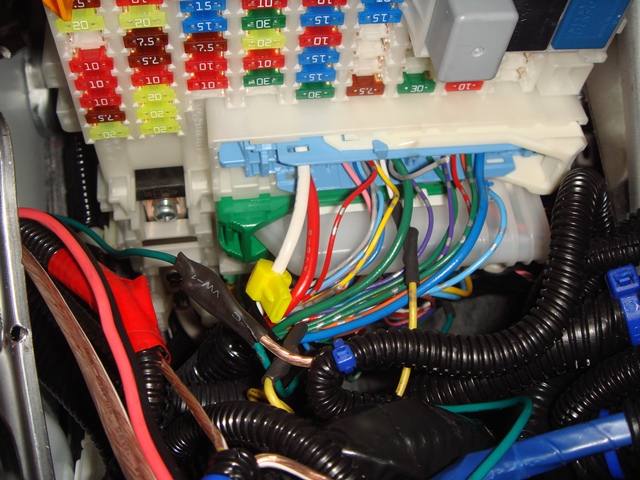
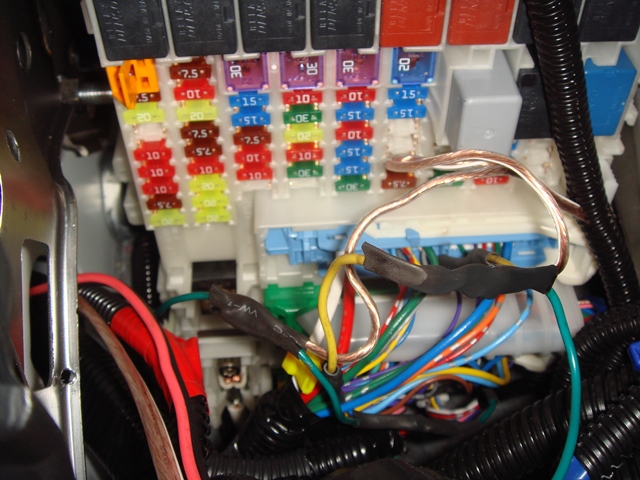
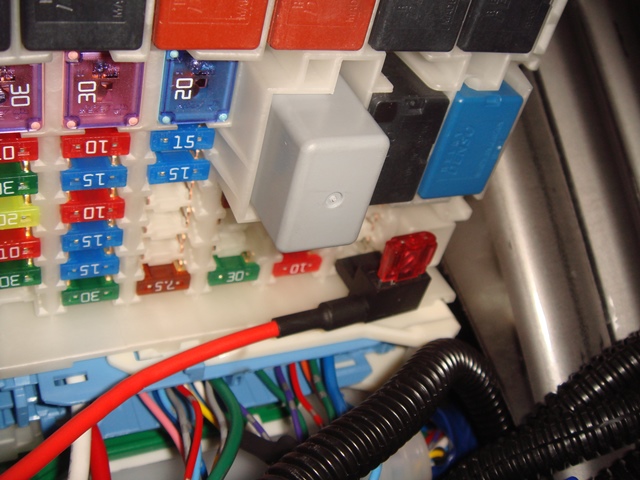
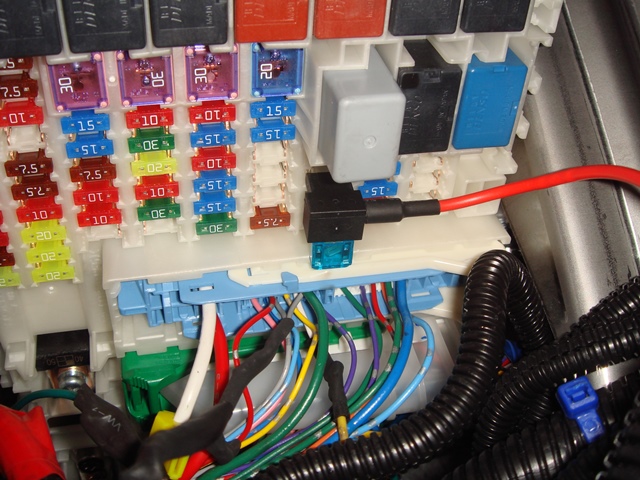
Now below is Fuse#13 which only have power when we turn the key to ACC position, I need this for Trigger to Relay#2 :
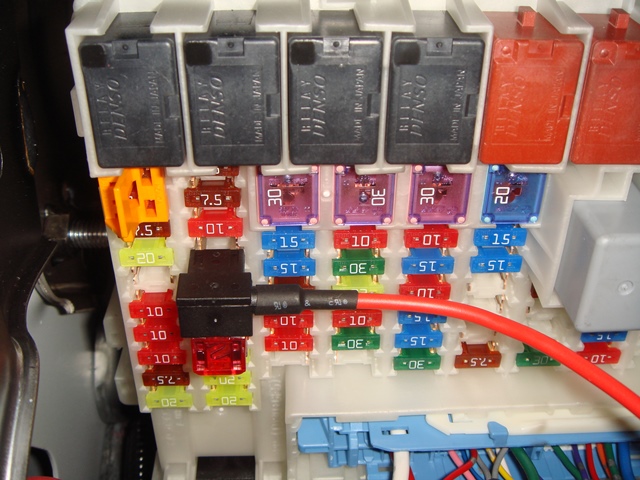
Finally, I need CONSTANT Always on power for the Power input into Relay#1, and I tap it from Fuse#45 (empty fuse) always ON.
Another pictures after I soldered all the connection, and then time to test
When I test it, everything works as expected
The LED Blinker, Blink when I Lock or Unlock the car using the Alarm Key.
Now the Rear Turn Signal in the Rear Tail Light while the Parking Light in the Rear Turn Signal is LED,
so When I lock/unlock the car, something cool happened
Because the Turn Signal conventional bulb takes longer to turn on then the LED,
it like there is a rhythmic delay between the Parking Light on, and few micro second later the LED turn signal turn on
It is also very bright when I lock my car from far away,
and the blinking on the JDM door mirror LED turn signal is also a cool sight from side view
It is very satisfying for me after I spent so many hours doing the wiring
Ok, for the time being, I will not have more update on this since
I had connect all the connection (LED Blinker, Folding Motor, and Mirror HEATER),
I will update this thread again once I had extra budget to buy the JDM Automatic Folding and Automatic Tilt Function
but I could not hold my self, and decide to do it today hahaha
Here it goes,
Usually when you connect the JDM Blinker, you just connect the wire from the LED Blinker to the cable at the fusebox, in my case,
I add/connect one more cable that is the output of the second relay (after the diode).
Here you can see below 3 cable joint/soldered into one :
then as usual, I use shrink tube to protect the soldered connection:
HEATED MIRROR CONNECTION:
I have not connected the Heated Mirror, so today, I am going to do it,
I use TAP A FUSE, and tap Fuse Location #55, shown at the pictures below. Before I connect/soldered the wire, I check and this fuse only have power when I press the Rear Defogger Switch on the dashboard,
so this is the CORRECT one to tap !
Now, the tap a fuse had 2 slot, one for the incumbent connection,
the other for the new connection,
since inside Fuse #55 it only have one pin, that mean it do not have any
incumbent connection going anywhere, so you can just use 1 fuse
for the new connection. (although it is better to put 2 fuse, so you can plug the tap a fuse either way, left or right, this is kinda hard to explain until you plug it in yourself and notice that if you just use 1 fuse, then
the plug can only be plug 1 way (either left or right), the other way will
result in no power).
Take a real close look and you will notice that I just CUT the GREY Wire,
This Grey Wire is the connection to the Parking Light,
and I will use this as the Trigger to Relay#1
Now below is Fuse#13 which only have power when we turn the key to ACC position, I need this for Trigger to Relay#2 :
Finally, I need CONSTANT Always on power for the Power input into Relay#1, and I tap it from Fuse#45 (empty fuse) always ON.
Another pictures after I soldered all the connection, and then time to test
When I test it, everything works as expected
The LED Blinker, Blink when I Lock or Unlock the car using the Alarm Key.
Now the Rear Turn Signal in the Rear Tail Light while the Parking Light in the Rear Turn Signal is LED,
so When I lock/unlock the car, something cool happened
Because the Turn Signal conventional bulb takes longer to turn on then the LED,
it like there is a rhythmic delay between the Parking Light on, and few micro second later the LED turn signal turn on
It is also very bright when I lock my car from far away,
and the blinking on the JDM door mirror LED turn signal is also a cool sight from side view
It is very satisfying for me after I spent so many hours doing the wiring
Ok, for the time being, I will not have more update on this since
I had connect all the connection (LED Blinker, Folding Motor, and Mirror HEATER),
I will update this thread again once I had extra budget to buy the JDM Automatic Folding and Automatic Tilt Function
Last edited by BMW ALPINA; 07-03-2013 at 02:33 PM.
#99
08-03-2013, 02:34 PM
i have a little question, i found this mirror control switch with folding function at ebay. it was removed from 2009 Jazz.

but i look quit different to your and to this one shown in japanese DIY pic 2.


is this one i found not the right one? because it has this holes for the screw.
but i look quit different to your and to this one shown in japanese DIY pic 2.
is this one i found not the right one? because it has this holes for the screw.
#100
08-03-2013, 03:00 PM
I think you got the right one, because I think that part where it have holes for the screw is actually an OUTER CASING of the switch itself.
so apparently the eBay seller decide to remove it with the outer casing intact...
but I have not installed mine yet, (although I already had the switch for CRV on my hand now), so I can NOT be 100% sure...
edit:
wait a minute,
after looking at my own CRV switch, now I am pretty sure that the eBay switch is the correct one for you too.
that part where it had screw, well it is the outer casing that will secure the switch to the dashboard.
the only think that I would suggest you is to try buy the switch for CRV instead for Honda Fit,
because the one for Honda Fit do NOT have backlighting, while the CRV switch will glow in the night (the white lettering part),
when you turn on your head light.
Last edited by BMW ALPINA; 08-03-2013 at 03:06 PM.