
Sound Deadening Project (Lots of Pics)

It's a subcompact car, not a luxury sedan. It's going to be loud by design.

New Member
Joined: Mar 2013
Posts: 14
From: Phoenix, AZ
I need to sound proof the hatch the top right piece of plastic is vibrating cuz of the 2 12" subs i got in the back. When i put my hand over it stops making the horrible rattle. Does anyone have experience sound deadening the hatch in order to solve my problem?

New Member
Joined: Aug 2013
Posts: 1
From: USA
Sequence or Priority
This is a lot of great, detailed information! I am newby at this so I want to do things in small chunks. If i want to choose a part of the car to work on, where should I start with to get the best noise reduction? What would be next? Etc.
Does it matter? Should I focus on the easy jobs first as I learn how to do it?
Does it matter? Should I focus on the easy jobs first as I learn how to do it?
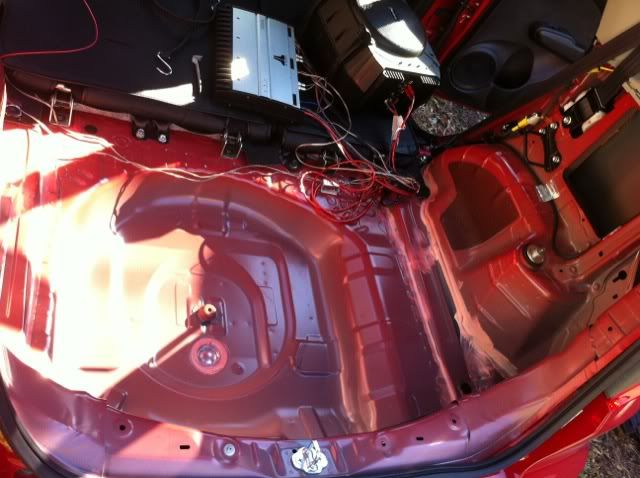
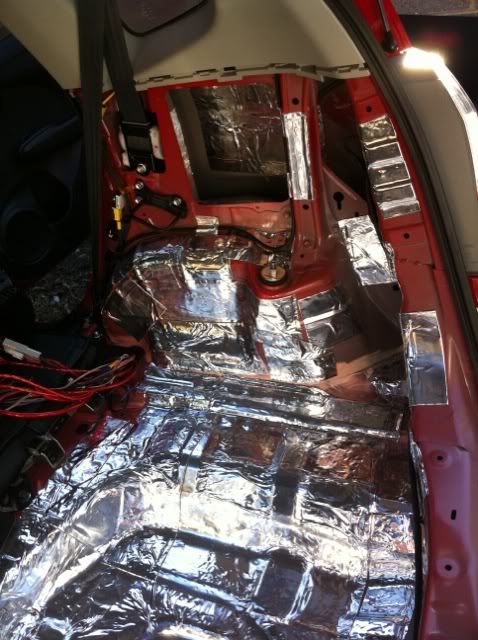
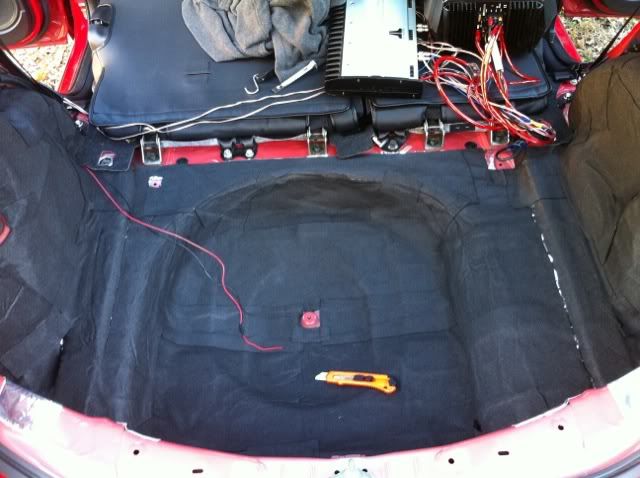
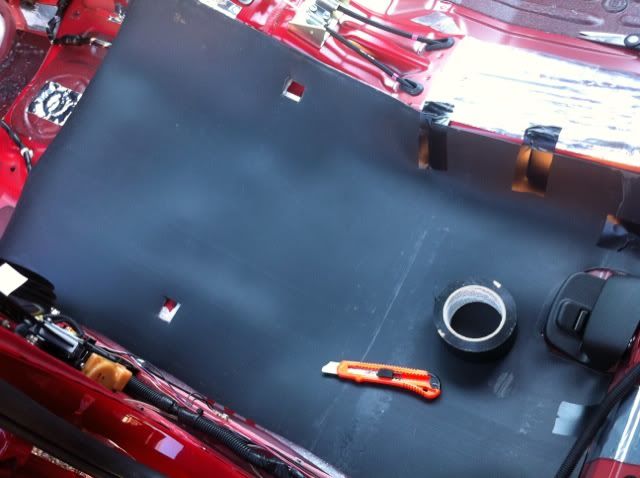
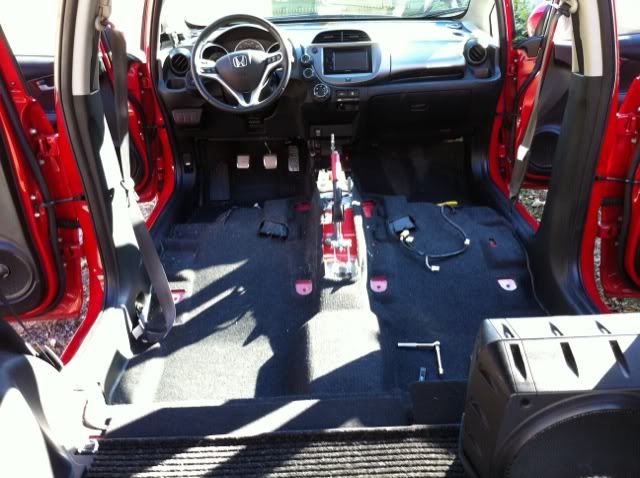
I spent the last few weekends sound deadening my GE8 Fit and thought I would share some pics and info. I used Raamat CLD tiles, Peel & stick ensolite foam, and 1/8" Mass Loaded vinyl (MLV). I did the trunk, hatch, doors, and floorboard.
Total time spent: 4 days
Cost (Materials): ~$250
Total Weight added: 48lbs
My Fit is much quieter now. Pretty much the only thing I can hear is the whiny engine. Very little road noise coming up through the floor, and its hard to hear tractor trailers passing on the highway. The fit also feels MUCH sturdier and heavier. I can drive down cobblestone roads without hearing creaking coming from every panel. I'm happy with the results
Audio stuff added:
Polk MM6501 in front
Polk MM651 in back
JL 300/4 amp
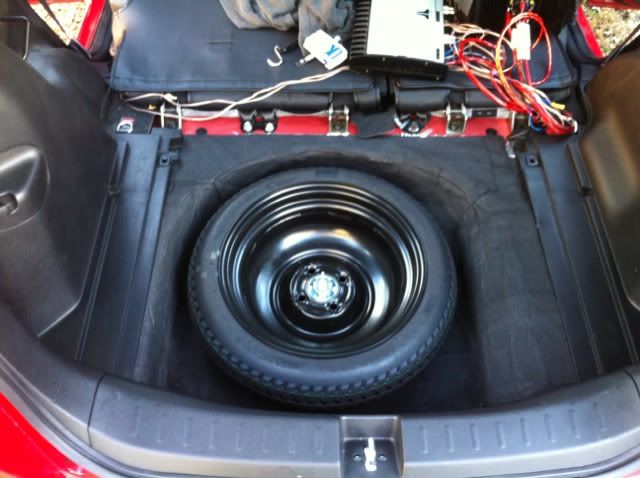
Okey, I started with he trunk and wheel wells:
Stripped Trunk:
Added CLD Tiles:
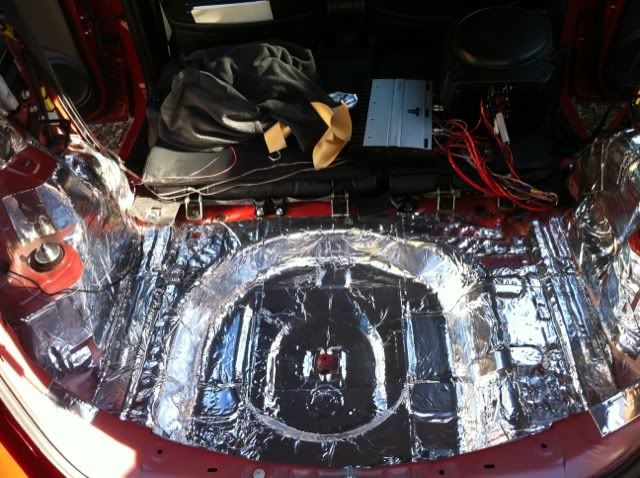
Ensolite:
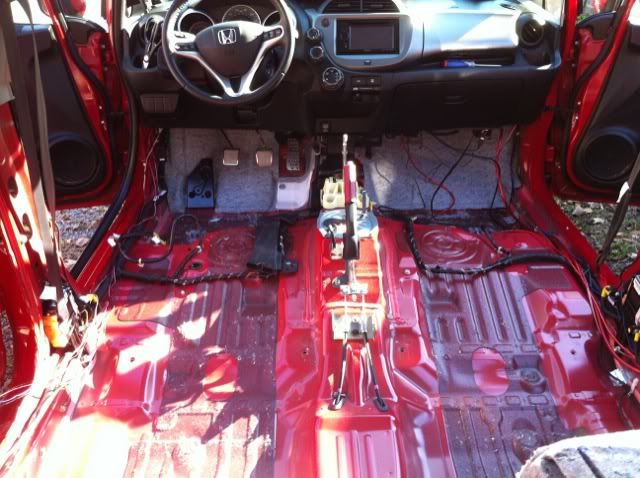
Floor:
Stripped:
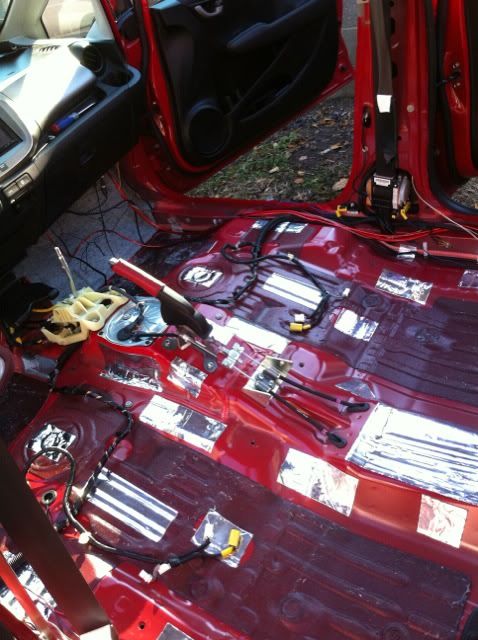
I started by placing CLD tiles in some locations:
Now I cut out some underlayment foam as a decoupler. Its easier to cut the foam and then transfer that to the MLV as its quite heavy.
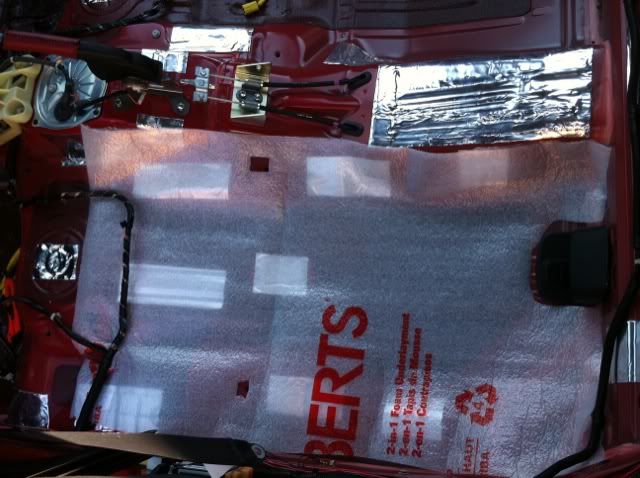
Now some MLV:
Seal up any seams with vinyl tape, and make sure to get up as far as possible under the cotton matts in the firewall.
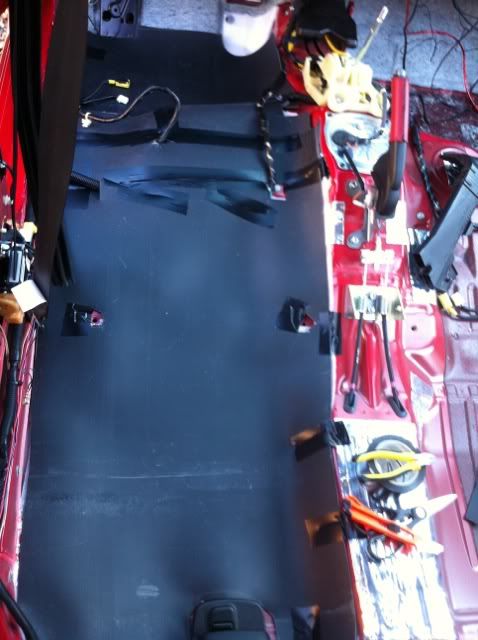
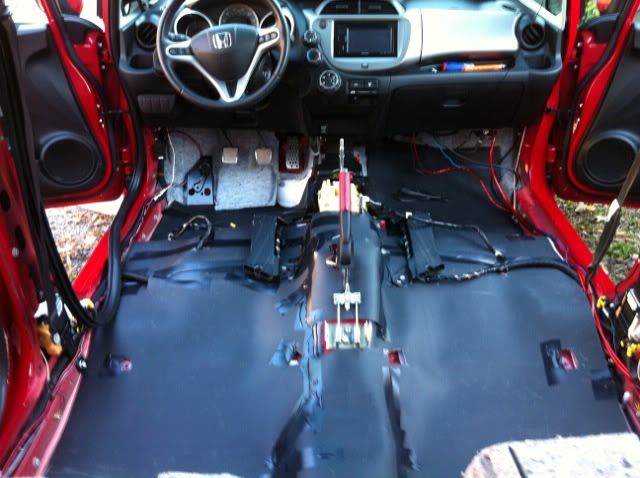
Now pull the carpet back over and make sure everything lines up:
Total time spent: 4 days
Cost (Materials): ~$250
Total Weight added: 48lbs
My Fit is much quieter now. Pretty much the only thing I can hear is the whiny engine. Very little road noise coming up through the floor, and its hard to hear tractor trailers passing on the highway. The fit also feels MUCH sturdier and heavier. I can drive down cobblestone roads without hearing creaking coming from every panel. I'm happy with the results
Audio stuff added:
Polk MM6501 in front
Polk MM651 in back
JL 300/4 amp
Okey, I started with he trunk and wheel wells:
Stripped Trunk:
Added CLD Tiles:
Ensolite:
Floor:
Stripped:
I started by placing CLD tiles in some locations:
Now I cut out some underlayment foam as a decoupler. Its easier to cut the foam and then transfer that to the MLV as its quite heavy.
Now some MLV:
Seal up any seams with vinyl tape, and make sure to get up as far as possible under the cotton matts in the firewall.
Now pull the carpet back over and make sure everything lines up:
Awesome DIY. Thanks for putting in the extra effort to share your process.
I've read through this several times but before I start collecting supplies to replicate, is there anything you'd do differently the second time around? Just curious.
Thread Starter
|
Member
Joined: Feb 2010
Posts: 176
From: Richmond, VA
Thanks!
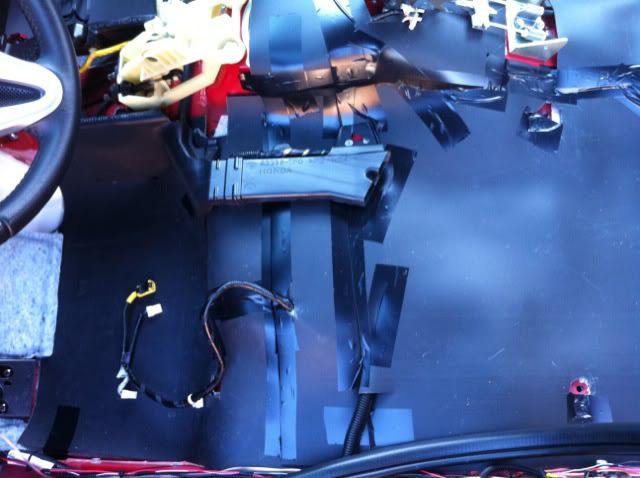
After a couple of years with the deadeneing im still very happy. I think the only area I would focus a little more on is the engine firewall. Maybe go up a little further from the inisde with the deadening materials or attack it from the engine side with some other materials (somehting heat and weather resistant). But maybe the engine is just more noticable as the rest of the car is so much quieter
The only other advice I can give is that if your at all thinking about changing out your carpeting I would do it at teh same time to avoid having to tear the car apart twice
The work that Sound deadening requires is quite hard and complicated, Still it is very comfortable to have the outside/Engine noise reduced. Most of People is prone to sound proof the outside, forgetting the engine. In my case, I did the doors, floor, roof.
But the road/engine noises kept on killing me, as they became more noticeable after the rest of the noises were damped.

The Engine compartment, can be sound proofed, but there is a hollow part, between the engine, the dashboard upper lid, that transports and, i would say, enhances the engine's and Front Shock absorber's sound into the Dashboard.... after a simple sound deadening, the car becomes incredible quiet.... ( specially if you have this uneven roads like the ones we have here in Shanghai...).


My recommendation to the Sound Proofing DIYers, is that doing sound deadening, and then doing other DIY is just a sort of waste of time... make a list of which projects you would do, and do as many as you can per area, so you dont have to redo everything all over again, as the pins get broken and plastic parts get bent ...is time consuming as well, for example:
Do engine sound deadening and change Spark plugs.
Floor sound deadening with stereo upgrading or seat heating
Doors sound deadening with Power mirrors, speaker upgrade.
Back door sound deadening and back wiper mod...
If you have to do some electrical connections for LEDs or Auto Climate Control ( where you have to remove the blower) then sound deaden the front wall at same time....
If you plan to install a bluetooth or homelink, then do roof sound deadening at same time
Cheers..
But the road/engine noises kept on killing me, as they became more noticeable after the rest of the noises were damped.
The Engine compartment, can be sound proofed, but there is a hollow part, between the engine, the dashboard upper lid, that transports and, i would say, enhances the engine's and Front Shock absorber's sound into the Dashboard.... after a simple sound deadening, the car becomes incredible quiet.... ( specially if you have this uneven roads like the ones we have here in Shanghai...).
My recommendation to the Sound Proofing DIYers, is that doing sound deadening, and then doing other DIY is just a sort of waste of time... make a list of which projects you would do, and do as many as you can per area, so you dont have to redo everything all over again, as the pins get broken and plastic parts get bent ...is time consuming as well, for example:
Do engine sound deadening and change Spark plugs.
Floor sound deadening with stereo upgrading or seat heating
Doors sound deadening with Power mirrors, speaker upgrade.
Back door sound deadening and back wiper mod...
If you have to do some electrical connections for LEDs or Auto Climate Control ( where you have to remove the blower) then sound deaden the front wall at same time....
If you plan to install a bluetooth or homelink, then do roof sound deadening at same time
Cheers..
Last edited by camivill; Mar 10, 2014 at 07:51 AM.

Member
Joined: May 2011
Posts: 60
From: Minneapolis

I am doing this right now on my GD3.
I used 1lb/sq ft MLV, and I'm easily going to use 100 sq ft. I think the estimates by the OP are way too low.
The added weight is noticeable. I only have the rear done right now, but I can tell the back end is heavier.
I used 1lb/sq ft MLV, and I'm easily going to use 100 sq ft. I think the estimates by the OP are way too low.
The added weight is noticeable. I only have the rear done right now, but I can tell the back end is heavier.

Member
Joined: Jul 2009
Posts: 273
From: Chicago
oh hell, I've been looking for this thread forever. I'll probably be ordering supplies next month and installing piecemeal. Camivill, thanks for adding the engine bay portion to this DIY. I'll try to add some pics of doing the roof. Anyone try doing the pillars as well or is it overly involved with trim removal vs payout?
I know some suppliers have been mentioned, but they are a few years old. has anything changed or are their better stateside suppliers now?
I know some suppliers have been mentioned, but they are a few years old. has anything changed or are their better stateside suppliers now?
Pillars
The roof is quite simple, but just deadens the rain... Lol
It's all mostly flat, but there are support bars all across, which is better to fill within... Specially the support next to the windshield.
The front pillars is better to be filled within, the middle ones have the belt system within, but if u manage to take it out, can be done... The back pillars have plenty of space to fill... The back hollow spaces are right above the tires so it's good to do some extra....
I did fill the door seal with a 6mm tubing ( which is hollow inside as we'll) using the upper/back corner which has an access... ( back door seal is located at upper/front corner).....I also put an additional door seal... That killed a weird wind sound when driving at more than 80 km/Hr....
Is very quiet now.... Lol

Member
Joined: Aug 2014
Posts: 58
From: arlington, va
For my 08 Fit Sport, I got Raammat and Ensolite(Package #1 on their website). Additionally, I got 3M 03584 Professional Grade Rubberized Undercoating from Amazon to spray on the wheel wells.
I only had time to do the hatch door and two front doors. The customer service guy told me not to worry about a roller, that I could do it all by hand. I'd advice you DO get a roller because I've got two cuts on my thumbs from going over the recently cut aluminum mats. Other than that, I basically covered the entire two doors with the mat and then ensolite in top. So far, I only notice slightly noticeable change in noise reduction. Hopefully after I do the rear hatch floor and two rear doors, the sound will be much reduced. I am hoping the 3M spray will also reduce noise from rocks and dirt hitting the wheel wells that are made of tinny metal. I have no idea how I can reduce the sound coming from the engine. Are there any areas I can put raammat between the engine and cabin without having to take out the dashboard?
I only had time to do the hatch door and two front doors. The customer service guy told me not to worry about a roller, that I could do it all by hand. I'd advice you DO get a roller because I've got two cuts on my thumbs from going over the recently cut aluminum mats. Other than that, I basically covered the entire two doors with the mat and then ensolite in top. So far, I only notice slightly noticeable change in noise reduction. Hopefully after I do the rear hatch floor and two rear doors, the sound will be much reduced. I am hoping the 3M spray will also reduce noise from rocks and dirt hitting the wheel wells that are made of tinny metal. I have no idea how I can reduce the sound coming from the engine. Are there any areas I can put raammat between the engine and cabin without having to take out the dashboard?
In my case, I did the doors, the roof and the floor.... then found the back wheels too noisy, then i did the back wheels wells... then the engine noise and front wheels were just too loud, then did the front wheels.. then the Engine noise was just weirdly high...
I took out the carpet on the front as much as possible up.. managed to go like 45%.. then i check on the engine cabin, found out a hollow area ( where the air intake and the whipper motor are located... ( will have to remove the black plastic cover between the engine lid and the wind shield... doing deadening there was the most effective cut-noise from the engine/front struts...
.. after that was done, then was wind noise from side doors... so i stuffed a rubber into the door's seal...
My wife got hit by a car, and she said she didn't hear a thing!

Member
Joined: Aug 2014
Posts: 58
From: arlington, va
Raammat
Just got done putting in Raammat Package #1 into all 4 doors, hatchdoor, and the trunk bottom. The rear wheel wells were covered 75% as well.
Unfortunately, I can't hear any difference in noise insulation. The only thing is when going over small bumps, the sound has more thud than tink.
I'll give an update once I cover the exterior of the wheel wells with rubberized coating but so far...$190 on Raammat is definitely not worth it.
Unfortunately, I can't hear any difference in noise insulation. The only thing is when going over small bumps, the sound has more thud than tink.
I'll give an update once I cover the exterior of the wheel wells with rubberized coating but so far...$190 on Raammat is definitely not worth it.
Sound deadening...
Yeah the sound deadening is dissapointing, because we cover everywhere without actually thinking... lol...
After I finished the WHOLE inside, I realized the sound of engine was too loud, then I did the U shaped space at the top of engine compartment and voila, was like magic, then added a 1 cm tube pipe to the door seals, and again "voila" was magic all over again...
Regarding the door seals... I added a 6 mm tube, useless, then i went 8 mm, with core empty...useless, then changed again to 1 cm diameter filled rubber with the best results....
Now i am trying to do the posterior wall of the Engine compartment, havent got anyone done that with pics yet...

New Member
Joined: Jul 2015
Posts: 1
From: Independence, LA USA
I need some help. I'm in the midst of installing some sound deadening in my 2013 FIT with automatic transmission. With the automatic transmission, how does one go about removing the gear shift knob in order to remove the console? All images that I've seen are of the manual, but I've found no information as to the automatic.
Thanks in advance,
A
Thanks in advance,
A
I sound deadened mine last year like that with Fatmat but honestly didn't really notice much if any difference. I can still hear all the road noise and feel all the bumps just fine lol.
I certainly wouldn't spend the time to do it again.
I certainly wouldn't spend the time to do it again.

Member

Joined: Jan 2010
Posts: 341
From: Anchorage, AK
The noise level in my car approaches 100 db on the highway, as measured by a SPL meter. Clearly in hearing-damage range over long periods. After driving it non-stop for five days down the Alcan I was about to go crazy. The old cement roads of Seattle are neither quiet nor gentle. A one hour-long drive on the interstate a few days ago left my ears ringing and I was squirming in my seat.
I'm nearing my first tire replacement and hoping that helps some. (Over five years on factory tires.)
I'm considering spending the money on the materials to do this project myself, following the OP's methods as closely as I can. I love my Fit, but the interior noise is embarrassing and frustrating. Fingers crossed!
Member
Joined: Jan 2010
Posts: 341
From: Anchorage, AK
Looking forward to hearing about your experience. I would have to do this alone or pay a shop to do what I want. I don't have a good place to park my car for a couple days while I do it, though. (Apartment dweller.) Having a helper would make it better. :-)
Member
Joined: Jul 2009
Posts: 273
From: Chicago
well truth be told I am a condo dweller with a tiny garage and I got a few weeks before my garage ornament track car returns. Your situation should not dissuade you. You tackle it in segments, a door panel this day, the trunk the next.... the only part you should need an uninterrupted day with are the floors. Definitely don't pay a shop for that work, it is guaranteed to be half-assed at an extreme premium for not having a few hours to spare here and there.
I'll cover unexpected uninstall/install issues I encounter (I am assuming the OP won't mind at this point to expand upon his work). I do want to officially cross reference BMW ALPINA's thread because he does such a thorough job with things: https://www.fitfreak.net/forums/2nd-...cld-tiles.html
I'll cover unexpected uninstall/install issues I encounter (I am assuming the OP won't mind at this point to expand upon his work). I do want to officially cross reference BMW ALPINA's thread because he does such a thorough job with things: https://www.fitfreak.net/forums/2nd-...cld-tiles.html
Don't forget to stuff as much s possible material over the A and C pillars, as well as on the sides under the dashboard. After you make your car quiet you will hear the engine noise more pronounced.. ( thats why the A pillar over the dash corners, and bellow the dash are important to work on little bit) and after I quiet the engine.. I could hear the rear axle noises more pronounced... ( thats when the C pillar is important, because the small spaces behind the safety belts are located work as a tunnel bringing up noise all way up and around)...
So be aware of details, with the pillars, prevent noise coming up as well, from corners, in this way your results will be good and you won't have to do like me ... 3 times doing this all over .....
So be aware of details, with the pillars, prevent noise coming up as well, from corners, in this way your results will be good and you won't have to do like me ... 3 times doing this all over .....