
Fried my OBD port?

Thread Starter
|
Member
Joined: Apr 2016
Posts: 172
From: O Canada

While changing the battery, my dad wanted to show off his OBD II port gadget that hooks up to a separate 12V battery and saves your audio/time/Bluetooth settings.
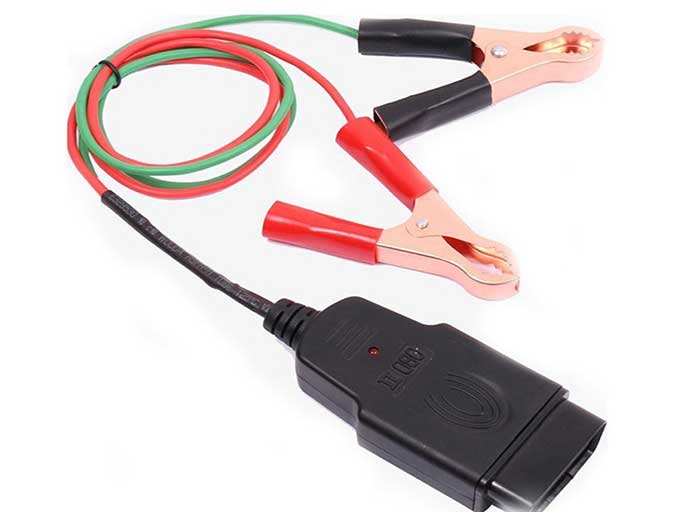
Unfortunately my dad plugged the OBD end first and before being able to connect to a 12V battery, the metal clamps (terminals) touched each other for a moment and his device (or my car) made an annoying beep for a few seconds.
Immediately after that the stereo/clock, interior dome/map lights and keyless locks have stopped working. Also the RPM and gas needles stay stuck at whatever level they were when I shut-off the engine, but both needles work fine when I put turn the key back on or have the engine running.
Everything else seems to work fine - and drove the car for an hour after, nothing else wrong.
I've just checked fuse #14 - Key Lock / Radio and it looked great. I've replaced it with a new 7.5 A fuse just in case and nothing changed. I also did the same with fuse #29 - Small Light and nothing changed. I didn't check the fuses for the door locks, I don't think that's the problem, because I can operate the door locks from the drivers door button when the key is in the ignition.
Do you guys have any idea what could be wrong or suggestions what else to check?
Has my dad successfully fried my OBD port + other interior electronic components?
Hopefully it's just a simple fuse change.
Last edited by Andrei_ierdnA; May 26, 2020 at 12:41 AM.
Member
Joined: Mar 2016
Posts: 1,325
From: Metro Atlanta, Georgia
Why not just unhook the car's battery and let it sit for a few minutes? The beeping makes me think that the car kinda.. goofed. But maybe in a way that was anticipated by engineers.
Once you hook the battery back up you'll need to re enter the car's security code into the stereo to get said stereo functioning, hopefully someone wrote it down and placed it in the glove box.
Once you hook the battery back up you'll need to re enter the car's security code into the stereo to get said stereo functioning, hopefully someone wrote it down and placed it in the glove box.
Thread Starter
|
Member
Joined: Apr 2016
Posts: 172
From: O Canada
However - I've just looked in the Owners Manual and I see those fuses on the positive terminal:
#1 - Battery
#2 - EPS
#3 - Horn/Hazard
All those components appear to be working fine. The battery is working, because I've started the car probably about 10 times since it happened. The EPS is probably Electronic Power Steering, which works fine. And the horn & hazard lights work too.
Why not just unhook the car's battery and let it sit for a few minutes? The beeping makes me think that the car kinda.. goofed. But maybe in a way that was anticipated by engineers.
Once you hook the battery back up you'll need to re enter the car's security code into the stereo to get said stereo functioning, hopefully someone wrote it down and placed it in the glove box.
Once you hook the battery back up you'll need to re enter the car's security code into the stereo to get said stereo functioning, hopefully someone wrote it down and placed it in the glove box.
Unfortunately for me, it can't be that simple.
So the problem with the OBD gadget that had its metal clamps touch and likely short-circuited something, happened while the original old battery was still connected. We didn't disconnect the old battery, since we wanted to use that OBD gadget to save the audio/time/Bluetooth settings while changing the battery after. So after the stupid incident, I disconnected the old battery and replaced it with a new one and the car was left without any power for about half an hour or so.
We also had to re-wire a new H4 connector for the passenger headlight (low/high beam) since the original one melted and wasn't working anymore. So while re-wiring the headlight H4 connector, I had disconnected the new battery terminals for another half hour or more.
Last edited by Andrei_ierdnA; May 27, 2020 at 03:32 PM.
Member
Joined: Mar 2016
Posts: 1,325
From: Metro Atlanta, Georgia
Sorry for the hold up, I'm still looking for the circuit diagram when i have time. Someone just posted up a service manual download I think, which would be worth a shot. you may find the necessary diagram before I do.

Member
Joined: Jul 2016
Posts: 390
From: Concord, Ca.
Since this hasn't been resolved yet I would take a slightly different approach now. If you have a simple 12 volt auto test light, I would check all the fuses in your fuse box under the dash and under your hood. If you don't have a test light, you can buy one at any auto parts store for about $3.00.
While you're checking the fuses you don't have to remove them from the fuse box to check them. On the face of each fuse you will see two small open ports in the plastic on each fuse which allows you to test each leg of the fuse for power. One foot is the supply side and the other side is the demand side. You also have to understand some fuses are hot all the time and some fuses are off until you turn the ignition on, so the easiest way is to check all fuses with the ignition on. Also remember to find a good ground for the test light's grounding clip. Test both feet of every fuse to be sure it's not blown. You should be able to do this process pretty quickly.
In thinking about what happened when your code reader was installed, the power for your code reader is supplied through the obd port wiring. Apparently your type of code reader supplies power to your electrical system from electrical cables you have to attach to an external 12 volt source through the port, so you don't lose electrical connection when you replace the car's battery. This lets you avoid having to do re-sets to things like your radio when the car loses power changing batteries. Since the electrical cables weren't hooked to an external source, you didn't introduce power to the port but when the cables touched they probably arched through the power source to the obd port.
Report back what you find. Eventually, if nothing turns up, you may have to trace down the wires to the obd port to find a solution.
Member
Joined: Mar 2016
Posts: 1,325
From: Metro Atlanta, Georgia
Holy hell I think I found what you need. It's not pretty, dude  I'll have to split it into 2 posts cuz this site always botches uploading the third attachment. Essentially what I got for you is a 12 page troubleshooting procedure. Had to segment it for uploading cuz I'm not tech savvy.
I'll have to split it into 2 posts cuz this site always botches uploading the third attachment. Essentially what I got for you is a 12 page troubleshooting procedure. Had to segment it for uploading cuz I'm not tech savvy.
Member
Joined: Mar 2016
Posts: 1,325
From: Metro Atlanta, Georgia
There yuh go. I think that'll walk you through step by step.
I will remark from minimal personal experience.. Sometimes these procedures may call for specific resistance readings, and if you're close to spec, you might wanna ignore it. What I'm referring to is my own experience servicing my AC system which was non-operational. Troubleshooting had me going through and testing compressor components and wiring. I continued til I hit the field coil on the compressor which ohmed at like.. 4, and spec called for 3.5 or some such sh*t. I took it off and examined it, found it actually had an indentation from melting, like someone pushed a hot pen into the side of its plastic bodess. Due to the fact that no one has ever had to replace one of these I had to go through honda. I brought a 3/8 ratchet with me (to ground the thing) and a multimeter and ohmed it out on the desk. it also came in at like.. 4.1. Out of spec range. Took it home and slapped it on anyways cuz at least this one wasn't melted, sure enough it wasn't my issue. Further down in the troubleshooting procedure it called for looking over wiring. Something broke a wire in the right front fender, likely a mouse although there were no other signs of rodents. Point being: I stopped too soon. cost me 115 bucks and a weeks wait time. Just food for though for when you're going through this.
I will remark from minimal personal experience.. Sometimes these procedures may call for specific resistance readings, and if you're close to spec, you might wanna ignore it. What I'm referring to is my own experience servicing my AC system which was non-operational. Troubleshooting had me going through and testing compressor components and wiring. I continued til I hit the field coil on the compressor which ohmed at like.. 4, and spec called for 3.5 or some such sh*t. I took it off and examined it, found it actually had an indentation from melting, like someone pushed a hot pen into the side of its plastic bodess. Due to the fact that no one has ever had to replace one of these I had to go through honda. I brought a 3/8 ratchet with me (to ground the thing) and a multimeter and ohmed it out on the desk. it also came in at like.. 4.1. Out of spec range. Took it home and slapped it on anyways cuz at least this one wasn't melted, sure enough it wasn't my issue. Further down in the troubleshooting procedure it called for looking over wiring. Something broke a wire in the right front fender, likely a mouse although there were no other signs of rodents. Point being: I stopped too soon. cost me 115 bucks and a weeks wait time. Just food for though for when you're going through this.
Thread Starter
|
Member
Joined: Apr 2016
Posts: 172
From: O Canada
Thanks for the suggestions guys, I was able to finally fix this problem and everything works fine now.
It was actually Fuse #1 - Backup that burnt out during that battery change incident.
Of course that I had first checked about 6-7 other fuses (horn, door locks, etc), but they were all fine. Afterwards I read your suggestions and decided to start checking all fuses in order and luckily it was #1.
So in the end it was a super easy and inexpensive fix.

Thread
Thread Starter
Forum
Replies
Last Post
Nando
Fit DIY: Repair & Maintenance
30
Jan 18, 2016 08:49 PM
Gimme Fits
2nd Gen GE8 Specific Fit Interior Modifications Sub-Forum
2
Jul 31, 2011 10:31 PM

