
Want a Cf Lip For the GE???


Updated list as of June 16th (12:24 pm PST)

JDP GE Carbon Lip

Other things to consider:
GE Carbon rear view mirror cap - NEW RELEASE!

DRY Carbon Look

JDP Carbon License Plate Frame - NEW RELEASE!

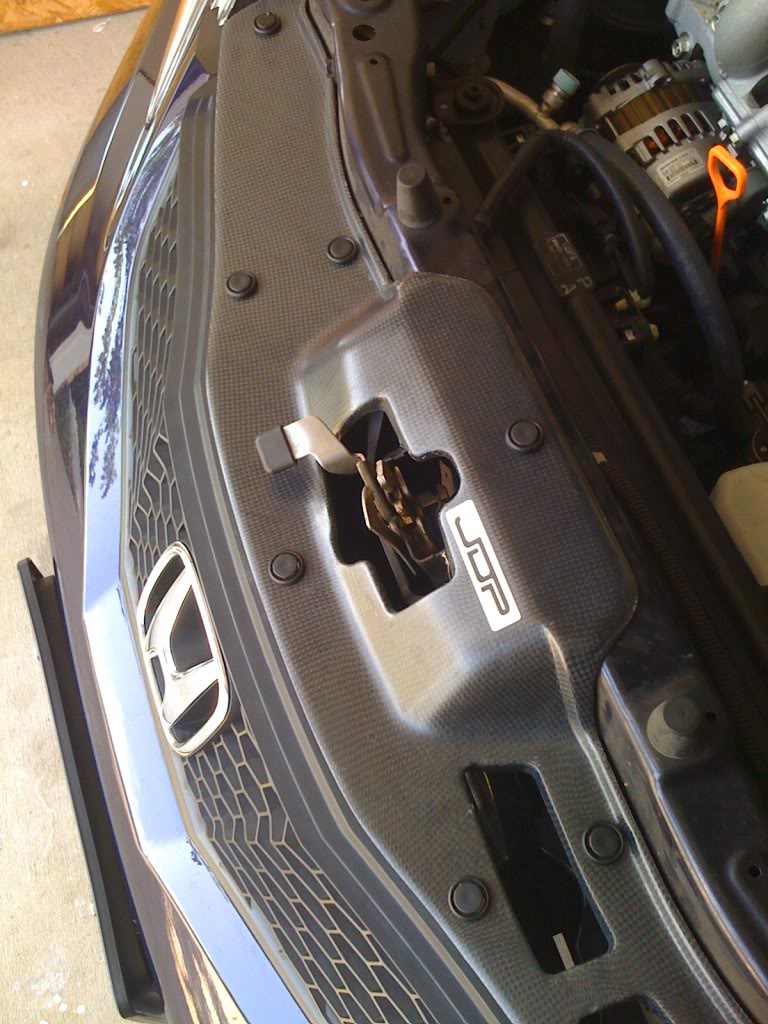
JDP Carbon Radiator Plate (this will complement the upcoming JDP grill) - NEW RELEASE!


Two lips can only be made per week.
Please submit $20 deposit to be on the list officially via paypal.
Paypal account: sales@jdpengineering.com
Orders will be fulfilled in the order deposits are submitted.
Many thanks for the support!!!!
JDP Carbon GE Lip List
1. stalonehong ($20 deposit received) - eCheck cleared 6/4. Shipped 6/5
2. FiT4Kim ($20 deposit received) - Payment cleared 6/8. Shipped 6/9
3. BakedCookies ($20 deposit received) - Payment received 6/9. Shipped 6/11
4. Cadwgawn ($20 deposit received) - Payment received 6/12. Shipped 6/16
5. Bengolf ($80 deposit received - 2 lips) - Payment received 6/16...will ship either Friday or Monday.
6. Kittengolf ($20 deposit received)
7. nghtrydr23 ($20 deposit received)
8. ken vs ryu ($20 deposit received)
9. lilaznphatboy ($20 deposit received for lip)
10. phillip ($20 deposit received)
11. umop-apisdn ($20 deposit received)
- additional $120 received 6/16
12. Hondafrk ($20 deposit received - FIBERGLASS Version)
13. strmslvrfit ($20 deposit received)
14. I<3_myfit ($30 deposit received)
JDP Carbon Rear Diffuser List
1. lilaznphatboy - $20 deposit received
2. Bengolf - $40 deposit received (2 cf diffusers)
3. I<3_myfit - $20 deposit received
JDP GE Carbon Lip
Other things to consider:
GE Carbon rear view mirror cap - NEW RELEASE!
DRY Carbon Look
JDP Carbon License Plate Frame - NEW RELEASE!
JDP Carbon Radiator Plate (this will complement the upcoming JDP grill) - NEW RELEASE!
Two lips can only be made per week.
Please submit $20 deposit to be on the list officially via paypal.
Paypal account: sales@jdpengineering.com
Orders will be fulfilled in the order deposits are submitted.
Many thanks for the support!!!!
JDP Carbon GE Lip List
1. stalonehong ($20 deposit received) - eCheck cleared 6/4. Shipped 6/5
2. FiT4Kim ($20 deposit received) - Payment cleared 6/8. Shipped 6/9
3. BakedCookies ($20 deposit received) - Payment received 6/9. Shipped 6/11
4. Cadwgawn ($20 deposit received) - Payment received 6/12. Shipped 6/16
5. Bengolf ($80 deposit received - 2 lips) - Payment received 6/16...will ship either Friday or Monday.
6. Kittengolf ($20 deposit received)
7. nghtrydr23 ($20 deposit received)
8. ken vs ryu ($20 deposit received)
9. lilaznphatboy ($20 deposit received for lip)
10. phillip ($20 deposit received)
11. umop-apisdn ($20 deposit received)
- additional $120 received 6/16
12. Hondafrk ($20 deposit received - FIBERGLASS Version)
13. strmslvrfit ($20 deposit received)
14. I<3_myfit ($30 deposit received)
JDP Carbon Rear Diffuser List
1. lilaznphatboy - $20 deposit received
2. Bengolf - $40 deposit received (2 cf diffusers)
3. I<3_myfit - $20 deposit received
Last edited by JDP; Jun 16, 2009 at 03:25 PM.
Installation is as follows:
- Remove front bumper.
- You have to remove the black plastic piece from under the bumper.
- Place the mid section of the lip over the middle section of bumper. The mid section will sit over the 3 bumps and center grill piece.
- Slide the sides of the bumper into the sides of the lip.
- Drilling time...use a drill bit that has the same diameter as the original mounting holes. Start from the middle and work your way to the sides.
- There are two holes that located closest to the front of the bumper. With the lip on, something sharp to mark where these holes need to be drilled on the lip. You will be marking the inner side of the lip.
- Each time you drill a hole, use the fastner to secure the lip on the bumper while drilling additional holes.
I hope this works for everyone.
No additional mounting hardware is needed. The lip was designed to use all your existing fastners. However, drilling is required to ensure proper fitment (sounds bigger than it really is).
Installation is as follows:
- Remove front bumper.
- You have to remove the black plastic piece from under the bumper.
- Place the mid section of the lip over the middle section of bumper. The mid section will sit over the 3 bumps and center grill piece.
- Slide the sides of the bumper into the sides of the lip.
- Drilling time...use a drill bit that has the same diameter as the original mounting holes. Start from the middle and work your way to the sides.
- There are two holes that located closest to the front of the bumper. With the lip on, something sharp to mark where these holes need to be drilled on the lip. You will be marking the inner side of the lip.
- Each time you drill a hole, use the fastner to secure the lip on the bumper while drilling additional holes.
I hope this works for everyone.
Updated list as of June 19th (11:16 am PST)
JDP GE Carbon Lip
Other things to consider:
GE Carbon rear view mirror cap - NEW RELEASE!
DRY Carbon Look
JDP Carbon License Plate Frame - NEW RELEASE!
JDP Carbon Radiator Plate (this will complement the upcoming JDP grill) - NEW RELEASE!
Two lips can only be made per week.
Please submit $20 deposit to be on the list officially via paypal.
Paypal account: sales@jdpengineering.com
Orders will be fulfilled in the order deposits are submitted.
Many thanks for the support!!!!
JDP Carbon GE Lip List
1. stalonehong ($20 deposit received) - eCheck cleared 6/4. Shipped 6/5
2. FiT4Kim ($20 deposit received) - Payment cleared 6/8. Shipped 6/9
3. BakedCookies ($20 deposit received) - Payment received 6/9. Shipped 6/11
4. Cadwgawn ($20 deposit received) - Payment received 6/12. Shipped 6/16
5. Bengolf ($80 deposit received - 2 lips) - Payment received 6/16...Shipped 6/23.
6. Kittengolf ($20 deposit received) - Payment received. 6/20...will ship 6/24
7. nghtrydr23 ($20 deposit received)
8. ken vs ryu ($20 deposit received)
9. lilaznphatboy ($20 deposit received for lip)
10. phillip ($20 deposit received)
11. umop-apisdn ($20 deposit received)
- additional $120 received 6/16
12. Hondafrk ($20 deposit received - FIBERGLASS Version)
13. strmslvrfit ($20 deposit received)
14. I<3_myfit ($30 deposit received)
JDP Carbon Rear Diffuser List
1. lilaznphatboy - $20 deposit received
2. Bengolf - $40 deposit received (2 cf diffusers)
3. I<3_myfit - $20 deposit received
Last edited by JDP; Jun 23, 2009 at 02:24 AM.

Member
Joined: May 2009
Posts: 25
From: San Diego
No additional mounting hardware is needed. The lip was designed to use all your existing fastners. However, drilling is required to ensure proper fitment (sounds bigger than it really is).
Installation is as follows:
- Remove front bumper.
- You have to remove the black plastic piece from under the bumper.
- Place the mid section of the lip over the middle section of bumper. The mid section will sit over the 3 bumps and center grill piece.
- Slide the sides of the bumper into the sides of the lip.
- Drilling time...use a drill bit that has the same diameter as the original mounting holes. Start from the middle and work your way to the sides.
- There are two holes that located closest to the front of the bumper. With the lip on, something sharp to mark where these holes need to be drilled on the lip. You will be marking the inner side of the lip.
- Each time you drill a hole, use the fastner to secure the lip on the bumper while drilling additional holes.
I hope this works for everyone.
Installation is as follows:
- Remove front bumper.
- You have to remove the black plastic piece from under the bumper.
- Place the mid section of the lip over the middle section of bumper. The mid section will sit over the 3 bumps and center grill piece.
- Slide the sides of the bumper into the sides of the lip.
- Drilling time...use a drill bit that has the same diameter as the original mounting holes. Start from the middle and work your way to the sides.
- There are two holes that located closest to the front of the bumper. With the lip on, something sharp to mark where these holes need to be drilled on the lip. You will be marking the inner side of the lip.
- Each time you drill a hole, use the fastner to secure the lip on the bumper while drilling additional holes.
I hope this works for everyone.

I can't wait to see this!


Thread Starter
|
Member
Joined: Dec 2008
Posts: 244
From: Norwalk, CA

let me know when i can check out the diffuser and maybe test fit it
I had to make minor enhancments to the finish...will post when it's done.