When you click on links to various merchants on this site and make a purchase, this can result in this site earning a commission. Affiliate programs and affiliations include, but are not limited to, the eBay Partner Network.
Installed a Tanabe (Revel) Medallion Touring axle-back. It sounds just like I hoped. Deeper and only slightly louder than stock, but by no means loud. And since it is only an axle-back, I get to stay in my stock rallycross class
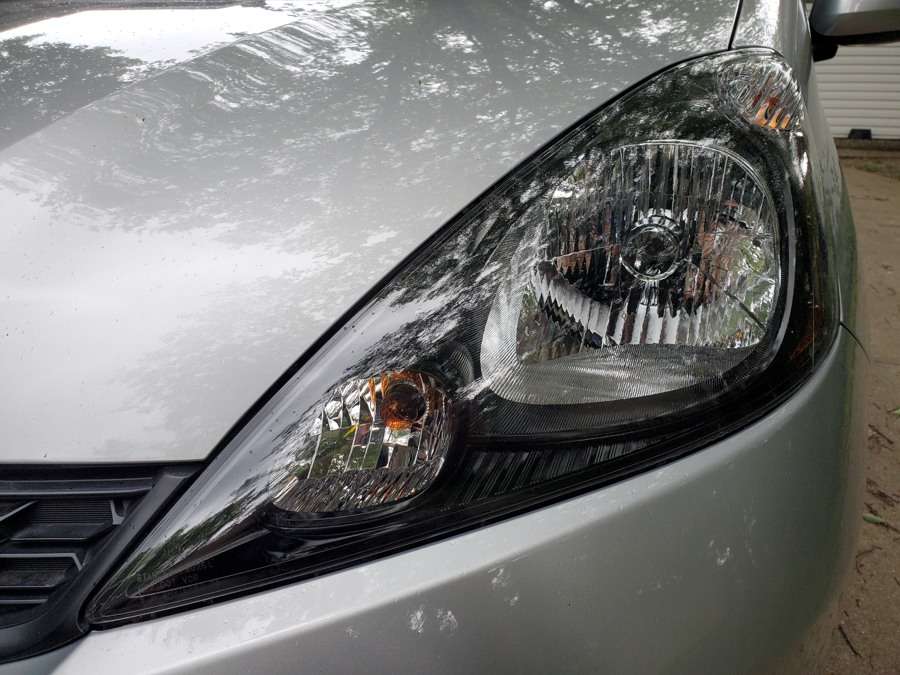
Headlights Hafta take the bumper off to get at this black bracket, then remove the bracket with the headlight (it sandwiches the headlight in & has alignment nubs that prevent removing the headlight without it) Leave this one on til you remove the whole thing 😂 Sweet new depo assembly from rockauto going on the right. (labeled as various manufacturer) shitty "various manufacturer" Eagle Eyes assembly, also from rockauto going on the left. The black mounting bracket was clearly modified and fitted by someone trying very hard despite being under-equipped. Fitment was tricky vs. the Depo. Had to keep all bolts loose until I could get it fully seated, which required some carefully applied pressure. The actual light housing part seems the same as the depo though regarding fit and finish. My hands weren't always as gentle as they are now. 3 busted clips of 4 that secure the bumper beneath the headlight on the right side. The left has no busted clips.. Clearly I originally worked from right to left when I first removed the bumper. It still holds well, sincerely, but I do have shame. :/ All tools required. The flathead was actually used for the clips in the previous image, not to unseat them (I used the pink pry tool for that) but to spread them for re-seating! wacky. All reASSembled. Now needs a bath. All in cost was $230, came with new bulbs but I retained my LED daytime running bulbs. I did this instead of refinishing because I'd refinished my headlights 3 times in the past in various ways. Kits, brake fluid wipe, just buffing with a dry shop towel folded beneath an orbital sander 😂 I'm done refinishing. If I had to do it again, id have more money and get 2 depos, or even more money and get 2 tyc's. the clear cover seems nice. will update after wash
I'll let you guys know if either leak and develop condensation. they both APPEAR to be well sealed.
Also, this is our pet duck, Football. Now we can all watch football together.
I have 3D printed boost gauge pods that are designed to fit using the OE window defroster vents. While they are still in the prototyping phase and have rough edges, my plan is to route the wires and vacuum lines through the vents to achieve a cleaner installation.
Nicely done! All of that for $230 from Rock Auto? I need to change mine as well; it's all hazy, and I also broke the height adjustment screw.
Woops, I guess one of the ones I ordered actually was a Depo. Could've been cheaper or nicer, but now I know what the super cheap assy.s are like compared to the next step up
I reorganized all my posts to be in the first post only. So no scrolling for images. Also, I have been doing alot of updating to the car and getting ready for the k24 swap.
The Tanabe/Revel axle-back was sitting a little higher and to the left than I wanted and trying to get it adjusted properly with the stock OEM hangers was not helping, so I replaced the left side hanger with an Evil Energy adjustable hanger. Using the top hole gets it sitting right where I wanted.
Before Replaced left OEM exhaust hanger with an Evil Energy one After
Replaced the messed up fog lights that mine came with, driver's side was cracked, passenger side, the mounts are all busted. Anyone know where to get the just the housing and mount without the actual light?
These are the 45$ Civic/Accord lights off Ebay, literally bolt right in.
Replaced the messed up fog lights that mine came with, driver's side was cracked, passenger side, the mounts are all busted. Anyone know where to get the just the housing and mount without the actual light?
These are the 45$ Civic/Accord lights off Ebay, literally bolt right in.
Replaced my wheel bearings on the front yesterday, used these gorilla lugs I originally bought for my Lexus since the originals were rough and I was missing two.. Lol.
Charged the ac a bit too.. It's nice to have it working for now. The compressor is noisy and will need replacing soon. Next up.. Roof rack! And better tires..
Replaced my wheel bearings on the front yesterday, used these gorilla lugs I originally bought for my Lexus since the originals were rough and I was missing two.. Lol.
Be sure that your lug nuts have the right seat for Honda OE wheels! Must have ball seat, not conical!
 05-23-2023, 08:59 PM