
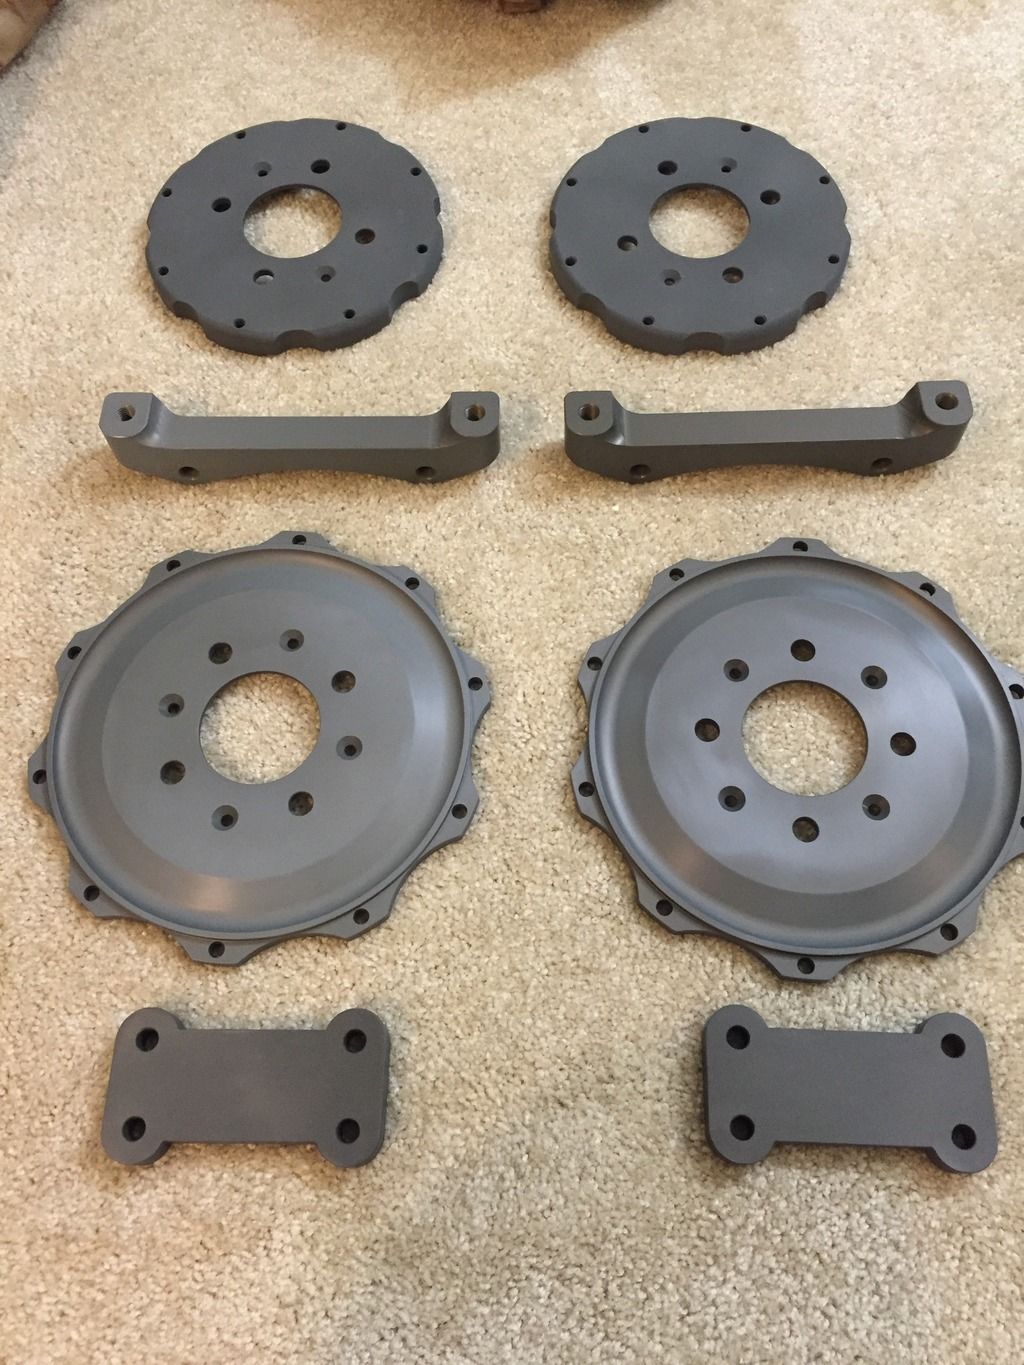
My Front Brembo Gran Turismo 6 Piston Type III Rotor

I just get the Hat and Bracket back from Anodizing Shop few hours ago.
I ask them to do the HARD (Type III) Anodizing.
so the color is not really adjustable (except black),
I told them to get it to as close to dark grey as possible,
and the result is quite good:


I think I will be able to install the Front Brembo Brakes this weekend,
while the rear axle disc brake with JDM DC5 Integra Type R caliper conversion might have to wait a bit more
since I plan to get a new custom rotor that is larger
then the current one so the entire rear brake pad will touch the rotor.
New Member
Joined: Jan 2016
Posts: 11
From: Ireland
Great results from the anodising! I think it will look great once on the car!
Keep the updates coming.
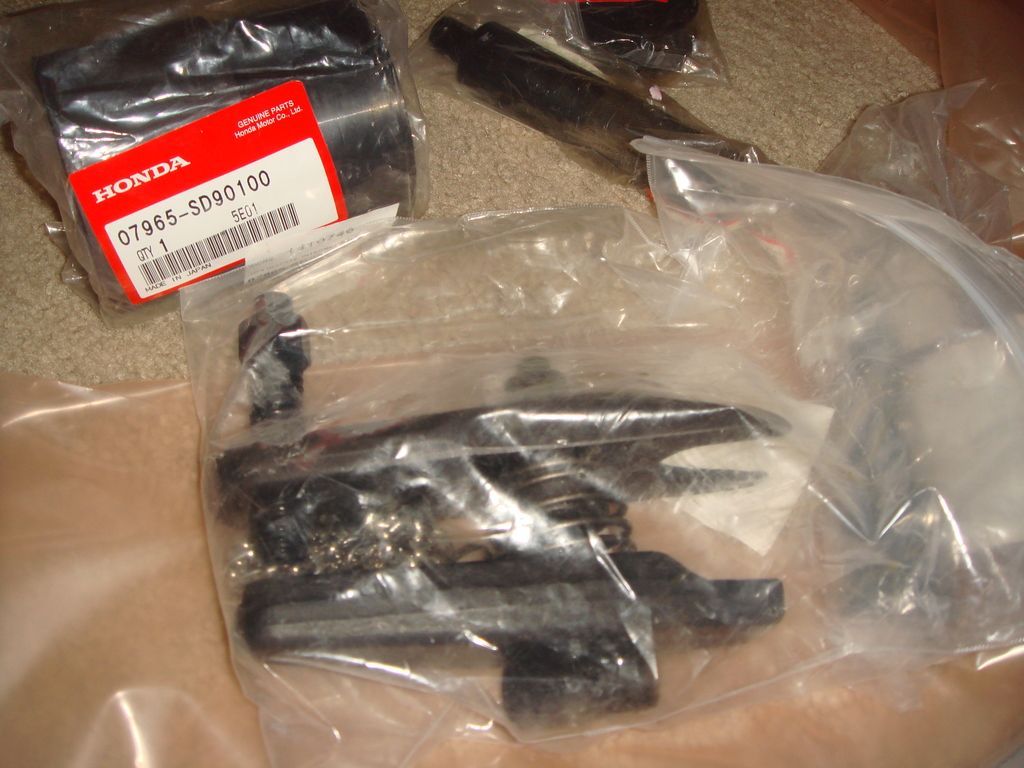
This ball joint separator tool in the pic is beautiful!
Do you know what brand it is and how much it cost? I like the way it has a location channel for the bolt and also the adjustable knuckle for different size ball joints!

Keep the updates coming.
This ball joint separator tool in the pic is beautiful!
Do you know what brand it is and how much it cost? I like the way it has a location channel for the bolt and also the adjustable knuckle for different size ball joints!
Great results from the anodising! I think it will look great once on the car!
Keep the updates coming.
This ball joint separator tool in the pic is beautiful!
Do you know what brand it is and how much it cost? I like the way it has a location channel for the bolt and also the adjustable knuckle for different size ball joints!
Keep the updates coming.
This ball joint separator tool in the pic is beautiful!
Do you know what brand it is and how much it cost? I like the way it has a location channel for the bolt and also the adjustable knuckle for different size ball joints!
all the special tools above are Honda Special Tools,
and for the Ball Joint Remover,
it is the 28mm, Honda Part# 07MAC-SL00201
It work flawlessly

Thanks
I had been working on installing this Brembo since Friday evening and finally done late last night 
First installing the rotor to the custom hat,
I put Loctite Silver Antiseize to the floating pin that hold/connect the rotor
to the hat, it suppose to float easily
but I guess after Type III Hard Anodizing, the holes become smaller
because the Type III Hard Anodizing is quite thick so...
in some cases I have to use rubber mallet to hammer the pin in
or screw it from other side to make it come in...
I guess now my rotor is not really easily "float",
hopefully after thousand of miles, it will loosen up by itself...


Then I put Loctite Thread Locker (High Strengh) on the bolt
that hold the rotor to the hat and tighten all of them
to 7nm (torque wrench).
Oh, 5 bolts are regular, 5 other bolts are Brembo McLaren F1 floating
hardware:


Now it is ready to be installed ya

to be continued in 5 minutes
First installing the rotor to the custom hat,
I put Loctite Silver Antiseize to the floating pin that hold/connect the rotor
to the hat, it suppose to float easily
but I guess after Type III Hard Anodizing, the holes become smaller
because the Type III Hard Anodizing is quite thick so...
in some cases I have to use rubber mallet to hammer the pin in
or screw it from other side to make it come in...
I guess now my rotor is not really easily "float",
hopefully after thousand of miles, it will loosen up by itself...
Then I put Loctite Thread Locker (High Strengh) on the bolt
that hold the rotor to the hat and tighten all of them
to 7nm (torque wrench).
Oh, 5 bolts are regular, 5 other bolts are Brembo McLaren F1 floating
hardware:
Now it is ready to be installed ya
to be continued in 5 minutes
Ok,
now installing on the car:
First Use a giant pipette to suck the brake fluid
from the reservoir:

note:
I was trying to use my vacuum brake bleeder which work
before, but this time it always leak on the connection
to the reservoir bottle spilling brake fluid everywhere,...
so I had to clean up and call my son and my wife
to help me pump the brake while I bleed the brake hahaha
Now take out the bolt holding my old Goodridge brake line
to the Ohlins suspension,

take out the Banjo Bolt on the caliper,
careful, brake fluid will dripping,
I use oil pan to catch them:

Taking out the old rotor, first taking out the 2 screw holding
the rotor through the holes from the H&R Spacer,
but
since my H&R Spacer were very super tight,
I need rubber mallet to take them out,
hammering from the back side:

Install the bracket on the Knuckle,
notice there is shim between the knuckle and bracket
that I thought I can use,
but turn out it actually make the spacing worse,
so I take it our later:


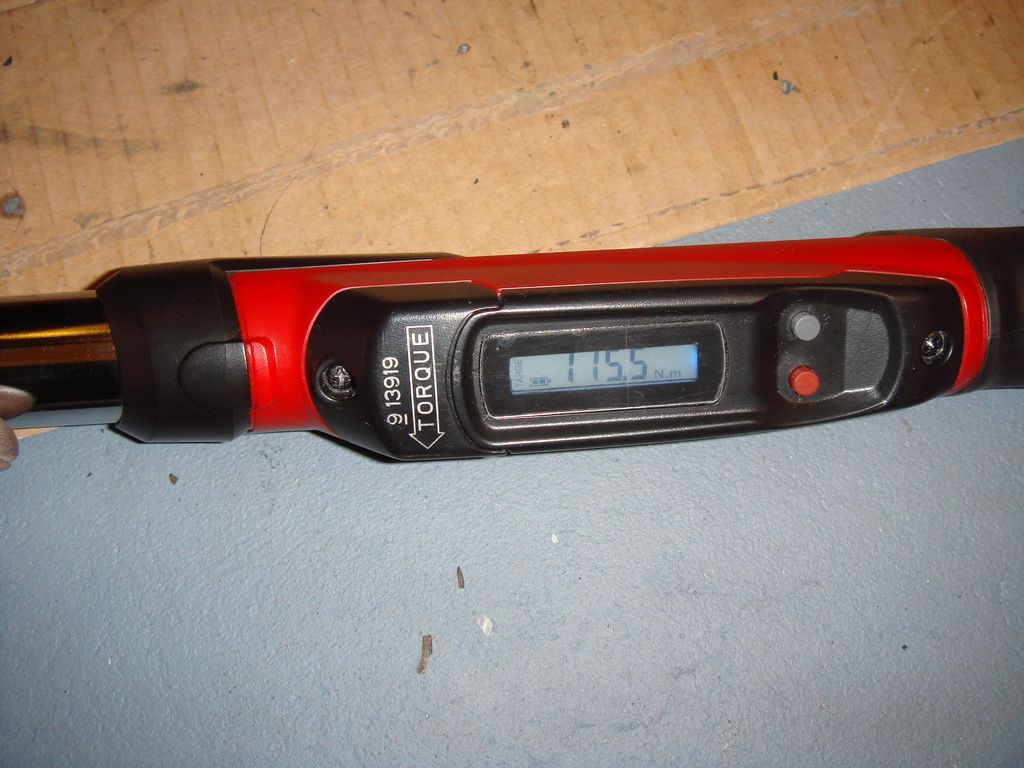
Tighten all the bolt that connect the bracket
to the knuckle (and later caliper to bracket) to 115nm per
Brembo install manual:
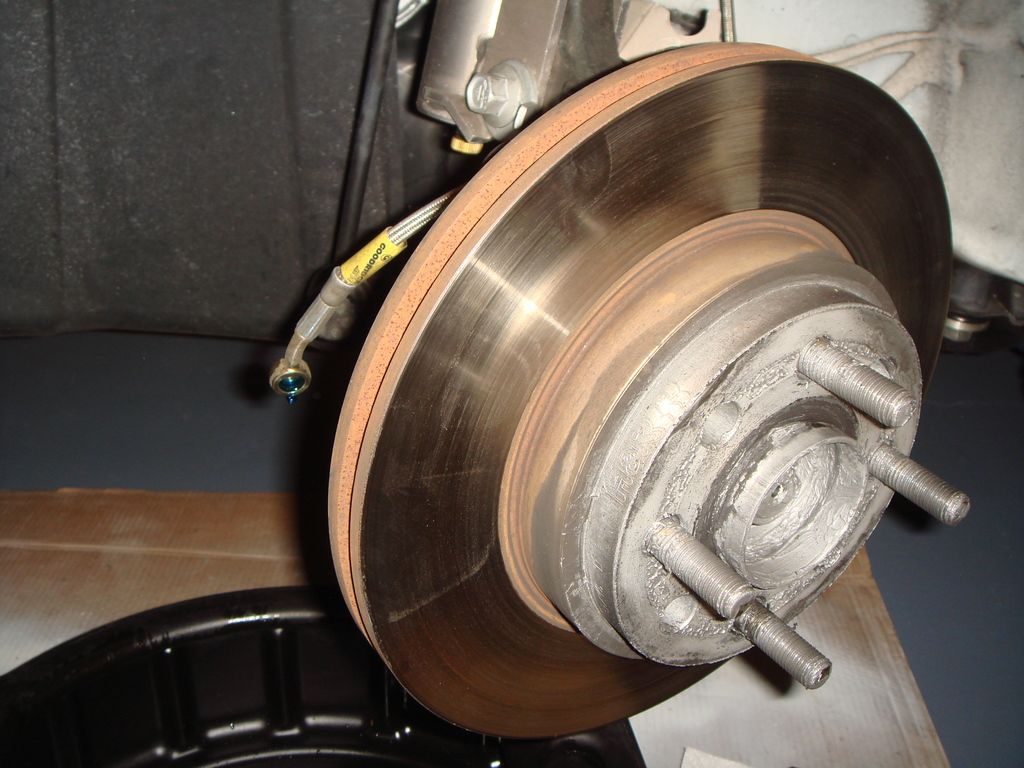
Install the new Brembo Rotor/Hat to the knuckle
and put 2 NEW Honda OEM Genuine Retaining Screw hahaha.
This actually redundant, but I like to keep it like factory do hahaha

Check clearance between inside surface of rotor
to my Honda Insight Aluminum Lower Control Arm,
quite tight but it clear it...
If I am still using the original Honda Fit Lower Control Arm,
I am sure it will rub... glad I find this solution...

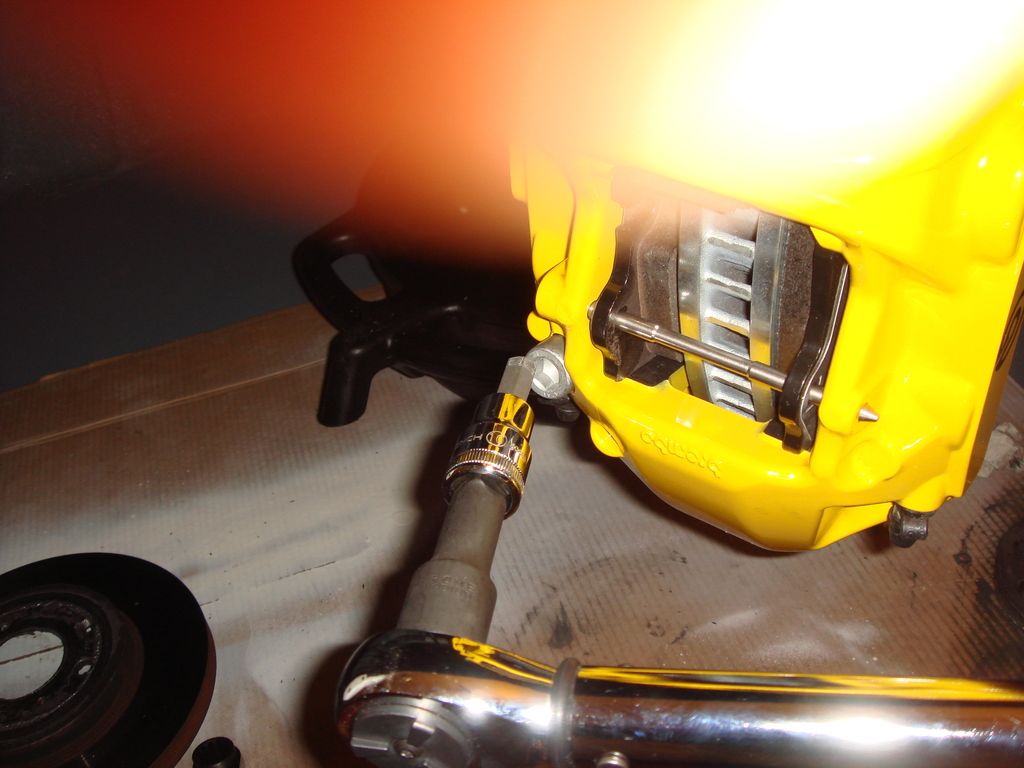
Now install the caliper,
again tighten the bolt to 115nm:

Get Honda OEM brake hose retainer clip (new since Honda
said always change with new one each time you take it out):

Install the NEW and LONGER LENGTH CUSTOM Full Stainless Steel
brake line/fitting from HEL UK:
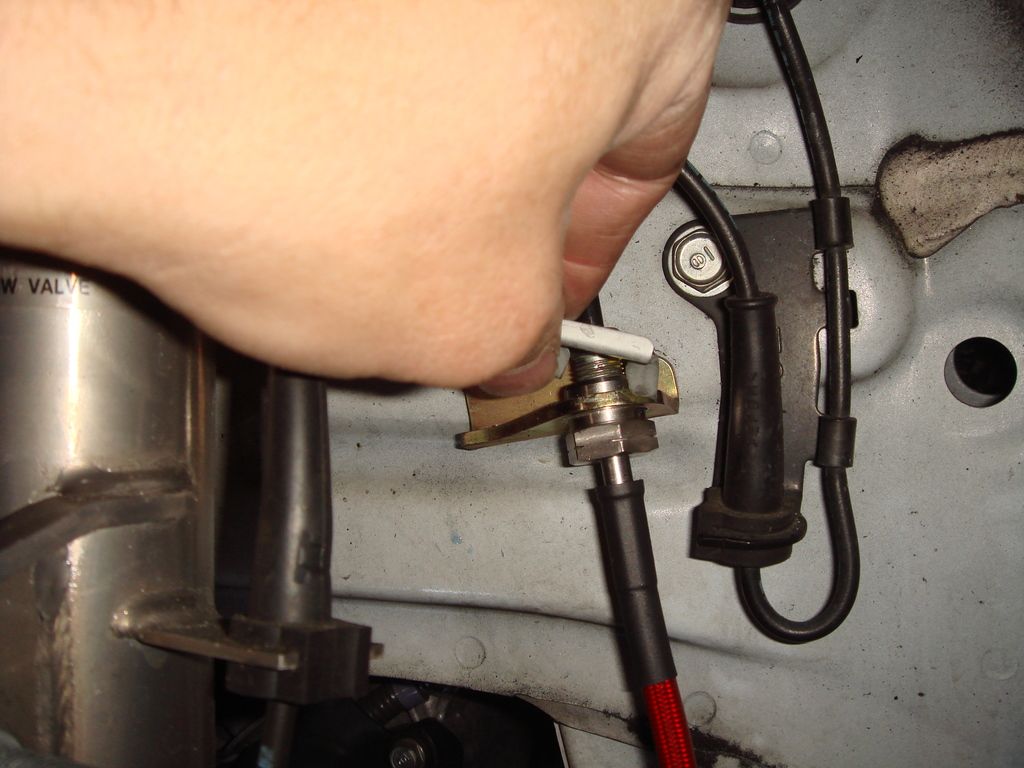
Notice how nice it is built with custom holder to the Ohlins
suspension in rubber:


Screw the HEL Brake Line to the Caliper using
the New TITANIUM Banjo Bolt, Yes I decide to go one step
further by replacing the Goodridge Stainless Steel Banjo
to TITANIUM one which I get from KurveyGirl.com.
Tighten to 20nm per Brembo Install Manual:


I will take more pictures after I wash my car,
but this is what I have so far


now installing on the car:
First Use a giant pipette to suck the brake fluid
from the reservoir:
note:
I was trying to use my vacuum brake bleeder which work
before, but this time it always leak on the connection
to the reservoir bottle spilling brake fluid everywhere,...
so I had to clean up and call my son and my wife
to help me pump the brake while I bleed the brake hahaha
Now take out the bolt holding my old Goodridge brake line
to the Ohlins suspension,
take out the Banjo Bolt on the caliper,
careful, brake fluid will dripping,
I use oil pan to catch them:
Taking out the old rotor, first taking out the 2 screw holding
the rotor through the holes from the H&R Spacer,
but
since my H&R Spacer were very super tight,
I need rubber mallet to take them out,
hammering from the back side:
Install the bracket on the Knuckle,
notice there is shim between the knuckle and bracket
that I thought I can use,
but turn out it actually make the spacing worse,
so I take it our later:
Tighten all the bolt that connect the bracket
to the knuckle (and later caliper to bracket) to 115nm per
Brembo install manual:
Install the new Brembo Rotor/Hat to the knuckle
and put 2 NEW Honda OEM Genuine Retaining Screw hahaha.
This actually redundant, but I like to keep it like factory do hahaha
Check clearance between inside surface of rotor
to my Honda Insight Aluminum Lower Control Arm,
quite tight but it clear it...
If I am still using the original Honda Fit Lower Control Arm,
I am sure it will rub... glad I find this solution...
Now install the caliper,
again tighten the bolt to 115nm:
Get Honda OEM brake hose retainer clip (new since Honda
said always change with new one each time you take it out):
Install the NEW and LONGER LENGTH CUSTOM Full Stainless Steel
brake line/fitting from HEL UK:
Notice how nice it is built with custom holder to the Ohlins
suspension in rubber:
Screw the HEL Brake Line to the Caliper using
the New TITANIUM Banjo Bolt, Yes I decide to go one step
further by replacing the Goodridge Stainless Steel Banjo
to TITANIUM one which I get from KurveyGirl.com.
Tighten to 20nm per Brembo Install Manual:
I will take more pictures after I wash my car,
but this is what I have so far
I finished installing at around 2am this morning,
then go to the street/freeway to be "bed in",
so I follow exactly what Brembo Instruction,
and I can do this since at 2am, traffic is very light.
First I drive below 30mph and try to drag the brake
to clean the zinc surface coating,
Second,
I accelerate to 60mph then brake to 20mph using about 60% braking power
then let the car run without braking for about 20 second,
then repeat the above process TWENTY yes 20 times.
after that let the car run for 5 minutes with no braking or light braking...
Third,
do the second bedding process,
go to freeway,
Accelerate to 80mph then brake to about 20 to 40mph using about 80% of
braking power,
then let the car run without braking for about 20 second,
then repeat the above process, this time just TEN (10) times,
after that let the car run for 10 minutes with no braking or light braking only if necessary because of traffic...
and I did all the above driving about 40 miles doing the above hahaha...
and now,
the braking oh... the braking...
at freeway speed, the car just decelerate very very fast...
I mean... wow
No comparison to stock brakes...
well, I guess money don't lie hahaha...
I am very satisfied even though this cost me a fortune...
plus the looks of course
I wonder how will this be better
after I installed my JDM RS rear axle conversion
with the custom rotor and the JDM (Red) Integra Type R caliper...
this one need to wait longer because the custom rotor I had now
is too small, need to make another one that is about 1/4in larger
then the current 12in one hahaha
I also might need to change my current J's Racing
brake master cylinder to a custom 1in one...
because right now,
the brake pedal travel after this Brembo
is about the same as with stock brake,
but after the JDM Integra Type R rear caliper,
it might travel longer...
well we will see.
Ok, I am ver happy now
hopefully I can finally come to the meet at Cerritos next Saturday
Adding my answer to FamilyWagon question on other thread:
Family Wagon,
this is why I sell my Bilstein and get the Ohlins,
because the Ohlins have much higher spring rate at 7k front,
that it cut the noise dive at least 70% compare to the Bilstein...
because of that,
when I bed in the brake yesterday (I wrote the detail on my DIY thread),
when I slam the brake, the car had very little noise dive
and the rear still keep planted to the ground...
I credit this good weight transfer behaviour to the Ohlins
Now, after I install the JDM RS Rear Axle with JDM Integra Type R (red) caliper, this will get even better,
since now the rear axle will have more braking power,
and will shift the bias to the rear even more compare
to the current drum brake one...
I just need to order a new custom rotor for the rear axle
because my current 12in custom rotor is too small
since I was designing it to use the standard JDM Fit RS rear caliper,
but in the middle of the project, I decide to change to a much bigger
JDM Integra Type R (red) caliper...
Hopefully I can install my JDM RS Rear Axle in 1 months or so

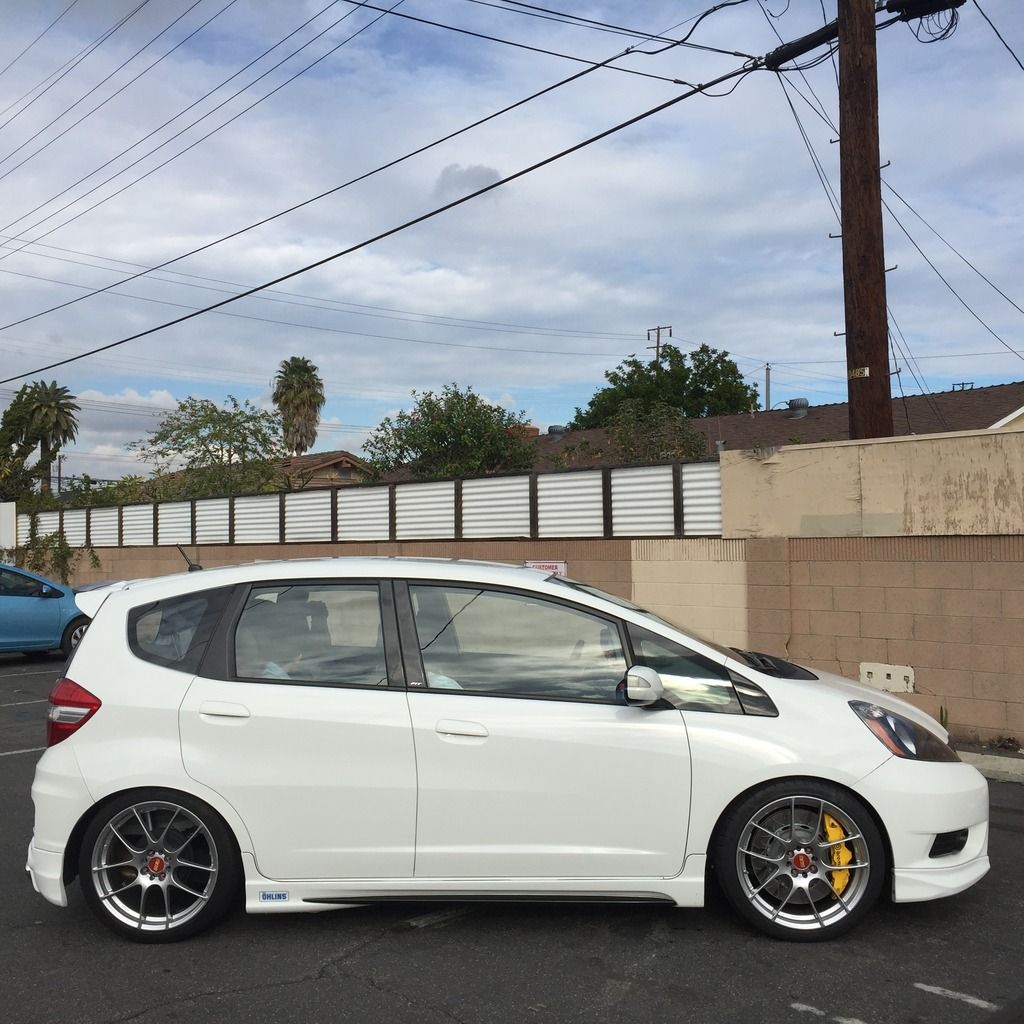
I just take more pictures after car wash,
this one show the whole car:


Hi,
That is still stock exhaust with OEM Honda S2000 AP2 exhaust tips.
but I already buy a OEM Honda Muffler from last generation Civic Si,
coupled with OEM Honda resonator from current generation Civic Si,
but I am still going to use the Honda S2000 AP2 exhaust tips
because the tips looks very nice and fit the rear Mugen Lower under spoiler perfectly.
I just had not go to muffler shop to install it yet
Member
Joined: Jan 2014
Posts: 128
From: VA/DC

Hi,
That is still stock exhaust with OEM Honda S2000 AP2 exhaust tips.
but I already buy a OEM Honda Muffler from last generation Civic Si,
coupled with OEM Honda resonator from current generation Civic Si,
but I am still going to use the Honda S2000 AP2 exhaust tips
because the tips looks very nice and fit the rear Mugen Lower under spoiler perfectly.
I just had not go to muffler shop to install it yet
That is still stock exhaust with OEM Honda S2000 AP2 exhaust tips.
but I already buy a OEM Honda Muffler from last generation Civic Si,
coupled with OEM Honda resonator from current generation Civic Si,
but I am still going to use the Honda S2000 AP2 exhaust tips
because the tips looks very nice and fit the rear Mugen Lower under spoiler perfectly.
I just had not go to muffler shop to install it yet
just go to the website, enter the year and model,
found the exhaust section and they have the diagram with part number you can click to order
Member
Joined: Jan 2014
Posts: 128
From: VA/DC
Thanks for the info! I forgot to ask but will the tip fit in the stock sport rear bumper?
I was using this same tip on the JDM Fit RS OEM rear bumper and it fit.
What mean by fit is,
very very tight fit and it touch a part of the bumper opening
but causing no problem, just like now.
Kinda like wheel stance to the fender, almost rubbing (or rub a little) but still ok hehehe


I am not building this car for race, I am too old for that now
actually yes, I am kinda old...
I just doing this for looks and a bit better driving experience from the car...
Thanks again

Member

Joined: Mar 2007
Posts: 243
From: Vancouver, Canada
Oh wow, I just discovered I have a twin here!  I'm waiting for my RF 500 DB wheels from Japan to go on a 2009 TW with RS rear (minus the Mugen). lolol I won't be upgrading my brakes though since I run 16" winter steelies.
Awesome build thread btw.
I'm waiting for my RF 500 DB wheels from Japan to go on a 2009 TW with RS rear (minus the Mugen). lolol I won't be upgrading my brakes though since I run 16" winter steelies.Awesome build thread btw.
Last edited by inkster; Jan 24, 2016 at 06:16 AM.