
The Stembridge Fit (Jazz) Mod Thread - 2015 MSM EX CVT


Thread Starter
|
Member
Joined: Sep 2014
Posts: 927
From: The Middle West

10-minute Parking Brake Adjustment Procedure
Like decades of rear drum brake cars that preceded it, the rear drum brakes on USDM Fit cars automagically adjust themselves every time you back the car up (in reverse) while applying the brake pedal. Since the parking brake is cable actuated and is not part of the main hydraulic brake system, it must be adjusted separately (they do not automatically adjust) as the brake shoes wear and leave a wider gap for you to have to close when you yank the handle in the cabin (you have to pull it higher and higher as the shoes wear out). When you are having to pull the handle excessively to engage the parking brake, you really should have the rear shoes checked and replaced if worn out - otherwise, you'll be paying for a new set of drums when the lining is completely gone and metal starts scraping on metal!
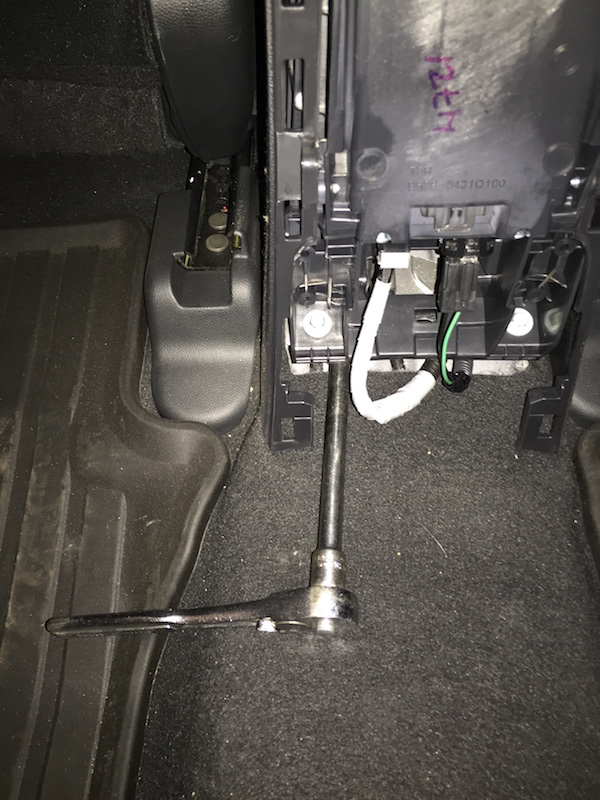
In the meantime, you can adjust the parking brake on the GK Fit yourself in less than 10 minutes. First, carefully pop the rear cover off the center console. I used a flat-blade screwdriver, being careful to not mar the plastic when I inserted it:
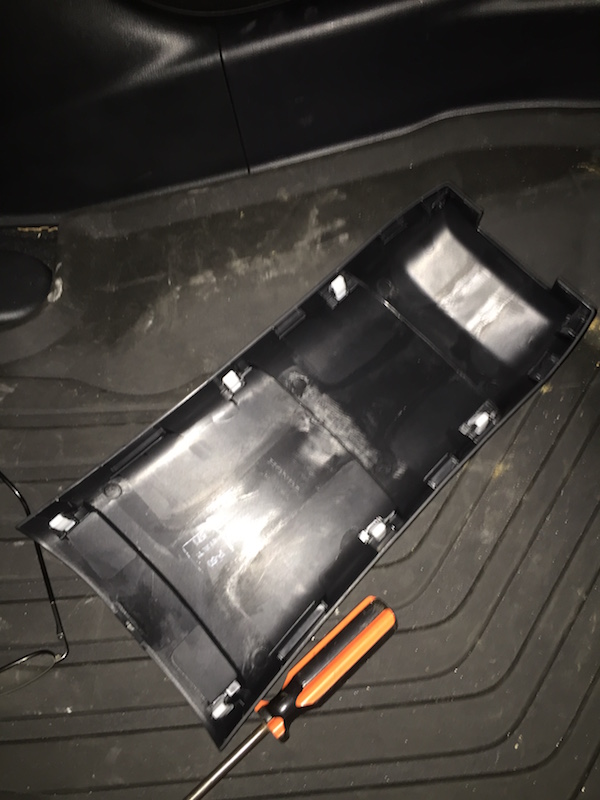
Here's the view inside the rear of the console:
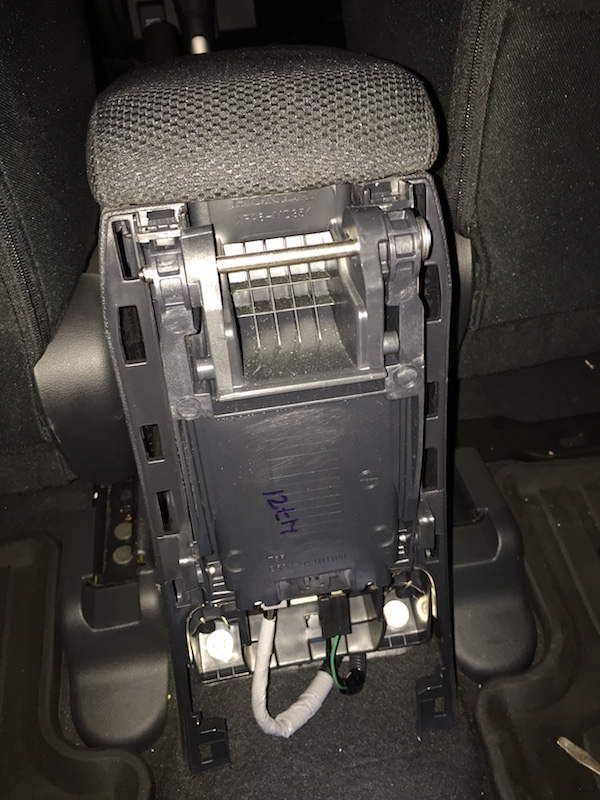
Way down underneath and inside the console is the adjusting nut:
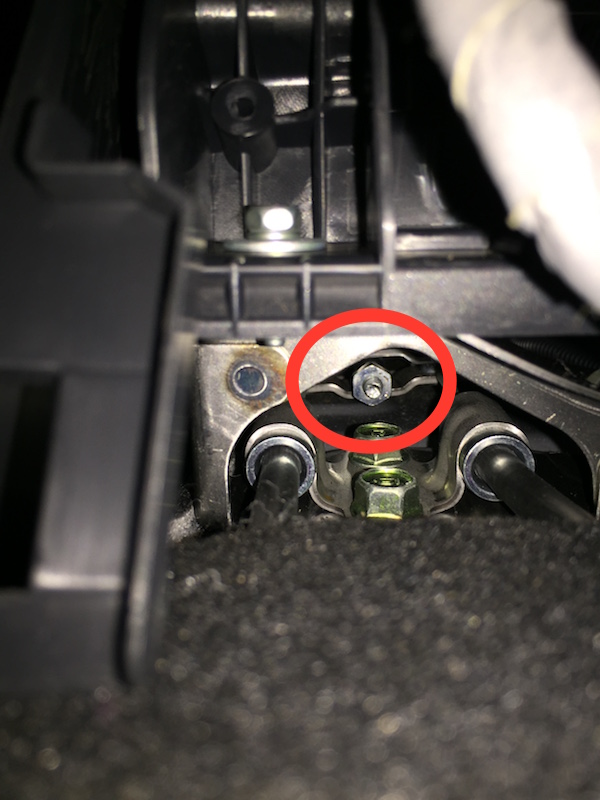
I used a ratchet wrench with a 6" extension, knuckle joint and a 3" extension with a 13mm socket (if I remember right - you may have to hunt and peck if that's wrong):
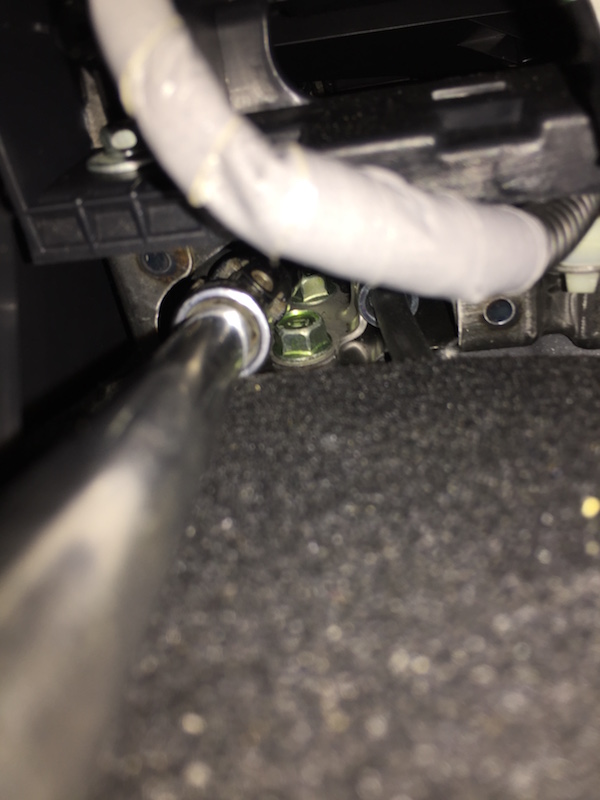
Turn the nut clockwise a turn or two and test your parking brake (feet off the brake pedal). Repeat until it feels about right to you. There should be a couple inches of slack when you pull the handle before it engages. Too tight, and you're brakes will be dragging all the time and wear out quickly. Note that you will likely have to back off the nut when you install new shoes/drums.
That's it! Pop the cover back on, put your tools away and you're done!
es
In the meantime, you can adjust the parking brake on the GK Fit yourself in less than 10 minutes. First, carefully pop the rear cover off the center console. I used a flat-blade screwdriver, being careful to not mar the plastic when I inserted it:
Here's the view inside the rear of the console:
Way down underneath and inside the console is the adjusting nut:
I used a ratchet wrench with a 6" extension, knuckle joint and a 3" extension with a 13mm socket (if I remember right - you may have to hunt and peck if that's wrong):
Turn the nut clockwise a turn or two and test your parking brake (feet off the brake pedal). Repeat until it feels about right to you. There should be a couple inches of slack when you pull the handle before it engages. Too tight, and you're brakes will be dragging all the time and wear out quickly. Note that you will likely have to back off the nut when you install new shoes/drums.
That's it! Pop the cover back on, put your tools away and you're done!
es
Last edited by stembridge; Jan 4, 2016 at 01:50 PM.


Thread Starter
|
Member
Joined: Sep 2014
Posts: 927
From: The Middle West
You'll have to google on your own, but I'm pretty sure I've seen the JDM brake lights offered on eBay separately from the upper tailgate lights.
es
es

New Member
Joined: Feb 2016
Posts: 13
From: Canton, Ohio
Stembridge,
Who was the manufacturer of the airbag for your 2015 Fit EX-L? I saw you removed it and replaced it. Was it Takata, who made the defective airbags that are being recalled? Is it an airbag that uses ammonium nitrate to cause the bag to inflate but may rupture in high humidity? I'm worried that while my 2016 Fit LX isn't subject yet to a recall that Honda installed a Takata airbag in my Fit, which was built in November, right when Honda announced it would no longer use Takata airbags for new models "in development." So a Takata airbag with issues still could have been installed in my Fit.
Who was the manufacturer of the airbag for your 2015 Fit EX-L? I saw you removed it and replaced it. Was it Takata, who made the defective airbags that are being recalled? Is it an airbag that uses ammonium nitrate to cause the bag to inflate but may rupture in high humidity? I'm worried that while my 2016 Fit LX isn't subject yet to a recall that Honda installed a Takata airbag in my Fit, which was built in November, right when Honda announced it would no longer use Takata airbags for new models "in development." So a Takata airbag with issues still could have been installed in my Fit.
Thread Starter
|
Member
Joined: Sep 2014
Posts: 927
From: The Middle West
Stembridge,
Who was the manufacturer of the airbag for your 2015 Fit EX-L? I saw you removed it and replaced it. Was it Takata, who made the defective airbags that are being recalled? Is it an airbag that uses ammonium nitrate to cause the bag to inflate but may rupture in high humidity? I'm worried that while my 2016 Fit LX isn't subject yet to a recall that Honda installed a Takata airbag in my Fit, which was built in November, right when Honda announced it would no longer use Takata airbags for new models "in development." So a Takata airbag with issues still could have been installed in my Fit.
Who was the manufacturer of the airbag for your 2015 Fit EX-L? I saw you removed it and replaced it. Was it Takata, who made the defective airbags that are being recalled? Is it an airbag that uses ammonium nitrate to cause the bag to inflate but may rupture in high humidity? I'm worried that while my 2016 Fit LX isn't subject yet to a recall that Honda installed a Takata airbag in my Fit, which was built in November, right when Honda announced it would no longer use Takata airbags for new models "in development." So a Takata airbag with issues still could have been installed in my Fit.
es
Thread Starter
|
Member
Joined: Sep 2014
Posts: 927
From: The Middle West
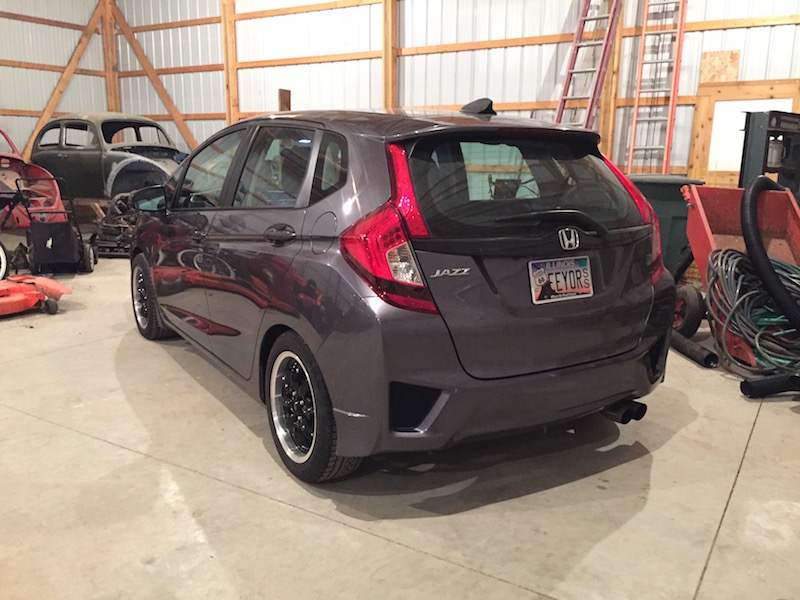
JDM Rear Bumper, RS-R Springs (rear)
I installed a JDM rear bumper cover tonight (got it back from the painters a few days ago), plus rear RS-R "Down" springs (�" drop).
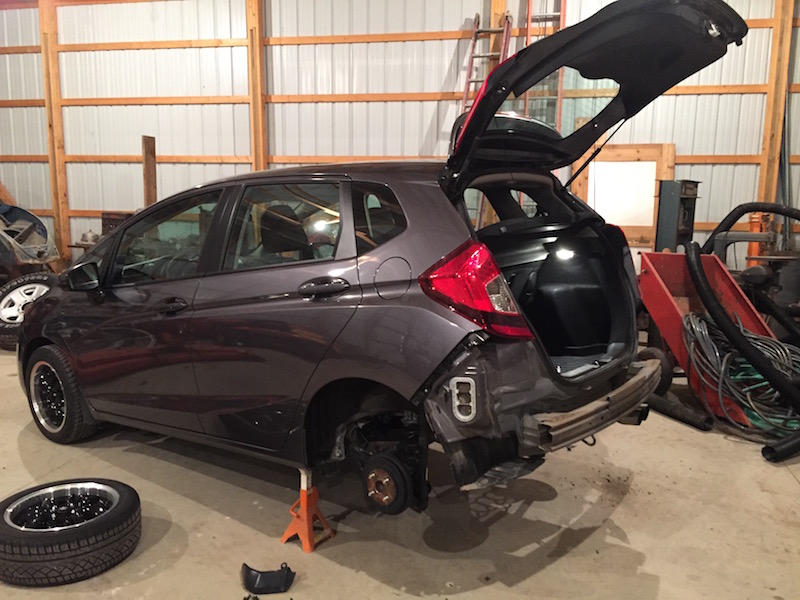
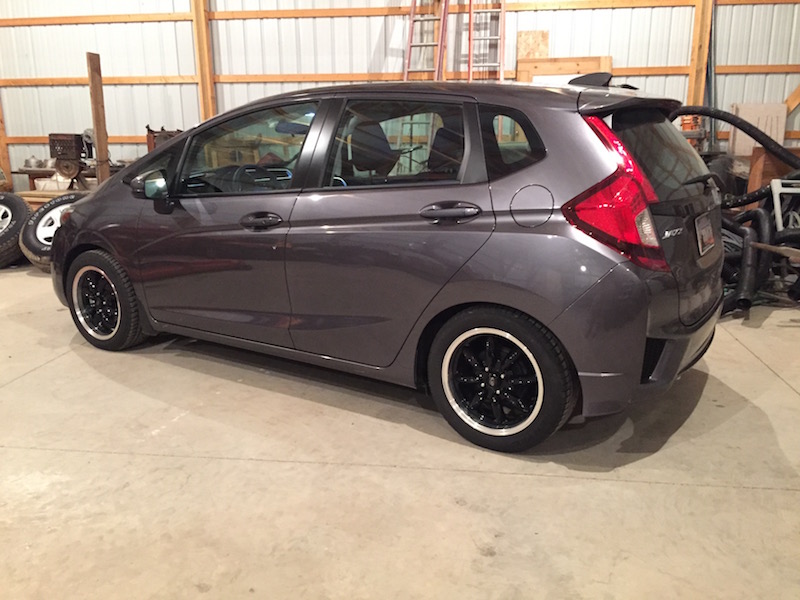
USDM bumper off. The rear beam also had to be removed - a point not mentioned in the Spoon Sports SEMA build thread where they did the same mod. Also, USDM rear splash guards do not work with the JDM bumper, so I left those off. The JDM bumper flares out a bit more, so I will probably just cut a piece of plastic to fill the gap in the wheelwell and call it good.
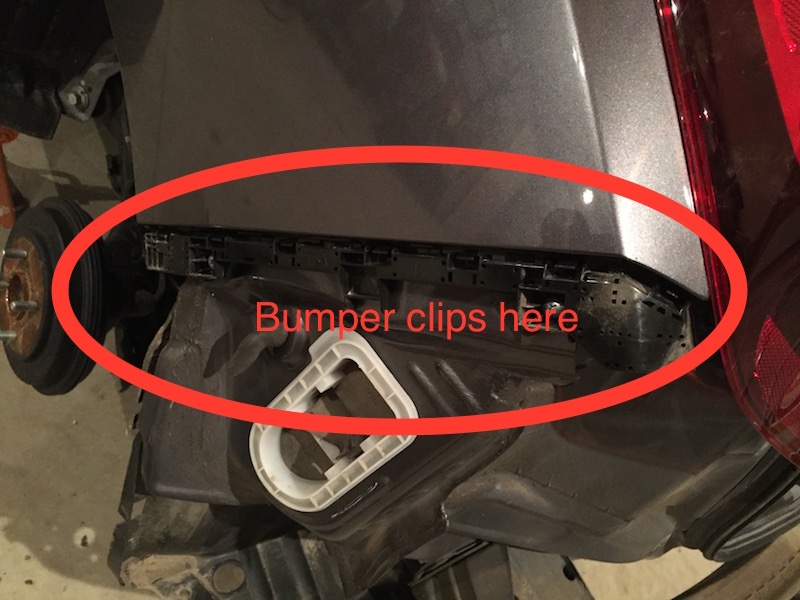
The diciest part of removing/installing the bumper is these press-fit clips here. The bumper kind of wraps around the sides of the car, so you have to do one side, then stretch the bumper around to install the other side.
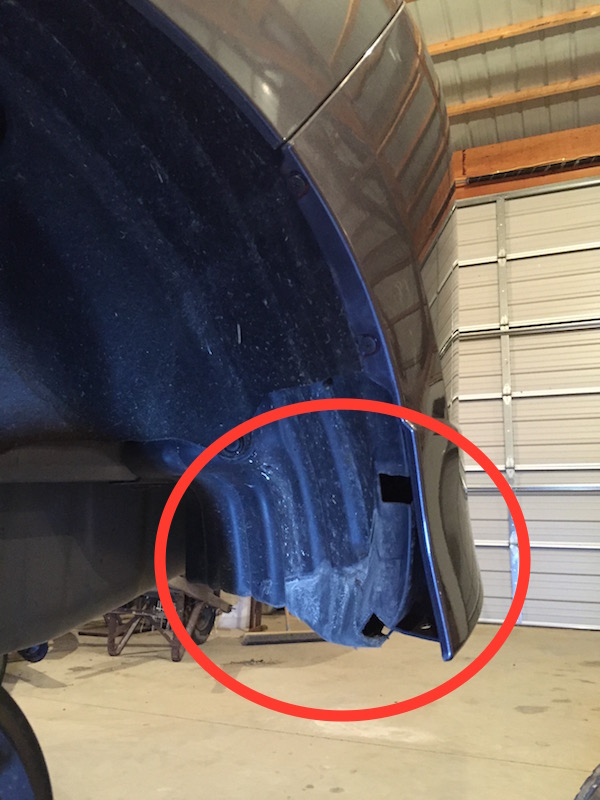
Detail of the wheelwell mismatch.
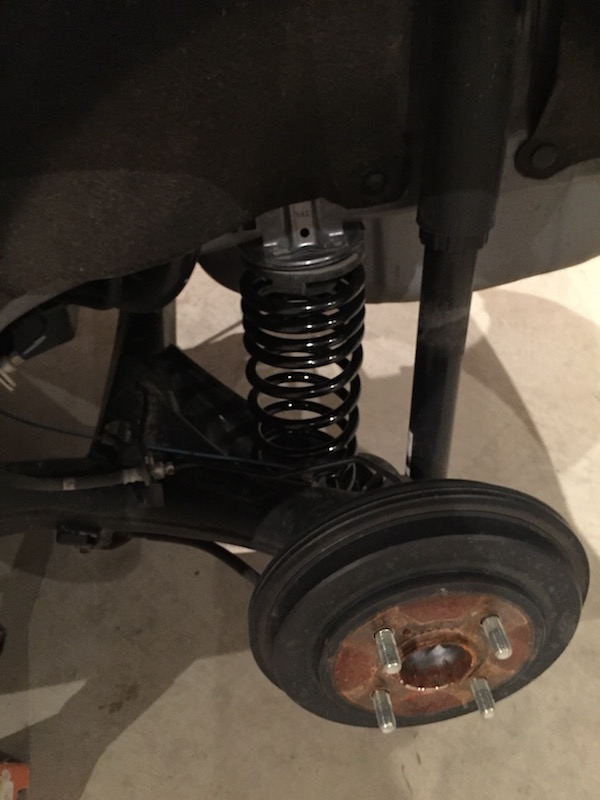
RS-R "Down" springs in (rear only at this point).
It was all fairly straightforward and took maybe 1.5 hours, going at it slowly.
I still have to install the front springs and will do camber bolts at that time.

Also still have to pull the rear brake drums to install toe shims. We have an autocross event at work in May and I plan to be READY.
es
USDM bumper off. The rear beam also had to be removed - a point not mentioned in the Spoon Sports SEMA build thread where they did the same mod. Also, USDM rear splash guards do not work with the JDM bumper, so I left those off. The JDM bumper flares out a bit more, so I will probably just cut a piece of plastic to fill the gap in the wheelwell and call it good.
The diciest part of removing/installing the bumper is these press-fit clips here. The bumper kind of wraps around the sides of the car, so you have to do one side, then stretch the bumper around to install the other side.
Detail of the wheelwell mismatch.
RS-R "Down" springs in (rear only at this point).
It was all fairly straightforward and took maybe 1.5 hours, going at it slowly.
I still have to install the front springs and will do camber bolts at that time.
Also still have to pull the rear brake drums to install toe shims. We have an autocross event at work in May and I plan to be READY.
es
It was all fairly straightforward and took maybe 1.5 hours, going at it slowly.
I still have to install the front springs and will do camber bolts at that time.
Also still have to pull the rear brake drums to install toe shims. We have an autocross event at work in May and I plan to be READY.
es
Could I ask you to take more pictures of the disassembly/reassembly of the front suspension? I'd like something to reference when I do mine.
Looks good so far and the shorter rear bumper shows off the Tanabe exhaust better


Last edited by 2Rismo2; Apr 1, 2016 at 07:03 AM.
Thread Starter
|
Member
Joined: Sep 2014
Posts: 927
From: The Middle West
I would be interested in your review of the springs after the full install. I'm looking at doing the same ones because I want a minimal drop but a stiffer suspension.
Could I ask you to take more pictures of the disassembly/reassembly of the front suspension? I'd like something to reference when I do mine.
Looks good so far and the shorter rear bumper shows off the Tanabe exhaust better
Could I ask you to take more pictures of the disassembly/reassembly of the front suspension? I'd like something to reference when I do mine.
Looks good so far and the shorter rear bumper shows off the Tanabe exhaust better
es

JDM rear 👍 So much nicer looking.
For JDM rear bumper from GD to GE to GK, the USDM rear crash always had to be removed or either cut. Look at J's Racing and Cusco, they have a rear monocoque bar that replaces the rear crash bar.
And if you source the JDM rear fender liners they'll fit spot on along with rear mudguards. Check out Lings Honda in UK or japanparts.com or Rakuten Japan or Amazon Japan for the parts, they will have them. Lings you can source the part numbers you need.
Ya I looked at the rear and it doesn't seem to be much. I'm assuming you got the rear end on jack stands and then used a floor jack on the torsion beam to lower it slightly after loosening the shocks?
Thread Starter
|
Member
Joined: Sep 2014
Posts: 927
From: The Middle West
es
Do you mean sway bar? If so, I have a RSB from Progressive and was thinking of removing it for the spring install. It's 4 bolts so it wouldn't add much time. It sounds like you didn't remove it so I may be able to skip that step. How did you lift up the torsion beam, with a scissor jack or just by hand? I was thinking of using this method I saw on this thread: https://www.fitfreak.net/forums/3rd-...springs-3.html
Thread Starter
|
Member
Joined: Sep 2014
Posts: 927
From: The Middle West
What I meant when I sad jack up the rear, was put the rear of the vehicle on jack stands, on the lift points that your scissor jack are meant to go on.
Do you mean sway bar? If so, I have a RSB from Progressive and was thinking of removing it for the spring install. It's 4 bolts so it wouldn't add much time. It sounds like you didn't remove it so I may be able to skip that step. How did you lift up the torsion beam, with a scissor jack or just by hand?
Do you mean sway bar? If so, I have a RSB from Progressive and was thinking of removing it for the spring install. It's 4 bolts so it wouldn't add much time. It sounds like you didn't remove it so I may be able to skip that step. How did you lift up the torsion beam, with a scissor jack or just by hand?
It almost takes longer to write it than it did to do it.
Thanks for the link to the other thread, too - I'd been contemplating struts and shocks as well, and that gives me a good lead.
es
I used a floor jack to lift each side from the body seam area just in front of where the scissor jack would normally be placed (which is where I placed my jack stands). I did not want to remove my sway bar, which is why I didn't jack the beam. Once I had it in the air, I used the floor jack to raise each side (jacking underneath the shock mount) - just enough to take the weight off the shock.
It almost takes longer to write it than it did to do it.
Thanks for the link to the other thread, too - I'd been contemplating struts and shocks as well, and that gives me a good lead.
es
It almost takes longer to write it than it did to do it.
Thanks for the link to the other thread, too - I'd been contemplating struts and shocks as well, and that gives me a good lead.
es
The springs are on my list for sure.

Member
Joined: Apr 2016
Posts: 39
From: Sacramento, CA
No pics for this mod (yet). Installation of the sway bar took about 30 minutes, give or take. I *highly* recommend this mod, as it tightens up handling without sacrificing any ride quality.
es
es
Thread Starter
|
Member
Joined: Sep 2014
Posts: 927
From: The Middle West

First, start by watching Top Gear explain the difference between understeer (what a stock Fit does) and oversteer (what an empty-bed rear-wheel-drive pickup does when you floor it going around an icy curve):
Here's a longer and more substantive video that explains what's going on:
He covers front-wheel drive cars toward the end.
Here's a site with more info describing different handling aspects: link
And of course, there's the ever-popular wikipedia: link
By adding a rear sway bar to my Fit, I am both decreasing body roll and adjusting the grip of my car front-to-rear: the bar reduces grip at the rear, moving my handling characteristics toward a more neutral experience. When I replaced my rear springs with stiffer ones (I have yet to install the new front springs), my handling moved even more toward a neutral balance, to the point where the car feels much more "eager" turning in and rounding a curve. For me, the car is much more engaging to drive now.
Here's a site that explains how you can tweak various bits in your suspension and tires to achieve the handling characteristics you desire: link
Hope that helps.
es
Last edited by stembridge; Apr 25, 2016 at 09:13 PM.