
Two Ways To Prevent A/C Damage from Rocks DIY/Photos

Frequent FitFreak Poster
Joined: May 2008
Posts: 898
From: Bay Area, CA
Mr.Grille on ebay. was like 100ish(a lil more) for all 3 pieces. worth every penny. I would rather do it right once than keep fixing/adjusting stuff or replacing it. It has held up to some real abuse, and looks great to this day.


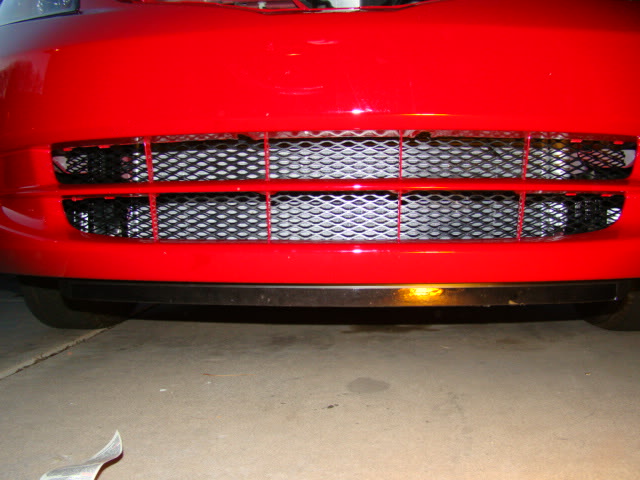
i did the gutter guard on the inside of my car and then today i went down to ace hardware and bought the plastic 1/8 inch gutter guard solid piece. some flat black spray paint (3 coats ftw) a little bit of patience and I have a solid front now.
i also like the fact that this piece has a solid part along the bottom, which you can't see in the pics, that helps to frame it out. and for ease of removal i used 3 tie straps {--Left Middle Right--}
enjoy...for $8.00 bucks, i feel better. especially since i noticed that rocks already knocked in some of the gutter guard i had up...
and yes, i know i need to wash my car lol. just got back from a trip to orlando before i go back again

New Member
Joined: Apr 2011
Posts: 1
From: Modesto, CA
Thanks for the info on installing a screen. My dealership wants to charge me close to $900 for a new condenser! Honda needs to fix this bad design, and enough of us have to file complaints! 


Member
Joined: Apr 2011
Posts: 47
From: Mesa AZ
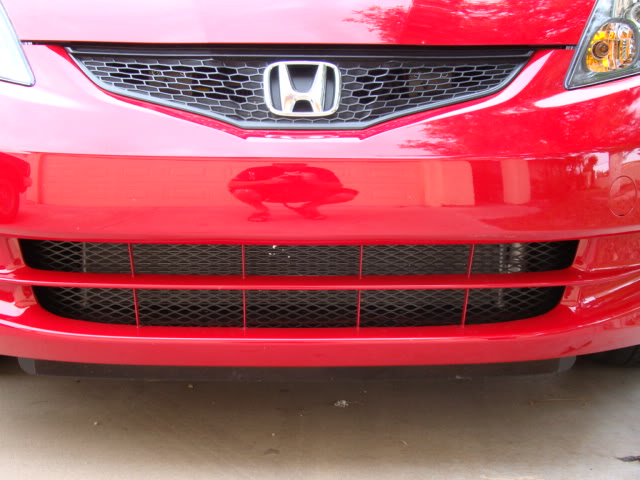
Here's mine. Took a little too close, as you can see where the grill ends however it extends further than the opening. Total time after grill painting: 20 minutes
Cost of $10 from Home Depot, it's basically a BBQ replacement mesh grill. Comes 2 per pack. I primered it gray, than flat black. Since one wasn't wide enough to fit the opening, I used two. I had to "mate" the two together using zip ties.
I'll take photo tomorrow from a further distance. This photo makes it look like there are two the entire width, however it is just the shadow from the camera flash.

Here's mine. Took a little too close, as you can see where the grill ends however it extends further than the opening. Total time after grill painting: 20 minutes
Cost of $10 from Home Depot, it's basically a BBQ replacement mesh grill. Comes 2 per pack. I primered it gray, than flat black. Since one wasn't wide enough to fit the opening, I used two. I had to "mate" the two together using zip ties.
I'll take photo tomorrow from a further distance. This photo makes it look like there are two the entire width, however it is just the shadow from the camera flash.
Member
Joined: Apr 2011
Posts: 47
From: Mesa AZ
I'll post my install pics of the lower grill tonight.
No kiddin'!
Last edited by Red Rockit; Apr 19, 2011 at 09:42 AM.

Member
Joined: Apr 2011
Posts: 235
From: Florida
Hey, thanks for taking the time and effort for posting all the info on this fix. You have me convinced that it is something that needs to be done.
I'm not use to Japanese engineering. There are plastic fasteners, joiners, whatchamacallits, holding the front bumper on (do you really call that a bumper?) Is there a special tool or technique for removing them? I hate to start out ruining something.
JIm 0311
I'm not use to Japanese engineering. There are plastic fasteners, joiners, whatchamacallits, holding the front bumper on (do you really call that a bumper?) Is there a special tool or technique for removing them? I hate to start out ruining something.
JIm 0311
Member
Joined: Apr 2011
Posts: 47
From: Mesa AZ
Hey, thanks for taking the time and effort for posting all the info on this fix. You have me convinced that it is something that needs to be done.
I'm not use to Japanese engineering. There are plastic fasteners, joiners, whatchamacallits, holding the front bumper on (do you really call that a bumper?) Is there a special tool or technique for removing them? I hate to start out ruining something.
JIm 0311
I'm not use to Japanese engineering. There are plastic fasteners, joiners, whatchamacallits, holding the front bumper on (do you really call that a bumper?) Is there a special tool or technique for removing them? I hate to start out ruining something.
JIm 0311

Member
Joined: Aug 2010
Posts: 345
From: San Antonio, Texas
My fix for this issue:
Purchased the lower portion of this...
09 + Honda Fit Billet Grille
Installed...
https://picasaweb.google.com/pvenne/...67897803997298
https://picasaweb.google.com/pvenne/...68072540187074
Easy install. If the shroud clips do not all secure correctly on
the re-install check to ensure the narrow tab running along the
leading edge of the shroud is actually fitting into the slot. You
will see what I mean when you dis-assemble this.
Member
Joined: Apr 2011
Posts: 235
From: Florida
The plastic fasteners are really easy to remove. Use a small flat head screwdriver to lift the center head, than you can grab the outer portion of the fastener to remove it. Just remember there are two different lengths of fasteners. If i remember correctly, the two longer ones are located at the outer edges(left & right). You will also need a smaller phillips head screwdriver to remove the center grill screws, there are only two.

New Member
Joined: Apr 2011
Posts: 1
From: Illinois
Similar Way to Prevent A/C Damage from Rocks
I used a galvanized gutter cover from Home Depot, took off the clips, cut it to size, formed it to match the contour of the fender, painted it black, and used black wire ties to attach it. It was very simple to pop the fasteners off with a screwdriver to access that area. I've had no problems.


Last edited by trevog; Nov 23, 2011 at 04:04 PM.

FYI: Now that I relocated to Brazil I bought a GD1 a few years back.
Both GE8 and GD1 came STANDARD with a grill (method 1) here. There are 8 predrill holes on the front rebar and the bottom with 10mm bolt to hold a very solid grill.
I still don't understand why Honda America doesn't do this. This is in the JDM design!
Both GE8 and GD1 came STANDARD with a grill (method 1) here. There are 8 predrill holes on the front rebar and the bottom with 10mm bolt to hold a very solid grill.
I still don't understand why Honda America doesn't do this. This is in the JDM design!
Watsonville, Palo Alto, and now Brazil, boy you do get around. Nice to see you back, Marty.
Wow, you know my path! Enjoy your "cheap/quality" mod at home! I transferred most of the GD3 mod to my GD1 and I got asked all the time where the heck did I get all these stuffs...PRM intake, progress RSB, Cusco front/rear strut, Philips DRL, Tanabe front lower strut, and all interior accessories...LED lights, Claszio seat cover, truck mat, scangauge, Mugen visor/short shifter, amp/stereos...the bottom line: I don't have to do a JDM front end conversion..sigh!