
DIY: Installation of lowering springs on 07-08 GD3


DIY: Installation of lowering springs on 07-08 GD3
DIY: Installation of lowering springs on a GD3 Fit
The following Do-It-Yourself article is for the installation of lowering springs on a 2007-2008 Honda Fit. This is a slightly more advanced installation and I am not responsible for any damage or injury that may occur during your installation by following these directions.
Required Tools:
-Jack
-Jack stands
-6 mm allen wrench
-14 mm socket
-17 mm combination wrench
-3/4" socket
Recommended but not necessary: Gloves, eye protection, wheel chocks, flat head screwdriver, tray/dish to hold nuts, bolts, etc.
1. Open the hood and prop it with the rod. Locate the strut tower on the side you are working on. Remove small black plastic cap located on the bolt in the center of the strut tower.
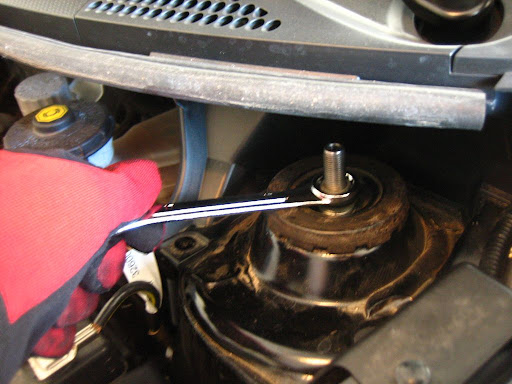
2. Loosen (but do not remove) the nut on the bolt using the 17 mm combination wrench.
3. Before lifting the vehicle, loosen the wheel lug nuts using a 3/4" socket.
4. Lift the front of the car using a floor jack and support with jack stands. I highly recommend using wheel chocks behind the rear tires before jacking for safety. Remove the lug nuts and wheel. Fully turn the steering wheel into the side you are working on (if working on the drivers side front spring, turn the steering wheel all the way left, if working on the passenger side, turn the steering wheel all the way right). This gives a little extra clearance room when removing/installing the shock assembly which helps to avoid issues with the axle pulling out.
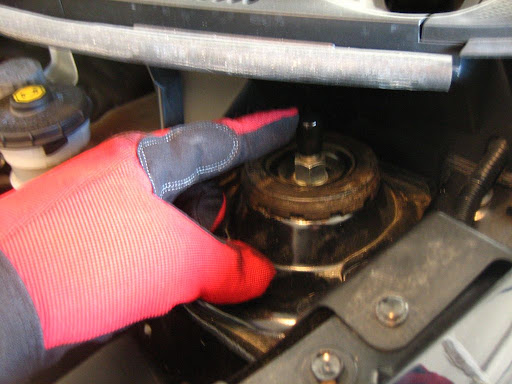
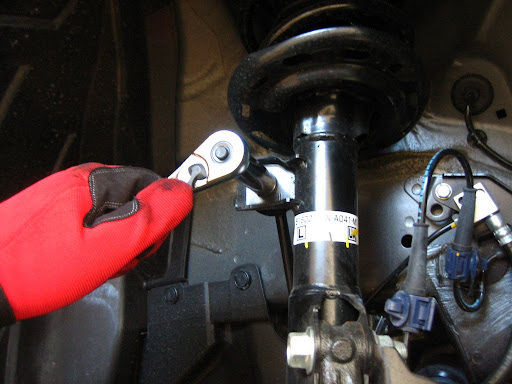
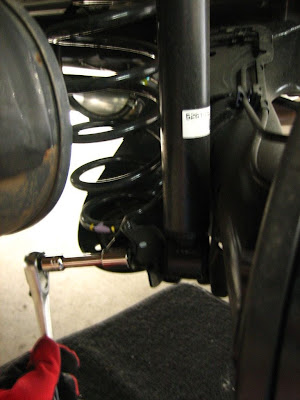
Here is what you will be looking at once the wheel is off and you've turned the steering wheel all the way.
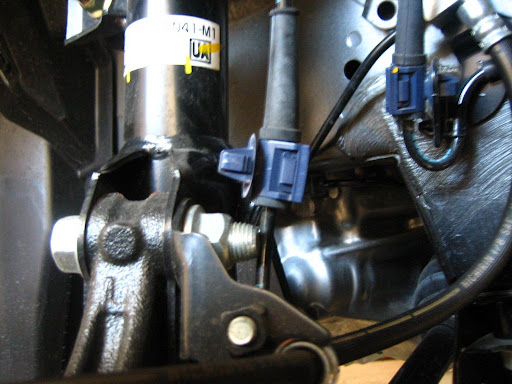
5. Unclip the blue ABS sensor clip by pinching the tabs. It is located near where the shock bolts to the knuckle. You may find that using a flat head screwdriver will help you push in the tabs.
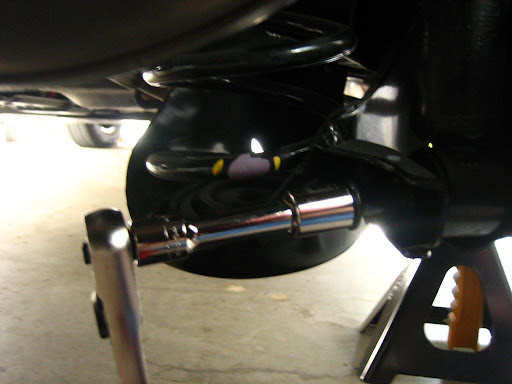
6. Remove the 14 mm nut holding the sway bar end link to the shock.
7. Next you will be removing the lower two 3/4" nuts and bolts that connect the shock to the knuckle. You will need to support the knuckle/arm so that it does not drop down once the shock is removed. If the knuckle/arm drop down, the axle might pull out. If for some reason the axle does pull out, do not panic. Use patience. Pushing the axle back in. If it does not go in easily, you may need to spin the hub with one hand while guiding the axle in at the boot with the other hand until it falls into place.
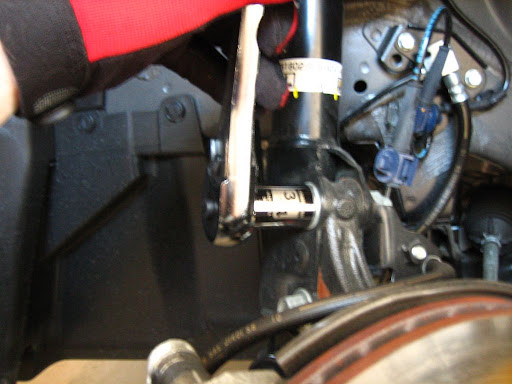
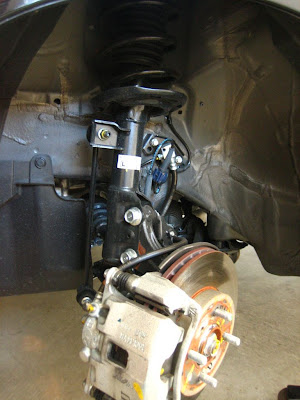
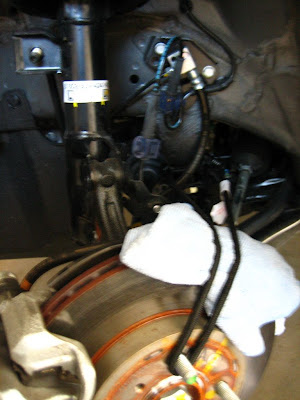
This is how I fashioned a support to hold the knuckle up. I used a bungee type strap and a towel to protect the brake rotor. You may also use a jack stand underneath. I did not have any issues with the axle falling out using this technique.
8. Next you will remove the top 17 mm nut and rebound stop that you loosened from the engine bay in step 2. Carefully remove the shock assembly by pushing the end link bolt out of the shock housing hole, then sliding the lower section out of the knuckle. Be careful to not move the knuckle much while removing the shock assembly. Once it is out, you will have this:

9. Start disassembling the shock assembly. First start by removing the rubber damper mounting.
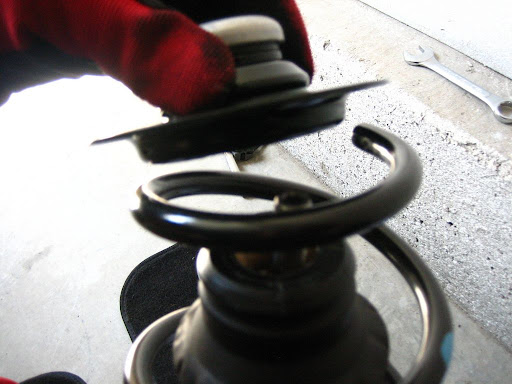
10. Put the 6 mm allen wrench into the end of the top bolt of the shock. This stops the shaft from turning. Use the combination wrench to loosen the bolt on the end while holding the allen wrench. This will be releasing the tension of the spring. Normally, a spring compressor would be used to avoid any danger of the springs tension causing injury as the bolt is removed. The spring is not under very much tension, so a spring compressor is not necessary on this application. For safety, you may want to stand with one foot on the spring as the nut is coming off. You may want the help of a friend on this.

11. Once the nut is off, you will be removing the damper mounting bearing and spring seat (the black and silver part) and the upper spring clip seat (the grey part with clips). The dust cover sleeve (accordion style boot on the shaft) is attached to the upper spring clip seat. Simple pull down on it to detach it. You will need to twist the upper spring clip seat to detach it from the spring.
In this image, the upper spring clip seat has been removed, this is showing the damper mounting bearing and spring seat.
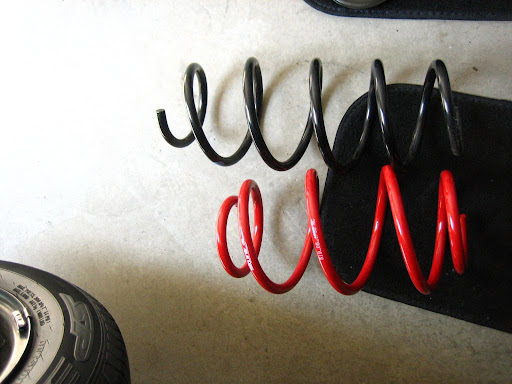
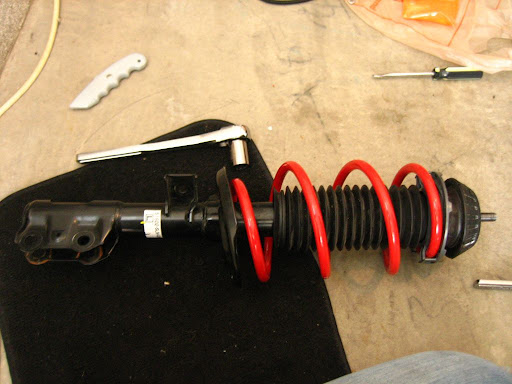
This is a comparison of the stock (black) spring next to the aftermarket (red) spring.
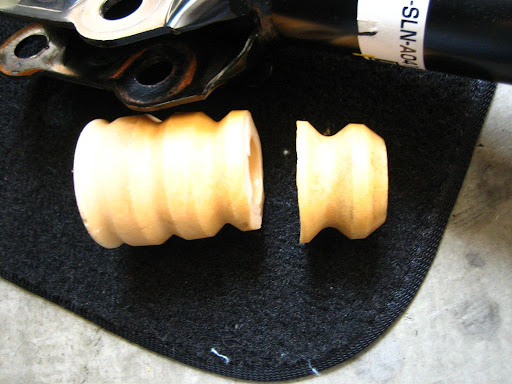
12. Remove the dust cover sleeve from the shaft by pulling it up and off of the shock. Under the sleeve you will find the rubber bump stop.

13. Remove the bump stop You will need to cut approximately an inch of the bump stop off using a sharp razor. Cut the smaller end carefully. This is to prevent bottoming out the shock on hard bumps. Bottoming out the shock will cause premature wear and failure. One you have made a clean cut, reinstall the bump stop.
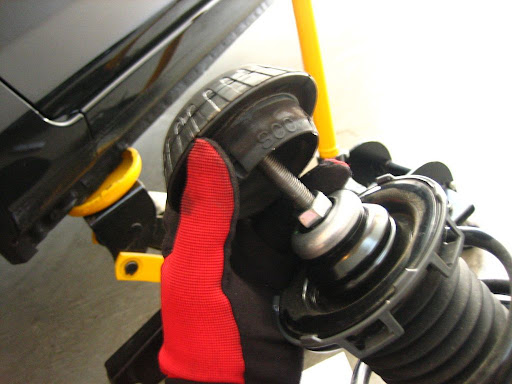
14. Reassemble the shock assembly with the aftermarket spring in place of the factory spring but reversing the previous steps. Torque the top nut to 25 ft-lbs. Once assembled, it will look like this:
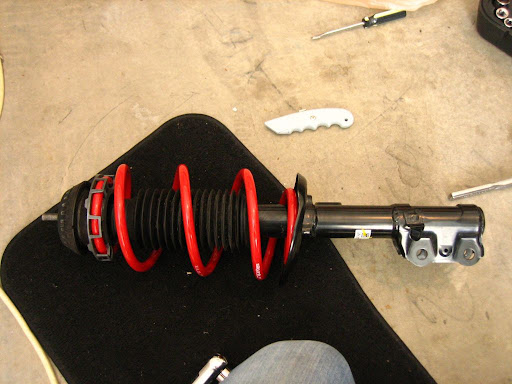
*Note: Some aftermarket springs have have the logo printed upside down in relation to the top of the spring. It will be clear which side is the top while assembling the shock assembly, it will only fit properly one way.
15. Reinstall the shock assembly onto the vehicle. You may find it easier to push the top section into the shock tower first, then pushing the end link bolt through the shock assembly hole. The next step would be pushing the lower section into the knuckle mounting. Be careful once again to not move the knuckle much while installing the shock assembly. This may take a bit of muscle. Tighten the nuts and bolt down to the factory torque specifications.
-strut tower bolt/rebound stop: 33 ft-lbs.
-upper end link to shock assembly nut: 22 ft-lbs.
-lower two shock assembly to knuckle bolts/nuts: 51 ft-lbs.
The final step is to reattach the blue ABS clip. Reinstall the wheel and lug nuts and move on to the opposite side following these same steps.
16. Next you will be installing the rear lowering springs. This is far easier than the front springs as you do not have to uninstall the strut. Start but placing the wheel chocks in front of the front tires and jacking put the rear of the vehicle from the triangular shaped pan located behind the rear tow hook. Place jack stands on both sides at the rear section of the side, just in front of the rear wheels. You may find it easier to not remove the wheels for the rear spring installation.
17. Remove the 14 mm bolt that is attaching the spring perch to the strut. You may find it easier to remove the bolt by using the floor jack to slightly compress the spring by jacking up the bottom of the spring perch very slightly.
18. Once the 14 mm bolt is removed, you will be able to remove the spring. If you have used a floor jack to support the lower spring perch, remove it now. If you have not removed the rear wheel, you can push down on the wheel and tire which will drop the perch down enough to pull the spring out. Otherwise you can push down by other means to drop the lower spring perch and pull the spring out.
19. Remove the upper and lower rubber spring mounts from the stock spring and put them on the aftermarket spring. If you have a progressive rate aftermarket spring, the end of the spring with the tighter wound coils is the top.
20. Install the rear spring by putting the aftermarket spring into the lower perch and using the floor jack to lift the spring perch enough so that the 14 mm bolt will fit back into the strut. Tighten down to the factory torque specification of 40 ft-lbs.
Follow the same steps for the opposite side spring installation.
Once you have finished the spring installation, you will want to have the vehicle aligned. It may take a few days for the springs to settle, so I recommend waiting a few days before getting the alignment. You may also want to sit in the driver's seat during the alignment so that the vehicle is aligned to the way the vehicle sits while you are driving.
The following Do-It-Yourself article is for the installation of lowering springs on a 2007-2008 Honda Fit. This is a slightly more advanced installation and I am not responsible for any damage or injury that may occur during your installation by following these directions.
Required Tools:
-Jack
-Jack stands
-6 mm allen wrench
-14 mm socket
-17 mm combination wrench
-3/4" socket
Recommended but not necessary: Gloves, eye protection, wheel chocks, flat head screwdriver, tray/dish to hold nuts, bolts, etc.
1. Open the hood and prop it with the rod. Locate the strut tower on the side you are working on. Remove small black plastic cap located on the bolt in the center of the strut tower.
2. Loosen (but do not remove) the nut on the bolt using the 17 mm combination wrench.
3. Before lifting the vehicle, loosen the wheel lug nuts using a 3/4" socket.
4. Lift the front of the car using a floor jack and support with jack stands. I highly recommend using wheel chocks behind the rear tires before jacking for safety. Remove the lug nuts and wheel. Fully turn the steering wheel into the side you are working on (if working on the drivers side front spring, turn the steering wheel all the way left, if working on the passenger side, turn the steering wheel all the way right). This gives a little extra clearance room when removing/installing the shock assembly which helps to avoid issues with the axle pulling out.
Here is what you will be looking at once the wheel is off and you've turned the steering wheel all the way.
5. Unclip the blue ABS sensor clip by pinching the tabs. It is located near where the shock bolts to the knuckle. You may find that using a flat head screwdriver will help you push in the tabs.
6. Remove the 14 mm nut holding the sway bar end link to the shock.
7. Next you will be removing the lower two 3/4" nuts and bolts that connect the shock to the knuckle. You will need to support the knuckle/arm so that it does not drop down once the shock is removed. If the knuckle/arm drop down, the axle might pull out. If for some reason the axle does pull out, do not panic. Use patience. Pushing the axle back in. If it does not go in easily, you may need to spin the hub with one hand while guiding the axle in at the boot with the other hand until it falls into place.
This is how I fashioned a support to hold the knuckle up. I used a bungee type strap and a towel to protect the brake rotor. You may also use a jack stand underneath. I did not have any issues with the axle falling out using this technique.
8. Next you will remove the top 17 mm nut and rebound stop that you loosened from the engine bay in step 2. Carefully remove the shock assembly by pushing the end link bolt out of the shock housing hole, then sliding the lower section out of the knuckle. Be careful to not move the knuckle much while removing the shock assembly. Once it is out, you will have this:
9. Start disassembling the shock assembly. First start by removing the rubber damper mounting.
10. Put the 6 mm allen wrench into the end of the top bolt of the shock. This stops the shaft from turning. Use the combination wrench to loosen the bolt on the end while holding the allen wrench. This will be releasing the tension of the spring. Normally, a spring compressor would be used to avoid any danger of the springs tension causing injury as the bolt is removed. The spring is not under very much tension, so a spring compressor is not necessary on this application. For safety, you may want to stand with one foot on the spring as the nut is coming off. You may want the help of a friend on this.
11. Once the nut is off, you will be removing the damper mounting bearing and spring seat (the black and silver part) and the upper spring clip seat (the grey part with clips). The dust cover sleeve (accordion style boot on the shaft) is attached to the upper spring clip seat. Simple pull down on it to detach it. You will need to twist the upper spring clip seat to detach it from the spring.
In this image, the upper spring clip seat has been removed, this is showing the damper mounting bearing and spring seat.
This is a comparison of the stock (black) spring next to the aftermarket (red) spring.
12. Remove the dust cover sleeve from the shaft by pulling it up and off of the shock. Under the sleeve you will find the rubber bump stop.
13. Remove the bump stop You will need to cut approximately an inch of the bump stop off using a sharp razor. Cut the smaller end carefully. This is to prevent bottoming out the shock on hard bumps. Bottoming out the shock will cause premature wear and failure. One you have made a clean cut, reinstall the bump stop.
14. Reassemble the shock assembly with the aftermarket spring in place of the factory spring but reversing the previous steps. Torque the top nut to 25 ft-lbs. Once assembled, it will look like this:
*Note: Some aftermarket springs have have the logo printed upside down in relation to the top of the spring. It will be clear which side is the top while assembling the shock assembly, it will only fit properly one way.
15. Reinstall the shock assembly onto the vehicle. You may find it easier to push the top section into the shock tower first, then pushing the end link bolt through the shock assembly hole. The next step would be pushing the lower section into the knuckle mounting. Be careful once again to not move the knuckle much while installing the shock assembly. This may take a bit of muscle. Tighten the nuts and bolt down to the factory torque specifications.
-strut tower bolt/rebound stop: 33 ft-lbs.
-upper end link to shock assembly nut: 22 ft-lbs.
-lower two shock assembly to knuckle bolts/nuts: 51 ft-lbs.
The final step is to reattach the blue ABS clip. Reinstall the wheel and lug nuts and move on to the opposite side following these same steps.
16. Next you will be installing the rear lowering springs. This is far easier than the front springs as you do not have to uninstall the strut. Start but placing the wheel chocks in front of the front tires and jacking put the rear of the vehicle from the triangular shaped pan located behind the rear tow hook. Place jack stands on both sides at the rear section of the side, just in front of the rear wheels. You may find it easier to not remove the wheels for the rear spring installation.
17. Remove the 14 mm bolt that is attaching the spring perch to the strut. You may find it easier to remove the bolt by using the floor jack to slightly compress the spring by jacking up the bottom of the spring perch very slightly.
18. Once the 14 mm bolt is removed, you will be able to remove the spring. If you have used a floor jack to support the lower spring perch, remove it now. If you have not removed the rear wheel, you can push down on the wheel and tire which will drop the perch down enough to pull the spring out. Otherwise you can push down by other means to drop the lower spring perch and pull the spring out.
19. Remove the upper and lower rubber spring mounts from the stock spring and put them on the aftermarket spring. If you have a progressive rate aftermarket spring, the end of the spring with the tighter wound coils is the top.
20. Install the rear spring by putting the aftermarket spring into the lower perch and using the floor jack to lift the spring perch enough so that the 14 mm bolt will fit back into the strut. Tighten down to the factory torque specification of 40 ft-lbs.
Follow the same steps for the opposite side spring installation.
Once you have finished the spring installation, you will want to have the vehicle aligned. It may take a few days for the springs to settle, so I recommend waiting a few days before getting the alignment. You may also want to sit in the driver's seat during the alignment so that the vehicle is aligned to the way the vehicle sits while you are driving.
Last edited by Tofuman; Oct 27, 2008 at 06:17 PM.

Good write up does not sound to hard. I thought it would be alot harder than this. I think i know where my Saturday is going to go. About how long did it take?? Thanks for this write up we all needed it bad
It took me maybe 3.5 hours of actual working time in the garage. I took a lunch break and a few cool-down breaks because it was about 100 degrees. I took my time and I was taking pictures.
If I don't have a jack and stands can I use a mechanic hydraulic lift? There's a place on base I can jack it up into the air with. I don't see why not. This does look a bit difficult, but I think I should do it because a shop might not know some of these steps like cutting the bumpstop? Or would they know? Gah I don't know!
If I don't have a jack and stands can I use a mechanic hydraulic lift? There's a place on base I can jack it up into the air with. I don't see why not. This does look a bit difficult, but I think I should do it because a shop might not know some of these steps like cutting the bumpstop? Or would they know? Gah I don't know!
yeah, there isn't much tension. it makes a very small pop out. i should have made a video of it. it is hardly anything at all.
i had an extra floor mat laying around so i put it over the spring and stood on the ends of the mat to hold the spring in place. it hardly moved at all, honestly.
i had an extra floor mat laying around so i put it over the spring and stood on the ends of the mat to hold the spring in place. it hardly moved at all, honestly.
as long as you don't hit a lot of big bumps in the road, you should be fine. just be careful. the life of your shocks depends on how rough of roads you drive on. some people can go a year or more on stock shocks before noticing that they need replacing.
Haha, well it's the thought that counts.
Good luck with the install, post pics of how it looks when you're done.

Joined: Jul 2008
Posts: 1,316
From: Chicago, IL
Will do. I think my last post was a bit misleading...I have yet to actually purchase a set of springs but now I feel comfortable doing it myself  . BTW...Can we get this thread Stickied? Mods?...Admins?...Buehler?
. BTW...Can we get this thread Stickied? Mods?...Admins?...Buehler?
Will a mod PLEASE sticky this?!? +rep for you!
Oh, and for the people scrolling through this thread, let me reiterate...
NO SPRING COMPRESSOR IS NECESSARY FOR THE INSTALLATION OF SPRINGS ON A FIT!
kthxbye
Oh, and for the people scrolling through this thread, let me reiterate...
NO SPRING COMPRESSOR IS NECESSARY FOR THE INSTALLATION OF SPRINGS ON A FIT!
kthxbye

Member
Joined: Oct 2007
Posts: 145
From: Orangevale, CA

dont forget that the front will need to have an alignment
good diy,
i want to lower my fit, but its already scary over large speed bumps lol
do you guys that have your fit lowered have any problems on steep driveways, speed bumps etc..
i would hate to scrape the front up
looks so good though
good diy,
i want to lower my fit, but its already scary over large speed bumps lol
do you guys that have your fit lowered have any problems on steep driveways, speed bumps etc..
i would hate to scrape the front up
looks so good though