
HID Installation


Thread Starter
|
Frequent FitFreak Poster
Joined: May 2006
Posts: 588
From: San Angelo, TX
HID Installation
Hey guys, No one has pics of installation so I thought I'd bust out to help you Fit Freaks..
So here we go.. Disclaimer: The following is provided as a GUIDE ONLY, and neither myself, nor FITFREAK.NET take any responsibility for the outcome of someone else doing the following. You follow these steps at your own risk!
First, I got the kit from Xenon Light Source - Wholesale & Distribution of Quality HID Lights Worlwide for $289.99 shipped. Arrived within 3 days Express.
H4-3 kit. 6000K.
2 Hour install. This was the first time I have ever handled and installed a HID kit. It took 2 hours because I had to figure out where things needed to be mounted. Other wise, after reading this, you should be able to do it under 30 minutes. The only tools I used was a Flat head, Phillips, needle nose plier, and a regular plier..

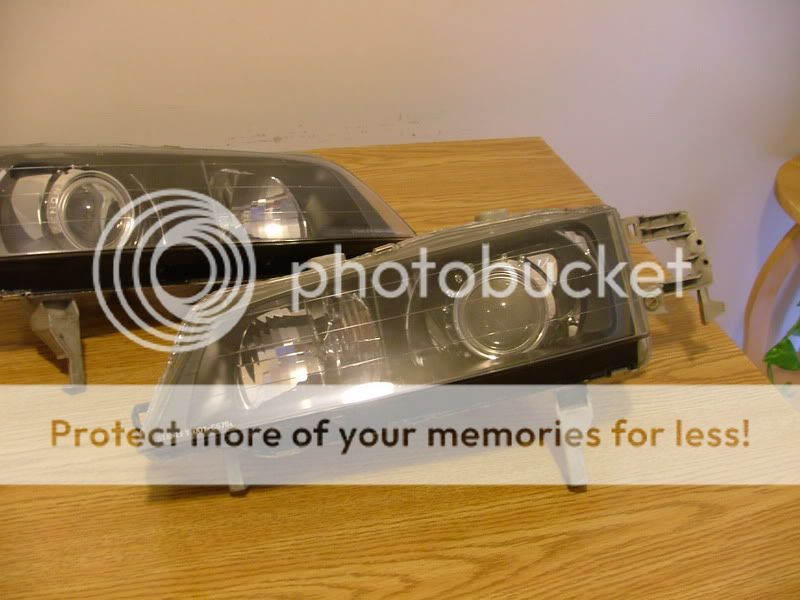
The kit with mounting hardware..

After taking out everything out of the box, I went ahead and took the bumper off. 2 screws under the fender, 2 under the bumper, and 2 clips under the bumper. Unclip the foglight clips. Easy to take the bumper off.

There is no order on this one so I'm going to show you the passenger side first since I did that side first. I turn the wheel towards the passenger side so that the fender wheel plastic cover thingie could go over the back of the wheel. Keeps it in place while you work. Took the stock light out and installed the HID bulb. The clip was a bitch to get back on so depending on which kit you get, it might be easier. When I get a chance I'm going to cut the dust boot cover. I installed the light without the dust covers. I didn't have stuff to cut it at the time so I went ahead and went with the installation. After I got both bulbs in, I went and figured out where to mount the Ballast boxes.
Passenger side I put it under the hood which was pretty roomy on that side. There was a few holes that were drilled out from the factory already so I used those to mount the ballast. These kits came with ballast brackets which I thought came in handy. I did use the double sided mounting tape it came with just for a little extra hold.
EDIT** Don't install the passenger side ballast on the inside of the engine bay. It gets really hot at that corner. So mount it underneath the fender.


The driver's side I mounted the ballast under the headlight. There's a bracket under there you can mount it on with the ballast bracket. Again, there was a hole predrilled and I used that. Since It was mounted sideways, I went ahead and used a zip tie to hold it in place. Even with the double sided mounting tape.


After installing the ballast, I went ahead laid out the wiring harness. Zip tied the wires on the back of the engine. Zip tied it to some of the hoses. But I tied it down very loosely. I made sure all the wires were tucked away. I forgot to take pics of where I mounted the ground wires. But easy, I used the bolts that held down the headlights which is the center bolt. Before installing the positive, I disconnected the negative. The positive wire I bolted to the wire that is on the driver side on the positive battery terminal. Then put the red cap back on the battery.
Make sure everything is done correctly and plug the negative back onto the battery. Turn the lights on and enjoy!


Put the bumper back on afterwards and play with the lights some more while you listen to some music!

Any Comments or Questions, let me know.
I hope this was some good info..
-Tomi
So here we go.. Disclaimer: The following is provided as a GUIDE ONLY, and neither myself, nor FITFREAK.NET take any responsibility for the outcome of someone else doing the following. You follow these steps at your own risk!
First, I got the kit from Xenon Light Source - Wholesale & Distribution of Quality HID Lights Worlwide for $289.99 shipped. Arrived within 3 days Express.
H4-3 kit. 6000K.
2 Hour install. This was the first time I have ever handled and installed a HID kit. It took 2 hours because I had to figure out where things needed to be mounted. Other wise, after reading this, you should be able to do it under 30 minutes. The only tools I used was a Flat head, Phillips, needle nose plier, and a regular plier..
The kit with mounting hardware..
After taking out everything out of the box, I went ahead and took the bumper off. 2 screws under the fender, 2 under the bumper, and 2 clips under the bumper. Unclip the foglight clips. Easy to take the bumper off.
There is no order on this one so I'm going to show you the passenger side first since I did that side first. I turn the wheel towards the passenger side so that the fender wheel plastic cover thingie could go over the back of the wheel. Keeps it in place while you work. Took the stock light out and installed the HID bulb. The clip was a bitch to get back on so depending on which kit you get, it might be easier. When I get a chance I'm going to cut the dust boot cover. I installed the light without the dust covers. I didn't have stuff to cut it at the time so I went ahead and went with the installation. After I got both bulbs in, I went and figured out where to mount the Ballast boxes.
Passenger side I put it under the hood which was pretty roomy on that side. There was a few holes that were drilled out from the factory already so I used those to mount the ballast. These kits came with ballast brackets which I thought came in handy. I did use the double sided mounting tape it came with just for a little extra hold.
EDIT** Don't install the passenger side ballast on the inside of the engine bay. It gets really hot at that corner. So mount it underneath the fender.
The driver's side I mounted the ballast under the headlight. There's a bracket under there you can mount it on with the ballast bracket. Again, there was a hole predrilled and I used that. Since It was mounted sideways, I went ahead and used a zip tie to hold it in place. Even with the double sided mounting tape.
After installing the ballast, I went ahead laid out the wiring harness. Zip tied the wires on the back of the engine. Zip tied it to some of the hoses. But I tied it down very loosely. I made sure all the wires were tucked away. I forgot to take pics of where I mounted the ground wires. But easy, I used the bolts that held down the headlights which is the center bolt. Before installing the positive, I disconnected the negative. The positive wire I bolted to the wire that is on the driver side on the positive battery terminal. Then put the red cap back on the battery.
Make sure everything is done correctly and plug the negative back onto the battery. Turn the lights on and enjoy!
Put the bumper back on afterwards and play with the lights some more while you listen to some music!
Any Comments or Questions, let me know.
I hope this was some good info..
-Tomi
Last edited by TomiGunz; Jan 6, 2007 at 12:00 PM.
Thread Starter
|
Frequent FitFreak Poster
Joined: May 2006
Posts: 588
From: San Angelo, TX
Oh BTW, my kit is Bi-Xenon, 1 bulb on each light, and has telescopic bulbs. Not too sure how the lights work but I can definetly hear a mechanical sound when I flip to hi-beams. I think it has a shutter on it.
Edit:
The bulb has 2 bulbs which is one long bulb. There's no shutter. The bulb moves in and out about 1/4" of an inch. At low beam, the bulb is 1/4" out which the top of the bulb sits inside of the HID bulb housing. On high beam, the bulb moves down into the bulb where the wire harness is. By doing that, it exposes both bulbs for high beams. I also noticed that when I turn it to high beams, the beam of light goes up. Low beams points down. Pretty neat how it does that with just the bulb moving forward and backwards.
Now I want HIDs for my fogs but naw!
Last edited by TomiGunz; Jul 31, 2006 at 06:20 PM.

Thread Starter
|
Frequent FitFreak Poster
Joined: May 2006
Posts: 588
From: San Angelo, TX
I don't know what you guys mean when you say "GLARE" but mine seems to be fine the way it is. Actually I think it looks really good. It made driving at night a better drive. High beams are funny cuz it just lights up everything.
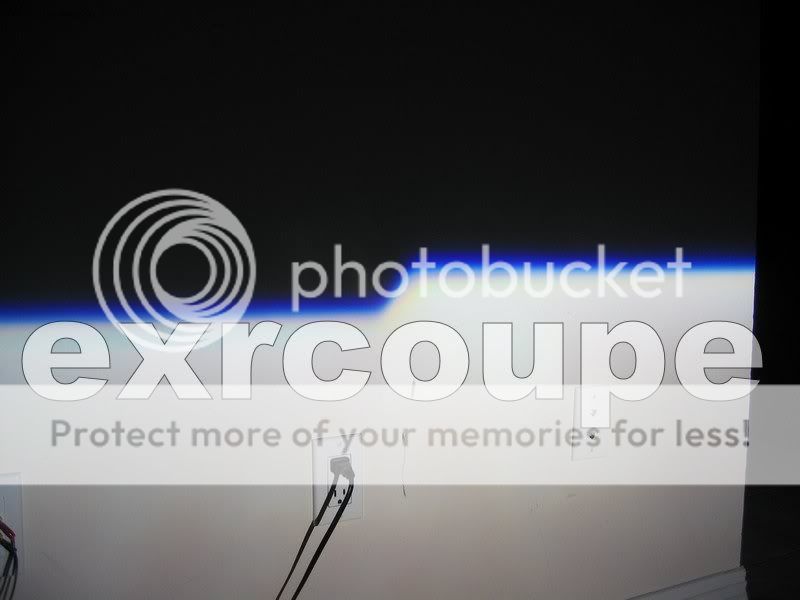
The fuzzyness on the photos are actually from my UV lens. I think it needs to be cleaned.
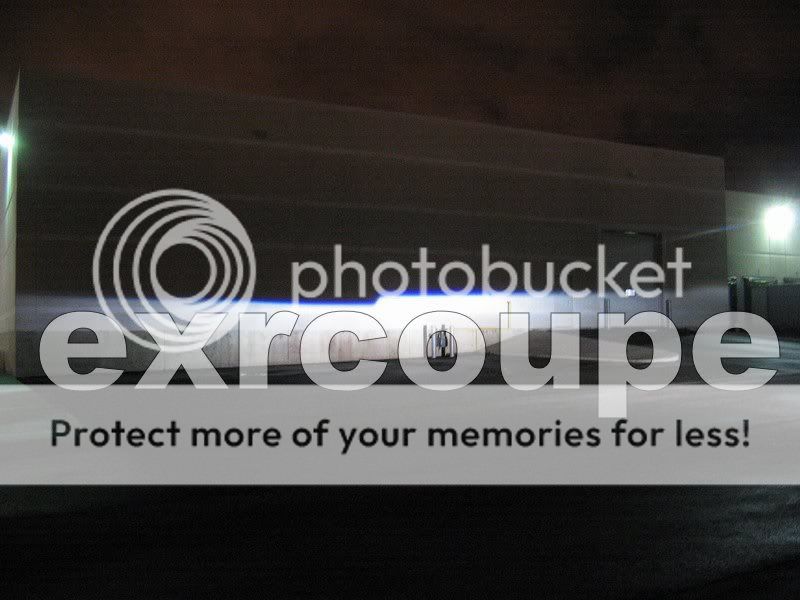
The beam pattern looks good. Drove around and no one flashed at me.
I really like HID lights. Thinking about getting another set for my wife's car.


This is a fuzzy photo of the lights. I guess I need to retake.

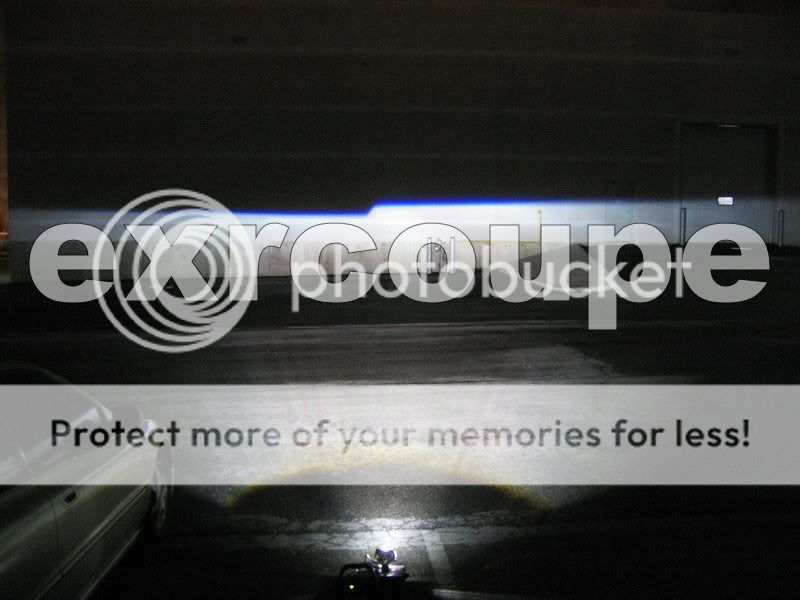
These photos I took on slow shutter setting so it came out a bit better.


Beam Pattern. I had to take this with slow shutter. The camera in normal mode didn't get enough light into the lens.

Enjoy!
The fuzzyness on the photos are actually from my UV lens. I think it needs to be cleaned.
The beam pattern looks good. Drove around and no one flashed at me.
I really like HID lights. Thinking about getting another set for my wife's car.
This is a fuzzy photo of the lights. I guess I need to retake.
These photos I took on slow shutter setting so it came out a bit better.
Beam Pattern. I had to take this with slow shutter. The camera in normal mode didn't get enough light into the lens.
Enjoy!
Last edited by TomiGunz; Feb 15, 2007 at 12:45 AM.

Thread Starter
|
Frequent FitFreak Poster
Joined: May 2006
Posts: 588
From: San Angelo, TX
Thanks!
Make sure you get the H4-3 kit. Not the H4-4 kit. The H4-4 kit comes with dual bulbs. Using high beams won't really help cuz it's gotta warm up when you turn them on. Try to request for H4-3 model.
-Tomi
Make sure you get the H4-3 kit. Not the H4-4 kit. The H4-4 kit comes with dual bulbs. Using high beams won't really help cuz it's gotta warm up when you turn them on. Try to request for H4-3 model.
-Tomi
Is there somewhere on their site that explains these different bulb options? I see the H4-4 model in their drop down menu, but not the H4-3.
Exactly what kind of bulb is being used for the highlight in your setup? Is it a HID or halogen?
Exactly what kind of bulb is being used for the highlight in your setup? Is it a HID or halogen?
Thread Starter
|
Frequent FitFreak Poster
Joined: May 2006
Posts: 588
From: San Angelo, TX
Originally Posted by sillypuddy
way too much glare 
-joe
-joe
When I get a chance I'm going to clean up the lens on my camera to take better photos.
And I still don't understand what the glare deal is.

thats clean bro. u beat me to the writeup lol. newayz i have a bi-xenon kit also. The way mine works is that the bulb has a built in magnetic puller motor. When the high beam is flashed, the electrical current sends a signal 2 the magnet and pulls the bulb back, aiming the pattern higher (sorta like door poppers on old school hot rod's). O BTW i like what ur listenin 2, paul wall is da sh**. 
Last edited by claymore; Aug 1, 2006 at 02:10 AM.
Thread Starter
|
Frequent FitFreak Poster
Joined: May 2006
Posts: 588
From: San Angelo, TX
Thanks Kevin, Mine is the same thing. push and pull for lo/hi beams. You can hear them come in and out. Sounds like when you hit a toilet plunger on the ground. Makes that cup sound. And I'm betting it's no motor in there. It's just actuators.
But I have been thinking about how long it will last from flipping it to high beams all the time. Would that actuator go out over time. But I guess time will tell.
Paul Wall and Mike Jones...Who Mike Jones... hehe
-Tomi
But I have been thinking about how long it will last from flipping it to high beams all the time. Would that actuator go out over time. But I guess time will tell.
Paul Wall and Mike Jones...Who Mike Jones... hehe
-Tomi

Member
Joined: Jun 2006
Posts: 86
From: easton, pa
glare is stray light that might be bright enough to make a person squint (not from websters.. hehe)
anyways, take a look at the picture above, and look at how the top of the line has some stray lighting.
compare it to this picture of a car equipped with stock hids.

anyways, take a look at the picture above, and look at how the top of the line has some stray lighting.
compare it to this picture of a car equipped with stock hids.
Member
Joined: Jun 2006
Posts: 86
From: easton, pa
although... im pretty satisfied with what i see from your kit compared to some others that i have seen.
just out of curiousity, do you think that the extra stray light might be coming from the reflection on the sheild attatched to the bulb? i wonder how it would look if the sheild is black.
i was looking at a stock h4 bulb earlier, and noticed that the shilding on it was a matte black finish, so maybe the same would work with that HID kit's sheilding
Thread Starter
|
Frequent FitFreak Poster
Joined: May 2006
Posts: 588
From: San Angelo, TX
Video
Here's a very quick and small video of the light against the same wall. (Which it shines on the downstair's lady's bedroom window..haha) I hadn't used my old digital camera in a while and had it set on the smallest pixel size. But the quick little video will show you what this particular kit does.
I kinda see what your saying about glare now. It does seem to have a bit of glare at the center. But does that really hurt anything? I careless about the glare. I can see better at night now. Seems to be fine.
I'm wondering if the light is actually bouncing off of the inside headlamp housing. The signal bubble. I bet it's hitting on top of that and making the glare. You can see it on the wall but you can't see it when you drive so I'm happy with what I got. Atleast I think it will last longer than regular xenon bulbs. Fun kit to install. Now I gotta figure out what else to put on the car..lol
-Tomi
Member
Joined: May 2006
Posts: 118
From: London
I have looked at pics of the JDM Stock HID Headlights and they are of the similar design as the Halogen headlight. The only way to get that Cut off is from headlights with Projectors, irrelavent of HID or Halogen....
Al.
Al.
Originally Posted by FikseRxSeven
glare is stray light that might be bright enough to make a person squint (not from websters.. hehe)
anyways, take a look at the picture above, and look at how the top of the line has some stray lighting.
compare it to this picture of a car equipped with stock hids.

anyways, take a look at the picture above, and look at how the top of the line has some stray lighting.
compare it to this picture of a car equipped with stock hids.

Someone that Posts too much
Joined: Apr 2006
Posts: 711
From: Toronto, Ontario, Canada
the glare won't affect you, it's causing a danger to the on coming traffic.. imagine driving with the sun in your eyes.. it's the same thing
you are causing a hazard on the road, that's what the big deal is with glare.. that's why ontario is pushing to ban HID kits, it's too bright in reflector housings
if you see the real hid cars, they all have a very clean cut off.. the light does not shine in your eyes
-joe
you are causing a hazard on the road, that's what the big deal is with glare.. that's why ontario is pushing to ban HID kits, it's too bright in reflector housings
if you see the real hid cars, they all have a very clean cut off.. the light does not shine in your eyes
-joe
Member
Joined: Jun 2006
Posts: 86
From: easton, pa
Originally Posted by p11wrg
I have looked at pics of the JDM Stock HID Headlights and they are of the similar design as the Halogen headlight. The only way to get that Cut off is from headlights with Projectors, irrelavent of HID or Halogen....
Al.
Al.