
Weapon*R Street Header


Member

Joined: May 2007
Posts: 68
From: Greenville, SC
I am sorry that no west coaster has taken you up on the offer. It would take 3-4 days to get there from here.
The "2" sections are so short. Will it really perform differently from a 4-1? Do you have any data on similar shorties, like for a Scion or something? I am just interested in the general shape of the power curves.
The "2" sections are so short. Will it really perform differently from a 4-1? Do you have any data on similar shorties, like for a Scion or something? I am just interested in the general shape of the power curves.
Member
Joined: Feb 2007
Posts: 548
From: Flint, MI
No more info on this? I'm starting my Co-Op semester soon and then I'll have some extra $$ 
Hoping for a header and/or a B-pipe. I was kinda hoping to see what kind of gains this header would yield.
Or, then again, I could always save up my money and go NOS...
Decisions Decisions...
Hoping for a header and/or a B-pipe. I was kinda hoping to see what kind of gains this header would yield.
Or, then again, I could always save up my money and go NOS...
Decisions Decisions...
Member
Joined: Apr 2007
Posts: 1,398
From: CT
Overall I'm happy with the Weapon*R headers, BUT there are noticible fitment issues with them. There's a good almost centimeter gap on the top right where the headers bolt on to the downpipe, also the hole for the support mount wouldn't align with the support mount either.
Here's a picture of what I'm talking about, luckily it doesn't leak.

Here's a picture of what I'm talking about, luckily it doesn't leak.
Last edited by Arisenfury; Oct 10, 2007 at 11:39 PM.
Member
Joined: Apr 2007
Posts: 1,398
From: CT
I am sorry that no west coaster has taken you up on the offer. It would take 3-4 days to get there from here.
The "2" sections are so short. Will it really perform differently from a 4-1? Do you have any data on similar shorties, like for a Scion or something? I am just interested in the general shape of the power curves.
The "2" sections are so short. Will it really perform differently from a 4-1? Do you have any data on similar shorties, like for a Scion or something? I am just interested in the general shape of the power curves.

Thread Starter
|
Member
Joined: May 2006
Posts: 341
From: South San Francisco

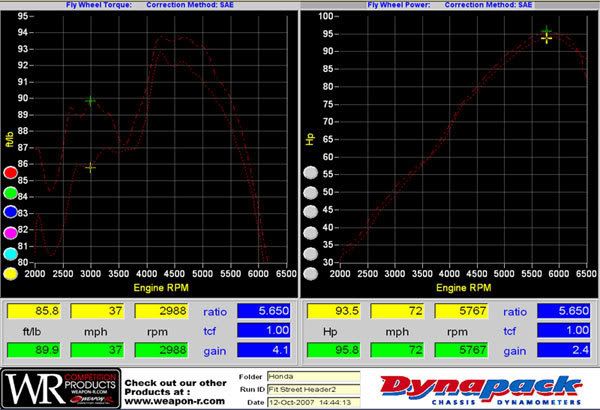
Here is the dyno results that we got last friday, forum member Bernardio was the one who came down to do the dyno testing. As you can see the header makes more impressive TQ curve and a little more HP overall. He did have a axle back and intake already on the car. If you are interested I am planning on doing a GB on this header and all over fit parts.
Member
Joined: Jun 2007
Posts: 71
From: San Ramon, CA
Thanks Chris for taking the time to install and dyno the street header on my Fit!! The rain was ridiculous, yet you guys were still willing to lay on soggy cardboard under a dripping under-carriage to get this product tested for your customers.
I'm very pleased with the street header so far. The extra torque comes on right where it's needed the most for daily driving. I didn't really notice much of an increase in noise level either while just cruising around, just a slight increase at WOT which is in no way intrusive.
Thanks again Weapon*R for developing products for the Fit!!
Member
Joined: Jun 2007
Posts: 71
From: San Ramon, CA
They didn't try to reinstall the support bracket for the new header so I'm not sure if there was a fitment issue or not. I'll see if I can get it back on this weekend. If not, maybe washer spacers or demelling the bracket's holes for adjustability will be an easy fix.
Member
Joined: Jun 2007
Posts: 71
From: San Ramon, CA
I had some time tonight to crawl under the fit to check out the header. Unbolting the header from downpipe/cat I noticed the exhaust really didn't move too much from where it was suppose to be. This tells me that the hangars do a fine job of holding up the piping and that the exhaust was not being pulling forward excessively by the header. I guess if you're hitting some hard bumps while driving it may stress the welds on the header, but it looks like the welds were solid and should hold up to some heavy abuse.
About the bracket, I got it back on. I ended up moving the thick washer under (instead of over) the bracket's top hole that bolts to the header. This made the bottom part of the bracket lay pretty flat against the engine block. I then took a hammer to the bracket while it was off the car to further adjust the angles of the bolted surface so it would lay prefectly flat against the block. Then I dremelled open the bottom hole into a fork so the bottom bolt could easily slip into the hole in the block. Finally I tighten the two bolts up. Nice and easy fix for a little peace of mind.
About the bracket, I got it back on. I ended up moving the thick washer under (instead of over) the bracket's top hole that bolts to the header. This made the bottom part of the bracket lay pretty flat against the engine block. I then took a hammer to the bracket while it was off the car to further adjust the angles of the bolted surface so it would lay prefectly flat against the block. Then I dremelled open the bottom hole into a fork so the bottom bolt could easily slip into the hole in the block. Finally I tighten the two bolts up. Nice and easy fix for a little peace of mind.
Member
Joined: Apr 2007
Posts: 1,398
From: CT
Idk... doesn't make sense that they'd fabricate the hole for the bolt but then not make it line up. And then not to even bother to fix it when they found out it wasn't working. I may end up doing what you did next time I get a free day.


Member
Joined: Apr 2007
Posts: 1,398
From: CT
No and no.
But you can reuse the one from the OEM header.
Instructions are fairly simple. Remove the three bolts holding the heat shield on, two up top one down in the middle. Take out the 5 bolts connecting the header to the exhaust manifold. Go underneath the car, remove the two bolts connecting the headers to the cat. Unplug/unscrew if you're feeling lucky the sensor. Remove the headers from the top of the engine. Repeat the steps in reverse for the new ones sans the heat shield.

Member
Joined: Jan 2008
Posts: 283
From: Mililani, Hawaii
No and no.
But you can reuse the one from the OEM header.
Instructions are fairly simple. Remove the three bolts holding the heat shield on, two up top one down in the middle. Take out the 5 bolts connecting the header to the exhaust manifold. Go underneath the car, remove the two bolts connecting the headers to the cat. Unplug/unscrew if you're feeling lucky the sensor. Remove the headers from the top of the engine. Repeat the steps in reverse for the new ones sans the heat shield.
But you can reuse the one from the OEM header.
Instructions are fairly simple. Remove the three bolts holding the heat shield on, two up top one down in the middle. Take out the 5 bolts connecting the header to the exhaust manifold. Go underneath the car, remove the two bolts connecting the headers to the cat. Unplug/unscrew if you're feeling lucky the sensor. Remove the headers from the top of the engine. Repeat the steps in reverse for the new ones sans the heat shield.
I ordered the stock gaskets from my local dealer (42 bucks yikes) just in case. I don't want to start and have that break on me. As for the O2 sensor should I try to unscrew that first so the car can hold the header. Is it that frozen? I guess I should put a little anti seize on it before putting it on the weapon r.