
NIGHTHAWKSI's custom turbo build progress thread


NIGHTHAWKSI's custom turbo build progress thread
turbo kit is FS!
so i am starting to collect parts for my custom turbo build. decided it was a MUCH cheaper way to go than a pre-built kit. my budget for this will be $1500. lets see if i can get it done.
i will update this thread with pics and buidl progress as i go. i expect to be done by spring.
turbo: garrett t3 ar.42/ar.48
intercooler/piping/couplers:
BOV: TYPE RS
manifold/downpipe parts
test pipe: a-spec
boost gauge: glowshift black and dual gauge pod
a/f gauge: AEM uego
EMS:E-manage blue with injector and ignition
Injectors: OEM 310cc injectors
oil feed/return, small parts, fittings, tape, etc
2" intercooler pipe and silicone reducing couplers
emanage ultimate and supplement harness
total spent:
GARRETT/AIRSEARCH t3 AR42/48 trubo. came off of a saab 9000.
a few quick measurments:
turbo intake: 52mm inside diameter, 60mm outside diameter
exhaust: 54mm
turbo -> intercooler: 35mm inside diameter, 51mm outside diameter


RSX 310cc injectors

AEM wideband

A-spec test pipe..only a 2" diameter . exhaust will be a 2.25" downpipe, 50mm test pipe, 50mm exhaust...hopefully will be fine for 160hp.

Ebay type RS BOV with 2.5" intercooler tube. took apart but forgot to take pics. seems very simple...not too much to fail except for the diaphram. im not too concerned, if it does break, it will be easy to replace the bov or replace the diaphram. *will post pics of it dissasembled soon*


welds look good...

universal 2.5" intercooler pipe kit...with beaded pipe. measures 2mm thick

dual gauge pod with glowshift boost gauge and AEM af uego gauge mounted

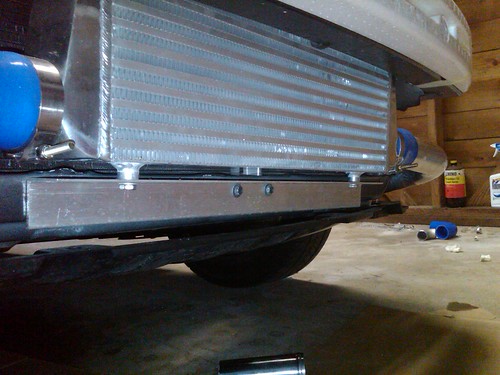
28"x7"x2.5" universal intercooler. 2.5" inlet/outlet

good welds. no dents.

emanage blue with serial harness(support tool) and main harnness/ignition/injector

sorry for the crappy progress pics. my camera was dead and i had to take them with my BB storm.
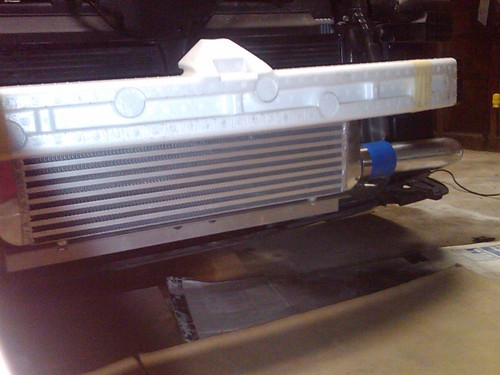
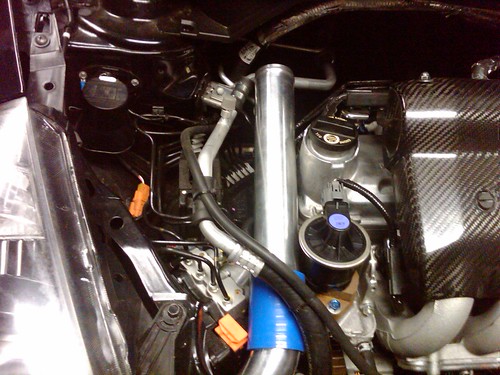
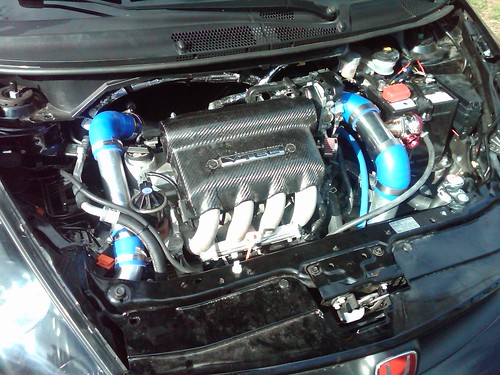
intercooler mount made out of 2 1/2" alumuminum angle and intercooler mounted to the car.
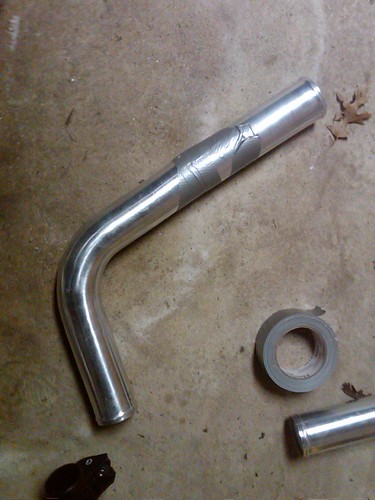
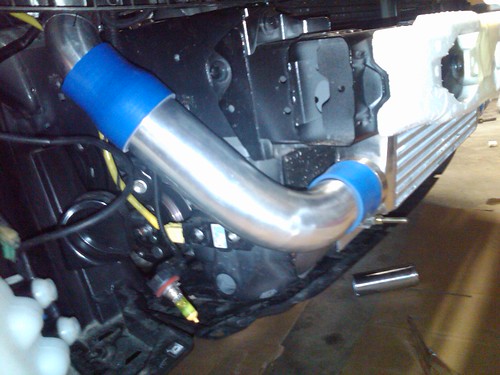
intercooler piping ready to be taken to my stepbrother for tig welding
another pipe ready to be welded
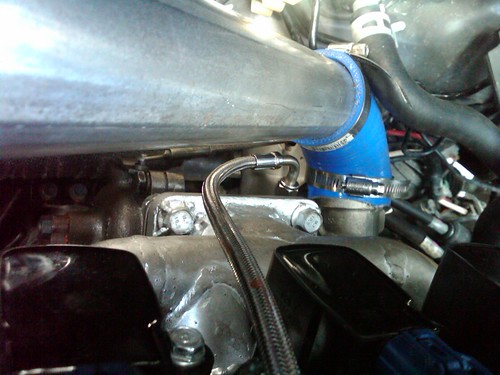
BOV section of the IC pipe
i installed the test pipe today with the wideband a/f gauge. forgot to take pics though.
finally took a pic of the gauges mounted. i modified a dual gauge pod holder to angle up more towards the driver and mounted it infront of the shifter.

yesterday i drilled and tapped the oil pan in preparation for the install.
remove the passenger front wheel. and there is this plastic underbody panel in the way. undo the 2 clips that are in the upper right, and one at the bottom left.
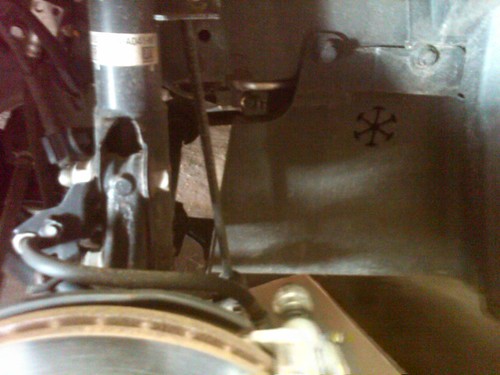
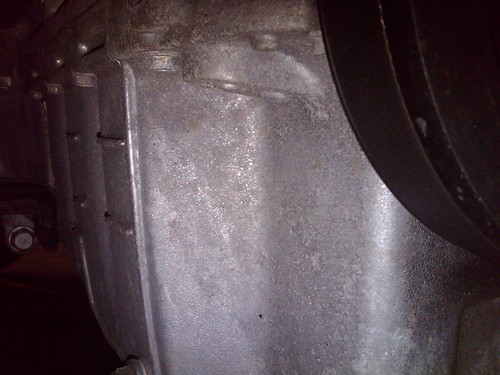
clips removed and plastic out of the way. a nice clear view of the oild pan where it needs to be drilled.
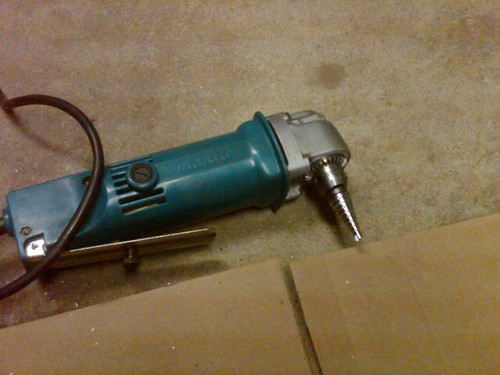
the 90 degree angle drill i used since there wasnt enough clearence for a regular one. i used a tapered drill bit. cut through like butter to 11/16"
drilled
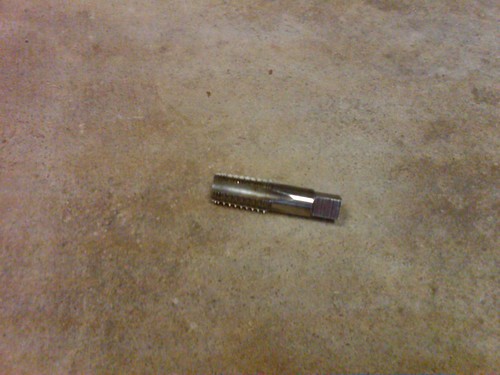
the 1/2" -14 NPT tap
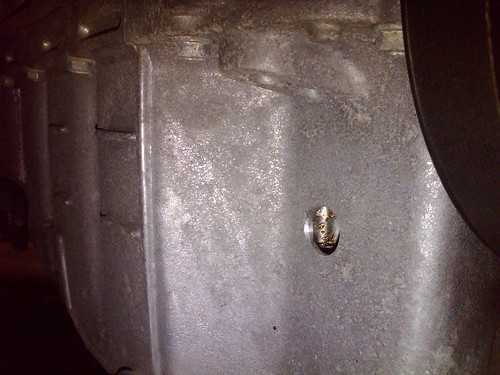
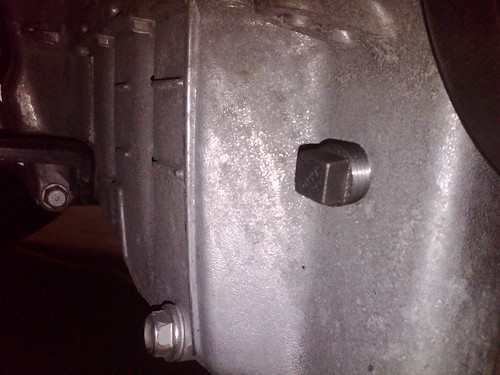
tapped and plugged. this picture was before i used red RTV silicone on it. just FYI, red rtv silicone is the same thing as "hondabond" aka oil pan gasket. i will remove the plug and install me 1/2" npt ->barb fitting and jb weld it in place when i do the install.
took a total of 2 hours taking my time. suprisingly went exactly as planned.
since i did this with my oil pan on...
i changed my oil next. drained it. puit the drain bolt back in. added 3 quarts of cheap oil to the motor. unplugged the spark plugs and cranked the motor a few times over without starting...did this to churn up the oil and get any shavings off the side of the pan. drained the oil immediatly after to not allow the shavings to settle to the bottom again. replaced oil filter and filled with 5w-20 mobil 1.
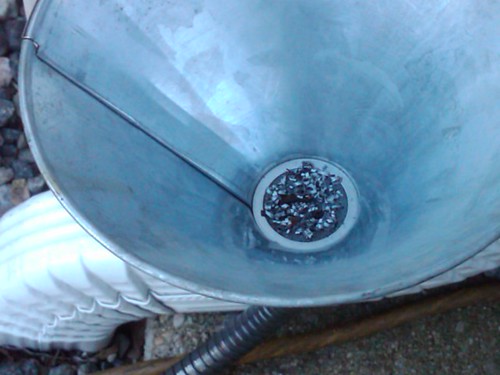
the shavings i filtered out of the old oil. for size reference, the filter at eth bottom of the funnel is about the size of a quarter.
more intercooler pipe design i did this weekend
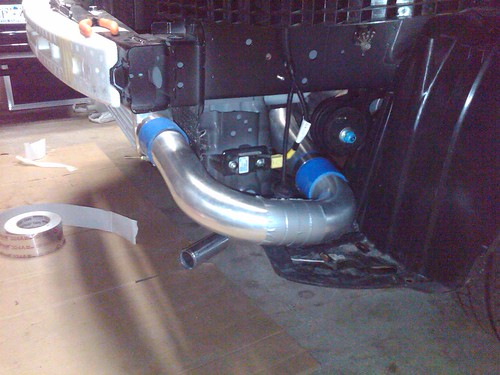
all of my intercooler piping is done at this point....need to bring it to the welder. i am just going to use two 90 degree couplers to connect to the turbo. it will be a top mount.
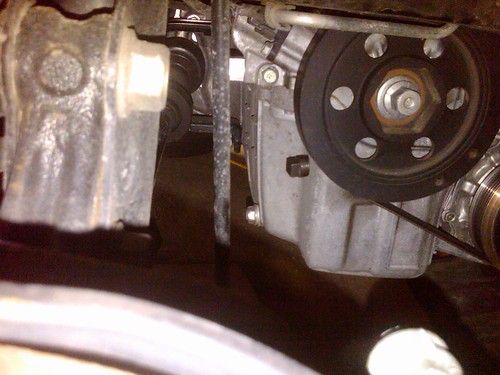
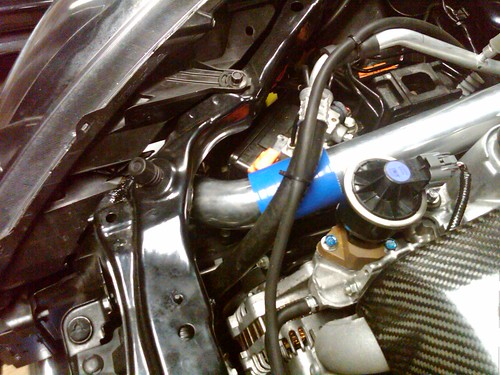
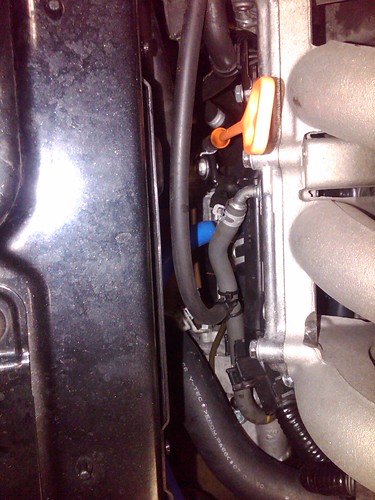
where i tapped into for my boost gauge...you can see it connected using a plastic tee and wireties. works great. no leaks.
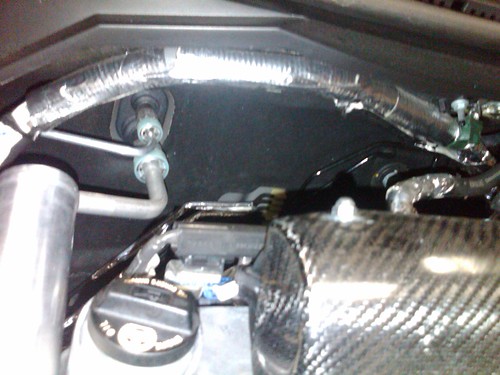
the back of the motor with brake lines, and wiring all heat taped.
i am wawiting on my USB->serial conversion cable in the mail so that i can program the emanage blue. i should have it today. i MIGHT install the emanage and injectors this afternoon if i feel up to it.
also, i checked my plug for my oil return..it is still not leaking
emanage was wired up last night and worked with it to get it running correctly today.
emanage blue jumper settings:
JP1 1-2
JP2 1-2
JP3 OPEN
JP4 1-2
JP5 OPEN
JP6 OPEN
JP7 OPEN
rotary switch settings:
4-8-A
a couple pictures i took along the way...
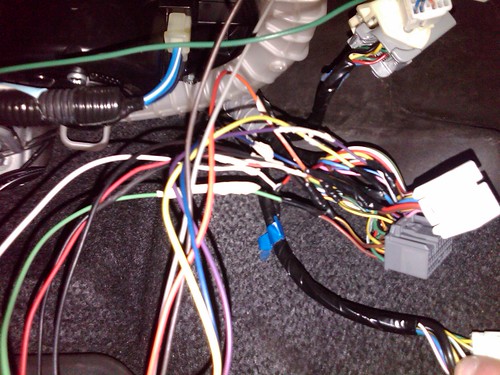
a few harness plugs unplugged with wires spliced. still need to wire up the ignition wires.
all wired and back together. dont mind the speaker wire routed next to the ecu

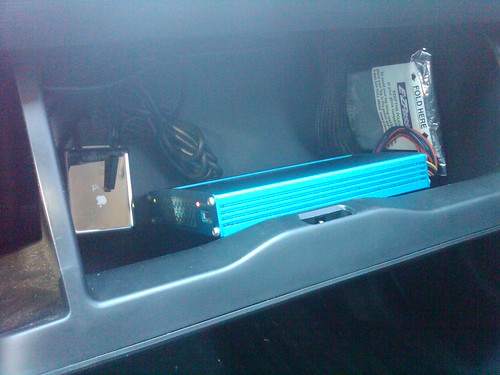
emanage installed in the glove box fits perfect and is easy to access.
i will be installing the injectors later this week.
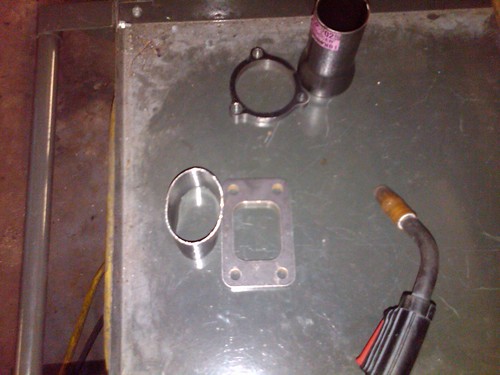
my t3 flange and home made adapter...2.5" tube placed in a vice adn compressed to an oval to fit the t3 inlet on one end and to be a 1.5" oval at the other to weld onto the log manifold. also my turbo exhaust flange and 2.5->2" adapter.
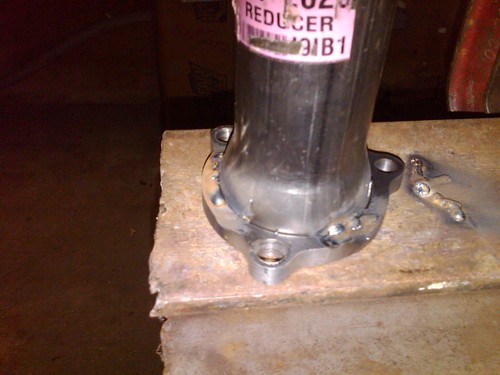
my super amazing welding skills at work .it was my second time ever welding.
i installed my 310cc injectors a few days ago...used the emanage to adjust for fuel...worked great.
i am still getting detonation from the MAP sensor not being calibrated correctly in the emanage.
got my intercooler piping welded up...for FREE:
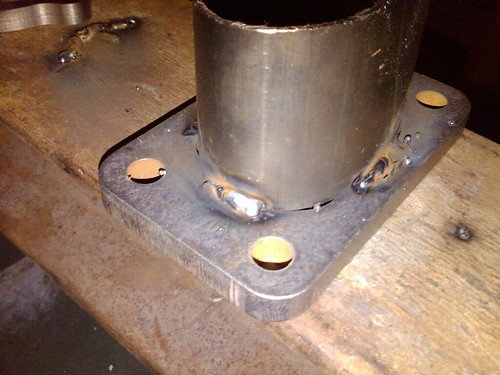
close up of a weld....looks good.
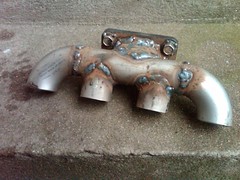
my manifold all fabbed up. just have to cut the holes for the inlet flange and the middle runners...then its time to weld.
please dont mind my shitty random tack weld spots, lol. i messed up a few times and had to reposition.
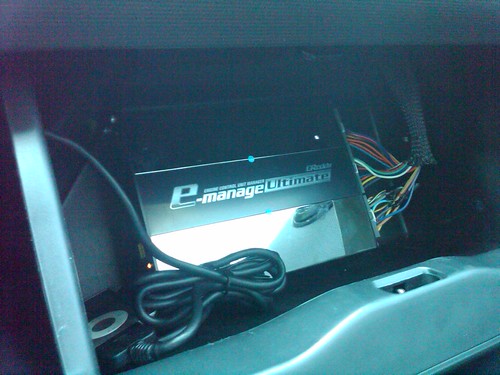
i installed my emanage ultimate last weekend. went very easy. car runs perfect and no CELs.
i marked my header for the holes to be cut out for cylinder 2 and 3 runners..it is now at the machinist getting cut for a perfect fit. it will be welded up by this weekend.
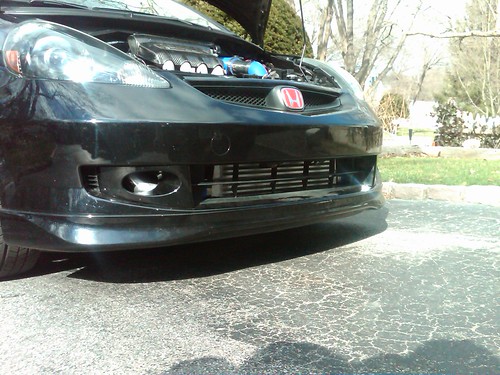
Fujistubo exhaust was installed last night. it is a very nice sound. deep, no raspyness...which i was suprised about since i have the test pipe. it is loud on cold start, especially in the garage, but once driven and at idle it is near as quiet as stock. when driving on side streets i can definatly tell it is there, but when on the highway, its quiet and there is no drone. im happy with it. i am hoping the turbo quiets it down a little bit though.
heres a picture of the emanage ultimate in its new home.
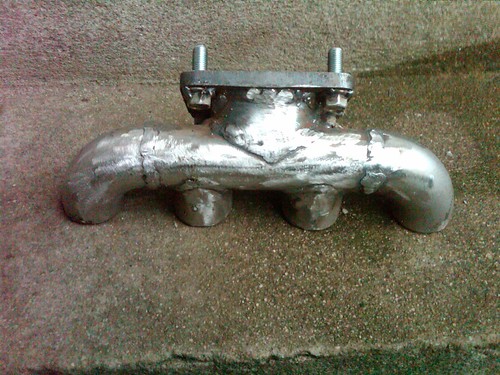
manidfold 90% done. just needs to be welded to the head flange and then painted silver. i know the paint will flake off. but i want ti silver for a few hundred miles to see if there is a leak since it would turn black in that area.
cleaned up:
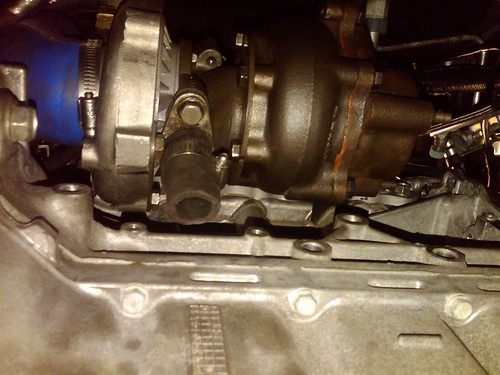
installed took about 24 hours+ broken up into 2 days. i will get some more detailed pics of the turbo fitment and downpipe by this weekend.
a few new pics of getting it to run correctly
disassembled...you can see the fins are in good condition and there are no marks on the turbine.
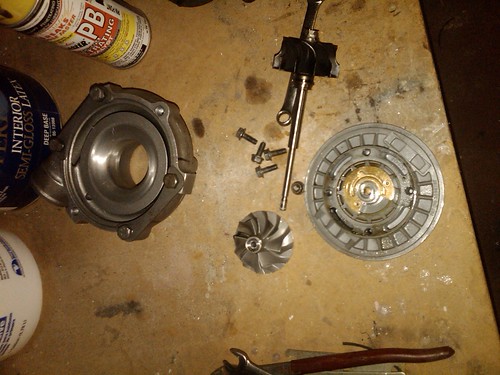
the bowl/heat shield that was filled with oil from a bad seal:

reassembled and reinstalled.
so i am starting to collect parts for my custom turbo build. decided it was a MUCH cheaper way to go than a pre-built kit. my budget for this will be $1500. lets see if i can get it done.
i will update this thread with pics and buidl progress as i go. i expect to be done by spring.
turbo: garrett t3 ar.42/ar.48
intercooler/piping/couplers:
BOV: TYPE RS
manifold/downpipe parts
test pipe: a-spec
boost gauge: glowshift black and dual gauge pod
a/f gauge: AEM uego
EMS:E-manage blue with injector and ignition
Injectors: OEM 310cc injectors
oil feed/return, small parts, fittings, tape, etc
2" intercooler pipe and silicone reducing couplers
emanage ultimate and supplement harness
total spent:
GARRETT/AIRSEARCH t3 AR42/48 trubo. came off of a saab 9000.
a few quick measurments:
turbo intake: 52mm inside diameter, 60mm outside diameter
exhaust: 54mm
turbo -> intercooler: 35mm inside diameter, 51mm outside diameter
RSX 310cc injectors
AEM wideband
A-spec test pipe..only a 2" diameter
. exhaust will be a 2.25" downpipe, 50mm test pipe, 50mm exhaust...hopefully will be fine for 160hp.Ebay type RS BOV with 2.5" intercooler tube. took apart but forgot to take pics. seems very simple...not too much to fail except for the diaphram. im not too concerned, if it does break, it will be easy to replace the bov or replace the diaphram. *will post pics of it dissasembled soon*
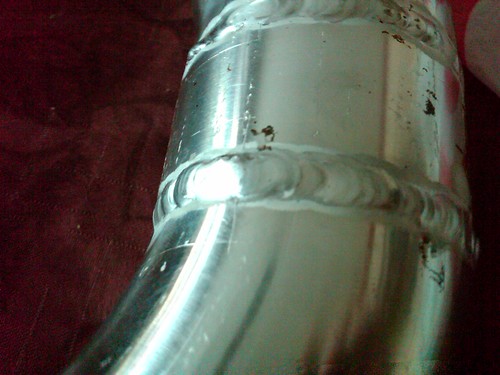
welds look good...
universal 2.5" intercooler pipe kit...with beaded pipe. measures 2mm thick
dual gauge pod with glowshift boost gauge and AEM af uego gauge mounted
28"x7"x2.5" universal intercooler. 2.5" inlet/outlet
good welds. no dents.
emanage blue with serial harness(support tool) and main harnness/ignition/injector
sorry for the crappy progress pics. my camera was dead and i had to take them with my BB storm.
intercooler mount made out of 2 1/2" alumuminum angle and intercooler mounted to the car.
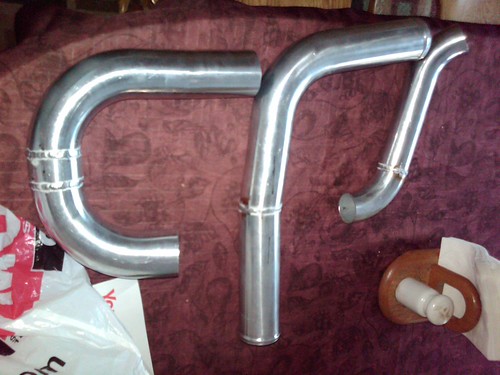
intercooler piping ready to be taken to my stepbrother for tig welding
another pipe ready to be welded
BOV section of the IC pipe
i installed the test pipe today with the wideband a/f gauge. forgot to take pics though.
finally took a pic of the gauges mounted. i modified a dual gauge pod holder to angle up more towards the driver and mounted it infront of the shifter.
yesterday i drilled and tapped the oil pan in preparation for the install.
remove the passenger front wheel. and there is this plastic underbody panel in the way. undo the 2 clips that are in the upper right, and one at the bottom left.
clips removed and plastic out of the way. a nice clear view of the oild pan where it needs to be drilled.
the 90 degree angle drill i used since there wasnt enough clearence for a regular one. i used a tapered drill bit. cut through like butter to 11/16"
drilled
the 1/2" -14 NPT tap
tapped and plugged. this picture was before i used red RTV silicone on it. just FYI, red rtv silicone is the same thing as "hondabond" aka oil pan gasket. i will remove the plug and install me 1/2" npt ->barb fitting and jb weld it in place when i do the install.
took a total of 2 hours taking my time. suprisingly went exactly as planned.
since i did this with my oil pan on...
i changed my oil next. drained it. puit the drain bolt back in. added 3 quarts of cheap oil to the motor. unplugged the spark plugs and cranked the motor a few times over without starting...did this to churn up the oil and get any shavings off the side of the pan. drained the oil immediatly after to not allow the shavings to settle to the bottom again. replaced oil filter and filled with 5w-20 mobil 1.
the shavings i filtered out of the old oil. for size reference, the filter at eth bottom of the funnel is about the size of a quarter.
more intercooler pipe design i did this weekend
all of my intercooler piping is done at this point....need to bring it to the welder. i am just going to use two 90 degree couplers to connect to the turbo. it will be a top mount.
where i tapped into for my boost gauge...you can see it connected using a plastic tee and wireties. works great. no leaks.
the back of the motor with brake lines, and wiring all heat taped.
i am wawiting on my USB->serial conversion cable in the mail so that i can program the emanage blue. i should have it today. i MIGHT install the emanage and injectors this afternoon if i feel up to it.
also, i checked my plug for my oil return..it is still not leaking
emanage was wired up last night and worked with it to get it running correctly today.
emanage blue jumper settings:
JP1 1-2
JP2 1-2
JP3 OPEN
JP4 1-2
JP5 OPEN
JP6 OPEN
JP7 OPEN
rotary switch settings:
4-8-A
a couple pictures i took along the way...
a few harness plugs unplugged with wires spliced. still need to wire up the ignition wires.
all wired and back together. dont mind the speaker wire routed next to the ecu
emanage installed in the glove box fits perfect and is easy to access.
i will be installing the injectors later this week.
my t3 flange and home made adapter...2.5" tube placed in a vice adn compressed to an oval to fit the t3 inlet on one end and to be a 1.5" oval at the other to weld onto the log manifold. also my turbo exhaust flange and 2.5->2" adapter.
my super amazing welding skills at work
.it was my second time ever welding.i installed my 310cc injectors a few days ago...used the emanage to adjust for fuel...worked great.
i am still getting detonation from the MAP sensor not being calibrated correctly in the emanage.
got my intercooler piping welded up...for FREE
:close up of a weld....looks good.
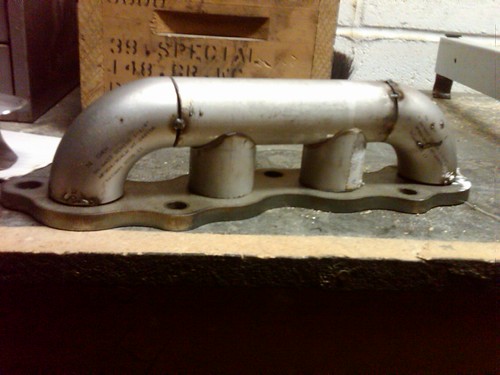
my manifold all fabbed up. just have to cut the holes for the inlet flange and the middle runners...then its time to weld.
please dont mind my shitty random tack weld spots, lol. i messed up a few times and had to reposition.
i installed my emanage ultimate last weekend. went very easy. car runs perfect and no CELs.
i marked my header for the holes to be cut out for cylinder 2 and 3 runners..it is now at the machinist getting cut for a perfect fit. it will be welded up by this weekend.
Fujistubo exhaust was installed last night. it is a very nice sound. deep, no raspyness...which i was suprised about since i have the test pipe. it is loud on cold start, especially in the garage, but once driven and at idle it is near as quiet as stock. when driving on side streets i can definatly tell it is there, but when on the highway, its quiet and there is no drone. im happy with it. i am hoping the turbo quiets it down a little bit though.
heres a picture of the emanage ultimate in its new home.
manidfold 90% done. just needs to be welded to the head flange and then painted silver. i know the paint will flake off. but i want ti silver for a few hundred miles to see if there is a leak since it would turn black in that area.
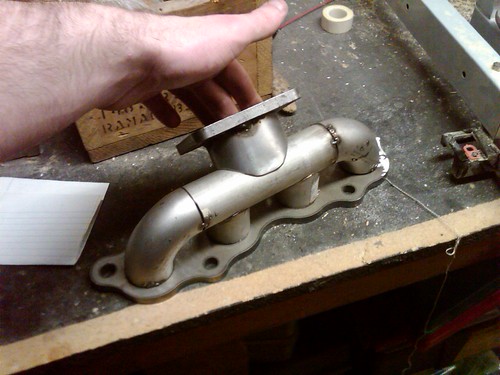
cleaned up:
installed took about 24 hours+ broken up into 2 days. i will get some more detailed pics of the turbo fitment and downpipe by this weekend.
a few new pics of getting it to run correctly
disassembled...you can see the fins are in good condition and there are no marks on the turbine.
the bowl/heat shield that was filled with oil from a bad seal:
reassembled and reinstalled.
Last edited by NIGHTHAWKSI; Apr 29, 2009 at 08:17 AM.

turbo: garrett t3 ar.42/ar.48............................................. .................$70 shipped
intercooler/piping/couplers: "just-intercoolers" (ebay).............................$180 shipped
BOV: Greddy RS................................................ ...............................$200
custom manifold and oil feed/return kit: parts from JGS Precision Turbo.....$230
down pipe: custom............................................ ...............................?????
test pipe: a-spec.............................................. ...............................$90 shipped
boost gauge: analog autometer......................................... .................$60 shipped
a/f gauge: AEM uego.............................................. ..........................$215 shipped
EMS:E-manage ultimate.......................................... ...........................$600ish
Injectors: OEM 310cc injectors......................................... ..................$30 shipped
oh and on a sidenote I can build you a log mani and dp if your bro can't, for a decent price. I have 90% of the materials on hand and even that same turbo for mockup purposes. obviously not going to be as cheap as doing it yourself, but just another option.
ok time for me to play the save you some money game again. lol you said your brother is doing the fab work for you right? tig or mig welded? if tig screw the jgs place and go to www.acestainless.com for your manifold parts. for your flanges weiRtech aaron is a great guy (i have some i can sell you from him if you don't want to wait from canada) now you have me confused on the downpipe? if your bro is welding your mani why not just make your dp as well? Columbia River Mandrel Bending for your dp tubing. I wish I could get this extension harness sooner to install my aem fi/c so I can see if that works well. it's about half the price as e-manage ultimate. quanglang has it installed on his car with good results from what I understood. my is just setting in the box in my nightstand. lol.
oh and on a sidenote I can build you a log mani and dp if your bro can't, for a decent price. I have 90% of the materials on hand and even that same turbo for mockup purposes. obviously not going to be as cheap as doing it yourself, but just another option.
oh and on a sidenote I can build you a log mani and dp if your bro can't, for a decent price. I have 90% of the materials on hand and even that same turbo for mockup purposes. obviously not going to be as cheap as doing it yourself, but just another option.
and only reason i have ???? next to my downpipe is because i dont know what bends i will need to order to connect the turbo to the test pipe. once the manifold is made, im sure it will be very easy.
very helpful, thank you! im just workign on getting everything first. i definatly think ill be in contact with that aaron guy...as i will need to have the exhaust manifold cut somwhere, and i dont think my step brother has an in-house cnc machine, so who knows what that may cost. seems aaron has great prices for that.
and only reason i have ???? next to my downpipe is because i dont know what bends i will need to order to connect the turbo to the test pipe. once the manifold is made, im sure it will be very easy.
and only reason i have ???? next to my downpipe is because i dont know what bends i will need to order to connect the turbo to the test pipe. once the manifold is made, im sure it will be very easy.
for your downpipe you'll obviously need the 3 bolt flange for the turbo, pick up 2 180* bends(then just cut and weld the angles you need) in your choice of 2, 2.25 or 2.5" I personally would get 2.5" (anything to help it spool faster) then you can decide which route to go on the midpipe. if your going to run a stock midpipe(not smart imo) then get a 2.5" to 2" reducer before the flange to reduce it back to size. if your going to go 60mm(~2.5") or larger midpipe then just go straight 2.5"(you can tell aaron to make the opening 2.5" on the 3 bolt flange if there's enough room) oh and don't forget some 02 bungs and a couple spark plug foulers(from vato zone=poor mans 02 simulators
 )
)have fun and good luck on the build
Last edited by underdog; Nov 26, 2008 at 02:03 PM.
Good luck with your turbo build. You might want to take out the intake manifold, compressor, starter, radiator/condenser, alternator, re-bars, fenders, to make things much easier.
If i were you, I'd just go k20a2.
If i were you, I'd just go k20a2.

looking foward to the build
ive got the test pipe, AEM widband gauge, and injectors being delivered today. ill probably order the manifold parts, boost gauge, and intercooler around christmas/new years...more updates to come around then
Last edited by NIGHTHAWKSI; Nov 26, 2008 at 02:51 PM.
yeah aaron makes the head flange for the fit, as well as the turbo flange, and downpipe flange. you may even want to send in a gasket of the 3 bolt flange after the cat/testpipe to have him make you a flange for that as well so you don't ruin the test pipe. sell the test pipe and make the dp all the way to the midpipe.
for your downpipe you'll obviously need the 3 bolt flange for the turbo, pick up 2 180* bends(then just cut and weld the angles you need) in your choice of 2, 2.25 or 2.5" I personally would get 2.5" (anything to help it spool faster) then you can decide which route to go on the midpipe. if your going to run a stock midpipe(not smart imo) then get a 2.5" to 2" reducer before the flange to reduce it back to size. if your going to go 60mm(~2.5") or larger midpipe then just go straight 2.5"(you can tell aaron to make the opening 2.5" on the 3 bolt flange if there's enough room) oh and don't forget some 02 bungs and a couple spark plug foulers(from vato zone=poor mans 02 simulators )
have fun and good luck on the build
for your downpipe you'll obviously need the 3 bolt flange for the turbo, pick up 2 180* bends(then just cut and weld the angles you need) in your choice of 2, 2.25 or 2.5" I personally would get 2.5" (anything to help it spool faster) then you can decide which route to go on the midpipe. if your going to run a stock midpipe(not smart imo) then get a 2.5" to 2" reducer before the flange to reduce it back to size. if your going to go 60mm(~2.5") or larger midpipe then just go straight 2.5"(you can tell aaron to make the opening 2.5" on the 3 bolt flange if there's enough room) oh and don't forget some 02 bungs and a couple spark plug foulers(from vato zone=poor mans 02 simulators
)have fun and good luck on the build
althoguh i would have liked 2.5"...i still think ill be able to make the gains i want with this. once the kit is installed and running good, i can upgrade whatever i want if i feel it needs it.
and for the exhaust, i think im going to go with 50mm skunk2. i thought about 60, but this is still a fit with only 160whp...so i dont see the need for the larger piping and noise that will be created. i just want to get back the power that i lost when trading in the SI.
O2 bung is on order with the AEM wideband, and the defouler comes with the aspec test pipe.
received the turbo this weekend. cleaned ip and and put anti-seize aon all the bolts. will port the wastegate and post pictures later today. i think i will be installing the af gauge and test pipe this weekend. any suggestions on where to mount the gauge? i onl yhave 1 gauge now, but i will have a boost gauge...so i will need enough room for 2 52mm gauges.
im thinking i can make a custom fiberglass pod that fits in the space infront of the cupholders by the shifter.
im thinking i can make a custom fiberglass pod that fits in the space infront of the cupholders by the shifter.
Last edited by NIGHTHAWKSI; Dec 8, 2008 at 08:08 AM.

-on top of the steering column will block the OEm gauges
-i dont know what pillar pods fit, if any
-i cant find the t1r pod anywhere
-i dont want to just plave in the middle top of the dash since then i will have all the wiring showing.
im thinking if i make the angle of a custom center console pod correctly it will be visisble. for the most part i am only going to need the af gauge when tuning, but of course i will want to check on it every now and then to make sure all is good....but its not like ill be needing to look at it every time im boosting.
sorry i dont have pictures from last night. i was kinda pissed off after i tried disassembling the exhaust side of the turbo and it seems to be rusted onto the center, even after a few whacks with a rubber mallet it wouldnt budge. and i couldnt find my die grinder to port the wastegate.

i also want to cut down the studs for the downpipe flange since the ones for the saab are uneven and very long to fit the saab OEM downpipe....but cutting threads into the bolt studs is a bitch. in about 30 minutes i only got 2 new threads made on the blank part of the stud.
lol yeah heat cycled cast iron is no fun. what you need is to get a brass hammer and hold the turbo compressor facing up and smack the living shit out of the exhaust housing then it will come free. but watch those toes! as for the gauge isn't there enough room in the instriment clustor above the tach to squeeze it in there?
lol yeah heat cycled cast iron is no fun. what you need is to get a brass hammer and hold the turbo compressor facing up and smack the living shit out of the exhaust housing then it will come free. but watch those toes! as for the gauge isn't there enough room in the instriment clustor above the tach to squeeze it in there?
and ill have to hold up the gauges to the instrument cluster to see. i feel that might look a little sloppy though....also im not sure how i would route the vacuum line and all wiring without permanantly damaging the cluster..