
View Poll Results: Make sense?
Super easy to understand!


10
45.45%
Kinda confused?


4
18.18%
Clear as mud...


2
9.09%
...What'd he say?


6
27.27%
Voters: 22. You may not vote on this poll
DIY: GE8 Interior footwell LED, wired into dome (overhead) light. BIG pics!


DIY: GE8 Interior footwell LED, wired into dome (overhead) light. BIG pics!
First DIY on this forum! I have a 2010 GE8 Sport. Didn't find a DIY for this model so I'll write one myself! This lighting mod splices LED or cathode tubes into your overhead dome light. They turn on when you push the unlock button on your key fob (Sport model) and fade out with the dome light when you lock the car. The switch on the dome light DOES NOT control these lights. Preform at your own risk! Fitfreaks.net nor I am responsible if you fry your wiring harness!
Time to complete: 1-2 hours max
Skills: Basic wire splicing and soldering (if you want to do it right) skill.
Materials:
- 12V LED light strips or cathodes. I used two 12" long LED strips from Autozone ($20). They came with adhesive backing.
- Wire cutters/strippers
- Soldering gun
- Electrical tape
Here goes:
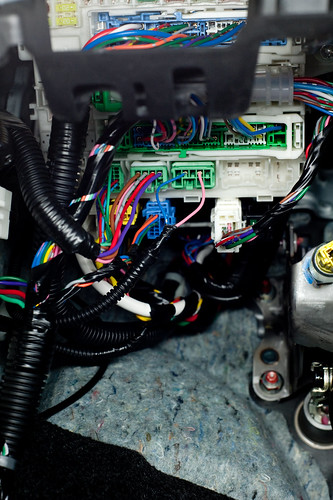
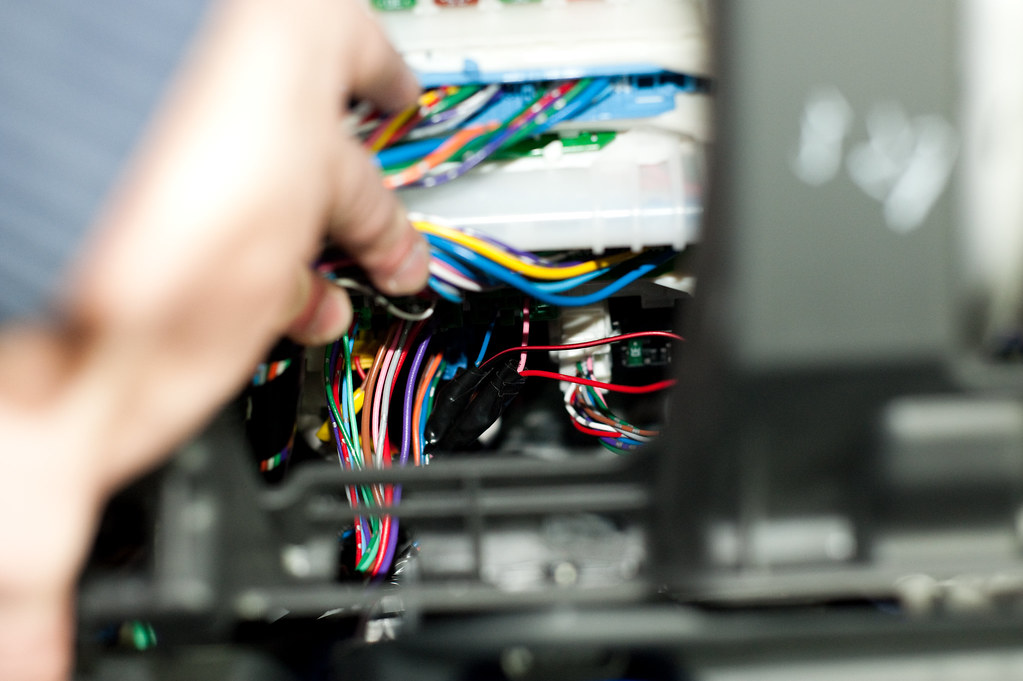
Find the fuse box located under the steering wheel. I took out most of the paneling to make it easier.
Look for the green plug under the box with the blue and pink wires coming from the back:

Unplug it:
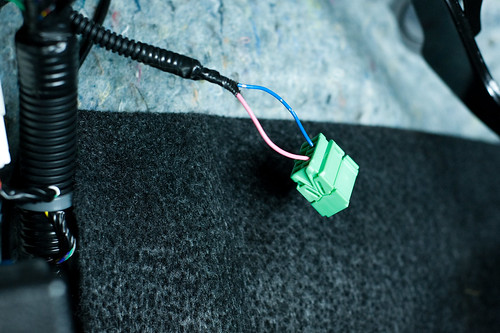
At this point your dome light will not work! This is supposed to happen, if it STILL turns on FIND the RIGHT plug! Its the only one that looks like this so it shouldn't be hard.
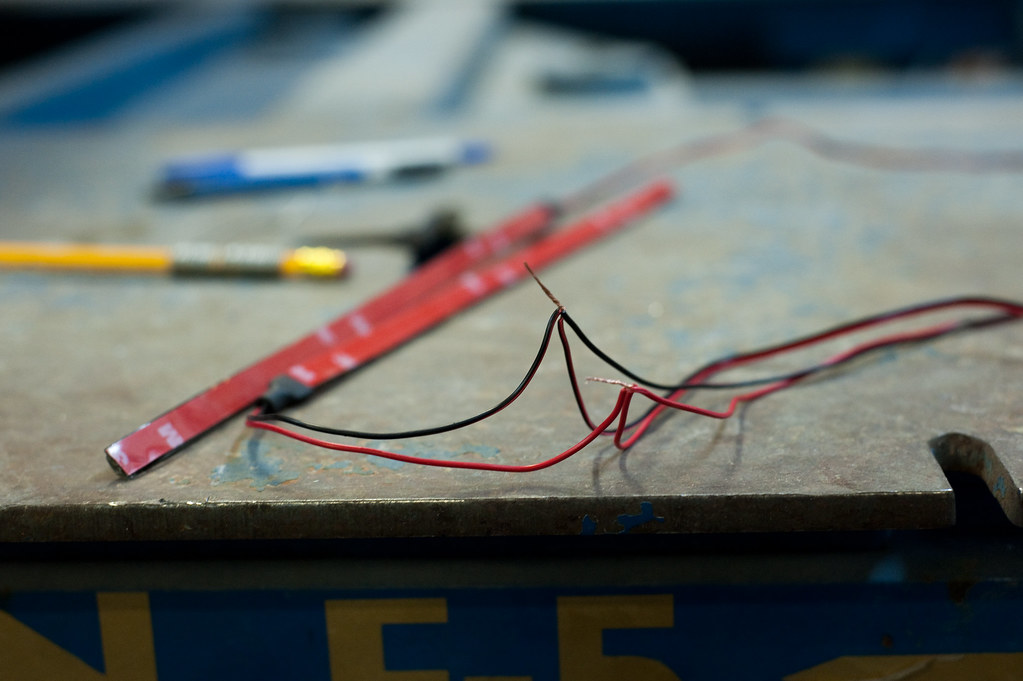
Now, wire your lights together. On the kit I have the RED wire is the positive(+) and the red with the black stripe is negative(-).
I spliced and soldered the wires so that they spider off leaving one positive(+) and one negative(-) end to splice into the wiring harness on the car.
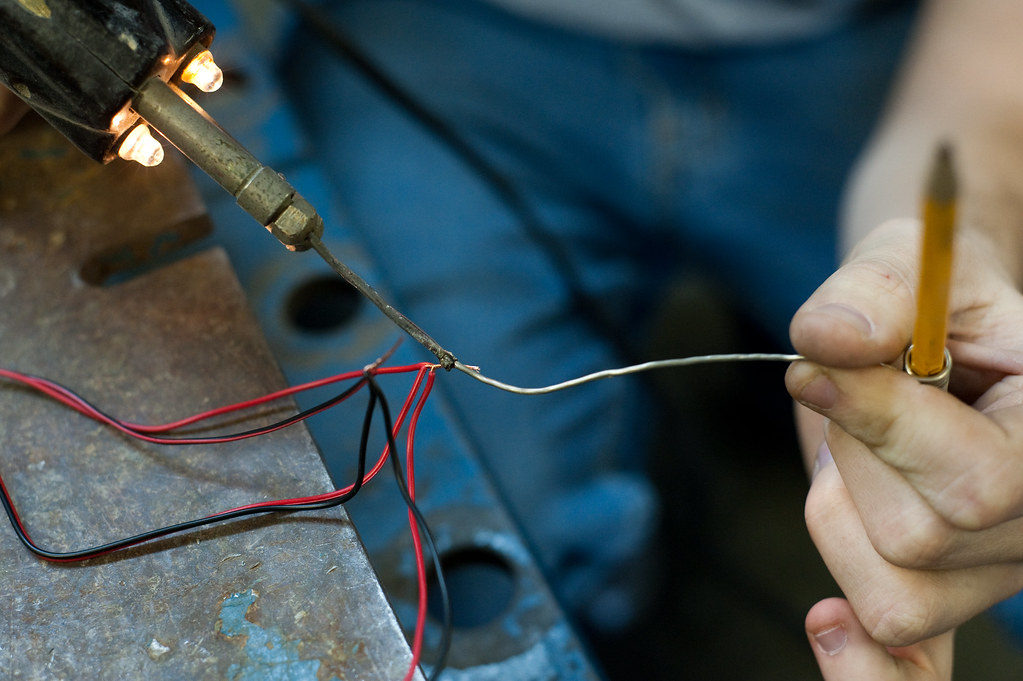
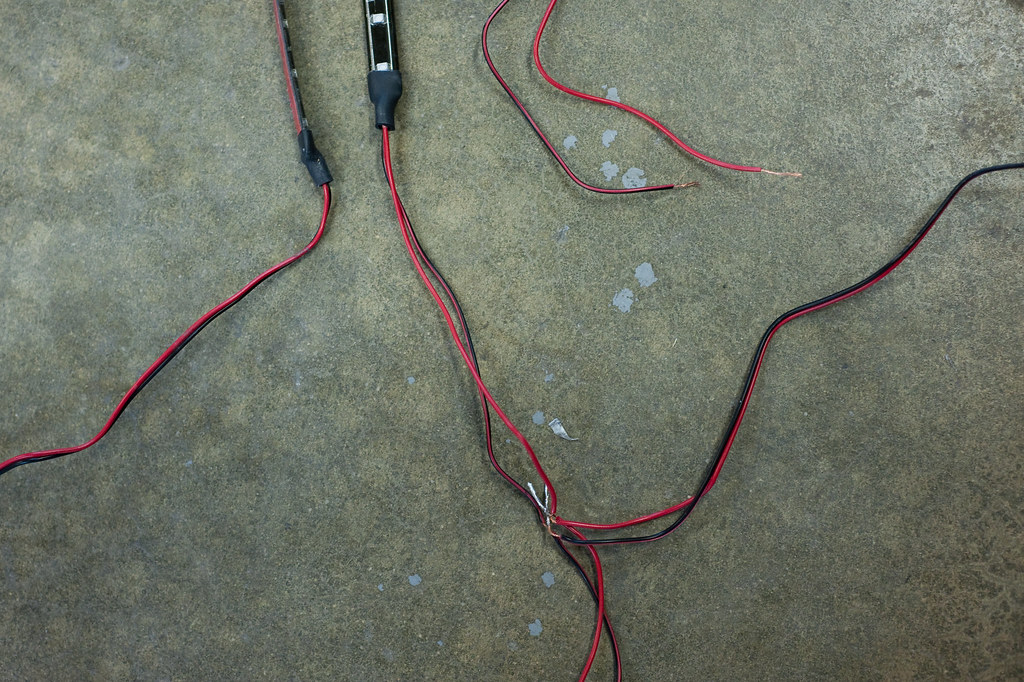
Now, strip the electrical tape off the harness and pull the wires out of the plastic tube to give you some breathing room. Cut the blue and pink wires back from the plug a little ways just in case. It gets tight when plugging it back in so a GOOD soldering job is KEY so the wires don't pull apart!
Splice the POSITIVE(+) wire into the PINK wire (This is your hot wire) and solder for a good connection! Wrap in electrical tape. Here's a diagram:
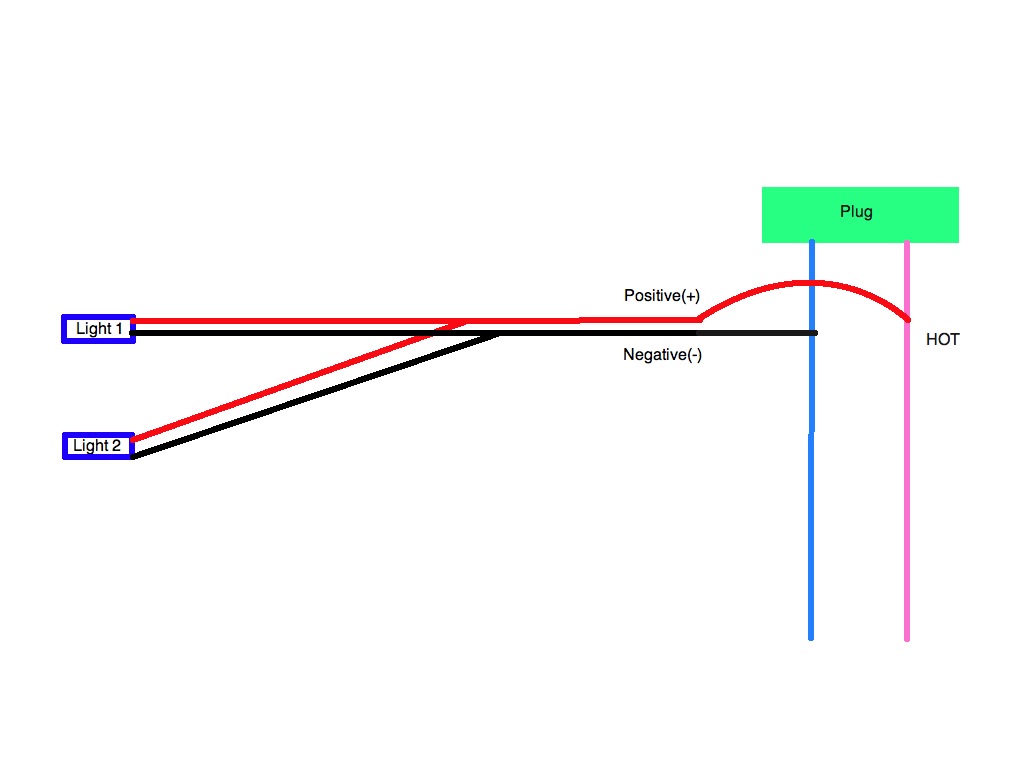

Do the same with the NEGATIVE(-) and BLUE wire.
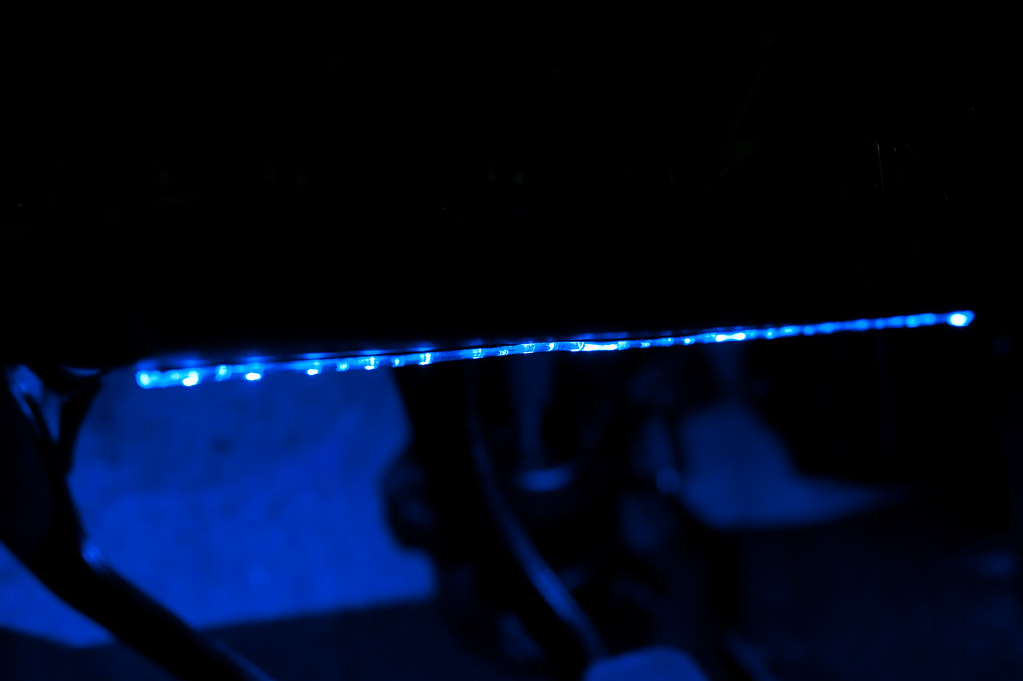
It should look like this when finished and plugged in
NOW your lights should come on with your dome light and look awesome. Put them where you want. I put them out of sight under the dash on both sides.


Enjoy
Time to complete: 1-2 hours max
Skills: Basic wire splicing and soldering (if you want to do it right) skill.
Materials:
- 12V LED light strips or cathodes. I used two 12" long LED strips from Autozone ($20). They came with adhesive backing.
- Wire cutters/strippers
- Soldering gun
- Electrical tape
Here goes:
Find the fuse box located under the steering wheel. I took out most of the paneling to make it easier.
Look for the green plug under the box with the blue and pink wires coming from the back:
Unplug it:
At this point your dome light will not work! This is supposed to happen, if it STILL turns on FIND the RIGHT plug! Its the only one that looks like this so it shouldn't be hard.
Now, wire your lights together. On the kit I have the RED wire is the positive(+) and the red with the black stripe is negative(-).
I spliced and soldered the wires so that they spider off leaving one positive(+) and one negative(-) end to splice into the wiring harness on the car.
Now, strip the electrical tape off the harness and pull the wires out of the plastic tube to give you some breathing room. Cut the blue and pink wires back from the plug a little ways just in case. It gets tight when plugging it back in so a GOOD soldering job is KEY so the wires don't pull apart!
Splice the POSITIVE(+) wire into the PINK wire (This is your hot wire) and solder for a good connection! Wrap in electrical tape. Here's a diagram:
Do the same with the NEGATIVE(-) and BLUE wire.
It should look like this when finished and plugged in
NOW your lights should come on with your dome light and look awesome. Put them where you want. I put them out of sight under the dash on both sides.
Enjoy
Last edited by Mr Tyler; Mar 2, 2010 at 12:55 AM.
Like the LEDS. Much neater than the cathode tubes I used.
https://www.fitfreak.net/forums/2nd-...tml#post761911
Wish someone would do a DIY to hook them up to the dome switch so we could turn them on when we want.
https://www.fitfreak.net/forums/2nd-...tml#post761911
Wish someone would do a DIY to hook them up to the dome switch so we could turn them on when we want.
That'd require MASSIVE wire running, probably pulling out the headliner and be WAY more work than it's worth. Your best bet would be to tap into the fuse box and put in a flip switch on the dash. I'll get to that one day... I like how they come on when I unlock the car... it's automatic! When would you need them to stay on anyway? Just leave the door open or don't lock the car if you're showing them off...
My run all the time I put them on a rocker switch it makes night driving easyer having low lighting in the car. That's the first thing everyone always asks me to help them do I like the way u ran ur setup but for my needs I like having them on all the time great diy
Member

Joined: Apr 2009
Posts: 132
From: Portland, OR

What needs to be changed in this install if you want it to just be controlled by a switch alone., obviously the leads would go to the switch but how is a power source tied in. I am no electrician so im sorry 

Thread
Thread Starter
Forum
Replies
Last Post
baseexcisionrepair
Fit Interior & Exterior Illumination
8
Jan 11, 2012 07:00 PM
theljnet
Fit Interior & Exterior Illumination
6
Dec 18, 2007 11:16 PM