
DIY: Install of HSD Coilovers on GD3


DIY: Install of HSD Coilovers on GD3
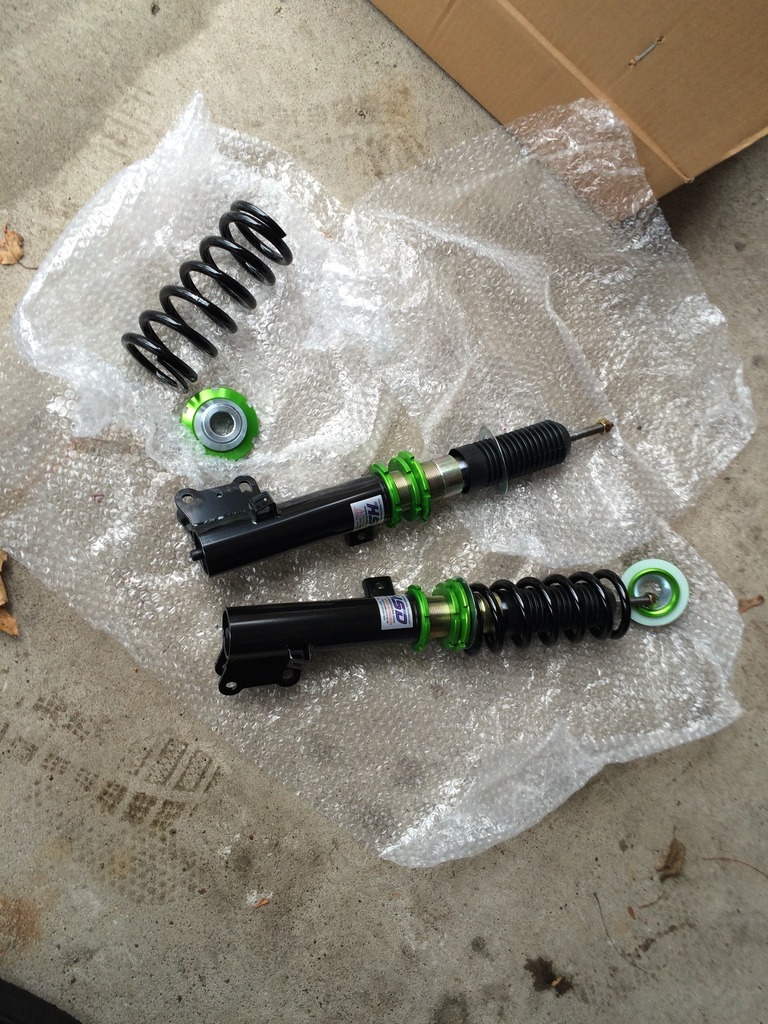
Hey everyone,
I blew my suspension and went out to buy HSD coilovers to install on my Fit. The handling is impeccable. I am extremely happy with this purchase.
I wrote this thread very quickly. This took me a few days to get going properly. My car needs to go lower. I thought I would post this DIY for the guys that are planning on lowering their car.
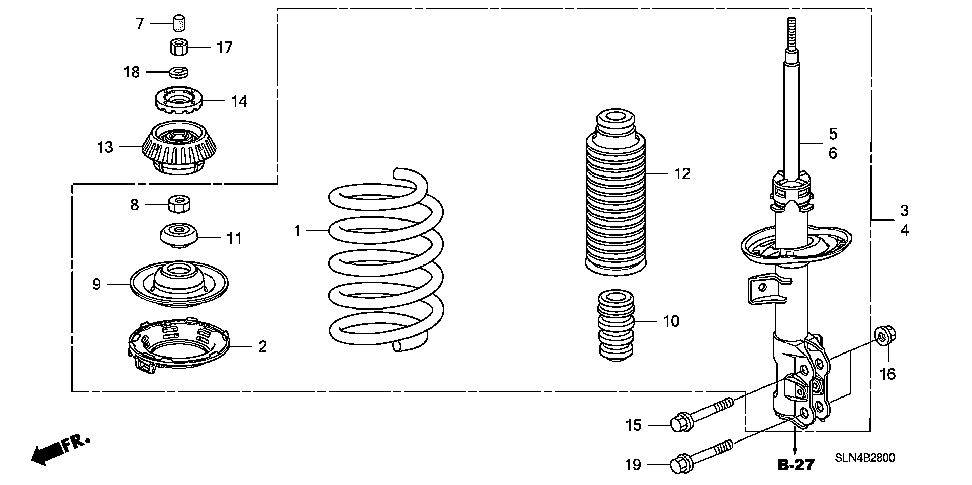
You will need the following from your old front struts:
Parts Diagram for what needs to be reused:
You reuse 7, 17, 18, 14, 13, 8, and 11.
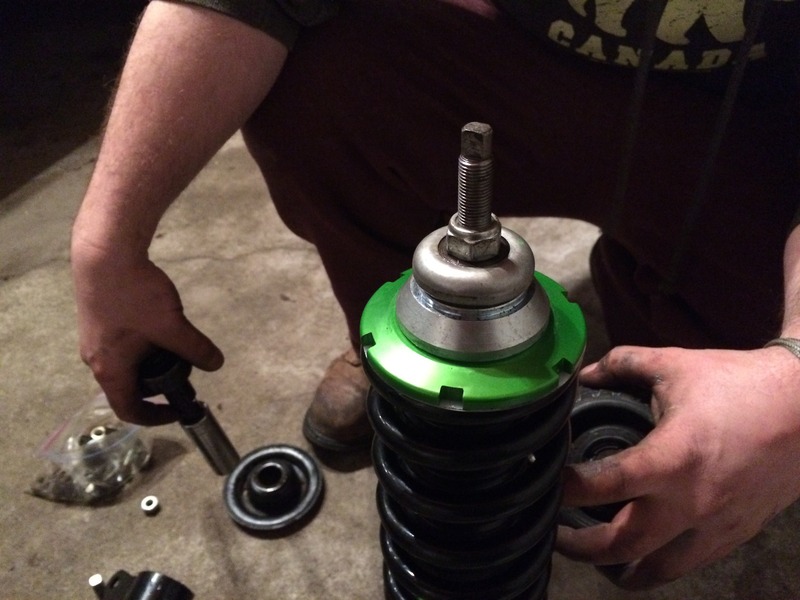
1. The top had that sits right underneath the strut tower bolt (Taken directly from your previous suspension. (Green piece came with the coilovers, its the black top hat that is reused.
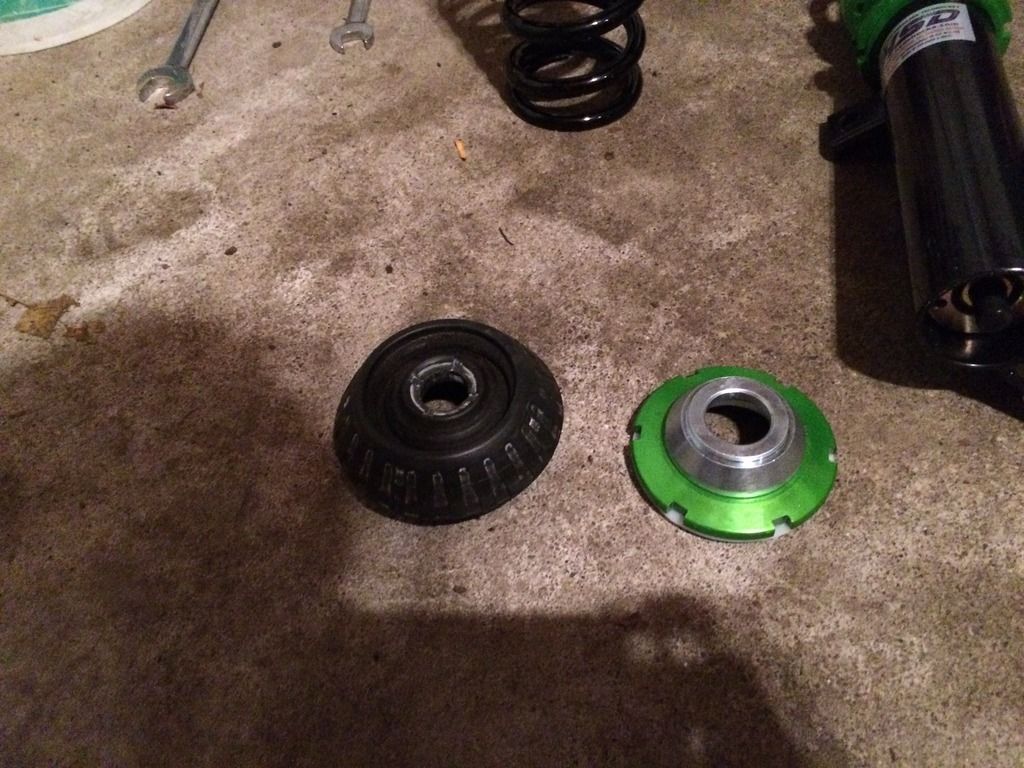
2. A nut that is used on to hold the suspension just under the strut tower nut.
3. You will NOT need to buy 4 new bolts as well as 8 washers to bolt the new suspension to the spindle. The reason being, the wholes on the suspension are smaller than the OEM ones. (See the 4 silver bolts right above the rotor). This was a manufacturer defect. My shock body holes were drilled for 12mm. They were suppose to be drilled for 14mm. The issue has been solved. I was given a defective pair.
This is how your suspension should look. Spring is on the strut, then the green spring cover, the nut from previous suspension, then the top hat from the old suspension. If you are curious as to what the green spring cover is, its up above in the pictures with the top hat.
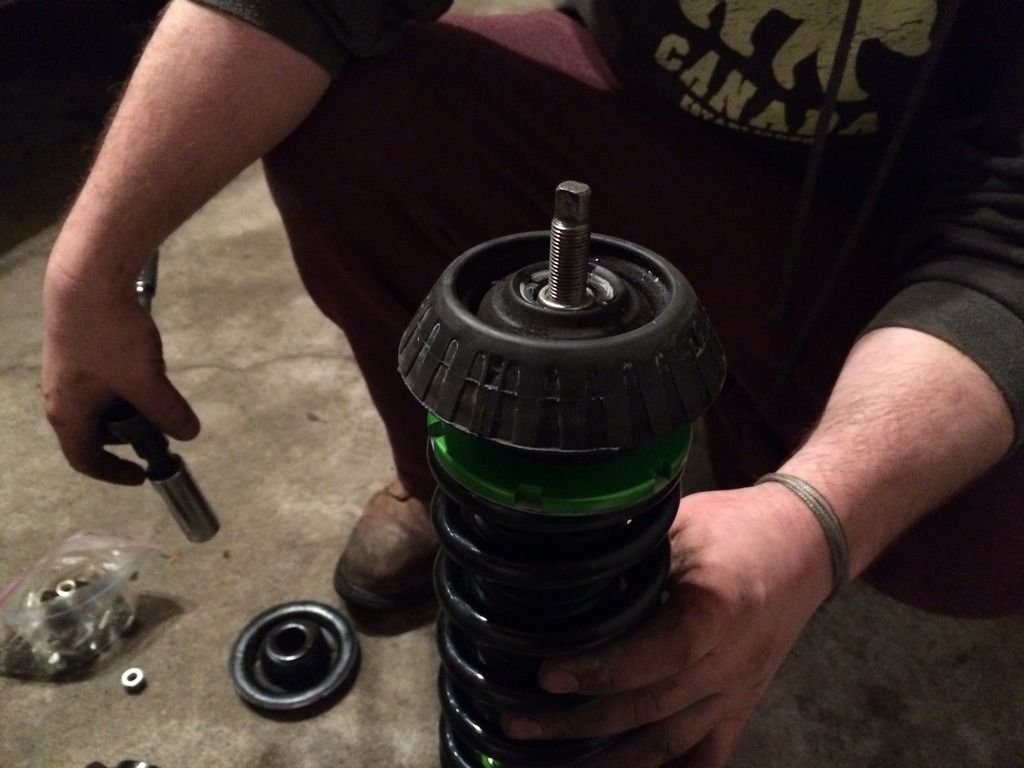
Dont forget the bearing then the nut prior to putting the top hat on:
Lets move on the the simple install
1. Jack up car.
2. Place jack stands on axle or sub frame of vehicle.
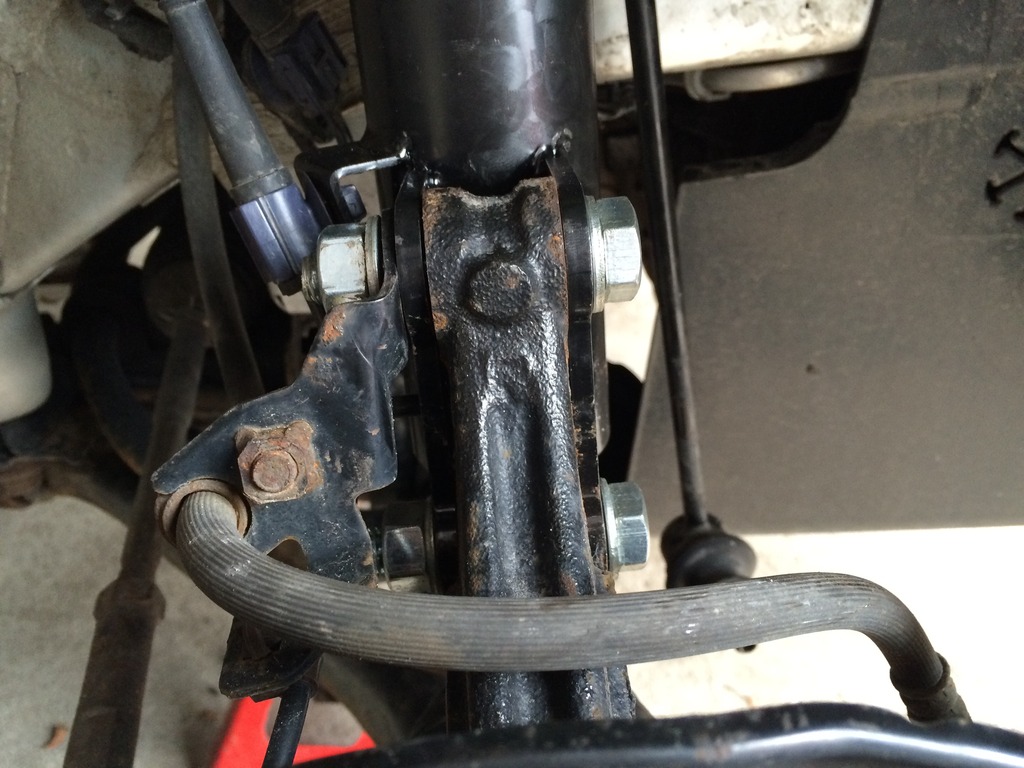
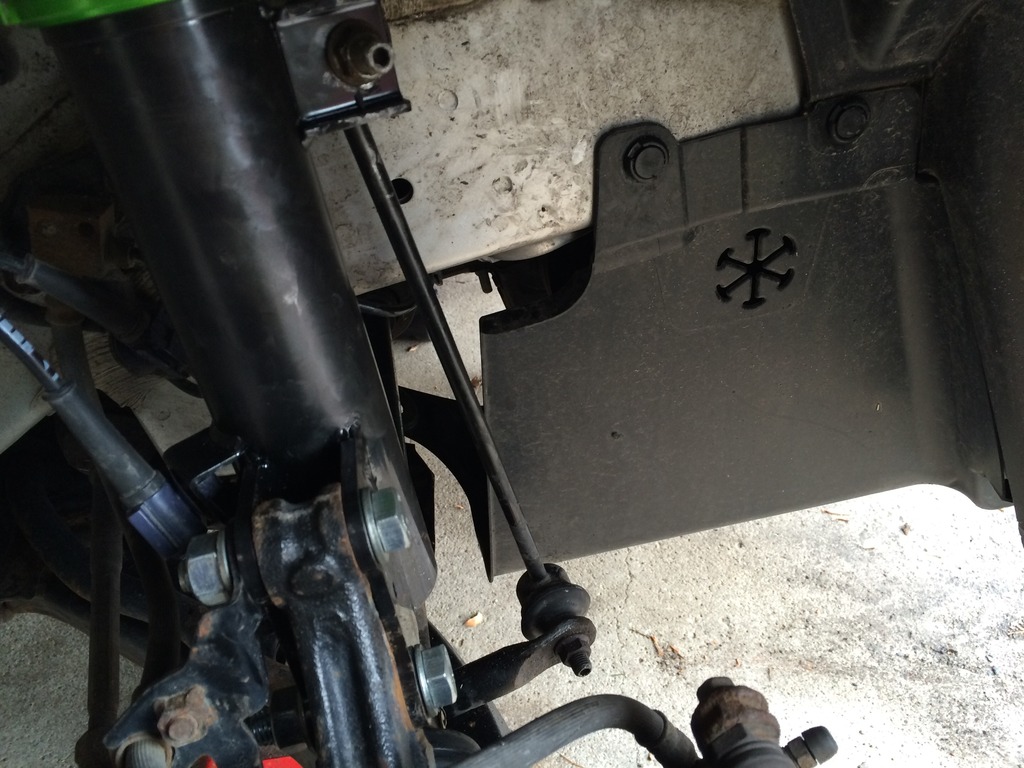
3. You must remove your end links to remove the suspension. These are a 14mm bolt and you may need a 5mm or 5.5 allen key.
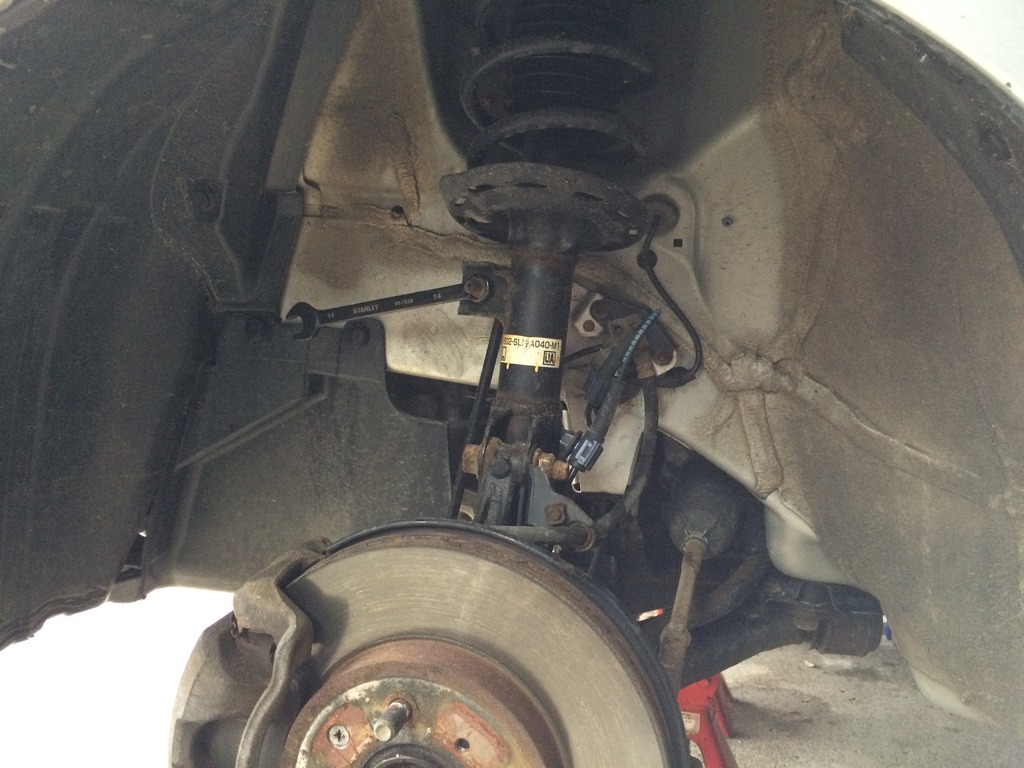
4. Remove the 4 bolts connected to the spindle.
5. Remove the strut tower nut.
Essentially you have to remove your suspension to get the old parts to even make your suspension as noted above.
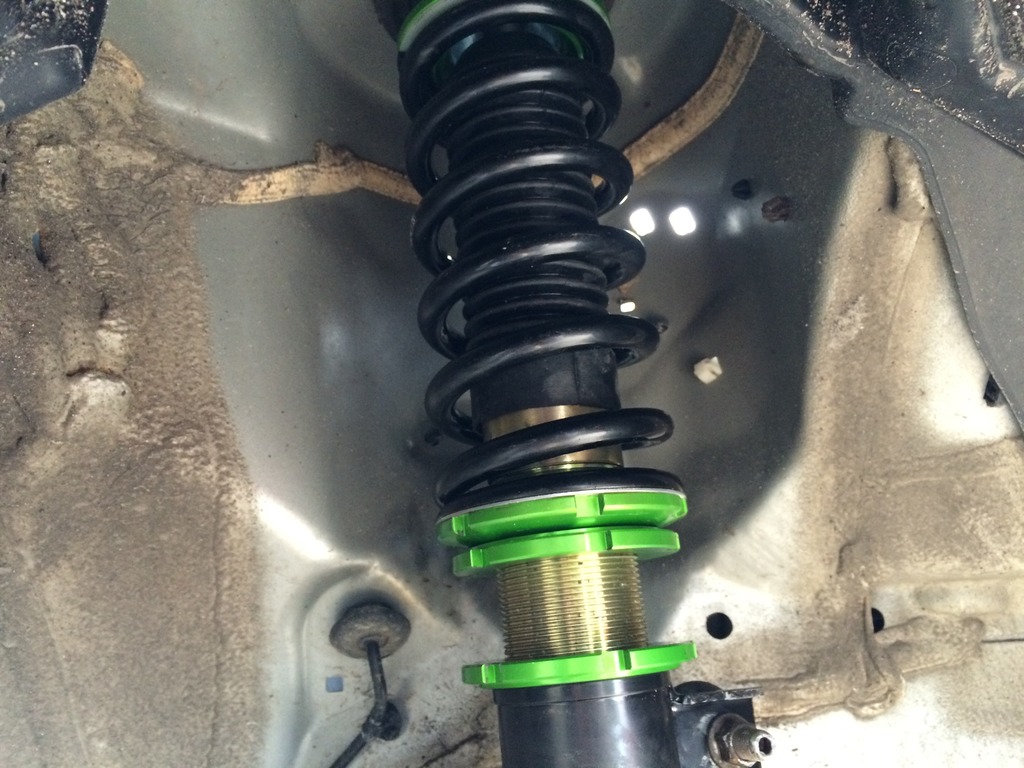
6. Pre load is set, you have the height you want so you install now. Your preload should be set at 0mm. I originally did 5mm by mistake. I received this spec from HSD customer service.
7. You bolt the end links up to the suspension.
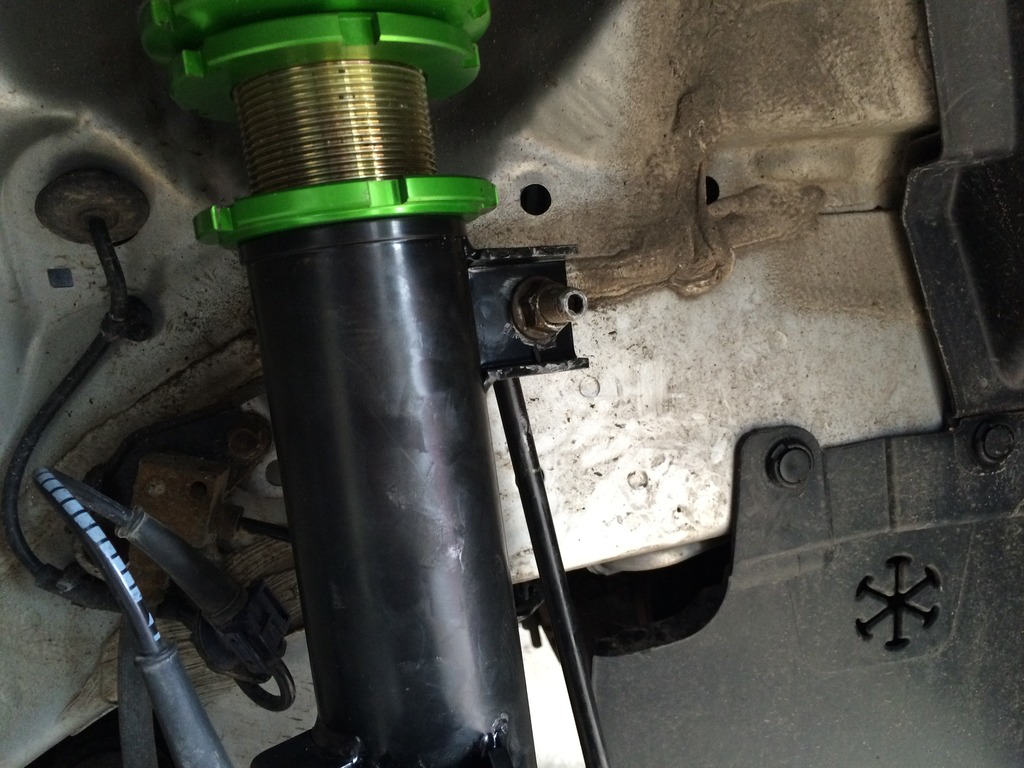
In this pic you can see the 2 shiny bolts that I had to purchase to hold the suspension to the spindle. As stated previously, the bolts from the car do not fit the wholes on the suspension.
8. You then bolt the 4 new bolts you purchased into the suspension to the spindle.
9. You jack up the suspension and tighten your strut tower nut. By jacking up the car to tighten the tower nut helps avoid the issue of when dropping your car on the ground and the threads pop out of the strut tower. I have read threads in which this occurs for people. You use a 3/4mm box wrench to tighten the strut nut as well.
I do need to buy adjustable end links. I want the car to get lower but you cannot get the lowest setting on these coilovers on the stock end link.
I blew my suspension and went out to buy HSD coilovers to install on my Fit. The handling is impeccable. I am extremely happy with this purchase.
I wrote this thread very quickly. This took me a few days to get going properly. My car needs to go lower. I thought I would post this DIY for the guys that are planning on lowering their car.
You will need the following from your old front struts:
Parts Diagram for what needs to be reused:
You reuse 7, 17, 18, 14, 13, 8, and 11.
1. The top had that sits right underneath the strut tower bolt (Taken directly from your previous suspension. (Green piece came with the coilovers, its the black top hat that is reused.
2. A nut that is used on to hold the suspension just under the strut tower nut.
3. You will NOT need to buy 4 new bolts as well as 8 washers to bolt the new suspension to the spindle. The reason being, the wholes on the suspension are smaller than the OEM ones. (See the 4 silver bolts right above the rotor). This was a manufacturer defect. My shock body holes were drilled for 12mm. They were suppose to be drilled for 14mm. The issue has been solved. I was given a defective pair.
This is how your suspension should look. Spring is on the strut, then the green spring cover, the nut from previous suspension, then the top hat from the old suspension. If you are curious as to what the green spring cover is, its up above in the pictures with the top hat.
Dont forget the bearing then the nut prior to putting the top hat on:
Lets move on the the simple install
1. Jack up car.
2. Place jack stands on axle or sub frame of vehicle.
3. You must remove your end links to remove the suspension. These are a 14mm bolt and you may need a 5mm or 5.5 allen key.
4. Remove the 4 bolts connected to the spindle.
5. Remove the strut tower nut.
Essentially you have to remove your suspension to get the old parts to even make your suspension as noted above.
6. Pre load is set, you have the height you want so you install now. Your preload should be set at 0mm. I originally did 5mm by mistake. I received this spec from HSD customer service.
7. You bolt the end links up to the suspension.
In this pic you can see the 2 shiny bolts that I had to purchase to hold the suspension to the spindle. As stated previously, the bolts from the car do not fit the wholes on the suspension.
8. You then bolt the 4 new bolts you purchased into the suspension to the spindle.
9. You jack up the suspension and tighten your strut tower nut. By jacking up the car to tighten the tower nut helps avoid the issue of when dropping your car on the ground and the threads pop out of the strut tower. I have read threads in which this occurs for people. You use a 3/4mm box wrench to tighten the strut nut as well.
I do need to buy adjustable end links. I want the car to get lower but you cannot get the lowest setting on these coilovers on the stock end link.
Last edited by GinoLicious; Apr 24, 2015 at 12:26 PM.
And I didn't see you list it in the parts you reused from the OEM suspension, but I hope you reused the bearing that goes right under the tophats?
It might be part of that thing next to your right foot in this pic.

It might be part of that thing next to your right foot in this pic.
The black thing by my buddy's foot does is hold the OEM spring in place. The green metal thing shown above is the piece that does that.
I tried to install the coilovers with that piece and they did not fit and it did not work. You only need the mushroom and a bolt. i have been riding without that black piece for about 2 weeks now, not an issue. Shocks are fine, car handles mint.
Last edited by GinoLicious; Apr 18, 2015 at 06:02 PM.
I'm talking about the bearing which is #11 in the illustration below, not the upper spring seat (#9).
Also, you should also replace or reuse the washer (#18). It doesn't look like you did in the installation pic.
Also, you should also replace or reuse the washer (#18). It doesn't look like you did in the installation pic.
Also it was a rough 4 days as I was clueless for the most part when I did this DIY. I thought you meant 9 i had to reuse. That is what the green thing is. 11 is in inside of 9 which I did use. Here is the pic before the top had went on.

Last edited by GinoLicious; Apr 21, 2015 at 05:48 PM.

would it not have been better to open up the holes in the coilover to except the stock sized bolts rather then replacing them with something smaller? seems like you would end up having alignment issues
This is correct. Keep reading as to why it is correct.
The shock body as written above was suppose to be 14mm and not 12. If your bolts do not fit you need to get a new pair. I had a defect in mine when originally wrote this.
Last edited by GinoLicious; Apr 24, 2015 at 12:27 PM.
Theory is correct.
Last edited by GinoLicious; Apr 24, 2015 at 12:27 PM.
The holes in the hubs,the holes in the stock shocks and the stock bolts are all the same size so that when bolted together every thing lines up. The way you did it when the bolts where loose you could probably wiggle the hub back and forth changing the camber. Im saying even with the bolts tight there is a possibility of slippage there. I personally would have contacted the company and asked what there solution was. Seems pretty lame for a $1200 coilover to not just bolt up.
The holes in the hubs,the holes in the stock shocks and the stock bolts are all the same size so that when bolted together every thing lines up. The way you did it when the bolts where loose you could probably wiggle the hub back and forth changing the camber. Im saying even with the bolts tight there is a possibility of slippage there. I personally would have contacted the company and asked what there solution was. Seems pretty lame for a $1200 coilover to not just bolt up.
The holes in the OEM shock body are slightly bigger than the holes on the HSD shock body. Therefore the holes on the knuckle are slightly bigger.
The bolts do line up perfectly with the knuckle. I have contacted HSD and it appears you are suppose to use different bolts. Im waiting for my confirmation.
On the HSD coilovers the holes on the shock body are slightly smaller. As you fully tighten the bolt and nut the shock body is secure to the knuckle. Even kicking or shaking the shock body and the knuckle does not cause it to move. Yes, the bolt fits snugly in the HSD shock body And leaves no Gap on the outside.
Last edited by GinoLicious; Apr 22, 2015 at 07:21 PM.
The point has been made and properly explained in post 16.
To reiterate you DO NOT need smaller bolts. Holes should line up. I had defective pair in which my holes were drilled for 12mm and not 14mm. These were fixed by the North American distributor for HSD free of charge.
To reiterate you DO NOT need smaller bolts. Holes should line up. I had defective pair in which my holes were drilled for 12mm and not 14mm. These were fixed by the North American distributor for HSD free of charge.
Last edited by GinoLicious; Apr 24, 2015 at 12:28 PM.
What you did was stick a smaller bolt in a bigger hole, no matter how well the bolt fits in the coil-overs you will still have play between those new bolts and the holes in the knuckle. You are now relying on the friction between the flanges on the strut body and the ear on the top of the knuckle to hold you camber positioning rather then the shear strength of properly fitting bolts.
It may never be a problem Im just saying that it could be and your solution is not the best one there is.
Now calling people name on the internet should be left to little kids playing call of duty. Please grow up
It may never be a problem Im just saying that it could be and your solution is not the best one there is.
Now calling people name on the internet should be left to little kids playing call of duty. Please grow up
The coils are now sitting fine. JRP in Oakville the distributor for HSD rectified the issue. The shock body holes were 12mm, they are not fixed to 14mm. I am getting my car back tonight. JRP fixed the issue free of cost and now everything is proper. The coils were installed properly so by following this DIY you will have no issue. I had a certified mechanic go over the work to ensure there were no further complications for the coilovers. And the coils needed to be removed to fix the issue.
12mm bolts you do not need. Holes should be lined up with 14mm. So yes, Geopat you were correct.
Geopat, if you wanted to make your point clear and your argument sound, you should have articulated your self as such:
"With bolt diameters that are smaller than the knuckles on the Fit, repeated hammering of moving metal parts against each other will continue to enlarge the too-large holes.
Continuous hammering of one metal part against another is called "fretting wear". Fretting causes metal to wear away non-stop. There is no cure. You have to match the hole diameters to prevent fretting."
Yes you were correct, but you were not making your point clear and able to understand. It was not an attack on you, rather I was trying to understand your point.
People who read this DIY. Follow the steps. Remember what old pieces you need from the OEM strut. You will re use all bolts and should not have to purchase any smaller sizes.
Last edited by GinoLicious; Apr 24, 2015 at 12:32 PM.

Thread
Thread Starter
Forum
Replies
Last Post
magellows
3rd Generation GK Specific Suspension & Brakes Sub-Forum
6
Feb 14, 2019 12:52 AM
frenchfries
Fit Suspension & Brake Modifications
6
Dec 6, 2013 08:57 PM
Halcyon
For Sale / Want To Buy / Classified Ads for USED Fit Items
7
Feb 4, 2013 05:37 PM
clay7160
2nd Generation GE8 Specific Suspension & Brakes Sub-Forum
1
Nov 20, 2009 07:20 PM