LOG IN
REGISTER
Forums
Welcome To FitFreak
Fit Freak Newbie / FAQs
Site Feedback and Suggestions
The Honda Fit and Jazz Forums
General Fit Talk
1st Generation (GD 01-08)
2nd Generation (GE 08-13)
3rd Generation (2015+)
Fit Photos & Videos
Car Shows, Events, and Racing
Other Car Related Discussions
Off Topic Discussion
Buy, Sell, Trade, Product Market Research and Group Buys
For Sale / Want To Buy / Classified Ads for USED Fit Items
FIT-Vendor Sponsored Group Buys and Sales
Gauge Interest in a Fit Product or Group Buy
Merchant Group Buys and New Product Sales
General For Sale Section
Fit Modifications
General Fit Modifications Discussion
Fit DIY: Repair & Maintenance
Fit Engine Modifications, Motor Swaps, ECU Tuning
Fit Exterior Modifications & JDM Styling
Fit Interior Modifications
Fit I.C.E.
Fit Wheels & Tires
Fit Suspension & Brake Modifications
Fit Interior & Exterior Illumination
Honda Dealer and Honda USA Discussions
Honda Fit Dealer Representatives
Honda Fit Dealer Reviews
Vendor Marketplace Forums
FIT Vendor General Discussion Area
FIT-Vendor Sponsored Group Buys
Tire, Wheel, Brake & Suspension
Fit Forums & Clubs
America East
America Central
America West
Canada Fit Forums & Clubs
Mexico Fit Forums & Clubs
European Fit Forums & Clubs
Asia Fit Forums & Clubs
Marketplace
Vendor Directory
Become a Vendor
New Posts
Tools
Car Payment Calculator
Tire Rim Calculator
Recalls
Technical Service Bulletins (TSBs)
Members List
Live Feed
Gallery
View Dark Mode
Please register or login to enable Dark Mode.
Log In
Register
Threads
Google
Threads
Posts
Advanced
Dark Mode
Please register or login to enable Dark Mode.
Log In
Forgot your Password?
By logging into your account, you agree to our
Terms of Use
and
Privacy Policy
, and to the use of cookies as described therein.
Recent
Commented
Albums
My Pictures
My Post Pictures
doctor J
June 22, 2016
355
0
Sort:
Most Recent
Default
Most Recent
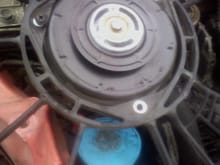
Motor on the shroud (it's spot welded in 3 places)
0
2018/09/02 17:08:43
doctor J
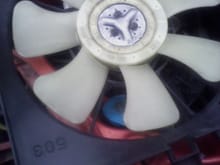
The blade is attached to the hub with Phillips-flat screws; I used my universal screwdriver
0
2018/09/02 17:07:08
doctor J
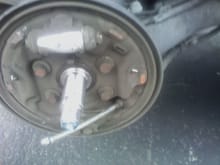
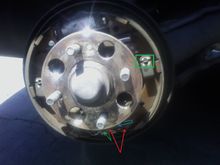
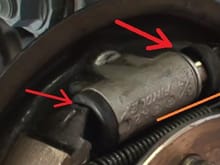
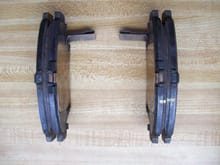
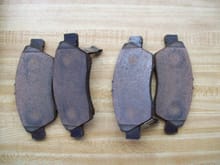
Time to take apart the brake system
0
2018/09/02 17:04:02
doctor J
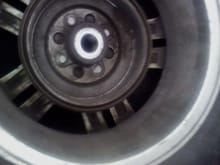
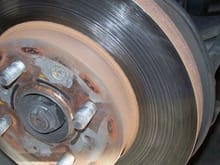
I was able to slide entire assembly off the spindle
0
2018/09/02 17:02:49
doctor J
Destroyed nut cap (screwdriver and hammer)
0
2018/09/02 17:01:50
doctor J
The new client
0
2018/09/02 16:57:41
doctor J
0
2018/07/31 08:11:45
doctor J
Approximate Third clip location (accessible after fender liner removal), I left it alone
0
2018/07/25 07:58:28
doctor J
Lower clip on passenger door
0
2018/07/25 07:57:48
doctor J
Upper clip (passenger door)
0
2018/07/25 07:57:03
doctor J
0
2018/07/25 07:56:33
doctor J
0
2018/07/10 11:09:10
doctor J
0
2018/07/10 09:23:51
doctor J
0
2018/07/09 11:17:54
doctor J
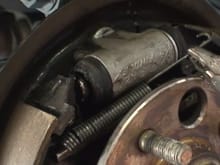
The spring is finally removed but the cylinder is messed up!
0
2018/07/09 10:53:36
doctor J
0
2018/07/09 10:53:16
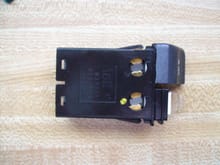
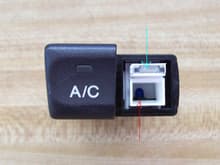
doctor J
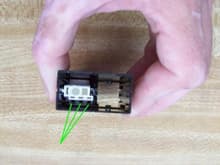
A/c switch actuation is shown; it has 3 flat contact springs. The push button face cover (saying A/C) needs to be pried off the actuator; the actuator than slides out from the back
0
2018/07/09 09:44:16
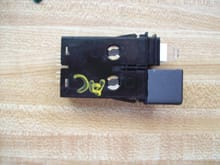
doctor J
Inverted defrost switch actuator (left) with corresponding contacts on contact board;when flat contact spring breaks off the actuator the switch will not work correctly
0
2018/07/09 09:40:40
doctor J
0
2018/07/09 09:40:09
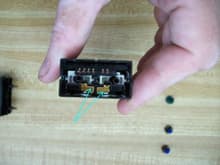
doctor J
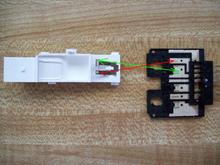
Top view; the main contact board can be pulled out as soon as on/off status lamps are removed
0
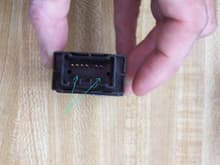
2018/07/09 09:38:22
doctor J
Bottom view; night illumination lamps are removed and entire board can be pulled out
0
2018/07/09 09:36:47
doctor J
Same pins with the back plate removed,black return springs are visible at mid level (one spring for each white actuator)
0
2018/07/09 09:33:55
doctor J
0
2018/07/09 09:33:13
doctor J
Arrows are pointing to night illumination pins (+ and - )
0
2018/07/09 09:31:56
doctor J
Red arrow points to the night illumination lamp (dark blue); cyan arrow points to the light transmitting prism from on/off lamp (amber)
0
2018/07/09 09:29:09
doctor J
0
2018/07/06 19:31:46
doctor J
0
2018/07/02 12:51:00
doctor J
0
2018/06/29 06:54:30
doctor J
0
2018/06/27 08:32:04
doctor J
0
2018/06/27 08:28:30
doctor J
0
2018/06/27 08:27:52
doctor J
0
2018/06/27 08:25:24
doctor J
0
2018/06/27 08:24:30
doctor J
0
2018/06/26 07:46:13
doctor J
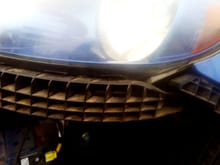
Note: the plastic tabs immediately below the headlight are very fragile and can brake easy during bumper removal!
0
2018/06/25 07:12:20
doctor J
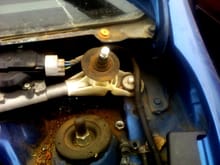
Inset screwdriver between two round bosses as shown; use box end offset to keep it in place when undoing the nut
0
2018/06/25 07:06:34
doctor J
One more view of the screws; the nut on the motor came out very easy
0
2018/06/25 07:03:48
doctor J
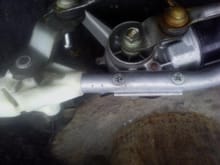
These two Phillips screws that are attaching motor to the beam are installed with thread locking compound ad will require additional steps to remove! I used an impact without much of the success!
0
2018/06/25 07:00:14
doctor J
Close up
0
2018/06/25 06:58:30
doctor J
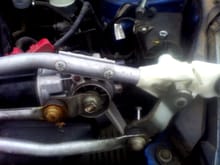
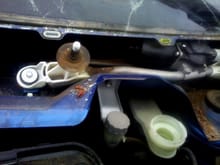
Left cover removed; time to unbolt three 10mm screws and disconnect electrical plug from the motor
0
2018/06/25 06:56:06
doctor J
First
Page
7 of 9
Last
Go To
Page
1
2
3
4
5
6
7
8
9
7 of 9
Go To
GO
Go to page
of 9
pages
1
2
3
4
5
6
7
8
9