
Bumper screw part


Bumper screw part
Today I was removing my bumper to wire my fog lights up. I noticed that the two screws on each side do not have the mount.
You know that blackl plastic piece that sits at the top of the bumper. It allows you to screw the tapping screw In? I do not have any. Mine are broken. And my bumper does not sit properly as I do not have those pieces for the screw to thread into. I cannot seem to find the part anywhere. I looked at Honda parts cheap and am struggling as to which part it is.
You know that blackl plastic piece that sits at the top of the bumper. It allows you to screw the tapping screw In? I do not have any. Mine are broken. And my bumper does not sit properly as I do not have those pieces for the screw to thread into. I cannot seem to find the part anywhere. I looked at Honda parts cheap and am struggling as to which part it is.

Member
Joined: Aug 2013
Posts: 336
From: Los Angeles

Here you go, just look at the part sections for the car and you'll find it.
91503-SZ3-003 | Honda Clip A - Bernardi Parts
91503-SZ3-003 | Honda Clip A - Bernardi Parts
I do not need bumper clips.
On each side of the bumper there is one screw each. Philips screw. This screw is threading into a plastic piece. Mine are broken and my self tapping screw cannot thread into something. Does anyone know the part for that? What you have provided is not what I need.
On each side of the bumper there is one screw each. Philips screw. This screw is threading into a plastic piece. Mine are broken and my self tapping screw cannot thread into something. Does anyone know the part for that? What you have provided is not what I need.
I really can't tell what part you're talking about from your description, but you can go to OEM Honda Parts & Honda Accessories - Bernardi Parts put in your vehicle info, and look for your own parts.
Just pull up the parts diagrams and find it.
Just pull up the parts diagrams and find it.
Member
Joined: Aug 2013
Posts: 336
From: Los Angeles
I do not need bumper clips.
On each side of the bumper there is one screw each. Philips screw. This screw is threading into a plastic piece. Mine are broken and my self tapping screw cannot thread into something. Does anyone know the part for that? What you have provided is not what I need.
On each side of the bumper there is one screw each. Philips screw. This screw is threading into a plastic piece. Mine are broken and my self tapping screw cannot thread into something. Does anyone know the part for that? What you have provided is not what I need.
As for that plastic thing you're talking about on the side. It's either the upper bumper support that holds the bumper up or you're just missing a screw.
Just look up on the site that's provided and enter your information. It's not that hard.
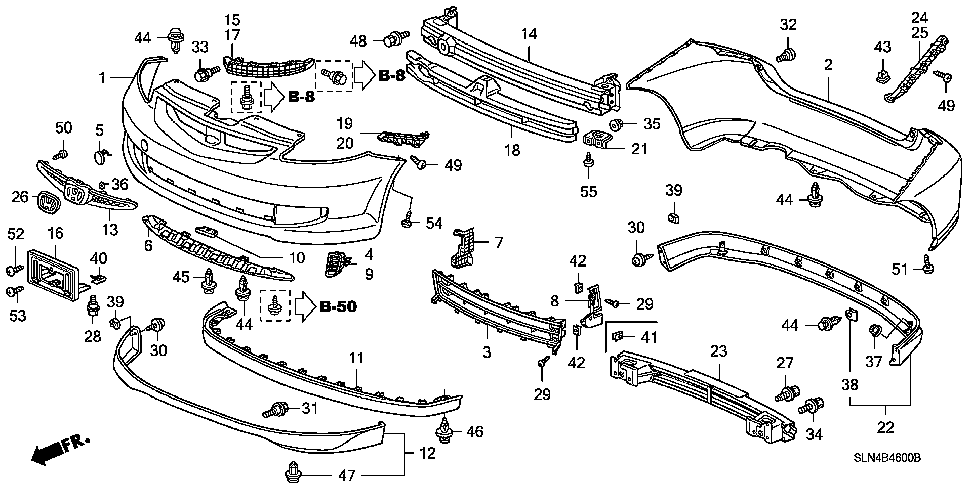
21 looks about right. I looked at that diagrams for so long before posting. Just couldn't figure it won't. But yeah. 21 seems about right. I guess I need two of these cause my bumper is not screwed in as I lost that plastic piece lol.
Member
Joined: Mar 2007
Posts: 1,704
From: Second house on the left
I'm thinking its this screw # 54.
93913-15580View
SCREW, TAPPING (5X20)
But I can't tell what it screws into:
the bumper "spacer" #19 or 20
020 71198-SLN-A01View
SPACER, L. FR. BUMPER
#21 on that page looks as if it retains the rear bumper. (as the Screw #55 says)
I'm thinking: might be easier to remove the fender liner and use a nut and bolt! (Stainless Steel to resist road salt)
Worst part is my car has part number 19 and 20. The bumper spacer. When looking closely at my car and the diagram my car is missing the piece on top of the hole closest to the headlight that has threads. This means my screws have nothing to thread into. I guess I have to replace both bumper spacers in order to have a small piece that broke off for the screw to thread into. Thank god it's not expensive.
Member
Joined: Mar 2007
Posts: 1,704
From: Second house on the left
I would go to a good hardware store and attempt to find a fitting to repair what you have.
One idea is a "Rawlnut"...a threaded rubber fitting that expands when tightened. Even Home-Depot/Lowes type stores have these.
Rawlnuts for Wheelarch liners (set of 12) (Elise, Exige) [RM615] - €11.99 : Elise Shop, Performance parts for your Lotus Elise
You might even get away with a plastic plug, glued into the existing stripped hole, and the original screw if you have it.
If you can, remove the "spacer" and bring it with you...
I would go to a good hardware store and attempt to find a fitting to repair what you have.
One idea is a "Rawlnut"...a threaded rubber fitting that expands when tightened. Even Home-Depot/Lowes type stores have these.
Rawlnuts for Wheelarch liners (set of 12) (Elise, Exige) [RM615] - �‚�11.99 : Elise Shop, Performance parts for your Lotus Elise
You might even get away with a plastic plug, glued into the existing stripped hole, and the original screw if you have it.
If you can, remove the "spacer" and bring it with you...
Member
Joined: Mar 2007
Posts: 1,704
From: Second house on the left
This PDF explains how a Rawlnut works.
http://products.vjtechnology.com/upl...%20Rawlnut.pdf
The important thing to realize is that you should only tighten about 1 1/2 to 2 full revolutions of the screw after resistance increases. The bulging synthetic rubber sleeve will hold the piece.
http://products.vjtechnology.com/upl...%20Rawlnut.pdf
The important thing to realize is that you should only tighten about 1 1/2 to 2 full revolutions of the screw after resistance increases. The bulging synthetic rubber sleeve will hold the piece.
Last edited by Carbuff2; Mar 8, 2015 at 09:13 PM.

Thread
Thread Starter
Forum
Replies
Last Post
Valashi
2nd Generation GE8 Specific DIY: Repair & Maintenance Sub-Forum
3
Aug 4, 2014 08:57 PM
wuggiewuggie
1st Generation (GD 01-08)
2
Feb 27, 2013 10:23 PM
GD3_JDMLIFE
SoCal Classifieds
4
Mar 24, 2011 05:46 AM