
DIY-- Grille Overlays to protect A/C condenser


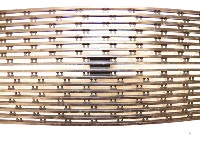
After 30 years working in all types of American industry as a Mechanical Engineer, it still surprises me to find an occasional product that is extraordinarily well made and that suits its design purpose perfectly. The "Mr. Grille" aluminum grilles are/were one such product.
The grille inserts made by "Mr. Grille" from eBaymotors.com were the VERY BEST quality. Apparently, he is out of business, which is a real shame. It is as bad as Hawk brake parts, or Progress Anti-Sway Bars, going out of business. This installation DIY is written to honor the passing of that great company, to help the buyer of my polished "Mr. Grille" install it on his car, and these techniques can be used to install most bar-type billet grilles using nylon zip ties to fasten the grille overlay to your existing stock plastic junk (I mean grille).
I have a BBP '09 Sport Fit and bought/installed a polished aluminum "Mr. Grill" overlay" to protect the A/C condenser from rocks back in 2008 when the car was only months old. The manufacturer later advertised a black anodized finish version, but I didn't want to buy the product again, so lived with the silver-colored grille on my dark purple Fit.
Received his Pay Pal funds today, and will ship his grille out on Monday. Thanks, tinctorius! That makes my black "Mr. Grill" overlay free!
Recently, member bad self advertised his black-anodized grille, and I bought it. I advertised my silver grille, and member tinctorius offered to buy my old one (with my suggestion to paint it black with "Plasti-Dip Spray coating".
So today I swapped grilles and shot a lot of photos. Will put this info. up on the forums over the weekend for the benefit of anyone who wants to know how to install a grille overlay. There are many for sale, from forums sponsor Zeta Products (polished stainless steel) and many eBaymotors.com vendors (no black ones that I have been able to find, but just get aluminum or stainless steel, roughen with sandpaper, and paint gloss or flat black with "Plast-Dip" spray from Ace Hardware or eBay).
YOU NEED A GRILLE OVERLAY. Or, you don't need air conditioning. You choose. More info. later.
The techniques that I will show in this DIY will probably work to install any brand of grille overlay, but keep in mind that they were developed for the one-piece "Mr. Grille" brand that seems not to be available any longer. If you EVER see a "Mr. Grille" overlay being sold for a Honda Fit, buy it. Either put it on your Fit, or double the price and sell it here on the forums or on eBay. It WILL sell. My own member/customer offered to pay $140.00 for my black grille. I am selling him my silver one for $90.00.
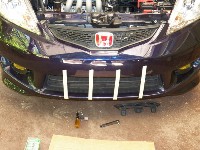
Oh yeah, and as part of my front-end refurb,. I have decided that I can't stand the stupid center-mount of the license plate any longer (after removing it to install the new grille). I ordered an aluminum license plate relocator bracket from the same eBaymotors vendor where I got the one I used on my GD Fit (from the Sacramento, CA area) and will put the plate in the lower driver's side of the grille area. Will use the "Door Handle Screw Cover" mod to cover the screw hole in the center of the bumper.
Fit ownership is just like old-house ownership. You never run out of things to make better.
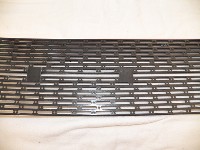
1. Use only the vertical struts of the stock plastic grille as the anchor points for the overlay.
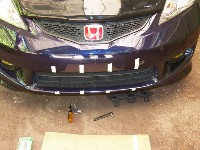
2. Use masking tape to mark the location of the vertical struts, and stick the tape to the upper edge of the bumper and the plastic lip under the grille area, then tear out the tape from the grille area, leaving only the bumper and lip tape as markers.
3. Place the grille overlay into the opening, and use more masking tape to loosely secure it so that it won't fall out.
4. Remove the plastic bridge/cover from the radiator support/hood latch area by removing the black plastic mushroom clips. the clips are of different sizes, so keep them organized so that you replace them in the same holes you took them out of. I have reused the same clips over a dozen times, and they still work fine. I use a small, sharp precision screwdriver to pry the center of the clips up, Then use a 1/4" flat screwdriver to lever up the round base of the clip.
5. Use heavy-duty black zip ties from the electrical dept. of Ace Hardware or other retailers. I used 14" long zip ties ($7.00 for eight zip ties). 11" long ones will also work, but the longer the zip tie, the easier to work with. DO NOT use cheap, Chinese-made zip ties sold in bulk quantities at Home Depot, Costco, or other discount stores. The zip ties sold by Ace Hardware have a breaking strength of 75 pounds each. Who knows the specs. of the imports ? You don't want to do this job twice, or lose your grille on the freeway if the zip ties break.
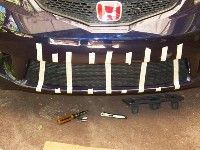
6. Reach down in the center of the grille area behind the stock grille and poke the sharp end of a zip tie through the stock grille and the overlay. Make sure that the zip tie is coming through between the horizontal bars of the overlay, between the top two bars. Now grab the tie from the front of the overlay, and loop it back to the back side of the overlay and stock grille. Pull the zip tie sideways until you feel resistance that tells you it has gone around one of the small vertical spacers that connect the horizontal bars of the overlay. The zip ties are exactly the right width to fit between the bars of the grille overlay.
7. Feed the pointed end of the zip tie into the locking joint, and pull in the slack but leave the first zip tie a little loose. Repeat the process on each side of the top of the grille overlay, and on the sides and center of the bottom area of the overlay. Pull all six zip ties as tightly as you can, and you will see that the overlay gets pulled into an exact fit against the stock grille with no gaps at the top, bottom or sides of the grille area.
8. The black zip ties are completely invisible between the bars of the Mr. Grille once they are tightened down as far as possible. The same was true with the vastly inferior "Grilles-4-U" grille overlay that I tried on my GD3. This will probably be the case with the stainless steel grilles from Zeta Products, and many of the other grilles from eBaymotors vendors.
Click on images to enlarge

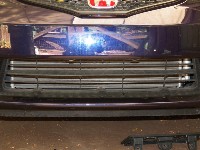

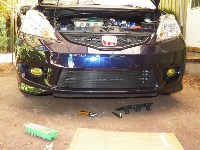
With all of the zip ties pulled as tight as possible, the grille overlay fits perfectly in the grille opening, will never move in any weather, and will never rattle or loosen. It is a permanent installation, but can be removed if necessary by cutting the zip ties from the rear with small, very sharp diagonal wire cutters.
The grille inserts made by "Mr. Grille" from eBaymotors.com were the VERY BEST quality. Apparently, he is out of business, which is a real shame. It is as bad as Hawk brake parts, or Progress Anti-Sway Bars, going out of business. This installation DIY is written to honor the passing of that great company, to help the buyer of my polished "Mr. Grille" install it on his car, and these techniques can be used to install most bar-type billet grilles using nylon zip ties to fasten the grille overlay to your existing stock plastic junk (I mean grille).
I have a BBP '09 Sport Fit and bought/installed a polished aluminum "Mr. Grill" overlay" to protect the A/C condenser from rocks back in 2008 when the car was only months old. The manufacturer later advertised a black anodized finish version, but I didn't want to buy the product again, so lived with the silver-colored grille on my dark purple Fit.
Received his Pay Pal funds today, and will ship his grille out on Monday. Thanks, tinctorius! That makes my black "Mr. Grill" overlay free!
Recently, member bad self advertised his black-anodized grille, and I bought it. I advertised my silver grille, and member tinctorius offered to buy my old one (with my suggestion to paint it black with "Plasti-Dip Spray coating".
So today I swapped grilles and shot a lot of photos. Will put this info. up on the forums over the weekend for the benefit of anyone who wants to know how to install a grille overlay. There are many for sale, from forums sponsor Zeta Products (polished stainless steel) and many eBaymotors.com vendors (no black ones that I have been able to find, but just get aluminum or stainless steel, roughen with sandpaper, and paint gloss or flat black with "Plast-Dip" spray from Ace Hardware or eBay).
YOU NEED A GRILLE OVERLAY. Or, you don't need air conditioning. You choose. More info. later.
The techniques that I will show in this DIY will probably work to install any brand of grille overlay, but keep in mind that they were developed for the one-piece "Mr. Grille" brand that seems not to be available any longer. If you EVER see a "Mr. Grille" overlay being sold for a Honda Fit, buy it. Either put it on your Fit, or double the price and sell it here on the forums or on eBay. It WILL sell. My own member/customer offered to pay $140.00 for my black grille. I am selling him my silver one for $90.00.
Oh yeah, and as part of my front-end refurb,. I have decided that I can't stand the stupid center-mount of the license plate any longer (after removing it to install the new grille). I ordered an aluminum license plate relocator bracket from the same eBaymotors vendor where I got the one I used on my GD Fit (from the Sacramento, CA area) and will put the plate in the lower driver's side of the grille area. Will use the "Door Handle Screw Cover" mod to cover the screw hole in the center of the bumper.
Fit ownership is just like old-house ownership. You never run out of things to make better.
1. Use only the vertical struts of the stock plastic grille as the anchor points for the overlay.
2. Use masking tape to mark the location of the vertical struts, and stick the tape to the upper edge of the bumper and the plastic lip under the grille area, then tear out the tape from the grille area, leaving only the bumper and lip tape as markers.
3. Place the grille overlay into the opening, and use more masking tape to loosely secure it so that it won't fall out.
4. Remove the plastic bridge/cover from the radiator support/hood latch area by removing the black plastic mushroom clips. the clips are of different sizes, so keep them organized so that you replace them in the same holes you took them out of. I have reused the same clips over a dozen times, and they still work fine. I use a small, sharp precision screwdriver to pry the center of the clips up, Then use a 1/4" flat screwdriver to lever up the round base of the clip.
5. Use heavy-duty black zip ties from the electrical dept. of Ace Hardware or other retailers. I used 14" long zip ties ($7.00 for eight zip ties). 11" long ones will also work, but the longer the zip tie, the easier to work with. DO NOT use cheap, Chinese-made zip ties sold in bulk quantities at Home Depot, Costco, or other discount stores. The zip ties sold by Ace Hardware have a breaking strength of 75 pounds each. Who knows the specs. of the imports ? You don't want to do this job twice, or lose your grille on the freeway if the zip ties break.
6. Reach down in the center of the grille area behind the stock grille and poke the sharp end of a zip tie through the stock grille and the overlay. Make sure that the zip tie is coming through between the horizontal bars of the overlay, between the top two bars. Now grab the tie from the front of the overlay, and loop it back to the back side of the overlay and stock grille. Pull the zip tie sideways until you feel resistance that tells you it has gone around one of the small vertical spacers that connect the horizontal bars of the overlay. The zip ties are exactly the right width to fit between the bars of the grille overlay.
7. Feed the pointed end of the zip tie into the locking joint, and pull in the slack but leave the first zip tie a little loose. Repeat the process on each side of the top of the grille overlay, and on the sides and center of the bottom area of the overlay. Pull all six zip ties as tightly as you can, and you will see that the overlay gets pulled into an exact fit against the stock grille with no gaps at the top, bottom or sides of the grille area.
8. The black zip ties are completely invisible between the bars of the Mr. Grille once they are tightened down as far as possible. The same was true with the vastly inferior "Grilles-4-U" grille overlay that I tried on my GD3. This will probably be the case with the stainless steel grilles from Zeta Products, and many of the other grilles from eBaymotors vendors.
Click on images to enlarge


With all of the zip ties pulled as tight as possible, the grille overlay fits perfectly in the grille opening, will never move in any weather, and will never rattle or loosen. It is a permanent installation, but can be removed if necessary by cutting the zip ties from the rear with small, very sharp diagonal wire cutters.
Last edited by Triskelion; Jul 9, 2012 at 03:26 PM.

Thread
Thread Starter
Forum
Replies
Last Post
drkatherine1
3rd Generation (2015+)
6
Mar 21, 2017 10:45 AM