
DIY Underpanel


DIY Underpanel
I just finished my DIY under panel. I had built a real quick and dirty one before using the plastic from a large rubbermaid bin. It was a real pain to remove due to how I had it screwed on and it said "rubbermaid" across it. 
This go around I had saved the door from of my old stainless steel dishwasher that crapped out on me. Not willing to part with a nice sheet of pretty stainless, I knew it would find a home.
I wanted this panel to be very easy to remove, so I designed it with only four fasteners (2 plastic OEM body pins 2 bolts with nuts in stock nut retainers) and a slide in front bracket.
This Mod didn't cost me anything all materials were already present in my garage... and the wife says I save useless stuff
I made a template from some leftover foam underlayment I had from a laminate floor I did in my sons room.
MATERIALS
Foam underlayment 24" x 24"
2 Nuts and Bolts size???
2 OEM body pins large size
SS Dishwasher door panel
2 perforated steel angle 1/2" x 1/2 " x 24"L
4 barrel nuts
Pile O rivets
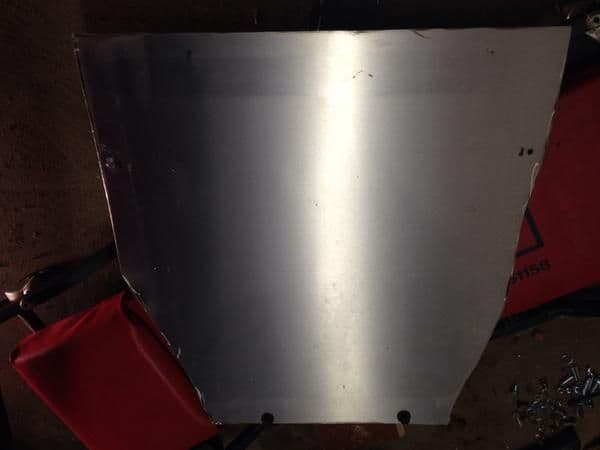
heres the door panel... or here it was.

General shape cutout

More refined shape and from bracket added, riveted.

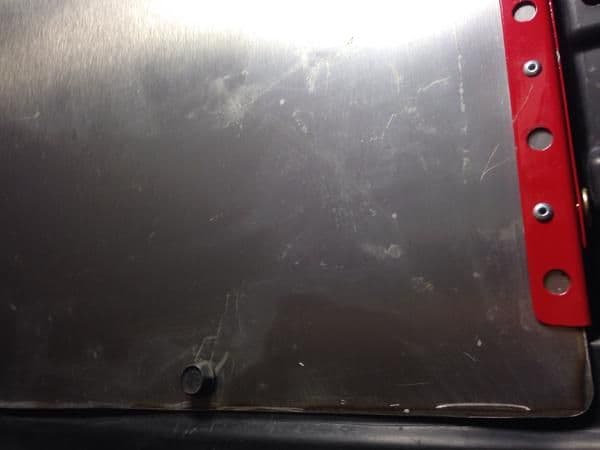
Mounted retaining bracket w/rivets to plastic (notice barrel nuts)

Panel mounted

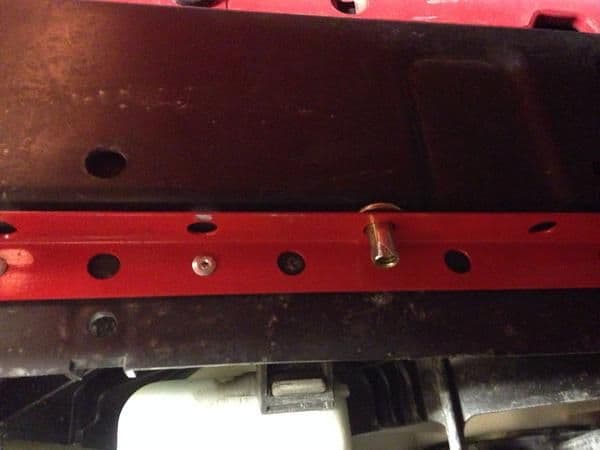
Close up of slide bracket and bolt location
OEM body pins... whatever they're called... also My DIY subframe brace made an appearance.

Well there she is about 4 hours work all together, and my junk pile is smaller!
I know there's about .2 - .5 MPG gain from last panel I had and last sailboat action on the highway. will my DIY front air dam it actually drives like a normal car on highway even with slight crosswinds.
This go around I had saved the door from of my old stainless steel dishwasher that crapped out on me. Not willing to part with a nice sheet of pretty stainless, I knew it would find a home.
I wanted this panel to be very easy to remove, so I designed it with only four fasteners (2 plastic OEM body pins 2 bolts with nuts in stock nut retainers) and a slide in front bracket.
This Mod didn't cost me anything all materials were already present in my garage... and the wife says I save useless stuff
I made a template from some leftover foam underlayment I had from a laminate floor I did in my sons room.
MATERIALS
Foam underlayment 24" x 24"
2 Nuts and Bolts size???
2 OEM body pins large size
SS Dishwasher door panel
2 perforated steel angle 1/2" x 1/2 " x 24"L
4 barrel nuts
Pile O rivets
heres the door panel... or here it was.
General shape cutout
More refined shape and from bracket added, riveted.
Mounted retaining bracket w/rivets to plastic (notice barrel nuts)
Panel mounted
Close up of slide bracket and bolt location
OEM body pins... whatever they're called... also My DIY subframe brace made an appearance.
Well there she is about 4 hours work all together, and my junk pile is smaller!
I know there's about .2 - .5 MPG gain from last panel I had and last sailboat action on the highway. will my DIY front air dam it actually drives like a normal car on highway even with slight crosswinds.

Hah, Yah looks mean but for that Id use the 1/8" plate steel I have laying around. Built similar for my Lifted Ford Ranger (may she rest in pieces).
My best DIY mods so far would be the subframe brace you can see in the last picture And the DIY sport RSB 3/4" spring steel rod welded into rear solid beam like sport model has.
The subframe brace was most noticeable mod right next to the Progress RSB.
The subframe brace really tightens up the front and makes steering at the limit very predicable.
The car is almost neutral now just needs a little more stiffness in rear. Current setup really emphasizes lack of spring rate, but can still get the car to oversteer with some work. I will pick up some progress springs but really want new dampers at same time although not sure if I'll wait.
Member
Joined: Feb 2014
Posts: 850
From: The 603

I saw you're in NH, too- have you thought of an air deflector over the wipers to keep snow from building up on them? I haven't looked too closely, but it looks like a small plexiglass panel on the black molding below the blades could extend the airflow up past where it would catch on the parked blades.
Maybe it'll just fill with snow when you're parked, I don't know. I expect to try one out for next winter.
Maybe it'll just fill with snow when you're parked, I don't know. I expect to try one out for next winter.
Thanks gd3,
I love to reuse things that otherwise end up in the dump or being recycled anyways. This was one of the better ones. It was the perfect size and everything else fell into place with out having to buy anything.
I was concerned about the grade of stainless as it was magnetic and generally when SS is magnetic its of a lower quality. But its seen some rough new england weather now and it shows no rust so I'm good there.
Hi xxryu,
I did ponder this for a while and came up with an idea.
Instead of mount the cowl on the existing plastic cowl I though about removing the stock piece and making all one piece.
I was looking at aluminum for this purpose but at that length and width it would be a bit to pricey for me.
It's still something I'm interested in but, is a lower priority than many of my other mods rattling around in my head.
If I find some suitable material in my travels though it may just get a boost.
Thanks for stopping in will definitely update if I do.
making it part of the cowl itself is gonna be a bitch when it comes to taking the cowl off. the cowl is 4 pieces total, and it will be difficult to put back together if its all in one piece.
Thing is, if I'm going to spend a lot of effort on something like this I don't want to see it mounted on that.
I would at the very least design a piece that covers the stock cowl but, the profile would not match the hood well.
Thinking about it has given me some new ideas but I'll have to take a look at the subject to see if they are viable.
Thanks is for the feedback.
Last edited by slimchriz; Mar 17, 2015 at 02:09 AM. Reason: Typos grrr

Thread
Thread Starter
Forum
Replies
Last Post
phenoyz
2nd Gen GE8 Specific Fit Interior Modifications Sub-Forum
2
Nov 1, 2010 08:51 PM