
DIY 2009 Door Fabric and Speaker Grill Cutouts

Thread Starter
|
Member

Joined: Sep 2008
Posts: 190
From: Texas
DIY 2009 Door Fabric and Speaker Grill Cutouts
Ok so I had some pioneer speakers I want to throw in there. I also wanted to change that gross feeling stock fabric. Cant even stand touching that shit. This requires taking off the door. So knock them out with one stone here.
Things you need to Remove Door
Screwdriver - Philips + Flathead
Things you need to Fix Speaker Mount
Screwdriver
Extra Screws
Dremel that can cut plastic
Things you need to Replace DOOR Fabric
Replacement Fabric of your choice (make sure it has good wear ability)
Dremel with drill attachment and plastic cutting attachment
Epoxy or Hot Glue gun (HOT GLUE GUN is my choice) I tried epoxy too.
3M Spray glue 77 and 90
Sandpaper

Starting (Speaker) - Removing Door 1st paragraph
Unscrew the screw in the door handle (place somewhere you wont loose it). Use your flathead scewdriver and look under the elbow rests. You will see 4 places for a flathead, bend them back so the armrest has flex and will come off. Once off there will be a screw and the cord for the windows and locks you will have to unscrew and take out the cord.

Once you have the door off The speaker has 1 screw. Unscrew this screw. Make sure to take it all the way out, otherwise you might snap a bottom flange like I did. Once the screw is out. jiggle the speakers foam loose, and pull up. Since there are two holders on the bottom of it that rest it in the door.

Once you have the speaker out. Just knock the little things on the back off with your hand. Cut the speaker and the magnet out. Then we are going to need to dremel. I tried mounting without dremeling and you will run the speaker into the door when putting it back on. Cut the wires as close as you can to the speaker, so you have length to mount the stock connector to the new speaker. Dremmeling is essential here.
Look at the picture above. The rim my thumb is on needs to be dremeled flat. Do not cut the hole for the screw however. I skipped the part where it lead to the hold, and it works fine for me. Then you will need to line up the speaker, and potentially dremel a little bit of the stock connector off to fit the magnet in.

Next I saudered the wire to the speaker, so i could use the stock connectors. One secure, drill the speaker in the holder and mount into the door. Easy huh. Sounds so much better too and you have a stock connection.
Starting the Fabric
Once you have the door off, remove the two foam pieces on top the fabic piece we are going to remove. Take the white towel thing off the door

You need to screw out these holes. There filled with a plastic compound. Just take the top off till you see a black round hole. Then your good.
Once you have the fabric piece off you will need to remove the window sill mount. There are prongs on the underside you can bend and remove it. Next Rip off the carpet and if necessary sand it down.
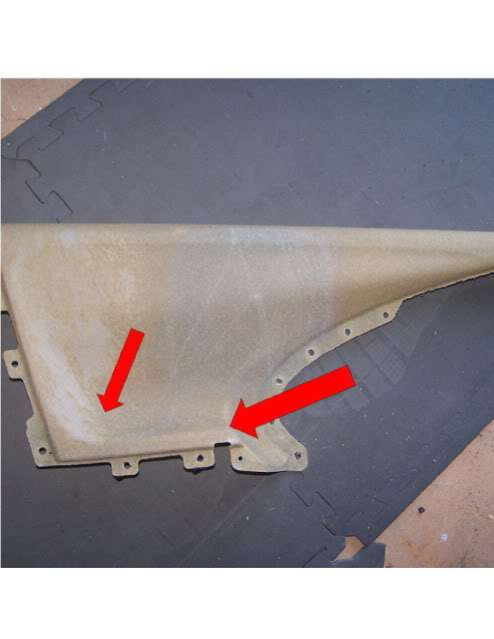
This is the hardest part here. If you follow any insructions please follow this. I tried vinyl. It did not work however. Please look at my photo. It took me about 5-6 hours of stretching to get the picture with the blue. It will not bend around that second corner. It just cant do it. It gets worse in hot conditions. So if you do it and it looks good. Wait for a hot day and it will flex where it wants.
So for my purpose, I went and bought a Silver / Greyish seude. Go to the store ( I went with my ripped off piece and searched for something that streched like the stock piece did.
Now when you are applying the fabric FIRST SPRAY THE DOOR PIECE WITH 90. MAKE SURE ITS EVEN AND NOT BUMPY!!!! Then you are going to spray the fabric underside with the 77. This creates a nice stick to each other process. Then wait about a minute and start working the fabric on. I went top to bottom and saved that crappy corner on the bottom for last.
If you run out of stick repeat spraying process again for piece not working.
Then cut to precise, make sure holes are visible. Put the window piece back on. And start hot gluing the holes over, screw the piece down and put the door back on. Wala you have a color you like!!!


Things you need to Remove Door
Screwdriver - Philips + Flathead
Things you need to Fix Speaker Mount
Screwdriver
Extra Screws
Dremel that can cut plastic
Things you need to Replace DOOR Fabric
Replacement Fabric of your choice (make sure it has good wear ability)
Dremel with drill attachment and plastic cutting attachment
Epoxy or Hot Glue gun (HOT GLUE GUN is my choice) I tried epoxy too.
3M Spray glue 77 and 90
Sandpaper
Starting (Speaker) - Removing Door 1st paragraph
Unscrew the screw in the door handle (place somewhere you wont loose it). Use your flathead scewdriver and look under the elbow rests. You will see 4 places for a flathead, bend them back so the armrest has flex and will come off. Once off there will be a screw and the cord for the windows and locks you will have to unscrew and take out the cord.
Once you have the door off The speaker has 1 screw. Unscrew this screw. Make sure to take it all the way out, otherwise you might snap a bottom flange like I did. Once the screw is out. jiggle the speakers foam loose, and pull up. Since there are two holders on the bottom of it that rest it in the door.
Once you have the speaker out. Just knock the little things on the back off with your hand. Cut the speaker and the magnet out. Then we are going to need to dremel. I tried mounting without dremeling and you will run the speaker into the door when putting it back on. Cut the wires as close as you can to the speaker, so you have length to mount the stock connector to the new speaker. Dremmeling is essential here.
Look at the picture above. The rim my thumb is on needs to be dremeled flat. Do not cut the hole for the screw however. I skipped the part where it lead to the hold, and it works fine for me. Then you will need to line up the speaker, and potentially dremel a little bit of the stock connector off to fit the magnet in.
Next I saudered the wire to the speaker, so i could use the stock connectors. One secure, drill the speaker in the holder and mount into the door. Easy huh. Sounds so much better too and you have a stock connection.
Starting the Fabric
Once you have the door off, remove the two foam pieces on top the fabic piece we are going to remove. Take the white towel thing off the door
You need to screw out these holes. There filled with a plastic compound. Just take the top off till you see a black round hole. Then your good.
Once you have the fabric piece off you will need to remove the window sill mount. There are prongs on the underside you can bend and remove it. Next Rip off the carpet and if necessary sand it down.
This is the hardest part here. If you follow any insructions please follow this. I tried vinyl. It did not work however. Please look at my photo. It took me about 5-6 hours of stretching to get the picture with the blue. It will not bend around that second corner. It just cant do it. It gets worse in hot conditions. So if you do it and it looks good. Wait for a hot day and it will flex where it wants.
So for my purpose, I went and bought a Silver / Greyish seude. Go to the store ( I went with my ripped off piece and searched for something that streched like the stock piece did.
Now when you are applying the fabric FIRST SPRAY THE DOOR PIECE WITH 90. MAKE SURE ITS EVEN AND NOT BUMPY!!!! Then you are going to spray the fabric underside with the 77. This creates a nice stick to each other process. Then wait about a minute and start working the fabric on. I went top to bottom and saved that crappy corner on the bottom for last.
If you run out of stick repeat spraying process again for piece not working.
Then cut to precise, make sure holes are visible. Put the window piece back on. And start hot gluing the holes over, screw the piece down and put the door back on. Wala you have a color you like!!!
Last edited by mdbrich; Sep 17, 2008 at 09:17 PM.

niice writeup man. This reminds me of the door inserts i did on my EG hatch. Those things were a BITCH to get on cuz the center was shaped as a bowl and it was hard as hell to conform it on.
Anyways, the inserts look real good. Hope u get the seats re-wrapped to match.
Anyways, the inserts look real good. Hope u get the seats re-wrapped to match.


Do not use heavy vinyl as mention above. It just does not conform to the two curves.
I will go back to fabric store and take panel with me and get some advice. I did not tear the original up so I could always put it back on and if that does not work get a new panel. I will update in a couple of days.
I will go back to fabric store and take panel with me and get some advice. I did not tear the original up so I could always put it back on and if that does not work get a new panel. I will update in a couple of days.
Well that was a Mod best not tried. I bought some thinner material and the same thing. It does not want to stay down in the hollow without wrinkles or go around that hump. I manage to get the old material back on with one small bubble. Shit.

Thread
Thread Starter
Forum
Replies
Last Post