When you click on links to various merchants on this site and make a purchase, this can result in this site earning a commission. Affiliate programs and affiliations include, but are not limited to, the eBay Partner Network.
Made a clear 3rd brake light a couple weeks ago. I had to make a little tab on the bottom to help secure it. i might make another one with tabs similar to the OE one so it looks a bit cleaner. the OE LEDs are RED in case anyone is wondering. before opening it i wasnt sure if they might be white.
Last few mornings my car barely cranked over so i got a new battery from walmart. i thought of the 51R upgrade...but didnt want the hack looking connector.even more so, i also didnt want to trim the OE airbox nor have the oversized battery jammed up on the airbox if i decide to put it back in. the walmart battery had something like 335 cold crank amps listed online..but sticker on battery says 370cca. im sure it makes no difference, but it was nice that it had more than advertised, vs less like most things. was $120 +$12 core charge. lots of other things id rather buy than a battery, but its nice having the car start when i need it to.
Last edited by eulogy; 11-01-2019 at 05:51 PM.
Reason: remove underline oops
I hear ya on the battery - it works well enough for my purposes (daily, never parked for long with the key in "accessory," etc). And I usually do a battery change soon after the warranty and pro-rated time expire. There never seems to be a convenient time for the battery to die.
so if anyone is interested, i made 2 shirts...one for me, and one for one of you. i am going to rework the design and make a few and post them eventually. recently i got sidetracked with fulfilling local sales of my other 2 designs, which was an accident..lol. i plan to migrate this new shirt "hobby" to online only.
Last edited by eulogy; 01-03-2020 at 08:16 PM.
Reason: link
I hear ya on the battery - it works well enough for my purposes (daily, never parked for long with the key in "accessory," etc). And I usually do a battery change soon after the warranty and pro-rated time expire. There never seems to be a convenient time for the battery to die.
yea...having more juice would be nice...but i just want to be able to drop parts back in and not have to think about it. new battery has been crankin like a champ all week (as it should).
Originally Posted by Fourunnerguy
Love the third brake light!! I would be interested in a DIY if possible.
not much to it...just picked up some fluorescent light sheet at Lowes and cut it with a soldering iron to shape and sanded it down, test fit, repeat. best to try to make tabs like the original lens to secure it, as the type of plastic the light housing is made of will fight 99% of glues known to man.
not much to it...just picked up some fluorescent light sheet at Lowes and cut it with a soldering iron to shape and sanded it down, test fit, repeat. best to try to make tabs like the original lens to secure it, as the type of plastic the light housing is made of will fight 99% of glues known to man.
Thanks man! I'm debating finding some RS tails so if I go through with it, I may end up having to do this to make it all match.
Went to Walmart for wiper fluid...got some...and left with something extra I 100% did not need. one of my favorite cars ever. complete with deep watanabes. wow, guess Ill never grow up.
I guess ive been going a bit too hard on my wipers since refilling the washer fluid with de-icer. they were a bit dry, and 1 finally ripped. guess ill stop being lazy and scrape the thick ice off from now on.
anyways replaced the fronts only with Oem refills to retain original wiper arms. $8.50 each at local dealer. heres pic w part numbers for anyone interested ..but mostly posting for my own future reference.
P/N
LT FT 76622-TK6-A01
RT FT 76632-SMA-004
REAR 76632-S2K-004
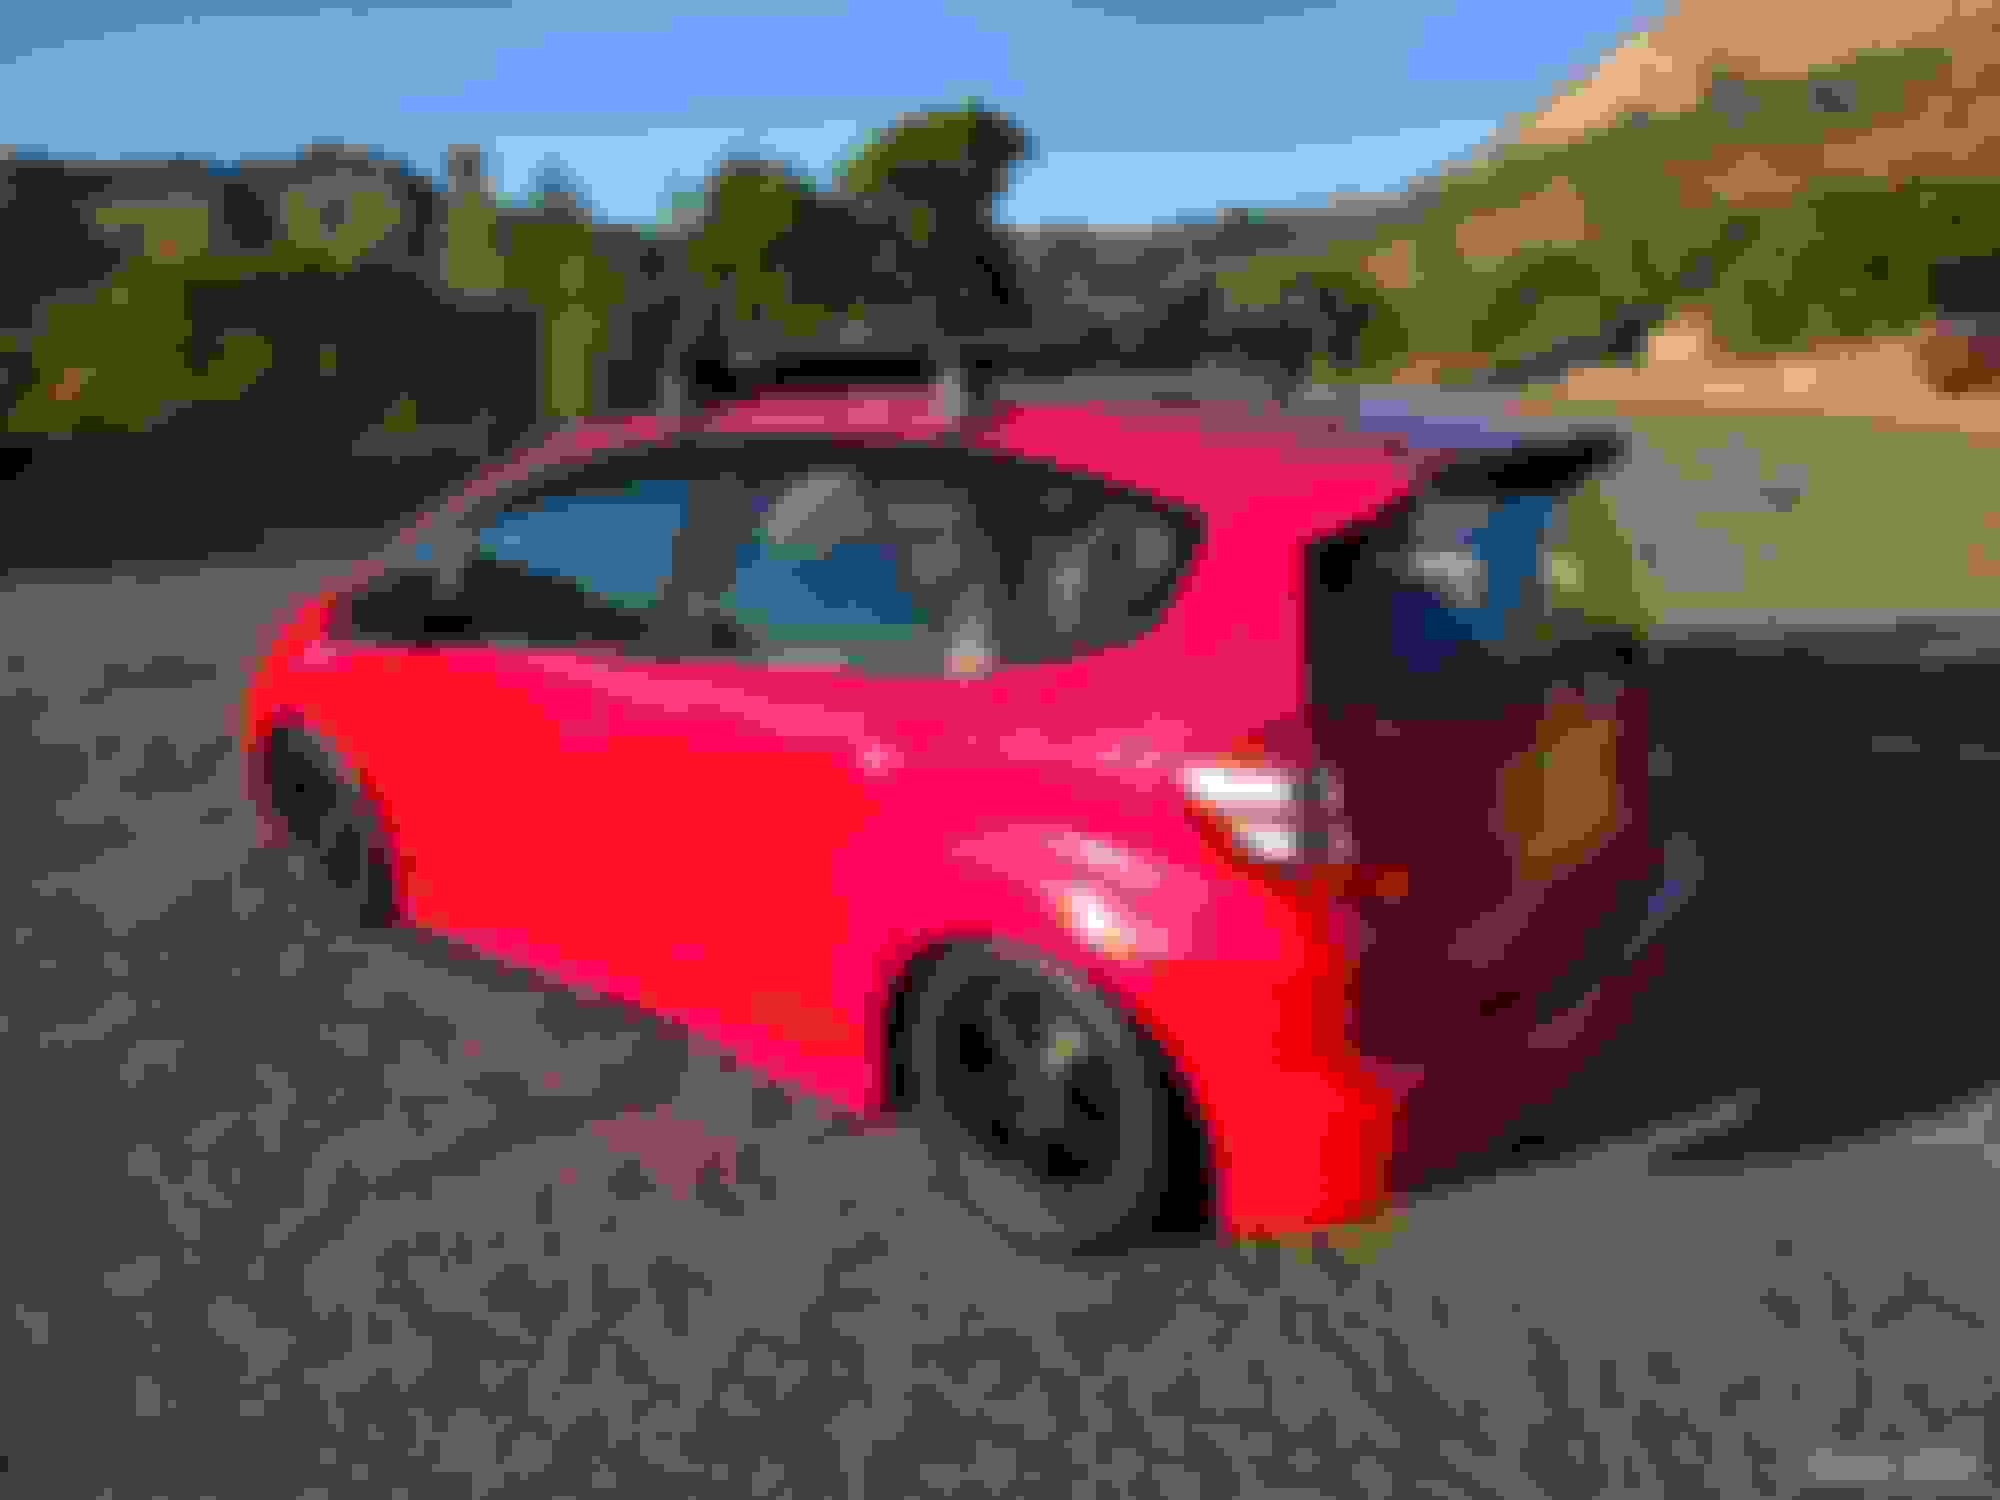
Had my yakima rack sitting on my patio for a couple of years. Finally got it cleaned up and installed thanks to marmaladedad offering his yakima clips!! Awesome dude.
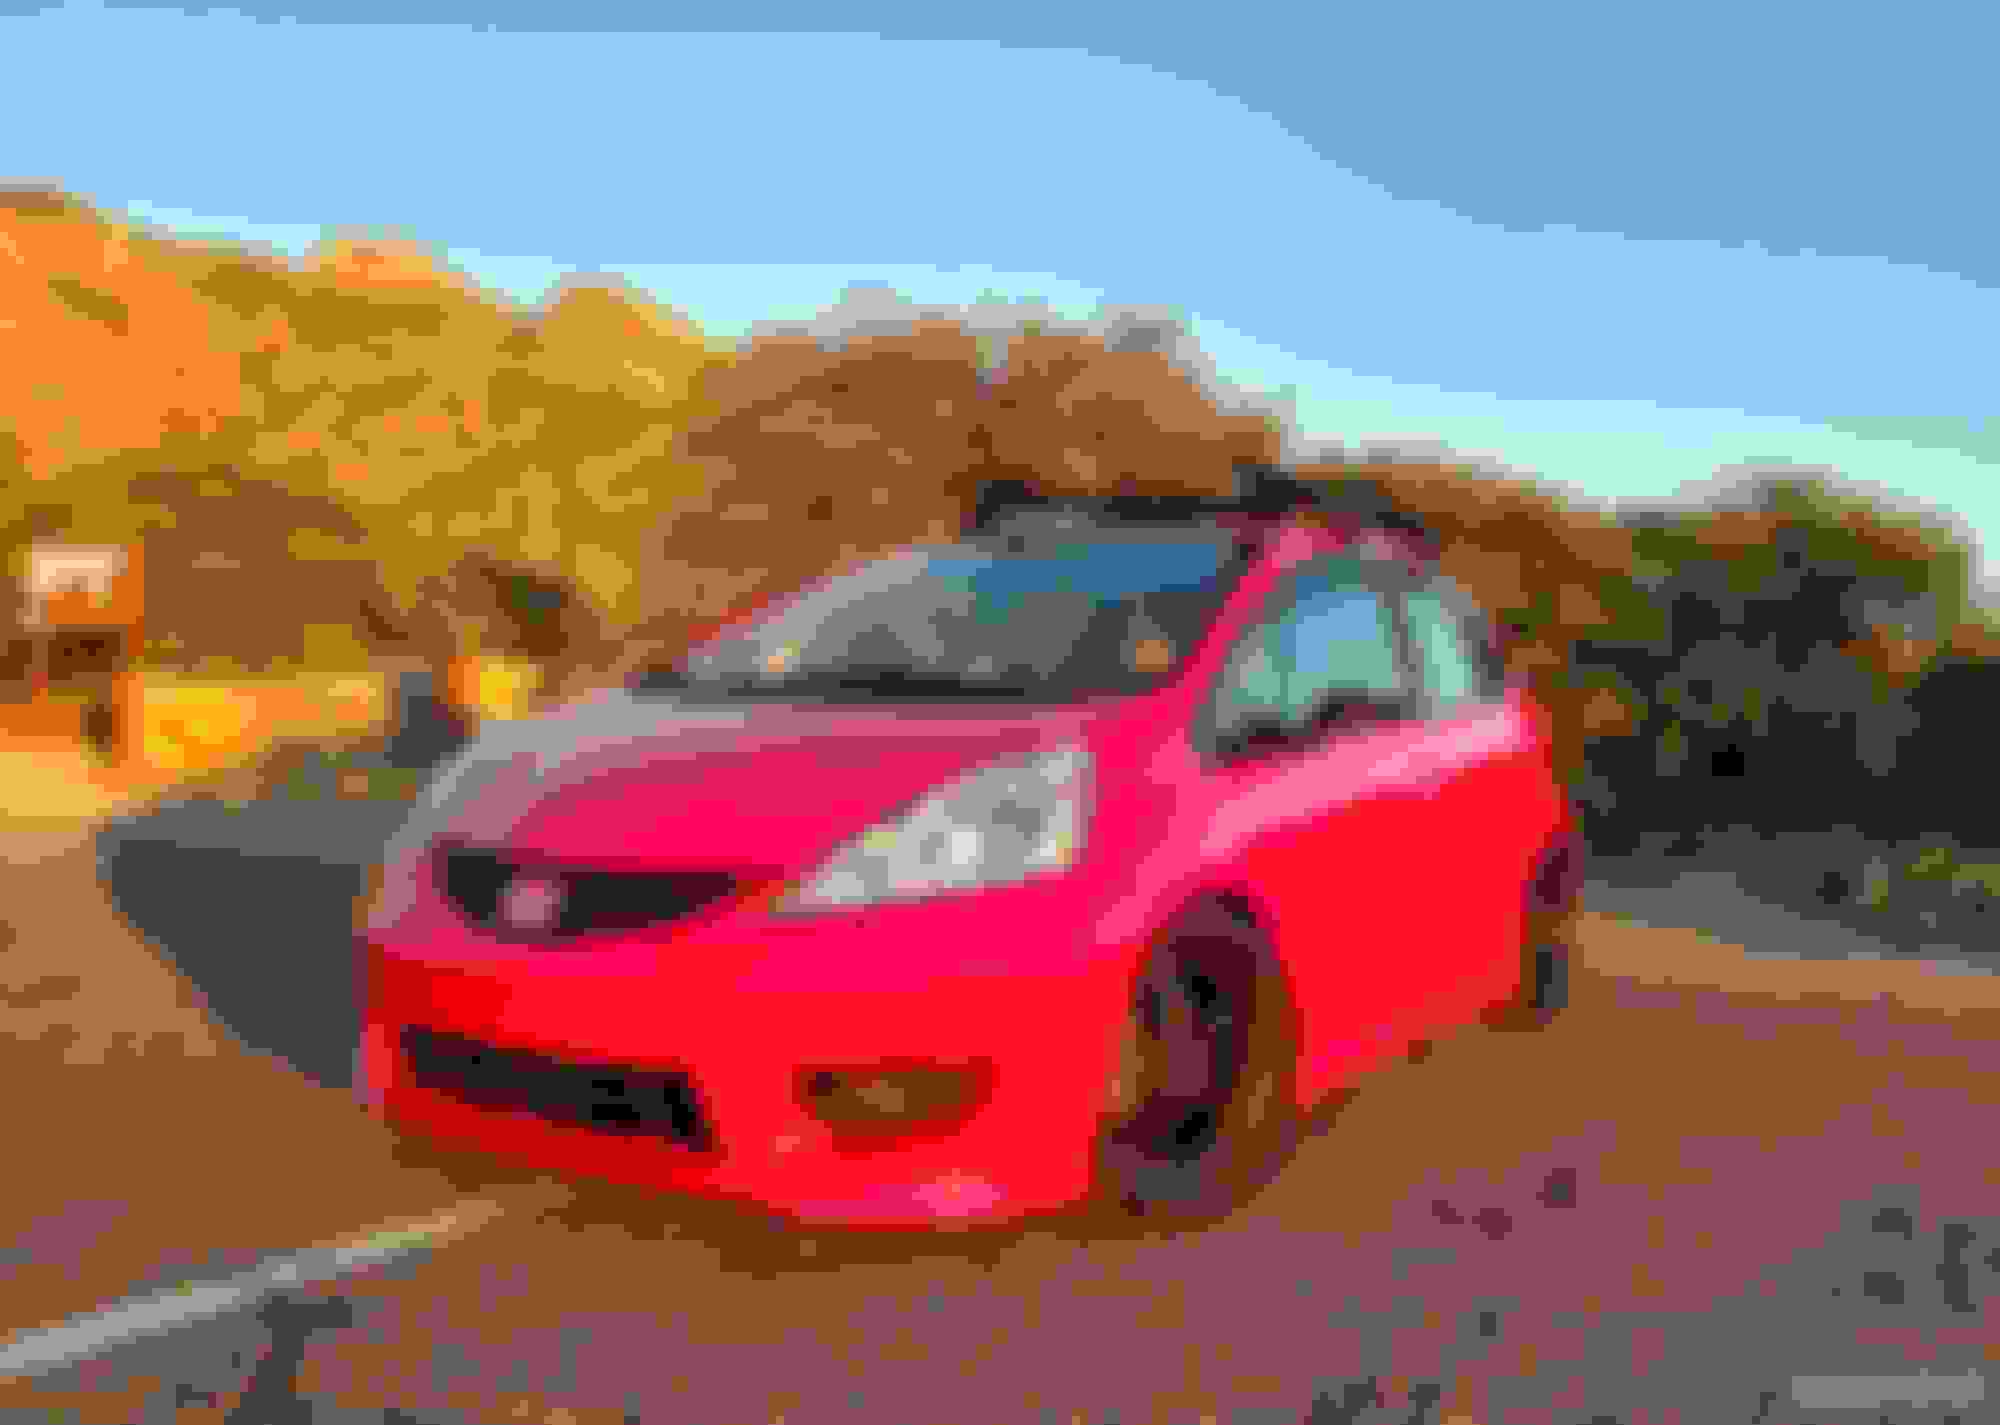
Next I need to replaced my cracked windshield, broken foglights, and restore my headlights and do an oil change.
The headlights were going to take too much work to restore with lots of scratches and haze. Just went for the ebay replacements instead. So much better in every way.
Used screw on each horizontal axis, one from OE foglight, other from new civic foglight kit. Unable to use "3rd screw" on back, utilizing original bracket because the new foglights are a bit smaller. Doesnt look like it will be an issue, its a snug fit. If i decide it bothers me or losens up ill just get a long bolt paired with a spacer of some sort that passes thru the bracket and reaches the new fog kight screw hole. Also There is about a 5mm gap between fog light and front trim, and no diffuser around the bulb like original. Overall very satisfied especially for the price!🥳
Was tough times for me financially...so the Fit got neglected for awhile. It needed lots of TLC.
Fortunate to have changed my circumstances in general, much less now with all the nonsense. I wish everyone well.
- New Windshield (old one had 2 foot long crack)
- New Headlights (old were hazed to hell)
- Meguires Headlight Sealant (recommended by scotty)
- New Foglights (both were broken)
- New Front Red "H" (rep) (old one was 2.5 years old. pitted and turning gold)
- New Rota Slipstreams 15x6.5 (because race car)
- New Bridgestone Potenza RE71R 205/50/15 (old tires worn)
- 81260 Front SPC Camber Bolts (installed 1 set on upper bolts as recommended) (SPC - 97ft/lb, Original lowers - 66ft/lbs) - VHT Satin Black Caliper Paint (calipers, rotor hats, rear drums) - Gorilla Black Wheel Nut - 12x1.5 (80ft/lbs) --pending-- - Alignment
- Moog Outer Tie Rods (passenger side # moog-es800591) (driver side # moog-es800592 )
Had very minor tire rubbing on fender liner in the 12 oclock position on fronts. combined with not liking the look or handling of the "positive camber" the GE inherits when lowering, i decided to finally got some SPC front camber bolts. definitely not wanting to roll my inner fenders, as i think it looks like garbage even if done "correctly", and also do not want to compromise the paint. I was going to get camber bolts when i installed the coilovers a couple years ago. im assuming i didnt get them at the time because i was thinking about the cost of the alignment i would need after. forward to today, I was hoping they would give me the clearance i needed, and they seem to be perfect. they give roughly 10mm additional tire/fender clearance in the max negative camber position. i crudely used a metal ruler pressed against the fender, extended downward towards the tire, and it would make contact on the sidewall. with the SPC bolts installed and maxed out, the ruler clears, with 10ish mm to spare. the sidewall looks like it will now completely clear the inner fender edge. i did however also acquire some toe-in. Obviously an alignment is in order. before the alignment I will probably install some new spare Moog tie rod ends ive had sitting around for a couple of years just to have fresh parts in there. No rubbing, better looks, better handling. yay.
Gave the brakes a quick spray with brake cleaner, then another quick spray with VHT satin black caliper paint. wasnt trying to win any awards or go for super durable, just get rid of the burnt brown caliper look. very forgiving and fast drying paint, as any satin or matte should be. ended it off with some black Gorilla closed end wheel nuts.
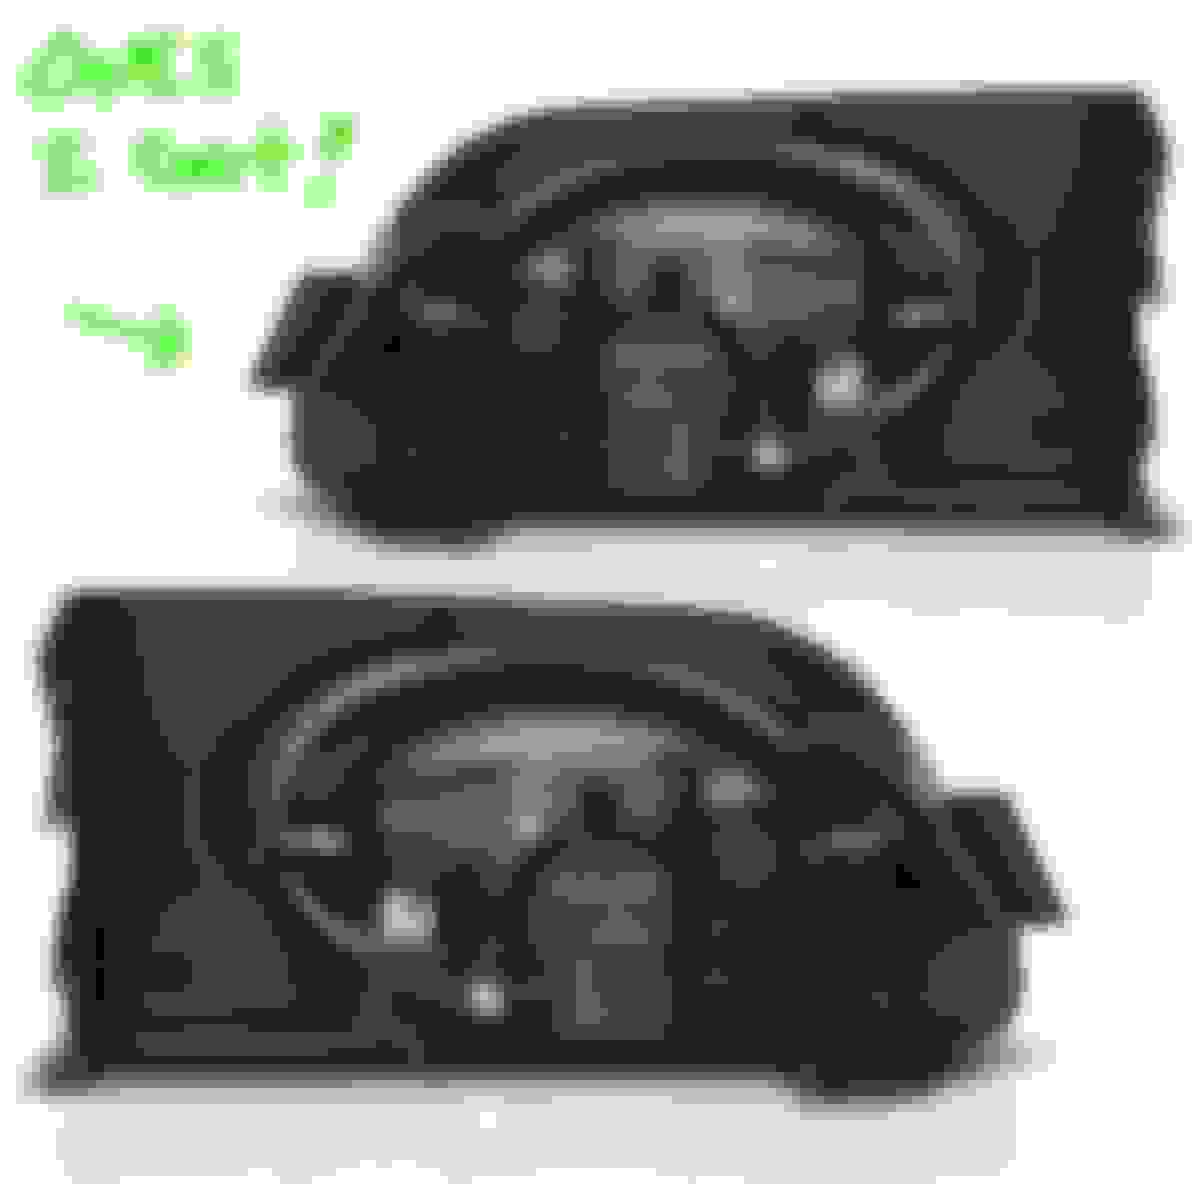
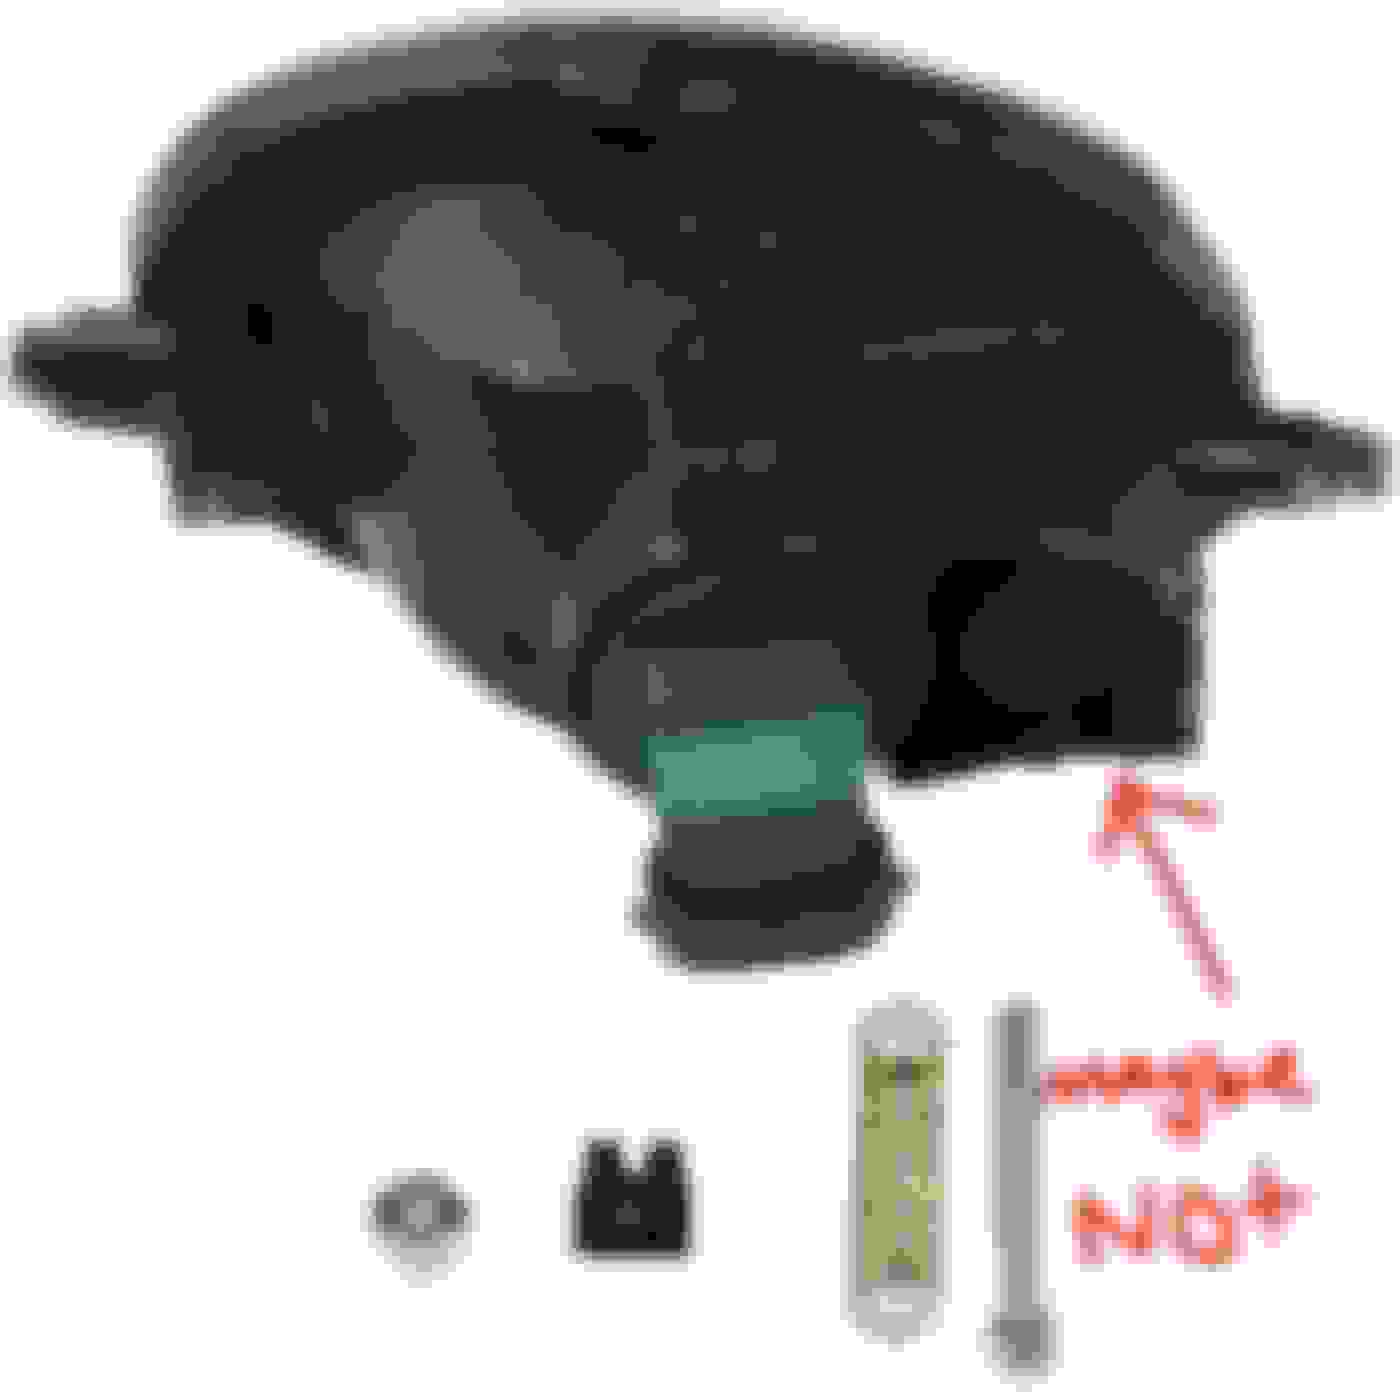
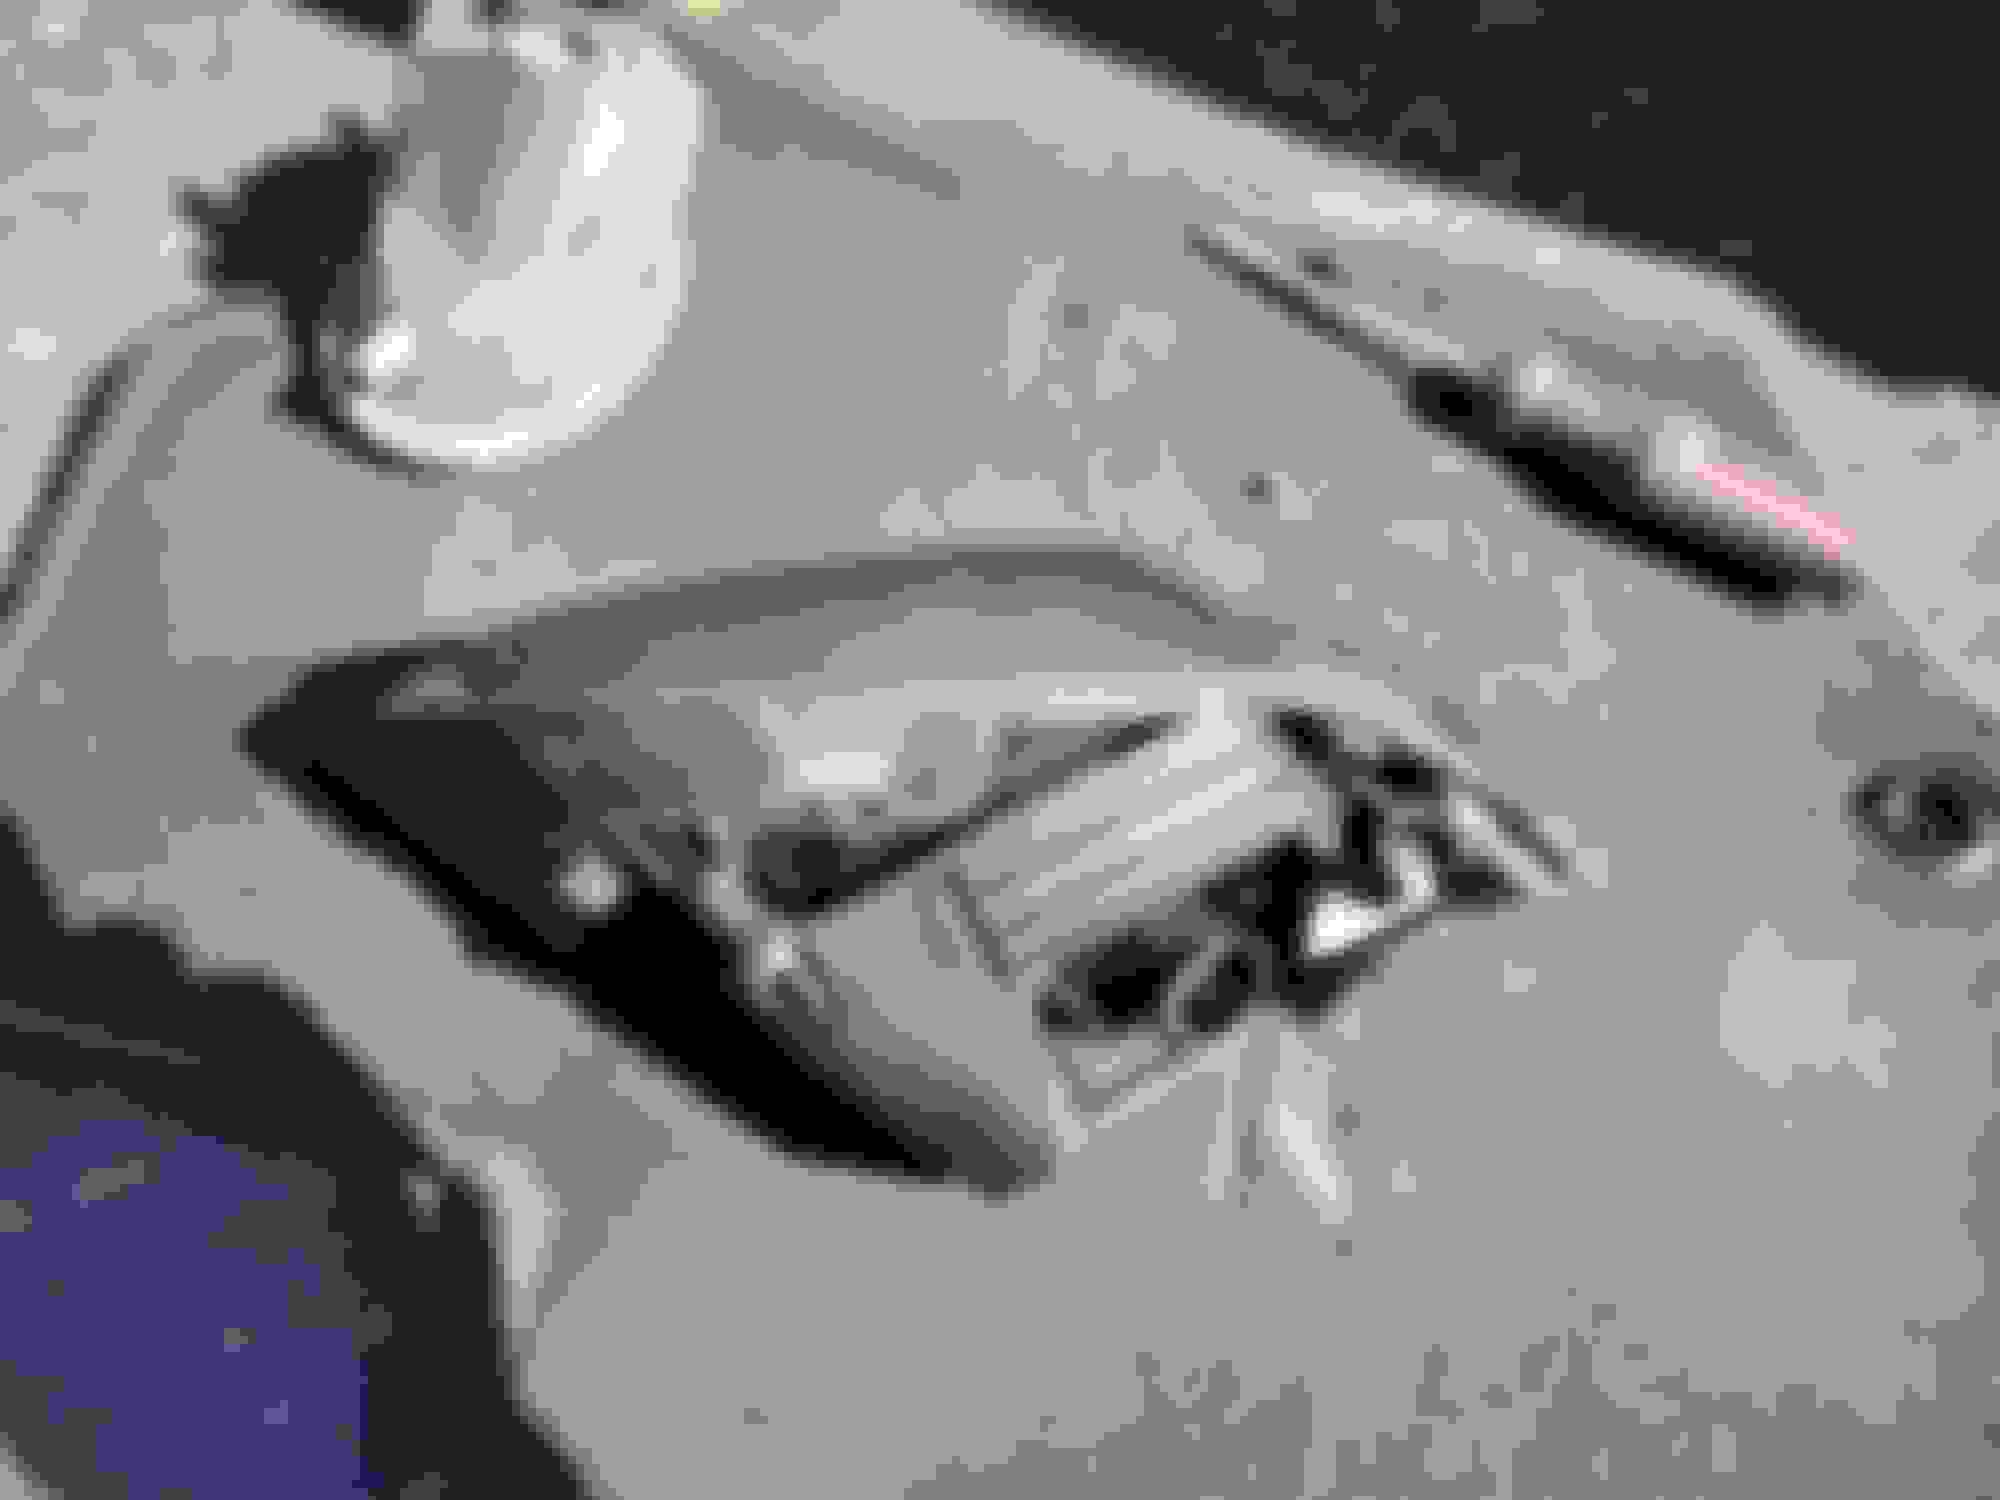
I know clear stuff looks better on lighter cars...but couldnt help myself and wanted to try out something different and a bit more rare on the rear of the car. I tried making my own clear 3rd brake light about a year ago with a fluorescent lighting panel and its been ok. came across an official one online for a decent price and went for it. The American OE one has 5 or 6 LEDs, the GP1 has about 10-12 (didnt bother counting exact). way brighter and cooler looking when applying the brake. The GP1 is on top (with part number still attached for your convenience), the homemade one is on the bottom. The homemade lens is held in with friction and that little piece of square plastic on the bottom center. was expecting the lens to shift or fall out, but never did.
As for the taillights, I personally like the GE6/GE7 taillight that I had on last the best...but I was feeling nostalgic with the clears, being a was a teen in the 90's when this whole Honda thing took off. I remember cops would pull cars over for having them. weird to see them become an OE taillight on so many cars from the factory for a while, even domestics in the 2000's. Future plans are to find a 2010+ RS rear bumper.
Last edited by eulogy; 11-21-2020 at 12:56 PM.
Reason: updated info


 11-01-2019, 05:47 PM