
Adding SiriusXM: GSR-HD01 Install


Thread Starter
|
New Member
Joined: Mar 2019
Posts: 10
From: Livermore, CA
Adding SiriusXM: GSR-HD01 Install
I recently purchased a 2018 Fit Sport and would like to add SiriusXM to the factory radio. I have purchased a VAIS Technology GSR-HD01 and a SXV300 Tuner. From what I gather, the GSR-HD01 takes the signal from the tuner and makes the factory radio think that it's an iPod. The tuner plugs into the GSR-HD01, which is in-turn plugged into the USB port on the radio.
Ideally, I would like to keep the USB port under the radio available for connecting to my phone (Android Auto or Car Play) and use the USB port in the center console for connecting the GSR-HD01. Doing some testing with an iPod, it appears that it should work (I was able to listen to music off the iPod while using navigation via Android Auto)... so far, so good!
Next step is to get GSR-HD01/Tuner plugged-in and see if everything works the same as it did with the iPod. Looking in the GSR-HD01 manual, I need a constant power source as well as a chassis ground... this is where my question comes-up:
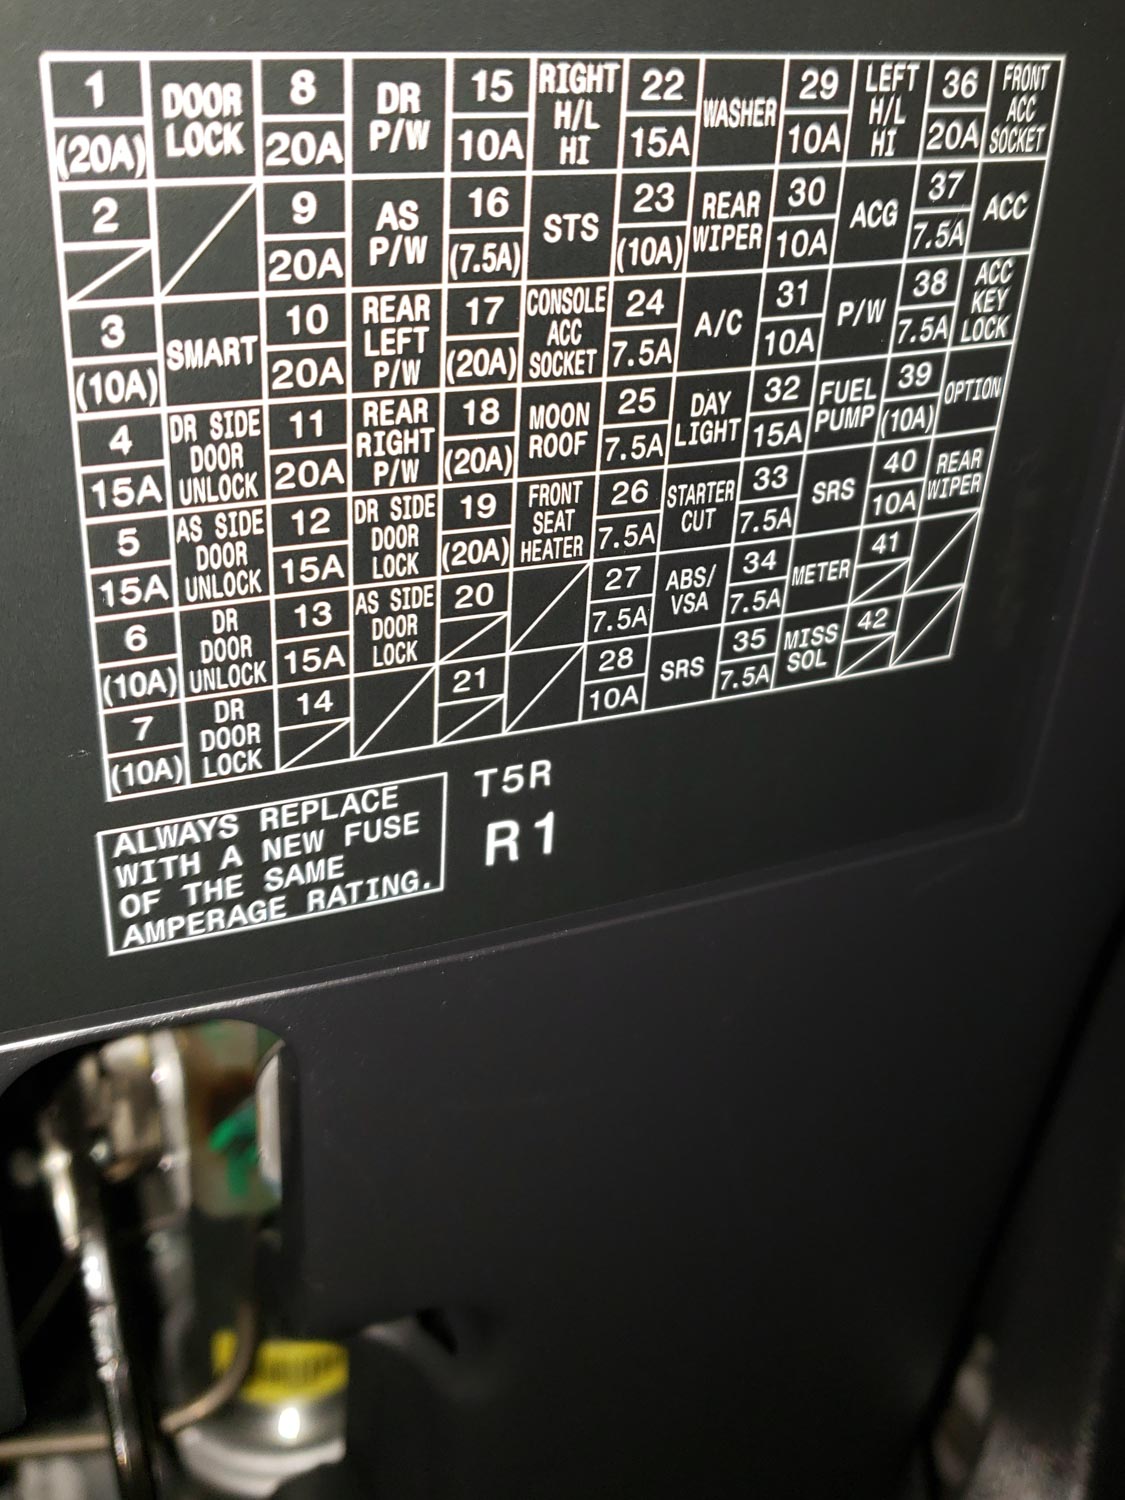
Is there a convenient place near the radio to constant power and a chassis ground? (Edit: Yes, Fuse box A, slot #2 is constant 12V... for chassis ground run a ring terminal to one of the many holes in a metal bracket and secure with nut/bolt)
I've not yet cracked into the dash to see what's available behind there, but I'm sure there has to be something (a fuse panel maybe? firewall port to run wires to a fuse panel under the hood? Existing wires to tap into?). Worst case I can breakout my multimeter and start probing around, but I prefer not to reinvent the wheel when it's not needed. Doing some searching I found some stuff for older models... this post is very helpful (I think it's a 2015?)... is the fuse panel the same on all 3rd Gen (my 2018 is a 3rd Gen, right? - sorry, I'm new to the world of Fits).
Can any of the experts care to provide some info on a 2018 Fit?
I'll be getting into the install on Sunday, so will take some notes/photos along the way. It's fun to have a car to tweak on again!
Ideally, I would like to keep the USB port under the radio available for connecting to my phone (Android Auto or Car Play) and use the USB port in the center console for connecting the GSR-HD01. Doing some testing with an iPod, it appears that it should work (I was able to listen to music off the iPod while using navigation via Android Auto)... so far, so good!
Next step is to get GSR-HD01/Tuner plugged-in and see if everything works the same as it did with the iPod. Looking in the GSR-HD01 manual, I need a constant power source as well as a chassis ground... this is where my question comes-up:
Is there a convenient place near the radio to constant power and a chassis ground? (Edit: Yes, Fuse box A, slot #2 is constant 12V... for chassis ground run a ring terminal to one of the many holes in a metal bracket and secure with nut/bolt)
I've not yet cracked into the dash to see what's available behind there, but I'm sure there has to be something (a fuse panel maybe? firewall port to run wires to a fuse panel under the hood? Existing wires to tap into?). Worst case I can breakout my multimeter and start probing around, but I prefer not to reinvent the wheel when it's not needed. Doing some searching I found some stuff for older models... this post is very helpful (I think it's a 2015?)... is the fuse panel the same on all 3rd Gen (my 2018 is a 3rd Gen, right? - sorry, I'm new to the world of Fits).
Can any of the experts care to provide some info on a 2018 Fit?
I'll be getting into the install on Sunday, so will take some notes/photos along the way. It's fun to have a car to tweak on again!
Last edited by TCorzett; Mar 31, 2019 at 05:41 PM.
Thread Starter
|
New Member
Joined: Mar 2019
Posts: 10
From: Livermore, CA
I started poking around into things last night and it turns out that the 2018 is very similar (maybe even identical?) to the photos posted by simonx314. I used a fuse tap into slot #2, just like him, for a constant 12V source... and found a hole in one of the metal brackets for a chassis ground. I was able to get everything connected electrically and get the SiriusXM up and running successfully without any issues. The VAIS interface on the radio (via iPod, channels listed under artists) isn't the most intuitive... and switching between presets isn't as simple as pushing buttons on the radio (since there are no physical buttons to push on the head unit)... but it works well enough (and is much better than having to change FM radio stations three times each direction on my commute due to poor reception). Today I'll be trying to get the wires/boxes concealed and more "professional" looking and will get some pictures posted.
Thread Starter
|
New Member
Joined: Mar 2019
Posts: 10
From: Livermore, CA
Major components needed VAIS Technology GSR-HD01 and a SXV300 Tuner:
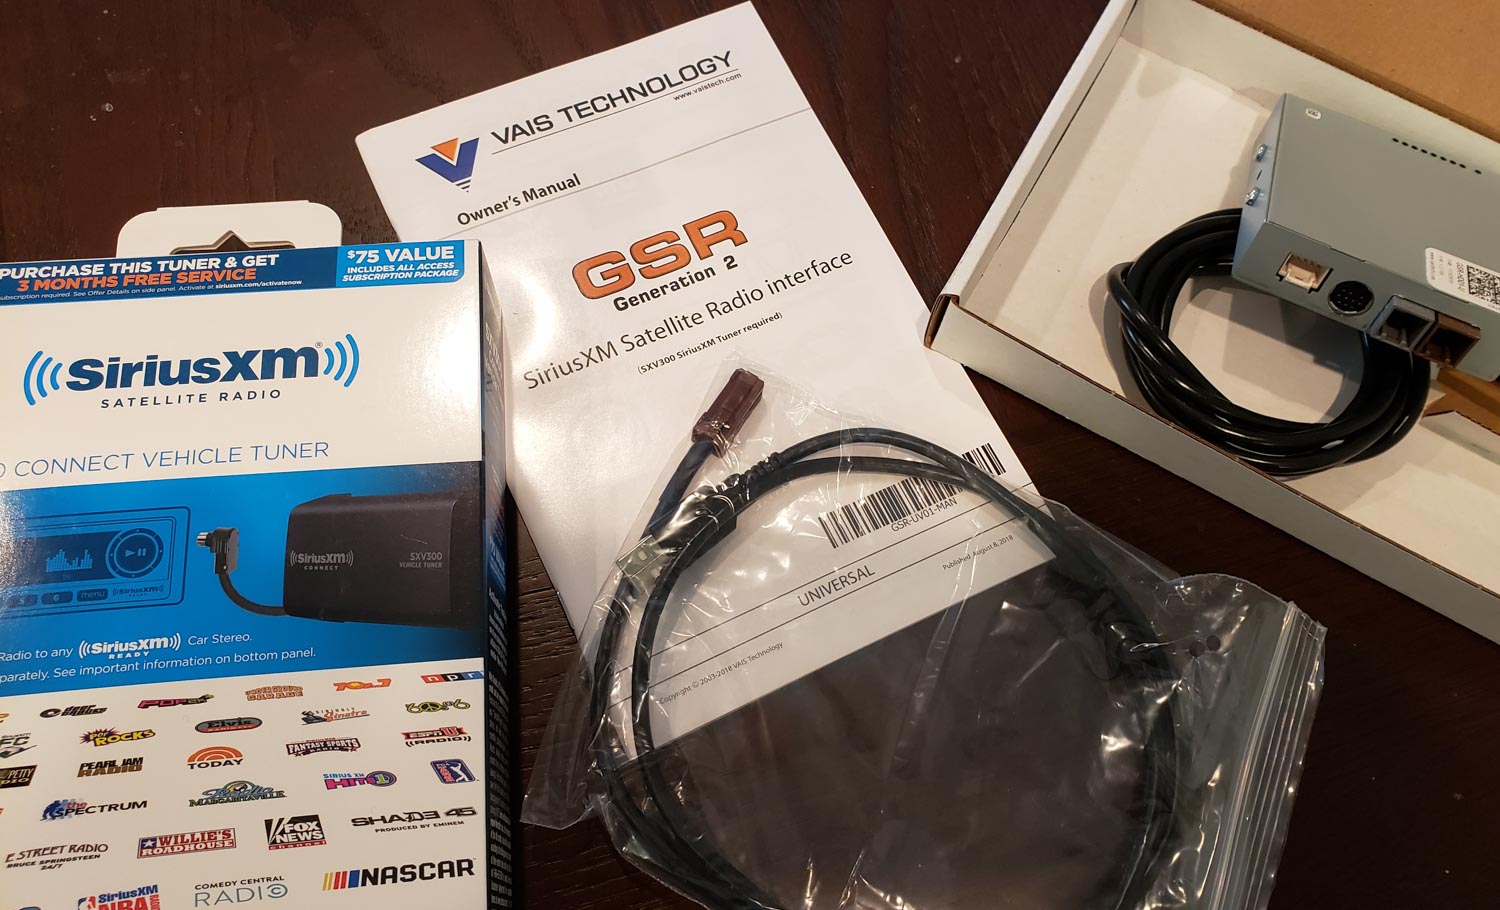
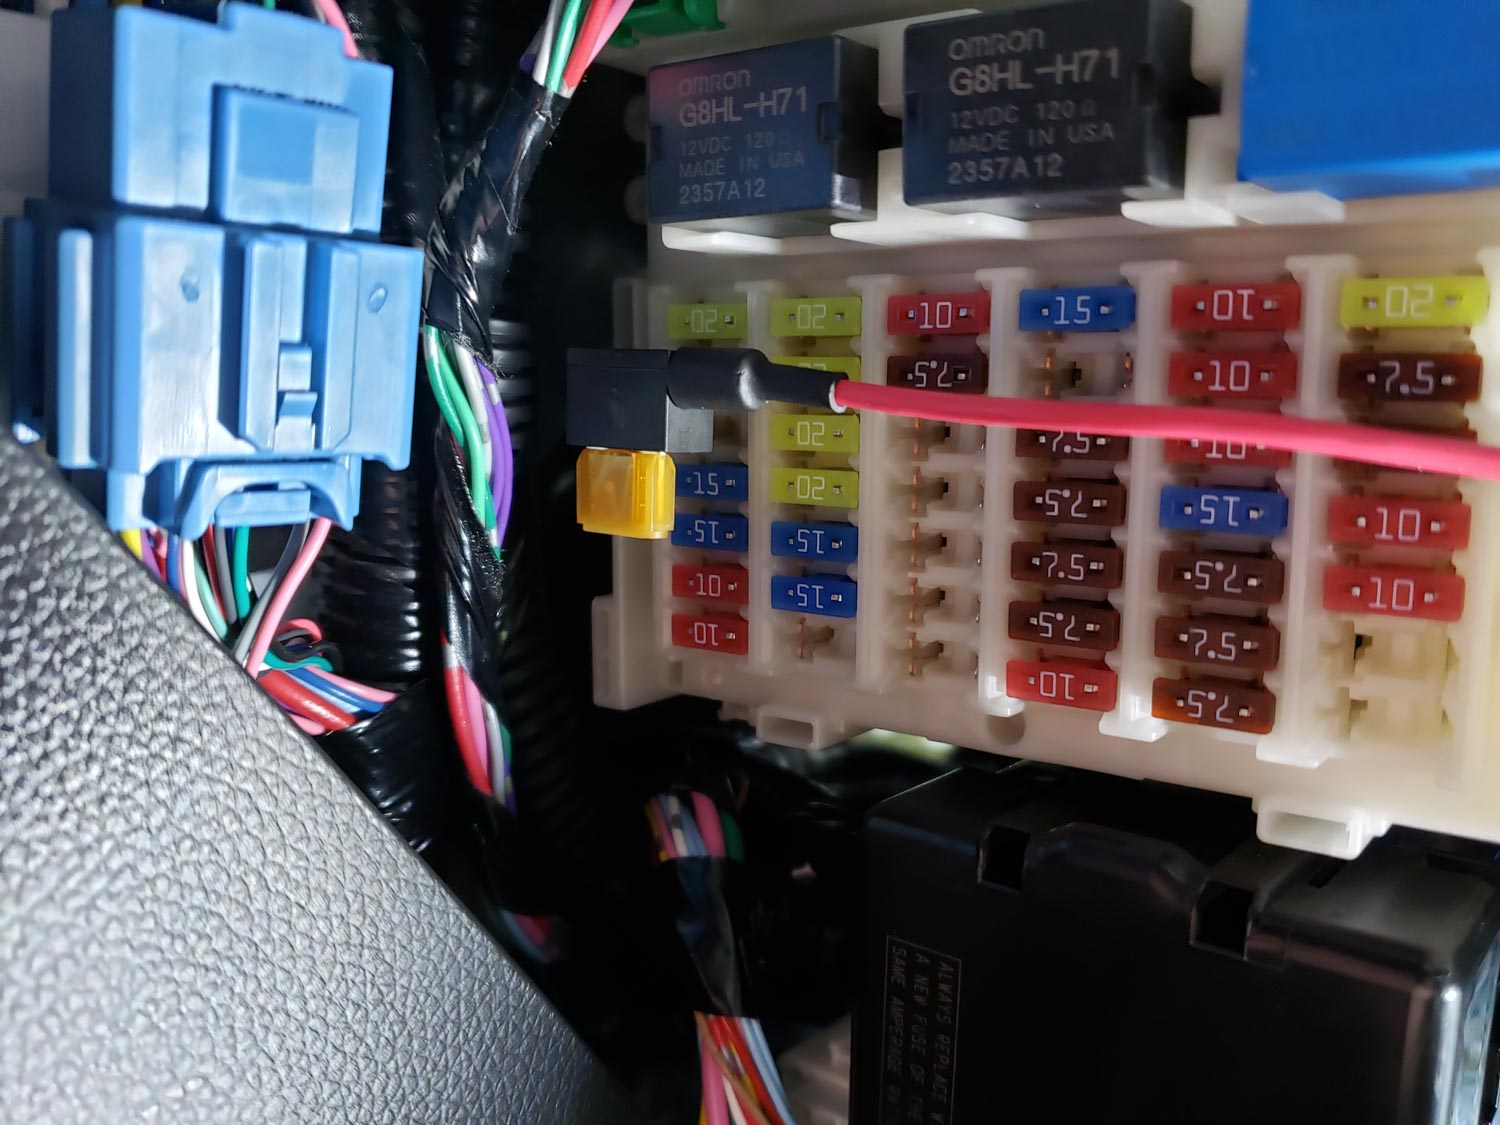
ATM Fuse Tap (could have used a ATM-LP but went with the one I did in case I needed clearance for the fuses for the new circuit above the rest of the panel) soldered to the power wires for the GSR-HD01 and a ring terminal soldered to the ground wires:

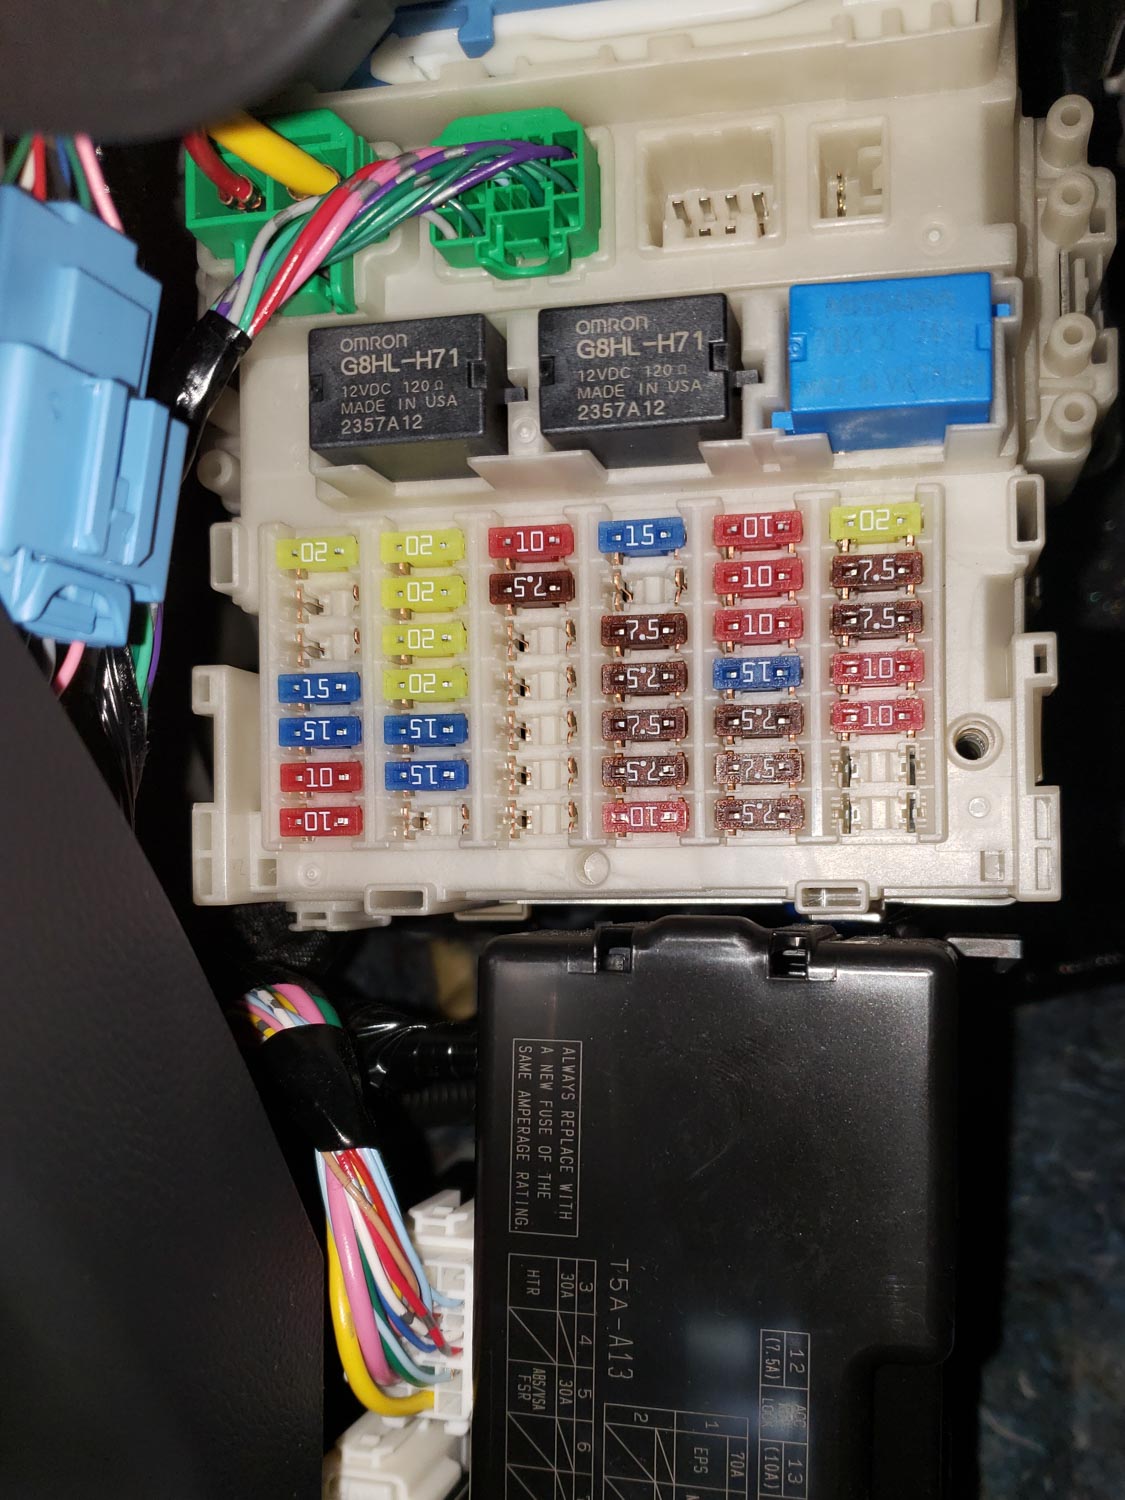
Fuse panel and panel layout:
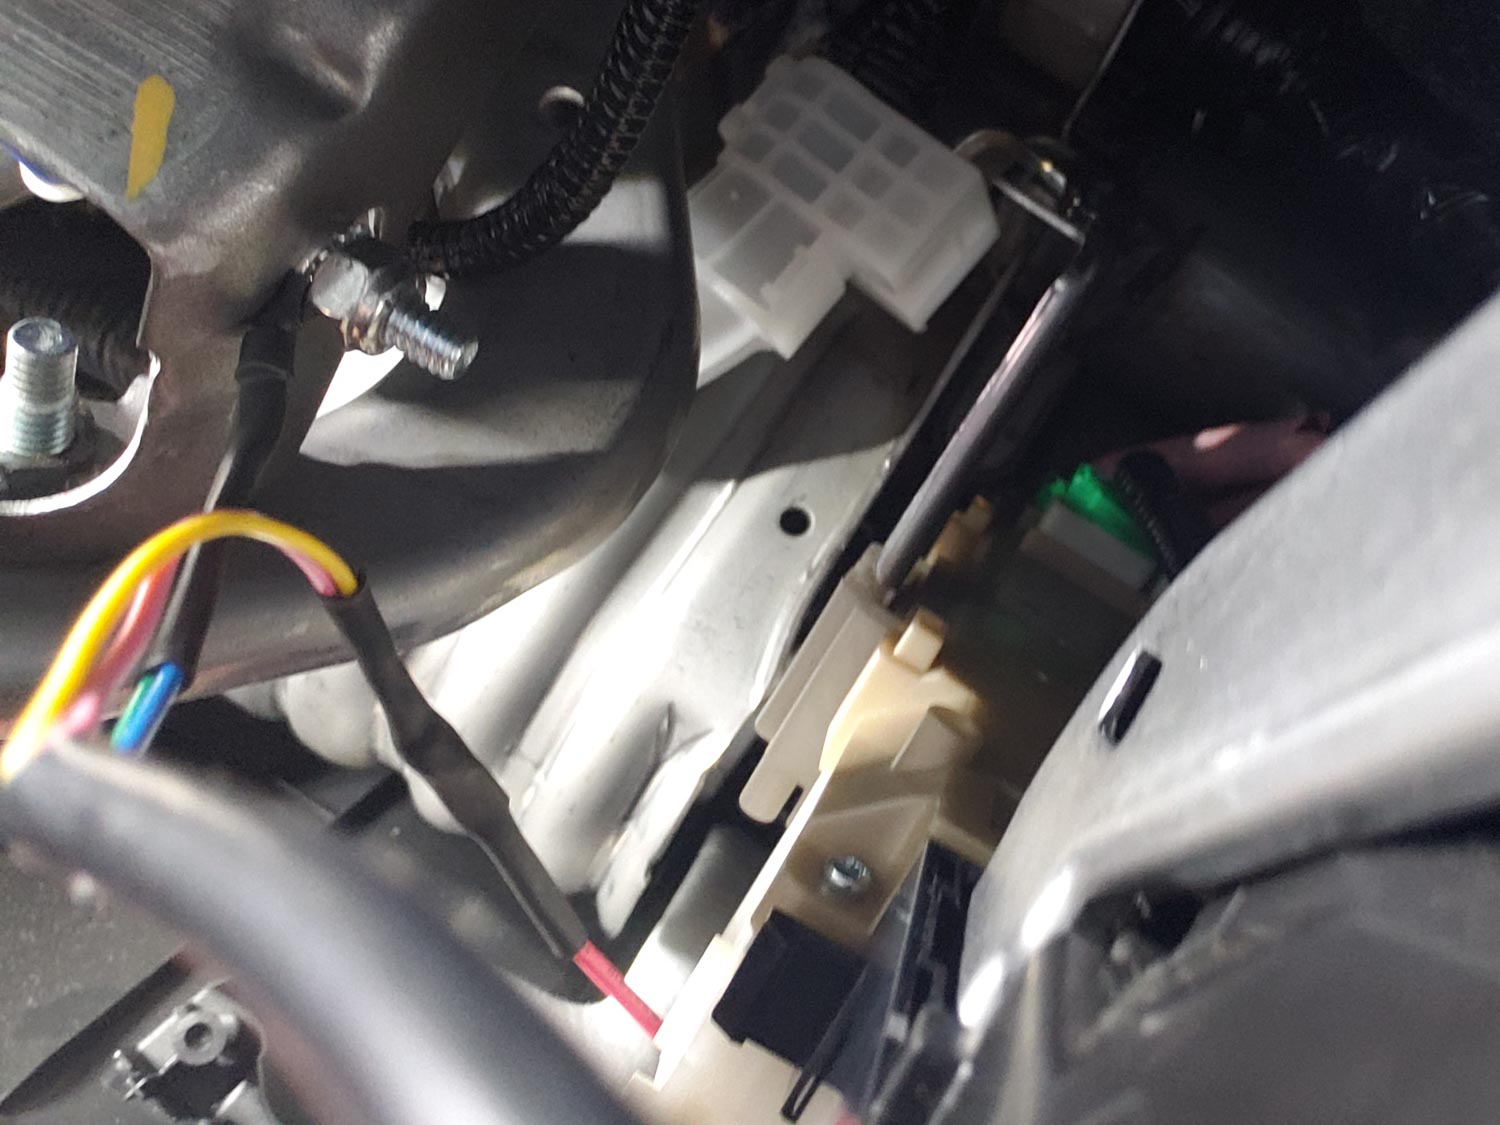
Fuse tap installed into the fuse panel... double-checked that it's constant 12V from the left-side of the fuse (so that the new circuit actually goes through the fuse). Put in a 5A fuse, but have no idea if that's overkill:
Ground going to a random hole in the metal brackets in the area around the fuse panel. Used some star washers and a nylock nut to keep make a good connection that hopefully doesn't back-off (although it made getting everything tight a pain, in an area I couldn't fit into well):
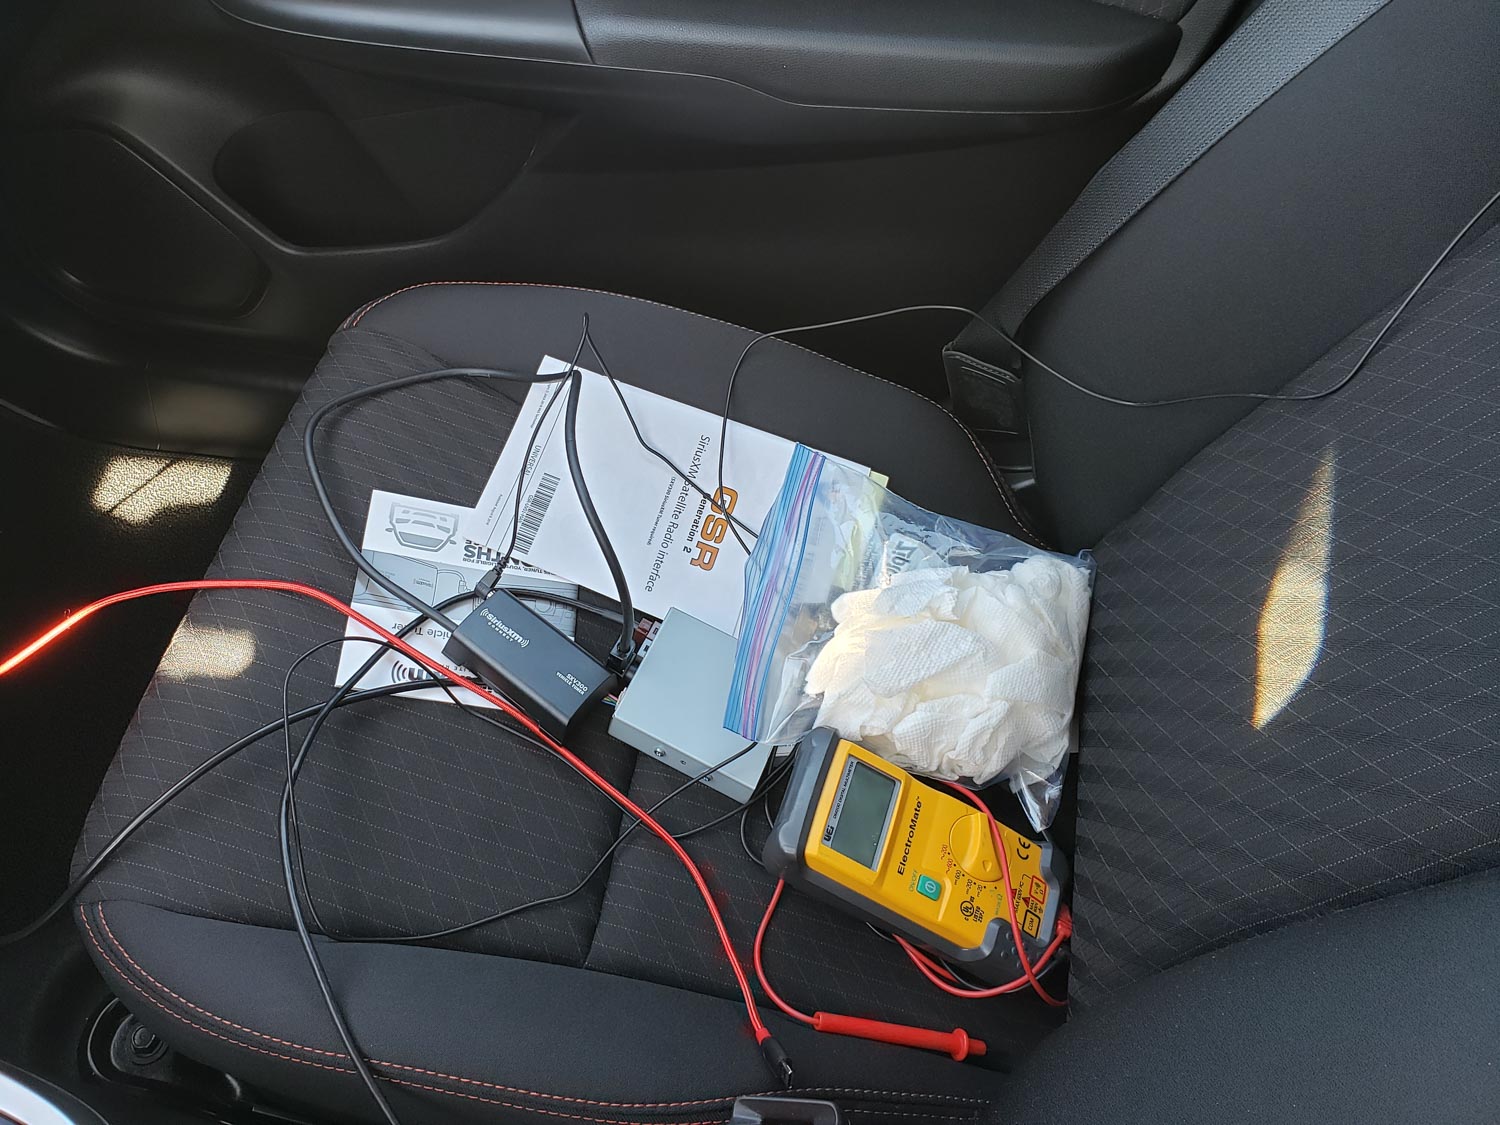
Stuff all connected, but not cleaned-up, while testing connections:
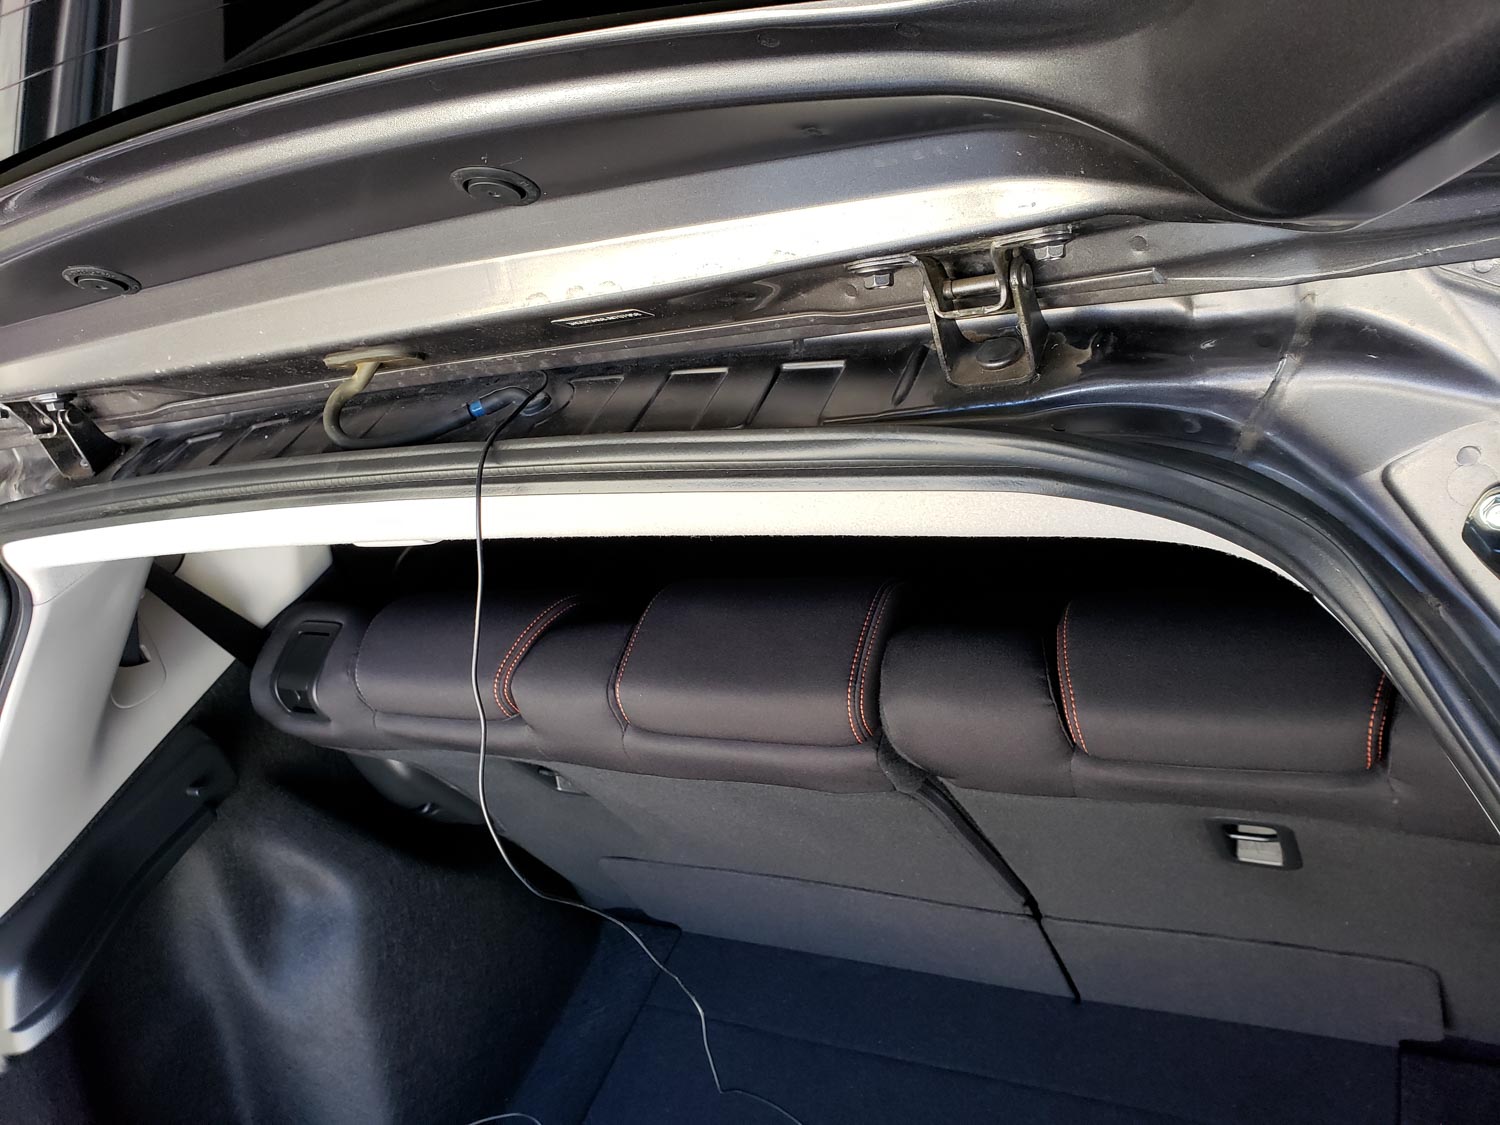
I put the magnetic antenna on the rear of the roof, just behind the AM/FM antenna, and ran the wire down into the hatch (tucked under the weather stripping):
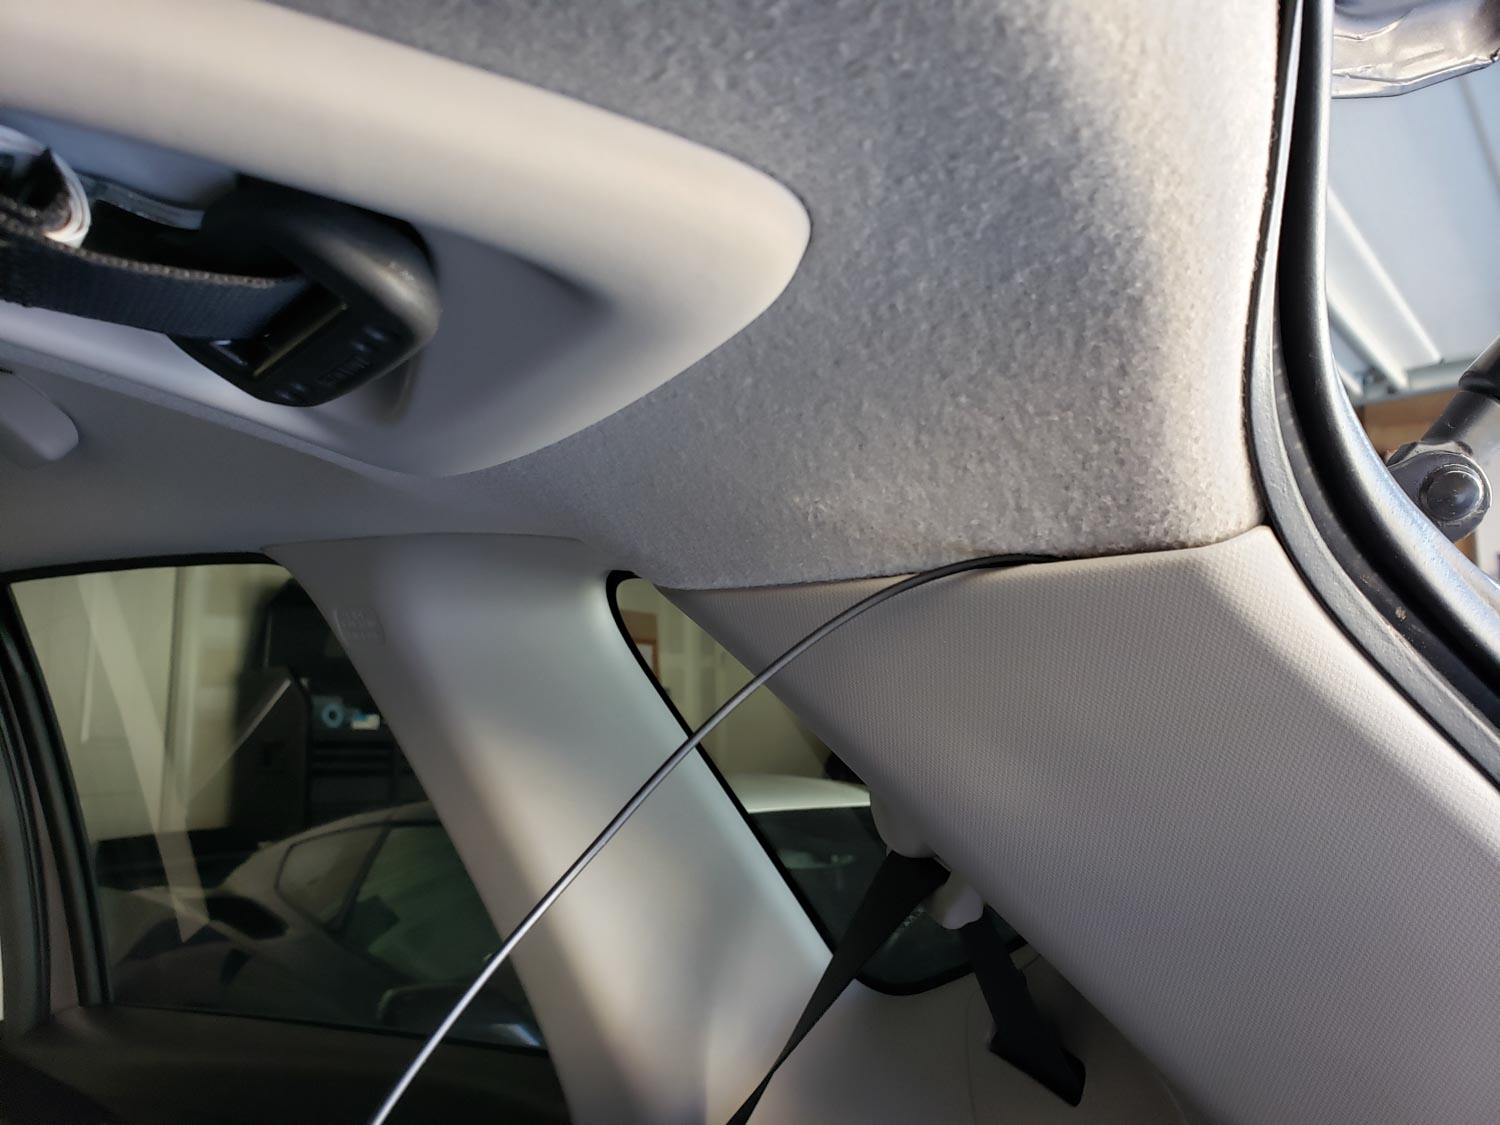
I then used the seam between the headliner and the pillars to run the wire along the side of the car and up to the front passenger seat:
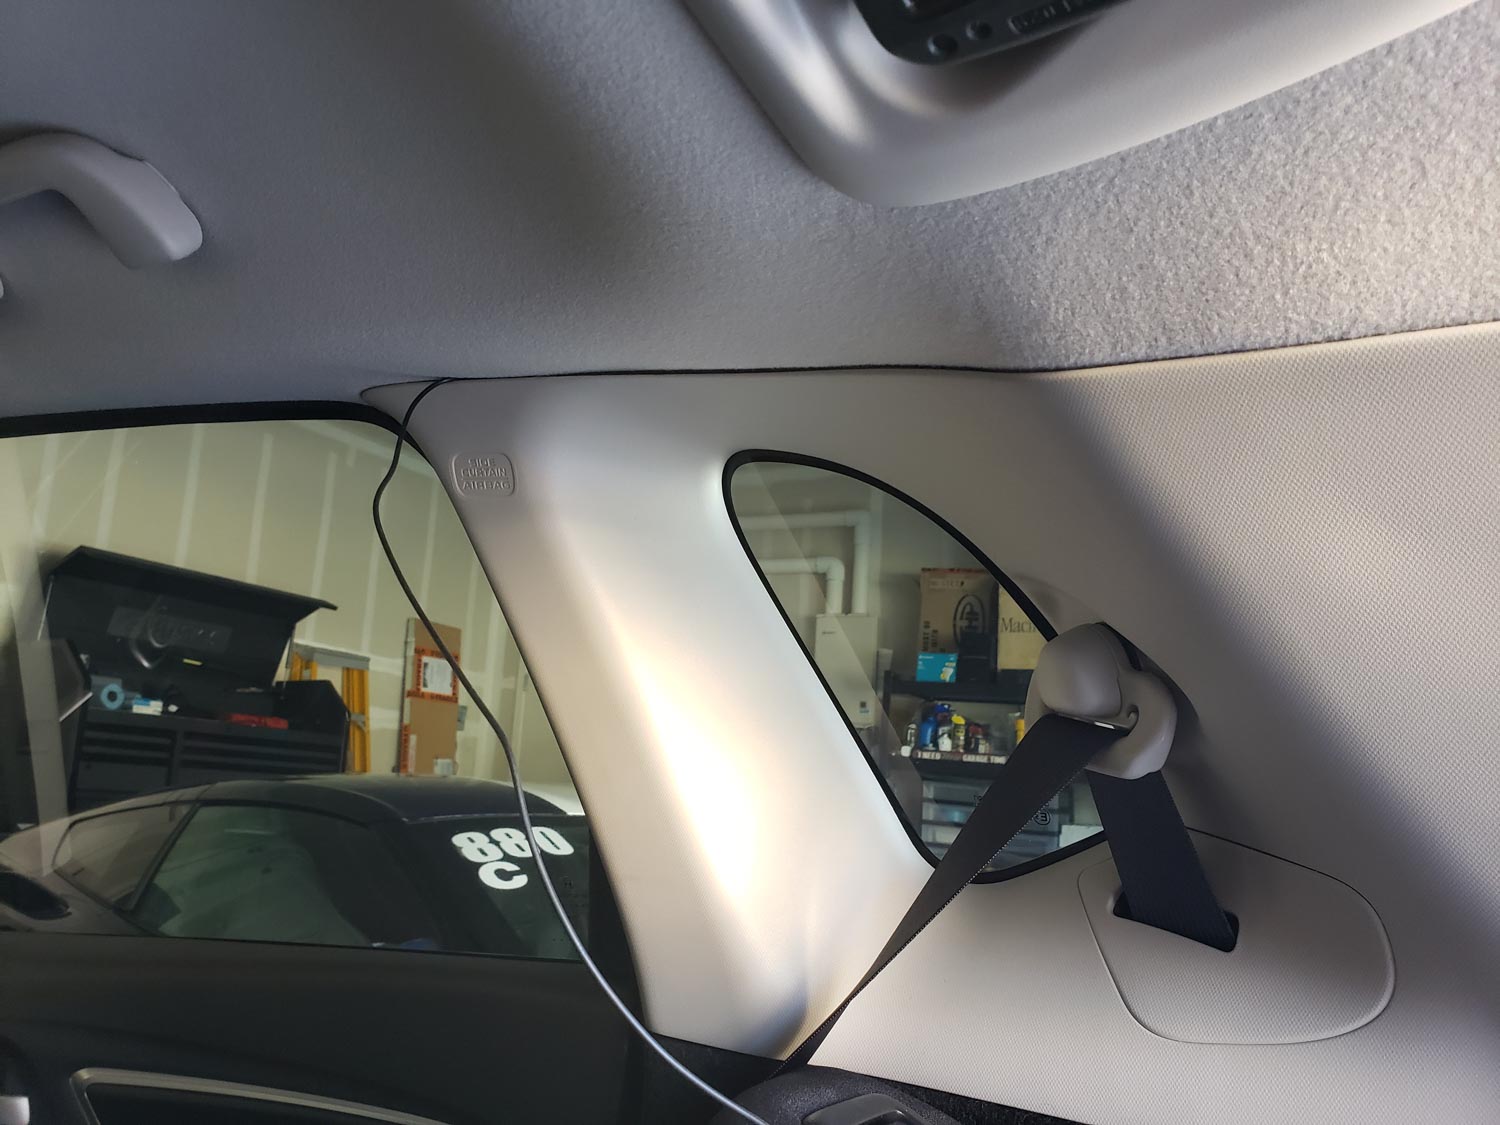
At the front passenger seat I again used the weather stripping on the inside of the door to get the wire down behind the foot well/glove box, which is as far as I could get today.
Everything is working well so far. Now I just need to find a place to mount the two boxes (likely under the glove box or on the backside of the center console) and run the USB cable under the center console to the armrest. I will need to drill a hole (for the USB cable) into the bottom of the compartment under the armrest, so want to do a bit more research about how best to go about it.
ATM Fuse Tap (could have used a ATM-LP but went with the one I did in case I needed clearance for the fuses for the new circuit above the rest of the panel) soldered to the power wires for the GSR-HD01 and a ring terminal soldered to the ground wires:
Fuse panel and panel layout:
Fuse tap installed into the fuse panel... double-checked that it's constant 12V from the left-side of the fuse (so that the new circuit actually goes through the fuse). Put in a 5A fuse, but have no idea if that's overkill:
Ground going to a random hole in the metal brackets in the area around the fuse panel. Used some star washers and a nylock nut to keep make a good connection that hopefully doesn't back-off (although it made getting everything tight a pain, in an area I couldn't fit into well):
Stuff all connected, but not cleaned-up, while testing connections:
I put the magnetic antenna on the rear of the roof, just behind the AM/FM antenna, and ran the wire down into the hatch (tucked under the weather stripping):
I then used the seam between the headliner and the pillars to run the wire along the side of the car and up to the front passenger seat:
At the front passenger seat I again used the weather stripping on the inside of the door to get the wire down behind the foot well/glove box, which is as far as I could get today.
Everything is working well so far. Now I just need to find a place to mount the two boxes (likely under the glove box or on the backside of the center console) and run the USB cable under the center console to the armrest. I will need to drill a hole (for the USB cable) into the bottom of the compartment under the armrest, so want to do a bit more research about how best to go about it.
Thread Starter
|
New Member
Joined: Mar 2019
Posts: 10
From: Livermore, CA
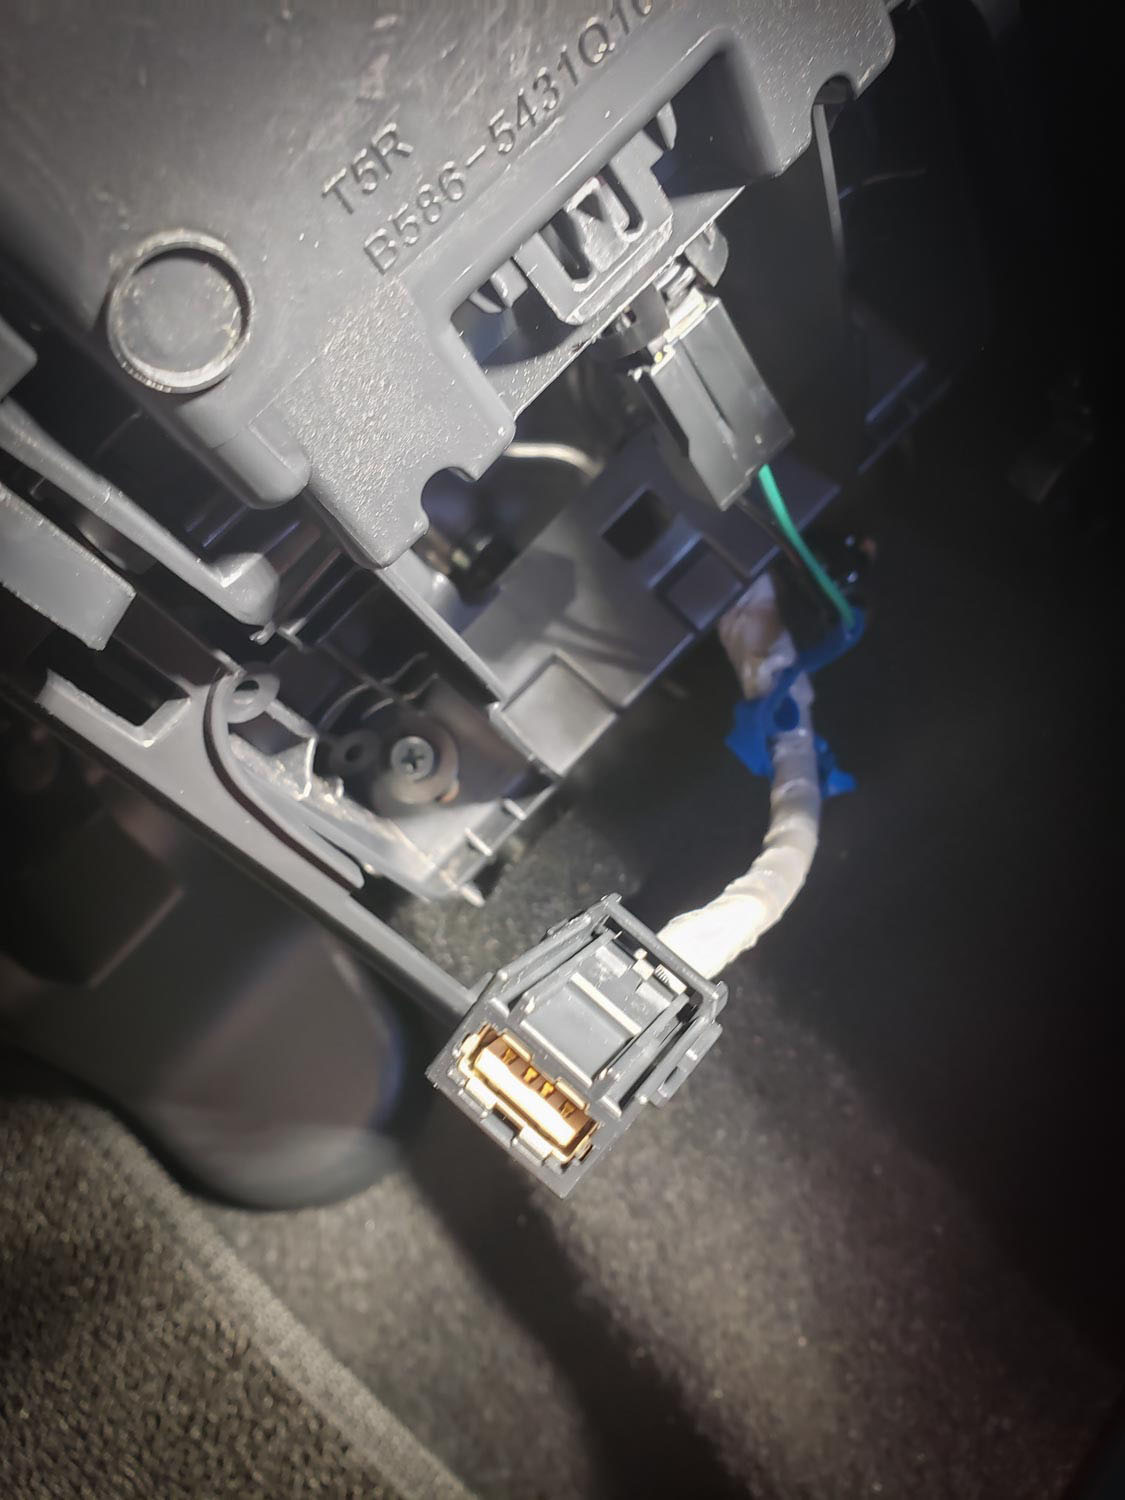
Finally had a chance to finish-up the installation. I had originally planned on drilling a hole in the compartment under the armrest to run the USB cable through, but it turns out that the plug end of the USB is attached to the wiring harness and is easily removed from behind the console. Looking at some of the photos/tips in another thread, I removed the cover at the rear of the center console and started looking for a good place to drill a hole. After some additional exploration, and disconnecting the wiring to the USB port (I was trying to remove the block that hold the Power/USB plugs) I was happy to find that the end of the connector/wire contains all of the USB circuitry. I plugged-in the USB (leaving the socket in the armrest console empty) and ran the wiring around the passenger's side of the center console. The GSR-HD01 was put behind the center console under the dash (not secured to anything, but there's not much room back there for anything to rattle against). The SiriusXM receiver was zip-tied up under the glove compartment (under the trim panel) along with the excess wiring. At this point, the only things that look different than stock are the extra antenna on the roof and the missing USB port (under the cap) in the armrest console.
Overall I've been very happy with how the project turned-out.
Overall I've been very happy with how the project turned-out.

Thread
Thread Starter
Forum
Replies
Last Post
waldcha
General Fit Modifications Discussion
2
Nov 7, 2019 09:28 AM
oiric2006@gmail.com
3rd Generation (2015+)
5
May 9, 2017 01:29 AM
grimpirate
2nd Gen GE8 Specific Fit Interior Modifications Sub-Forum
17
Nov 6, 2013 09:30 AM
Tigerman50
Fit Interior Modifications
3
Dec 15, 2008 10:14 PM