
MODS/ACCESSORIES for the GK

Member
Joined: Sep 2014
Posts: 26
From: Yellowknife, Northwest Territories
Can you tell me how to get the center console out? I see the two "screws" near the footwell on each side. I need to know how to remove gear shift knob and does it just pull up? Thanks
REPLY: Center console removal
- pop out the plastic cover behind the armrest (facing the rear seats), unplug the lighter and USB
- remove the two lower bolts
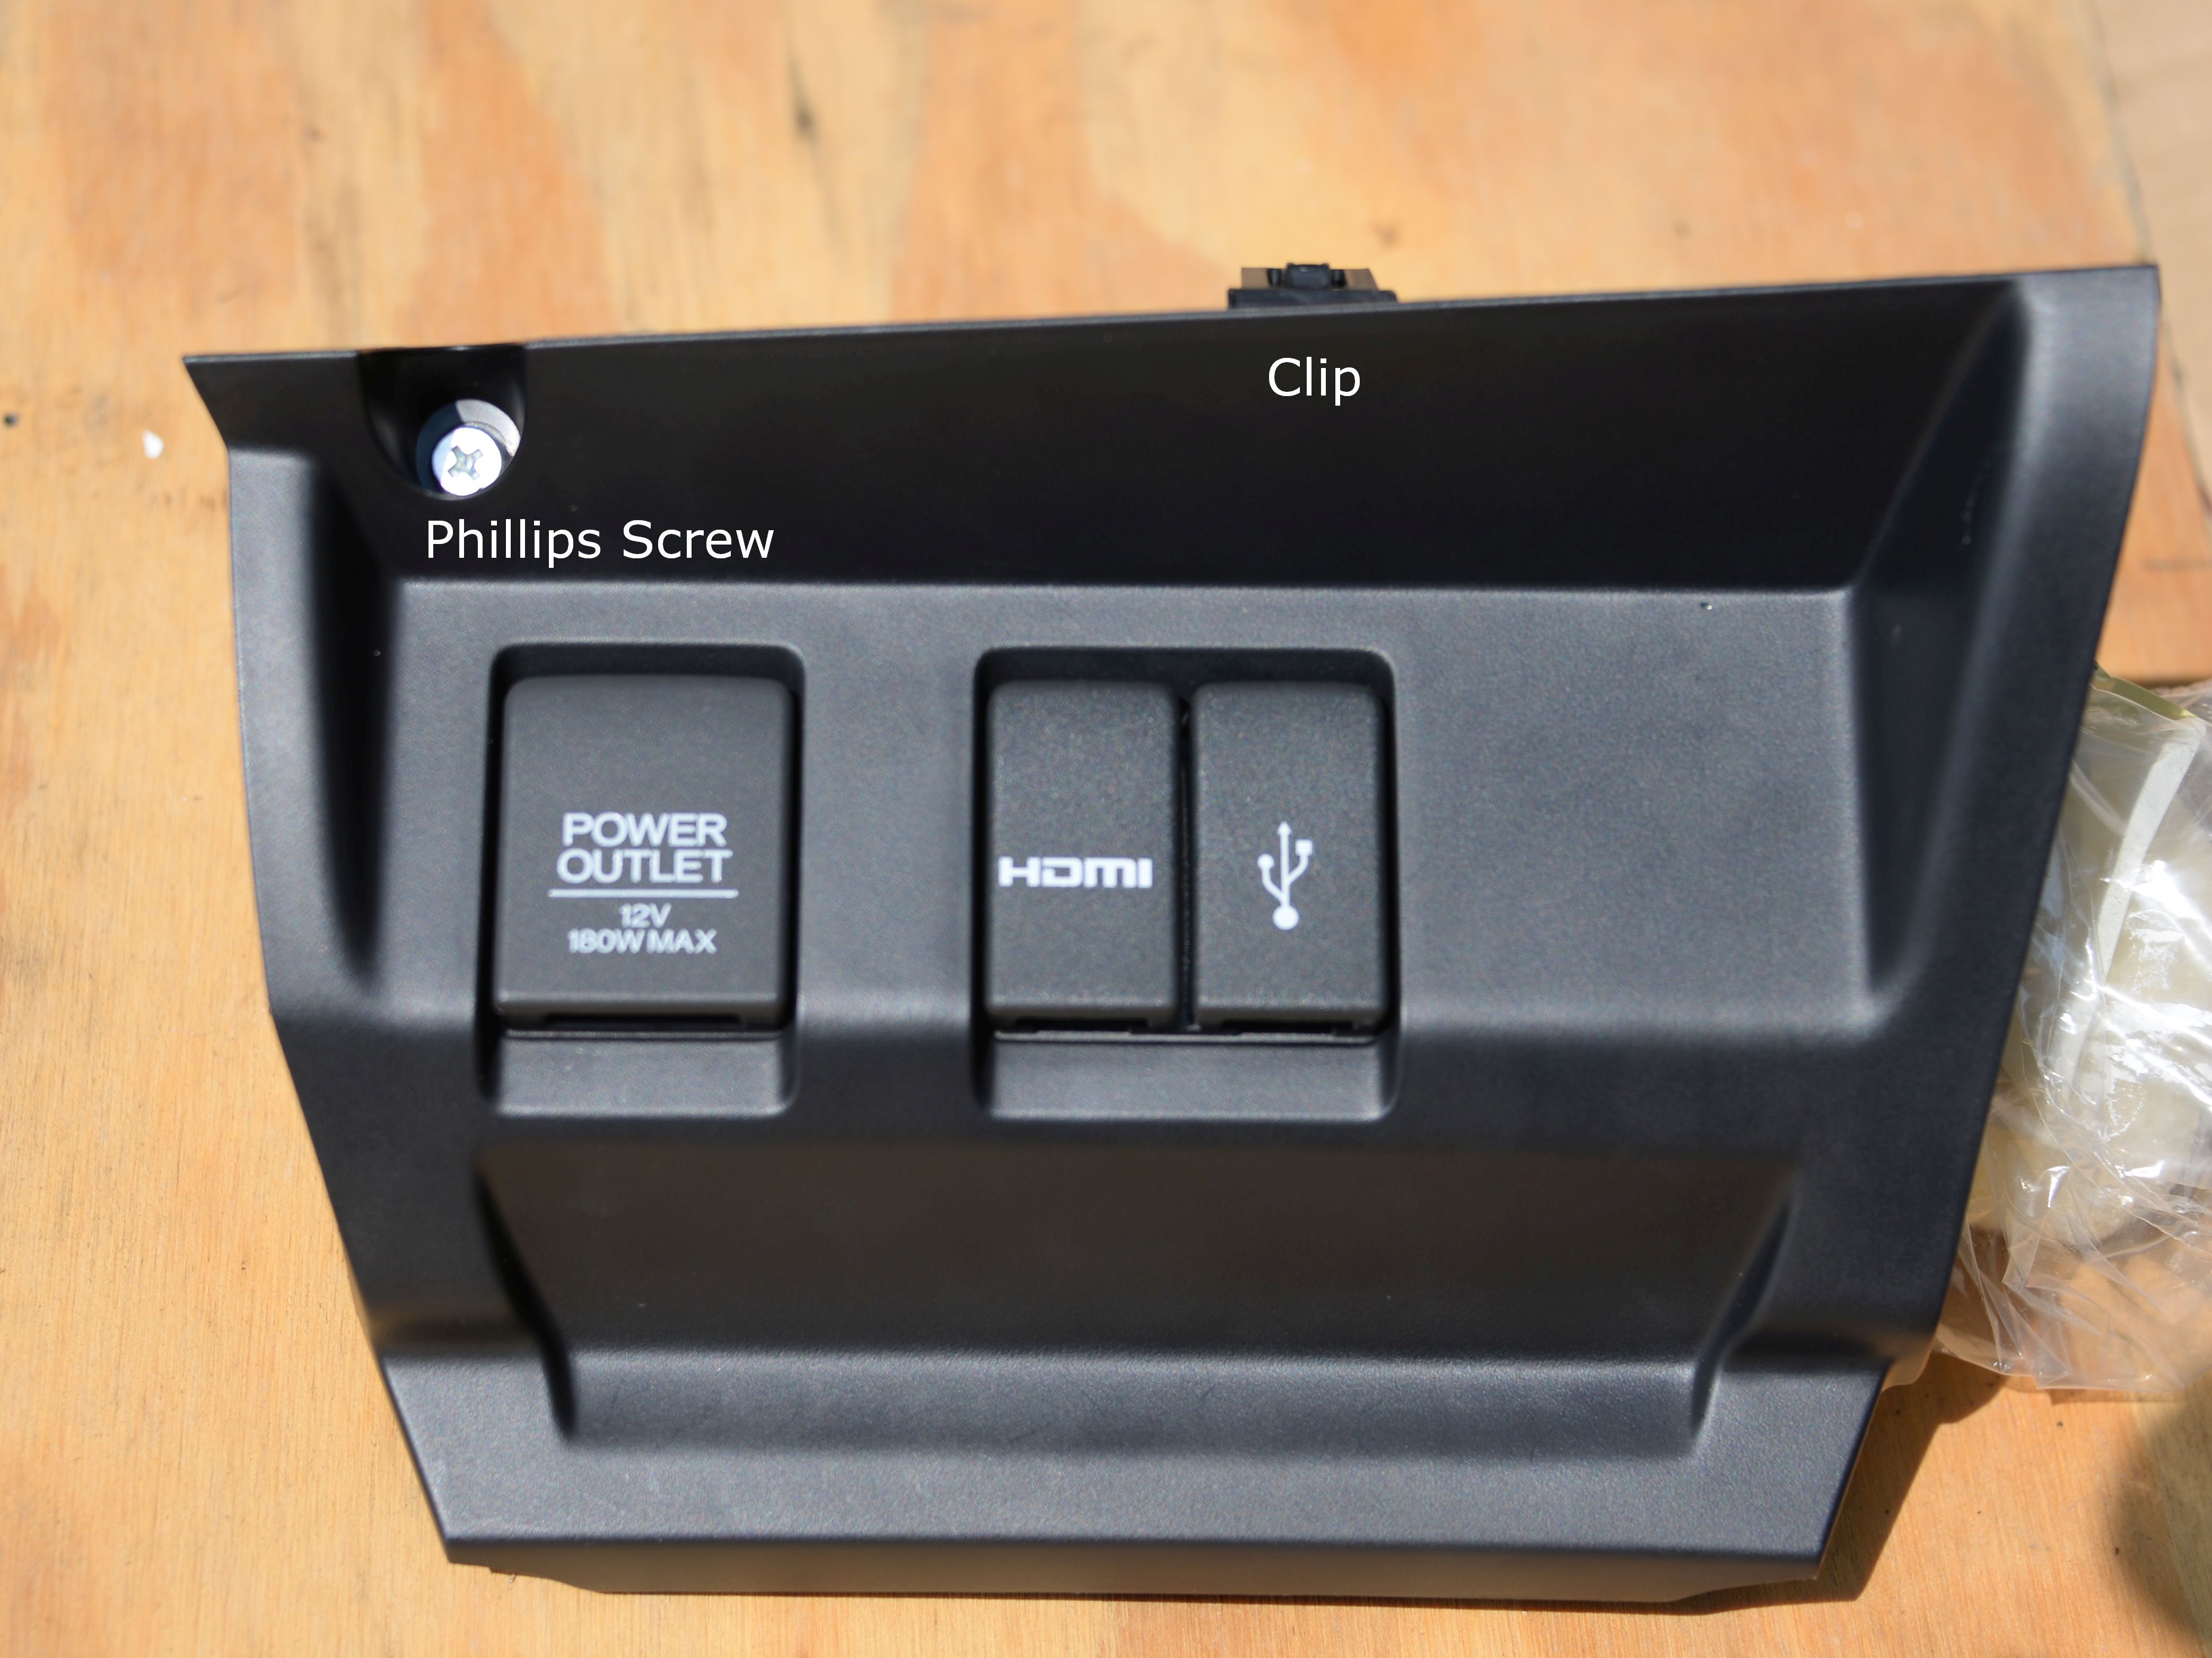
- remove the lower front center console panel containing the lighter, HDMI and USB (one screw on top - then pop it out) once done, you'll see two screws in the center which are to be removed.
- remove the gear shift knob
- the console is now held in place by a center clip (green). Just pull up the console and give is a small tug to unpop the clip. Remember to reinstall the clip back to the console if it gets stuck with the car body.
If your gearshift knob is auto there is a thread somewhere on FF that describes this. (Update: SilverEX15 to the rescue in the succeeding post)
For the 6-speed, you have to pull down the boot shift cover (held in place with plastic hooks at the base of the knob). Once you separate the cover from the knob then just unscrew to remove.
Hope that helps - rttby
REPLY: Center console removal
- pop out the plastic cover behind the armrest (facing the rear seats), unplug the lighter and USB
- remove the two lower bolts
- remove the lower front center console panel containing the lighter, HDMI and USB (one screw on top - then pop it out) once done, you'll see two screws in the center which are to be removed.
- remove the gear shift knob
- the console is now held in place by a center clip (green). Just pull up the console and give is a small tug to unpop the clip. Remember to reinstall the clip back to the console if it gets stuck with the car body.
If your gearshift knob is auto there is a thread somewhere on FF that describes this. (Update: SilverEX15 to the rescue in the succeeding post)
For the 6-speed, you have to pull down the boot shift cover (held in place with plastic hooks at the base of the knob). Once you separate the cover from the knob then just unscrew to remove.
Hope that helps - rttby
Last edited by ROTTBOY; Oct 23, 2014 at 08:53 AM.

Member
Joined: Jul 2014
Posts: 3,276
From: Shokan, NY


Thread Starter
|
Someone that spends his life on FitFreak.net
Joined: Mar 2014
Posts: 1,116
From: Hawaii: relocated to Western Canada Sept, 2015
Stereo install cont..........
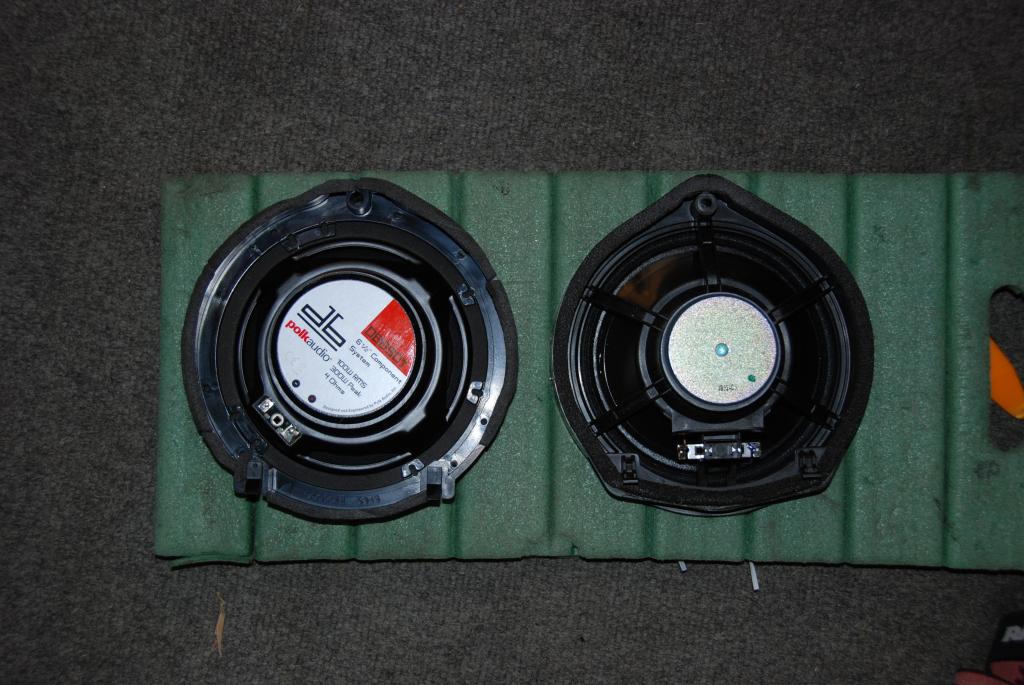
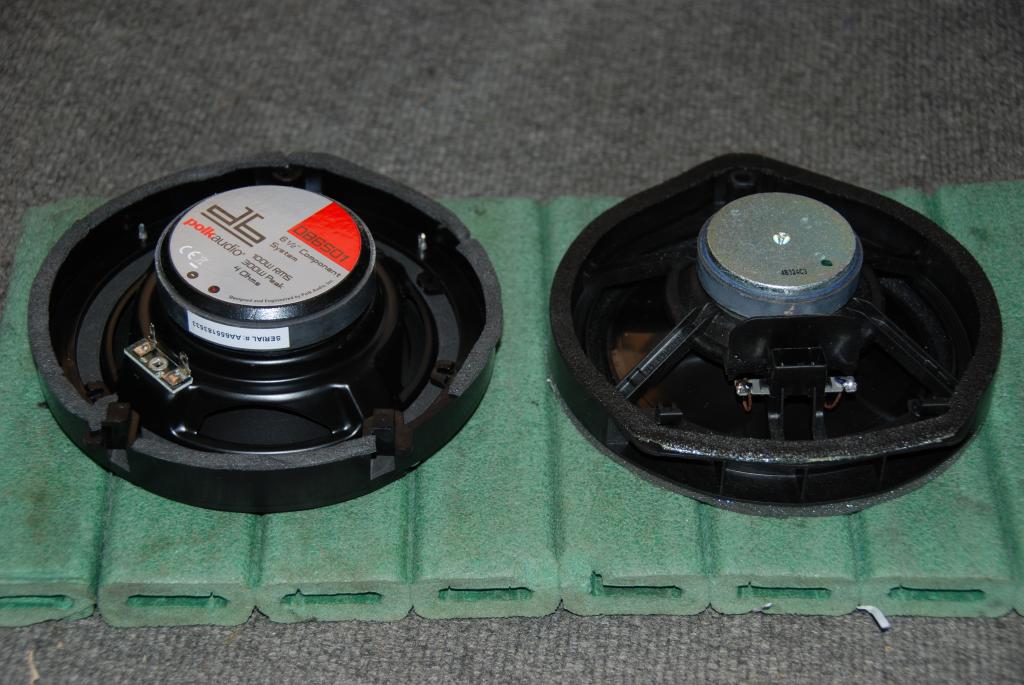
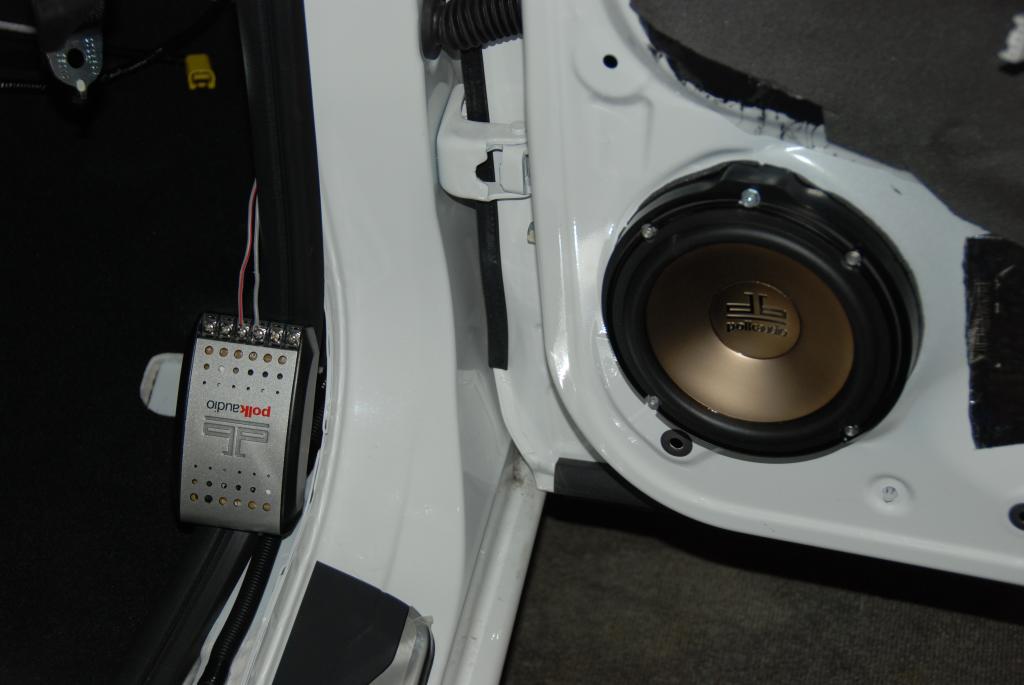
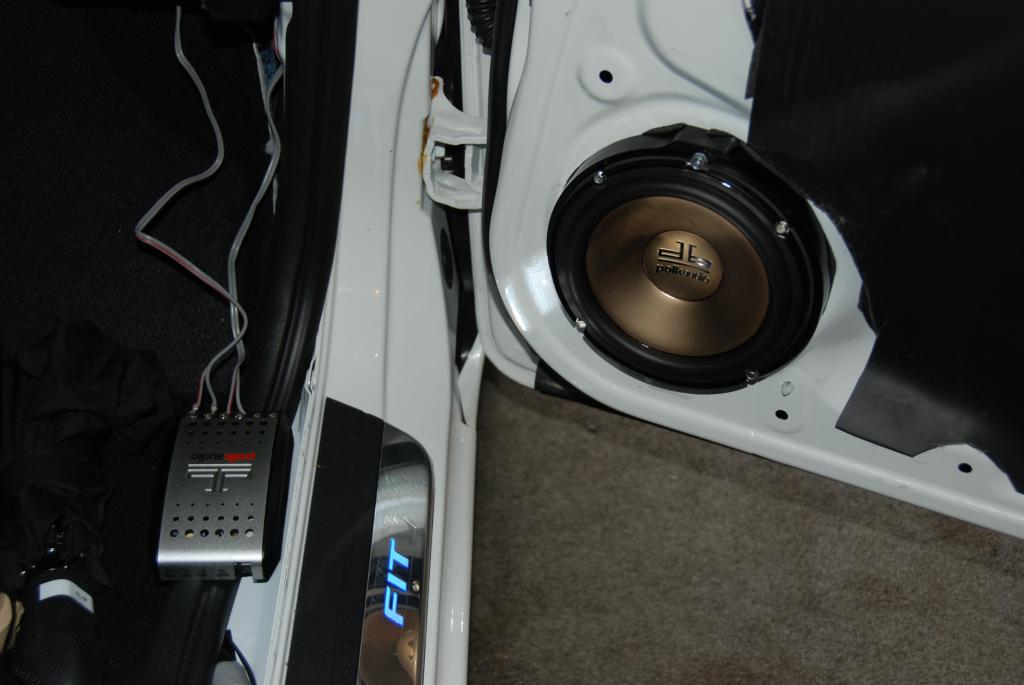
Compare the factory OEM speakers with the mid-range priced Polks. Bigger magnets and twice the weight. Easy to figure out why Honda had to boost equalization from the OEM HU to make those factory tinny speakers sound decent.
Finished install of speakers and crossovers on the remaining doors. Feeding through the door-grommet was easy enough except for the front driver's door. On the rubber boot attached to the body, there is a plastic surround base. To add to the difficulty, once past, there is a double wall so fishing the wire was tedious.
Rear Right door bare wire
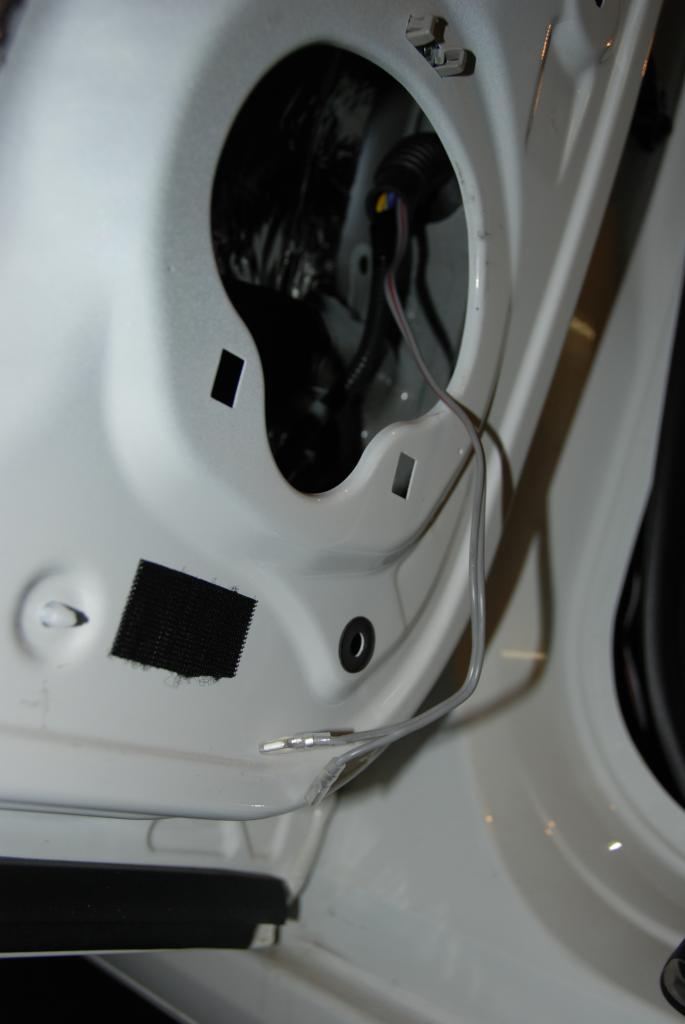
REar right door. Wire with conduit.
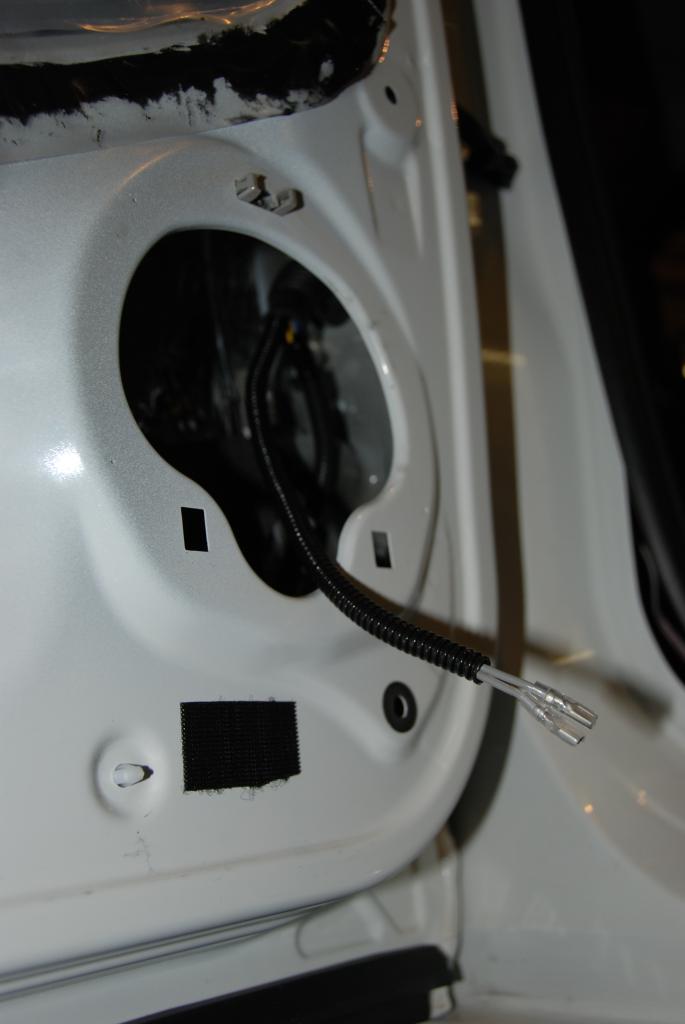
Speaker connected to crossover - Right rear door
Right front door Wire ready for install w/ conduit

Speaker, tweeter connected to crossover Right front door
Speaker ready for install Left front door

Speaker, tweeter connected to crossover Left Front door
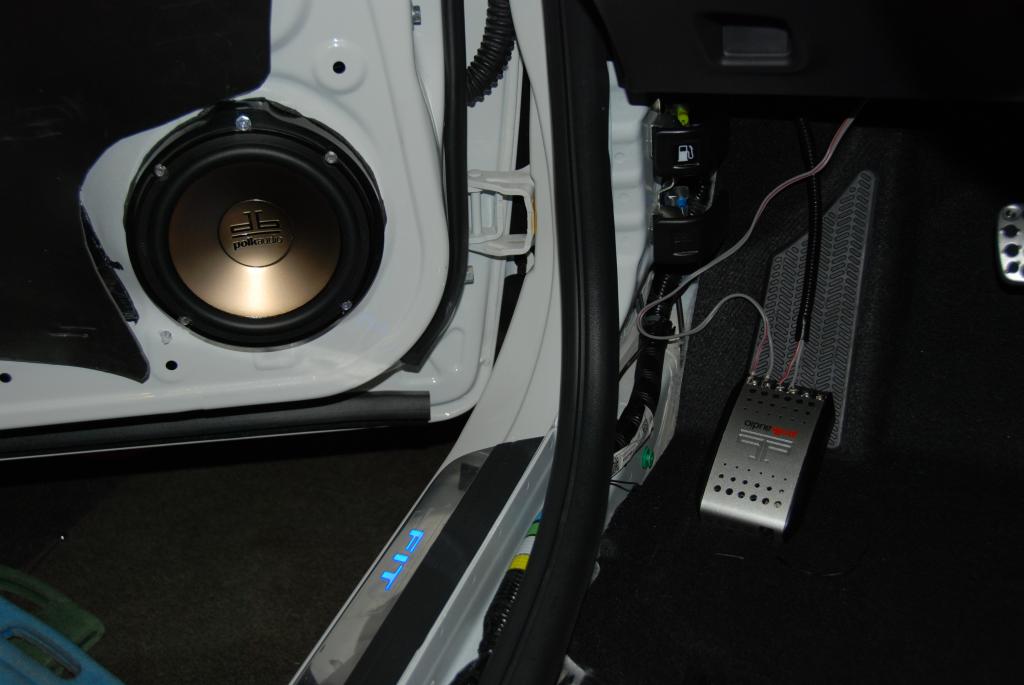
Next, will layout the remaining wires and will make a temporary hook-up to the powered components. Can't wait to test.
Won't be till this weekend though - wife arrives in a couple of days so will be busy doing my regular errands.
Finished install of speakers and crossovers on the remaining doors. Feeding through the door-grommet was easy enough except for the front driver's door. On the rubber boot attached to the body, there is a plastic surround base. To add to the difficulty, once past, there is a double wall so fishing the wire was tedious.
Rear Right door bare wire
REar right door. Wire with conduit.
Speaker connected to crossover - Right rear door
Right front door Wire ready for install w/ conduit
Speaker, tweeter connected to crossover Right front door
Speaker ready for install Left front door
Speaker, tweeter connected to crossover Left Front door
Next, will layout the remaining wires and will make a temporary hook-up to the powered components. Can't wait to test.
Won't be till this weekend though - wife arrives in a couple of days so will be busy doing my regular errands.
Last edited by ROTTBOY; Oct 20, 2014 at 05:24 PM.

New Member
Joined: Oct 2014
Posts: 17
From: Oakley ca
Already got:
- Ultragauge
- reverse park sensor kit (Ebay) w/ LED/beep display
- i-vtec DOHC stickers (both rear doors) and plaque (rear hatch area)
- Front grill JDM emblem (still can't find the right size for the rear)
- F & R JDM RS emblems
- non-OEM Wheel locks
- LED bulbs for the interior
- 16" alloys (HD w/ 185/55x16 Kumho PA31 tires placed order 6/14 finally arrvd. 6/28)
- OEM Door visors, rear applique, Nose mask, cargo liner, Door Edge film, Cargo net, All-season mats
- OEM JDM rear LED upper piping tail-lights (as in JDM GK Hybrid)
- OEM illuminated door sills, rear seat covers, cargo tray
- OEM Sport Pedals
- Blox 6 Spd. Shift knob (to be soon replaced by OEM GK RS leather knob)
- Wheelskins Leather steering wheel cover
Stereo upgrade parts:
- Polk DB6501 (two sets) - Kenwood KSC-SW11 8" powered sub - Kenwood Excelon XR400-4 channel amp.
- Audison BIT TEN D Processor - 100 ft. of oxygen-free speaker wire 16 g. - T-Spec install kit - Dynamat Extreme (bulk) - MLV (40 sq. ft.) - Ensolite foam
- 15% tint on rear door windows & hatch glass (Llumar CTX ceramic)
Will paint the front calipers and ordered heat-resistant stickers:
link: Honda Accord Brake Caliper Decals 6pc Stickers 2013
Other items:
- retrofit aftermarket perimeter entry + OEM push/start (after spending too much money on all other accessories, now that the Fit is here, decided against this) Decided I can live with the LX Set-up after all!!!
- not to foget. Yes, I am putting a hawaiian dancing cupie doll on the dash!!!
7 years and never bought any toys for my GD. Joined FF last March and now, have gone overboard with plans for add-ons. This forum is just "BAD". Thanks a lot, everybody here!!!
What are you planning on???
REPLY: Got mine from EBAY. Still haven't put them on. They are JDM OEM badges. Good luck shopping and post what you decide!!! - rttby
Last edited by ROTTBOY; Oct 23, 2014 at 09:37 AM.

Member
Joined: Sep 2014
Posts: 43
From: Los Angeles
Question sir, are you changing your head unit too? or just speakers? I would like to upgrade my speakers to JBL or something, but I was wondering if I have to do this much taking-out-stuff just to do that...
REply: Am keeping the OEM HU. YOu could upgrade just the speakers. It will be clearer but all depends on how much your expectations are. Am almost certain that whatever brand you get, you won't be pleased with the bass response. Scroll back to previous posts to find out why this project required the removal of the interior. Whatever you decide, don't forget to post!!!! Good luck - rottboy

REply: Am keeping the OEM HU. YOu could upgrade just the speakers. It will be clearer but all depends on how much your expectations are. Am almost certain that whatever brand you get, you won't be pleased with the bass response. Scroll back to previous posts to find out why this project required the removal of the interior. Whatever you decide, don't forget to post!!!! Good luck - rottboy
Last edited by ROTTBOY; Oct 21, 2014 at 03:53 PM.

Member
Joined: Aug 2014
Posts: 144
From: st louis
Wow, has there been a lot of activity since I last came to this site. You guys with the super cool looking lowering, wheel spacers, interior lighting etc..........
Definitely devilizing the rest of our GK community.
Here is my plain jane LX.

Started to install all my accessories (listed in the 1st post on this thread). So far have done a Blox Shifter knob.

Got a leather steering wheel cover (Wheelskins - made in the USA) for me and my neighbor (EX-CVT) and helped him this afternoon do the install. Mfg. says an hour. Its more like 2 hours + and that was two of us. Not perfect but definitely feels like the real thing. Can't go wrong for $50. Do not get the ones they sell for the GE. Its slightly bigger and won't have the exact fit. I measure mine and made the Special Order. Its 14 1/4" and 3 7/8".


Still have a ton of stuff to install. Next will be painting the calipers (red), installing the caliper Honda sticker, 16" alloys, rear JDM upper tail-lights. Won't happen tomorrow - its NFL Sunday.
BTW, has anyone here taken out the OEM stereo H/U??? Anyone install amps or the like??? The only place I can find for my audio stuff in under the two front seats. Any tips would be great.
Did a short 50 mile jaunt just to see what kind of mileage I could get with the manual. Was able to squeeze 46 MPG doing 60 mph (60% hwy and 40% city - no A/C) and watching that eco green light. Pretty pleased with those results. Will post what I finally get after my first fill-up.
So nice to be back!!!!!!!!

Definitely devilizing the rest of our GK community.
Here is my plain jane LX.
Started to install all my accessories (listed in the 1st post on this thread). So far have done a Blox Shifter knob.
Got a leather steering wheel cover (Wheelskins - made in the USA) for me and my neighbor (EX-CVT) and helped him this afternoon do the install. Mfg. says an hour. Its more like 2 hours + and that was two of us. Not perfect but definitely feels like the real thing. Can't go wrong for $50. Do not get the ones they sell for the GE. Its slightly bigger and won't have the exact fit. I measure mine and made the Special Order. Its 14 1/4" and 3 7/8".
Still have a ton of stuff to install. Next will be painting the calipers (red), installing the caliper Honda sticker, 16" alloys, rear JDM upper tail-lights. Won't happen tomorrow - its NFL Sunday.
BTW, has anyone here taken out the OEM stereo H/U??? Anyone install amps or the like??? The only place I can find for my audio stuff in under the two front seats. Any tips would be great.
Did a short 50 mile jaunt just to see what kind of mileage I could get with the manual. Was able to squeeze 46 MPG doing 60 mph (60% hwy and 40% city - no A/C) and watching that eco green light. Pretty pleased with those results. Will post what I finally get after my first fill-up.
So nice to be back!!!!!!!!
REply: If its the same size your in good shape. When it arrives make sure you have a couple of hours to spare cause that's how long its gonna take to do it properly. Can't go wrong for $50, plus, its made it our good 'ol USA!!!!
- rttby
Last edited by ROTTBOY; Oct 22, 2014 at 11:08 AM.
Member
Joined: Jul 2014
Posts: 3,276
From: Shokan, NY
REply: If your Polks are components (separate woofer and tweeter), your best served by installing the crossovers. If they are full range (all combined in one housing) your good to go as these would have built-in crossovers/filters (am not 100% sure on all the models). As inferred previously, the mids and the highs will both improve but I doubt if the bass would be similar. In fact, it might be worse. Hook em up and see what it sounds like. Let us know so others can follow your lead.
 - rttby
Last edited by ROTTBOY; Oct 23, 2014 at 09:39 AM.

Member
Joined: Jun 2014
Posts: 78
From: Brisbane, Australia
My tip is to go and invest $5 or $10 in a set of plastic trim removal tools as the plastic trims are very soft and scratch easily. Plus they make removing the clips that don't pull out with the door trim easier.
REply: Nicco has a great tip here and it makes using the OEM wiring connectors a breeze w/out resorting to cutting. If swapping with 6.5" speakers I do further remind all that if drilling is to be avoided, get the speaker adaptor brackets (there the same as for the GE's). Only very slight modification needs to be done to the brackets so they will fit perfect. Happy mod shopping to all!!!! - rttby
Last edited by ROTTBOY; Oct 22, 2014 at 11:04 AM.
New Member
Joined: Oct 2014
Posts: 17
From: Oakley ca
REply: Here's the info.
09-13 FIT GE8 GENUINE HONDA JDM FRONT & REAR RS EMBLEM BADGE COMBO Item price $49.99 Seller: rebelperformanceparts
The rear looks exactly the same as what's on the JDM GK RS. The front may have to be modified as its a bracket. The GK's grill, there's no opening to screw it in. Might have to dremel part of the plastic off the front badge and use industrial double-sided tape instead. Mind you this was purchased last March, therefore, am not sure if this seller is still around. Happy shopping!!!!
Last edited by ROTTBOY; Oct 23, 2014 at 03:29 PM.
Thread Starter
|
Someone that spends his life on FitFreak.net
Joined: Mar 2014
Posts: 1,116
From: Hawaii: relocated to Western Canada Sept, 2015
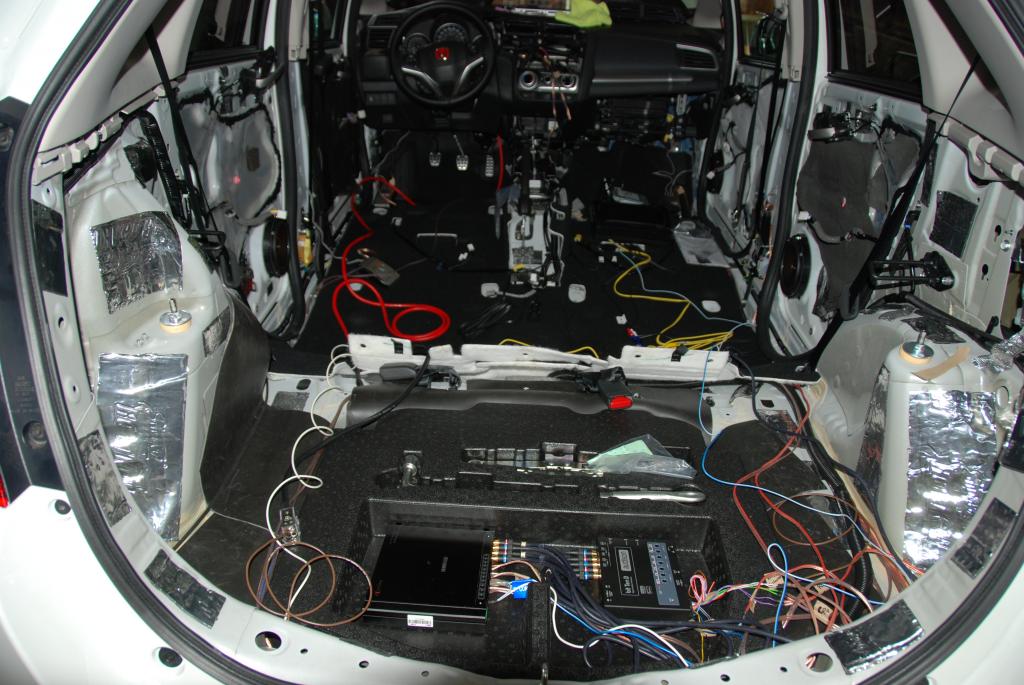
Wires and more wires
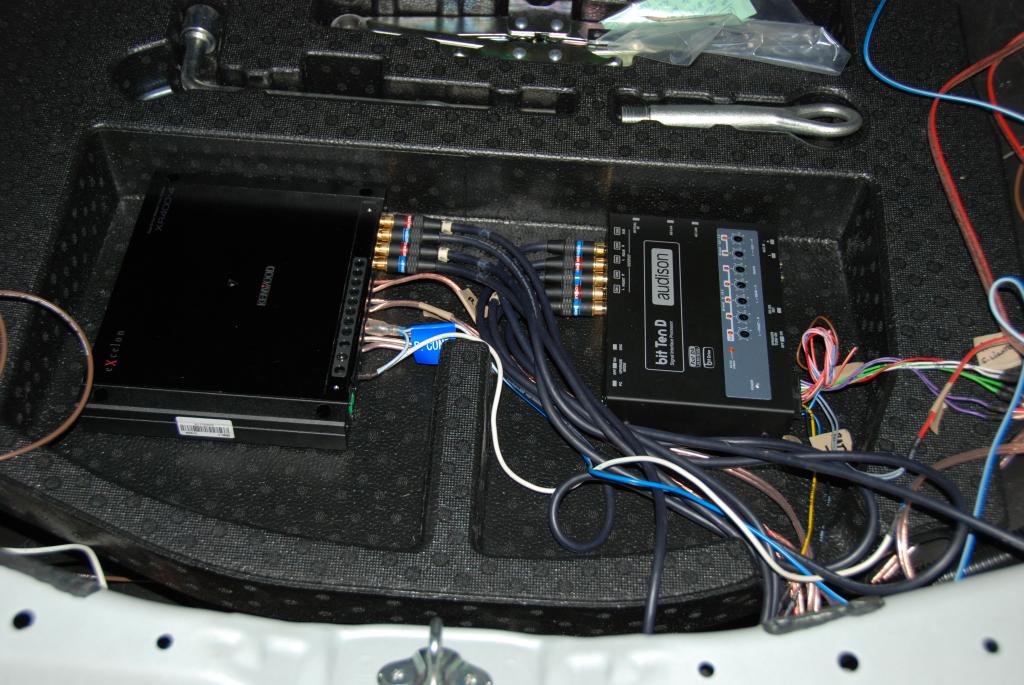
Speaker wires laid out from sound processor and connected to crossovers.
A mess of wires getting ready for hook-up to sound processor (to be mounted on spare tire cover right beside the amp.)

Speaker wires and Remote ON soldered and shrink-wrap connected to sound processor harness.

Tomorrow will mount and wire the power and negative cables from the battery will go to respective blocks to provide "juice" for the processor, amp. and powered sub.
A mess of wires getting ready for hook-up to sound processor (to be mounted on spare tire cover right beside the amp.)
Speaker wires and Remote ON soldered and shrink-wrap connected to sound processor harness.
Tomorrow will mount and wire the power and negative cables from the battery will go to respective blocks to provide "juice" for the processor, amp. and powered sub.
Last edited by ROTTBOY; Oct 22, 2014 at 12:12 AM.


Member
Joined: Aug 2014
Posts: 179
From: Some where
My brother needs the floor mat =) in the bay area too. He has the LX which doesn't come with it.
COMMENT: Could you have your brother ask the dealership again? My LX came with those carpet mats. I'm almost sure carpet mats are a standard item throughout the line-up. Good luck.
 - rttby
Last edited by ROTTBOY; Oct 23, 2014 at 09:41 AM.
Thread Starter
|
Someone that spends his life on FitFreak.net
Joined: Mar 2014
Posts: 1,116
From: Hawaii: relocated to Western Canada Sept, 2015
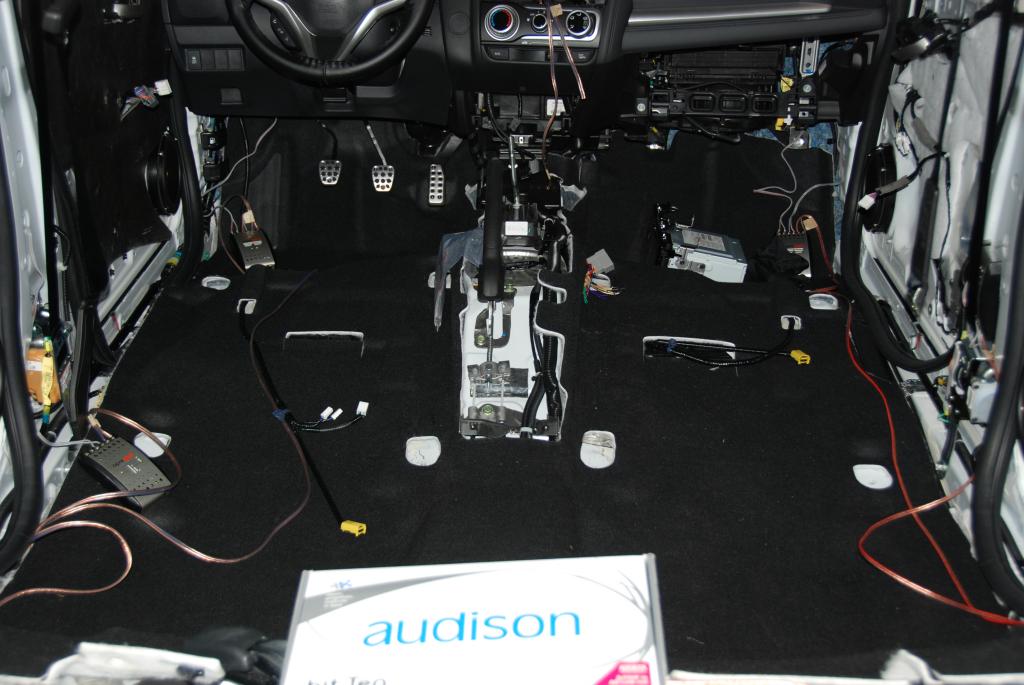
Power and components wired
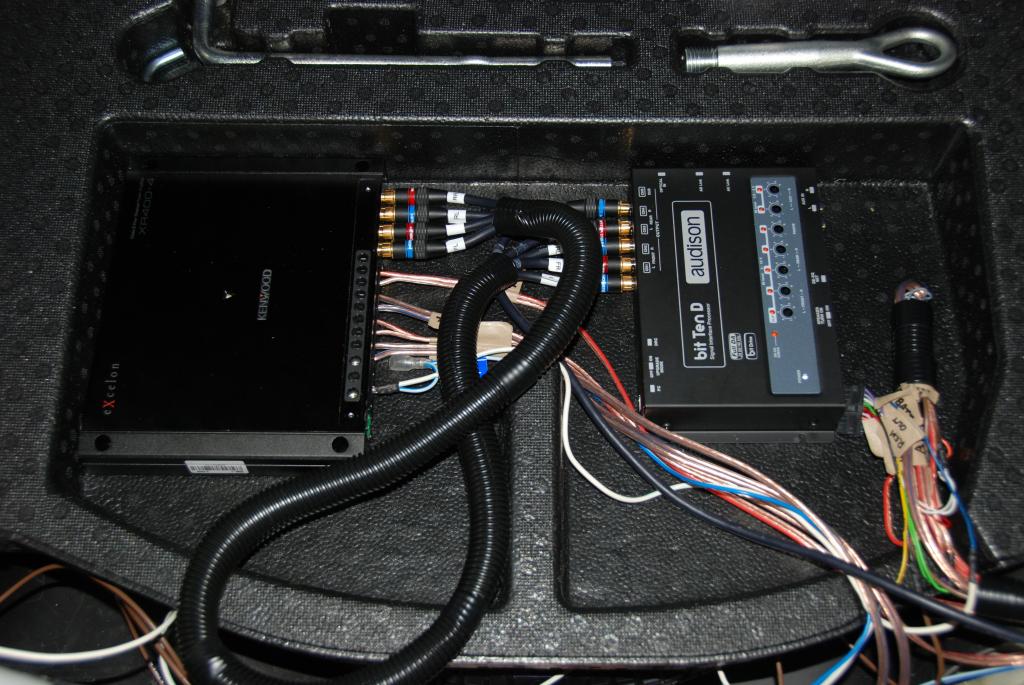
Wires and components finally laid out
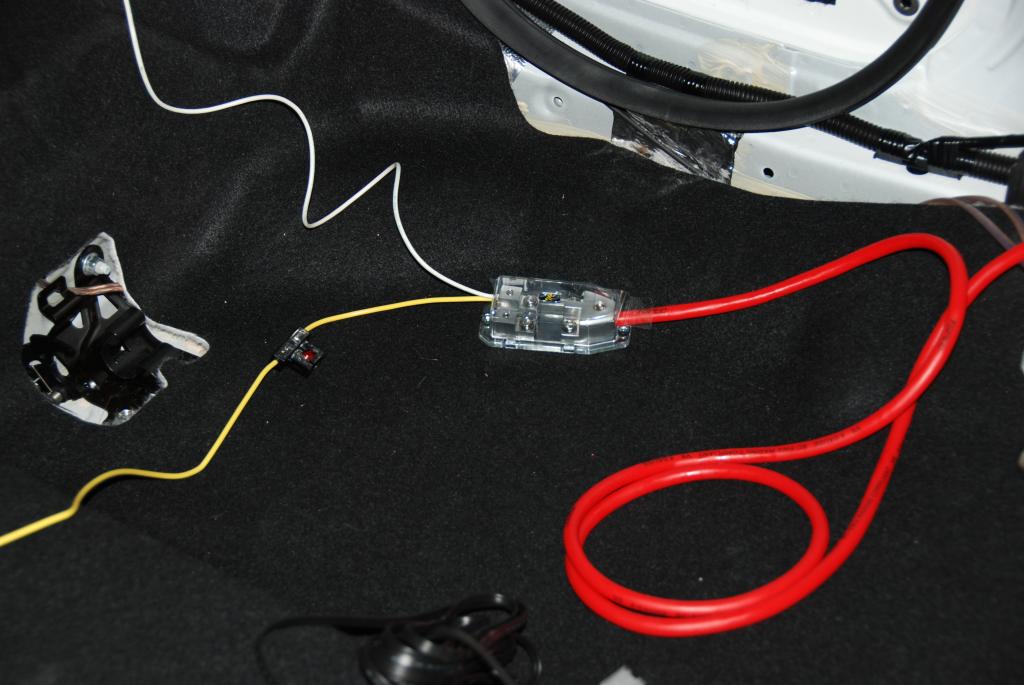
Power Blocks installed.
Positive block straight to battery. 4 gauge cable was fished through the rubber boot located on the engine firewall slightly below the brake reservoir.
Negative block connected to rear seat bolt

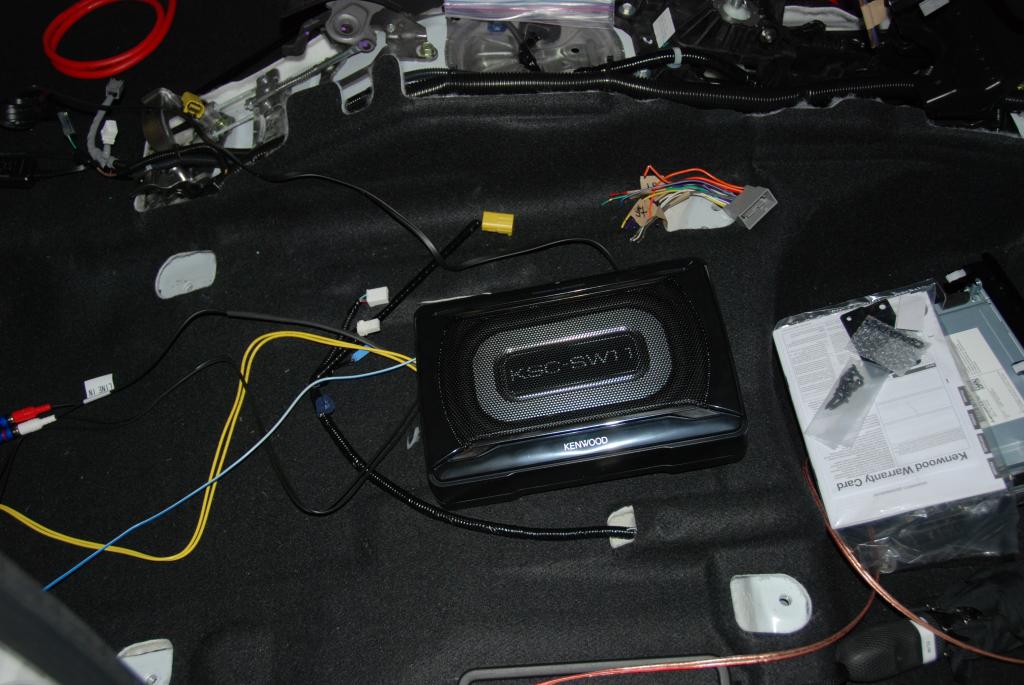
Kenwood Amp and Sound processor wired
Kenwood powered sub wired
Before starting all my projects, had so much time and thought everything was covered. NADA! Will go to Autozone or our local parts store tmrw and score 4 gauge and 6 gauge power cables for the amp.
As previously mentioned, OEM HU connector should arrive this weekend and am targeting Sat. for the first sound test. Should that fare well, it'll be another couple of days to tidy and secure up all wires, power blocks, components.
Finally, interior reinstall and then DRIVE, DRIVE, DRIVE at long last!!!!!!!!!
UPDATE 10/23: Wire clean-up started this morning. What a bloody mess I created!!!
Power Blocks installed.
Positive block straight to battery. 4 gauge cable was fished through the rubber boot located on the engine firewall slightly below the brake reservoir.
Negative block connected to rear seat bolt
Kenwood Amp and Sound processor wired
Kenwood powered sub wired
Before starting all my projects, had so much time and thought everything was covered. NADA! Will go to Autozone or our local parts store tmrw and score 4 gauge and 6 gauge power cables for the amp.
As previously mentioned, OEM HU connector should arrive this weekend and am targeting Sat. for the first sound test. Should that fare well, it'll be another couple of days to tidy and secure up all wires, power blocks, components.
Finally, interior reinstall and then DRIVE, DRIVE, DRIVE at long last!!!!!!!!!
UPDATE 10/23: Wire clean-up started this morning. What a bloody mess I created!!!
Last edited by ROTTBOY; Oct 23, 2014 at 03:25 PM.

Member
Joined: Jul 2014
Posts: 334
From: Florida, USA
Can you tell me how to get the center console out? I see the two "screws" near the footwell on each side. I need to know how to remove gear shift knob and does it just pull up? Thanks
REPLY: Center console removal
- pop out the plastic cover behind the armrest (facing the rear seats), unplug the lighter and USB
- remove the two lower bolts
- remove the lower front center console panel containing the lighter, HDMI and USB (one screw on top - then pop it out) once done, you'll see two screws in the center which are to be removed.
- remove the gear shift knob
- the console is now held in place by a center clip (green). Just pull up the console and give is a small tug to unpop the clip. Remember to reinstall the clip back to the console if it gets stuck with the car body.
If your gearshift knob is auto there is a thread somewhere on FF that describes this. (Update: SilverEX15 to the rescue in the succeeding post)
For the 6-speed, you have to pull down the boot shift cover (held in place with plastic hooks at the base of the knob). Once you separate the cover from the knob then just unscrew to remove.
Hope that helps - rttby
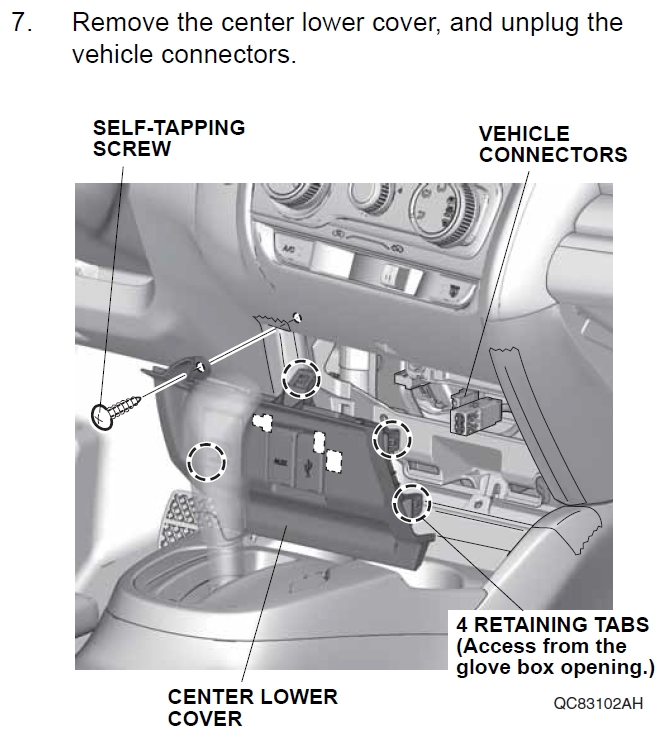
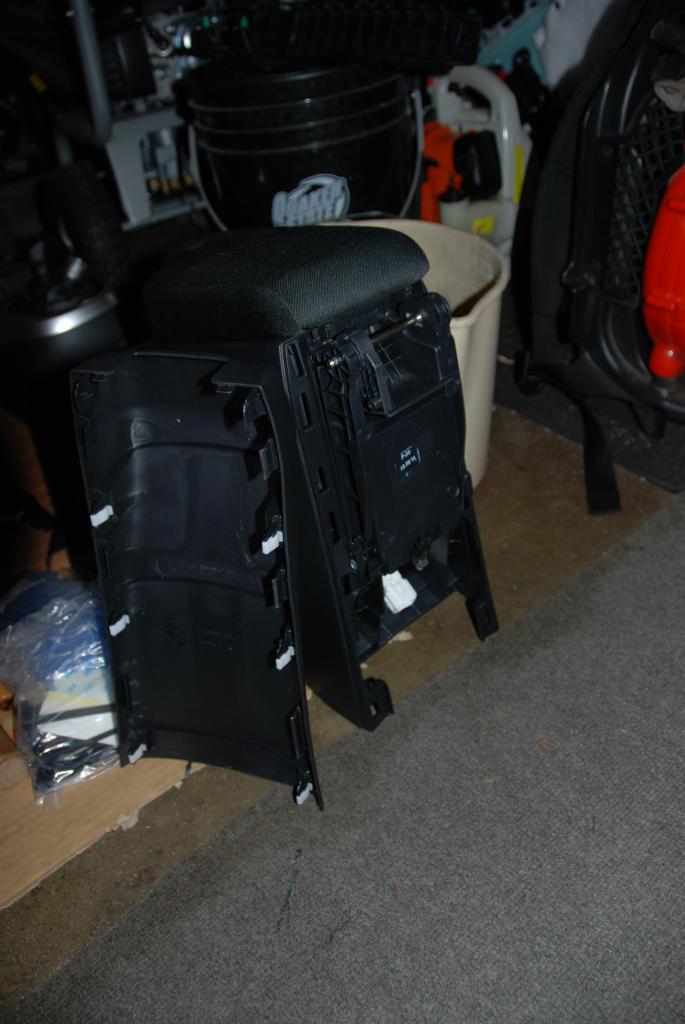
REPLY: Unfortunately, yes. The boot ring cannot pop out. Its secured underneath the console with 8 screws.
- rttbyHere's a pic:
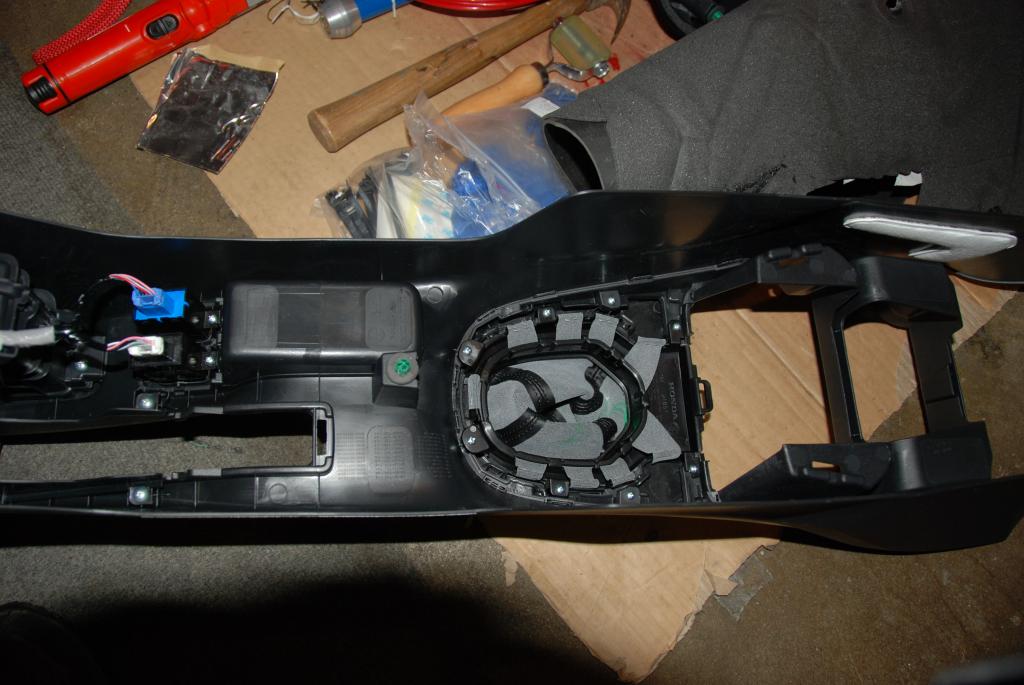
REPLY TO REPLY: Thanks Rottboy! Seeing the pic is a big help. My adapter ring should be here tomorrow so this will make a nice weekend project. Also, I like you method of responding within the post like this. Keeps things organized.
Last edited by m_x; Oct 24, 2014 at 10:53 AM.
Member
Joined: Jul 2014
Posts: 3,276
From: Shokan, NY
What do I have to do to completely remove the center console on an EX? I can unhook the front, but I don't see a way to free the rear portion.
REply: Try following the steps in reply on post #556. Note, it applies to 6-spds. For CVT's, once you remove the shift knob, the procedure should be the same. Good luck! - rttby
REply: Try following the steps in reply on post #556. Note, it applies to 6-spds. For CVT's, once you remove the shift knob, the procedure should be the same. Good luck! - rttby
Last edited by ROTTBOY; Oct 24, 2014 at 08:23 AM.

Member
Joined: Sep 2014
Posts: 57
From: Cincinnati, OH
Add'l: Suggest investing in some plastic trim removal tools to keep the plastic components "mark-free". These make removals easier too!!! - rttby
Pictorial reply: Hope this helps too!!! - rttby
Last edited by ROTTBOY; Oct 25, 2014 at 03:30 AM.
Member
Joined: Jul 2014
Posts: 3,276
From: Shokan, NY
The back of the console is a seperate piece. It's just clipped on. Pull it off and you'll see two 8mm bolts. There will also be 3 cables that need to be unplugged. Then it will just pull out. There is also a green clip, like what's used in the doors, near the e-brake. It will just come loose when you pull up. Just make sure you reconnect it when you re-install.