When you click on links to various merchants on this site and make a purchase, this can result in this site earning a commission. Affiliate programs and affiliations include, but are not limited to, the eBay Partner Network.
Hi guys, I bought a Sony XAV-AX5000 head unit and successfully installed it on my 2018 Honda Jazz (Australia model of Fit), with everything works perfectly including backup camera and steering wheel control. I have to say it takes me a lot of time and effect and more than 100 Australian dollars to install, however it was a lot of fun and I really enjoyed it. This post might be a little bit long so I split it into several parts.
0. The beginning
I had no idea about car head unit before this installation. When I bought the Sony head unit, I didn't expect it would be so many difficulties, I simply thought when I remove the old head unit I just need to plug in the new one and that's all. So that was surprised me a lot when I took off the old unit, found all the plugs cannot be fitted in my new Sony unit.
There are mainly two plugs on my OEM head unit (the 3rd one is for radio antenna).
I searched on google, found some harnesses, but looked into those harnesses pictures I could tell they were not the correct ones for my car. Finally, I found this forum, and thanks to Bassguitarist1985's post, I realised I was so lucky that Honda changed the head unit's terminals and plugs from 2018 model, and there are no harnesses or adapters on the market at all.
Therefore I changed my focus from searching a harness to studying head unit wiring. Thanks to the internet, I found many useful information(I will put them on the end of the post). And thanks to the internet again, I found a Chinese seller has the newest type of Honda plugs(but he don't know the wiring diagram). At last I bought many stuffs from China, including RCA (for backup camera), radio antenna adapter, butt connecters, etc.
1. Figuring out the OEM head unit pinout diagram
Bassguitarist1985's post helped me a lot in the first place. Although his diagram is not the same as my car (maybe because of my Australian model), the basic ones are the same, such as +12V, GND, ACC, 8 pins of speakers.
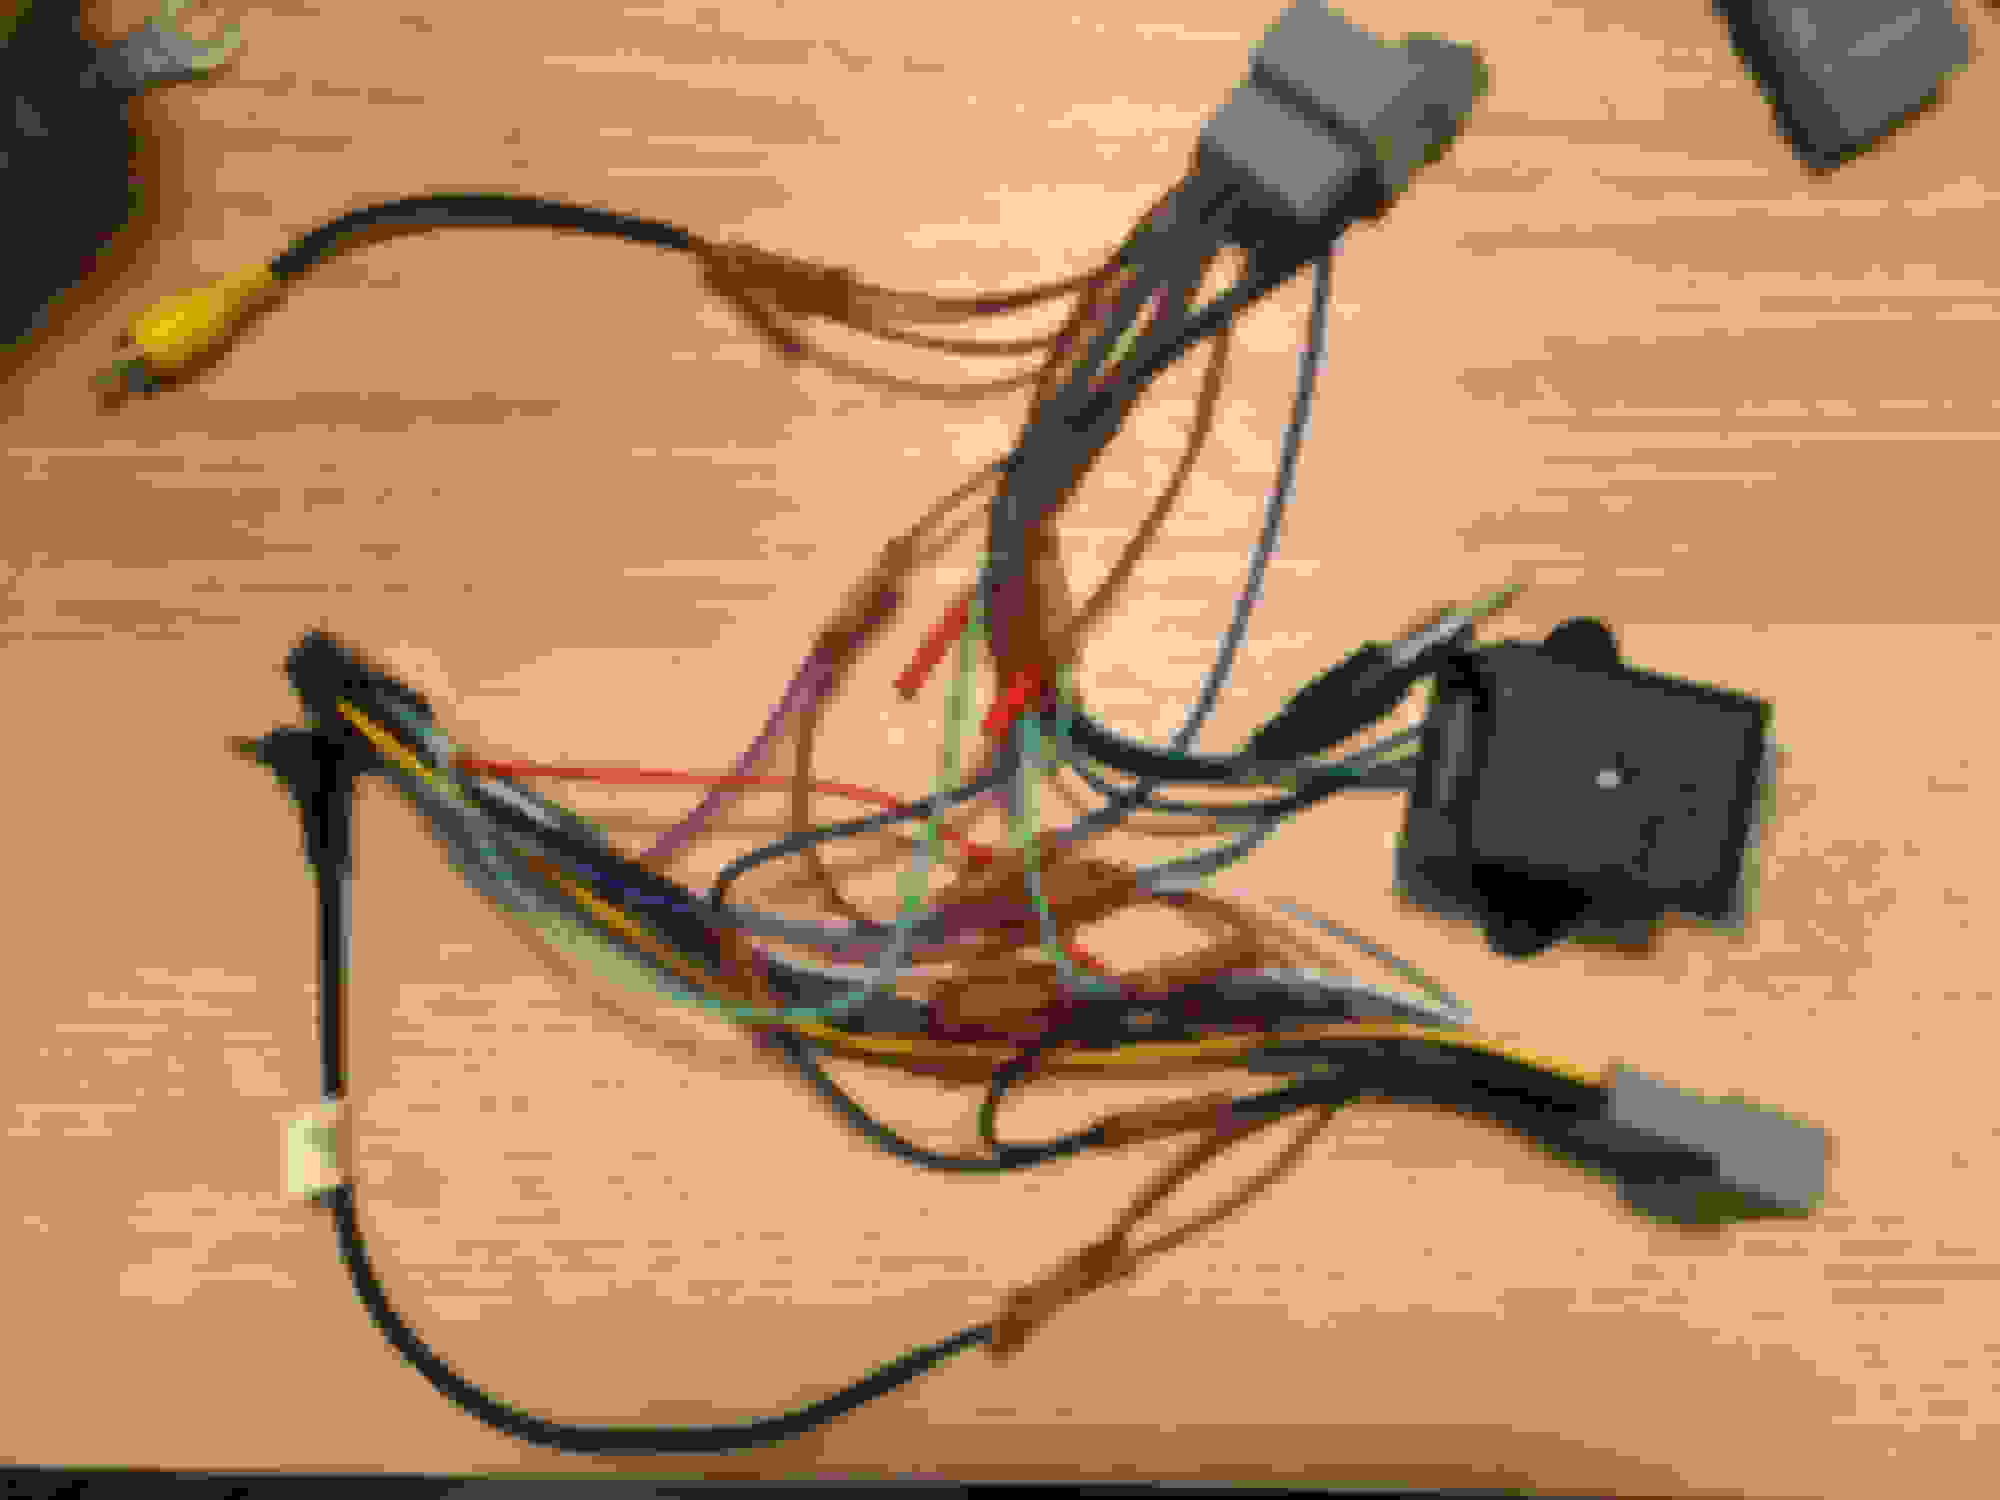
I made a harness made of female/male butt connectors for easy connecting/disconnecting to test the functions of each pin.
A multimeter was essential to this project.
After several hours, I worked out most of the pins. There are still 2 pins' functions I don't know(A22 and B19), but those don't have any issues at last (maybe they are for the higher level trim and my car is the lowest trim).
About A9, A13 and A19, they are for the steering control. B5 and B18 are for reverse camera view mode. I will explain in the next parts.
2. Steering wheel control
I found there are some universal adaptors for steering wheel control on the market but they all very pricy (more than 100 Australian dollars). Actually, you might don't need an adaptor at all.
Most of the steering control provides a pair of signals to the head unit, tell the head unit which button has been pressed. It works like a head unit provide a pair of signals to a speaker to make a sound. To my car, it is a bit special because it has three pins (A9, A13 and A19) providing three signals, not two.
My 2018 Honda Jazz has 7 buttons. A19 is the ground of steering wheel control signal, A13+A19 provides bluetooth buttons (pick up button and hang up button) signal, and A9+A19 relates to other five buttons: SOURCE, volume up/down, next/previous song.
And according to Sony's official instructions, Sony's head unit receives a pair of signals from 2 wires of a 3.5 mm jack plug: input 1 and GND. A19 is GND obviously. Then I simply connected A13 and A9 together to input1, and it works perfectly.
3. Backup camera
Normally the backup camera needs five wires: a pair for power supply, another pair for the video signal, and the last one is to make a shield for all the other four wires to provide electronic protection. Those five wires are B2, B3, B4, B15 and B16.
There is an important thing to my car and maybe to most of the other cars, the OEM backup camera's power input voltage is 6V, not 12V from battery. The 6V power supply is from the OEM head unit B16 (that means there must be a transformer inside the OEM head unit), but the Sony head unit doesn't have this kind of voltage output. So I bought a DC voltage step-down transformer for it.
Another thing is B7, it connects to the backlight. When I put the shift to the reverse gear, B7 gets +12V output because backlights are turned on. This voltage will trigger the head unit to display the backup camera view. I also connected B7 to the transformer to get 6V output for reverse camera, and there is an advantage: the reverse camera won't get power supply unless the car is reversing, it means that the transformer produces less heat and also good for the camera.
I made the connections and the camera works, but there was a small issue you can find in the picture: the view is odd, like a fish-eye view, not a normal backup view.
The thing is, my 2018 Honda Jazz OEM head unit provides three different views for the reverse camera: wide view mode, normal view mode and top-down view mode. And the OEM head unit has three buttons on the screen to select a specific view. I tested using a multimeter, the voltage between B5 and B18 changed when I tapped a button.
I think B5 and B18 provide a signal together to tell the backup camera which view is selected, but obviously, my new Sony head unit won't provide three buttons for this function. So I tried several combinations, and found that the view can be selected when B5 or B18 is grounded or not connect to any wire:
B5 grounded + B18 not connected = top-down view
B5 not connected + B18 grounded = normal view
B5 grounded + B18 grounded = wide view
B5 not connected + B18 not connected = odd fish-eye view (maybe this is the original view from the camera)
I like the normal view so I put B5 not connected and B18 grounded, it works very nice finally.
4. The DIY harness
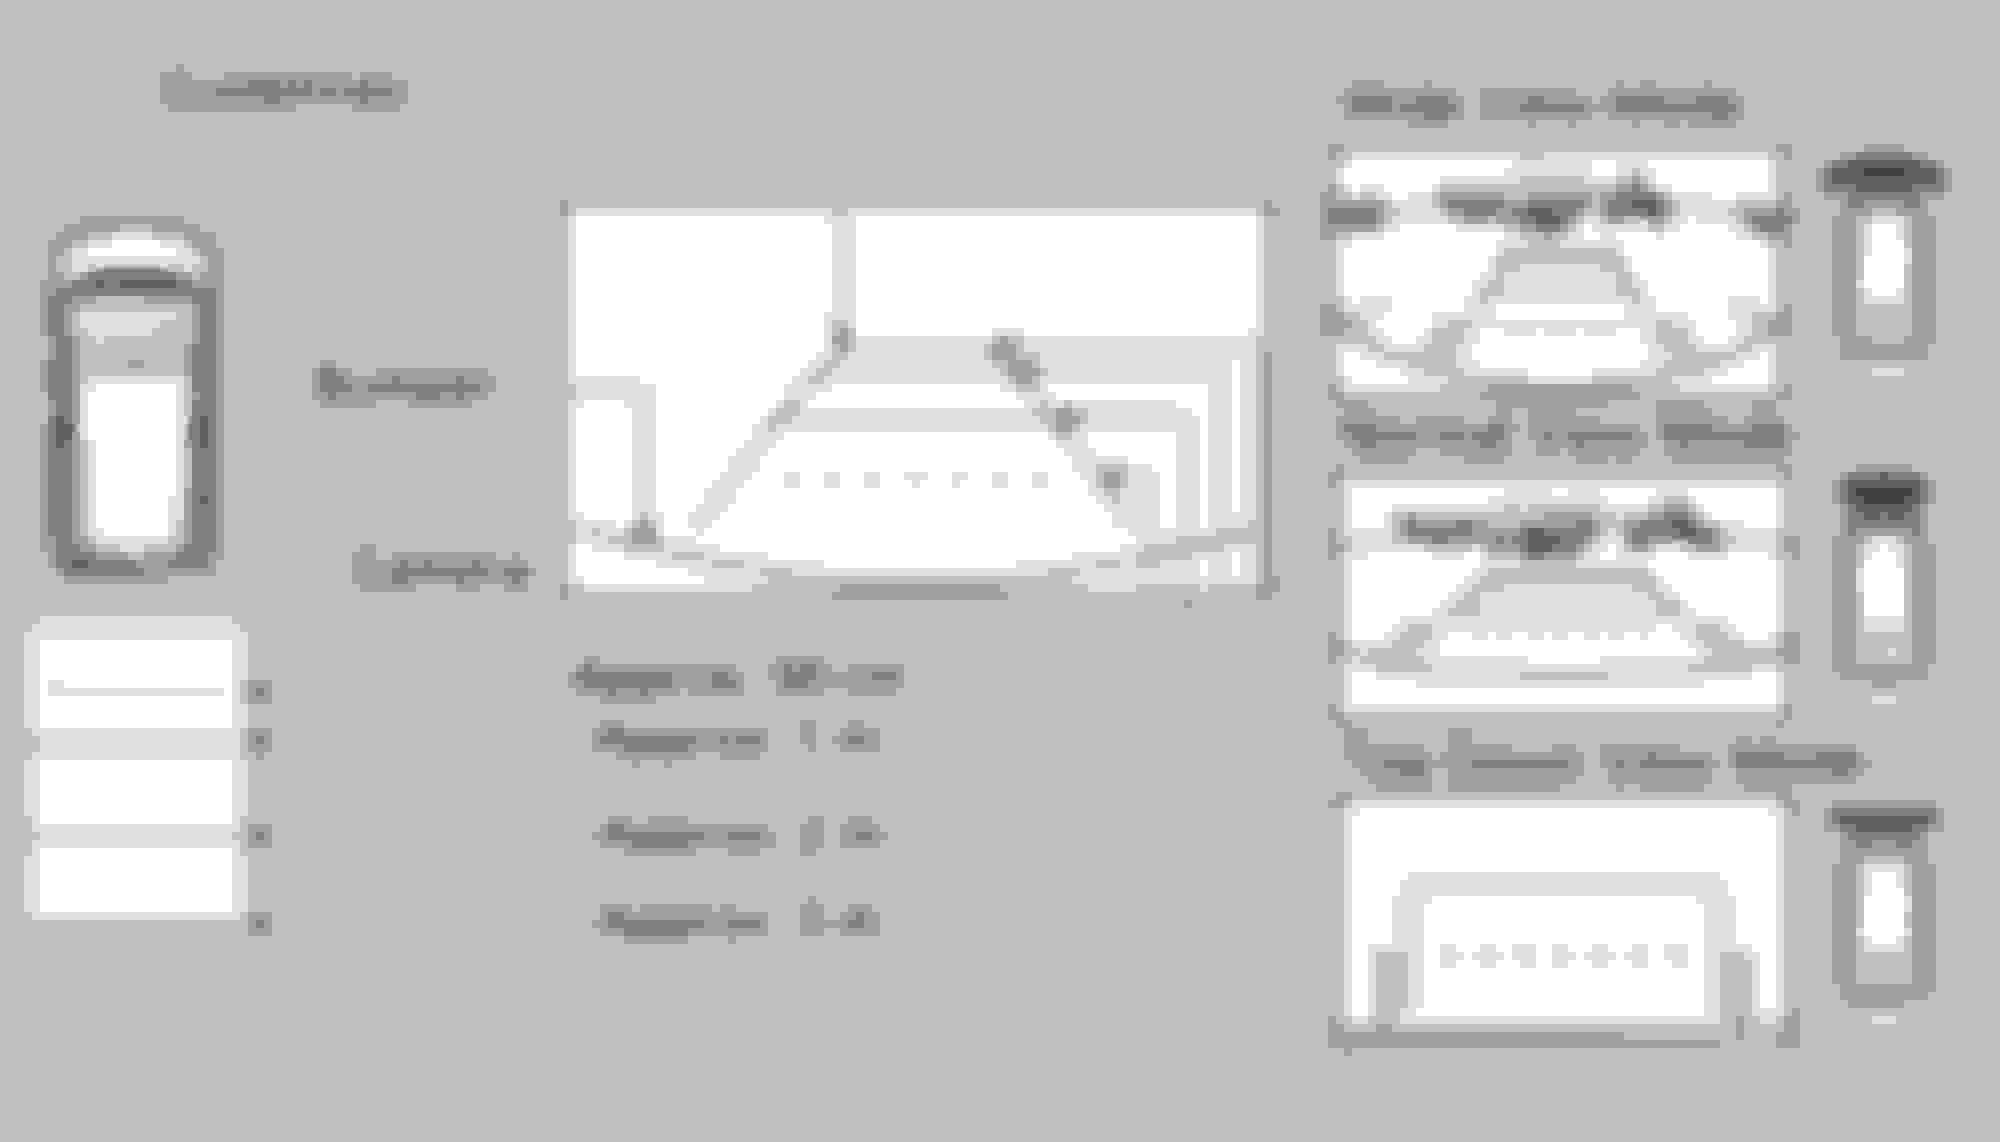
Finally, a harness was made through this diagram to connect the Sony head unit to my 2018 Honda Jazz:
Note: I bypassed the parking brake safety check; B5 not connect and B18 grounded to A1 to select the 'normal view mode' of reverse camera.
For my 16, there are 2 universal steering wheel adapters. One made by Access which works for volume, fast forward/track change and source. It doesn't work for the phone control buttons.
The other is made by PAC and everything works including the phone controls, but one thing I couldn't figure out was why the headunit would not turn off with the key out of ignition.
I was also going to do a camera input like you but gave up on that. Now I've forgotten which wire triggered the cameras, etc...
great job. which specific oem head unit did you replace? is it the android auto/carplay compatible one?
No, just a very basic China made Honda Display Audio, no carplay no andriod auto, only have very few functions and the screen display very bad. That's why I decided to replace it.
For my 16, there are 2 universal steering wheel adapters. One made by Access which works for volume, fast forward/track change and source. It doesn't work for the phone control buttons.
The other is made by PAC and everything works including the phone controls, but one thing I couldn't figure out was why the headunit would not turn off with the key out of ignition.
I was also going to do a camera input like you but gave up on that. Now I've forgotten which wire triggered the cameras, etc...
So I really applaud your efforts.
Maybe that PAC adapter connects the +12V continuous power supply to the head unit's ACC pin, that will result in the head unit always be turned on.
You can work out the camera trigger wire using a multimeter: just check each wire from the car with the multimeter, if you get 0V in P shift but 12V in R shift, that is the trigger wire (aka, backlight wire).
Where did you get the female connectors.
My AU 2017 has the 24 pin A connector but only an 8 pin B connector.
A Chinese seller on Taobao.com. He is some kind of car connector specialist or manufacturer, I think he should also have your 8 pin connector. This is the online store: https://m.tb.cn/h.ehzOu67
Hi guys, I bought a Sony XAV-AX5000 head unit and successfully installed it on my 2018 Honda Jazz (Australia model of Fit), with everything works perfectly including backup camera and steering wheel control. I have to say it takes me a lot of time and effect and more than 100 Australian dollars to install, however it was a lot of fun and I really enjoyed it. This post might be a little bit long so I split it into several parts.
0. The beginning
I had no idea about car head unit before this installation. When I bought the Sony head unit, I didn't expect it would be so many difficulties, I simply thought when I remove the old head unit I just need to plug in the new one and that's all. So that was surprised me a lot when I took off the old unit, found all the plugs cannot be fitted in my new Sony unit.
There are mainly two plugs on my OEM head unit (the 3rd one is for radio antenna).
I searched on google, found some harnesses, but looked into those harnesses pictures I could tell they were not the correct ones for my car. Finally, I found this forum, and thanks to Bassguitarist1985's post, I realised I was so lucky that Honda changed the head unit's terminals and plugs from 2018 model, and there are no harnesses or adapters on the market at all.
Therefore I changed my focus from searching a harness to studying head unit wiring. Thanks to the internet, I found many useful information(I will put them on the end of the post). And thanks to the internet again, I found a Chinese seller has the newest type of Honda plugs(but he don't know the wiring diagram). At last I bought many stuffs from China, including RCA (for backup camera), radio antenna adapter, butt connecters, etc.
1. Figuring out the OEM head unit pinout diagram
Bassguitarist1985's post helped me a lot in the first place. Although his diagram is not the same as my car (maybe because of my Australian model), the basic ones are the same, such as +12V, GND, ACC, 8 pins of speakers.
I made a harness made of female/male butt connectors for easy connecting/disconnecting to test the functions of each pin.
A multimeter was essential to this project.
After several hours, I worked out most of the pins. There are still 2 pins' functions I don't know(A22 and B19), but those don't have any issues at last (maybe they are for the higher level trim and my car is the lowest trim).
About A9, A13 and A19, they are for the steering control. B5 and B18 are for reverse camera view mode. I will explain in the next parts.
2. Steering wheel control
I found there are some universal adaptors for steering wheel control on the market but they all very pricy (more than 100 Australian dollars). Actually, you might don't need an adaptor at all.
Most of the steering control provides a pair of signals to the head unit, tell the head unit which button has been pressed. It works like a head unit provide a pair of signals to a speaker to make a sound. To my car, it is a bit special because it has three pins (A9, A13 and A19) providing three signals, not two.
My 2018 Honda Jazz has 7 buttons. A19 is the ground of steering wheel control signal, A13+A19 provides bluetooth buttons (pick up button and hang up button) signal, and A9+A19 relates to other five buttons: SOURCE, volume up/down, next/previous song.
And according to Sony's official instructions, Sony's head unit receives a pair of signals from 2 wires of a 3.5 mm jack plug: input 1 and GND. A19 is GND obviously. Then I simply connected A13 and A9 together to input1, and it works perfectly.
3. Backup camera
Normally the backup camera needs five wires: a pair for power supply, another pair for the video signal, and the last one is to make a shield for all the other four wires to provide electronic protection. Those five wires are B2, B3, B4, B15 and B16.
There is an important thing to my car and maybe to most of the other cars, the OEM backup camera's power input voltage is 6V, not 12V from battery. The 6V power supply is from the OEM head unit B16 (that means there must be a transformer inside the OEM head unit), but the Sony head unit doesn't have this kind of voltage output. So I bought a DC voltage step-down transformer for it.
Another thing is B7, it connects to the backlight. When I put the shift to the reverse gear, B7 gets +12V output because backlights are turned on. This voltage will trigger the head unit to display the backup camera view. I also connected B7 to the transformer to get 6V output for reverse camera, and there is an advantage: the reverse camera won't get power supply unless the car is reversing, it means that the transformer produces less heat and also good for the camera.
I made the connections and the camera works, but there was a small issue you can find in the picture: the view is odd, like a fish-eye view, not a normal backup view.
The thing is, my 2018 Honda Jazz OEM head unit provides three different views for the reverse camera: wide view mode, normal view mode and top-down view mode. And the OEM head unit has three buttons on the screen to select a specific view. I tested using a multimeter, the voltage between B5 and B18 changed when I tapped a button.
I think B5 and B18 provide a signal together to tell the backup camera which view is selected, but obviously, my new Sony head unit won't provide three buttons for this function. So I tried several combinations, and found that the view can be selected when B5 or B18 is grounded or not connect to any wire:
B5 grounded + B18 not connected = top-down view
B5 not connected + B18 grounded = normal view
B5 grounded + B18 grounded = wide view
B5 not connected + B18 not connected = odd fish-eye view (maybe this is the original view from the camera)
I like the normal view so I put B5 not connected and B18 grounded, it works very nice finally.
4. The DIY harness
Finally, a harness was made through this diagram to connect the Sony head unit to my 2018 Honda Jazz:
Note: I bypassed the parking brake safety check; B5 not connect and B18 grounded to A1 to select the 'normal view mode' of reverse camera.
I have been looking everywhere for the power harness (labeled A(1-24) you posted the one thats for your 2018 honda jazz by any chances can you lead me in the right direction as to where you bought it i need the harness for my Honda accord EX-l Radio navigation its the only wire i cant find.
Hi Carlyee, thank you very much for your beautiful post , i spent too much time just to figure out what suit my head unit until i saw your post.
I have a honda hrv 2018 (Australian version) with the same shitty OEM head unit, the only difference is that it has GPS navigation. do you think it is the same as yours?
if so i will follow your wire mapping
thank you
Update to Sony Head Unit install on 2018 Honda Jazz
Originally Posted by carlyee
Hi guys, I bought a Sony XAV-AX5000 head unit and successfully installed it on my 2018 Honda Jazz (Australia model of Fit), with everything works perfectly including backup camera and steering wheel control. I have to say it takes me a lot of time and effect and more than 100 Australian dollars to install, however it was a lot of fun and I really enjoyed it. This post might be a little bit long so I split it into several parts.
0. The beginning
I had no idea about car head unit before this installation. When I bought the Sony head unit, I didn't expect it would be so many difficulties, I simply thought when I remove the old head unit I just need to plug in the new one and that's all. So that was surprised me a lot when I took off the old unit, found all the plugs cannot be fitted in my new Sony unit.
There are mainly two plugs on my OEM head unit (the 3rd one is for radio antenna).
I searched on google, found some harnesses, but looked into those harnesses pictures I could tell they were not the correct ones for my car. Finally, I found this forum, and thanks to Bassguitarist1985's post, I realised I was so lucky that Honda changed the head unit's terminals and plugs from 2018 model, and there are no harnesses or adapters on the market at all.
Therefore I changed my focus from searching a harness to studying head unit wiring. Thanks to the internet, I found many useful information(I will put them on the end of the post). And thanks to the internet again, I found a Chinese seller has the newest type of Honda plugs(but he don't know the wiring diagram). At last I bought many stuffs from China, including RCA (for backup camera), radio antenna adapter, butt connecters, etc.
1. Figuring out the OEM head unit pinout diagram
Bassguitarist1985's post helped me a lot in the first place. Although his diagram is not the same as my car (maybe because of my Australian model), the basic ones are the same, such as +12V, GND, ACC, 8 pins of speakers.
I made a harness made of female/male butt connectors for easy connecting/disconnecting to test the functions of each pin.
A multimeter was essential to this project.
After several hours, I worked out most of the pins. There are still 2 pins' functions I don't know(A22 and B19), but those don't have any issues at last (maybe they are for the higher level trim and my car is the lowest trim).
About A9, A13 and A19, they are for the steering control. B5 and B18 are for reverse camera view mode. I will explain in the next parts.
2. Steering wheel control
I found there are some universal adaptors for steering wheel control on the market but they all very pricy (more than 100 Australian dollars). Actually, you might don't need an adaptor at all.
Most of the steering control provides a pair of signals to the head unit, tell the head unit which button has been pressed. It works like a head unit provide a pair of signals to a speaker to make a sound. To my car, it is a bit special because it has three pins (A9, A13 and A19) providing three signals, not two.
My 2018 Honda Jazz has 7 buttons. A19 is the ground of steering wheel control signal, A13+A19 provides bluetooth buttons (pick up button and hang up button) signal, and A9+A19 relates to other five buttons: SOURCE, volume up/down, next/previous song.
And according to Sony's official instructions, Sony's head unit receives a pair of signals from 2 wires of a 3.5 mm jack plug: input 1 and GND. A19 is GND obviously. Then I simply connected A13 and A9 together to input1, and it works perfectly.
3. Backup camera
Normally the backup camera needs five wires: a pair for power supply, another pair for the video signal, and the last one is to make a shield for all the other four wires to provide electronic protection. Those five wires are B2, B3, B4, B15 and B16.
There is an important thing to my car and maybe to most of the other cars, the OEM backup camera's power input voltage is 6V, not 12V from battery. The 6V power supply is from the OEM head unit B16 (that means there must be a transformer inside the OEM head unit), but the Sony head unit doesn't have this kind of voltage output. So I bought a DC voltage step-down transformer for it.
Another thing is B7, it connects to the backlight. When I put the shift to the reverse gear, B7 gets +12V output because backlights are turned on. This voltage will trigger the head unit to display the backup camera view. I also connected B7 to the transformer to get 6V output for reverse camera, and there is an advantage: the reverse camera won't get power supply unless the car is reversing, it means that the transformer produces less heat and also good for the camera.
I made the connections and the camera works, but there was a small issue you can find in the picture: the view is odd, like a fish-eye view, not a normal backup view.
The thing is, my 2018 Honda Jazz OEM head unit provides three different views for the reverse camera: wide view mode, normal view mode and top-down view mode. And the OEM head unit has three buttons on the screen to select a specific view. I tested using a multimeter, the voltage between B5 and B18 changed when I tapped a button.
I think B5 and B18 provide a signal together to tell the backup camera which view is selected, but obviously, my new Sony head unit won't provide three buttons for this function. So I tried several combinations, and found that the view can be selected when B5 or B18 is grounded or not connect to any wire:
B5 grounded + B18 not connected = top-down view
B5 not connected + B18 grounded = normal view
B5 grounded + B18 grounded = wide view
B5 not connected + B18 not connected = odd fish-eye view (maybe this is the original view from the camera)
I like the normal view so I put B5 not connected and B18 grounded, it works very nice finally.
4. The DIY harness
Finally, a harness was made through this diagram to connect the Sony head unit to my 2018 Honda Jazz:
Note: I bypassed the parking brake safety check; B5 not connect and B18 grounded to A1 to select the 'normal view mode' of reverse camera.
Great Job on the 2018 Jazz, I think if it wasn't for your efforts I would have gone down the rabbit hole by lots of unnecessary adaptors etc.
I have managed to install a Sony XAV-AX4000 but have found a couple of small things worth highlighting that added hours to the install.
Pin 1 of both connectors is located as per the diagram below. I had this mirror hence all my B connection where wrong.
The descriptions for the Reverse Camera signals are opposite to the original post. The center conductor for the RCA connection signal + should go to B15.
Two more thing the Aerpro FB8077 makes the install complete.
I managed to get the connectors from Amazon:
"24Pin Car Radio Wiring Harness for Honda 2013-2020 with Radio Antenna Adapter Aftermarket Car Stereo Wiring Harness Connector for Accord Civic CR-V Odyssey Fit Car Stereo Radio Wiring Harness Cable" https://www.amazon.com.au/gp/product/B0DCS25NB6
I also sourced a "Multi-Voltage Regulated Adaptor Module" from Jaycar (a local Australian Company) CAT.NO: AA0372 to convert the 12V to 6V for the Reversing Camera.