
Tire Changing Tips


Thread Starter
|
Member
Joined: Jul 2014
Posts: 3,241
From: Shokan, NY

Tire Changing Tips
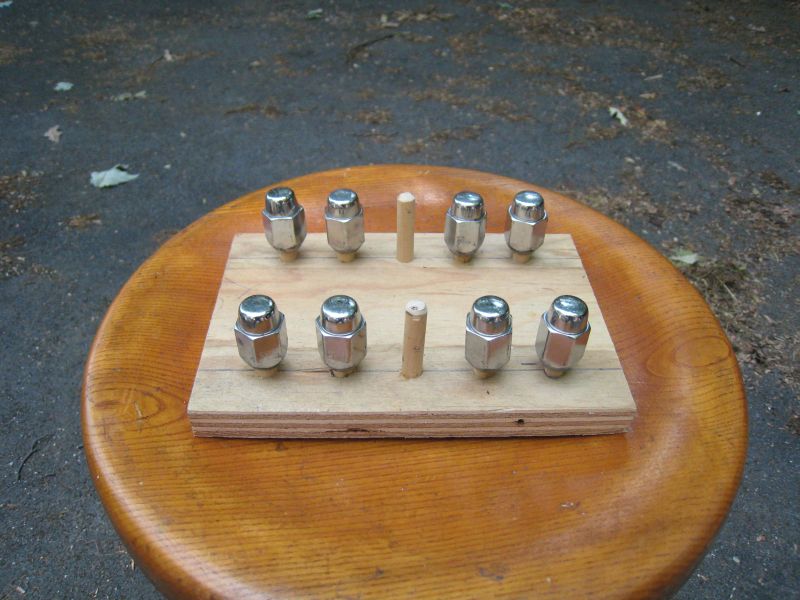
Here are two things I made to make changing tires and jacking up the car easier. The first is a holder for the lug nuts. They aren't going to roll away or get scratched .
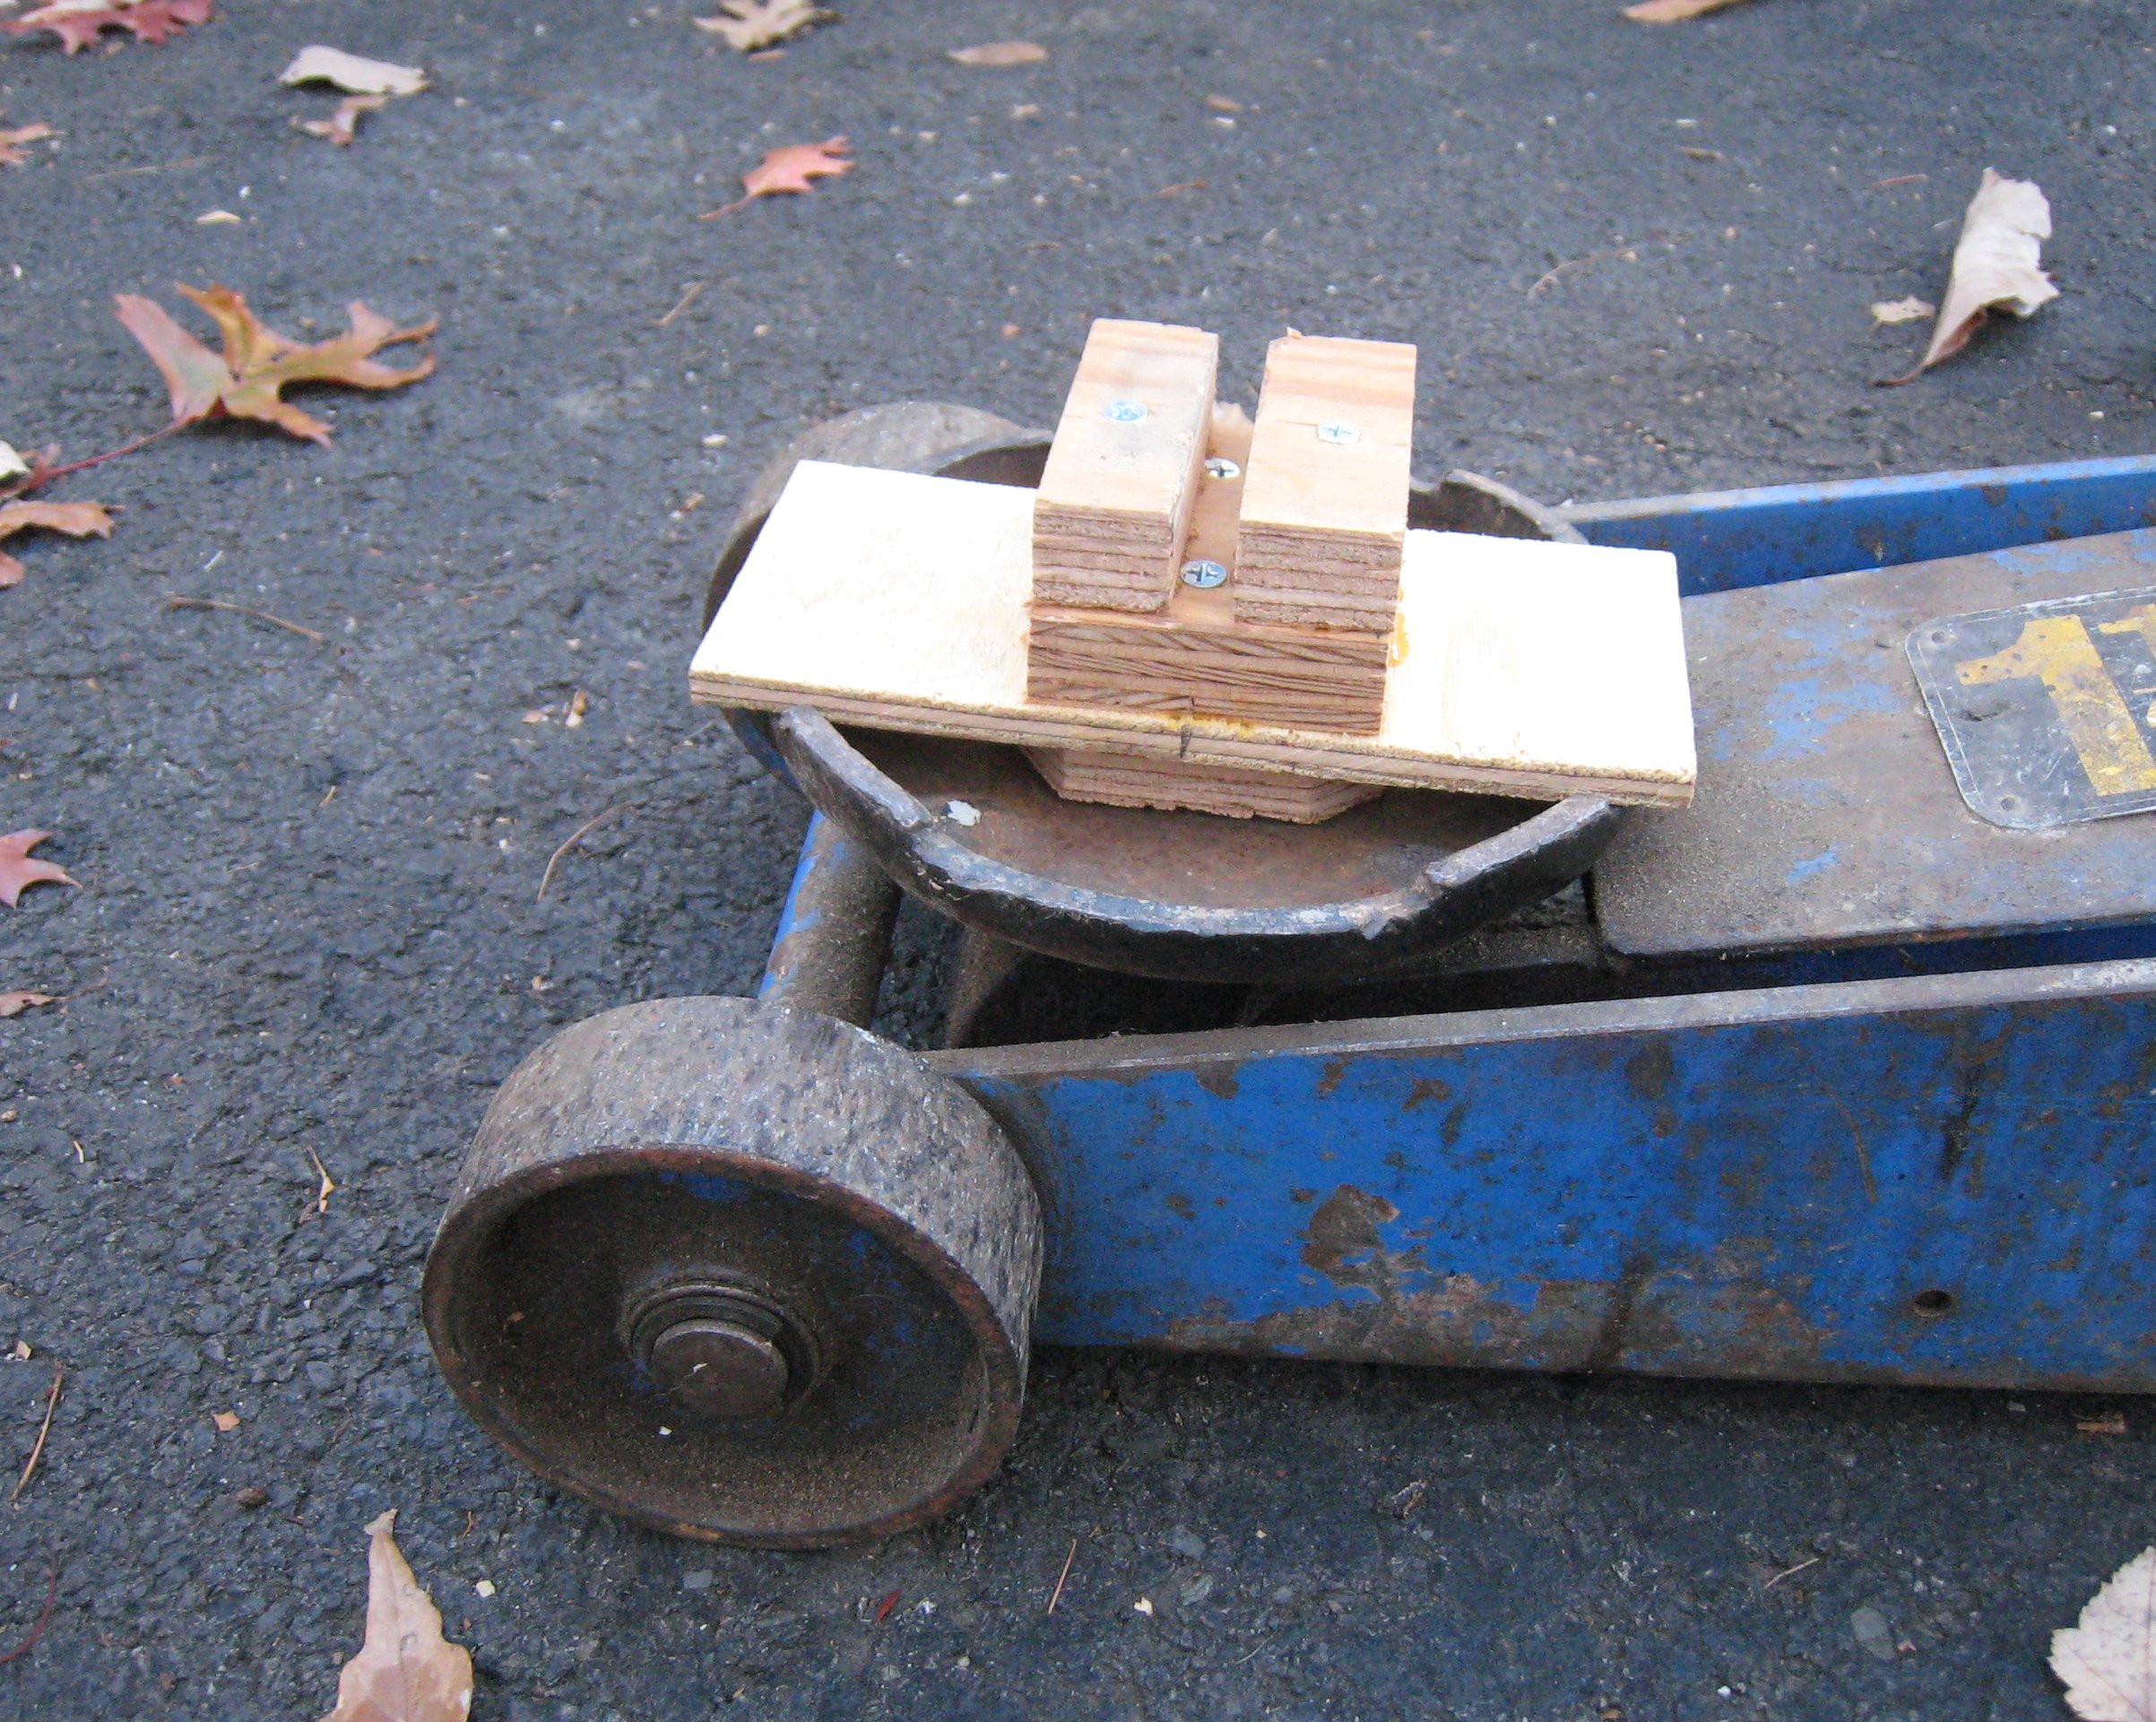
The second is a block I made for the Nissan Cube I used to have. I can use the big jack without worrying that it will damage the bottom of the car. First, I tried cutting a groove into a 2 X 4, but it split too easily. Then I used two pieces of plywood the right distance apart. This one is too high to fit under the Fit, so I'll have to make another. One difficulty is getting it to rest securely into the rounded bottom of the jack pad. If any of you have ideas, I'd like to hear them.
Another tip. Get some type of anti-seize compound and put a bit on the wheel bolts and also on the back of the wheel where it contacts the car. More than once, I've had a difficult time getting the wheel unstuck from the car.
Thread Starter
|
Member
Joined: Jul 2014
Posts: 3,241
From: Shokan, NY
As for the large floor jack - yes, it means I can lift large loads.


Member
Joined: Oct 2014
Posts: 342
From: Modesto, CA
Cool tips! I bought a pair of scissor jacks with large base to keep the car stable. I rarely ever use the stock jack unless changing the tire away from home.
Normally I use two to three layers of cardboard on top of the jack to protect the car just enough for the "notch" to catch onto the car frame.
Normally I use two to three layers of cardboard on top of the jack to protect the car just enough for the "notch" to catch onto the car frame.
Thread Starter
|
Member
Joined: Jul 2014
Posts: 3,241
From: Shokan, NY
Cool tips! I bought a pair of scissor jacks with large base to keep the car stable. I rarely ever use the stock jack unless changing the tire away from home.
Normally I use two to three layers of cardboard on top of the jack to protect the car just enough for the "notch" to catch onto the car frame.
Normally I use two to three layers of cardboard on top of the jack to protect the car just enough for the "notch" to catch onto the car frame.

Member
Joined: Aug 2014
Posts: 1,521
From: Manitoba CANADA
You can just buy a rubber hockey puck, use a saw to cut a groove across the surface of the puck and then drop it onto the jack. It should work real well with the jack shown in the above picture. It might take a bit of work with the saw to make the groove wide enough for the car edge and you don't want to cut it too deep.
Thread Starter
|
Member
Joined: Jul 2014
Posts: 3,241
From: Shokan, NY
You can just buy a rubber hockey puck, use a saw to cut a groove across the surface of the puck and then drop it onto the jack. It should work real well with the jack shown in the above picture. It might take a bit of work with the saw to make the groove wide enough for the car edge and you don't want to cut it too deep.
I'm off to check Amazon.
EDIT: Amazon has pucks for $1.99. They're 3" in diameter and 1" thick. I'd have to use one on top of another, since the jack pad is 1" deep. Cutting a groove wouldn't be difficult. The jack pad is 5 1/2" in diameter, but that shouldn't matter.
Thanks for the tip!
Last edited by SilverEX15; Nov 15, 2014 at 01:57 PM.

Member
Joined: May 2014
Posts: 1,545
From: SoCal, CA
The wood pad looks good, but I'd make it longer to spread the load over more of the sill. I'd also reverse the screws so there isn't any chance of the screw heads damaging the paint if the wood compresses a bit.
Or, you could just get this:
http://protechproducts.com/index.php...&product_id=56

Or, you could just get this:
http://protechproducts.com/index.php...&product_id=56
Last edited by GeorgeL; Nov 15, 2014 at 03:11 PM.
Member
Joined: Aug 2014
Posts: 1,521
From: Manitoba CANADA
Not sure how securely the rubber used in hockey pucks takes glue but you could probably also just screw or nail them together in addition for reinforcement. Hockey pucks are commonly used for this purpose up here in the Great White North.
Thread Starter
|
Member
Joined: Jul 2014
Posts: 3,241
From: Shokan, NY
[QUOTE=GeorgeL;1277855]The wood pad looks good, but I'd make it longer to spread the load over more of the sill. I'd also reverse the screws so there isn't any chance of the screw heads damaging the paint if the wood compresses a bit.
Or, you could just get this:
Clever. I'm glad I didn't know about that, or I might have spent a lot more than the hockey pucks cost. When I get something made with them, I'll post pictures.
Or, you could just get this:
Clever. I'm glad I didn't know about that, or I might have spent a lot more than the hockey pucks cost. When I get something made with them, I'll post pictures.
Member
Joined: Jul 2014
Posts: 254
From: Massachusetts
Puck You!
You can just buy a rubber hockey puck, use a saw to cut a groove across the surface of the puck and then drop it onto the jack. It should work real well with the jack shown in the above picture. It might take a bit of work with the saw to make the groove wide enough for the car edge and you don't want to cut it too deep.

A puck would probably work perfectly on my diminutive floor jack from Harbor Frieght! Thanks!
Just don't use one with the Leaf Logo. Will fail!! Go Habs!

New Member
Joined: Dec 2014
Posts: 11
From: Western Ma
On another note, I'm making that lug holder, then going to supper glue it to the bottom of my roller seat.
Thread Starter
|
Member
Joined: Jul 2014
Posts: 3,241
From: Shokan, NY
Love the Lug-nut holder idea, but I'm going have to chime in on this one. I would never recommend using anti-seize or any other lubricating compound on the lugs (on the hub contact point yes in fact that's a great idea). Reason behind it is that it lubricates the threads and facilitates the over-torquing of the lugs, causing you to tighten them more than they should and stripping the bolts. If you're rotating them at a set interval, they should never get stuck. Well at least that's what they told us in auto-class.
On another note, I'm making that lug holder, then going to supper glue it to the bottom of my roller seat.
On another note, I'm making that lug holder, then going to supper glue it to the bottom of my roller seat.
The worst thing that happened in regard to this was my inability to get a wheel off the car after all the nuts had been removed. It was rusted onto the hub. I took it to a gas station, and they had to work on it for quite a while to get it off.
It was a tire store that recommended putting the lube onto the back of the wheel.
New Member
Joined: Dec 2014
Posts: 11
From: Western Ma
I realize that over-torquing is a possibility, so I apply very little lube. In the past, I've had to deal with bad threads that made turning the nut very difficult, which would lead to under-torquing.
The worst thing that happened in regard to this was my inability to get a wheel off the car after all the nuts had been removed. It was rusted onto the hub. I took it to a gas station, and they had to work on it for quite a while to get it off.
It was a tire store that recommended putting the lube onto the back of the wheel.

Thread
Thread Starter
Forum
Replies
Last Post
MTLian
Fit DIY: Repair & Maintenance
9
Dec 12, 2012 10:23 AM