
DIY OEM Fog Light install on Base Fit

Member

Joined: Apr 2006
Posts: 577
From: USA
To Spule or Stormsilvergd3,
heres a picture that i took,its wrapped in a BLACK TAPE but its wires are connected to the front panel,i'm not sure if this is the one,the color of the switch is GRAY and it fits perfectly on the switch harness.fig.1 shows the 2 pin gray switch,fig.2 shows when its connected to harness.
but when i tried to turn on my switch the foglights did'nt do nothing.,
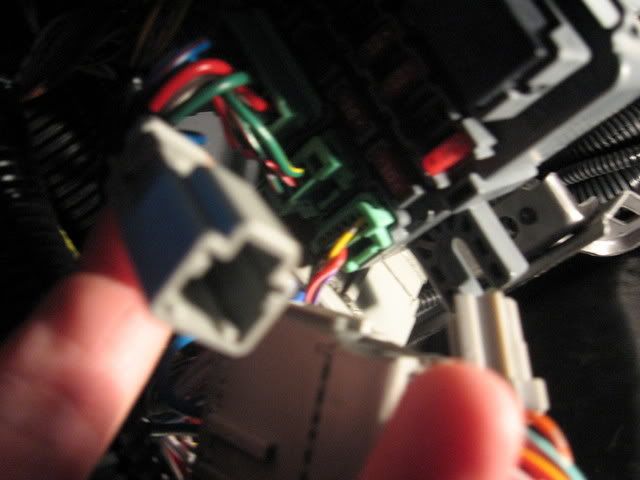
Hmm, that should be the plug. Thin wires to it?
Now, for the fogs not working, are you trying with the headlights (low) on? They will not work without them. And not on parking or high beam either, just low.
If so.....
Does the switch light up when in the ON position?
If not, and the (head) lights are on, double check the fuse in step 40 (position Nr 20). Check with VOM or test light to be sure, not just looking at it.
If the light on the switch comes on, then check the relay, does it "click".
If not, remove it and check the input voltage with a VOM or testlicht.
If not, there is a wiring problem for feed.
If it does click, and no light, check the bulbs. If they are good but do not light up, check the sockets with a VOM or test light.
If there is no voltage there, check the plugs in the fender, and the ground in step 18.
If not.....PM me and I will give you my mobile phone number and I can double check with you on the phone and compare to my car, OK? It may be later tonite or Monday afternoon however, this afternoon I have to visit a close friend that has taken seriously ill and just got out of hospital.
 I am in Tennessee, so I am in CDT zone.
Last edited by Spule 4; Aug 12, 2007 at 01:41 PM.
Member
Joined: May 2006
Posts: 288
From: camarillo,ca,usa
[. Thin wires to it?
yes,its 1 thin wire'
Now, for the fogs not working, are you trying with the headlights (low) on? They will not work without them. And not on parking or high beam either, just low.
yes,they are in ON position
Does the switch light up when in the ON position?
yes,the switch lights up in the ON position
If the light on the switch comes on, then check the relay, does it "click".
NO,it does not click,i remove it and check the input voltage using a voltmeter and i dont get anything not even 1 or 2 volts.
If not, there is a wiring problem for feed.
this is the part that i dont understand,"there is a wiring problem on the feed",does it mean theres a mistake on my connections?
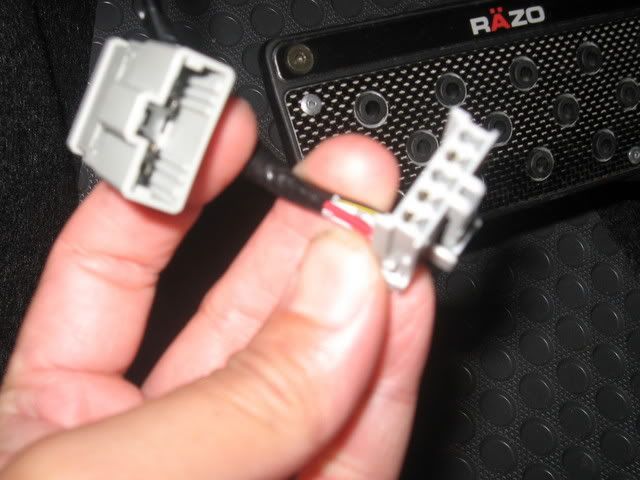
another question is on instruction no.39,like you i also had the keyless entry,when you said you piggyback the 5 pin connector you mean just connect those 5 pin connectors,am i right ? pictures shows what i did with the 5 pin connector switch harness,
Since its a busy day for you today,i will try to call you on your mobile phone on monday or anyday that's convenient for you,i will pm you right now to get your number.
yes,its 1 thin wire'
Now, for the fogs not working, are you trying with the headlights (low) on? They will not work without them. And not on parking or high beam either, just low.
yes,they are in ON position
Does the switch light up when in the ON position?
yes,the switch lights up in the ON position
If the light on the switch comes on, then check the relay, does it "click".
NO,it does not click,i remove it and check the input voltage using a voltmeter and i dont get anything not even 1 or 2 volts.
If not, there is a wiring problem for feed.
this is the part that i dont understand,"there is a wiring problem on the feed",does it mean theres a mistake on my connections?
another question is on instruction no.39,like you i also had the keyless entry,when you said you piggyback the 5 pin connector you mean just connect those 5 pin connectors,am i right ? pictures shows what i did with the 5 pin connector switch harness,
Since its a busy day for you today,i will try to call you on your mobile phone on monday or anyday that's convenient for you,i will pm you right now to get your number.
Member
Joined: Apr 2006
Posts: 577
From: USA
[quote=boyetssilverfit;165432][. Thin wires to it?
yes,its 1 thin wire'
BLUE W/RED? UNPLUGGING THIS WIRE WILL MAKE THE LIGHTS GO ON AND OFF, BUT DOES NOT IMPACT THE LIGHT ON THE SWITCH
Now, for the fogs not working, are you trying with the headlights (low) on? They will not work without them. And not on parking or high beam either, just low.
yes,they are in ON position
OK, GOOD.
Does the switch light up when in the ON position?
yes,the switch lights up in the ON position
OK, GOOD.
If the light on the switch comes on, then check the relay, does it "click".
NO,it does not click,i remove it and check the input voltage using a voltmeter and i dont get anything not even 1 or 2 volts.
LET ME GO BACK AND LOOK AT THAT.....REMOVAL OF FIVE PIN, SINGLE PIN AND FUSE WILL KILL THE FOG LIGHTS, BUT KEEP THE GREEN LIGHT ON AND ALLOW THE RELAY TO CLICK. DOUBLE CHECK THE 13 PIN PLUGS IN STEPS 42 AND 43.
this is the part that i dont understand,"there is a wiring problem on the feed",does it mean theres a mistake on my connections?
SEE ABOVE.
another question is on instruction no.39,like you i also had the keyless entry,when you said you piggyback the 5 pin connector you mean just connect those 5 pin connectors,am i right ? pictures shows what i did with the 5 pin connector switch harness,
FIRST, DOES YOUR KEYLESS CURRENTLY WORK?
TAKE THE KEYLESS PLUG OUT, PLUG IN THE FOG LIGHT, THEN PLUG THE KEYLESS INTO THE PLUG ON THE HARNESS FOR THE GOF LIGHTS.
EDIT: REMOVE THE KEYLESS PLUG FROM THE FUSE BOX, INSERT THE FIVE PIN OF THE FOG HARNES AS SHOWN IN 39 INTO THE BOX. REMOVE DUMMY PLUG ON THE FOG HARNESS, INSERT KEYLESS INTO THAT PLUG ON THE FOG LIGHT HARNESS. IN YOUR PHOTOS, IT APPEARS YOU ARE JUST MAKING A LOOP OF THE FOG LIGHT HARNESS BACK INTO ITSELF? SORRY, BUT IT IS HARD FOR ME TO TELL BY YOUR PHOTO.
Since its a busy day for you today,i will try to call you on your mobile phone on monday or anyday that's convenient for you,i will pm you right now to get your number.
SAW NOTICE OF PM, I WILL REPLY.
Last edited by Spule 4; Aug 12, 2007 at 06:31 PM. Reason: a moment of clarity?
Member
Joined: May 2006
Posts: 288
From: camarillo,ca,usa
SPULE,
THANK YOU VERY MUCH,i cant do it without your help,youre right about the 5 pin connector,i'm just making a loop,so i disconnect it & plug it to the 5 pin keyless fuse,& the 5 pin keyless harness to the 5 pin fog light switch harness,members like you are BIG ASSET to this forum because of youre KNOWLEDGE & CHARACTER,youre very helpful,i will post some pictures tonight.
THANK YOU VERY MUCH,i cant do it without your help,youre right about the 5 pin connector,i'm just making a loop,so i disconnect it & plug it to the 5 pin keyless fuse,& the 5 pin keyless harness to the 5 pin fog light switch harness,members like you are BIG ASSET to this forum because of youre KNOWLEDGE & CHARACTER,youre very helpful,i will post some pictures tonight.
Member
Joined: Apr 2006
Posts: 577
From: USA
That is great!
If I had a nickel for every silly thing I have overlooked in my decades of wrenching, I would be a rich man. But honestly, the Honda instructions are a bit vague here and there.
Do post the pix, and have a pat on the back for a job well done.
If I had a nickel for every silly thing I have overlooked in my decades of wrenching, I would be a rich man. But honestly, the Honda instructions are a bit vague here and there.
Do post the pix, and have a pat on the back for a job well done.
Member
Joined: May 2006
Posts: 288
From: camarillo,ca,usa
Its been a painful experienced to install this oem foglights,honda instructions helps but there some points i'd like to share to future fit freak members who in the future will install their oem foglights.
INSTRUCTION NO# 46.Unplug the vehicle 20 pin connector from the lower left side of the fuse box,and plug the switch harness 20 pin connector into the fuse box.
To accomplished this task,i have to loosen the 2 bolts that holds the fuse box,i also unplug 2 green connector that is closed to the 20 pin connector ,this will give you some space to pull the 20 pin connector,
also i used a small needle nose plier to pull the 20 pin connector,it's close to imposible to pull it just using your bare hand.
INSTRUCTION NO#48.Locate the 2 pin connector taped to the vehicle harness.Remove the BLUE tape to free the connector.Plug the switch harness 2-pin connector into the 2 pin connector you just freed.
This is the HARDEST part of the installation,i was looking for a BLUE taped that DOESN'T EXIST,me & spule did'nt find a F##@ING BLUE TAPE ,Its not easy sticking out your neck underneath the dashboard,i found the 2 pin connector but its wrapped on a BLACK tape.
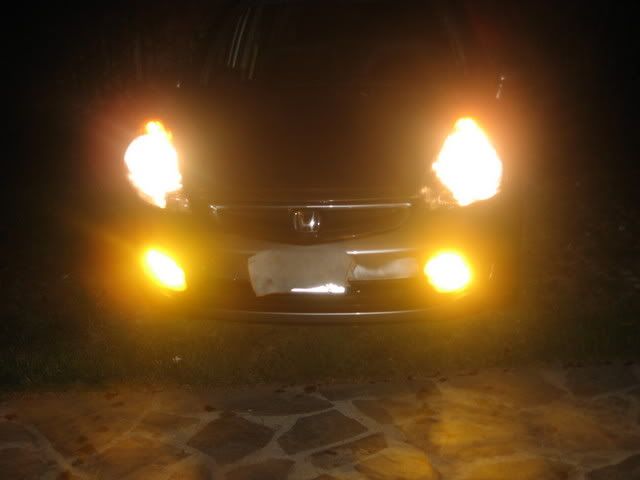
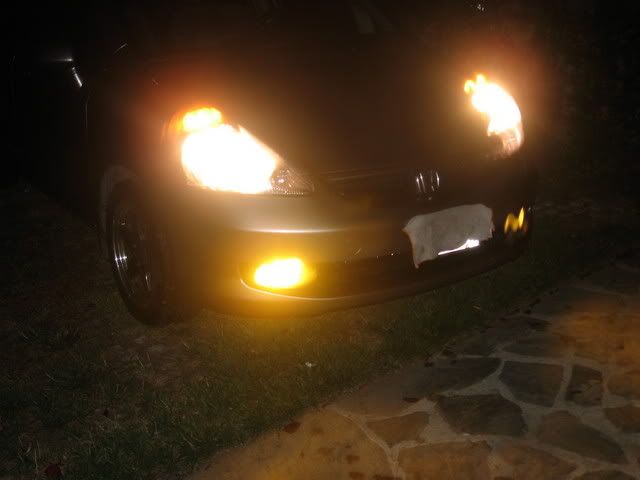
Heres some pictures,i painted my foglights with yellow stain glass and i also install the x-pel yellow film protection,i will make the necessary adjustment tomorrow.
INSTRUCTION NO# 46.Unplug the vehicle 20 pin connector from the lower left side of the fuse box,and plug the switch harness 20 pin connector into the fuse box.
To accomplished this task,i have to loosen the 2 bolts that holds the fuse box,i also unplug 2 green connector that is closed to the 20 pin connector ,this will give you some space to pull the 20 pin connector,
also i used a small needle nose plier to pull the 20 pin connector,it's close to imposible to pull it just using your bare hand.
INSTRUCTION NO#48.Locate the 2 pin connector taped to the vehicle harness.Remove the BLUE tape to free the connector.Plug the switch harness 2-pin connector into the 2 pin connector you just freed.
This is the HARDEST part of the installation,i was looking for a BLUE taped that DOESN'T EXIST,me & spule did'nt find a F##@ING BLUE TAPE
,Its not easy sticking out your neck underneath the dashboard,i found the 2 pin connector but its wrapped on a BLACK tape.Heres some pictures,i painted my foglights with yellow stain glass and i also install the x-pel yellow film protection,i will make the necessary adjustment tomorrow.
Member
Joined: Apr 2006
Posts: 577
From: USA
Did you use film, paint or bulbs for your yellow fogs? Yours look a LOT more yellow than mine. I am using Lamin-X.
EDIT, nevermind, I read the last bit of your post, I may try the paint too.......
I think only a couple people have tried this accessory, and hence why they have not made this thread a sticky......
EDIT, nevermind, I read the last bit of your post, I may try the paint too.......
I think only a couple people have tried this accessory, and hence why they have not made this thread a sticky......
Last edited by Spule 4; Aug 13, 2007 at 07:08 AM. Reason: Too early in the AM to be posting on FitFreak, I need coffee.....
Member
Joined: Apr 2006
Posts: 577
From: USA
Actually, somehow I did the entire under the dash bit without laying down or with my head under the dash. All done via viewing through the fuse box hole. Under dash stuff I have done in the past, (clutch master cylinders, HVAC work, steering racks, automatic to five speed conversions, etc) and try and get out of anymore. Of course, my knees were not all that great the next day....

o m g...these instructions from collegehills are ridiculous...i dont think i have the auto-savy or better yet, even the tools to complete these fog lights setup...good job on the installation and the write up tho...looks clean as hell
Member
Joined: Apr 2006
Posts: 577
From: USA
It could be worse, years back it there would be no or generic instructions but then, they would not have you looking for some certain color of tape that is not there!
Member
Joined: Apr 2006
Posts: 577
From: USA
Wires to look for for independent lighting for fog not via headlamps
All:
https://www.fitfreak.net/forums/fit-...not-solve.html
For the question of how to make these independent from the headlamps....
Caveat, this is me poking around to find the wire, I cannot have independent lights due to local laws so I have not completed the conversion. Procede on your own car with caution! I make no claims other than my findings here and assumptions beyond that are just that and that alone......assumptions.
Remove the foglight switch from the dash, have a volt ohm meter, and the schematic on the last page of the Honda base foglight installation kit.
Note the wires going into the switch. The red and red with black are for the swtiche's illumination light for at nite (not the indicator). The red and white should show as a ground with your meter. Now, this leaves the red with yellow and the blue with yellow.
Turn on the headlamps.
The red with yellow and blue with yellow should both have 12V positive to them (hot) and should be off when the headlamps are off.
DO NOT DO THIS, If you make jumper from the red with yellow (far end of plug) to the red with white, you will blow the front farside (driver's) headlamp fuse (20 amp under hood).
But, if you run a jumper between the red with white and the blue with yellow (they should be right next to each other in the harness) the foglights come on. (with headlamps on)
These findings can be seen on the schematic from Honda and you can see the reason for the blown fuse.
ASSUMPTION TIME: Therefore, the red with yellow is the hot to the relay and to the indicator light, and the blue with yellow is the path back to the relay for the ground to trigger the relay. The problem is getting to the red with yellow ahead of the relay, someone else is going to have to dig for that.
This needs to be replaced with a constant hot Vs. one switched with the headlamp. Getting in front of the split to the indicator light and the relay will be the catch.
Let me know of your findings.
the instructions are good...i meant they are ridiculous for me to understand and go through, b/c i dont have enough skills to do this job...thanks for the write up tho...looks really good on ur car
Member
Joined: Mar 2008
Posts: 587
From: Wash DC Metro
The first part is done - I've installed the fog lights and put the bumper back on. Tomorrow AM I'll finish the interior electrical work - and throw in some pics too!!
So far the instructions here are right on. The tip about crimping the clip nut was great - no other way to keep those lined up with the holes when putting the lamp housings into the bumper.
Also no worries about cutting the bumper. There's plenty of room for error so if you're concerned about cutting too much of the bumper cover, just cut a little smaller. The lamps don't take up all the room and the fascia on the fogs fills the remaining space between the small vent and the main opening.
The wiring harness inside the bumper is a little tight so try to stretch it out across the back of the bumper well to make sure the plugs will reach the back of the lights. Also, I could have used a helper getting the bumper back on to get the pieces underneath the front of the car lines up the right way. Other than that, it's been a one person job so far.
Last edited by Rob22315; May 16, 2008 at 10:54 PM.
Can someone who has the OEM fog light kit do me a favor?
I need you to pop out the dash switch and then tell me what the colour of the wires are from top to bottom. Better yet, if someone could take a picture of the the wires coming out of the switch that would be much appreciated!!
I'm attempting to use the OEM switch to wire up a set of Raybrig LED lights so I need to know which wire is which.
Thanks!