
how much clear coat did I take off?


Thread Starter
|
Member
Joined: Feb 2008
Posts: 64
From: Norman, OK
how much clear coat did I take off?
so im hoping to get an idea of how much clear coat i took off my car this week. i started reading about polishing too much and paint failing if you take too much cc off.
I completely did my car with Menzerna SIP and finished with Final Polish II(with PC, orange pad with SIP and white pad with FPII), the panels look amazing now.
but how much clear coat did i take off? should i worry? some people on other forums say you can polish twice a year for 10 years with a mild polish and a PC, others say just once or twice in the life of the vehicle....
so hoping someone can calm my nerves.
qbmurderer13??? you do this all the time....what's your take on it?


Member
Joined: Apr 2009
Posts: 53
From: California
Get a delfesko(sp?) Paint depth guage (600-800 bucks), and you will have accurate before and after readings.
That is the way to know. Buf if this is the first time, don't worry, you didn't take enough off to hurt the paint.
That is the way to know. Buf if this is the first time, don't worry, you didn't take enough off to hurt the paint.

Member
Joined: Oct 2008
Posts: 66
From: SoCal
Buff the car with medium to light compound (use medium to light pressure with the buffer) and finish it off with fine polisher or wax. Clean off the residue then hand wax throught out the panels. Twice a year and you should be fine.
Thread Starter
|
Member
Joined: Feb 2008
Posts: 64
From: Norman, OK
sorry took so long to reply...
thats more of what i was looking for as far as a reply...I pretty sure i have not gone through the cc, but i was wondering more of the 'how often is too often'
but I keep hearing that twice or once a year and the cc should be fine without any failure...
so goes back to my initial post.

New Member
Joined: Dec 2009
Posts: 6
From: Florida, USA
You don't remove clear coat from one pass, here is some information that might help you out.
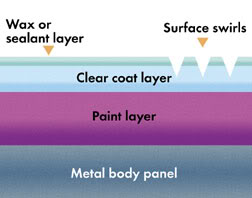
Before starting, it's a good idea to check for paint contamination by placing your hand inside a plastic sandwich bag and running your fingertips over the surface. If the paint is rough or gritty, consider using a clay bar before trying to remove swirls. Here some options:
Option #1
Temporarily hide swirls & spots:
Swirls can be visually hid by polishing the surface with a non-abrasive polish such as Blackfire Gloss Enhancing Polish, Meguiar's No. 9 Swirl Remover or 3M Perfect-It Swirl Remover. These polishes do not remove swirls. They round off the top edge of the swirl, robbing sunlight of a sharp edge to cause a reflection. When you buff off the polishing residues, fillers will stay in the depressions.
Finish by applying your favorite wax or paint sealant. This will hold the fillers in place, cosmetically hiding swirls and minor paint blemishes.
This procedure does not remove the swirl. Swirls may be visible in certain light conditions (fluorescent lamps are ruthlessly revealing) and will reappear as the wax ages. That said, most people will look at your car and think it's flawless.
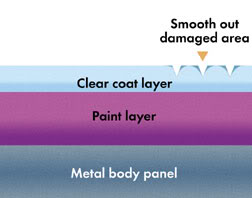
Remove the swirl, water spot or paint defect:
Removing a swirl requires you to remove the top layer of paint or clear coat that contains the swirl. This is best accomplished with a circular machine polisher which is designed to remove paint. You literally abrade away the surface until the swirls are gone.
Dual-action polishers like the Porter Cable 7424 are not designed to remove paint. They can round over and make invisible minor swirls and spots but may not have the power to fully remove deeper paint defects.
To remove a swirl, you must remove the
layer of paint or clear coat that contains
the defect.
These polishers will definitely do a better job than can be accomplished by hand and offer the novice enthusiast the safety of a random orbital motion which will not make the problem worse or introduce additional swirls.
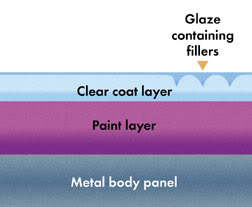
Very fine swirls can be removed by polishing alone. Deeper swirls. water spots and/or light scratches typically requires a three-step compound, polish and finish procedure. These are the same three steps used by automakers, body shops and professional detailers.
Compounding involves abrading away the area surrounding the scratch or blemish until the defect is no longer visible. This is best accomplished with a circular polisher (DeWalt 849, Makita 9227, etc.) but dual-action polishers like the Porter Cable 7424 will remove minor defects and visually reduce deeper swirls, scratches and blemishes. Compounding may leave the surface dull. This is normal. This dullness, or compounding haze, is removed in the next step which is polishing.
Polishing removes compounding haze and restores surface gloss. It creates a mirror-like, highly reflective finish ready for waxing.
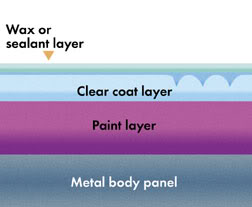
Finishing protects the surface with your favorite wax or sealant. Finishing can be accomplished by hand or with a dual action polisher (Porter Cable 7424). Applying a wax or paint sealant by machine is typically done with an ultra-soft, foam finishing pad.
Before starting, it's a good idea to check for paint contamination by placing your hand inside a plastic sandwich bag and running your fingertips over the surface. If the paint is rough or gritty, consider using a clay bar before trying to remove swirls. Here some options:
Option #1
Temporarily hide swirls & spots:
Swirls can be visually hid by polishing the surface with a non-abrasive polish such as Blackfire Gloss Enhancing Polish, Meguiar's No. 9 Swirl Remover or 3M Perfect-It Swirl Remover. These polishes do not remove swirls. They round off the top edge of the swirl, robbing sunlight of a sharp edge to cause a reflection. When you buff off the polishing residues, fillers will stay in the depressions.
Finish by applying your favorite wax or paint sealant. This will hold the fillers in place, cosmetically hiding swirls and minor paint blemishes.
This procedure does not remove the swirl. Swirls may be visible in certain light conditions (fluorescent lamps are ruthlessly revealing) and will reappear as the wax ages. That said, most people will look at your car and think it's flawless.
Remove the swirl, water spot or paint defect:
Removing a swirl requires you to remove the top layer of paint or clear coat that contains the swirl. This is best accomplished with a circular machine polisher which is designed to remove paint. You literally abrade away the surface until the swirls are gone.
Dual-action polishers like the Porter Cable 7424 are not designed to remove paint. They can round over and make invisible minor swirls and spots but may not have the power to fully remove deeper paint defects.
To remove a swirl, you must remove the
layer of paint or clear coat that contains
the defect.
These polishers will definitely do a better job than can be accomplished by hand and offer the novice enthusiast the safety of a random orbital motion which will not make the problem worse or introduce additional swirls.
Very fine swirls can be removed by polishing alone. Deeper swirls. water spots and/or light scratches typically requires a three-step compound, polish and finish procedure. These are the same three steps used by automakers, body shops and professional detailers.
Compounding involves abrading away the area surrounding the scratch or blemish until the defect is no longer visible. This is best accomplished with a circular polisher (DeWalt 849, Makita 9227, etc.) but dual-action polishers like the Porter Cable 7424 will remove minor defects and visually reduce deeper swirls, scratches and blemishes. Compounding may leave the surface dull. This is normal. This dullness, or compounding haze, is removed in the next step which is polishing.
Polishing removes compounding haze and restores surface gloss. It creates a mirror-like, highly reflective finish ready for waxing.
Finishing protects the surface with your favorite wax or sealant. Finishing can be accomplished by hand or with a dual action polisher (Porter Cable 7424). Applying a wax or paint sealant by machine is typically done with an ultra-soft, foam finishing pad.

New Member

Joined: Sep 2009
Posts: 4
From: california

Coating by Honda Dealer
Along these same lines, is there a process you can buy at the Honda dealer when you buy a car that "seals" the paint so you never have to wax? A friend of ours who is a Honda customer says he always has this process done, whatever it is, to any Honda he buys from a Honda dealer. When we bought our Fit in summer 2009, we asked our dealer about what waxing would necessary. They did not mention any coating they could put on at the dealership when we purchased our Fit. We did not inquire any further. We have only washed our car once, park our Fit in the garage, and have put only about 1000 miles on it. (We are low-mileage folk.) The paint looks nice and like it does not need any waxing yet. Anyone have any information on this process, if it exists, and if it's worth it to do?
Thread Starter
|
Member
Joined: Feb 2008
Posts: 64
From: Norman, OK
Thanks for all the replies, guys! I feel generally better nowadays about the whole thing. I have not seen any majors scratches or swirls since i started washing i at home with the two bucket method ( before i polished i used to go to the car wash and use the brush on the paint  )
)
i've kept it clean, put on zaino, use the Supernatural and dodo juice spray when i dont wax and its stayed pretty shinny and scratch free. so at this rate i should not need to polish for a long while.
when i originally posted i was afraid it would be a twice a year process...but now looking at it and maintaining it, it appears it will stay looking good as long as I'm careful maintaining it. and if the clear fails, well, then i guess i'll have to have it recleared or get the CR-Z!
anybody thinking their fit may turn into a CR-Z?
) i've kept it clean, put on zaino, use the Supernatural and dodo juice spray when i dont wax and its stayed pretty shinny and scratch free. so at this rate i should not need to polish for a long while.
when i originally posted i was afraid it would be a twice a year process...but now looking at it and maintaining it, it appears it will stay looking good as long as I'm careful maintaining it. and if the clear fails, well, then i guess i'll have to have it recleared or get the CR-Z!
anybody thinking their fit may turn into a CR-Z?

New Member
Joined: Sep 2013
Posts: 1
From: st louis mo


Thread
Thread Starter
Forum
Replies
Last Post
FITinMyPocket
2nd Generation (GE 08-13)
7
Oct 2, 2008 10:46 AM