
07 Drum Brake DIY


New Member
Joined: Sep 2016
Posts: 8
From: Mass
So is there a trick to reaching the adjuster starwheel?
I can't remove the drum on 2007 GD, Bolts reach the hub plate and stop, hammer didn't help either. The Haynes manual suggests adjusting the starwheel but that opening is kind of hard to reach, I can't see or feel the starwheel through it.
BTW Awesome DIY, thanks!
I can't remove the drum on 2007 GD, Bolts reach the hub plate and stop, hammer didn't help either. The Haynes manual suggests adjusting the starwheel but that opening is kind of hard to reach, I can't see or feel the starwheel through it.
BTW Awesome DIY, thanks!
Member
Joined: Mar 2007
Posts: 1,704
From: Second house on the left

Are you attempting access through the rubber plug on the drum? That should allow you to adjust the star wheel (located at the bottom of the assembly, IIRC) to allow removal.
If there is a Rusty Ridge on the drum's braking surface, they can be difficult to remove. On one car we owned (Isuzu) I needed a Drum Removal Tool every time.

Notice the hammer in the picture, LOL. It's a LOT smaller than the one I used!
PS, see if an auto parts store near you loans the tool.
If there is a Rusty Ridge on the drum's braking surface, they can be difficult to remove. On one car we owned (Isuzu) I needed a Drum Removal Tool every time.
Notice the hammer in the picture, LOL. It's a LOT smaller than the one I used!
PS, see if an auto parts store near you loans the tool.
New Member
Joined: Sep 2016
Posts: 8
From: Mass
Yeah that's what I'm trying to do. On my car the rubber plug is on the top front part of the backplate (about 11 o'clock if looking from the drum side, or 1 o'clock from the axle side). But the coil spring is in the way so it's hard to reach and I can't find that starwheel anywhere. Even with mirrors and phone camera I can't see the starwheel through that opening.
Member
Joined: Mar 2007
Posts: 1,704
From: Second house on the left
OK, I looked up the parts list. My memory was faulty, too many car repairs I guess!!!! 
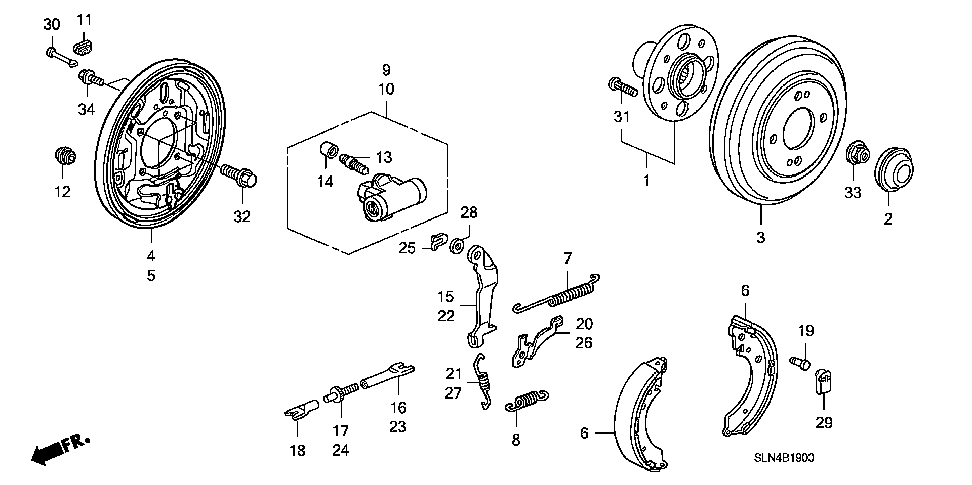
The star-wheel (#17 or 24) is accessed thru the rubber plug on the backing plate. I agree, it is difficult to see or access.
The star-wheel (#17 or 24) is accessed thru the rubber plug on the backing plate. I agree, it is difficult to see or access.

Member

Joined: Dec 2010
Posts: 176
From: Canada
Is very difficult to put them back in, and if you replaced your rear brake with new pads, chances are you can set them back to the "loosest" position, otherwise your new pad will most likely be touching the drum otherwise.
Man, i would make sure my next Fit won't have the freakin' drum brakes!!! They are nightmare and PITA to work with.
Man, i would make sure my next Fit won't have the freakin' drum brakes!!! They are nightmare and PITA to work with.
New Member
Joined: Sep 2016
Posts: 8
From: Mass
Ok so copious amounts of PB Blaster and the 8mm bolts did the trick! One thing I learned is that the rubber plug is a joke. The starwheel is offset by about one inch towards the back, not a chance it can be adjusted from the outside with standard tools.

New Member
Joined: Sep 2016
Posts: 8
From: Mass
Yeah I tried that, the one I have came in the kit with the brake spring pliers and it was too big to reach there. The one in your picture actually looks a bit smaller so it might work assuming one knew where the darn starwheel was. A hook or a pick with about 75 degree bend might work too. Still surprises me why was it positioned so far off that rubber plug. Makes no sense I've not seen such a bizarre design in any other car.

New Member
Joined: Oct 2016
Posts: 11
From: Milwaukee Wisconsin
Nice tutorial. However I have always found it best to remove the top spring first. Although not recommended to use a diagonal cutters a rather dull one performs this task nicely. This allows both shoes to be drawn out the bottom once the backing plate clips have been removed. The diagonal or side cutters (Dykes) can be used through out the rest of disassembly. A beefy expanding circlip tool makes easy work of spreading the pin clip, just do not over do it.

New Member
Joined: Apr 2017
Posts: 3
From: Bellevue, WA USA
How to pull the drum?
According to earlier post, to remove the drum one needs to tighten a (one or two?) bolt(s) into the holes in the drum. However, no info is provided as to the size of the bolt(s). I tried several and none worked. Can someone advise about the pull-bolt size?

Member
Joined: Apr 2011
Posts: 103
From: Rochester, NY
I think I understand why some people on this and other threads are saying sizes larger than 8mm bolt for removing the drum. Some people mistakenly talk about bolt size by mentioning the size of the wrench to fit the bolt head. That's a common misconception. Bolt sizes are measured by the outside diameter of the threads. Most 8 mm bolts have a head which is 13mm across the flats. If you are deep enough into working on your car to be reading this, you should own a metric Vernier caliper or micrometer. Harbor Freight sells a digital Vernier caliper which can be set for either Metric or English for under twenty bucks so it's a handy thing to have. Or at least have an SAE Vernier caliper and a calculator nearby so you can convert from English to Metric. Simply take the English measurement for example 0.75 inches and multiply by 25.4 (which is the millimeters in one inch). Thus, 0.75 inches = 19.05 mm. That means a � inch wrench is close enough to 19mm to fit just fine.

Thread
Thread Starter
Forum
Replies
Last Post
Santiad
2nd Generation (GE 08-13)
8
Apr 20, 2019 05:31 PM
richard612
Fit Suspension & Brake Modifications
8
Jul 9, 2015 10:23 AM
FrogDaddy
Fit Suspension & Brake Modifications
17
Aug 26, 2009 02:39 PM
fm2n
Fit DIY: Repair & Maintenance
5
Aug 13, 2007 03:46 PM