
Windscreen wiper

New Member

Joined: Oct 2005
Posts: 7
From: Poland
1. Remove the nuts and wiper arms.

2. Disconnect the washer tube, then remove the hood seals and cowl covers .
3. Disconnect the 5P connector from the wiper motor.
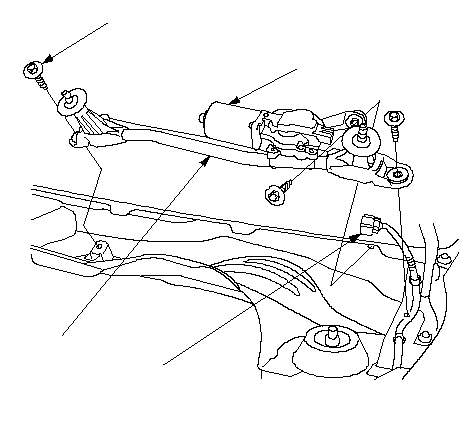
4. Remove the three bolts and wiper linkage assembly .
5. Scribe a line across the link the windshield wiper linkage to show the original adjustment, then remove the nut and link .
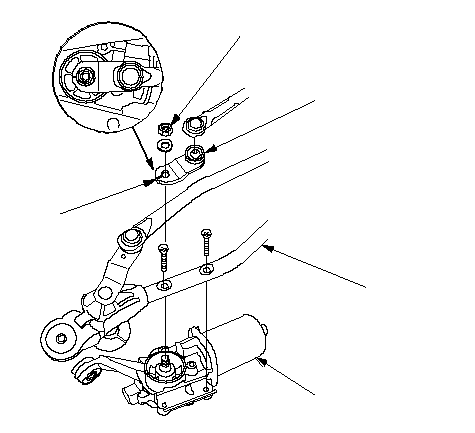
6. Remove the two screws and wiper motor from the wiper linkage .
2. Disconnect the washer tube, then remove the hood seals and cowl covers .
3. Disconnect the 5P connector from the wiper motor.
4. Remove the three bolts and wiper linkage assembly .
5. Scribe a line across the link the windshield wiper linkage to show the original adjustment, then remove the nut and link .
6. Remove the two screws and wiper motor from the wiper linkage .
New Member
Joined: Oct 2005
Posts: 7
From: Poland
I have ordered a CD "Honda Jazz Workshop Manual" on the eBay once  . I search the eBay once again today but unfortunately I did not found this item or any similar
  (there used to be few sellers that offered this CD) .
The CD contains detailed description of the engine / transition /steering / suspension / brakes / HVAC / body / SRS and control systems + wiring diagrams with cable colors notes. Each section contains a component location index and some parts replacement instructions (lot of pictures with specified locations of screews and clips that holds each part + description how to unmount the part and mount it back). Some sections provides step-by-step troubleshooting guides or description of test procedures.
The CD provides a keyword searching and individual search via system/component/modules selection.
The descriptions are available in several languages: English, French, German, Italian, Duch, Spanich, Portuguese, Czech, Hungarian and Polish.
. I search the eBay once again today but unfortunately I did not found this item or any similar (there used to be few sellers that offered this CD) . The CD contains detailed description of the engine / transition /steering / suspension / brakes / HVAC / body / SRS and control systems + wiring diagrams with cable colors notes. Each section contains a component location index and some parts replacement instructions (lot of pictures with specified locations of screews and clips that holds each part + description how to unmount the part and mount it back). Some sections provides step-by-step troubleshooting guides or description of test procedures.
The CD provides a keyword searching and individual search via system/component/modules selection.
The descriptions are available in several languages: English, French, German, Italian, Duch, Spanich, Portuguese, Czech, Hungarian and Polish.

Thread Starter
|
New Member
Joined: Jan 2006
Posts: 7
From: Hong Kong
Lesico, Apart from repairing the windscreen wiper of my Fit, I would like to know how to dismount the interior covers in order to complete the wiring connection of the front door door seal (side step) which come with LED light, so every time when the front door is open the light will come on.
Last edited by Wing On; Jan 25, 2006 at 02:45 AM.
New Member
Joined: Oct 2005
Posts: 7
From: Poland
Wing On, I hope the description below is this is what you want. If you need any additional pictures please let me know and I hope I will find them.
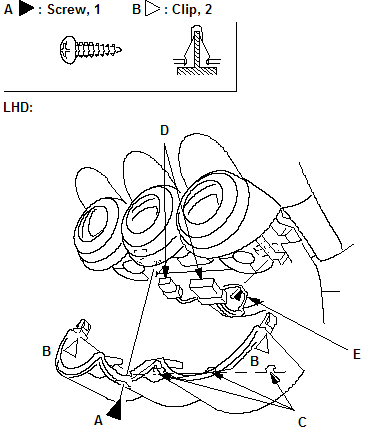
Interior Trim Removal/Installation - Door Area
Remove the trim as shown:
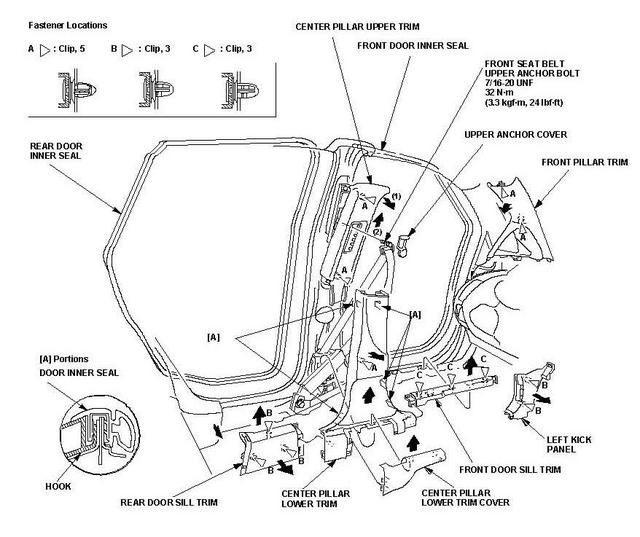
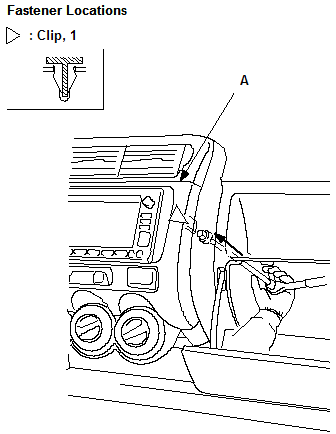
To remove the left kick panel, remove the driver's dashboard under cover:
* Turn the lock knob (B) 90�.
* Gently pull down the rear edge to release the clip.
* Pull the cover away to release it from the clip (C) on the body and to release its pin (D) from the kick panel (E).
Install the trim in the reverse order of removal, and note these items:
Interior Trim Removal/Installation - Door Area
Remove the trim as shown:
To remove the left kick panel, remove the driver's dashboard under cover:
* Turn the lock knob (B) 90�.
* Gently pull down the rear edge to release the clip.
* Pull the cover away to release it from the clip (C) on the body and to release its pin (D) from the kick panel (E).
Install the trim in the reverse order of removal, and note these items:
- Replace any damaged clips.
- Push the clips into place securely.
- Apply liquid thread lock to the front seat belt upper anchor bolt before installation.
- Before installing the anchor bolts, make sure there are no twists or kinks in the seat belts

New Member
Joined: Oct 2005
Posts: 7
From: Poland
NvM, this is what I found:
Stereo sound system circuit diagram (pin numbers and cable colors!):
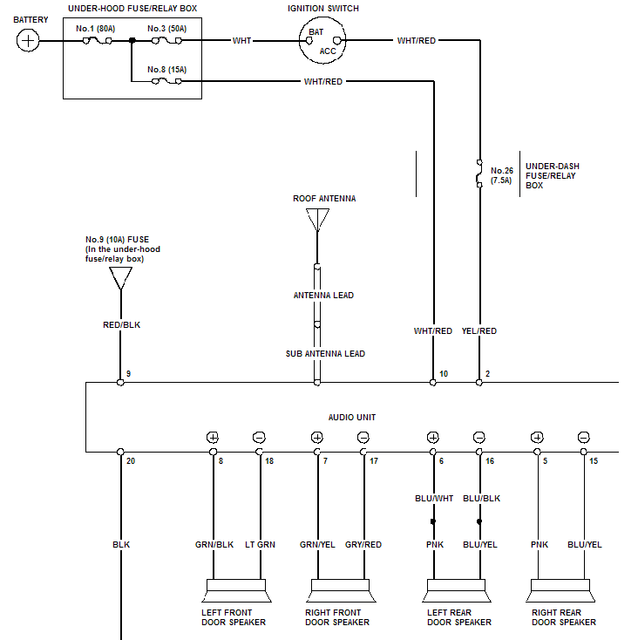
The black cable connected to pin 20 is GND.
Audio Unit Removal/Installation


Stereo sound system circuit diagram (pin numbers and cable colors!):
The black cable connected to pin 20 is GND.
Audio Unit Removal/Installation
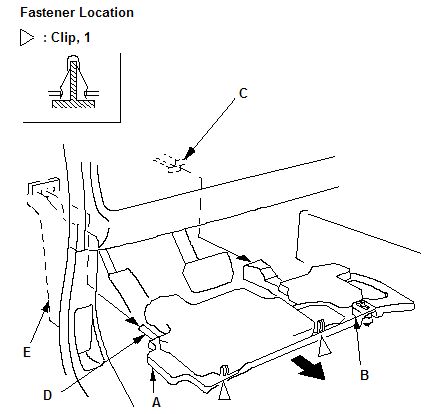
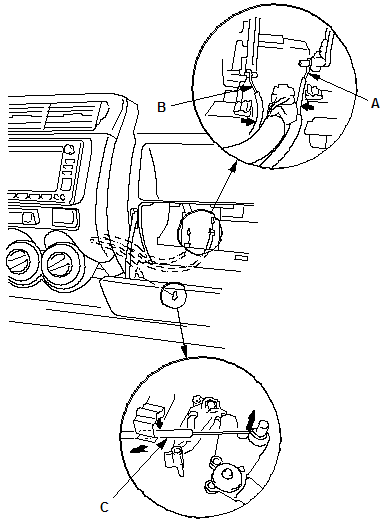
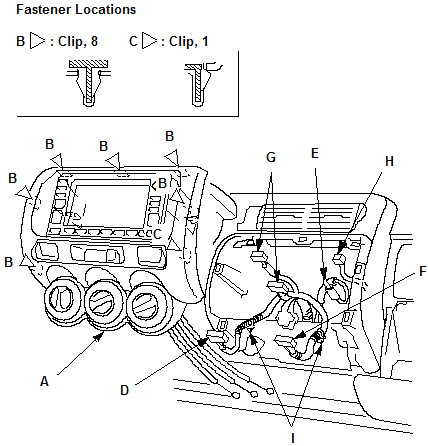
- Remove Inner glove box
- Remove the screw (A). Detach the clips (B) and release the hooks (C) by pulling the center lower cover (D) down, by hand.
- Disconnect the heater control unit connectors (D), and release the unit harness (E) from the clamp.
- In the inner glove box opening, disconnect the recirculation control cable and the mode control cable (B), and from under the dashboard, disconnect the air mix control cable (C):
- Take care not to bend any cables.
- LHD is shown, RHD is symmetrical.
- From the glove box and driver's dashboard lower cover openings, loosen the bolts securing the center panel (A).
- Using a wrench, carefully insert a wrench from the inner glove box opening, and push a panel clip on the glove box side from back of the center panel (A) to release it. LHD is shown, RHD is symmetrical.
- Pull out the center panel (A) to release the clips (B, C), and disconnect the heater control switch connector (D), antenna lead (E), rear deffoger switch connector (F) and if equipped, navigation unit connectors (G) and GPS antenna connector (H). Detach the harness clips(I) from both center panel brackets. Then remove the center panel:
- Take care not to bend any cables.
- LHD with navigation is shown, RHD is symmetrical for the most part, and if equipped with no navigation, disconnect the audio unit connector.
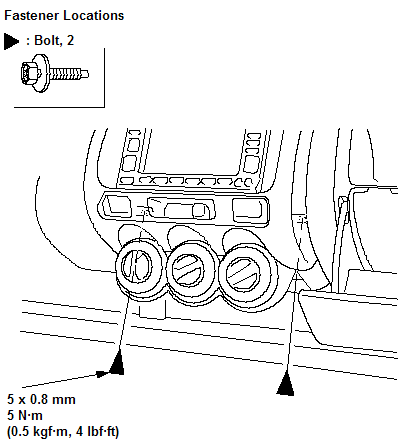
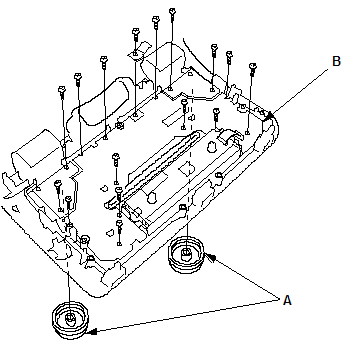
- Remove the seven mounting screws, then remove the audio unit (A).
- Remove the four mounting screws from the LCD unit (A), then remove the cover (B).
- Remove the two knobs (A).
- Remove the sixteen mounting screw from the printed circuit board (B), then remove the printed circuit board and LCD unit.


1. Remove the nuts and wiper arms.
2. Disconnect the washer tube, then remove the hood seals and cowl covers .
3. Disconnect the 5P connector from the wiper motor.
4. Remove the three bolts and wiper linkage assembly .
5. Scribe a line across the link the windshield wiper linkage to show the original adjustment, then remove the nut and link .
6. Remove the two screws and wiper motor from the wiper linkage .
This is very helpful, but I am having problems trying to adjust the motor to where the wipers would return normally when shut off. Do you think I would need a new motor or what else would you think I would need to do?
Thank you

New Member
Joined: Apr 2023
Posts: 5
From: london
I did it on my Fit last year: first you have to remove the wiper arms, then disassemble the plastic grille under the windshield. Once that's done, you have access to the engine — three bolts and a connector to disconnect. It's not too complicated with a little patience!
Last edited by sidaaz; Sep 21, 2025 at 03:01 PM.

Thread
Thread Starter
Forum
Replies
Last Post
kkim
2nd Generation (GE 08-13)
9
Jan 9, 2025 02:36 PM