
Matt's #SpecFit Project...


Thread Starter
|
Member
Joined: Sep 2017
Posts: 27
From: Knoxvegas, TN

A solution for castor/poor ackerman, and a solution to get my knees out of the steering column!
Much more info to follow...
Eastwood Roller, hammer, even broke out the grinder for the rear inner bumper tab! 
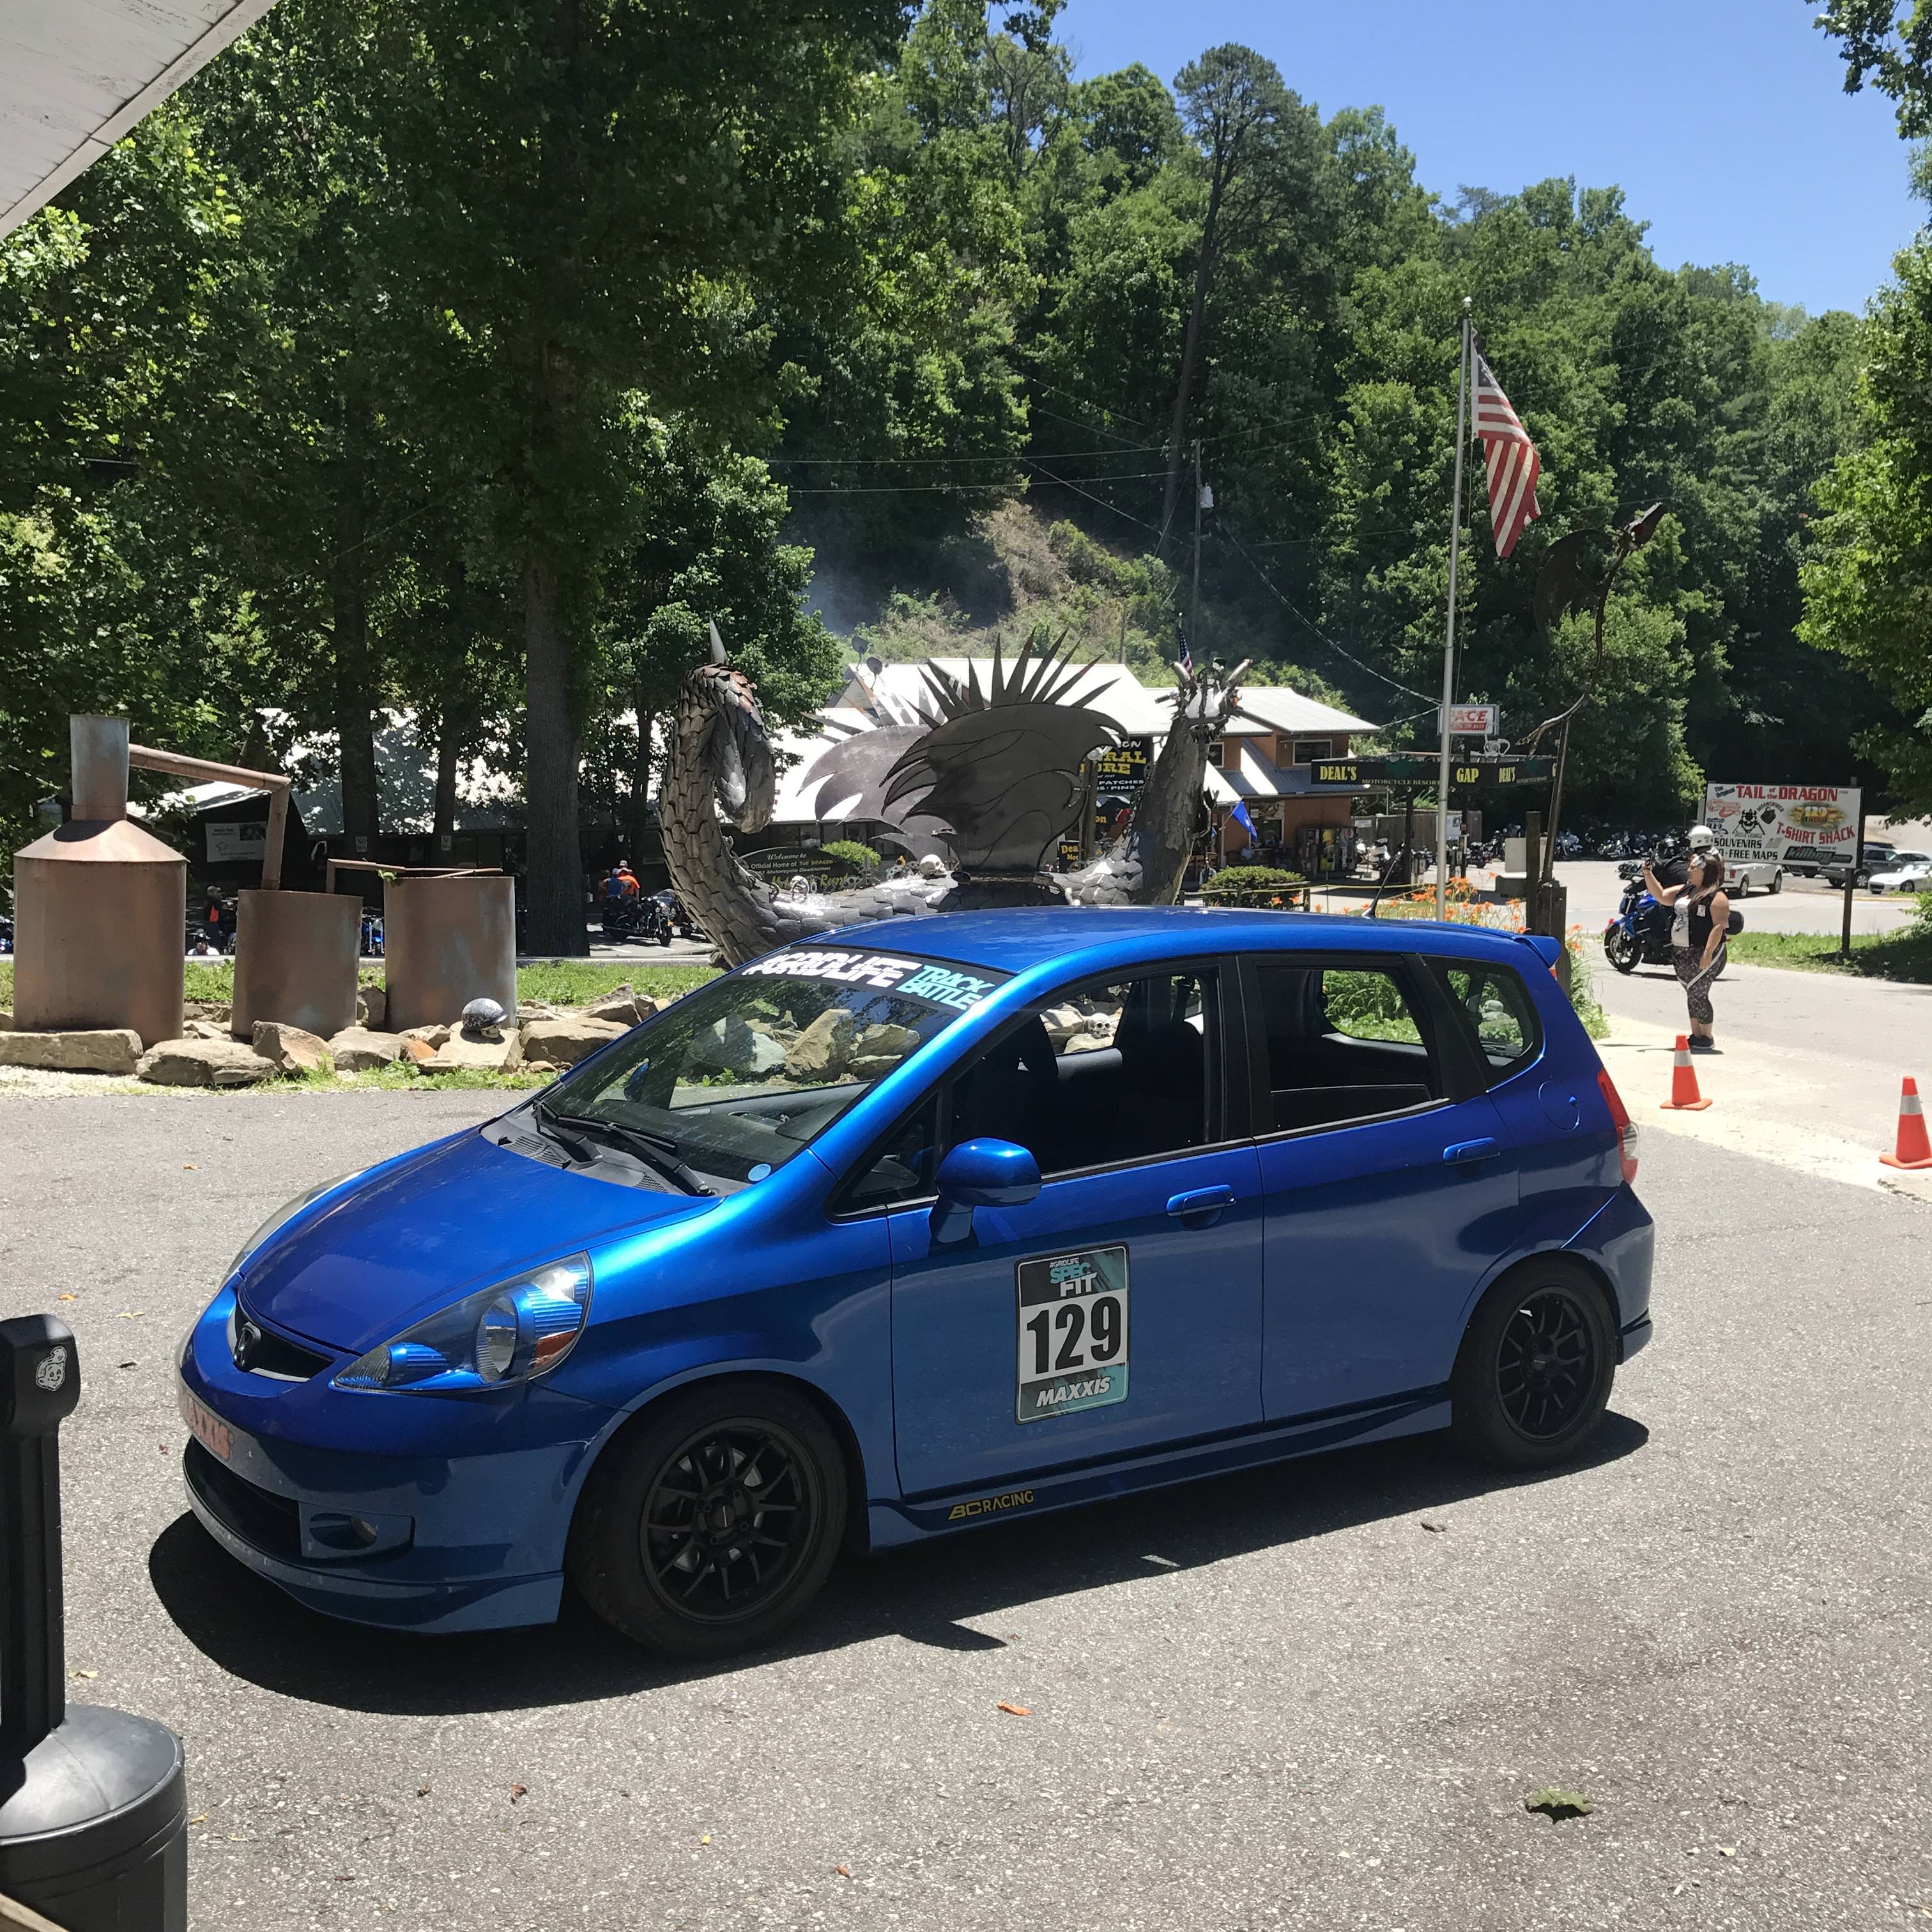
Its not the wheels, its the tires.
The fronts were a breeze; my issue was only in the rear.
Besides, all cars vary, mine has definitely been hit in the drivers rear fender before. Likely part of my troubles.
They are seriously wide for 205's! They are based of the same molds as the RC-1 line, a racing slick that's known to run wide.
They don't use a super soft, sticky, and temp sensitive compound like some current 200tw tires. They make up for it in tread width and are still class legal when 205's are the limit. And they save me a ton of money easily lasting a whole season with little drop-off.
That's a great wheel!
But... that weight is for the 7" wide version. I believe the 15x8" version weighs 11.3lbs and at 28mm offset would be a PITA to fit. If you ever consider running the Maxxis VR-1's (or for that matter RS-4, RT615k+, RE71r, R888r's) I wouldn't go narrower then 7.5" wheels for track or spirited street use.
If you have a chance, please take a look at the Konig Hypergram 15x7.5 +35's.
They are strong, ultra light, stupid cheap at the moment (see link... $127 Free shipping), and perfect offset for Fits (GD and GE I've seen first hand). For example, compared to my wheels (15x8 +36 6UL's) they would yield the exact same inner clearance and yet provide 4mm more outer fender clearance. So basically you could take near full advantage of track width without putting as much effort into fender massaging as I had too! If I could go back in time......https://www.good-win-racing.com/Mazd...t/61-1922.html
Also, good deals from Summit and your local Discount Tire (if you have one) gets a great price!
Many of the current "top crop" 200tw tires prefer a bit of sidewall stretch provided by 7.5"-to-8" wide wheels. I am happy to expound further but the info on tread-triangulation and sidewall spring-rate is already out there. You would be better off looking at articles by Andy Hollis (multi national champ, tire/chassis tuning, data gathering god) and David Whitener (of Whitener Racing Shocks) in the recent issue of Grassroots Motorsports Magazine.
https://www.bcracing-na.com/product/...d=p2883-c25379
Yup!
They could also do the DS series kit (Digressive valved with more low speed dampening) in any spring rate you want, with a phone call, if you are serious about track use. However, if your not, this BR series would save you some money, offer most of the performance, and is actually very civil for daily use. The added low-piston-speed dampening inherent in the DS-series bodies is great at the track for turn-in, transitions, and controlling brake dive..... but, it doesn't do any favors for around town comfort. Feel free to PM if you want more detailed info.
Oh, and one last comment, the "Extreme Low" kit is not just for stance kids... It may not be right for every situation but there are some track-benefits when used properly. Negative weight transfer, down-stops, increased travel... a lot of factors involved!
Correct, rear clearance was the only issue. Again, just the VR-1's and their wide shoulders.
Its not even close to "too low". The mountain roads I frequent wouldn't allow it.
I ordered my BC's with the shortened bodies to keep full up-travel before hitting bump stops. In fact, the rears are currently set at full high. Once I get the new top-mounts installed I may even try to run a tad lower, just to knock down some aero drag. 3" from the ground is the real sweet spot; but, is unrealistic for a street car.... Lips are "open" though, I just need to get creative. A little drag reduction can make a huge difference at some tracks. Road Atlantas back straight, for example, with almost 40 seconds of full throttle in a FIT...
My spring rates are currently 12k front 10k rear with dampening to match and it feels awesome. I expected much more harshness and on track its really close to dialed. However, I carry around and extra set of 12k rears to play with if the track needs it. They can also be used to help rotation; but, as I get my alignment/tires dialed in that won't be needed.

Much more info to follow...
Its not the wheels, its the tires.
The fronts were a breeze; my issue was only in the rear.
Besides, all cars vary, mine has definitely been hit in the drivers rear fender before. Likely part of my troubles.
They don't use a super soft, sticky, and temp sensitive compound like some current 200tw tires. They make up for it in tread width and are still class legal when 205's are the limit. And they save me a ton of money easily lasting a whole season with little drop-off.
But... that weight is for the 7" wide version. I believe the 15x8" version weighs 11.3lbs and at 28mm offset would be a PITA to fit. If you ever consider running the Maxxis VR-1's (or for that matter RS-4, RT615k+, RE71r, R888r's) I wouldn't go narrower then 7.5" wheels for track or spirited street use.
If you have a chance, please take a look at the Konig Hypergram 15x7.5 +35's.
They are strong, ultra light, stupid cheap at the moment (see link... $127 Free shipping), and perfect offset for Fits (GD and GE I've seen first hand). For example, compared to my wheels (15x8 +36 6UL's) they would yield the exact same inner clearance and yet provide 4mm more outer fender clearance. So basically you could take near full advantage of track width without putting as much effort into fender massaging as I had too! If I could go back in time......https://www.good-win-racing.com/Mazd...t/61-1922.html
Also, good deals from Summit and your local Discount Tire (if you have one) gets a great price!
Many of the current "top crop" 200tw tires prefer a bit of sidewall stretch provided by 7.5"-to-8" wide wheels. I am happy to expound further but the info on tread-triangulation and sidewall spring-rate is already out there. You would be better off looking at articles by Andy Hollis (multi national champ, tire/chassis tuning, data gathering god) and David Whitener (of Whitener Racing Shocks) in the recent issue of Grassroots Motorsports Magazine.
Yup!
They could also do the DS series kit (Digressive valved with more low speed dampening) in any spring rate you want, with a phone call, if you are serious about track use. However, if your not, this BR series would save you some money, offer most of the performance, and is actually very civil for daily use. The added low-piston-speed dampening inherent in the DS-series bodies is great at the track for turn-in, transitions, and controlling brake dive..... but, it doesn't do any favors for around town comfort. Feel free to PM if you want more detailed info.
Oh, and one last comment, the "Extreme Low" kit is not just for stance kids... It may not be right for every situation but there are some track-benefits when used properly. Negative weight transfer, down-stops, increased travel... a lot of factors involved!
I KNOW that the GD can sink in a lot of tire up front with very little modification aside from camber and a fender liner tuck. The rear needs a little more persuasion though.
Judging from picture the car is just too low but should have plenty camber to clear... I'm also curious about spring rate too.
Judging from picture the car is just too low but should have plenty camber to clear... I'm also curious about spring rate too.
Its not even close to "too low". The mountain roads I frequent wouldn't allow it.
I ordered my BC's with the shortened bodies to keep full up-travel before hitting bump stops. In fact, the rears are currently set at full high. Once I get the new top-mounts installed I may even try to run a tad lower, just to knock down some aero drag. 3" from the ground is the real sweet spot; but, is unrealistic for a street car.... Lips are "open" though, I just need to get creative. A little drag reduction can make a huge difference at some tracks. Road Atlantas back straight, for example, with almost 40 seconds of full throttle in a FIT...
My spring rates are currently 12k front 10k rear with dampening to match and it feels awesome. I expected much more harshness and on track its really close to dialed. However, I carry around and extra set of 12k rears to play with if the track needs it. They can also be used to help rotation; but, as I get my alignment/tires dialed in that won't be needed.
Last edited by Revhappymatt; May 18, 2018 at 02:26 AM.
Correct, rear clearance was the only issue. Again, just the VR-1's and their wide shoulders.
Its not even close to "too low". The mountain roads I frequent wouldn't allow it.
I ordered my BC's with the shortened bodies to keep full up-travel before hitting bump stops. In fact, the rears are currently set at full high. Once I get the new top-mounts installed I may even try to run a tad lower, just to knock down some aero drag. 3" from the ground is the real sweet spot; but, is unrealistic for a street car.... Lips are "open" though, I just need to get creative. A little drag reduction can make a huge difference at some tracks. Road Atlantas back straight, for example, with almost 40 seconds of full throttle in a FIT...
My spring rates are currently 12k front 10k rear with dampening to match and it feels awesome. I expected much more harshness and on track its really close to dialed. However, I carry around and extra set of 12k rears to play with if the track needs it. They can also be used to help rotation; but, as I get my alignment/tires dialed in that won't be needed.
Well in that case, it sounds like we may actually be at similar ride heights and VERY SIMILAR alignments. I was near the top of my adjustment sleeve on the rear of my GD with 7 inch springs, just ran a 650 lb rear spring as a two for one to both aid in rotation (I autocross) and to get rid of the tire rub whenever I decided to street my 245s square.
I definitely hear you on the subject of drag, the entire rear of the car is darn near parachute like thanks to how much area from the rear wells to the bumper cover is all open.
Thread Starter
|
Member
Joined: Sep 2017
Posts: 27
From: Knoxvegas, TN
Glad you found something of interest.
Not intentional, and not how I would prefer. But, this is the life with the twist-beam rear axle in our Fits and it only gets worse the lower you go.
Rear toe-in does the opposite... It will hinder rotation and aid in stability, especially at high speed and under heavy braking.
A tiny bit of toe-out in the rear can really liven things up on track. If you take it too far the rear tends to over rotate on entry and wander under braking. There is actually speed to be found there, especially in FWD cars... because a rotating rear tends to push the driver to get back on throttle early; but, if a chassis isn't stable or predictable (i.e. safe) a driver won't push at all. So, like all things, its a balancing act that depends on track conditions and driver preference.
I may tackle this issue some day with a grinder or more shims, I dunno.
Zero-toe would likely feel great, and wouldn't mind experimenting to see how much toe out I can dial in before things get unstable.
I hear ya!
lets see, 650lb/in springs would convert to 11.6kg/in. So, that should be very comparable to what I can expect when I run the 12k's in the rear. I had every intention of experimenting with them at Mid-Ohio; but, with the wet track surface all weekend.... I was doing everything I could to soften my setup.
Rear toe-in does the opposite... It will hinder rotation and aid in stability, especially at high speed and under heavy braking.
A tiny bit of toe-out in the rear can really liven things up on track. If you take it too far the rear tends to over rotate on entry and wander under braking. There is actually speed to be found there, especially in FWD cars... because a rotating rear tends to push the driver to get back on throttle early; but, if a chassis isn't stable or predictable (i.e. safe) a driver won't push at all. So, like all things, its a balancing act that depends on track conditions and driver preference.
I may tackle this issue some day with a grinder or more shims, I dunno.
Zero-toe would likely feel great, and wouldn't mind experimenting to see how much toe out I can dial in before things get unstable.
lets see, 650lb/in springs would convert to 11.6kg/in. So, that should be very comparable to what I can expect when I run the 12k's in the rear. I had every intention of experimenting with them at Mid-Ohio; but, with the wet track surface all weekend.... I was doing everything I could to soften my setup.
Thread Starter
|
Member
Joined: Sep 2017
Posts: 27
From: Knoxvegas, TN
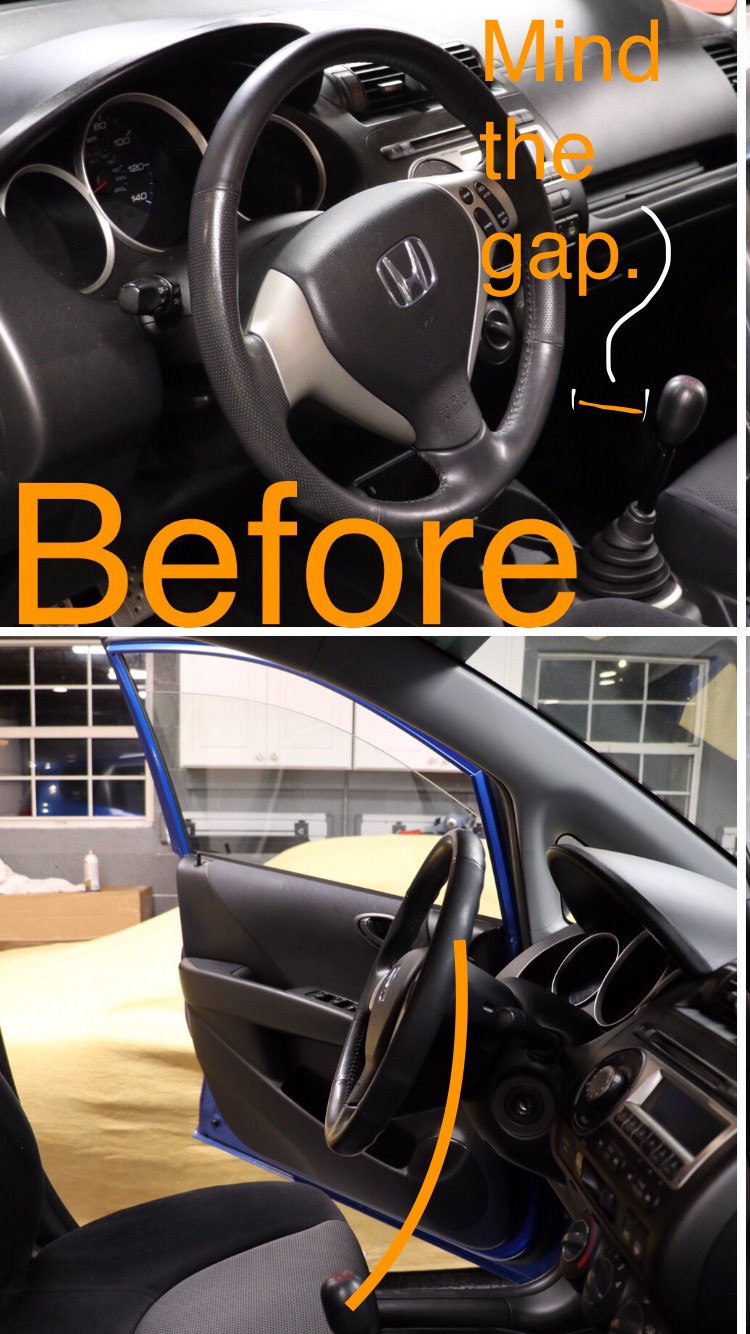
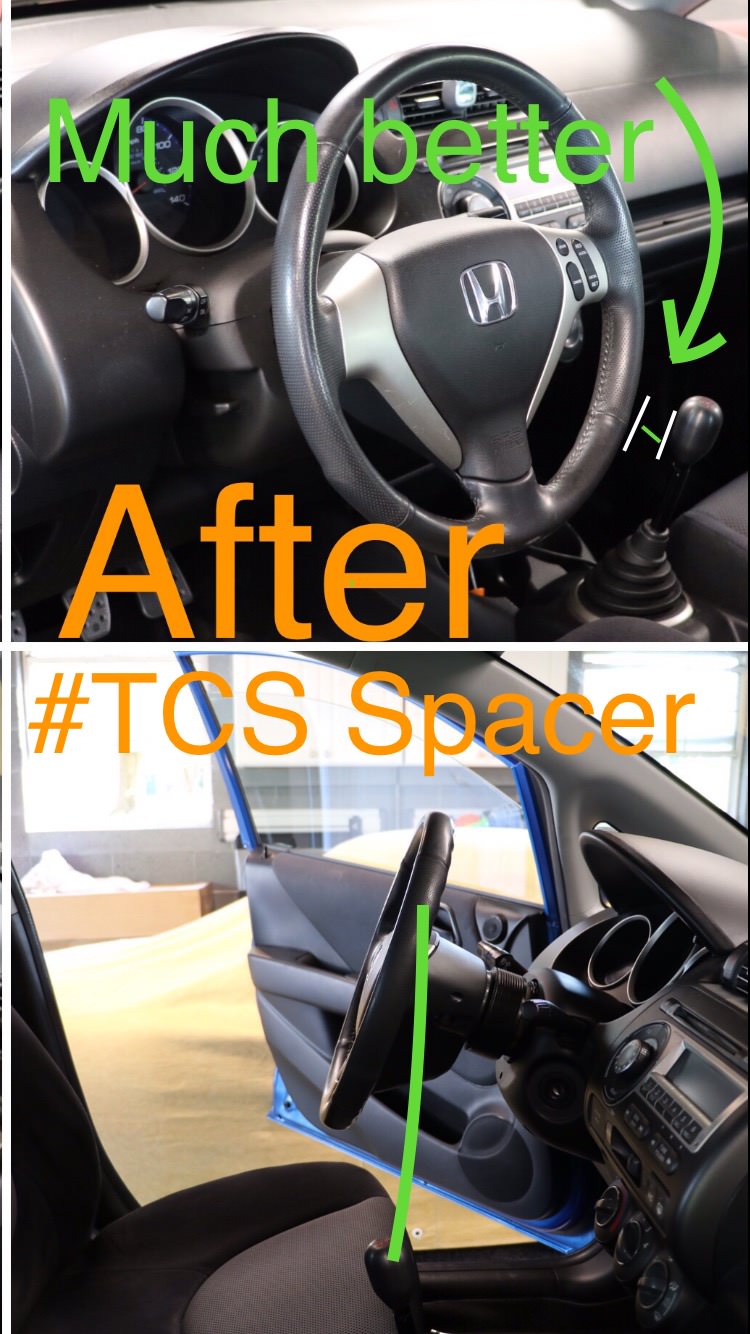
TCS steering spacer
As much fun as the Fit is, I have hated the seating position since the first drive. Either my knees are crammed into the steering column or I move my seat back and swing at the steering wheel like an ape! And the shifter is set aft of the factory steering wheel placement.
I am picky about ergonomics, probably to an unhealthy almost obsessive extent... This had to be fixed.
Thanks to Seamus at Tailored Chassis Solutions... It is.... and it was so easy!
I selected a 2.5" version of his custom "Fit Specific" spacer.
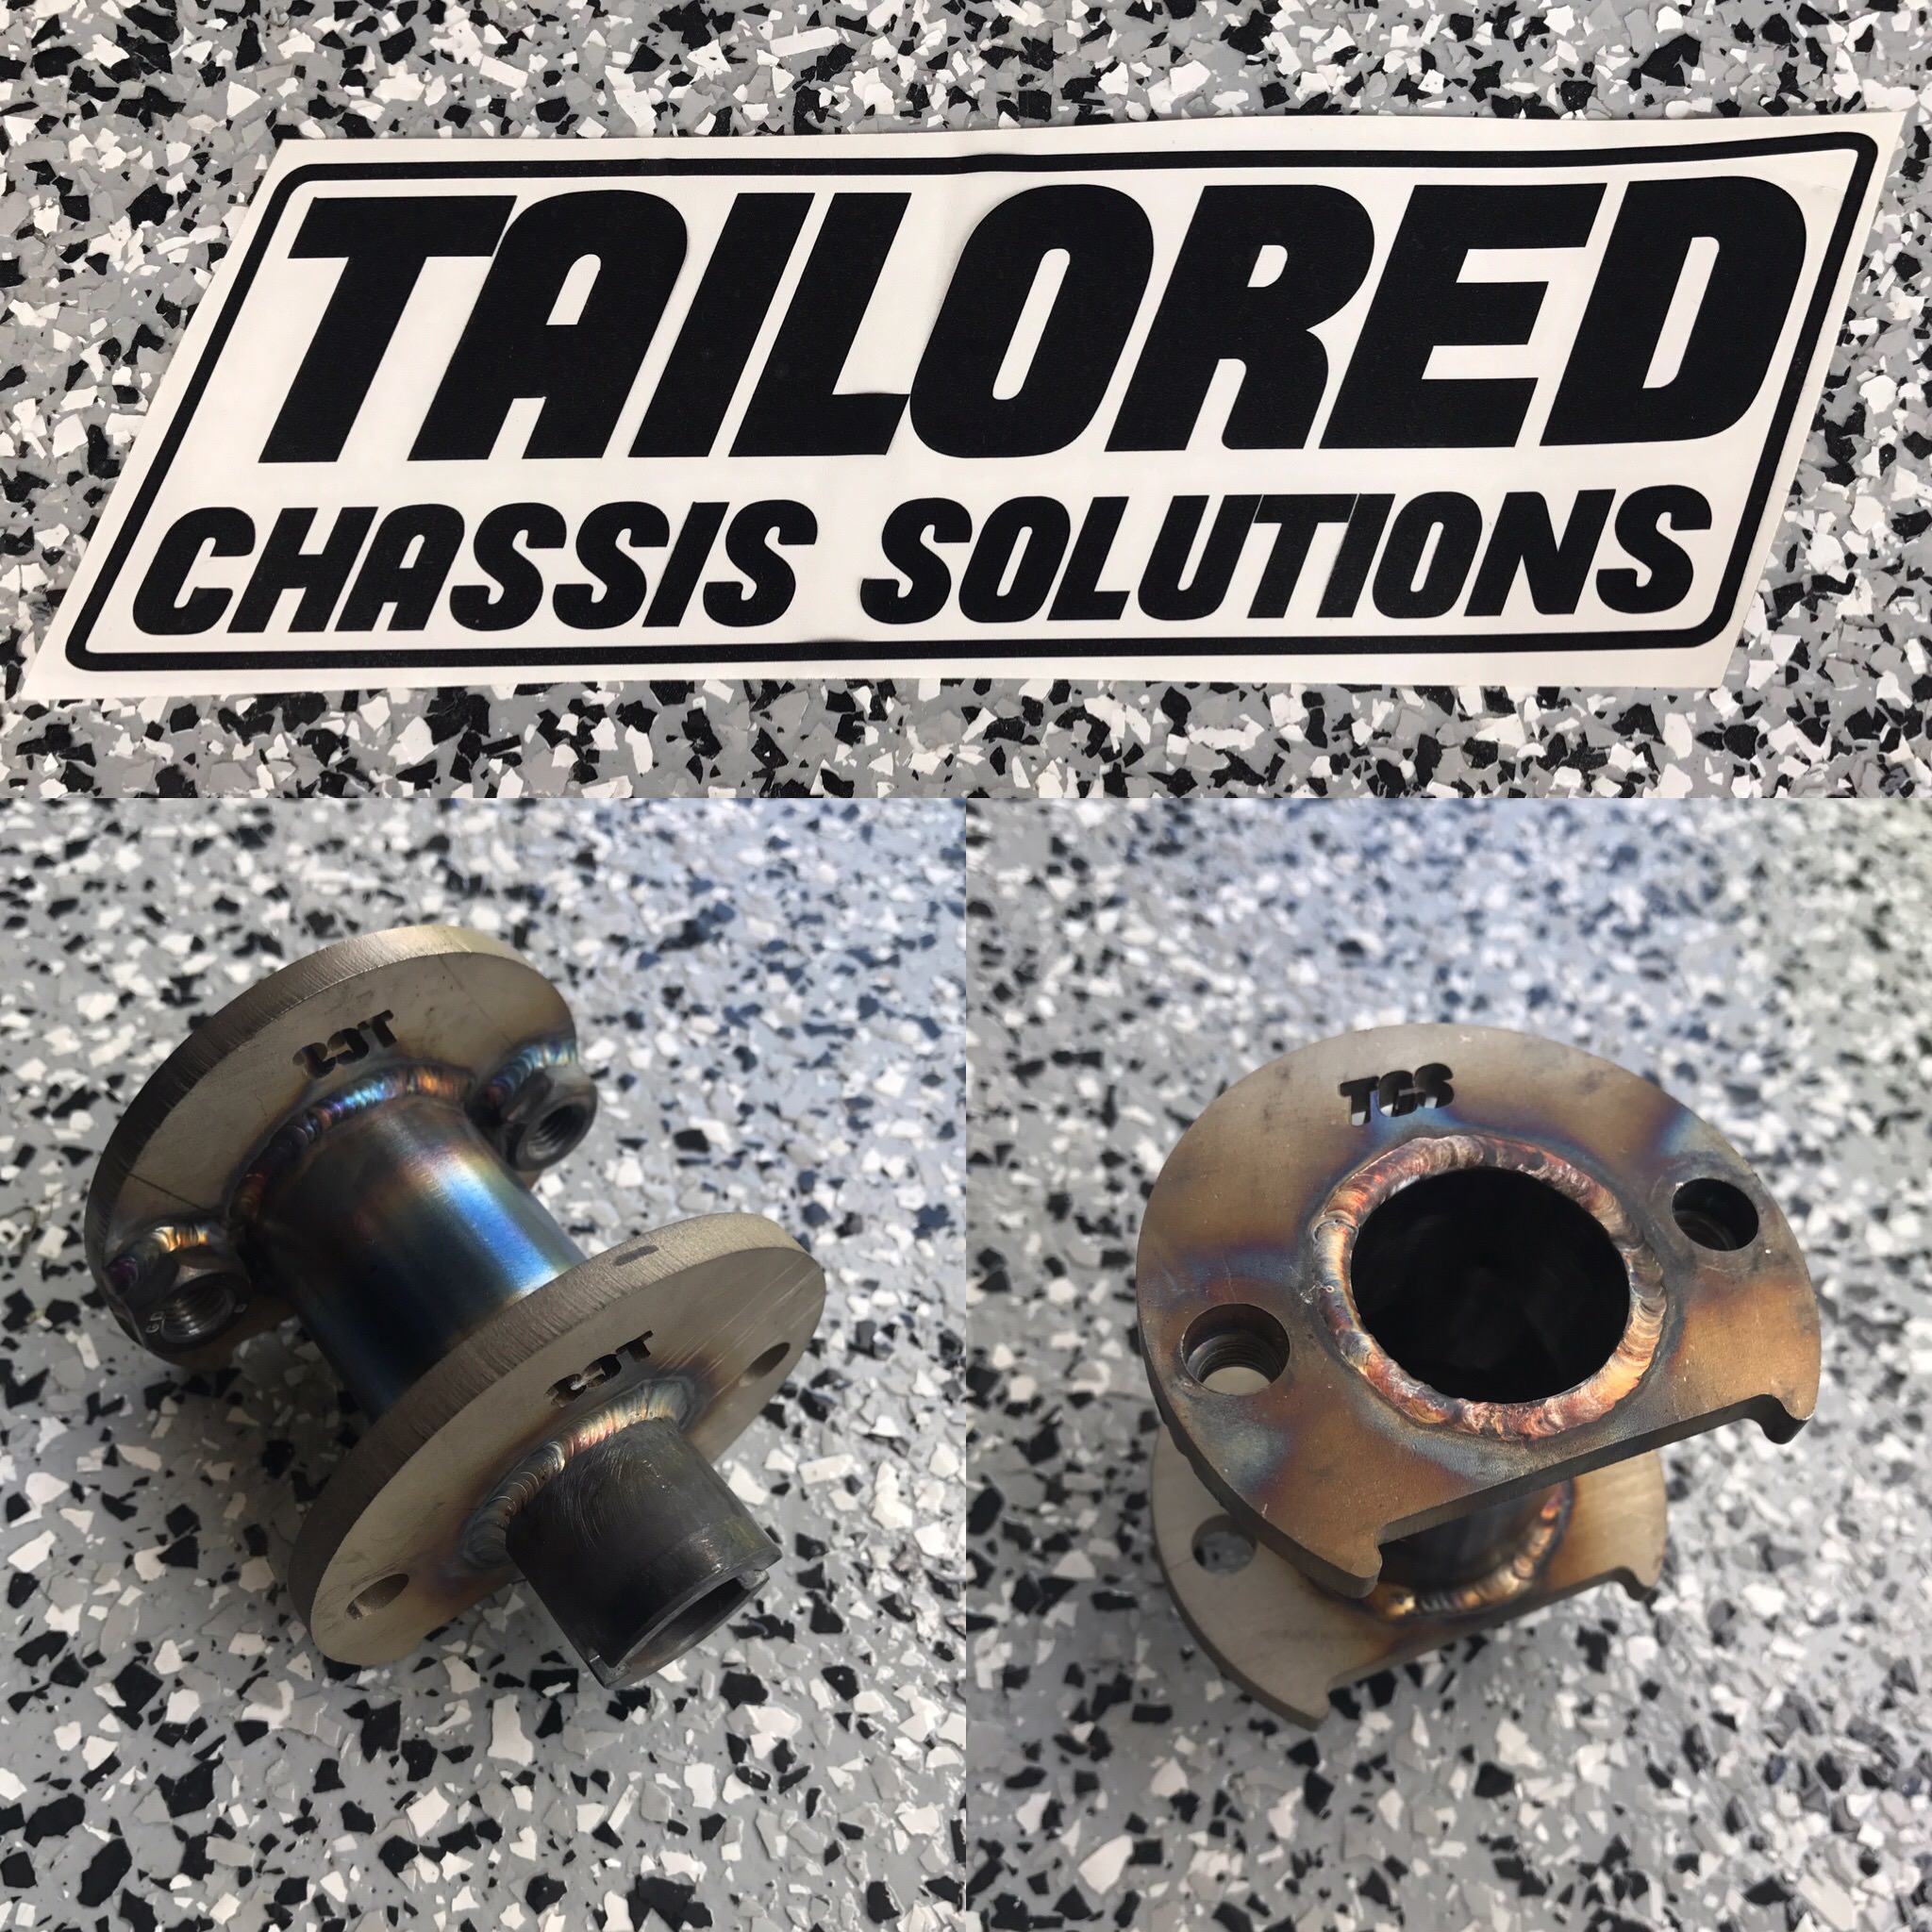
This allows me to move the light, strong, and comfortable factory wheel away from the pedals and closer to the shifter.
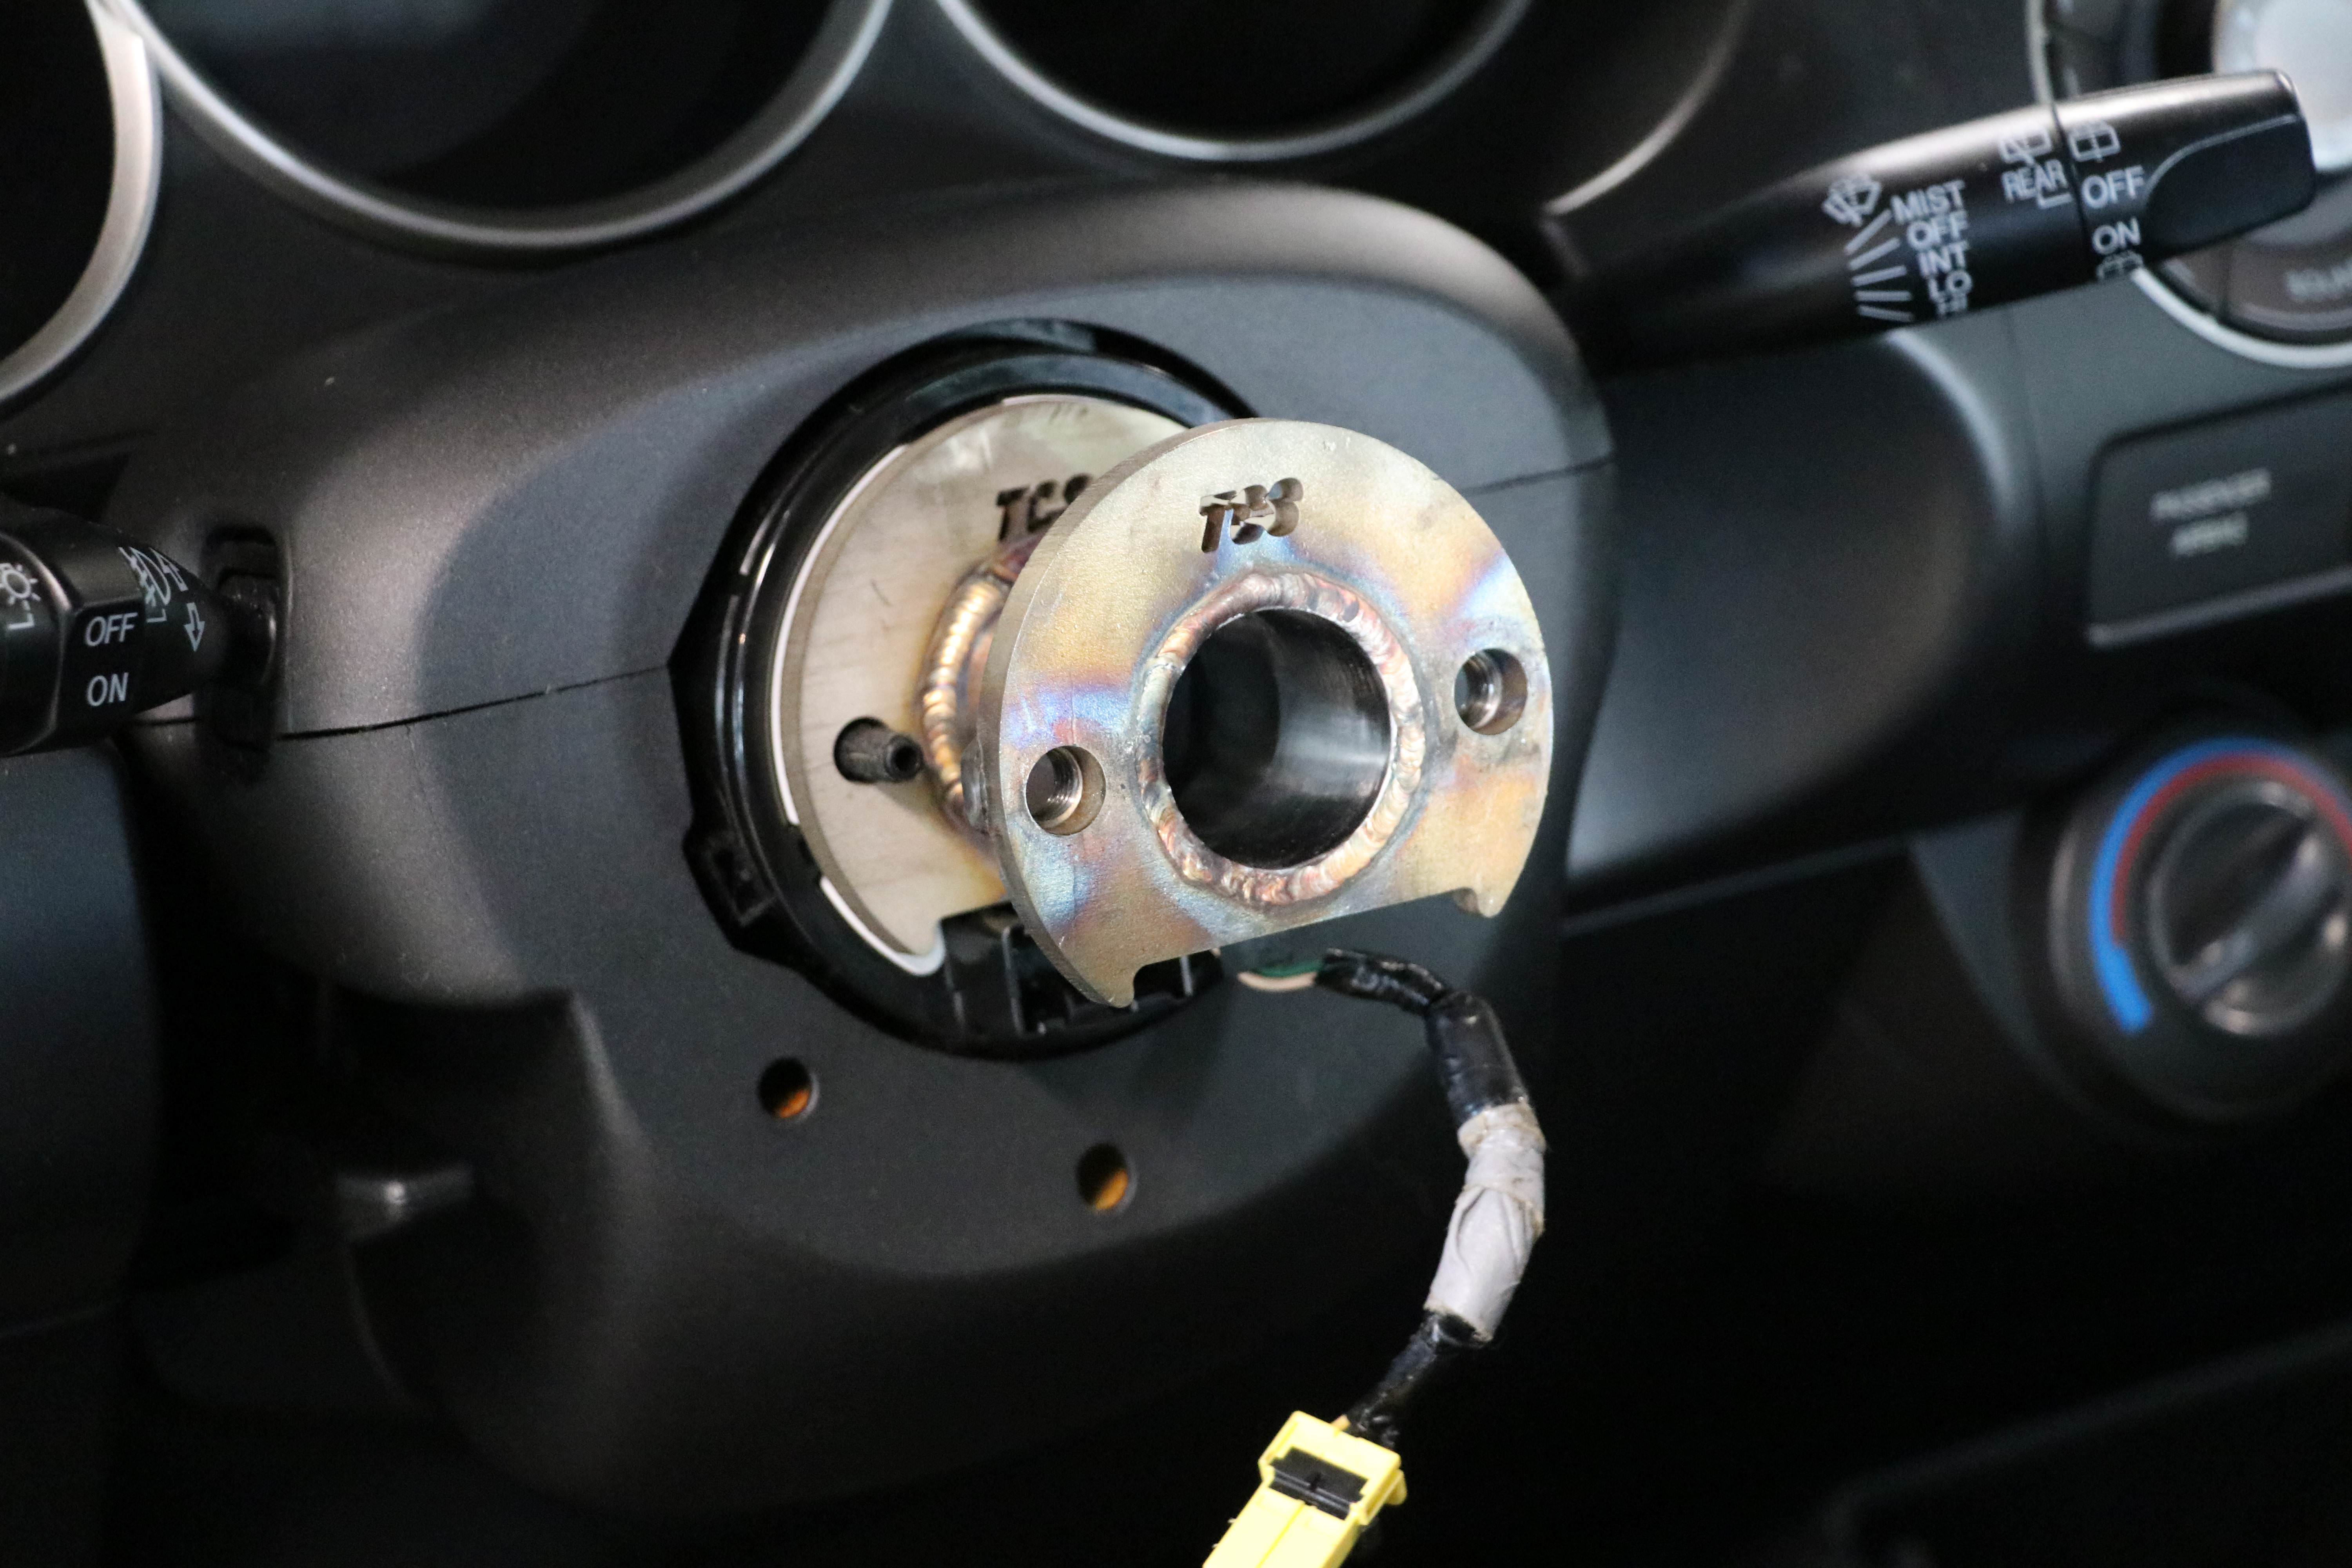
It also meant I could retain airbag and cruise control functionality. This is important to me, my wife and I both drive this car regularly.
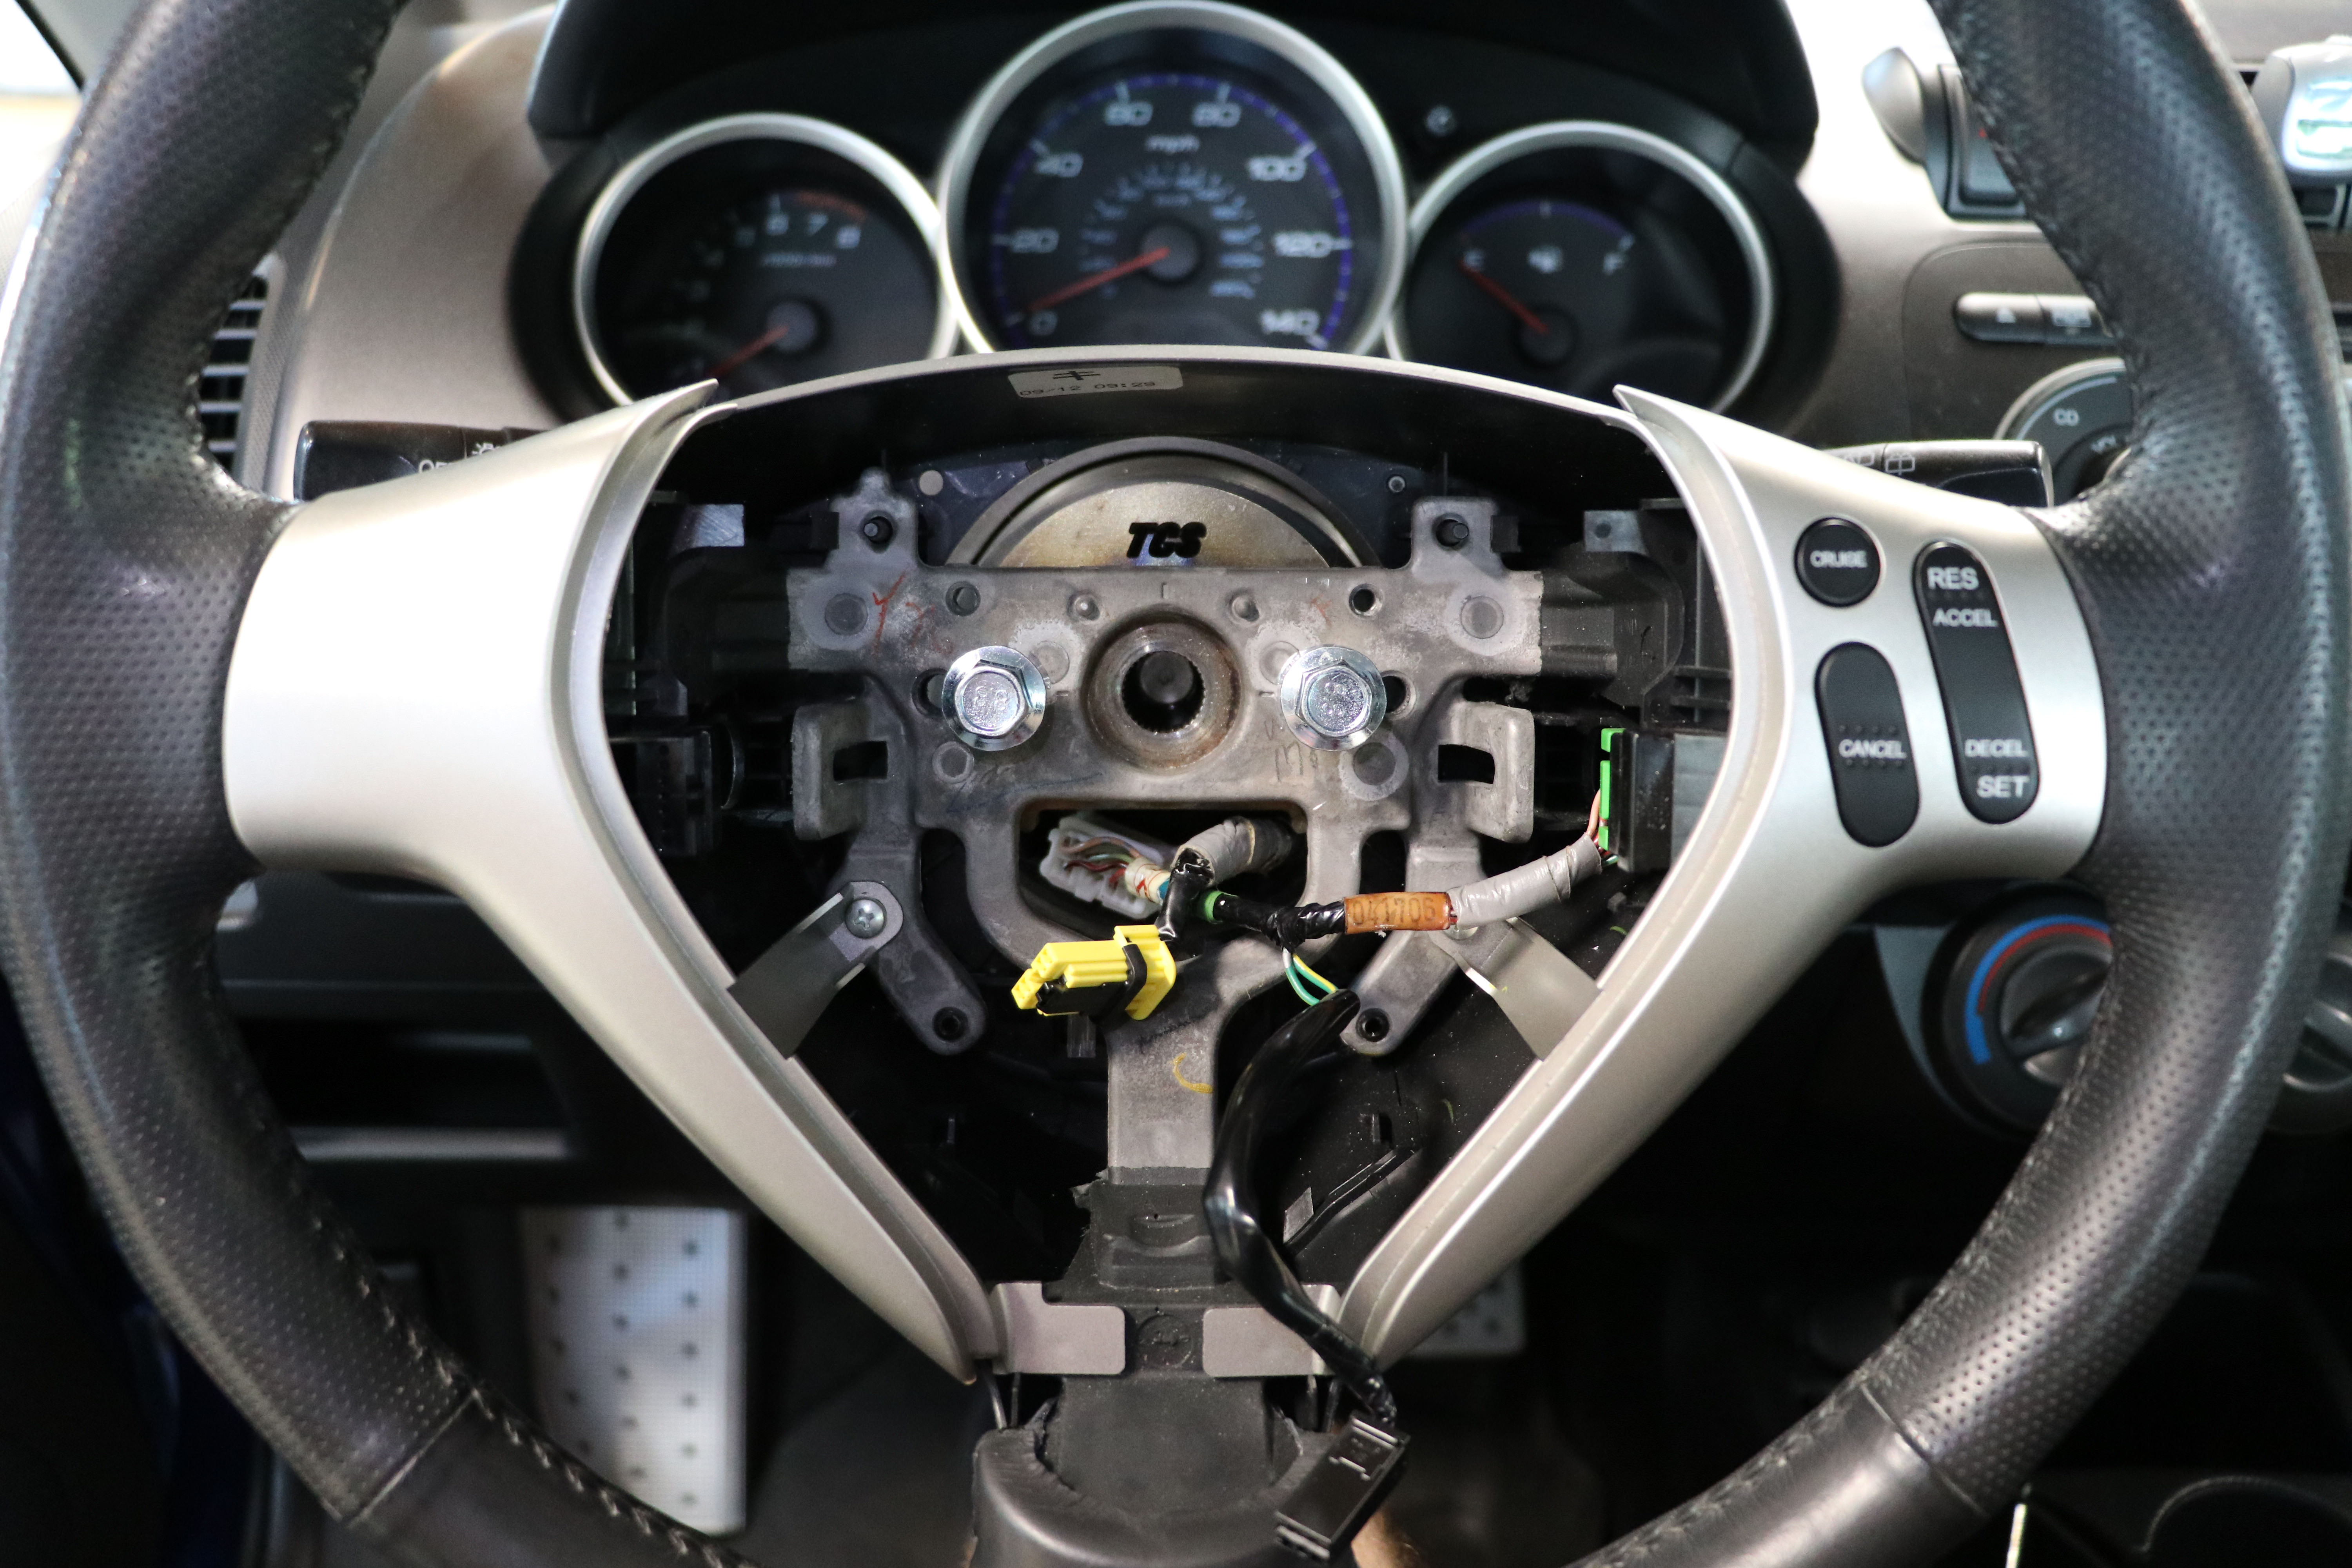
For such a subtle visual change... It has completely changed my driving comfort!
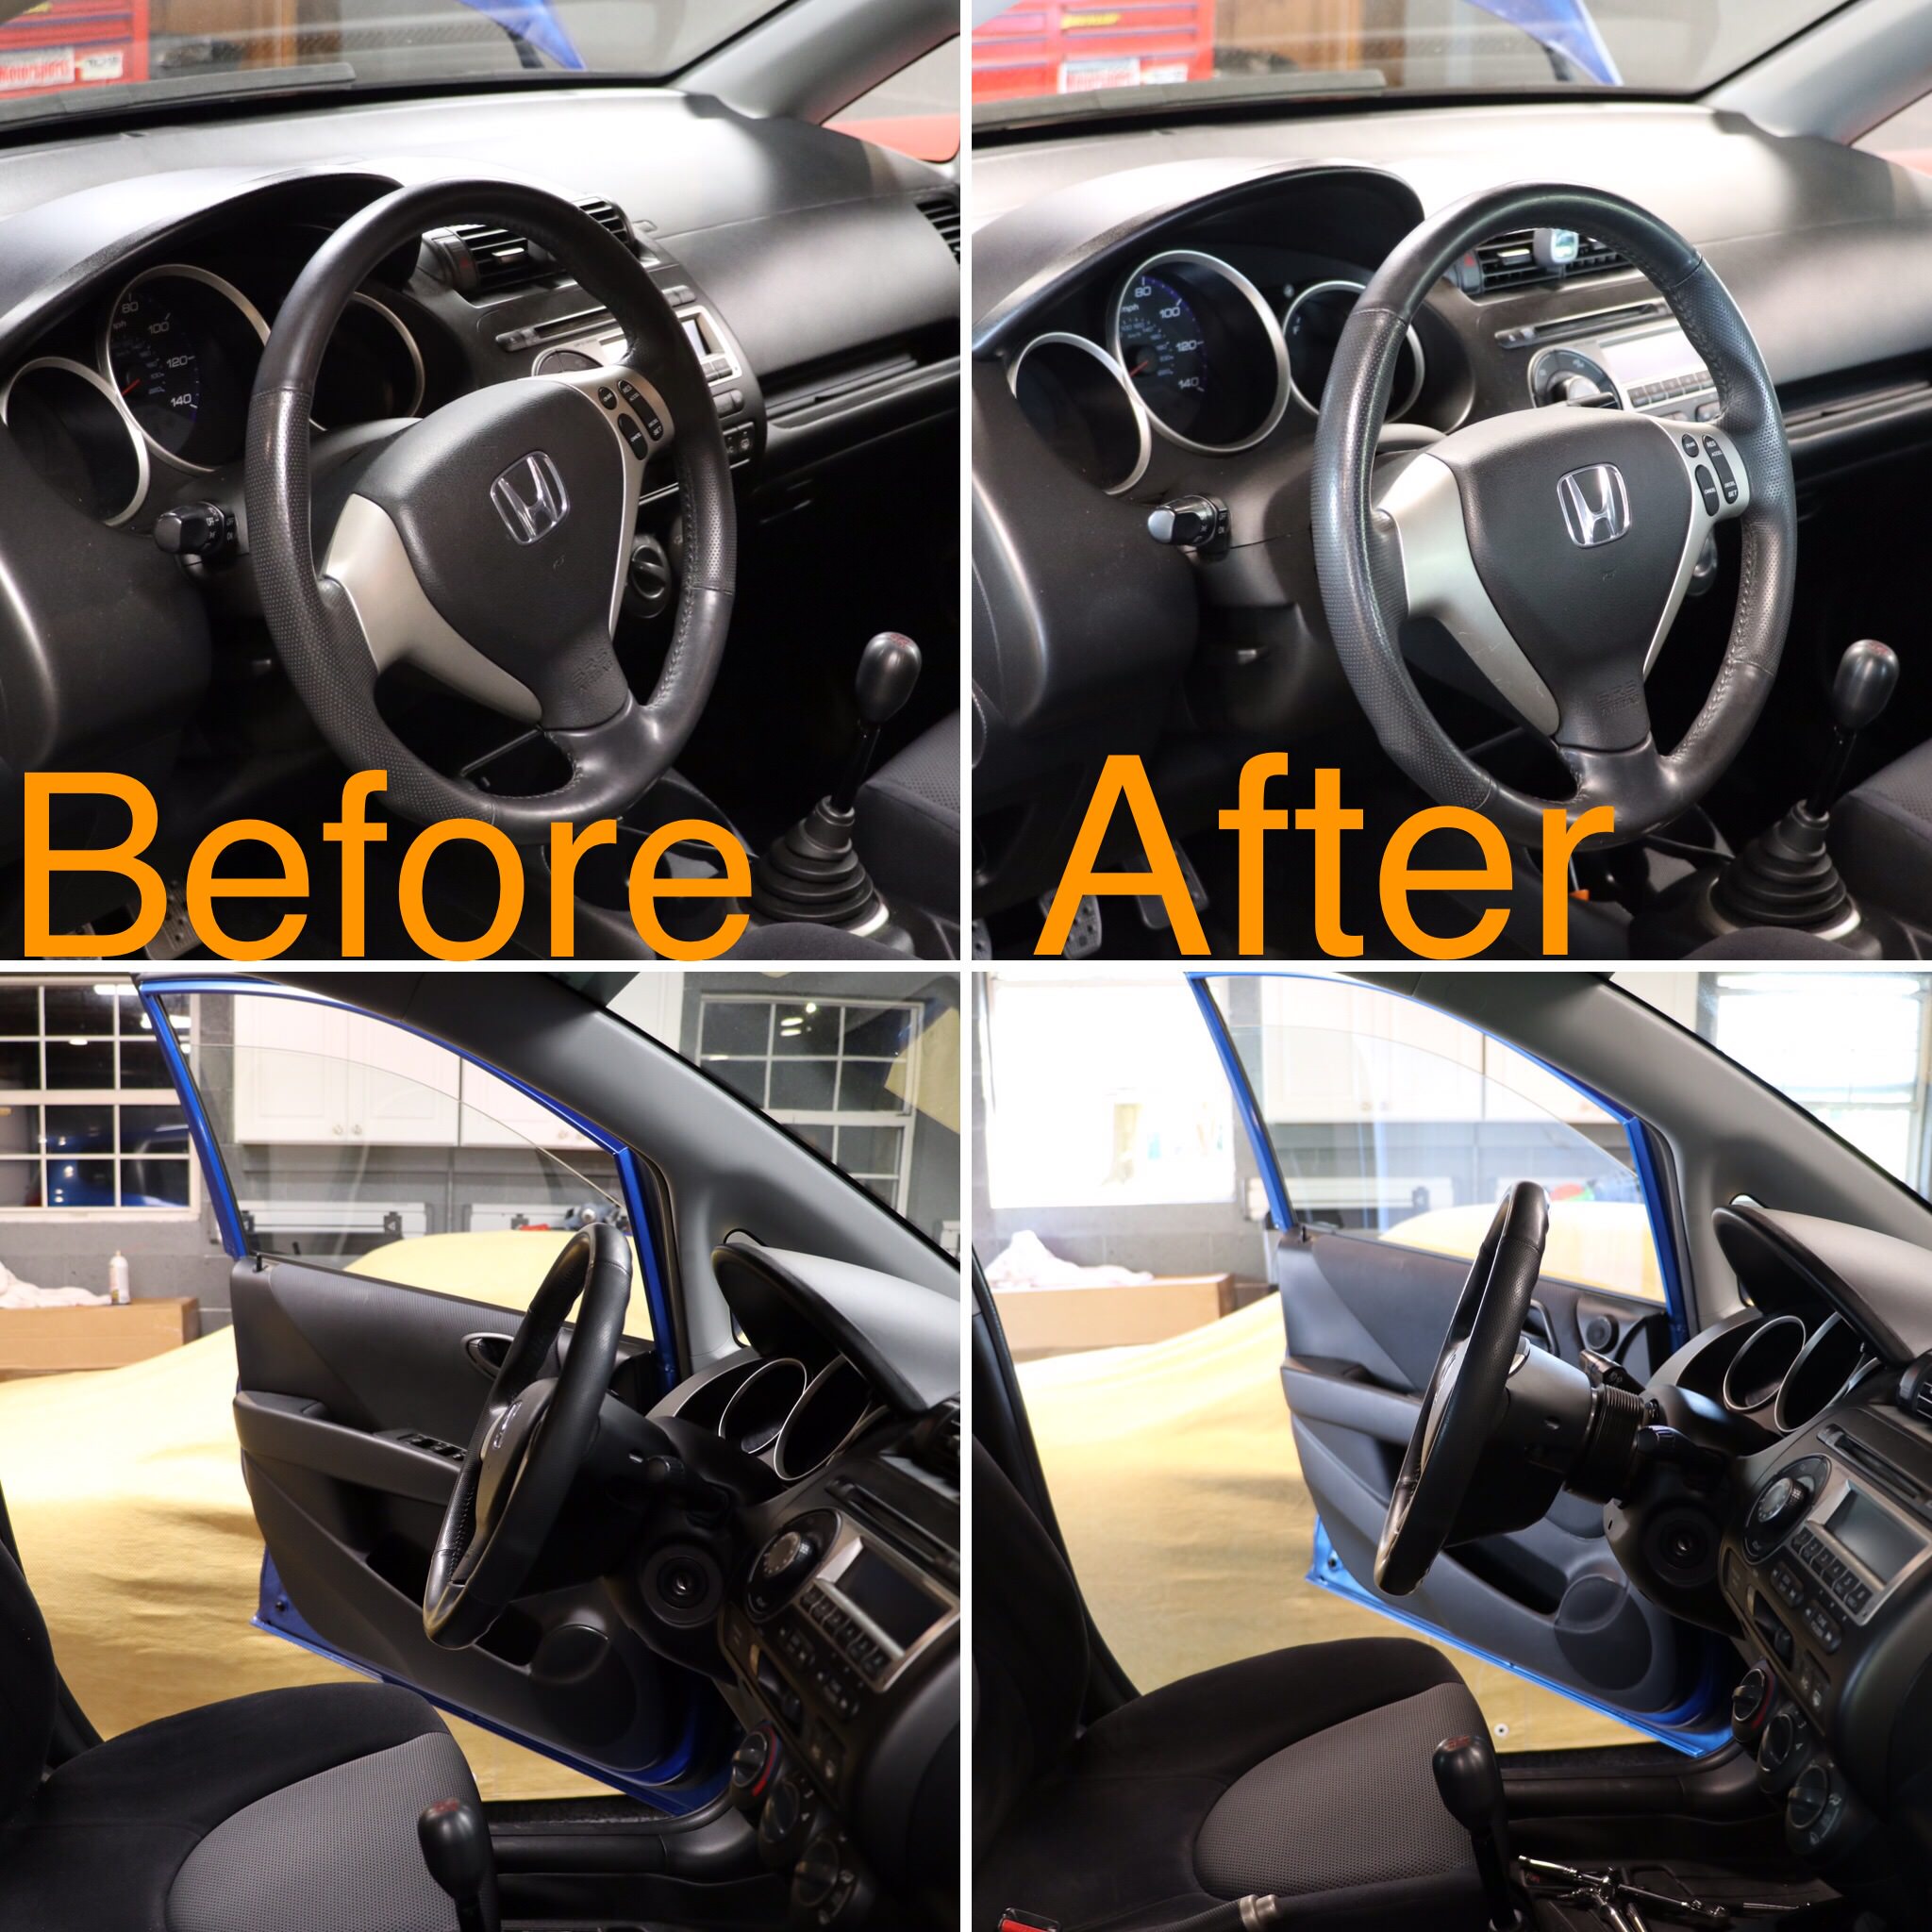
I didn't want to throw out a great wheel, I just wanted to be able to rest my wrists on it and have more room to dance on the pedals!
Let me point out the results. Keep in mind, I tried really hard to take each of these shots from the same viewing angle.... The change is real
If you would like to see more detailed pictures and a summary of the install process, please visit this thread...
https://www.fitfreak.net/forums/fit-...ners-look.html
Talk soon guys...
I am picky about ergonomics, probably to an unhealthy almost obsessive extent... This had to be fixed.
Thanks to Seamus at Tailored Chassis Solutions... It is.... and it was so easy!
I selected a 2.5" version of his custom "Fit Specific" spacer.
This allows me to move the light, strong, and comfortable factory wheel away from the pedals and closer to the shifter.
It also meant I could retain airbag and cruise control functionality. This is important to me, my wife and I both drive this car regularly.
For such a subtle visual change... It has completely changed my driving comfort!
I didn't want to throw out a great wheel, I just wanted to be able to rest my wrists on it and have more room to dance on the pedals!
Let me point out the results. Keep in mind, I tried really hard to take each of these shots from the same viewing angle.... The change is real
If you would like to see more detailed pictures and a summary of the install process, please visit this thread...
https://www.fitfreak.net/forums/fit-...ners-look.html
Talk soon guys...

Thread Starter
|
Member
Joined: Sep 2017
Posts: 27
From: Knoxvegas, TN
....and I'm back!
Kids, life, travel, racing..... blah blah blah. 
Sorry for the lack of updates, lets get caught up!
Gridlife's second round of track battle was approaching fast.
Round #2 takes place at Gingerman Raceway in South Haven, MI and is one of two Festivals on the Gridlife Calendar.
Its also the event I most look forward too. Its a great track where I get to see awesome friends.
But, I had some mods that I really wanted to get installed before hitting the track again.
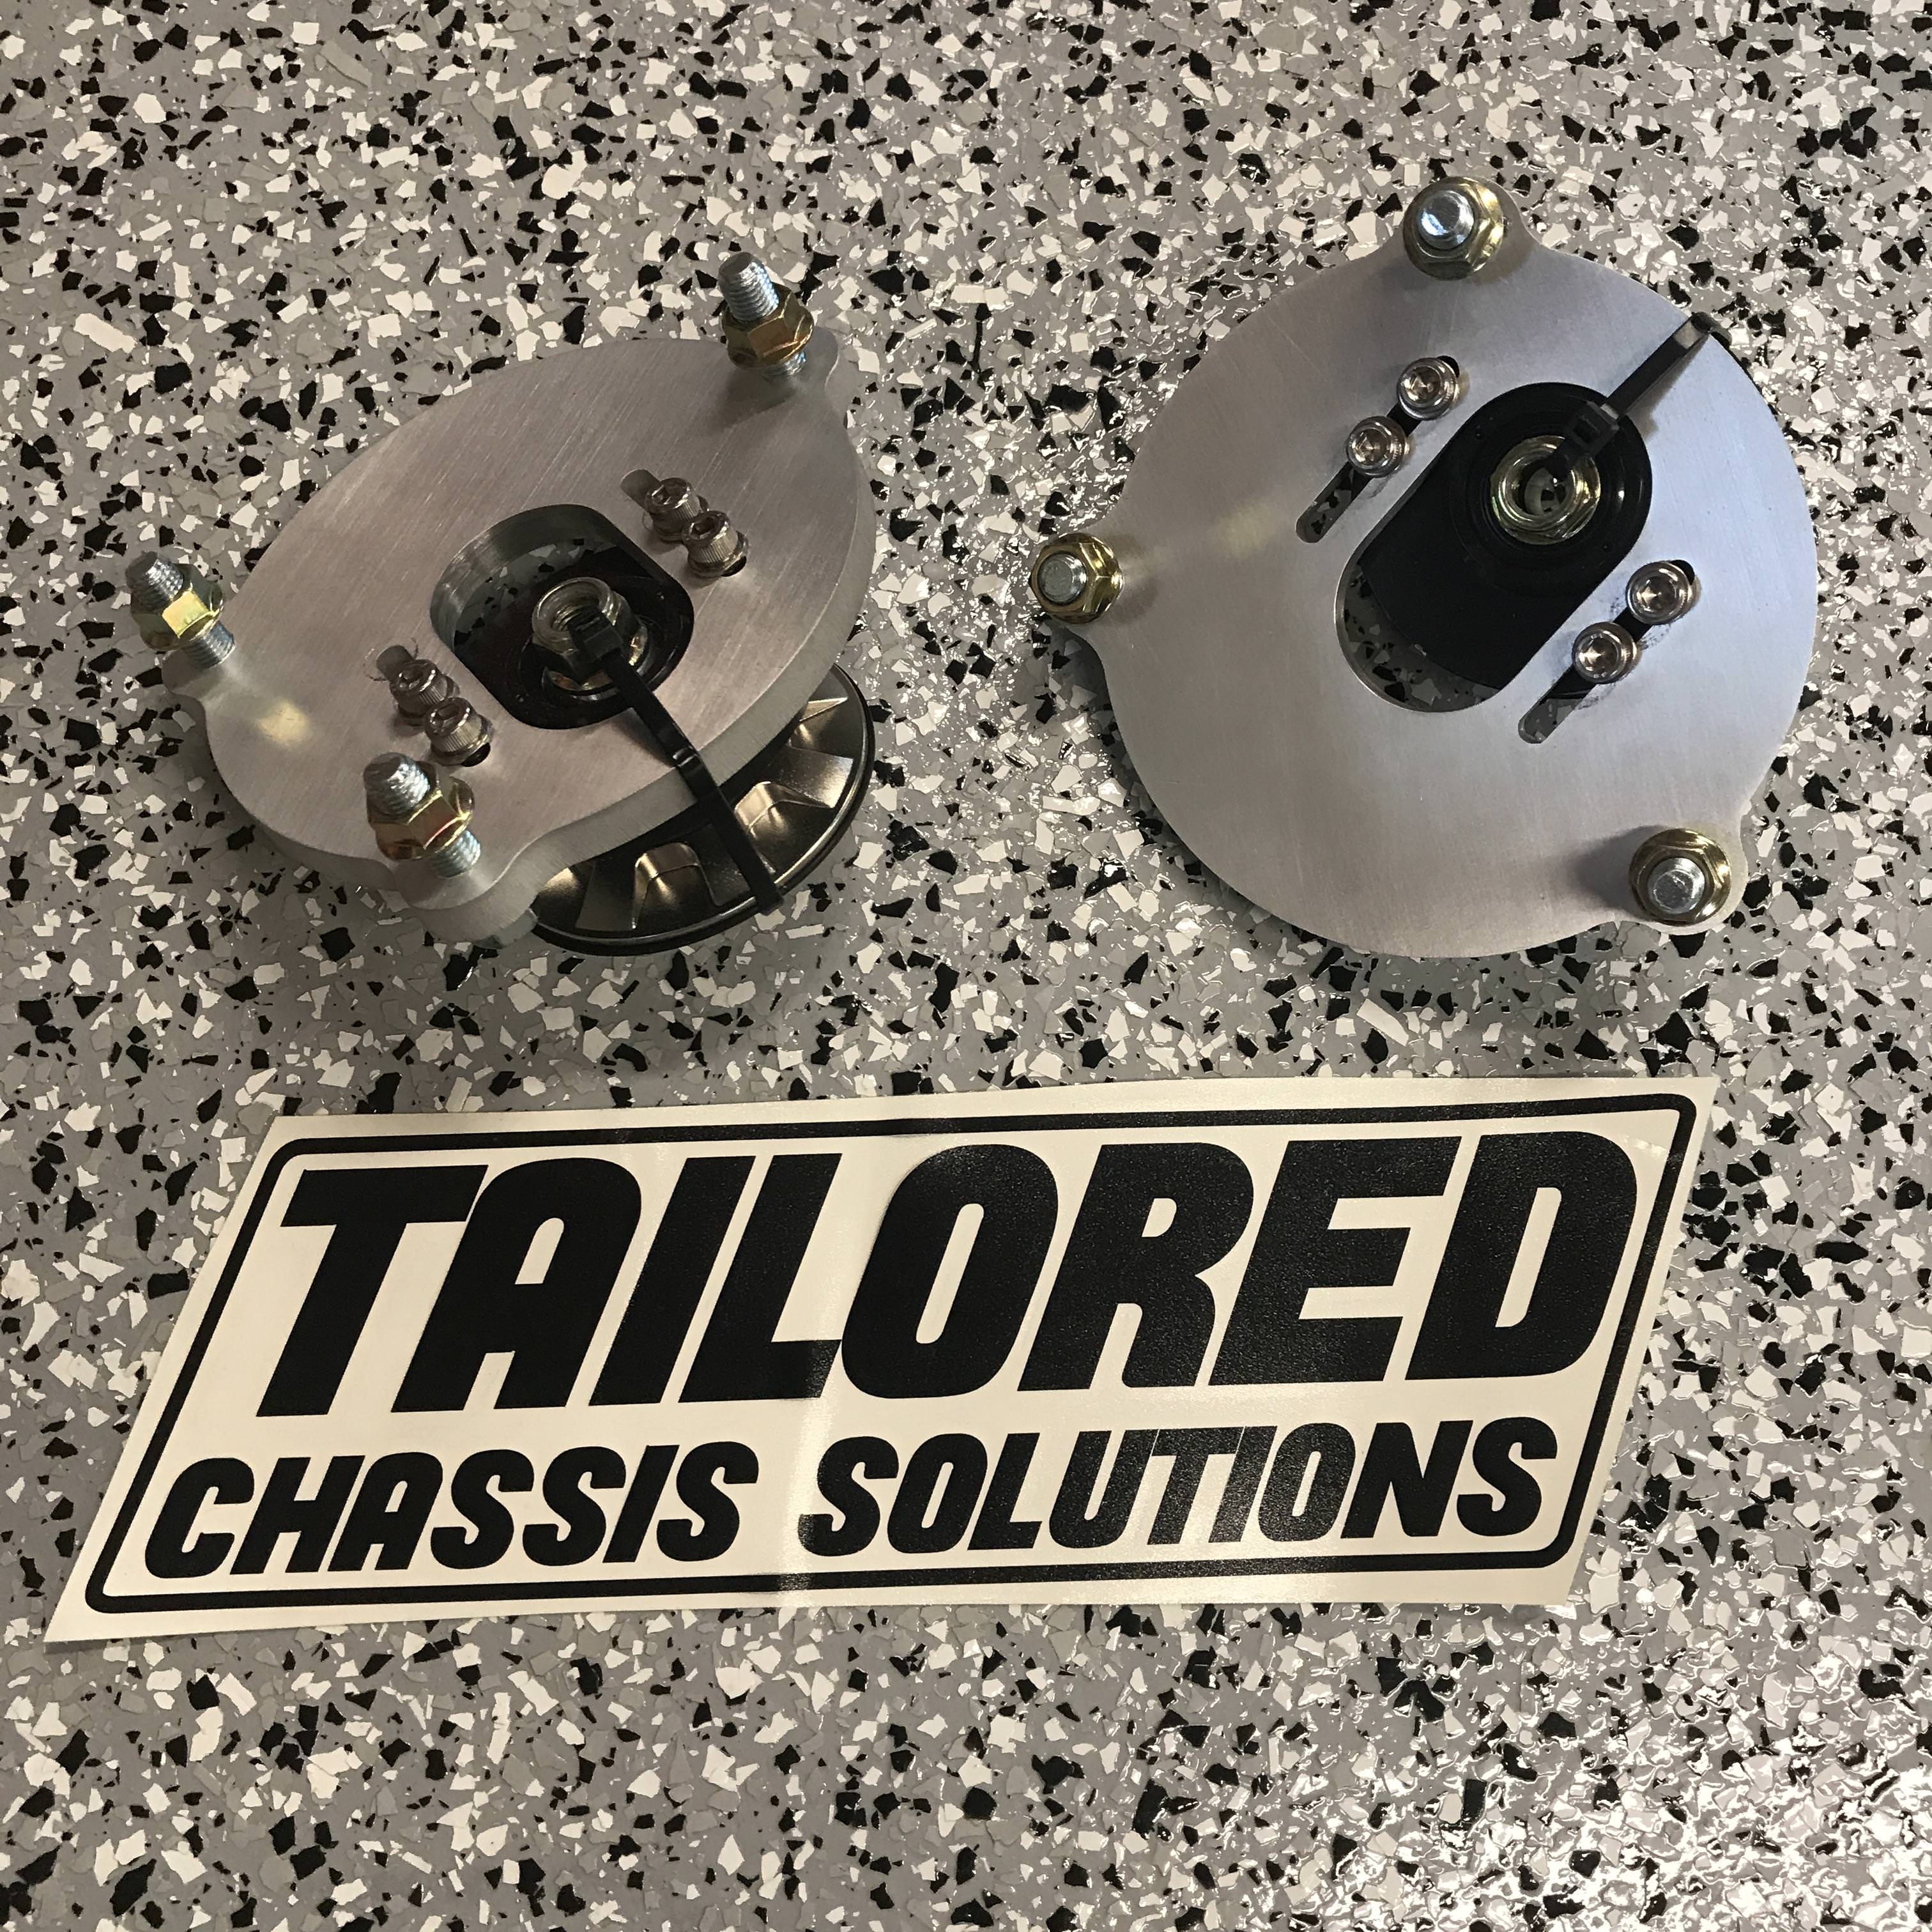
The most important was front castor/camber plates from TCS.
I'm going to post very in depth pictures in the next post.
Let me skip ahead right now and tell you these plates made a night-n-day difference on the handling of the Fit.
The install was a breeze once I got into it and I was 100% satisfied with the product that Seamus delivers. I was honestly not prepared for the amount of turn-in response and on-command rotation I could get. I actually found myself cutting a wee-bit much off a few apex's.... video on that later. I have done a few tracks since having these installed. I finally feel like I'm using the tires potential and as a bonus, getting much more even wear. With actual camber gain on compression and much improved steering feel thanks to the added castor... there are zero down-sides to this mod.
Sorry for the lack of updates, lets get caught up!
Gridlife's second round of track battle was approaching fast.
Round #2 takes place at Gingerman Raceway in South Haven, MI and is one of two Festivals on the Gridlife Calendar.
Its also the event I most look forward too. Its a great track where I get to see awesome friends.
But, I had some mods that I really wanted to get installed before hitting the track again.
The most important was front castor/camber plates from TCS.
I'm going to post very in depth pictures in the next post.
Let me skip ahead right now and tell you these plates made a night-n-day difference on the handling of the Fit.
The install was a breeze once I got into it and I was 100% satisfied with the product that Seamus delivers. I was honestly not prepared for the amount of turn-in response and on-command rotation I could get. I actually found myself cutting a wee-bit much off a few apex's.... video on that later. I have done a few tracks since having these installed. I finally feel like I'm using the tires potential and as a bonus, getting much more even wear. With actual camber gain on compression and much improved steering feel thanks to the added castor... there are zero down-sides to this mod.
Thread Starter
|
Member
Joined: Sep 2017
Posts: 27
From: Knoxvegas, TN
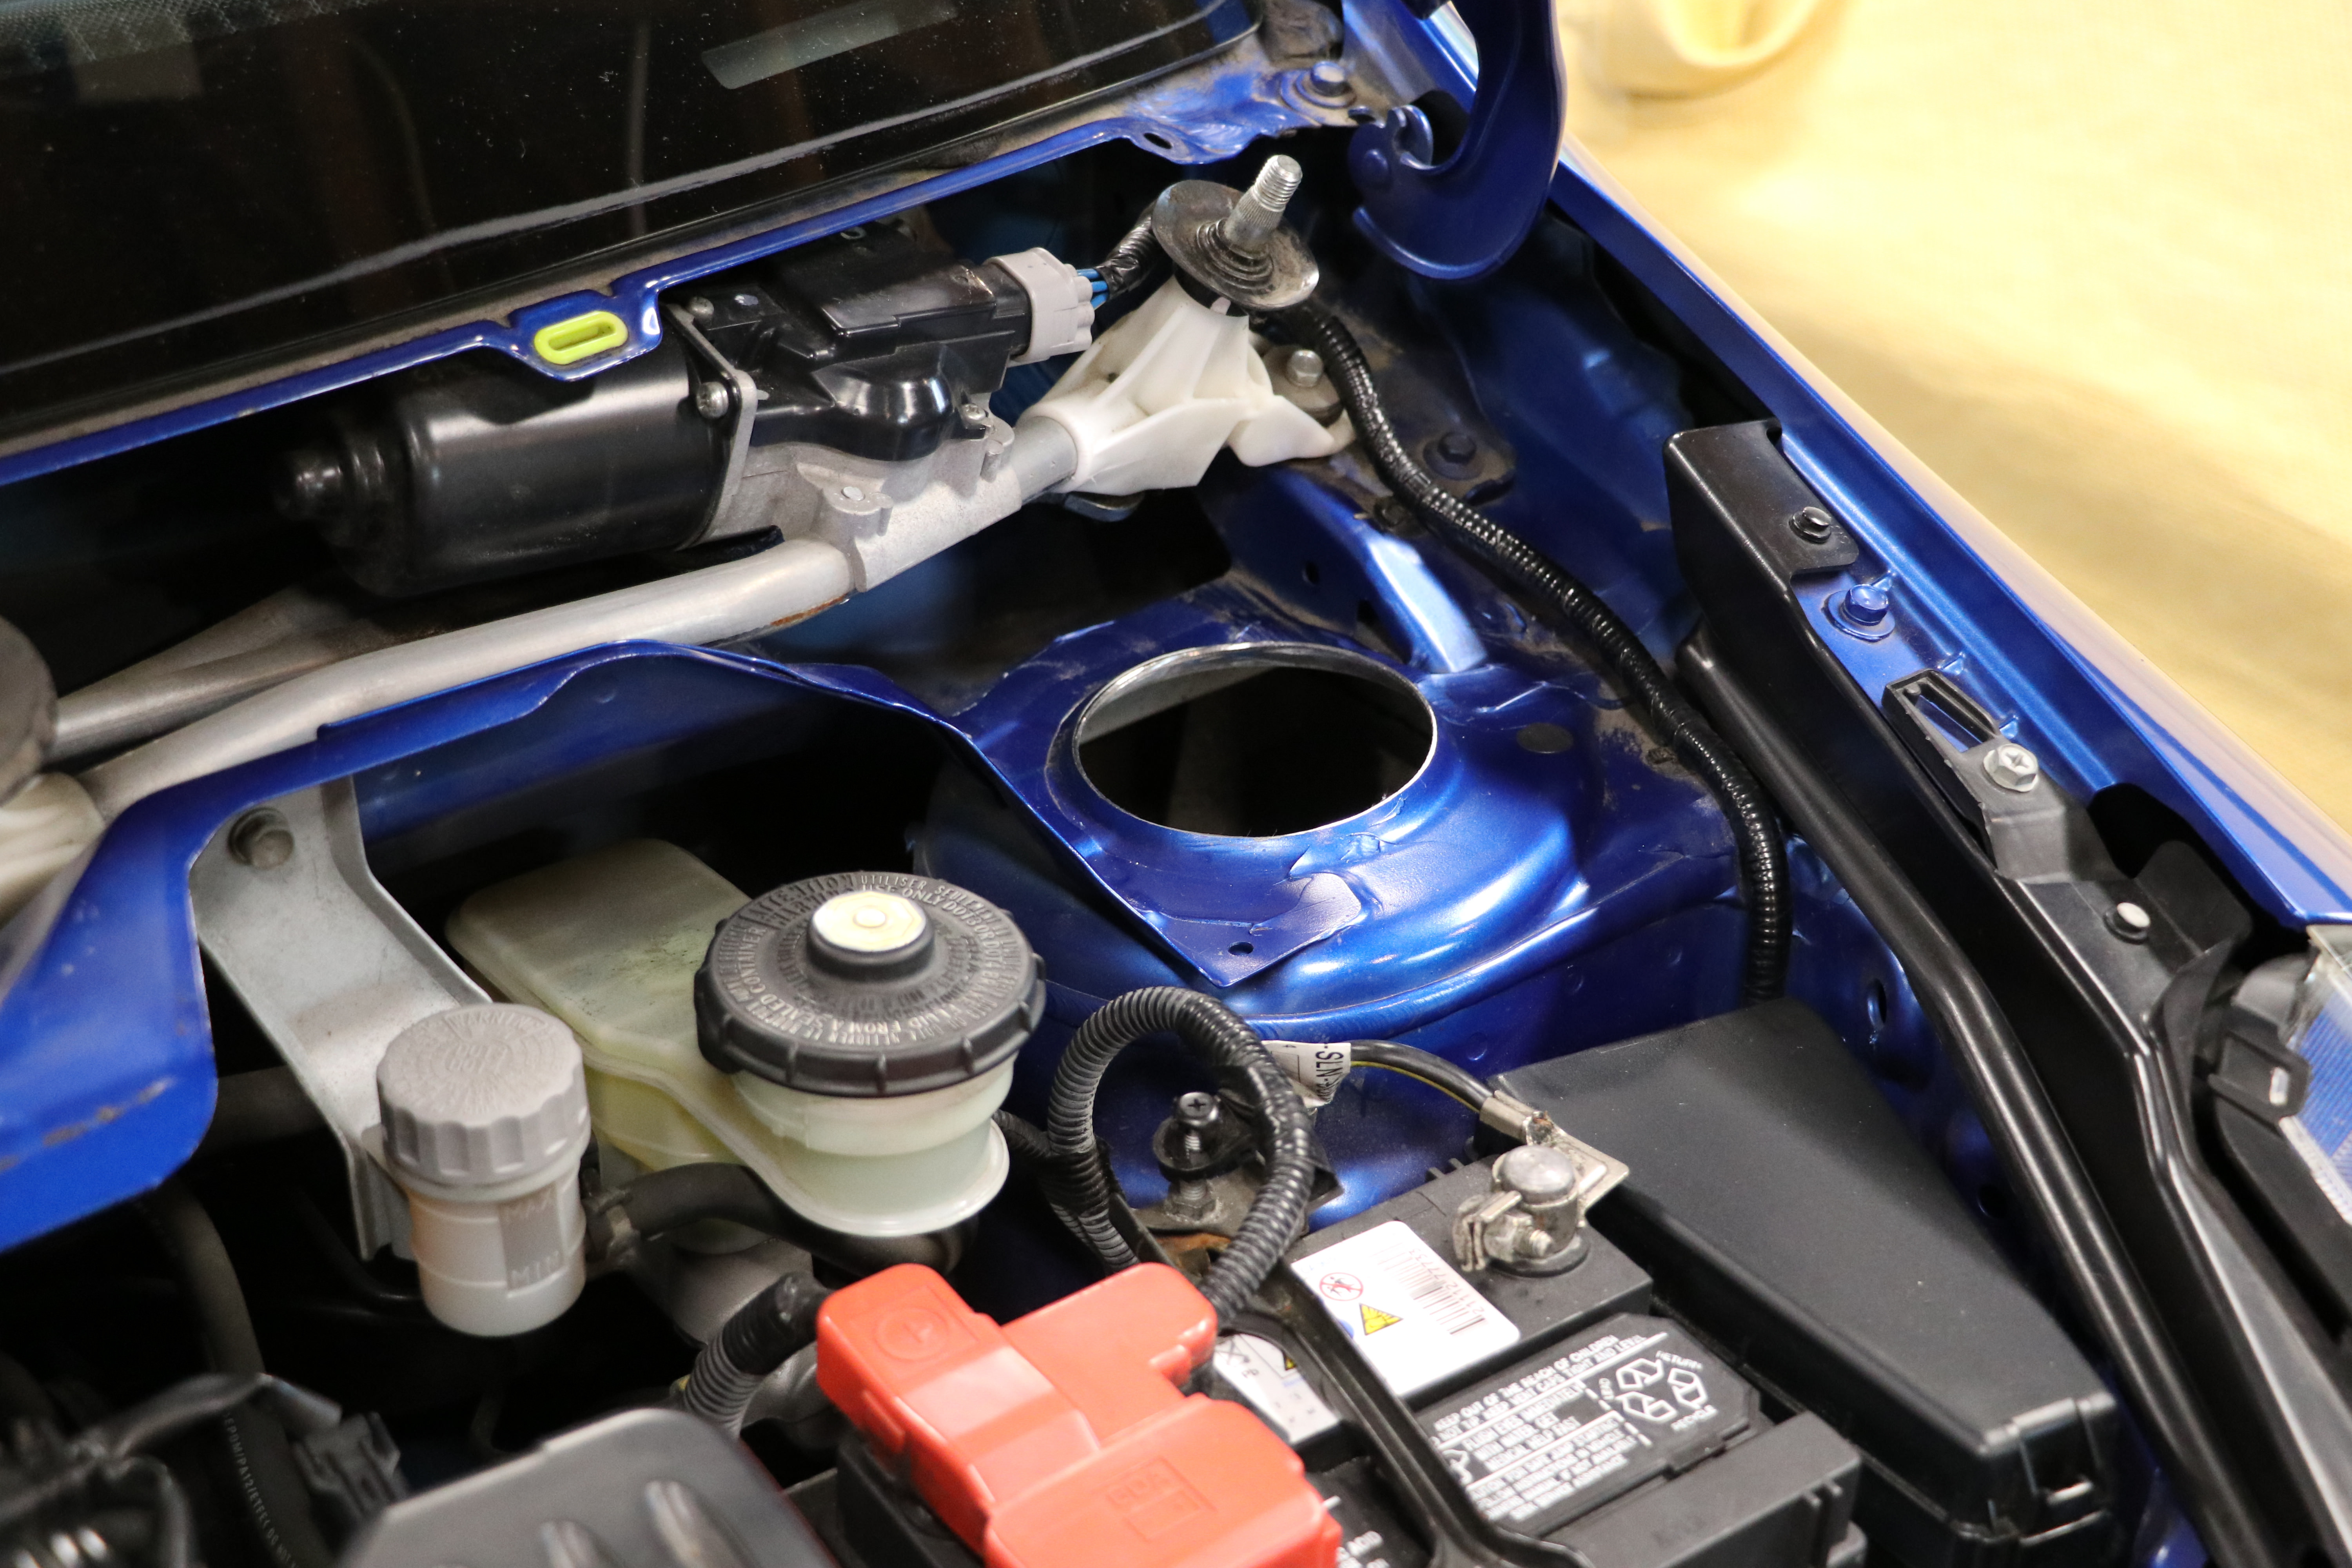
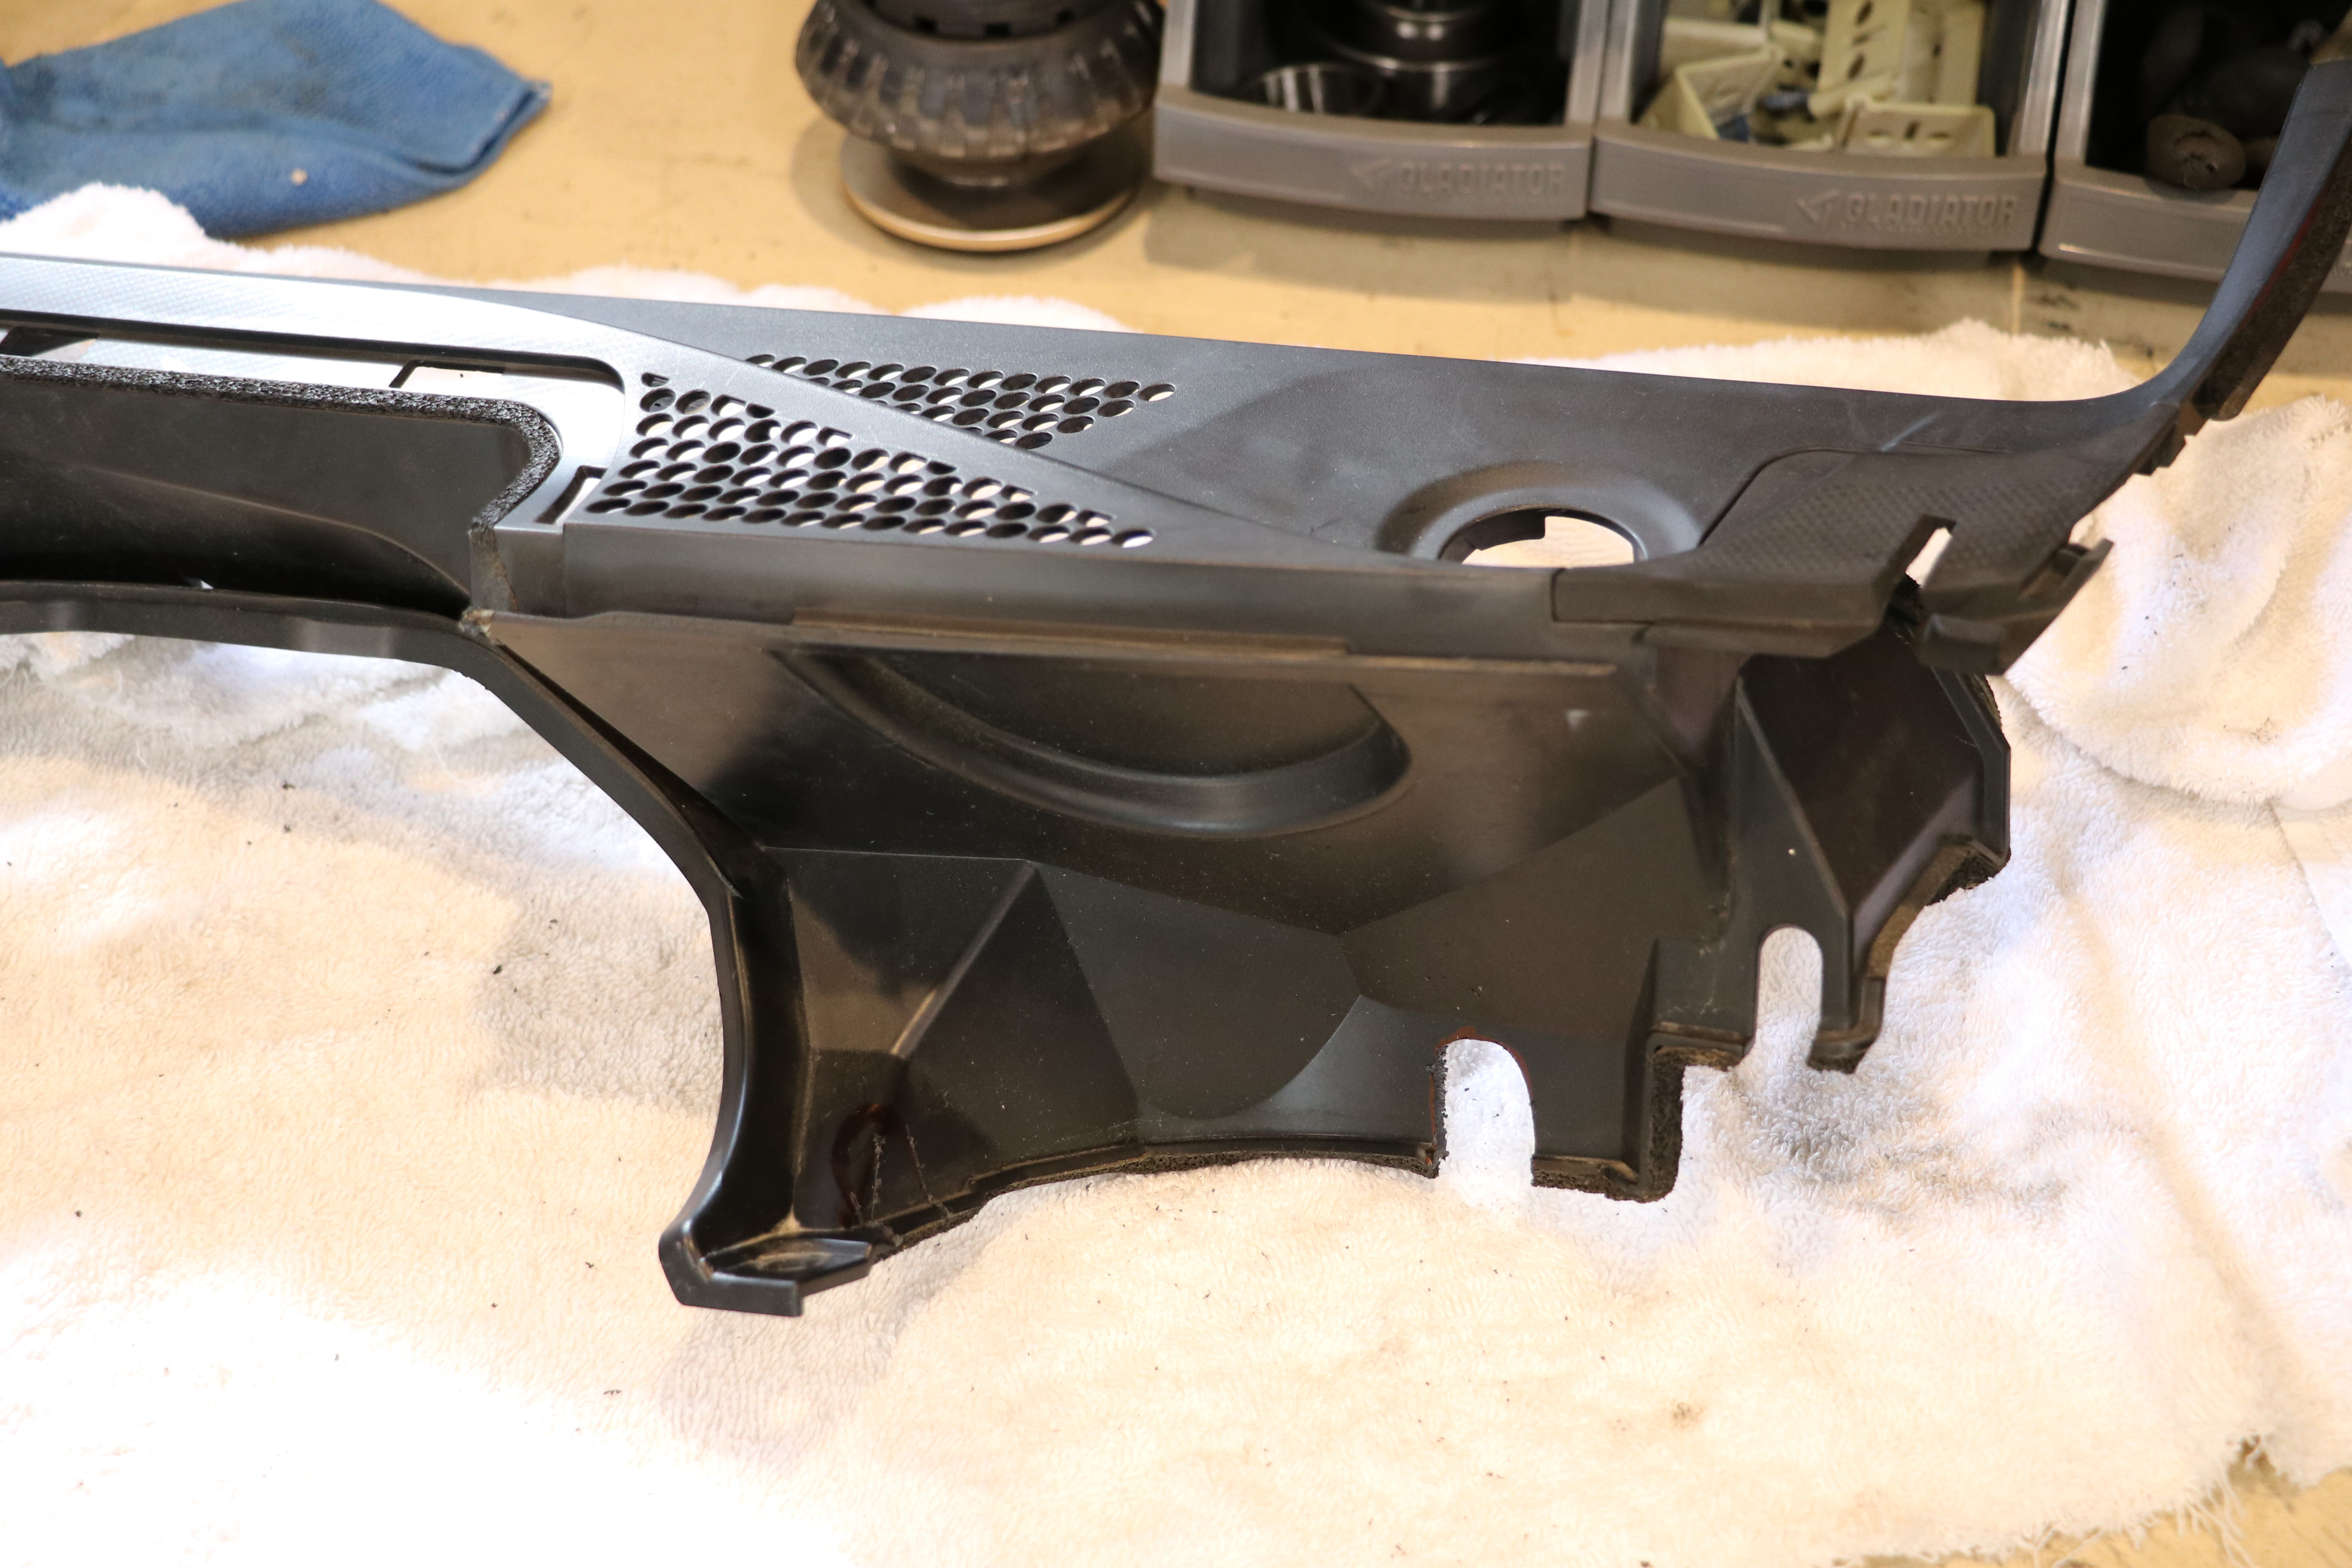
First step, gain access.
Remove this stuff...

Pop-up the windshield trim. (protect the glass)
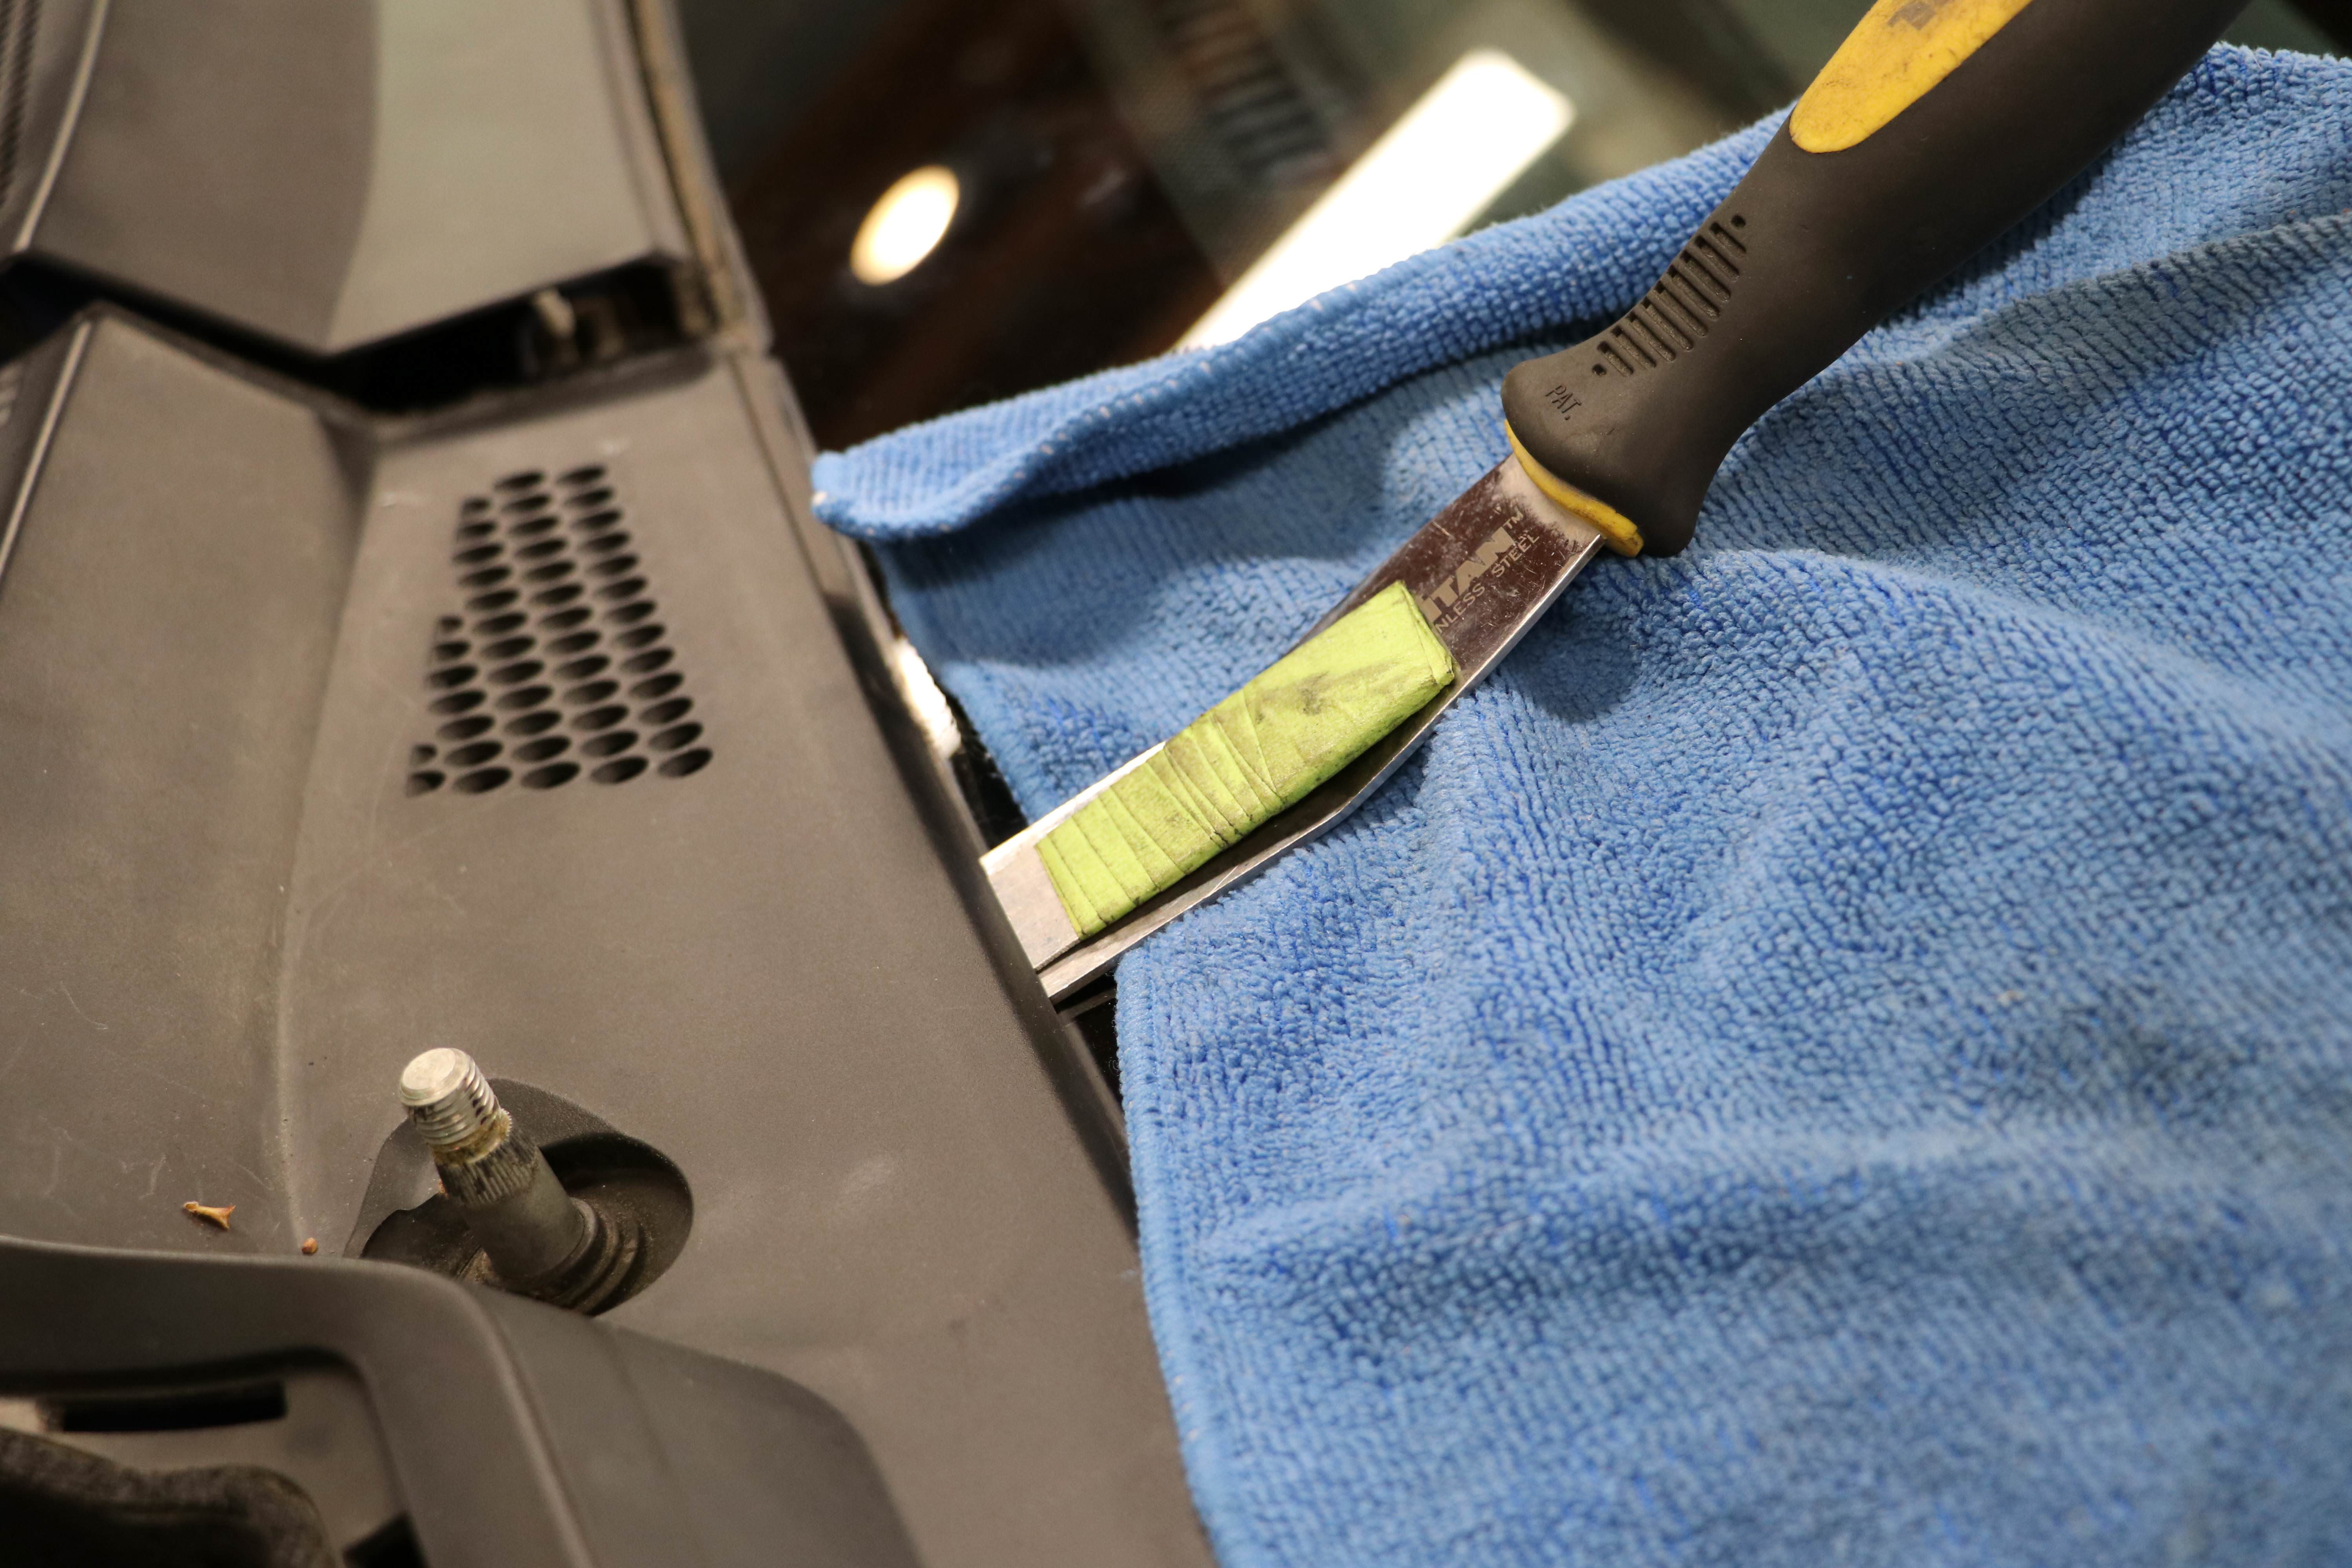
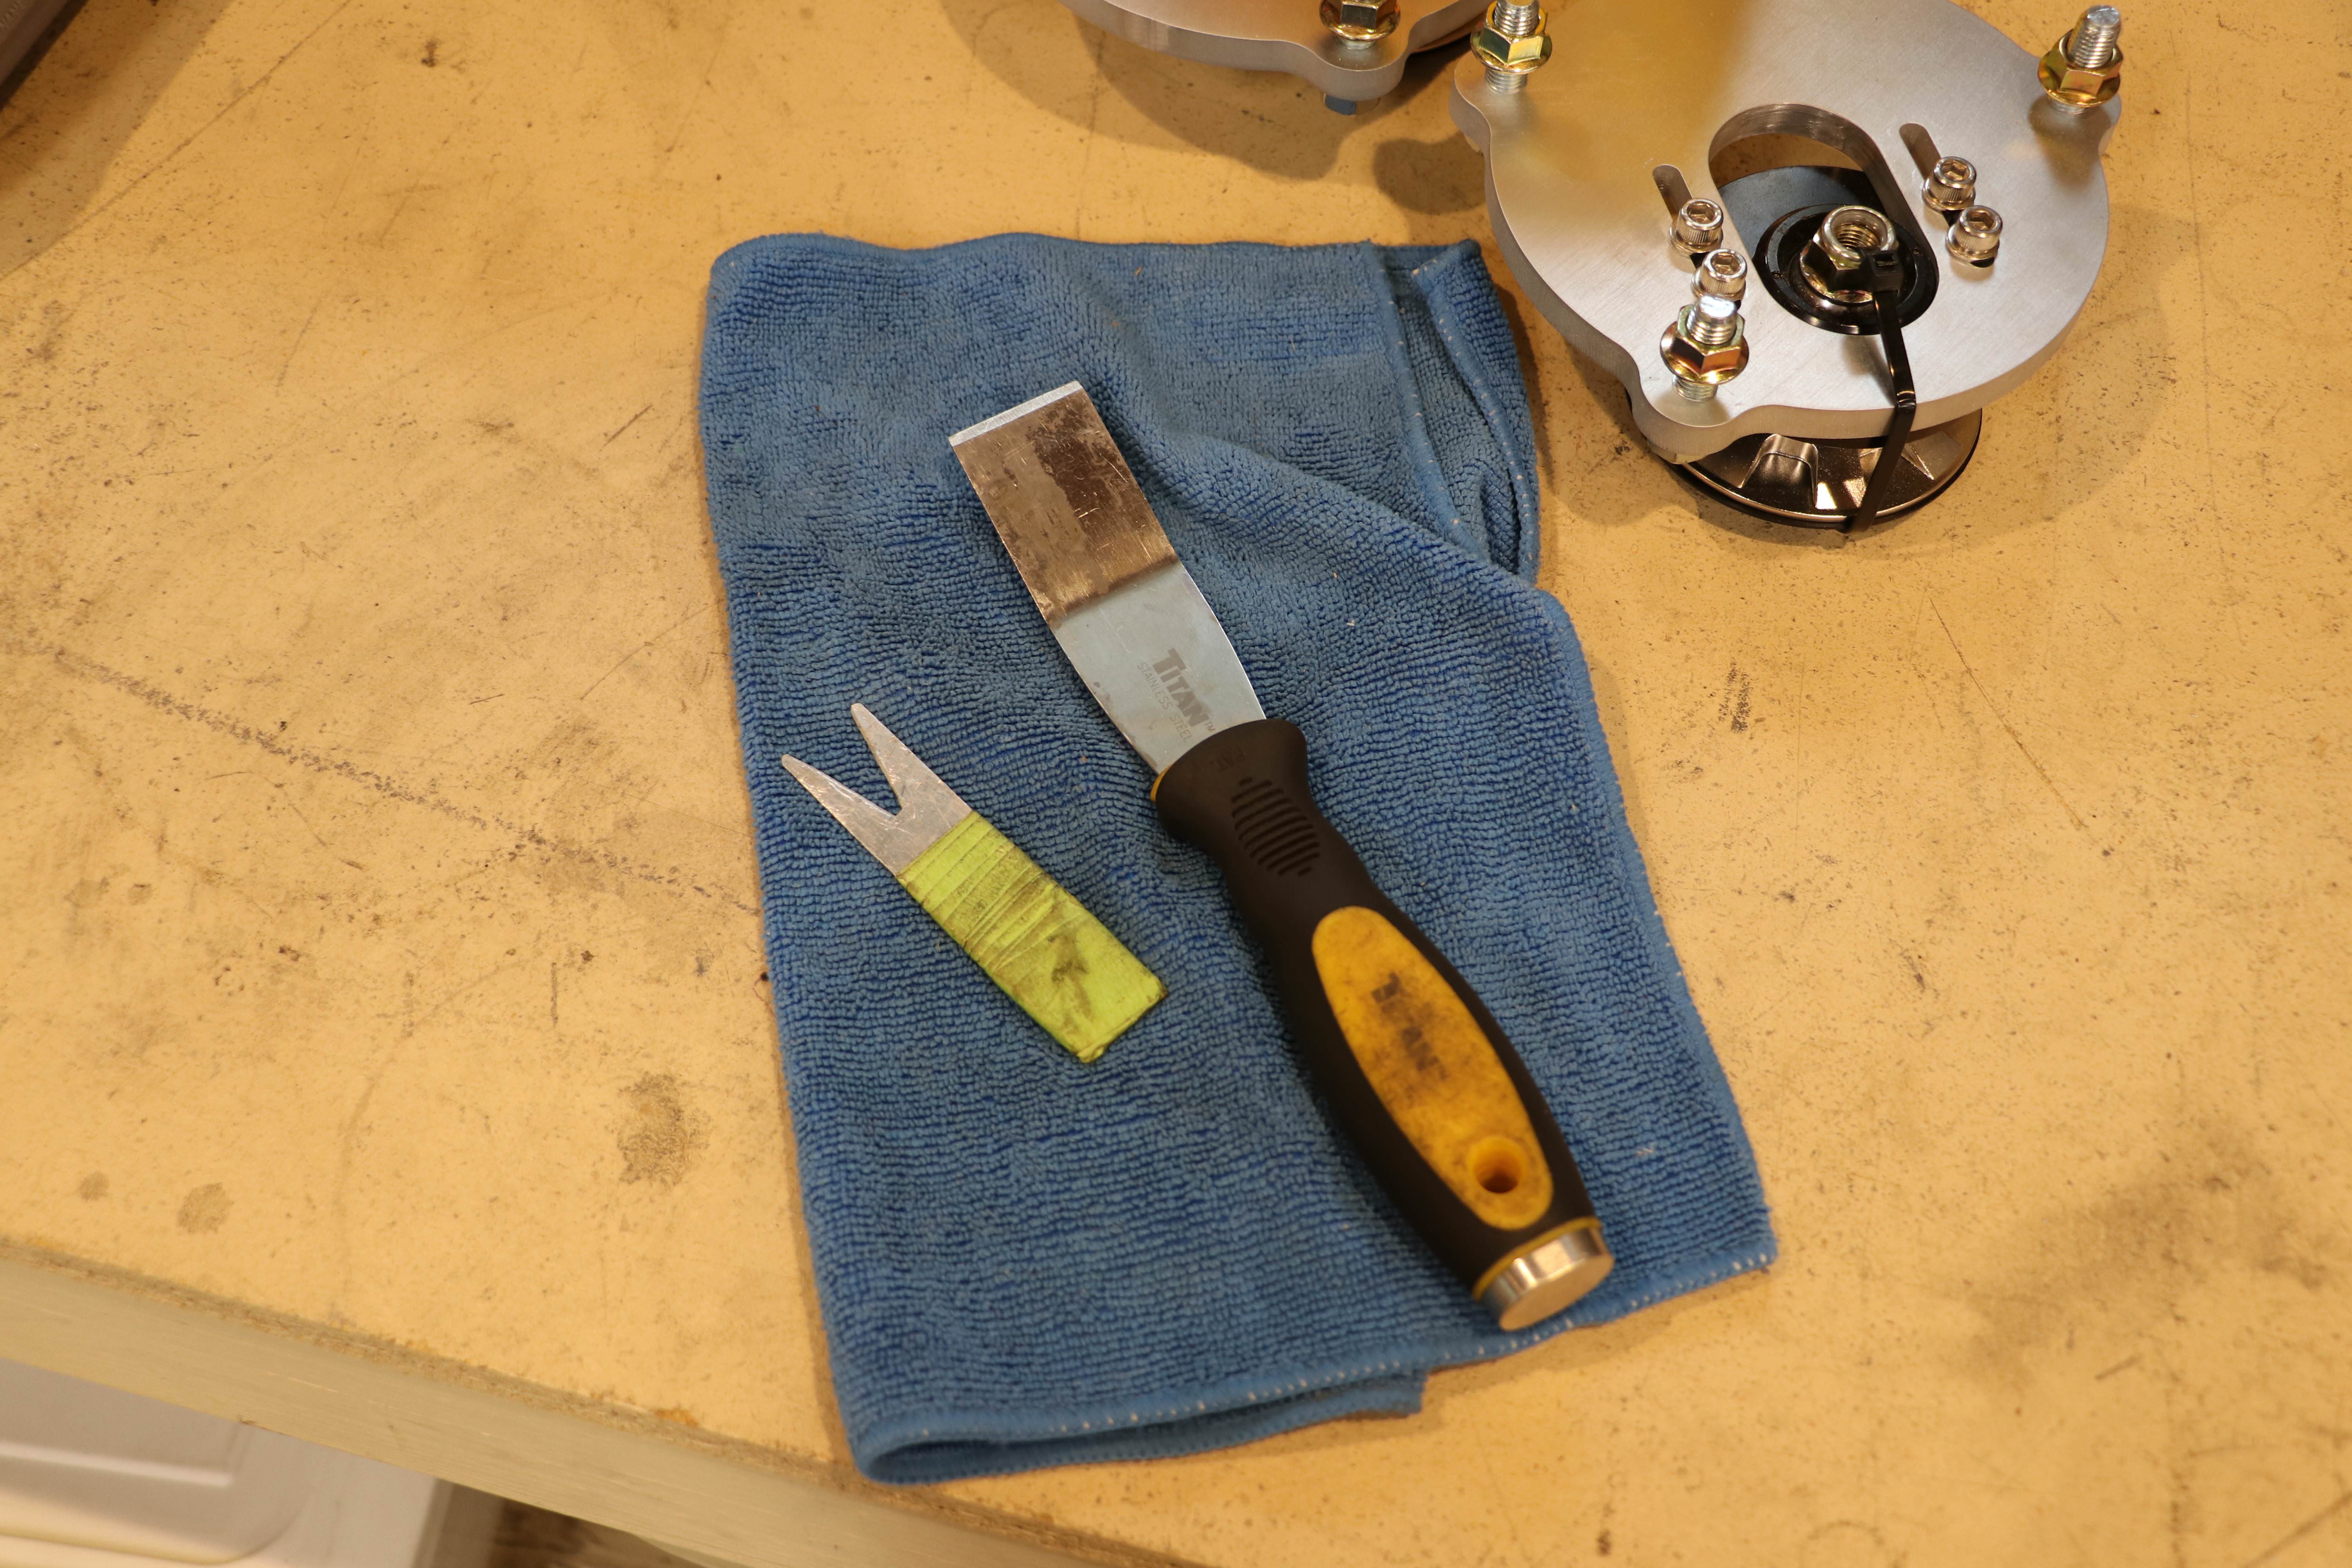
If you rig a little fork-tool like this out of thin sheet metal it really helps to get in that thin space.
prying directly around the pin so you don't snap them..
Now, we have a work area! Have fun cleaning it....
Remove this stuff...
Pop-up the windshield trim. (protect the glass)
If you rig a little fork-tool like this out of thin sheet metal it really helps to get in that thin space.
prying directly around the pin so you don't snap them..
Now, we have a work area! Have fun cleaning it....
Thread Starter
|
Member
Joined: Sep 2017
Posts: 27
From: Knoxvegas, TN
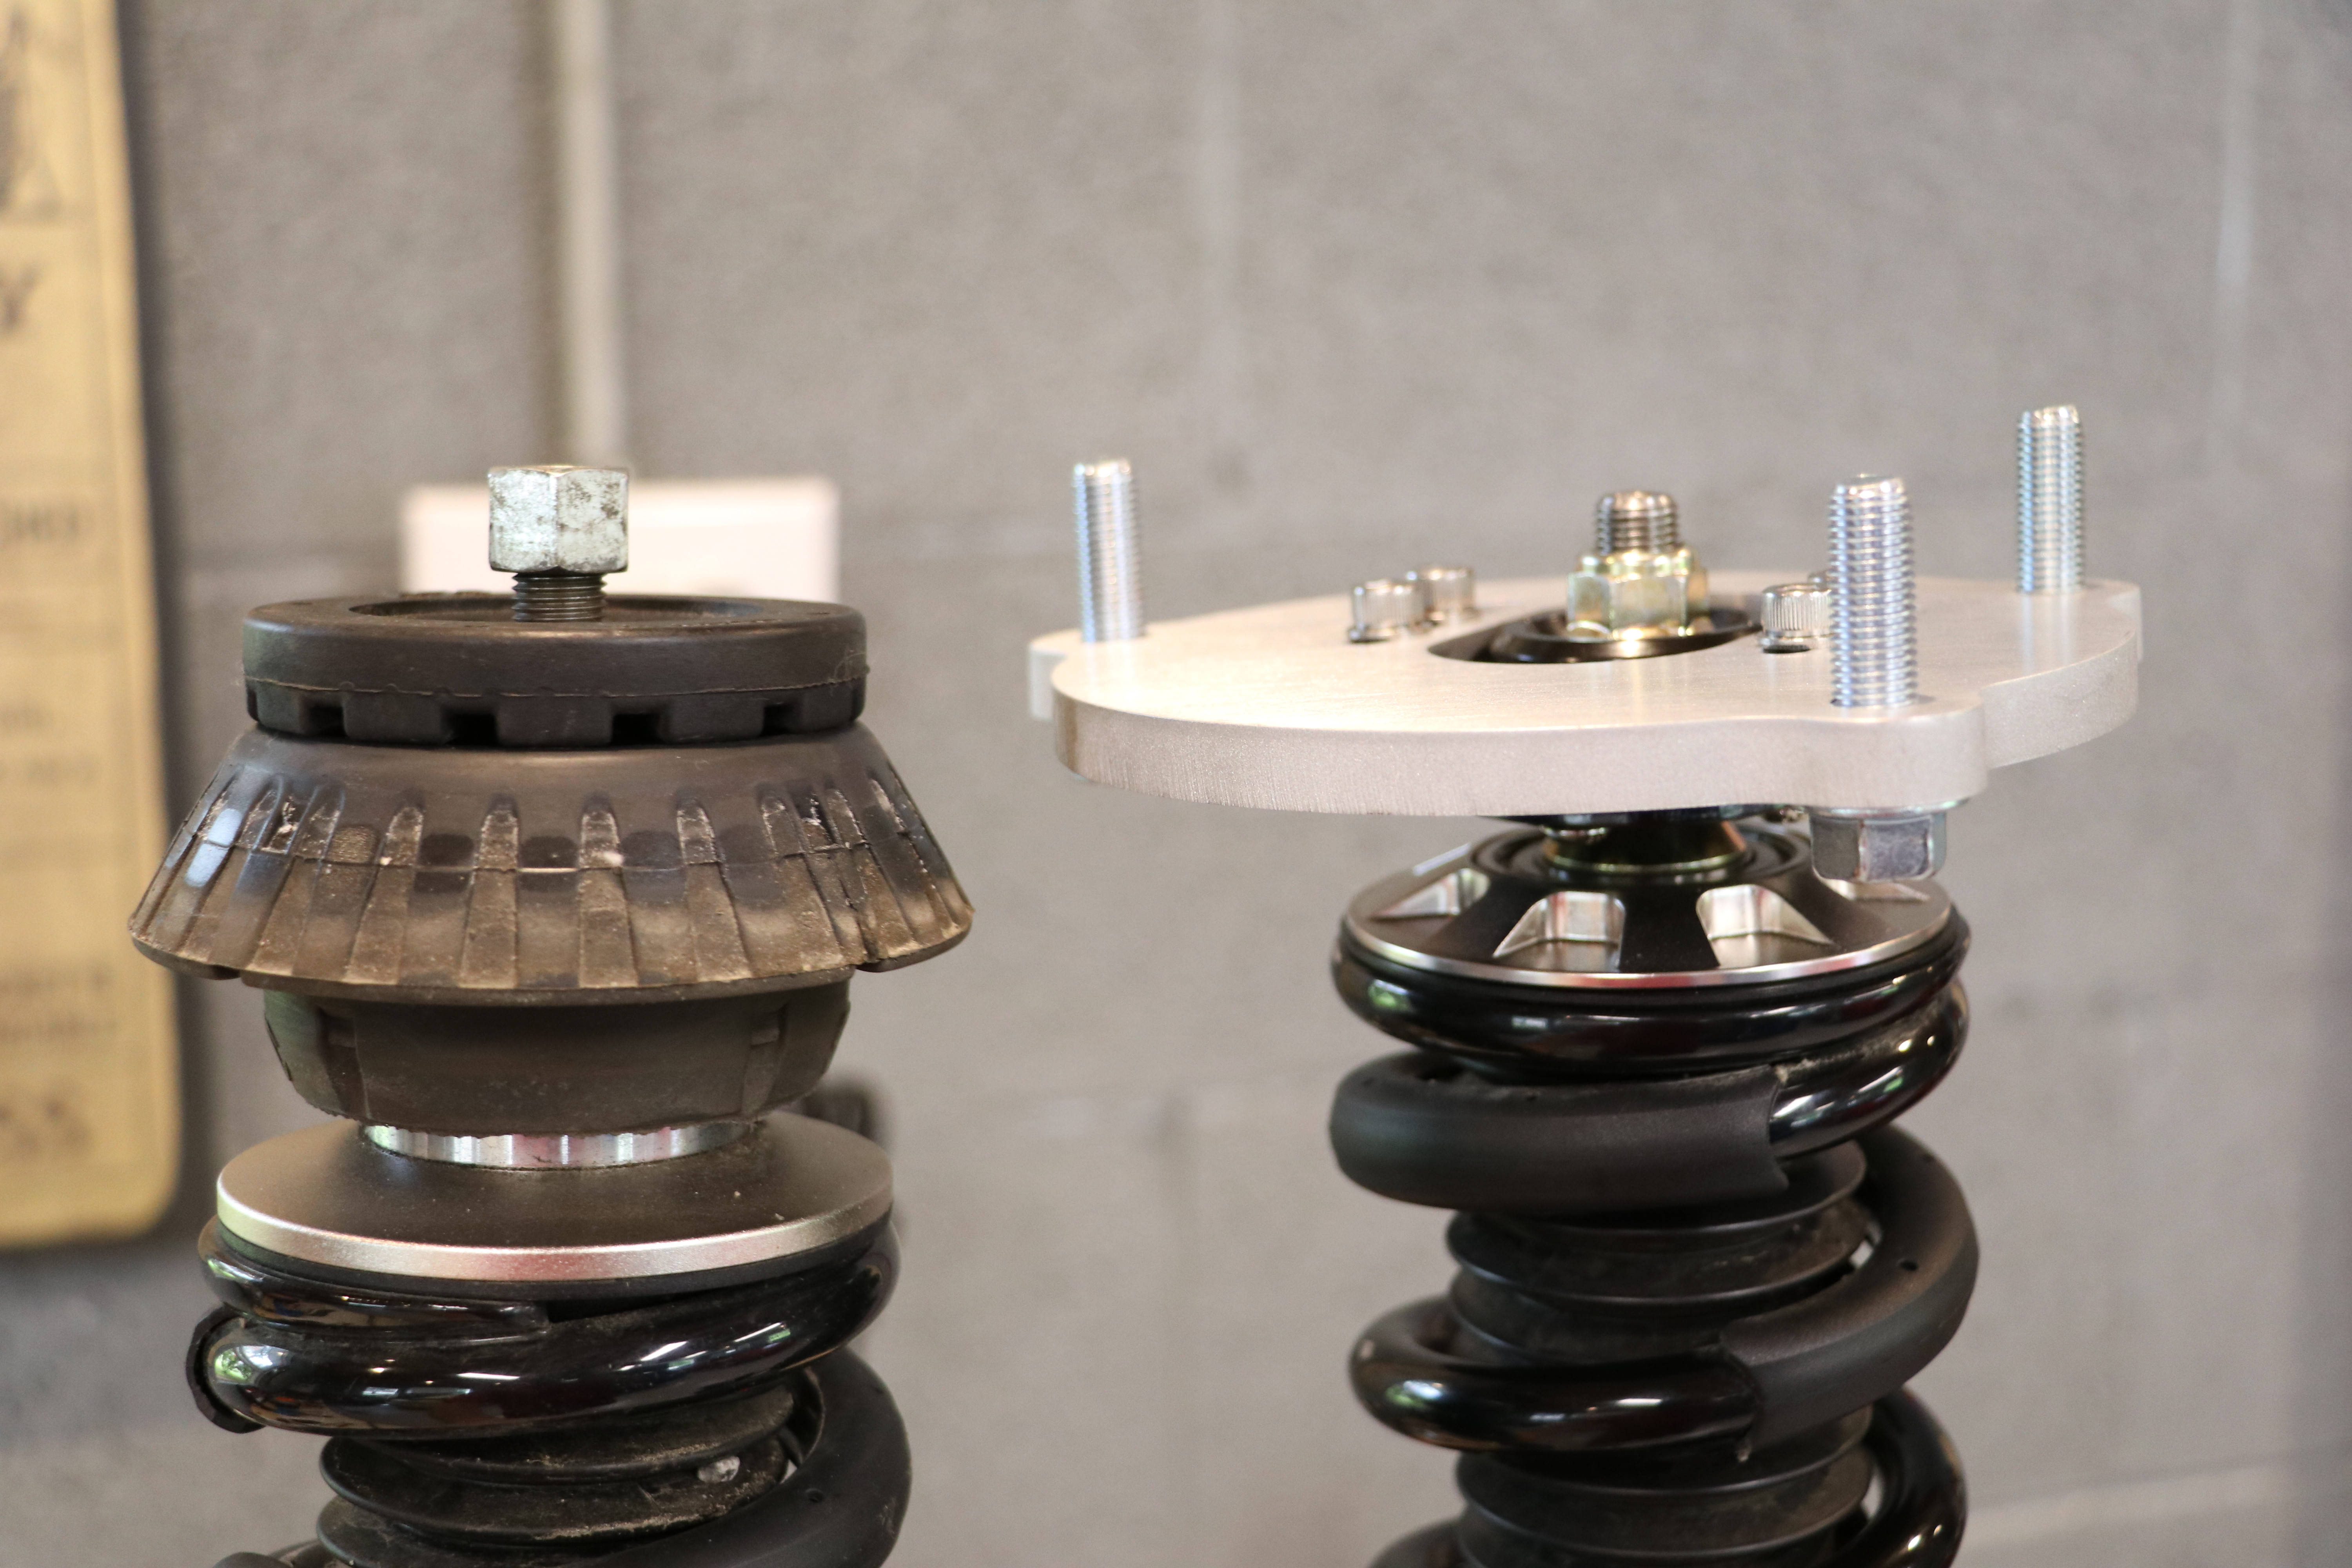
Remove the coilovers and discard the old worn out bushings and top bearings. Hold on to the the top bushing for a bit....
Scrounge up a long bolt and washer....


Use it as a template to mark your cut.
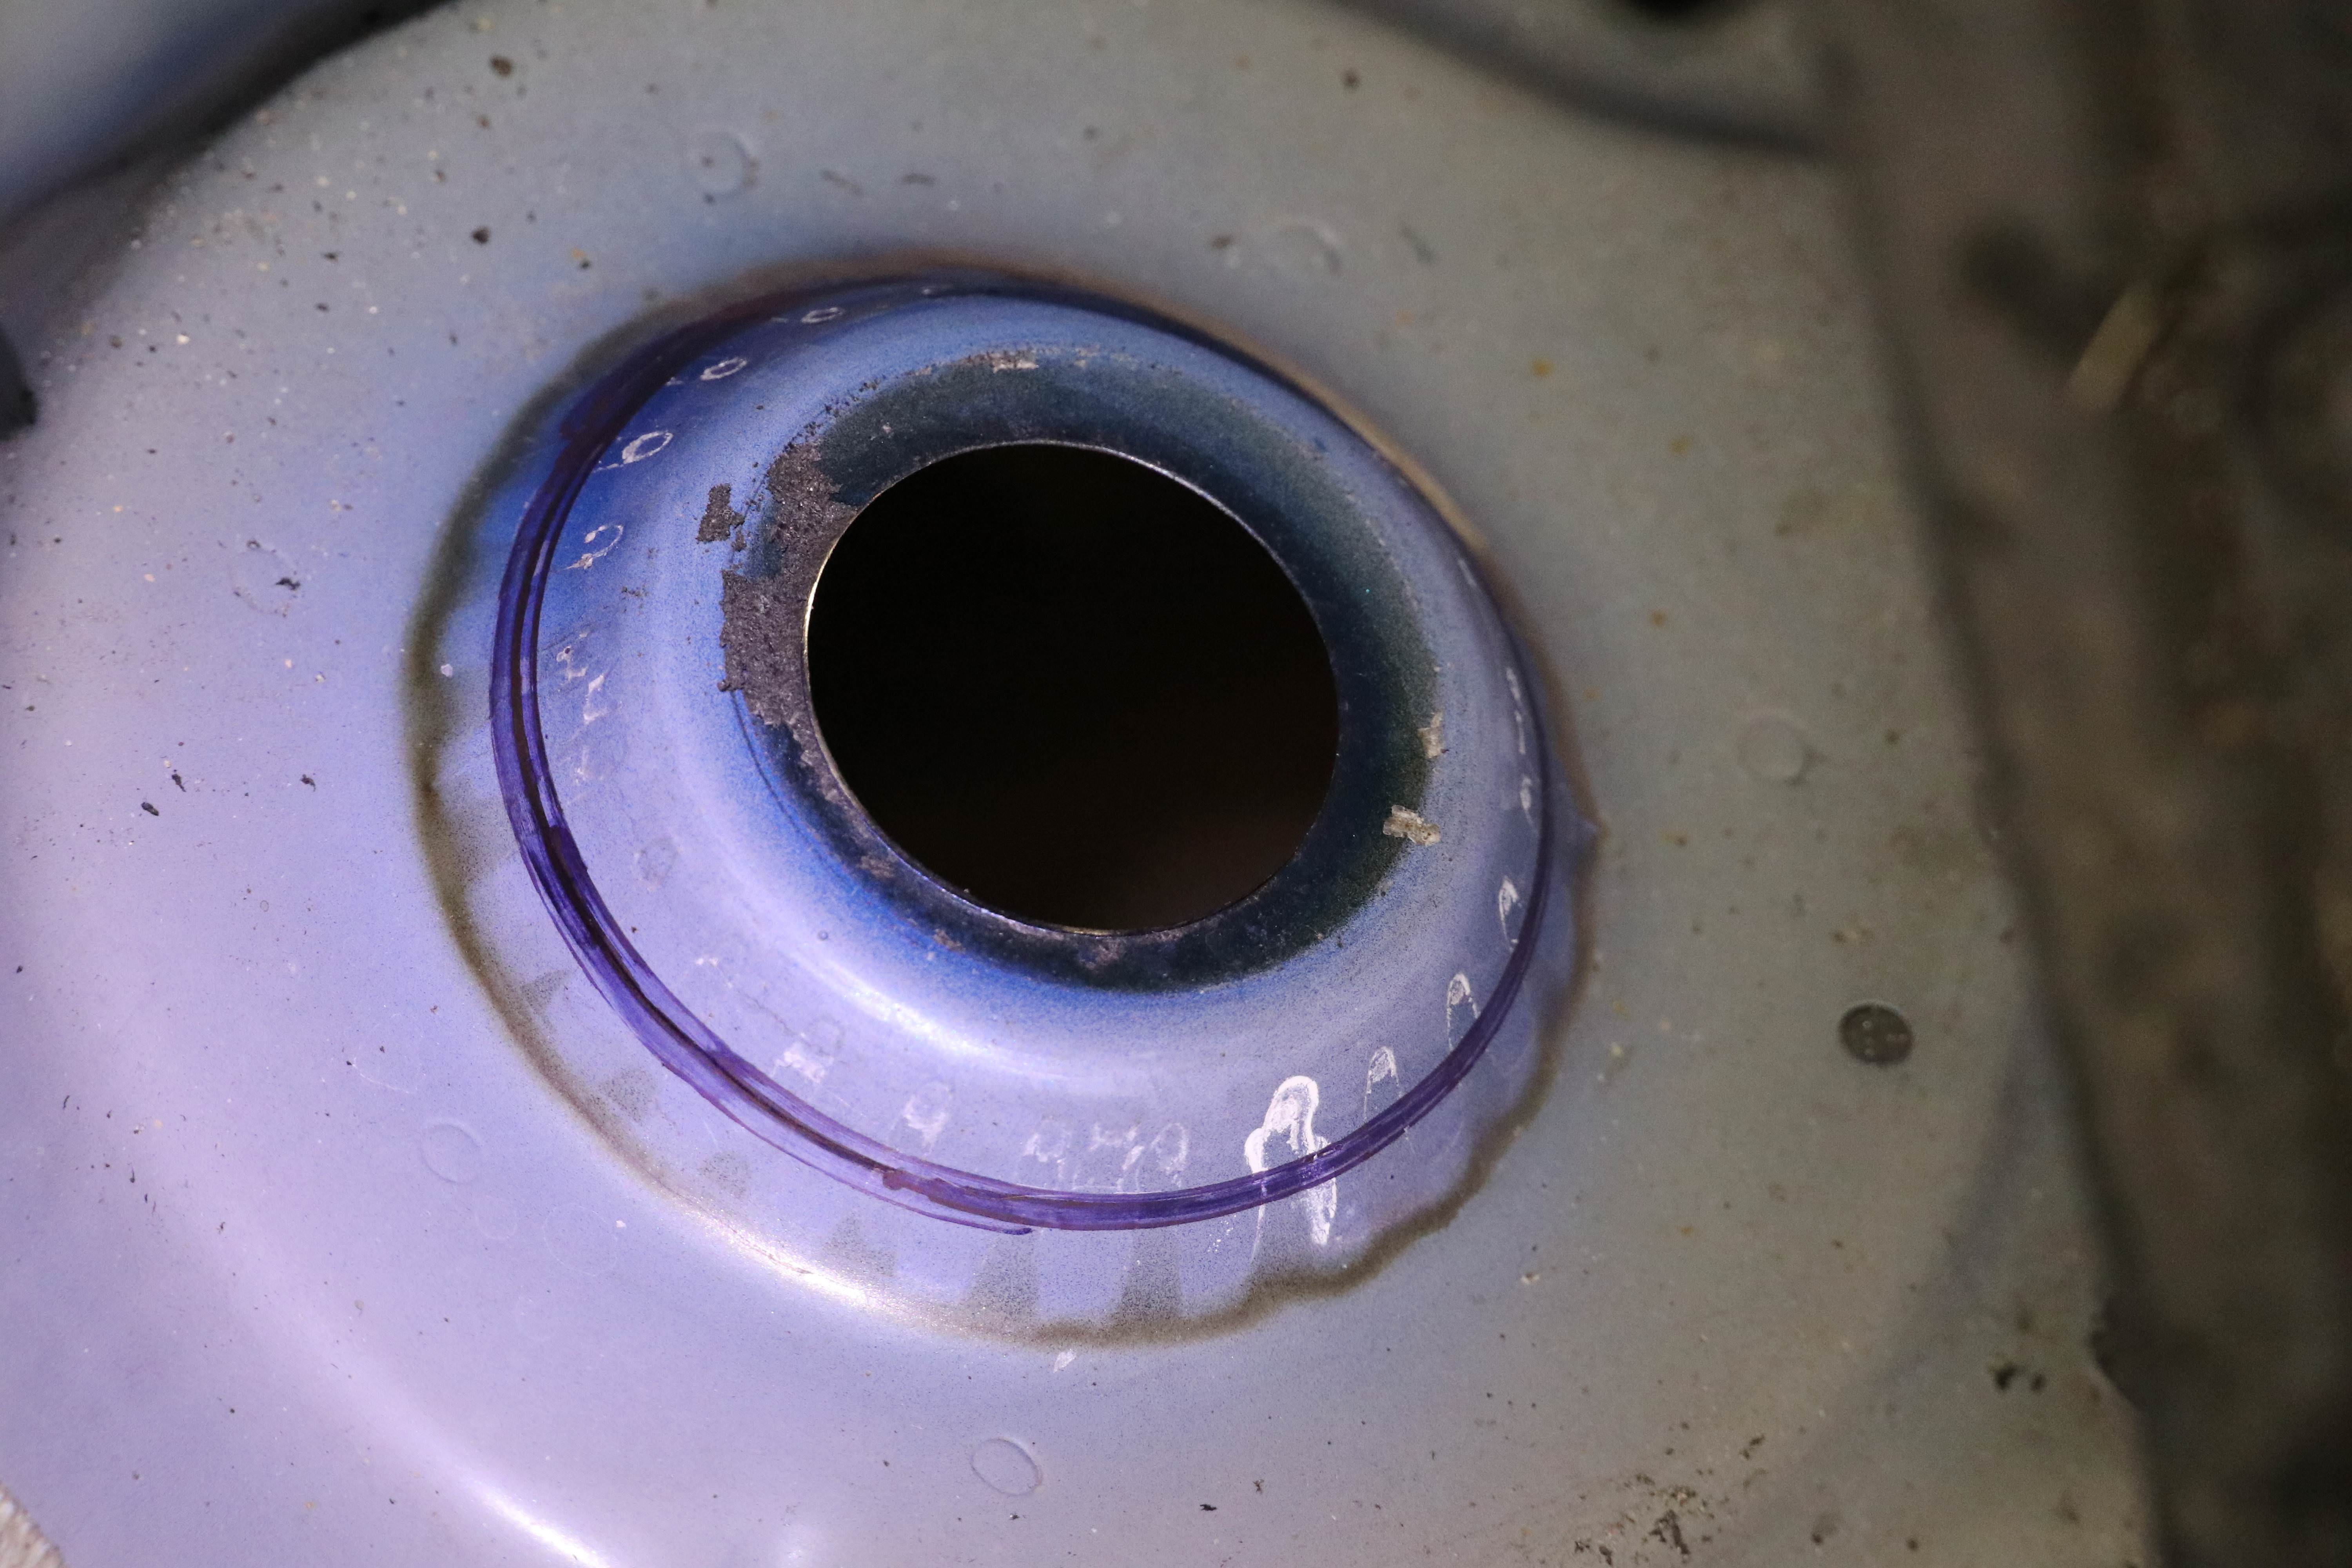
Then just do it!
Make the cut from the under-side for easy access. (simply placing a plastic bin or bucket over top confines the mess and sparks)
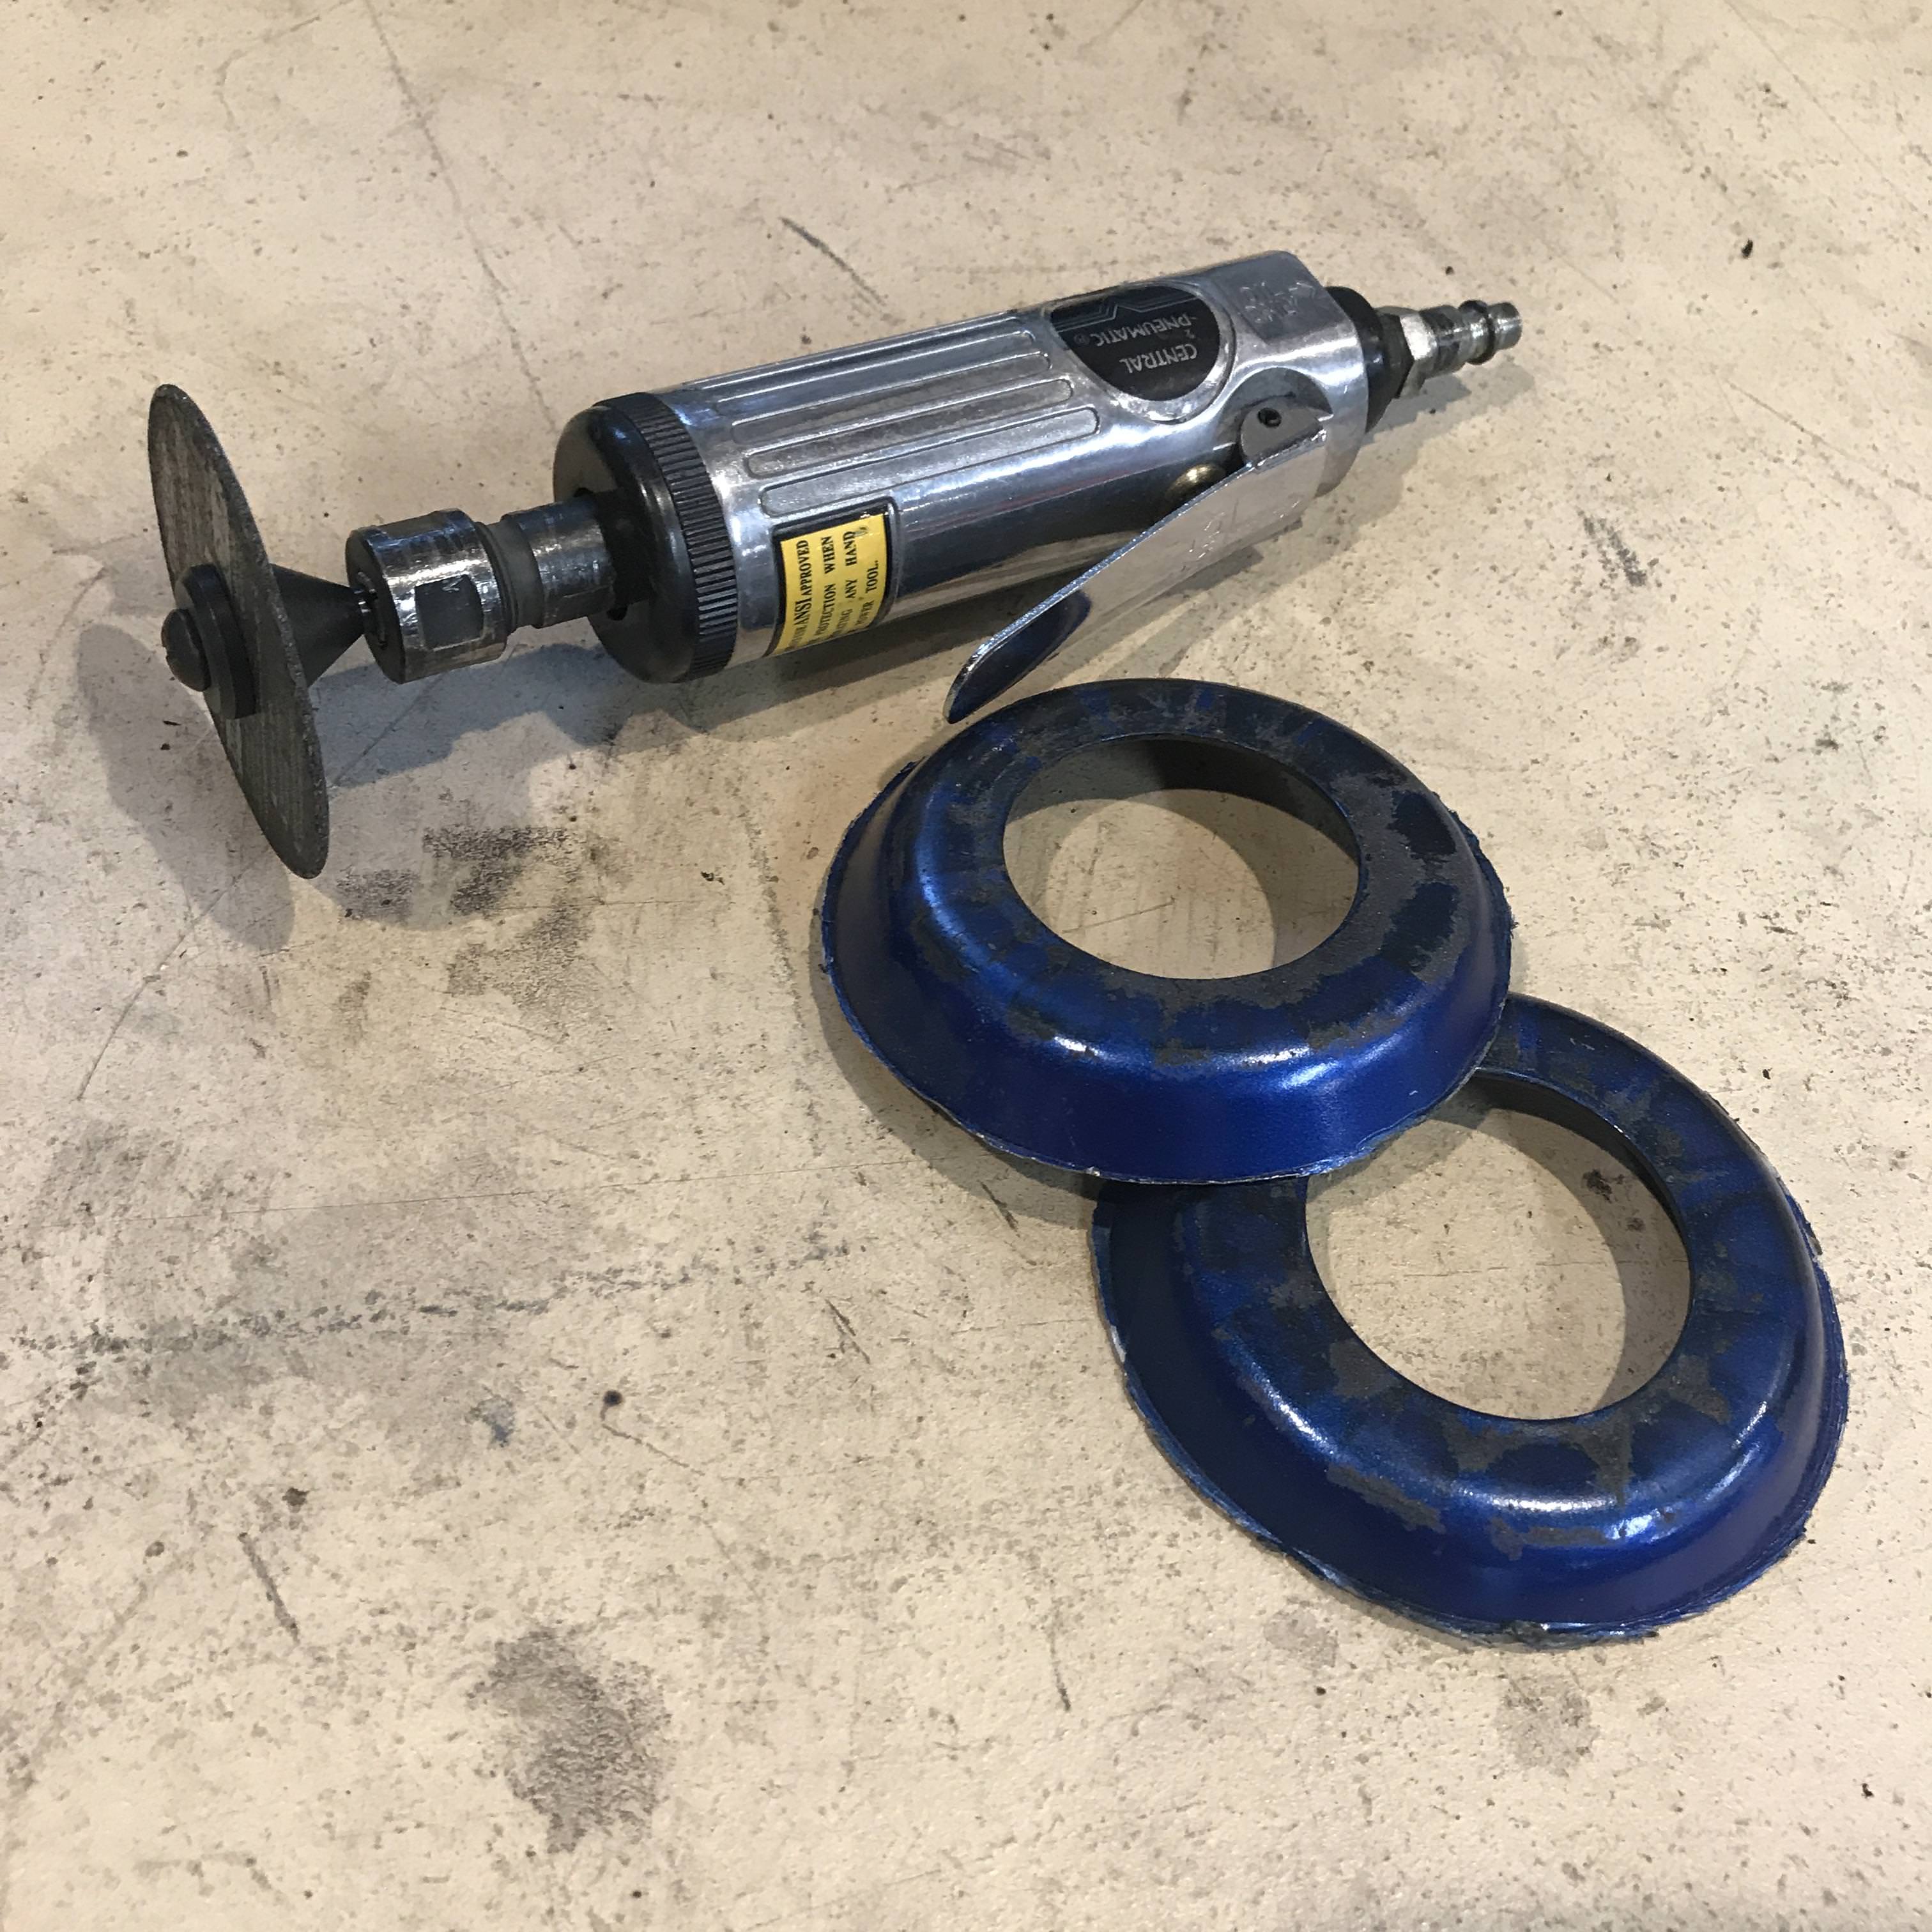
Now your committed.
Scrounge up a long bolt and washer....
Use it as a template to mark your cut.
Then just do it!
Make the cut from the under-side for easy access. (simply placing a plastic bin or bucket over top confines the mess and sparks)
Now your committed.
Thread Starter
|
Member
Joined: Sep 2017
Posts: 27
From: Knoxvegas, TN
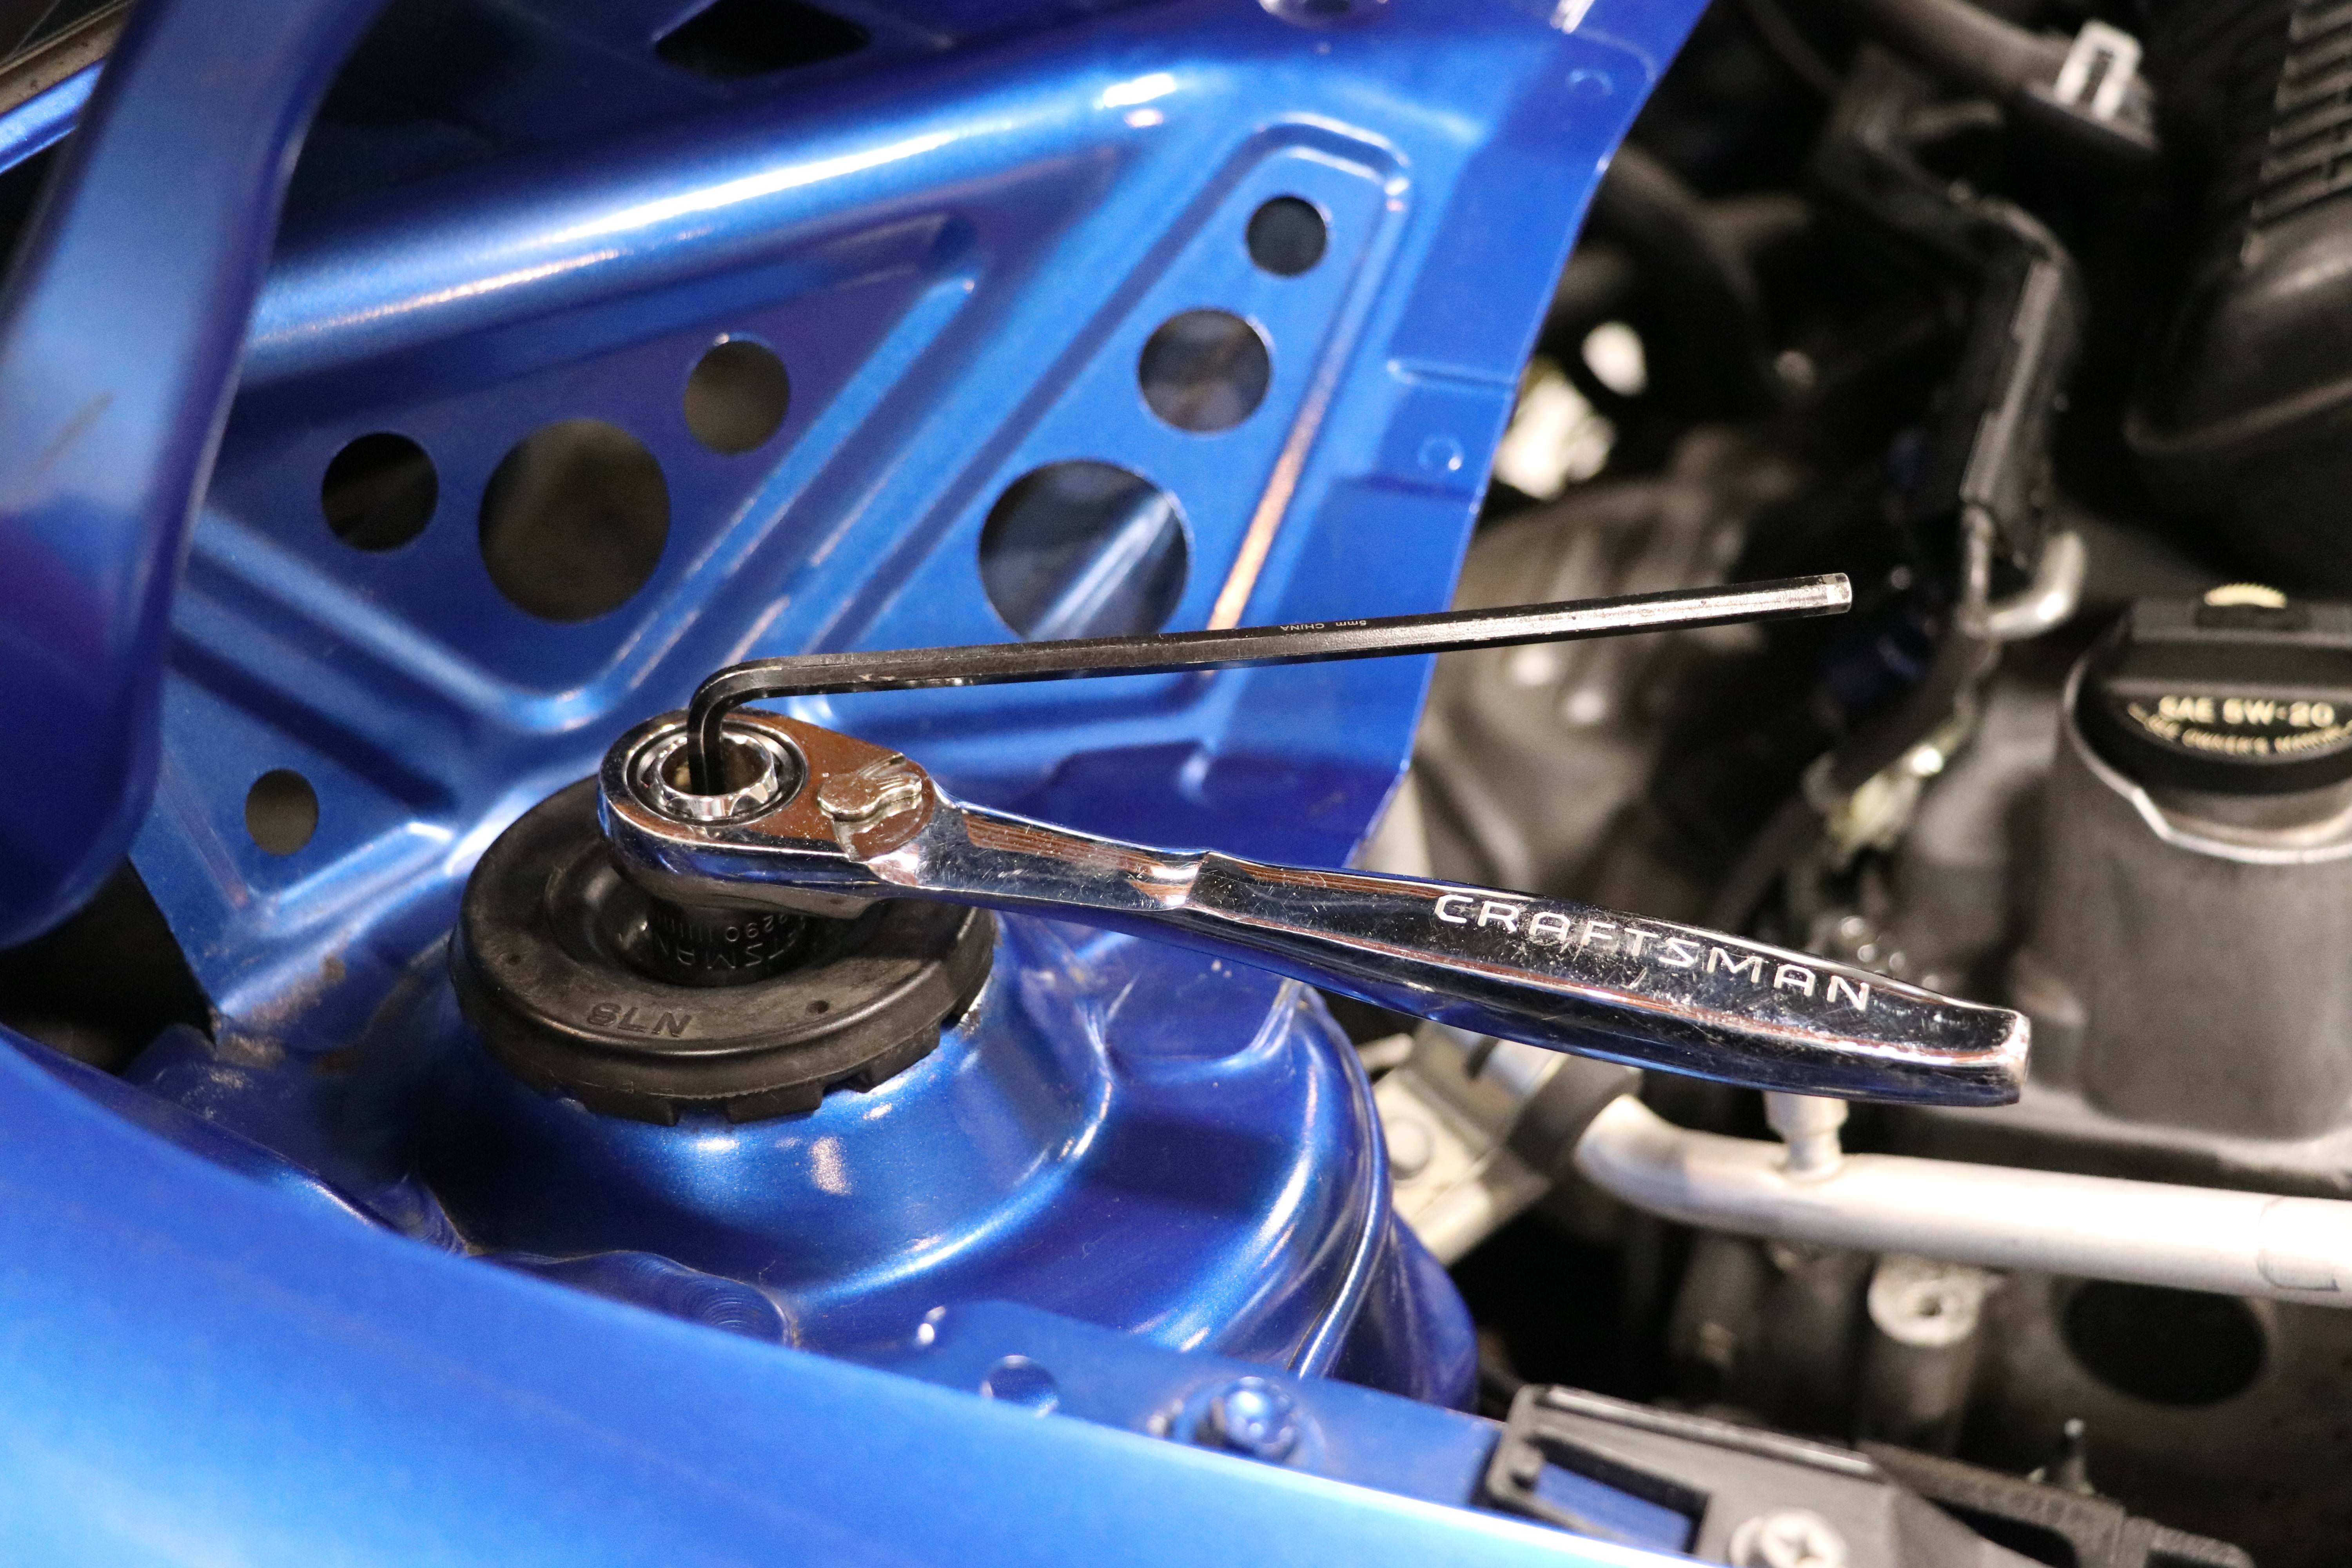
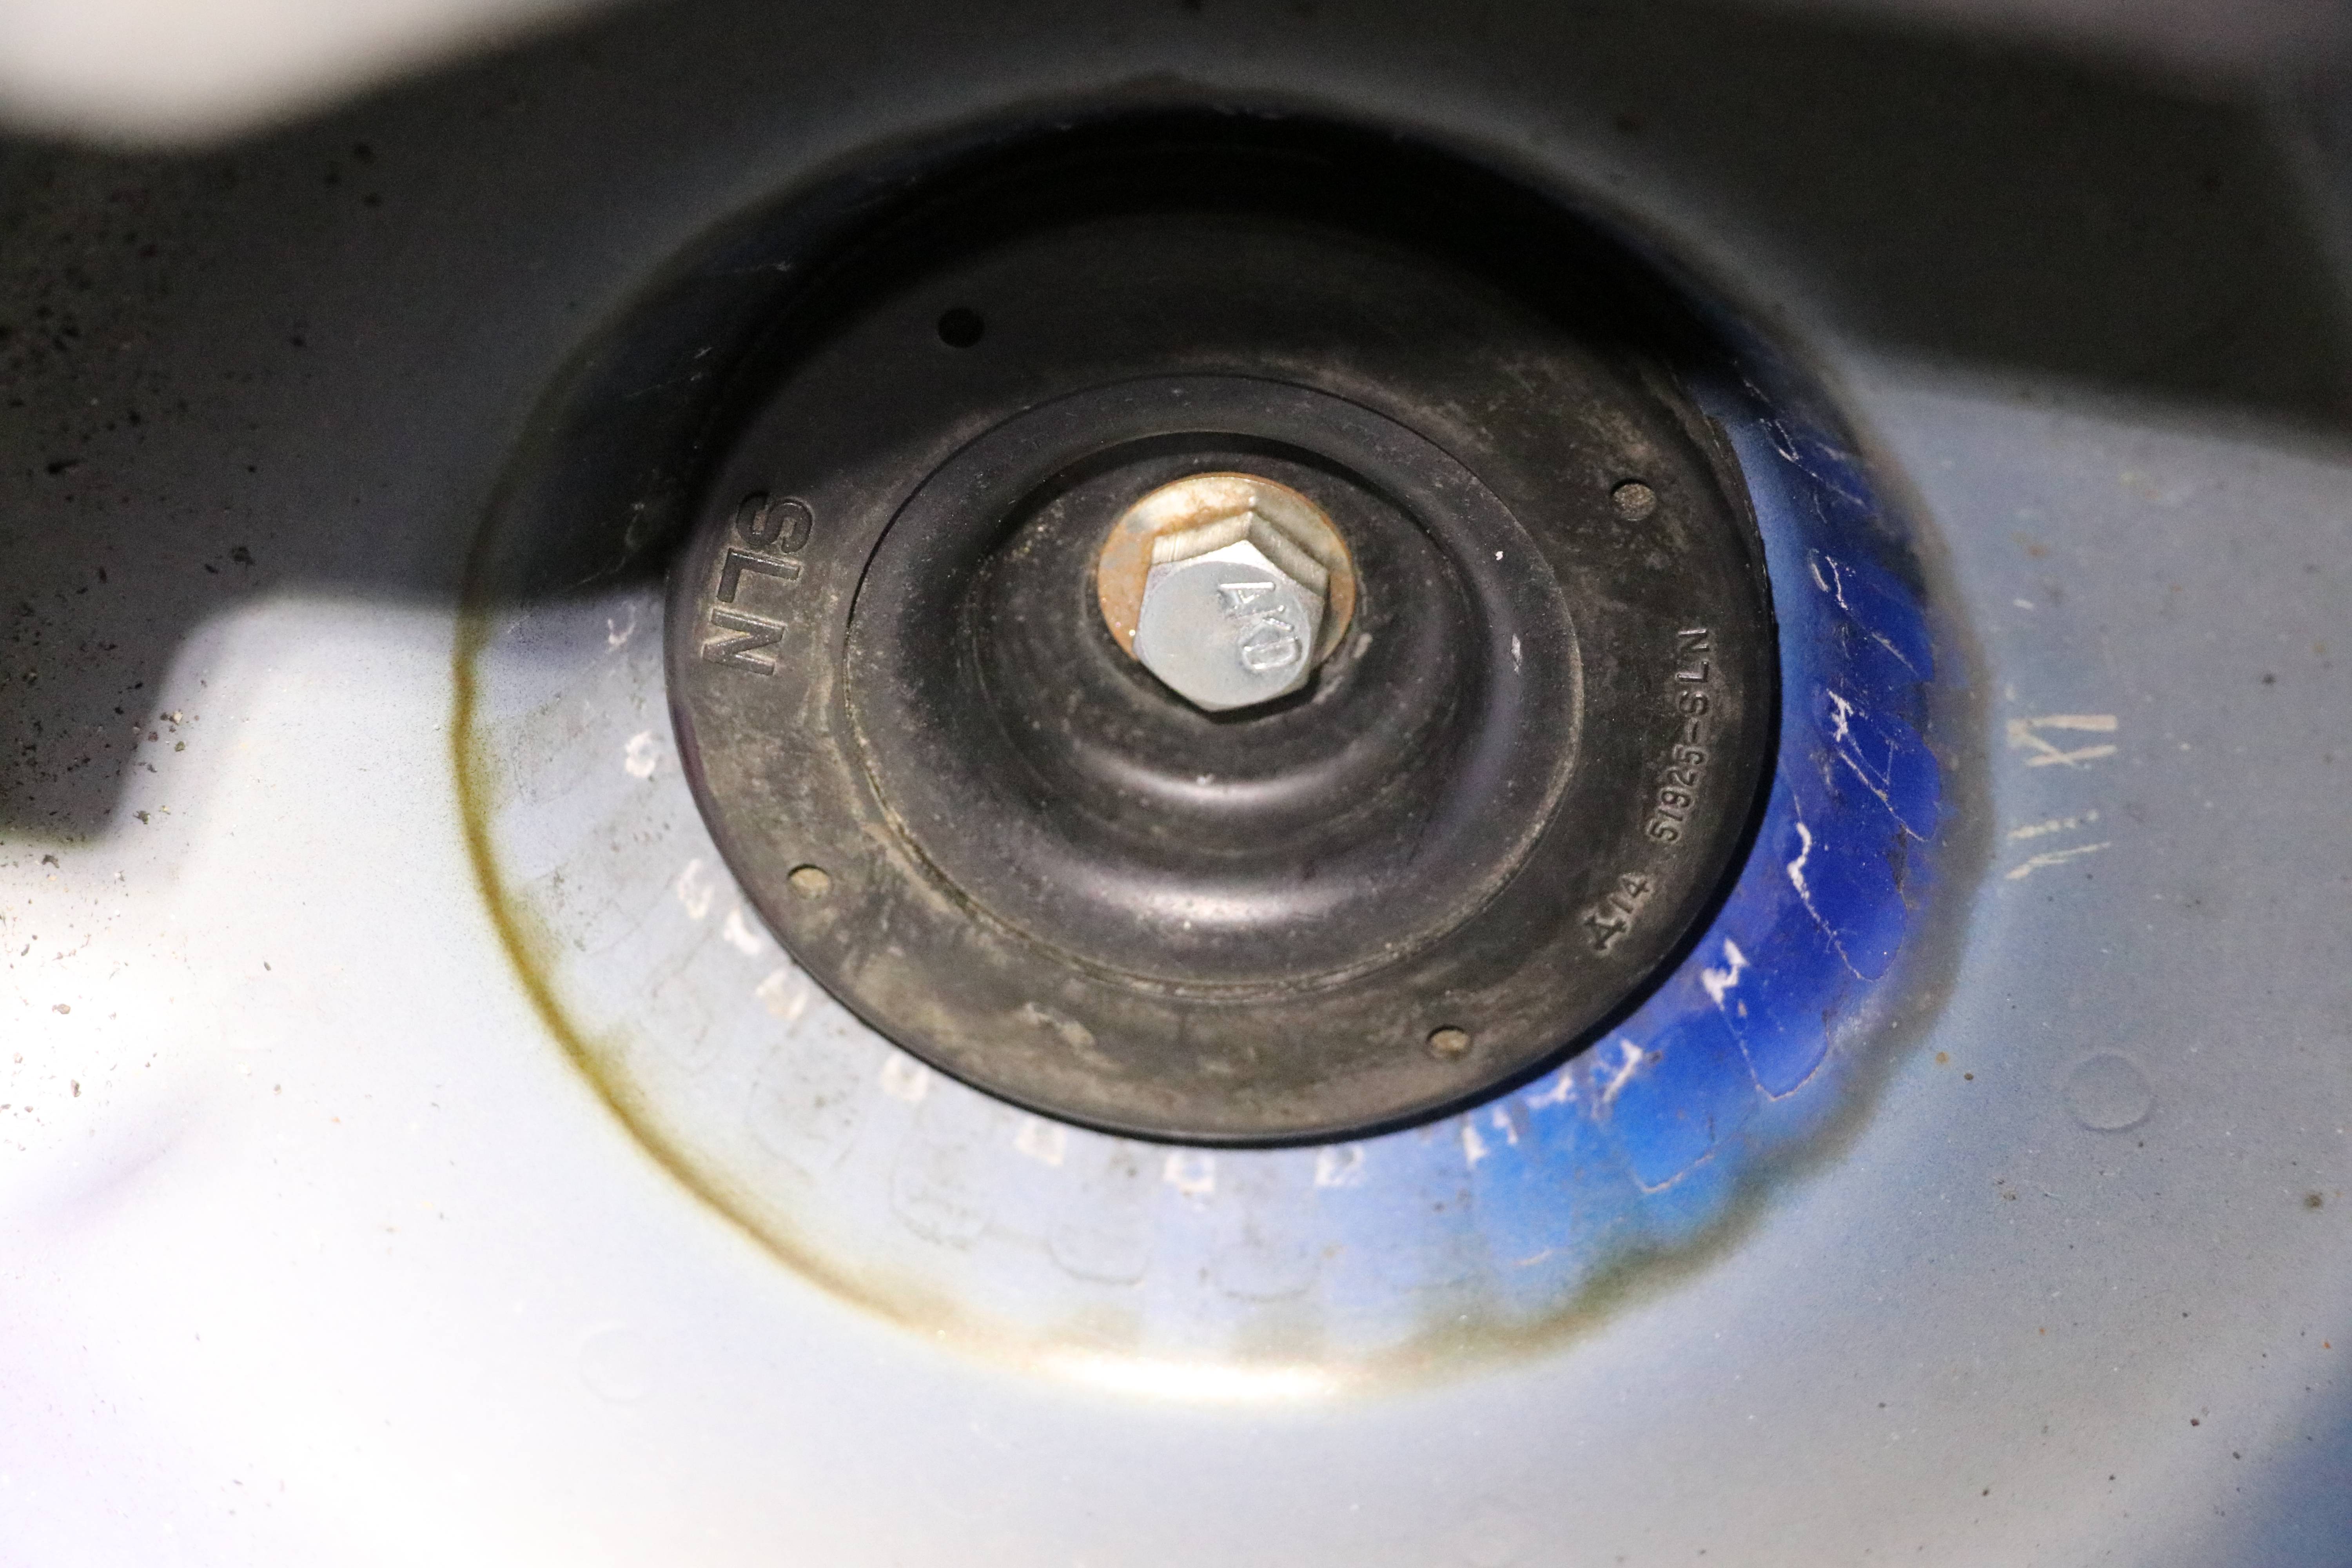
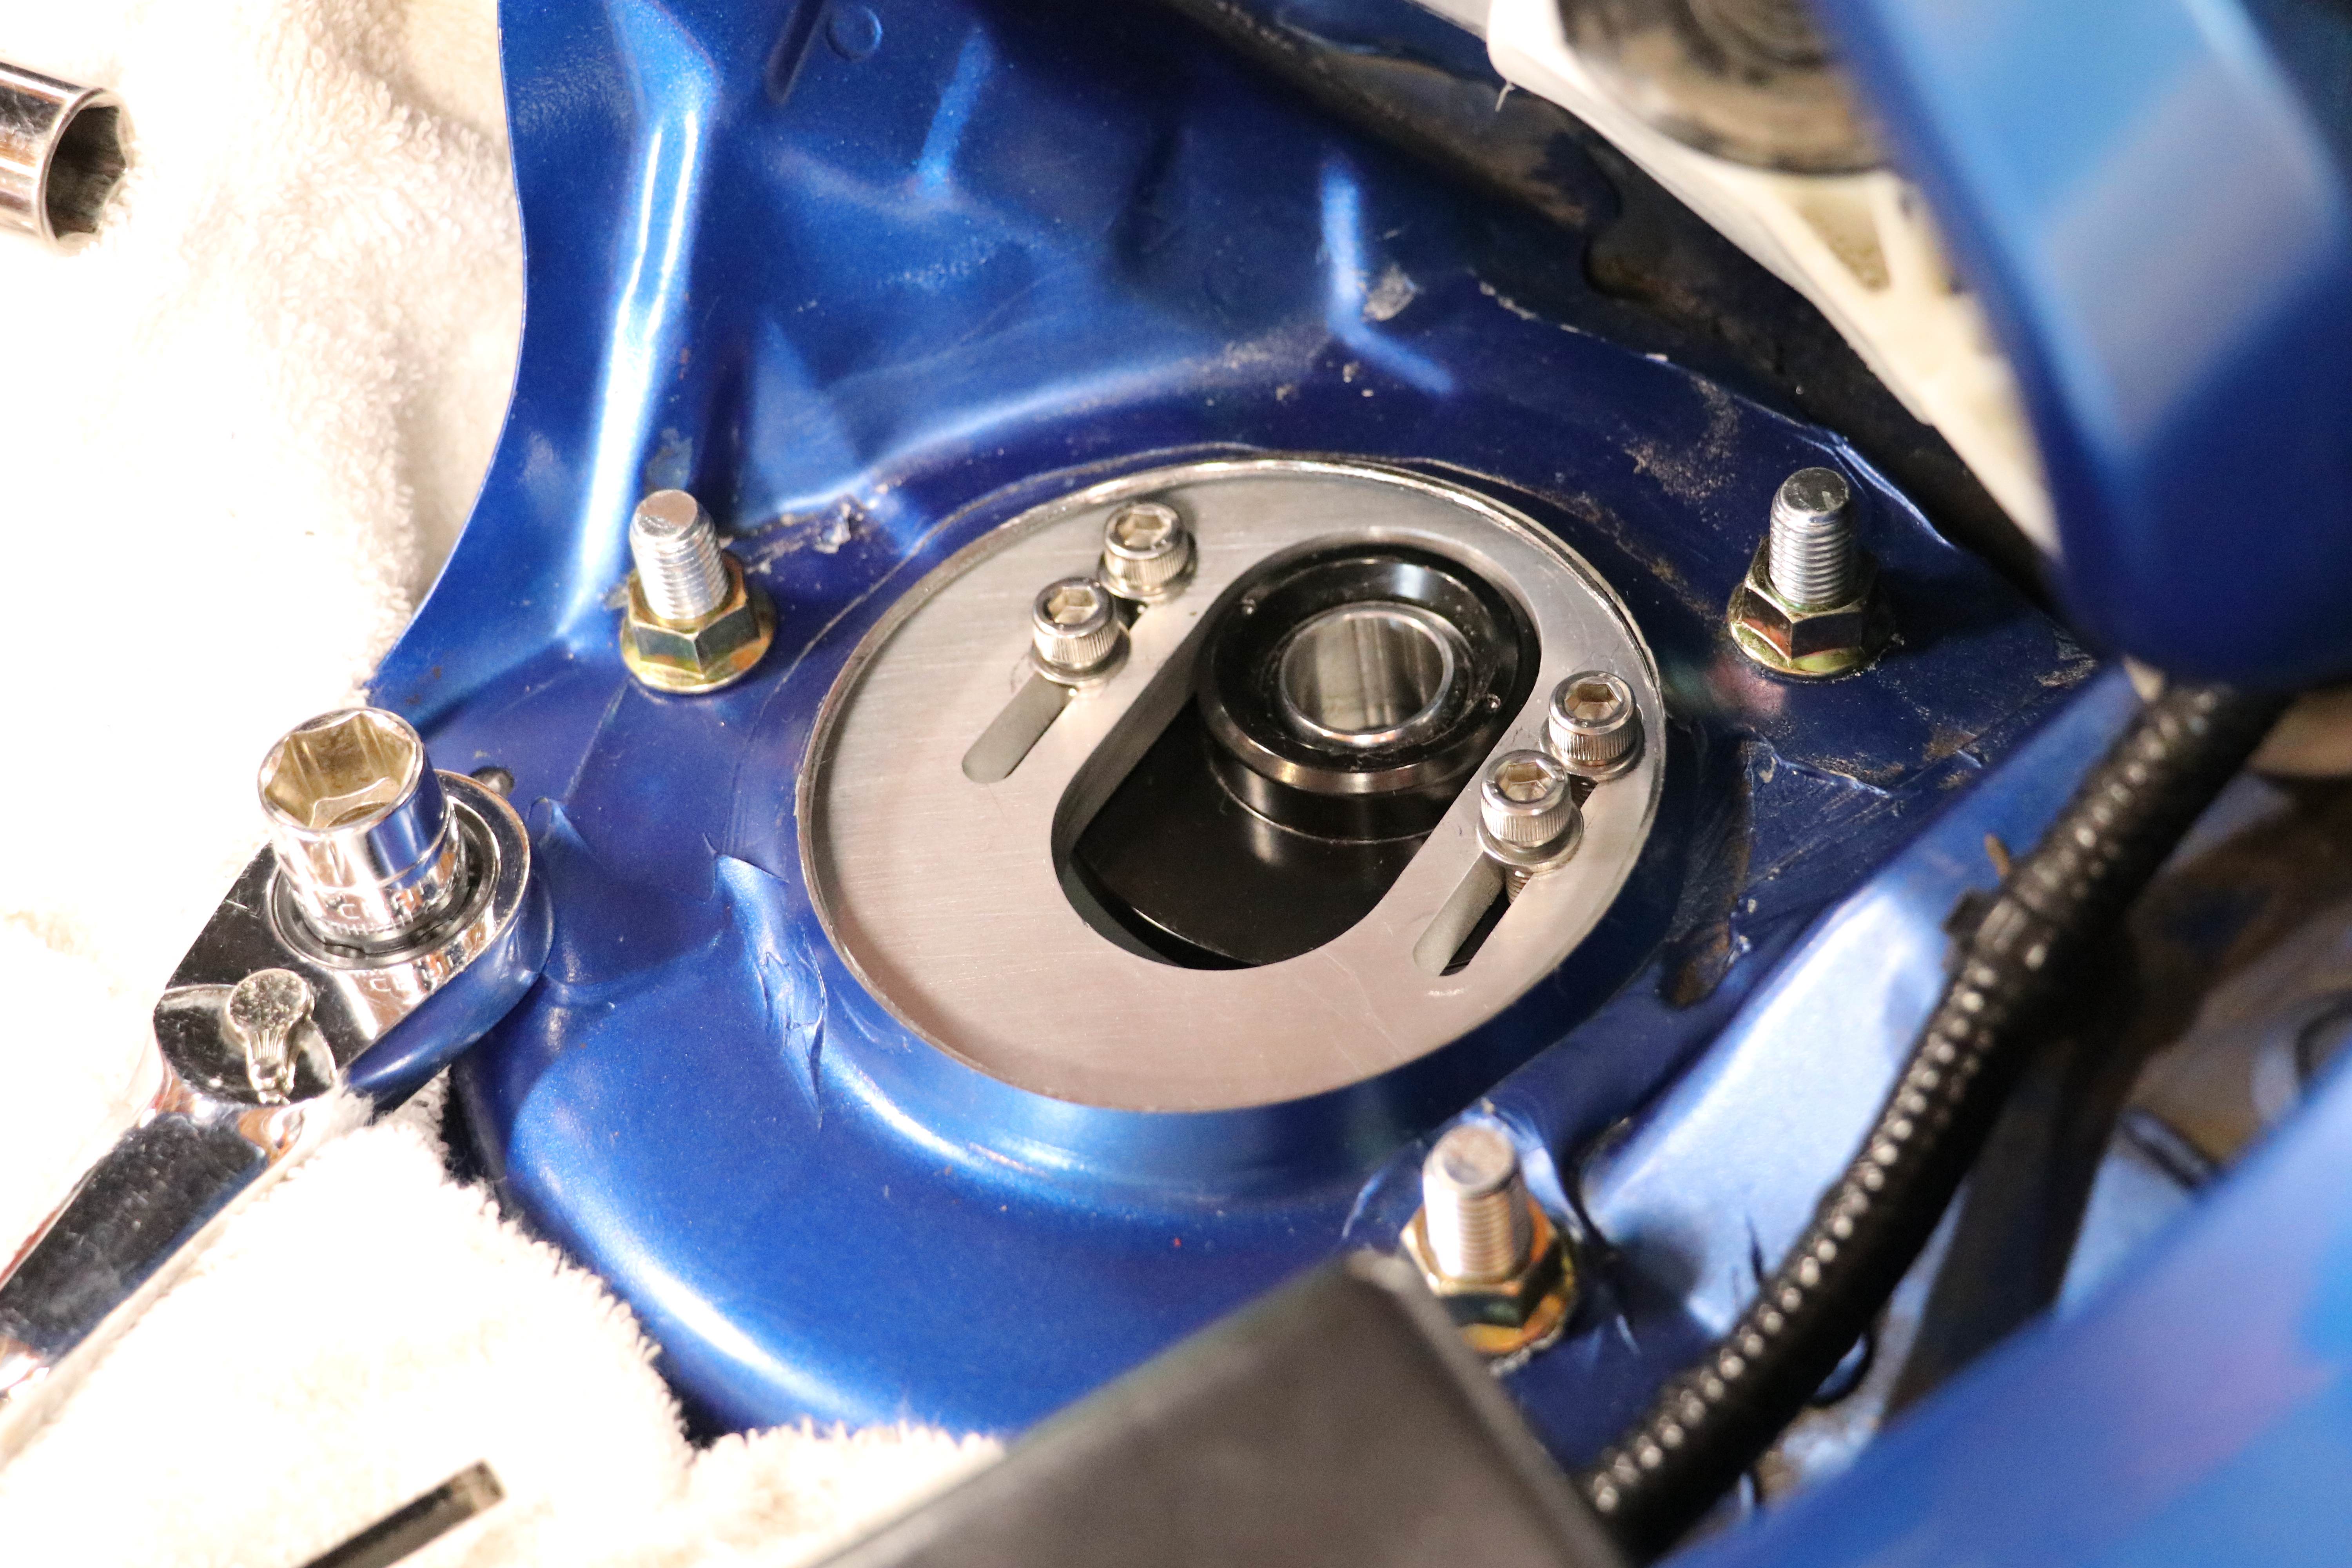
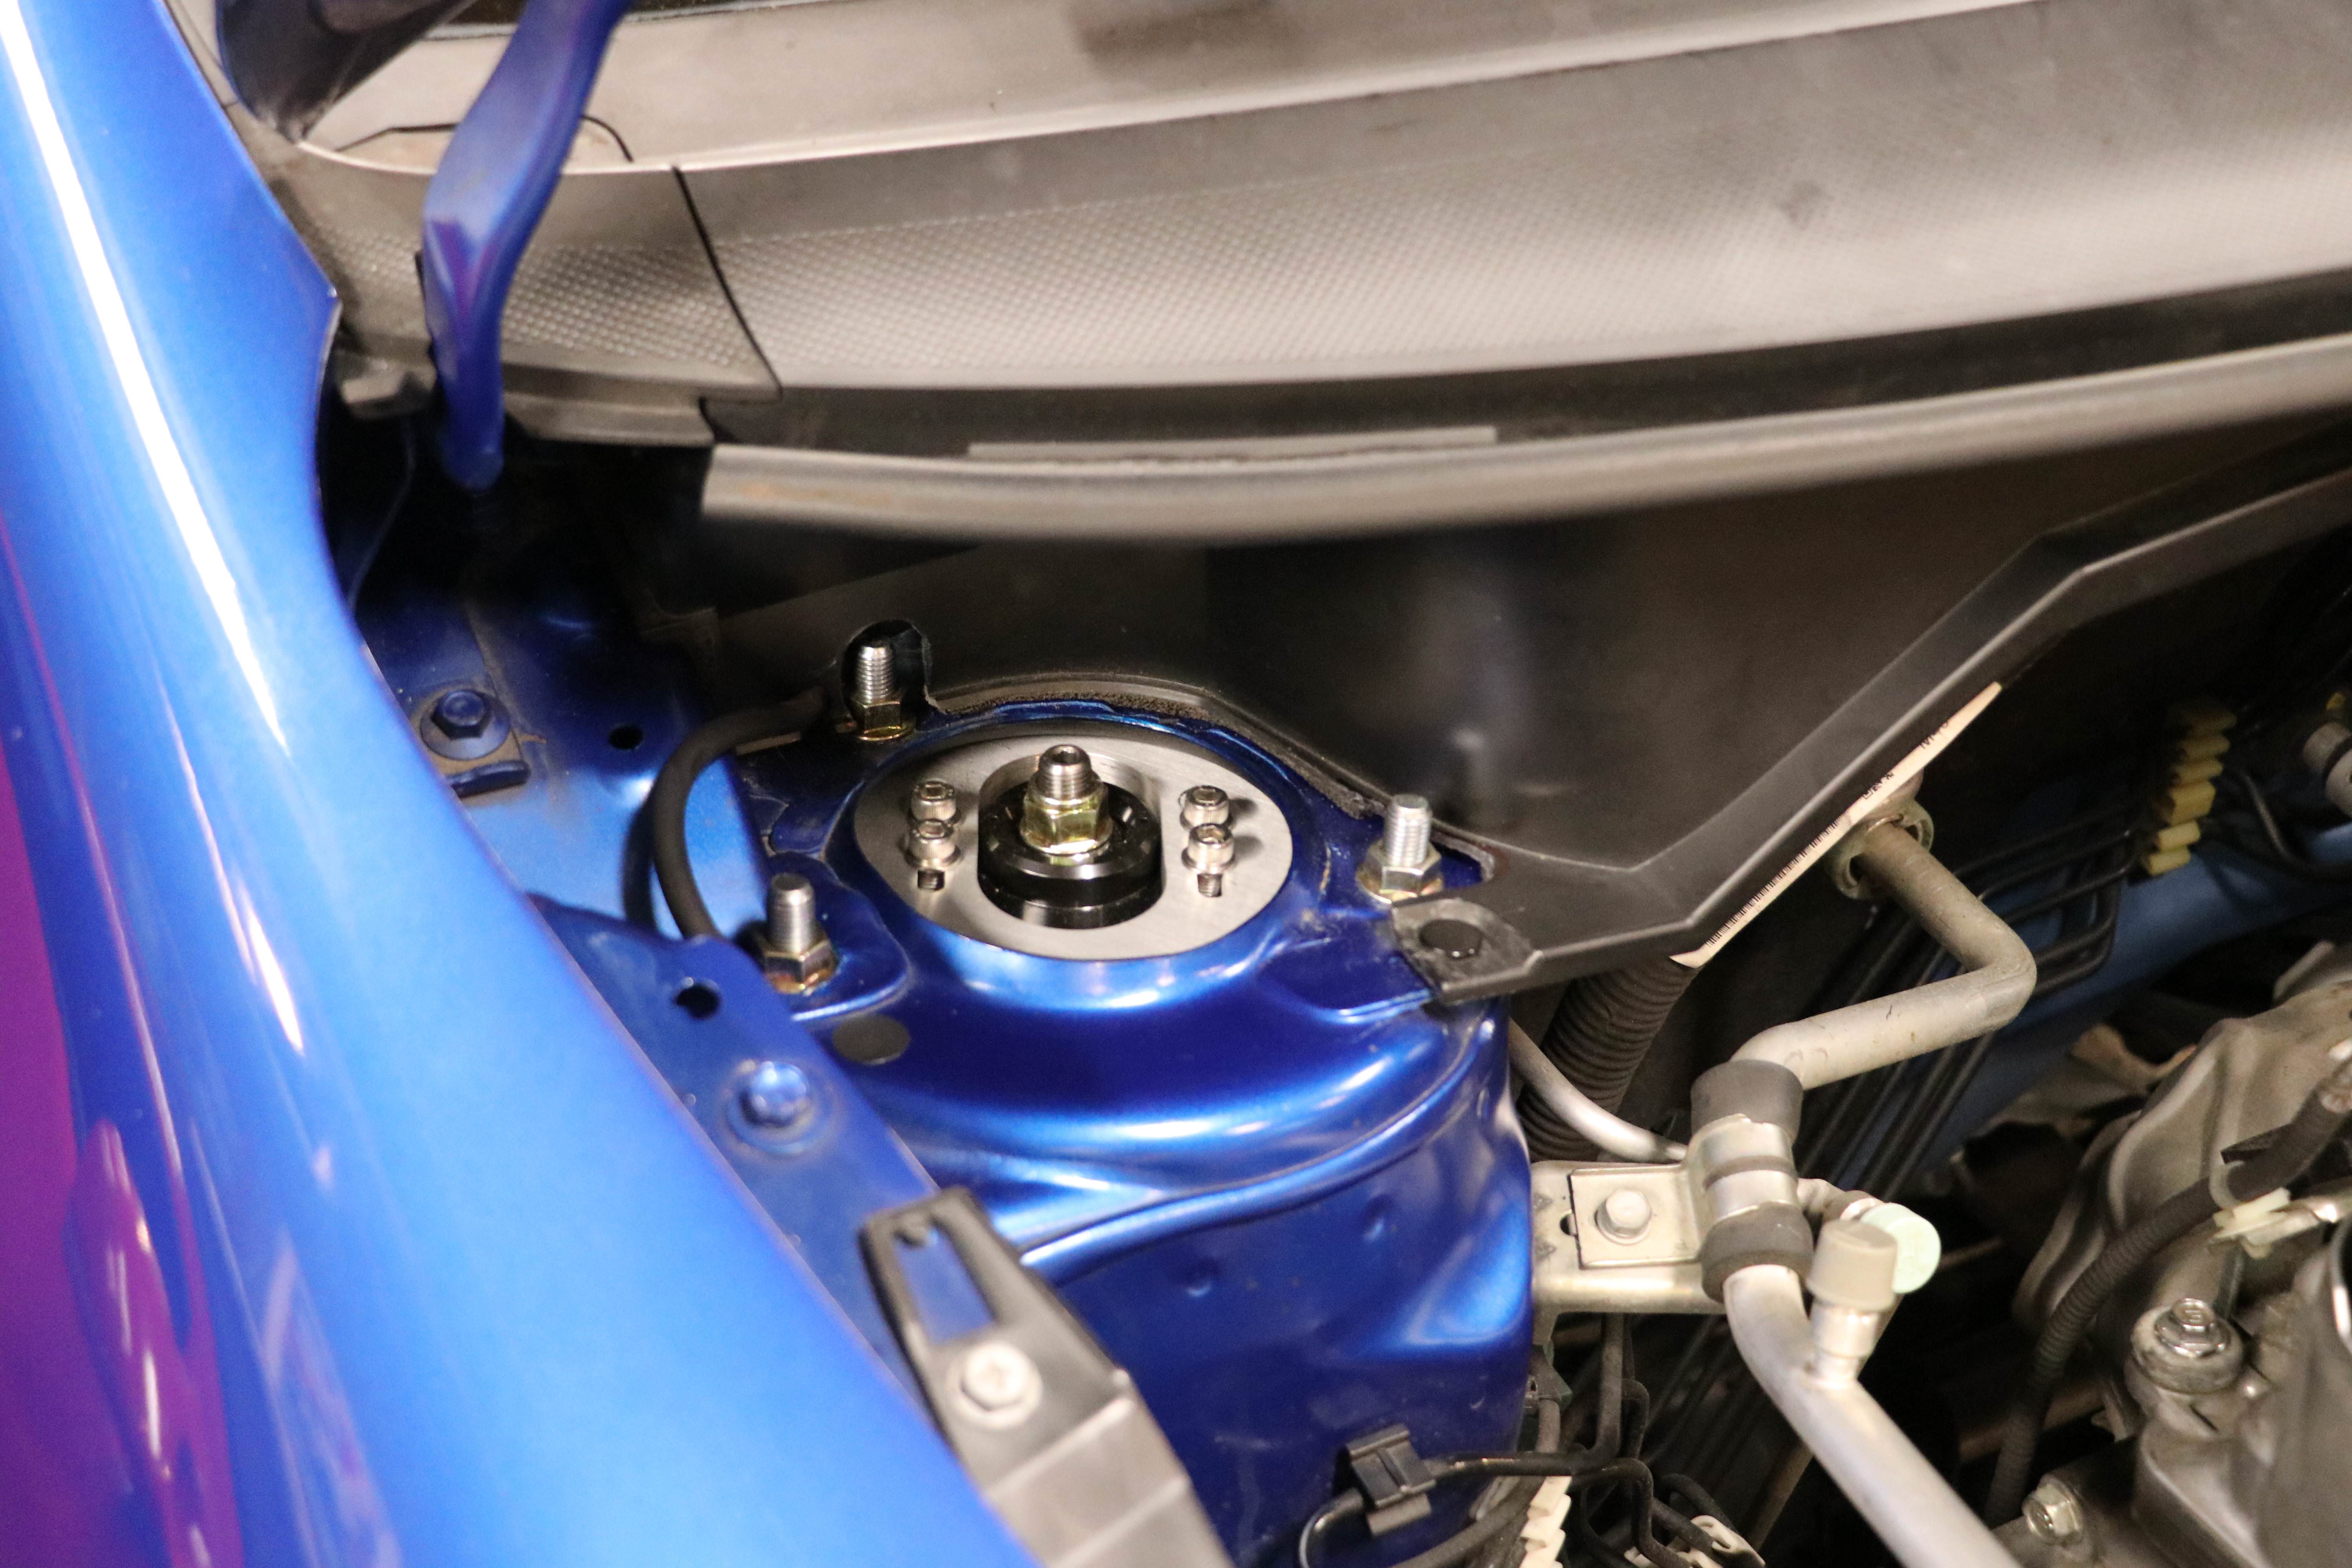
I used the same arrangement to suspend the plates while deciding where to drill for the studs.
Having done this and stressed over getting them positioned just right, which was pointless considering the range of adjustment, I have a hint...
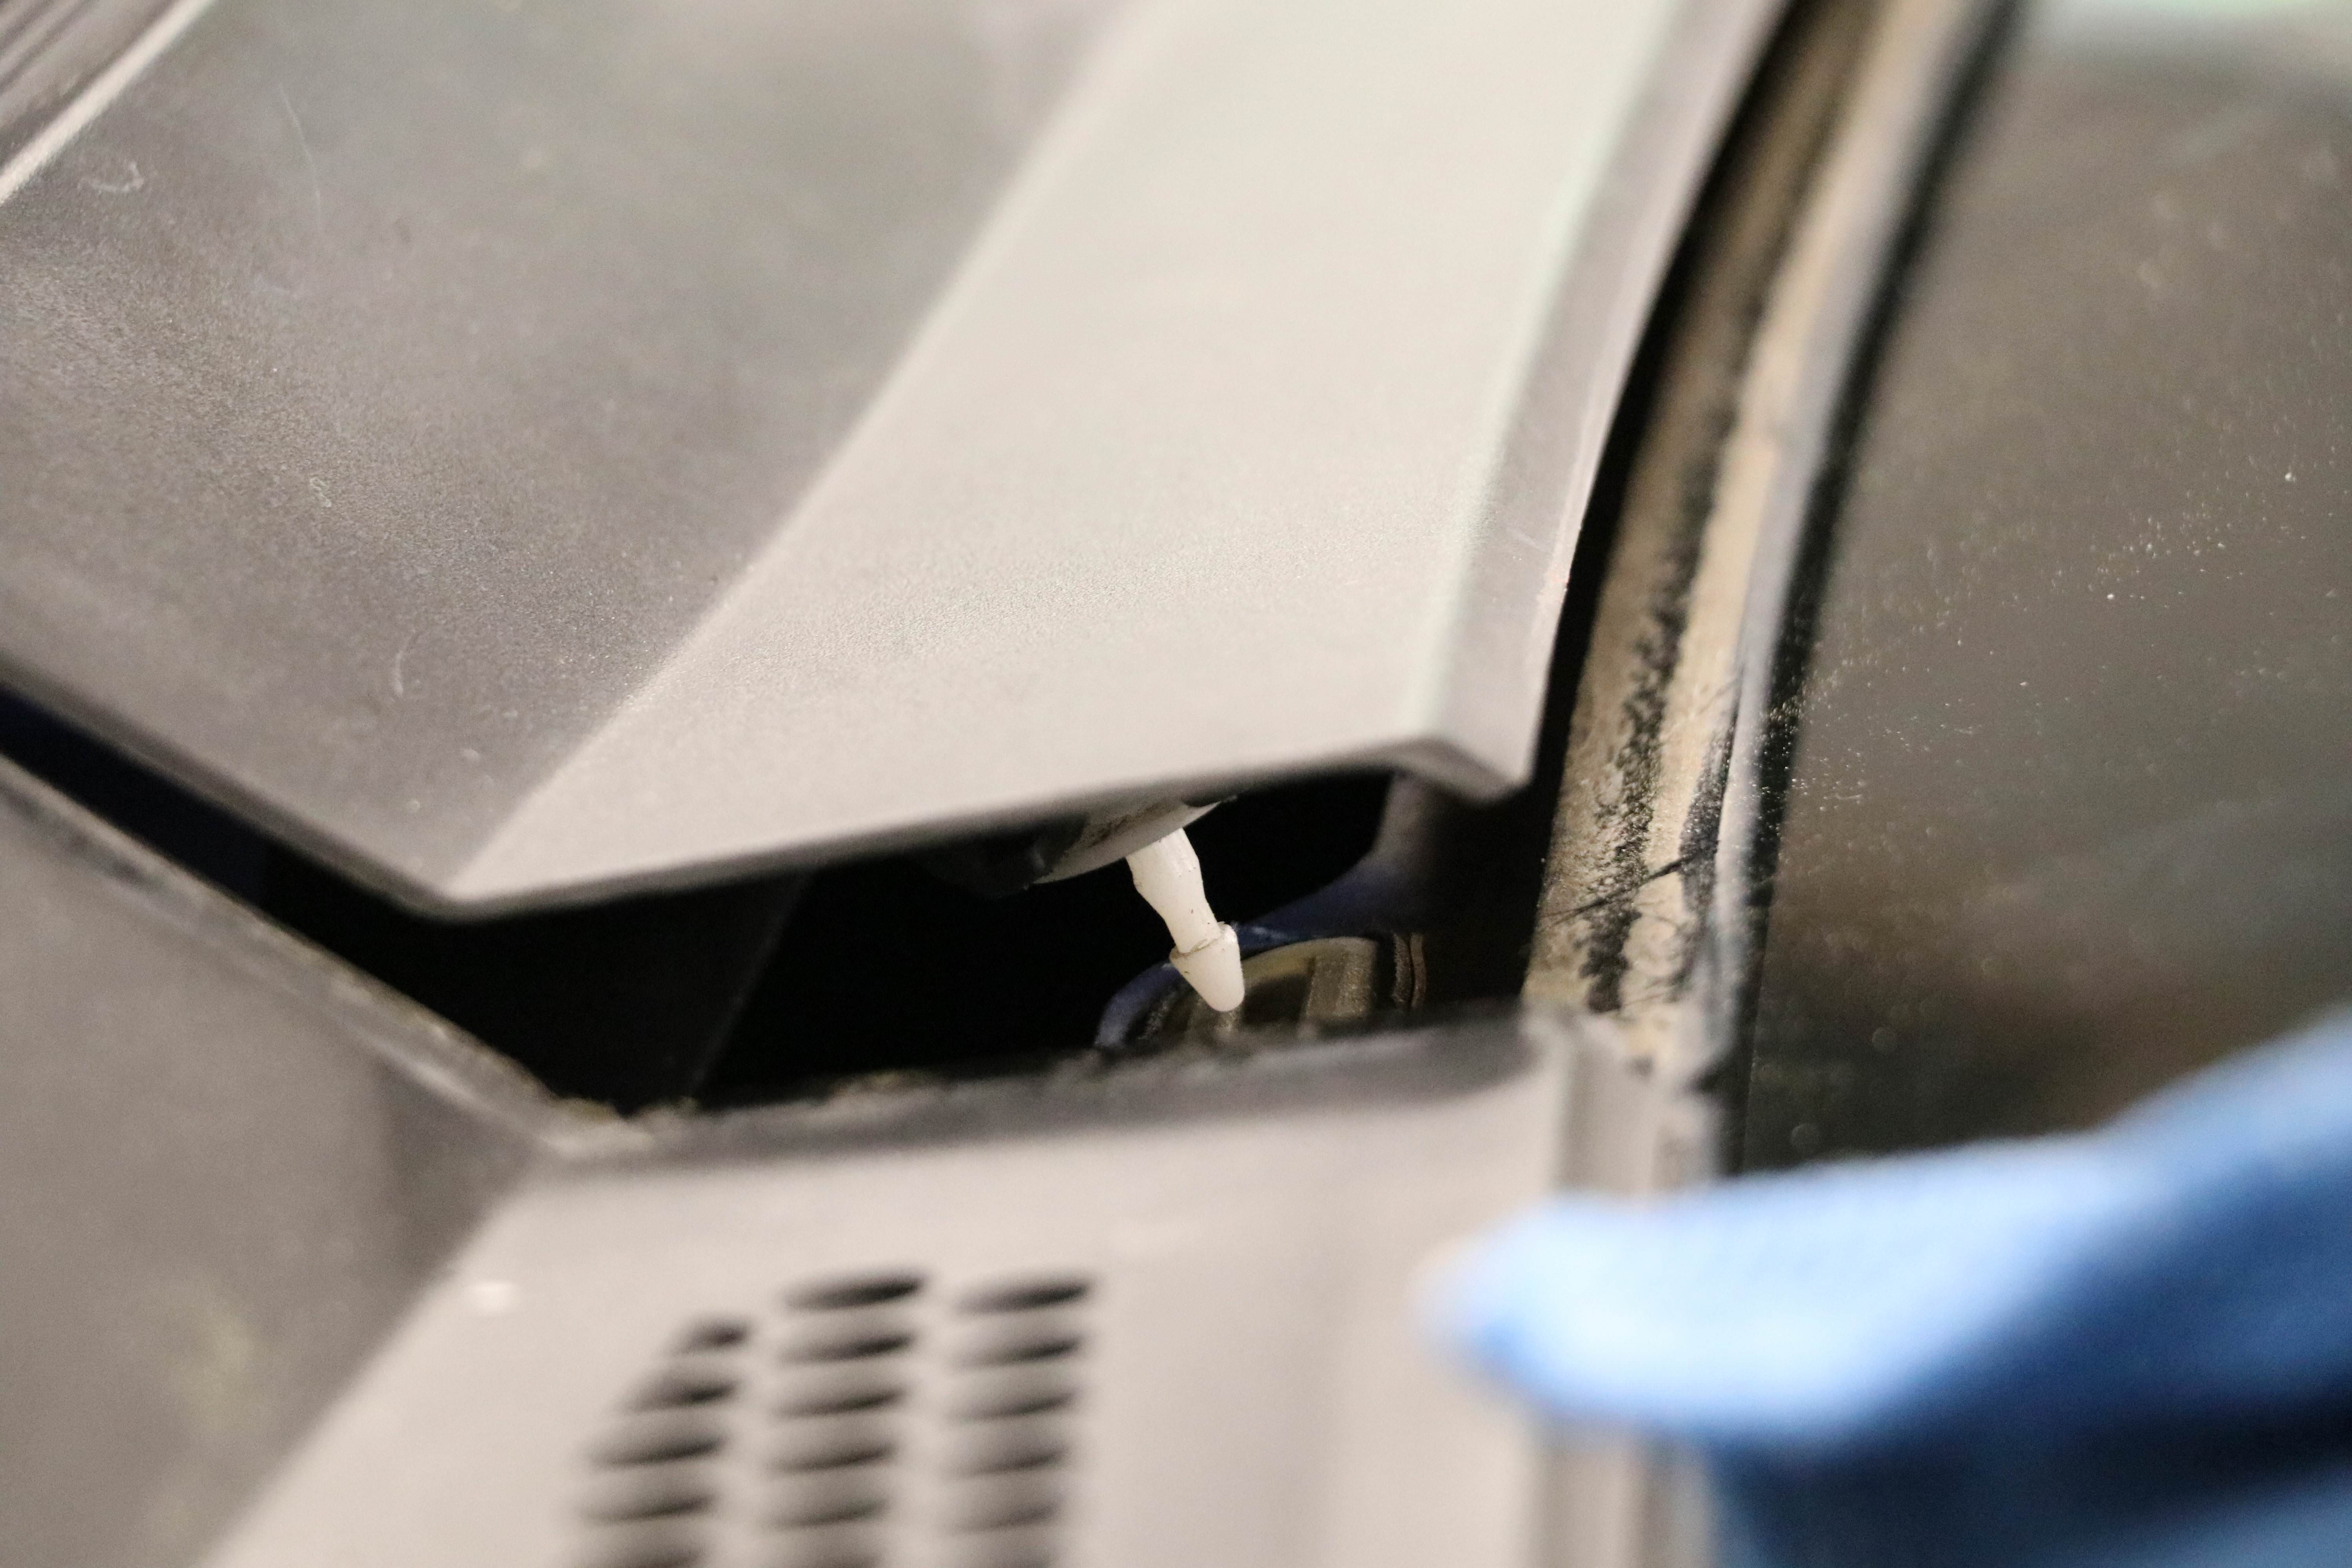
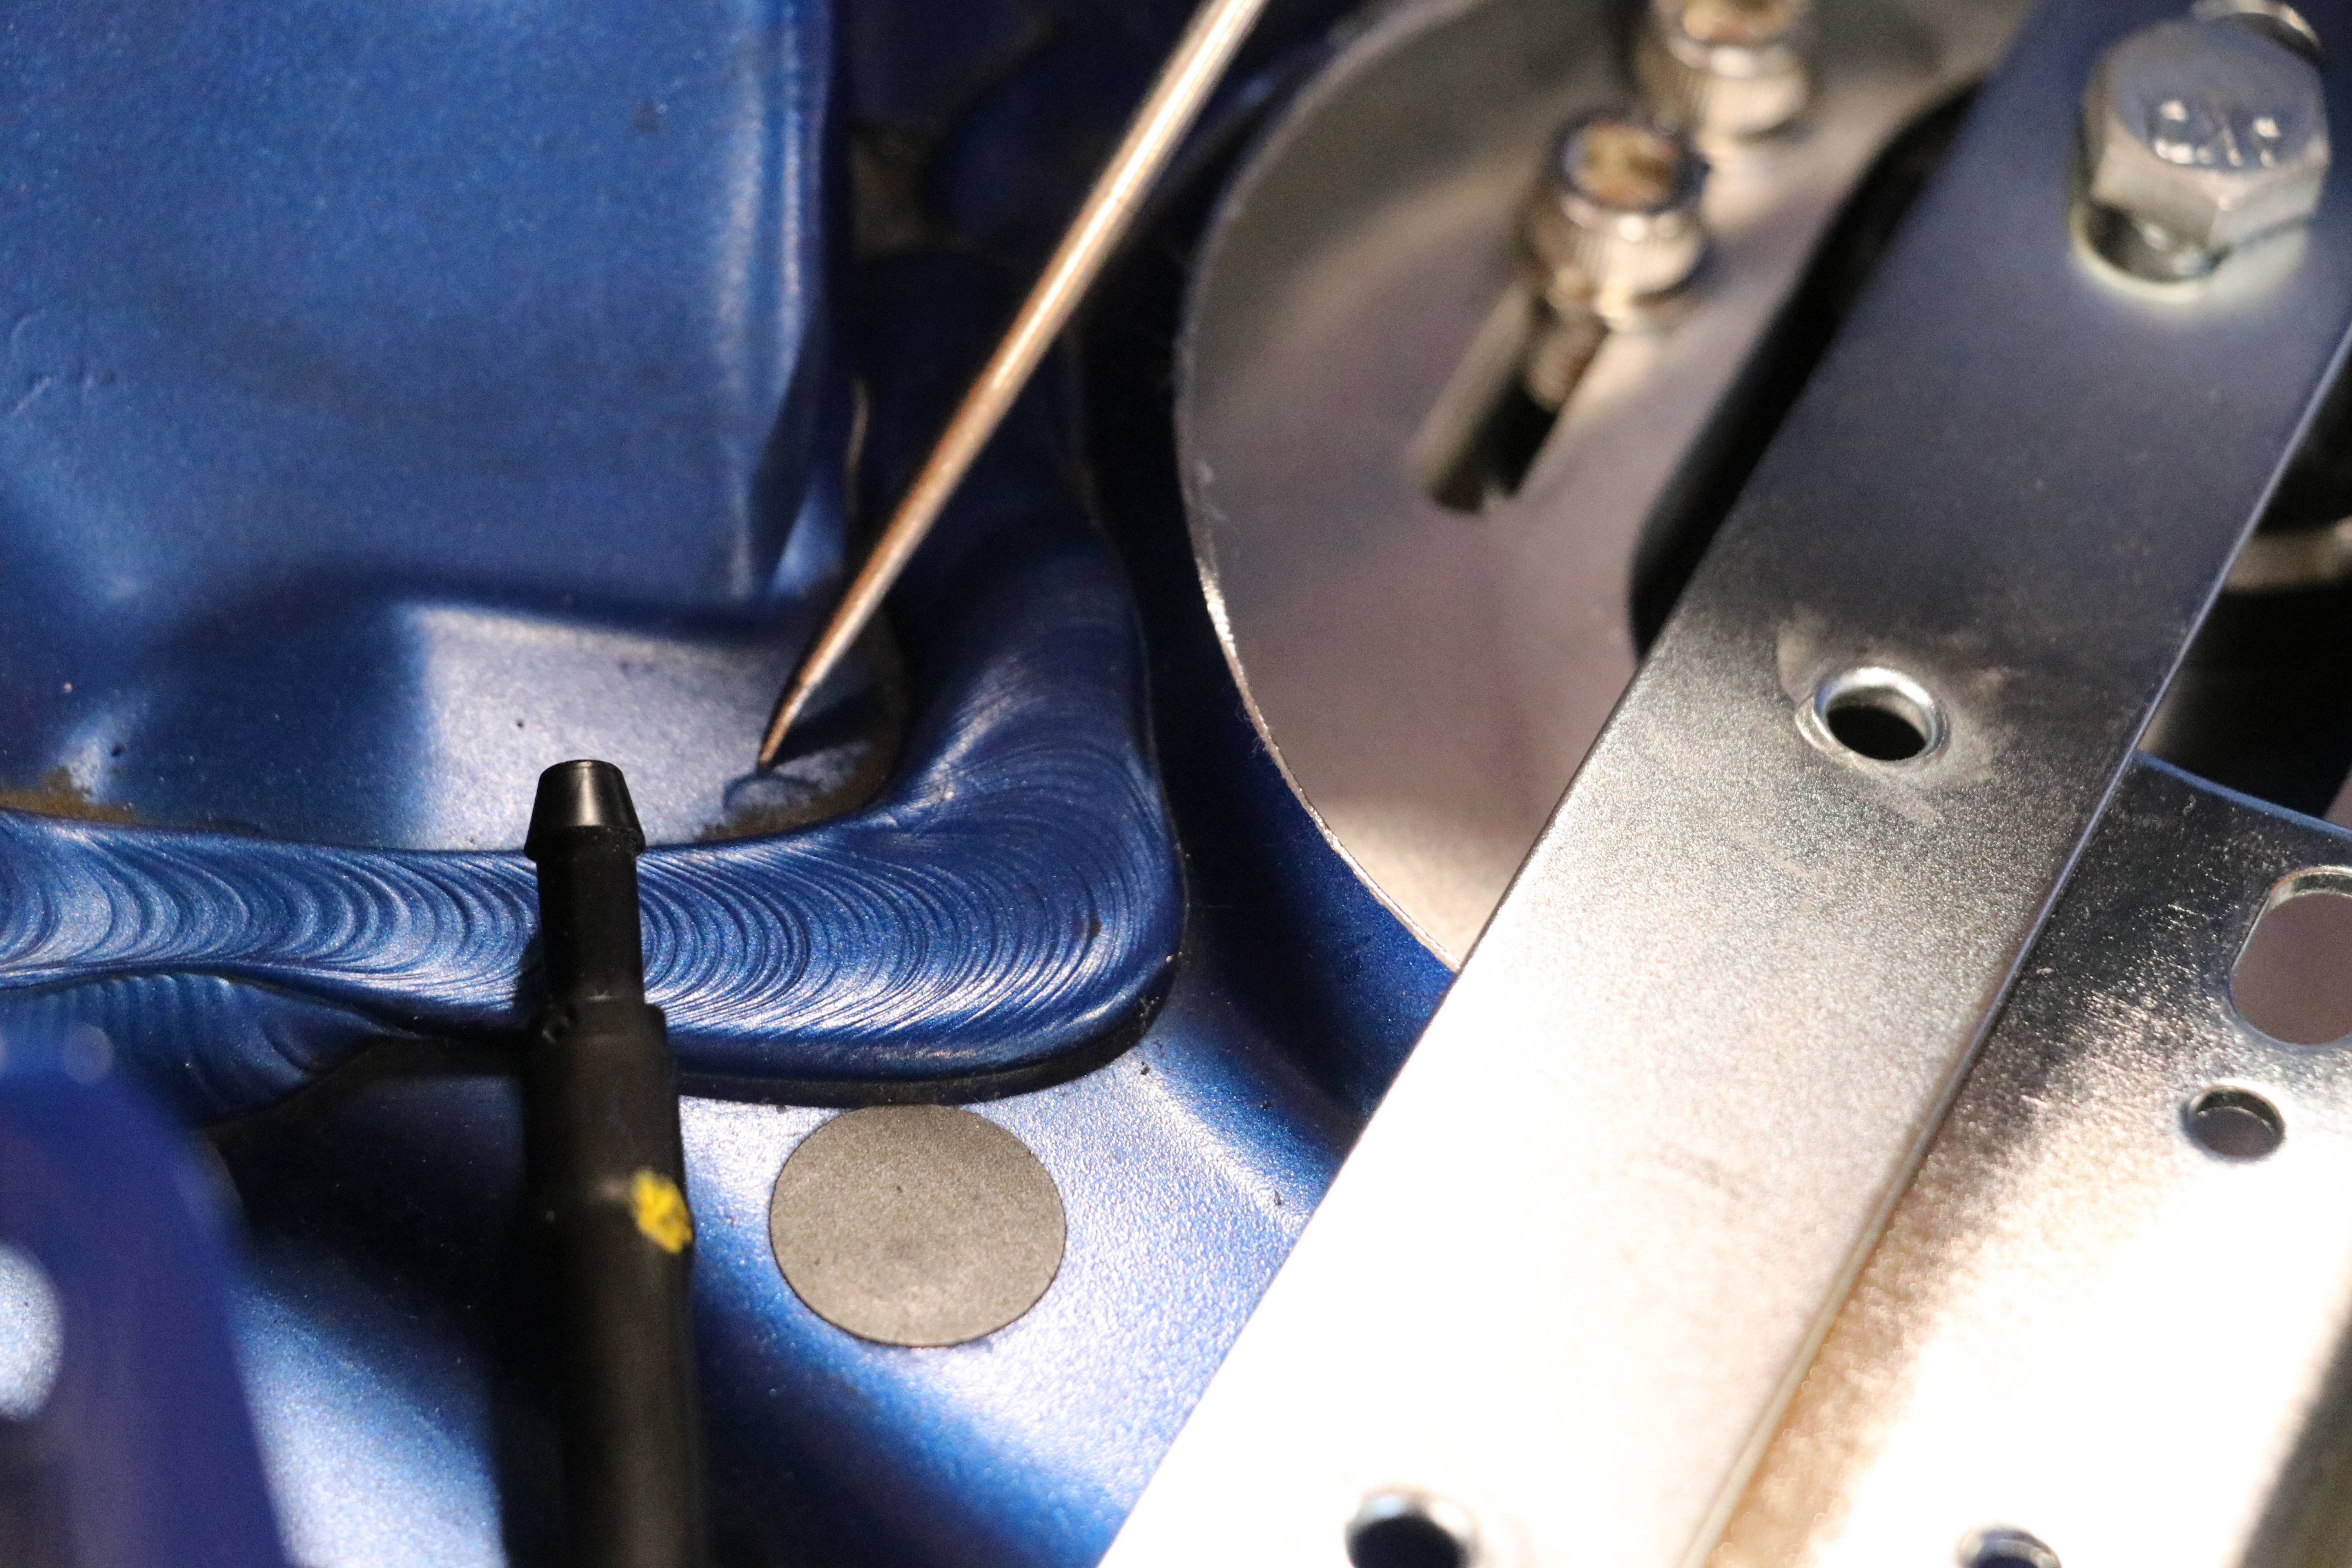
This pick is pointing at a spot weld.
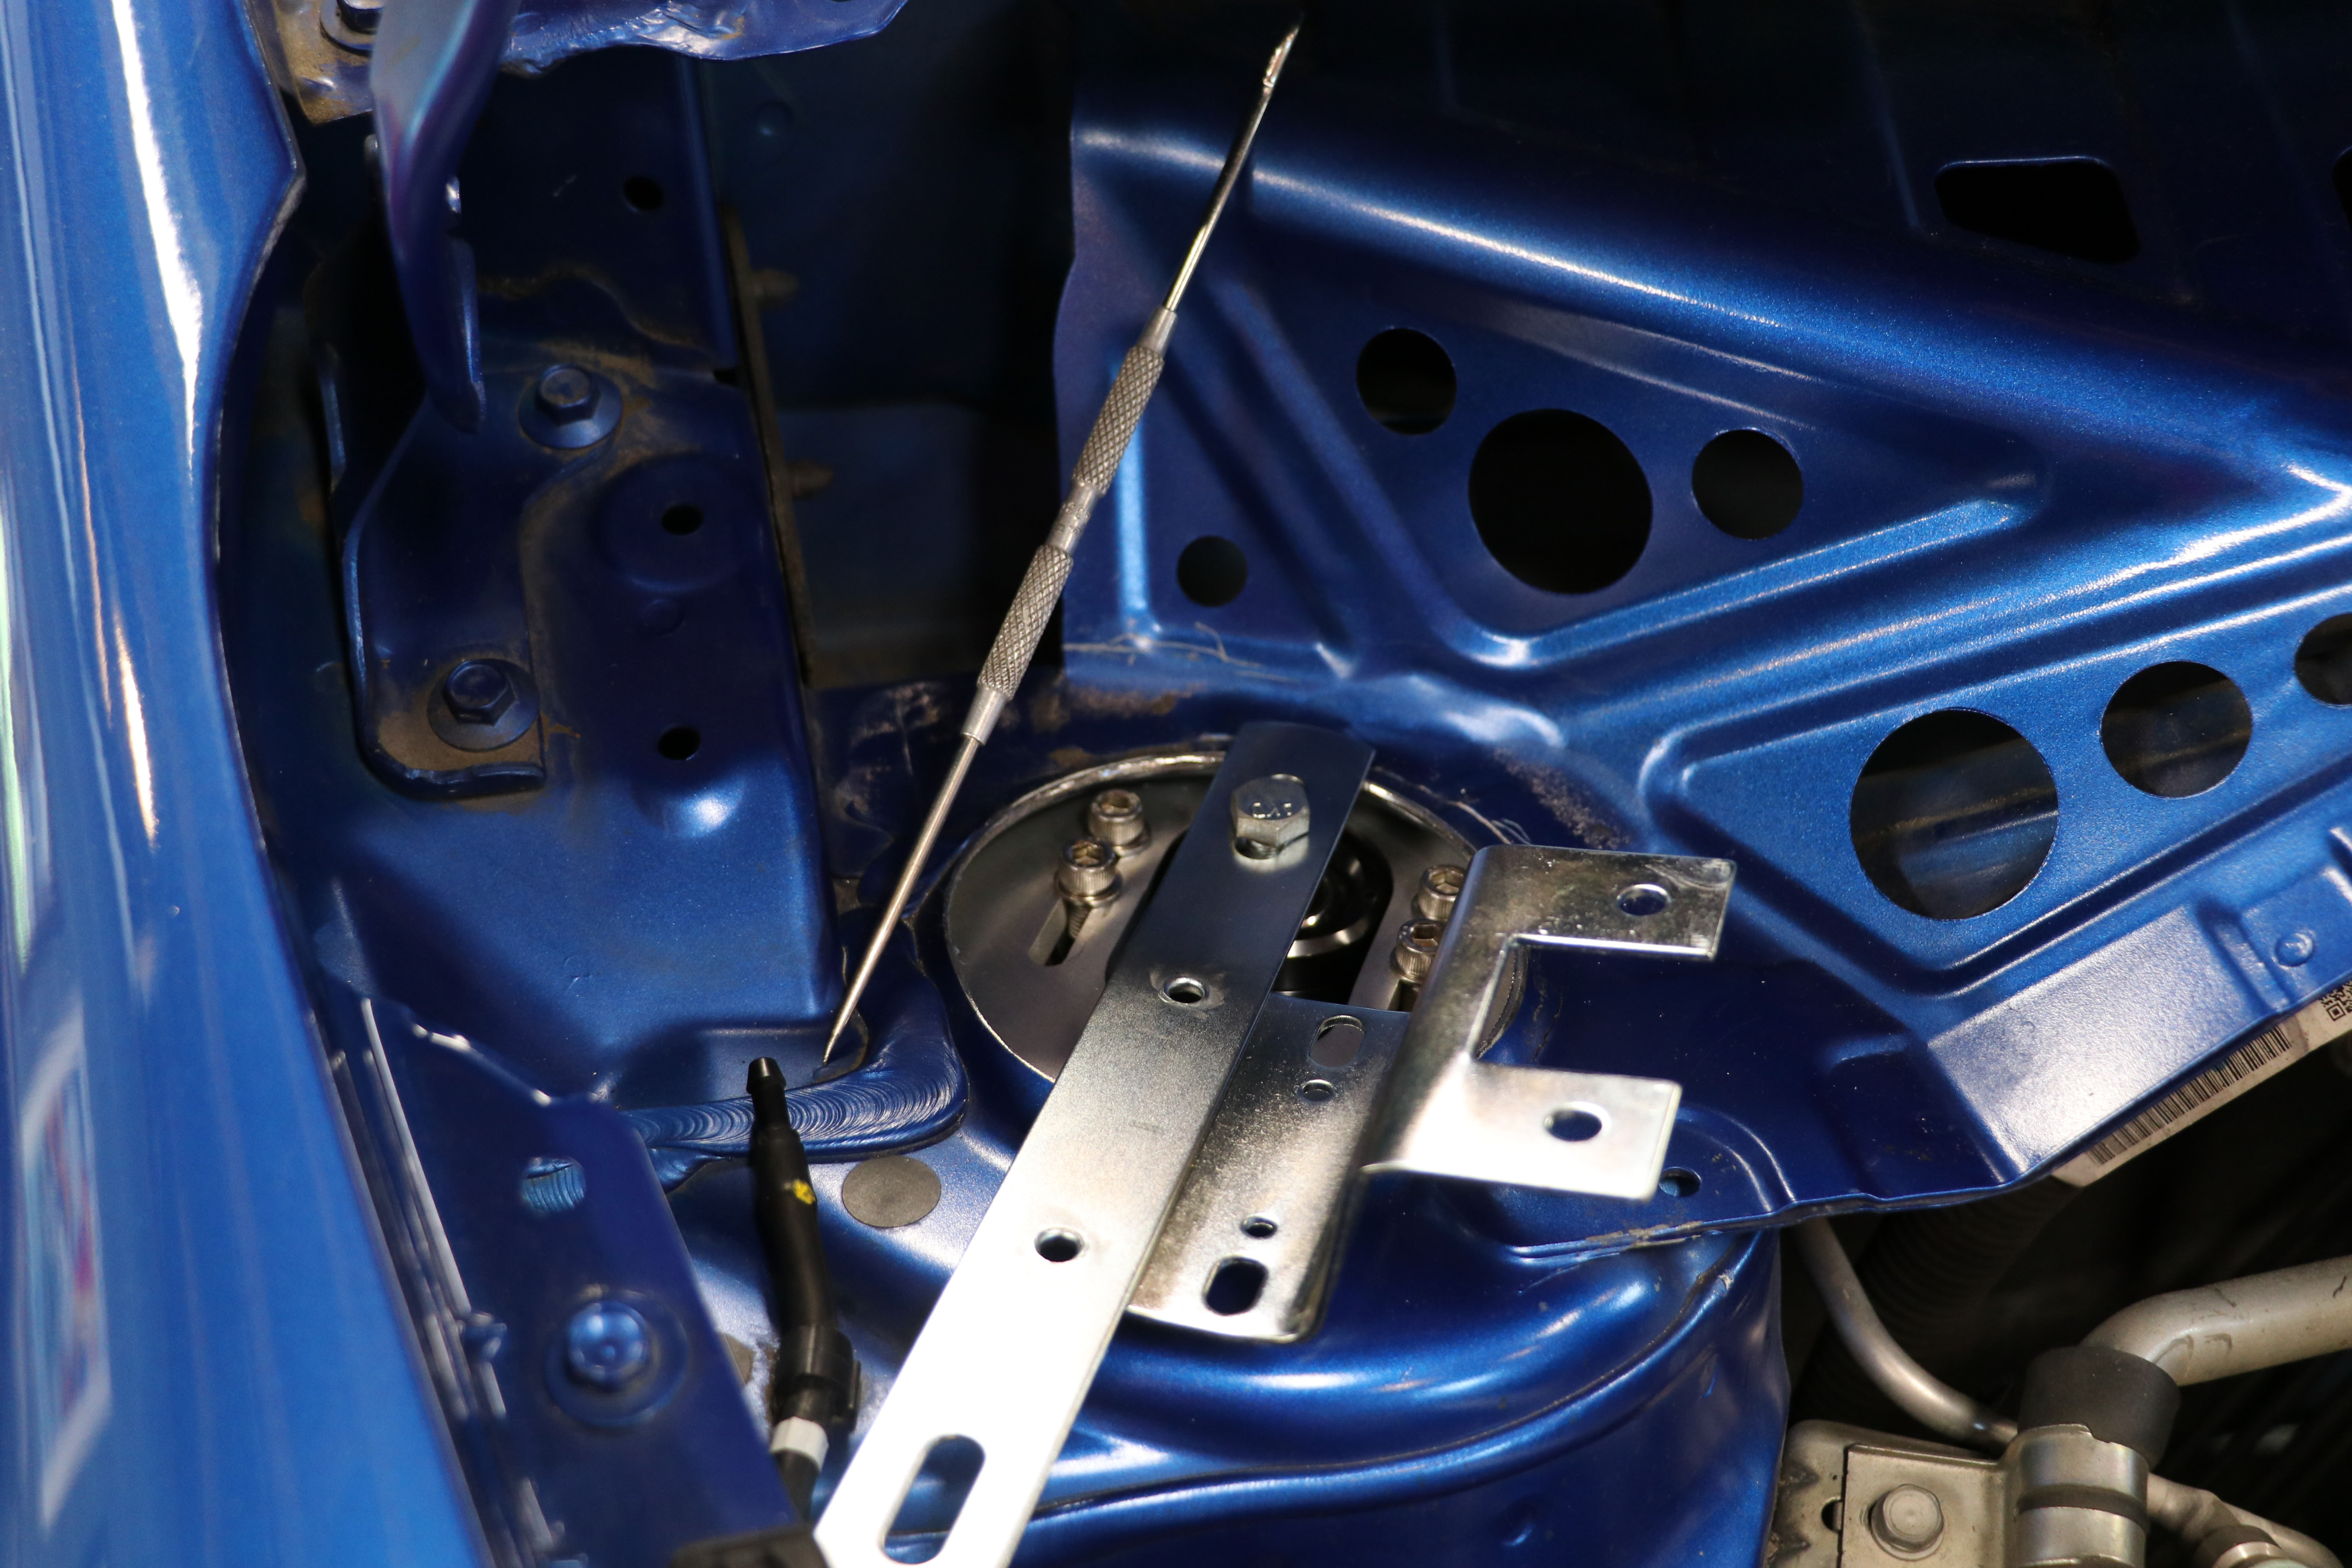
This spot weld is mirrored on each side of the chassis, is easily identifiable from underneath, and is the perfect location to drill your first hole.
Pay careful attention to the stud spacing on the top-hats as the two bolts placed closer together are outboard with the solo pointed in... take a look at my pics and you'll see it. This way all the studs land on flat areas of the multi-layer steel shock tower. (ignore the seam sealer... once you have run the nuts down once, its easy to scrape away the unwanted material.)
Once you have that first hole, the rest is cake. The other two holes can really only fall in one spot due to a ridge on the under skin (see first pic of this post).
At this point I chose to temp install the plates and crank the nuts down tight so they could cut through the seam sealer and make any scratches they were going to make and make sure everything cleared. Also, now is a good time to make sure you cut your circle large enough for the hex screws to slide all the way back in their slots...
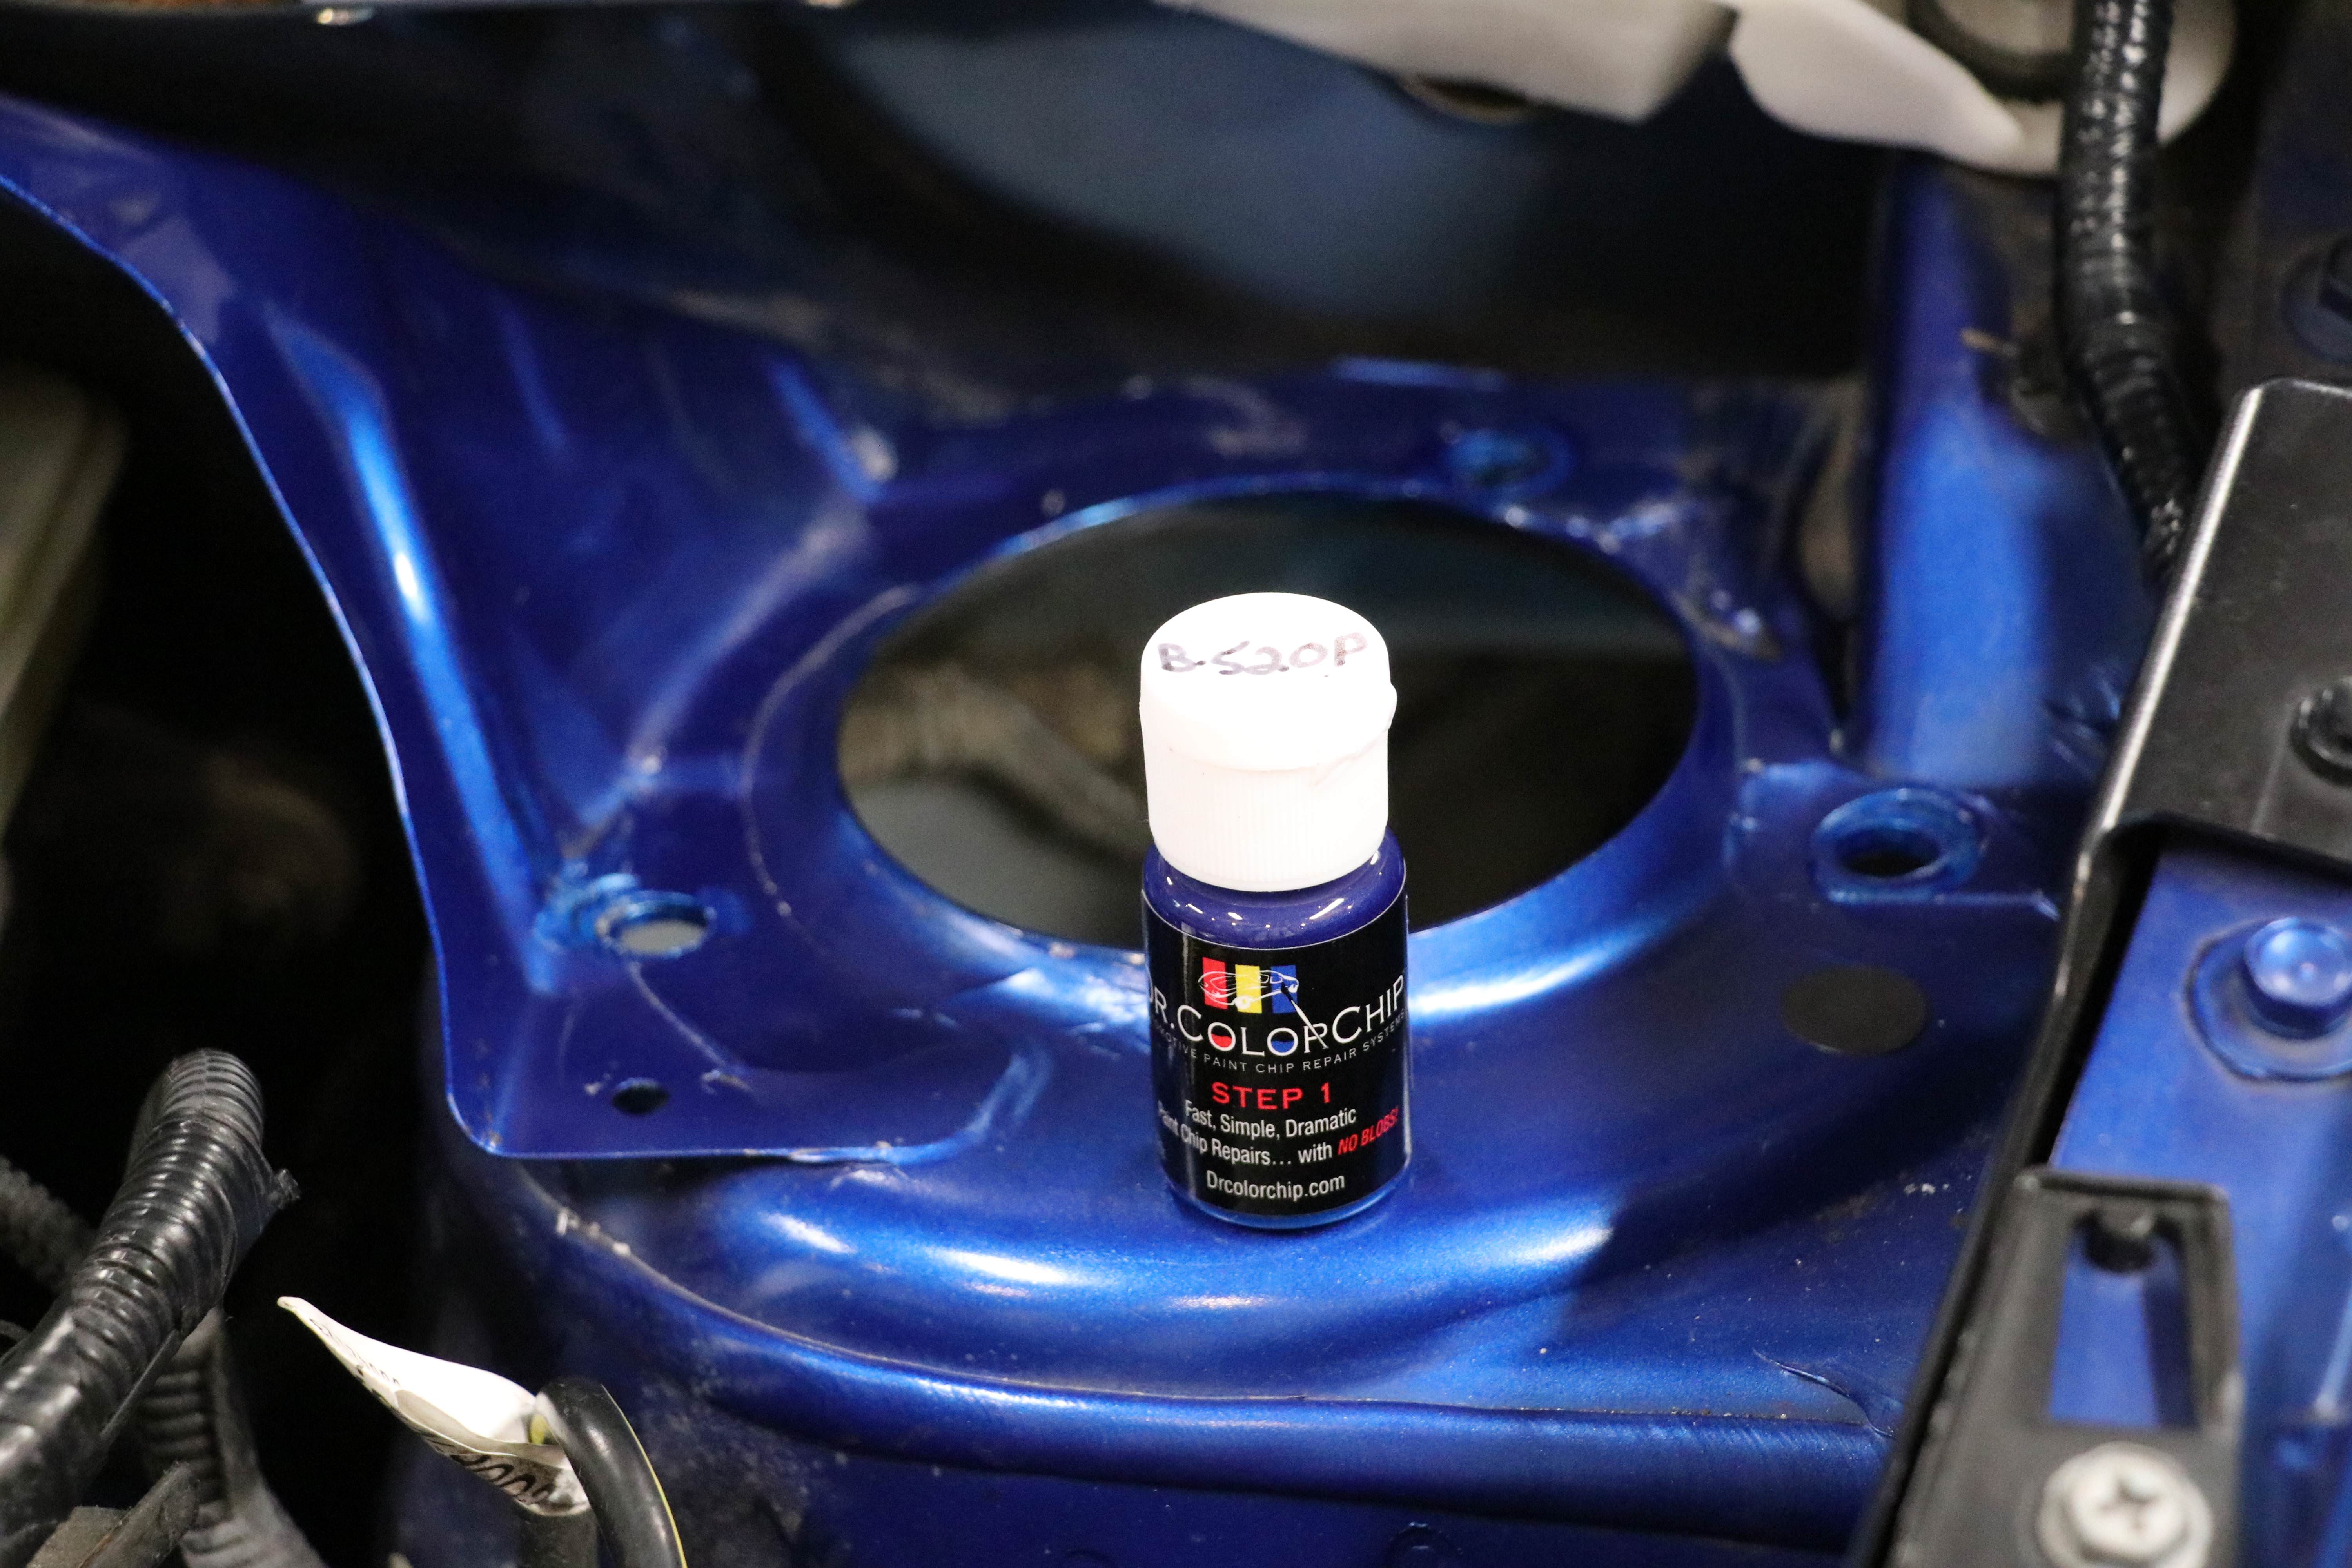
Tidy up, do a little corrosion prevention.
I sprayed the underside with this stuff.
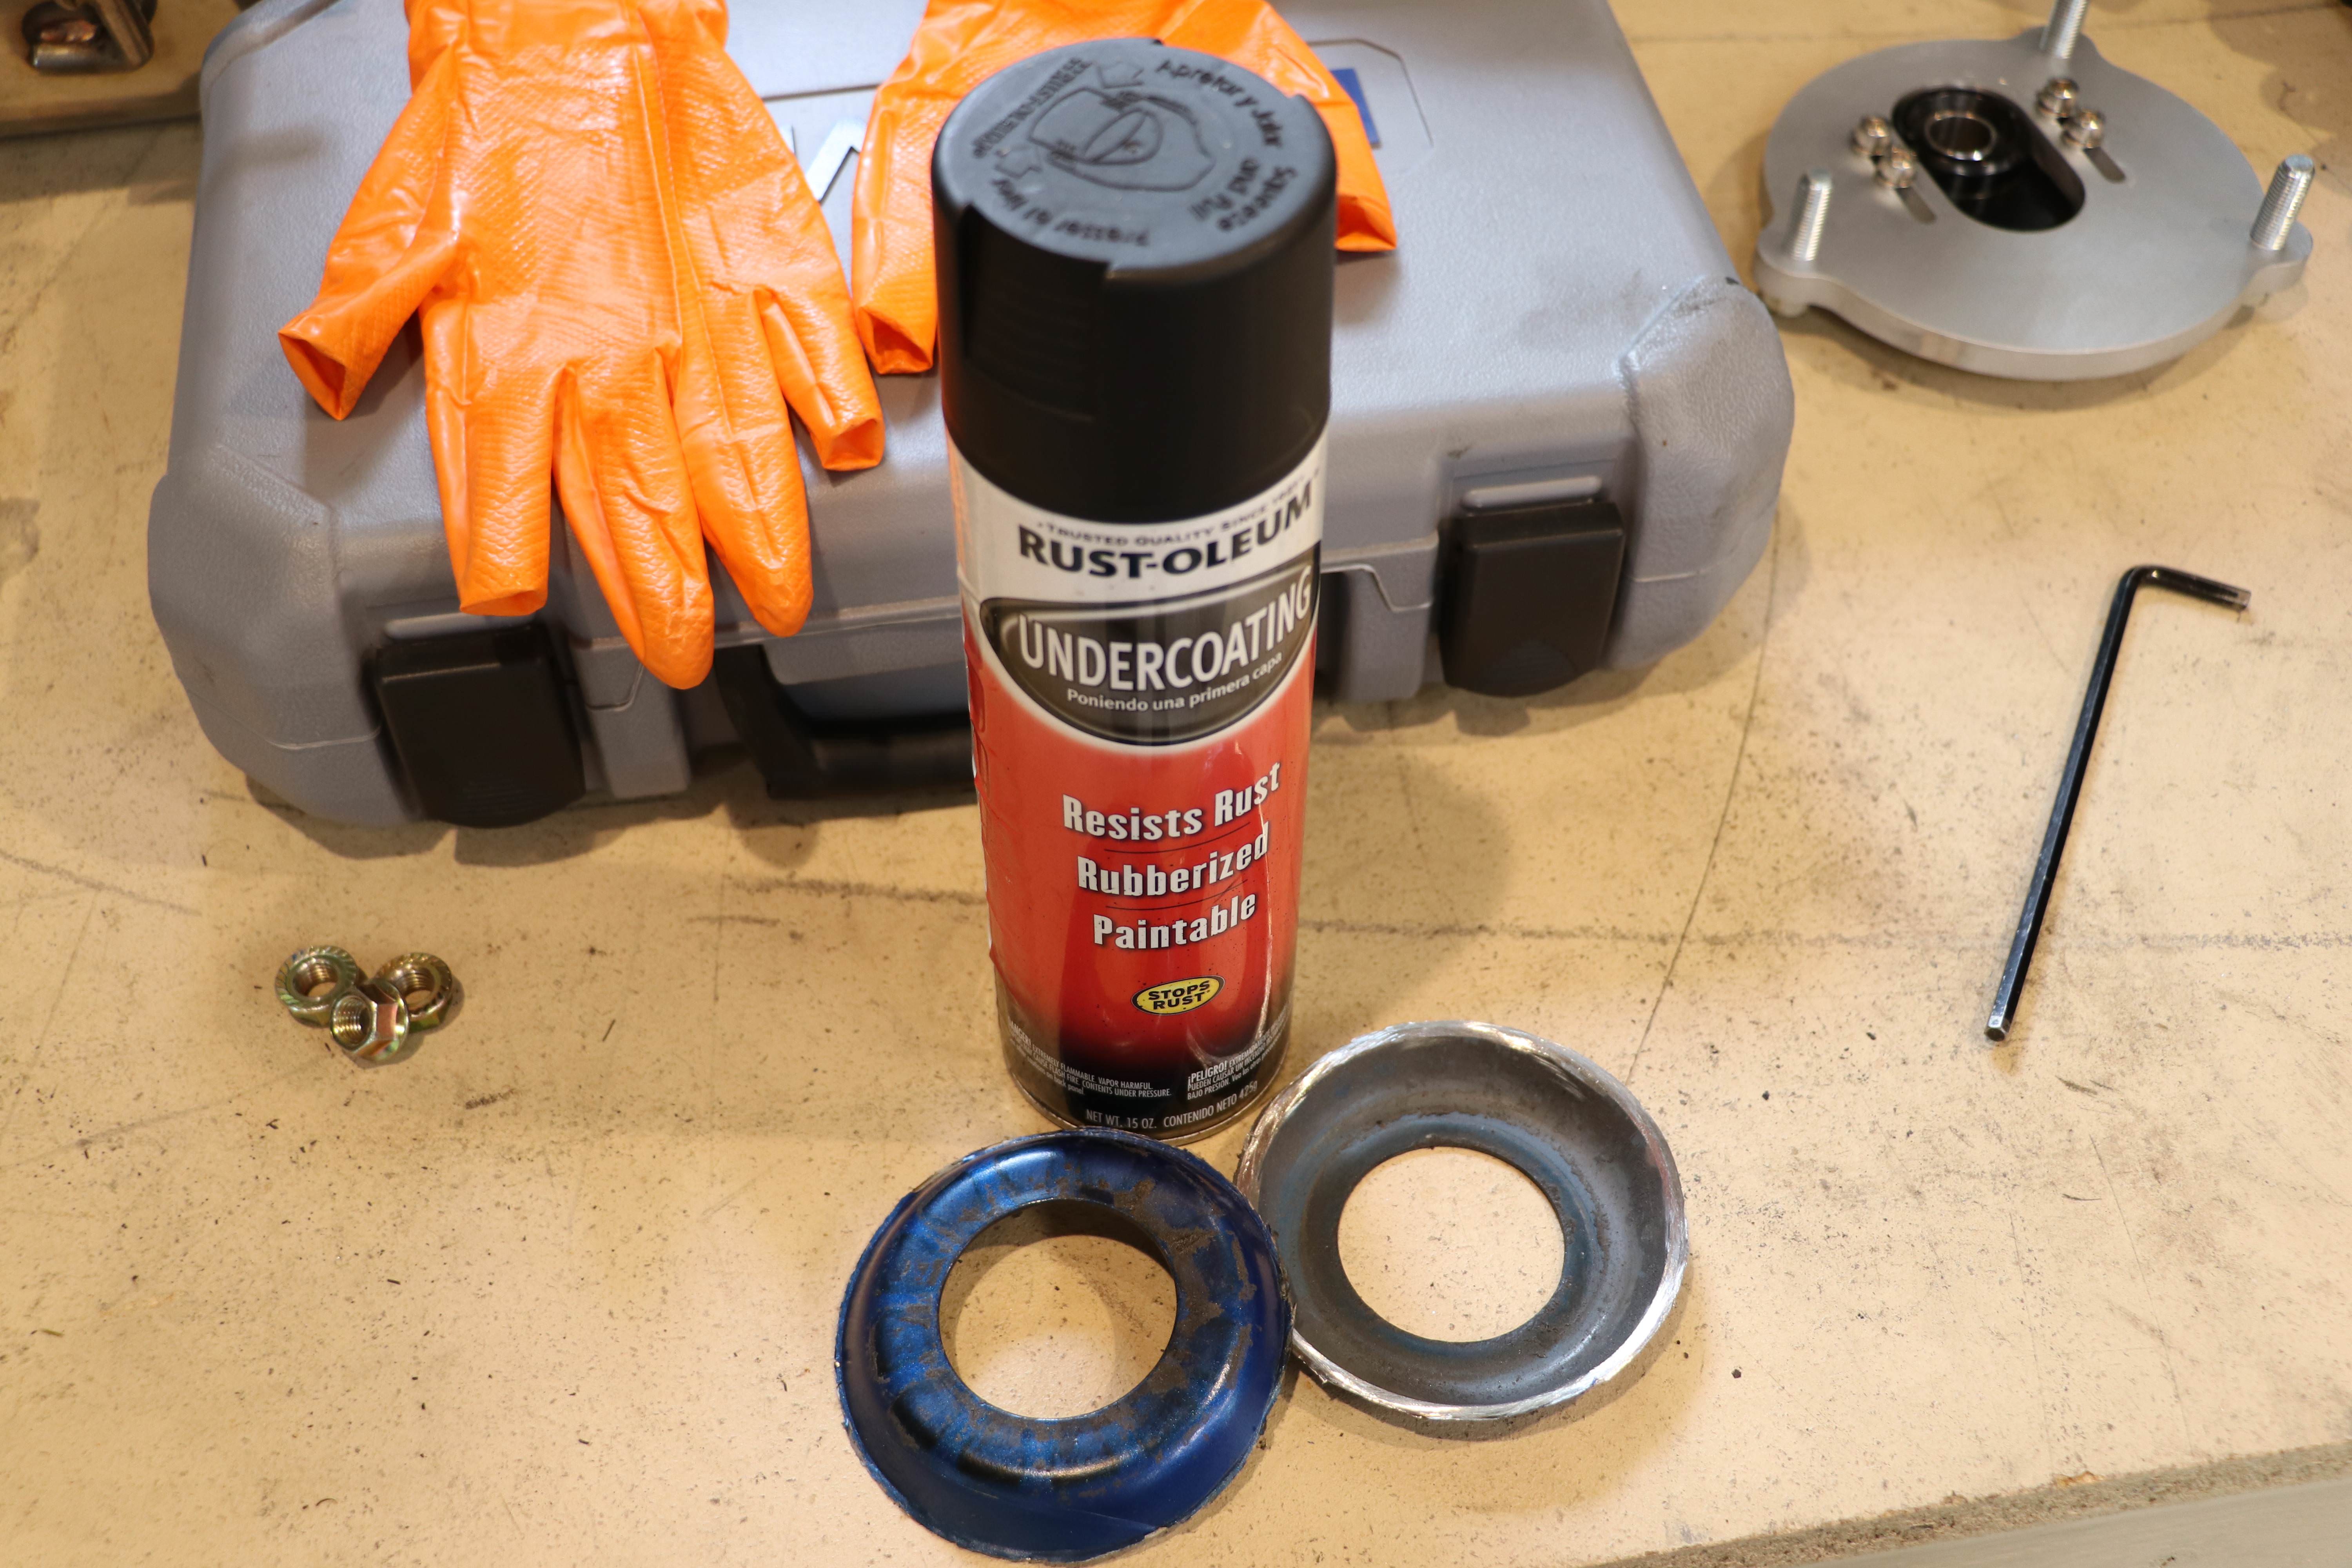
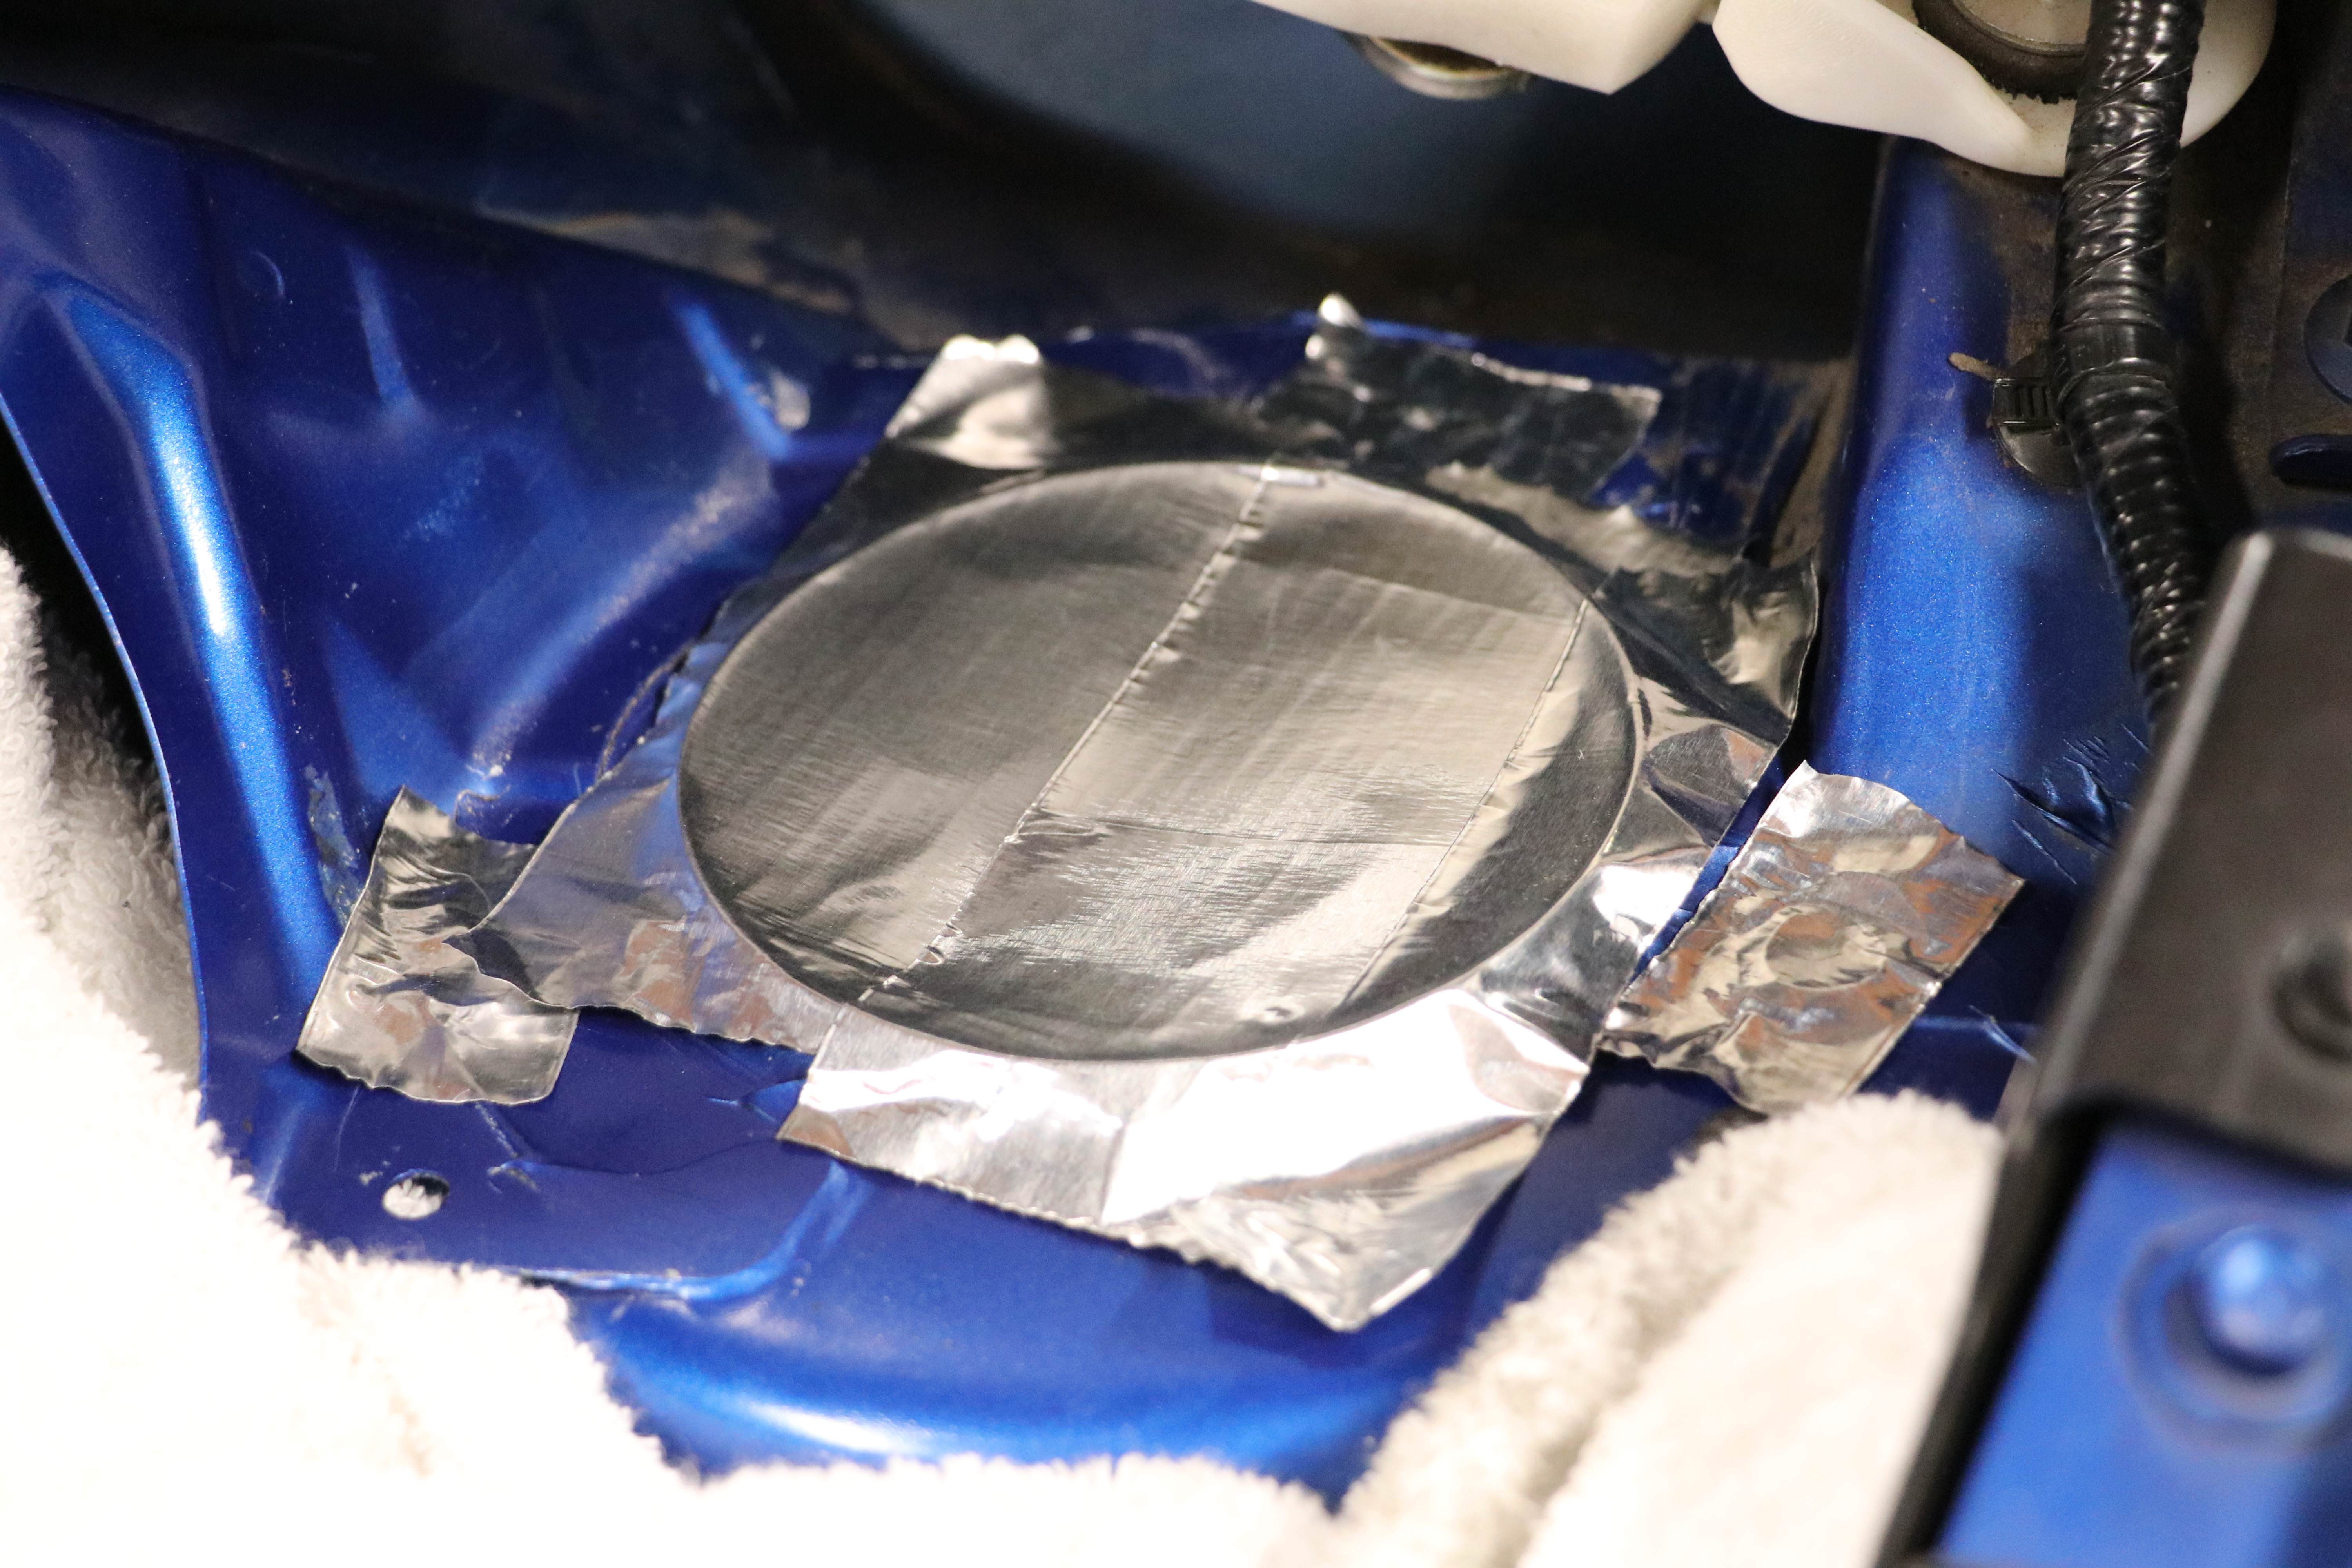
And ordered some factory matched Dr. Colorchip for the visible areas (and many future rock chips).
Having done this and stressed over getting them positioned just right, which was pointless considering the range of adjustment, I have a hint...
This pick is pointing at a spot weld.
This spot weld is mirrored on each side of the chassis, is easily identifiable from underneath, and is the perfect location to drill your first hole.
Pay careful attention to the stud spacing on the top-hats as the two bolts placed closer together are outboard with the solo pointed in... take a look at my pics and you'll see it. This way all the studs land on flat areas of the multi-layer steel shock tower. (ignore the seam sealer... once you have run the nuts down once, its easy to scrape away the unwanted material.)
Once you have that first hole, the rest is cake. The other two holes can really only fall in one spot due to a ridge on the under skin (see first pic of this post).
At this point I chose to temp install the plates and crank the nuts down tight so they could cut through the seam sealer and make any scratches they were going to make and make sure everything cleared. Also, now is a good time to make sure you cut your circle large enough for the hex screws to slide all the way back in their slots...
Tidy up, do a little corrosion prevention.
I sprayed the underside with this stuff.
And ordered some factory matched Dr. Colorchip for the visible areas (and many future rock chips).
Thread Starter
|
Member
Joined: Sep 2017
Posts: 27
From: Knoxvegas, TN
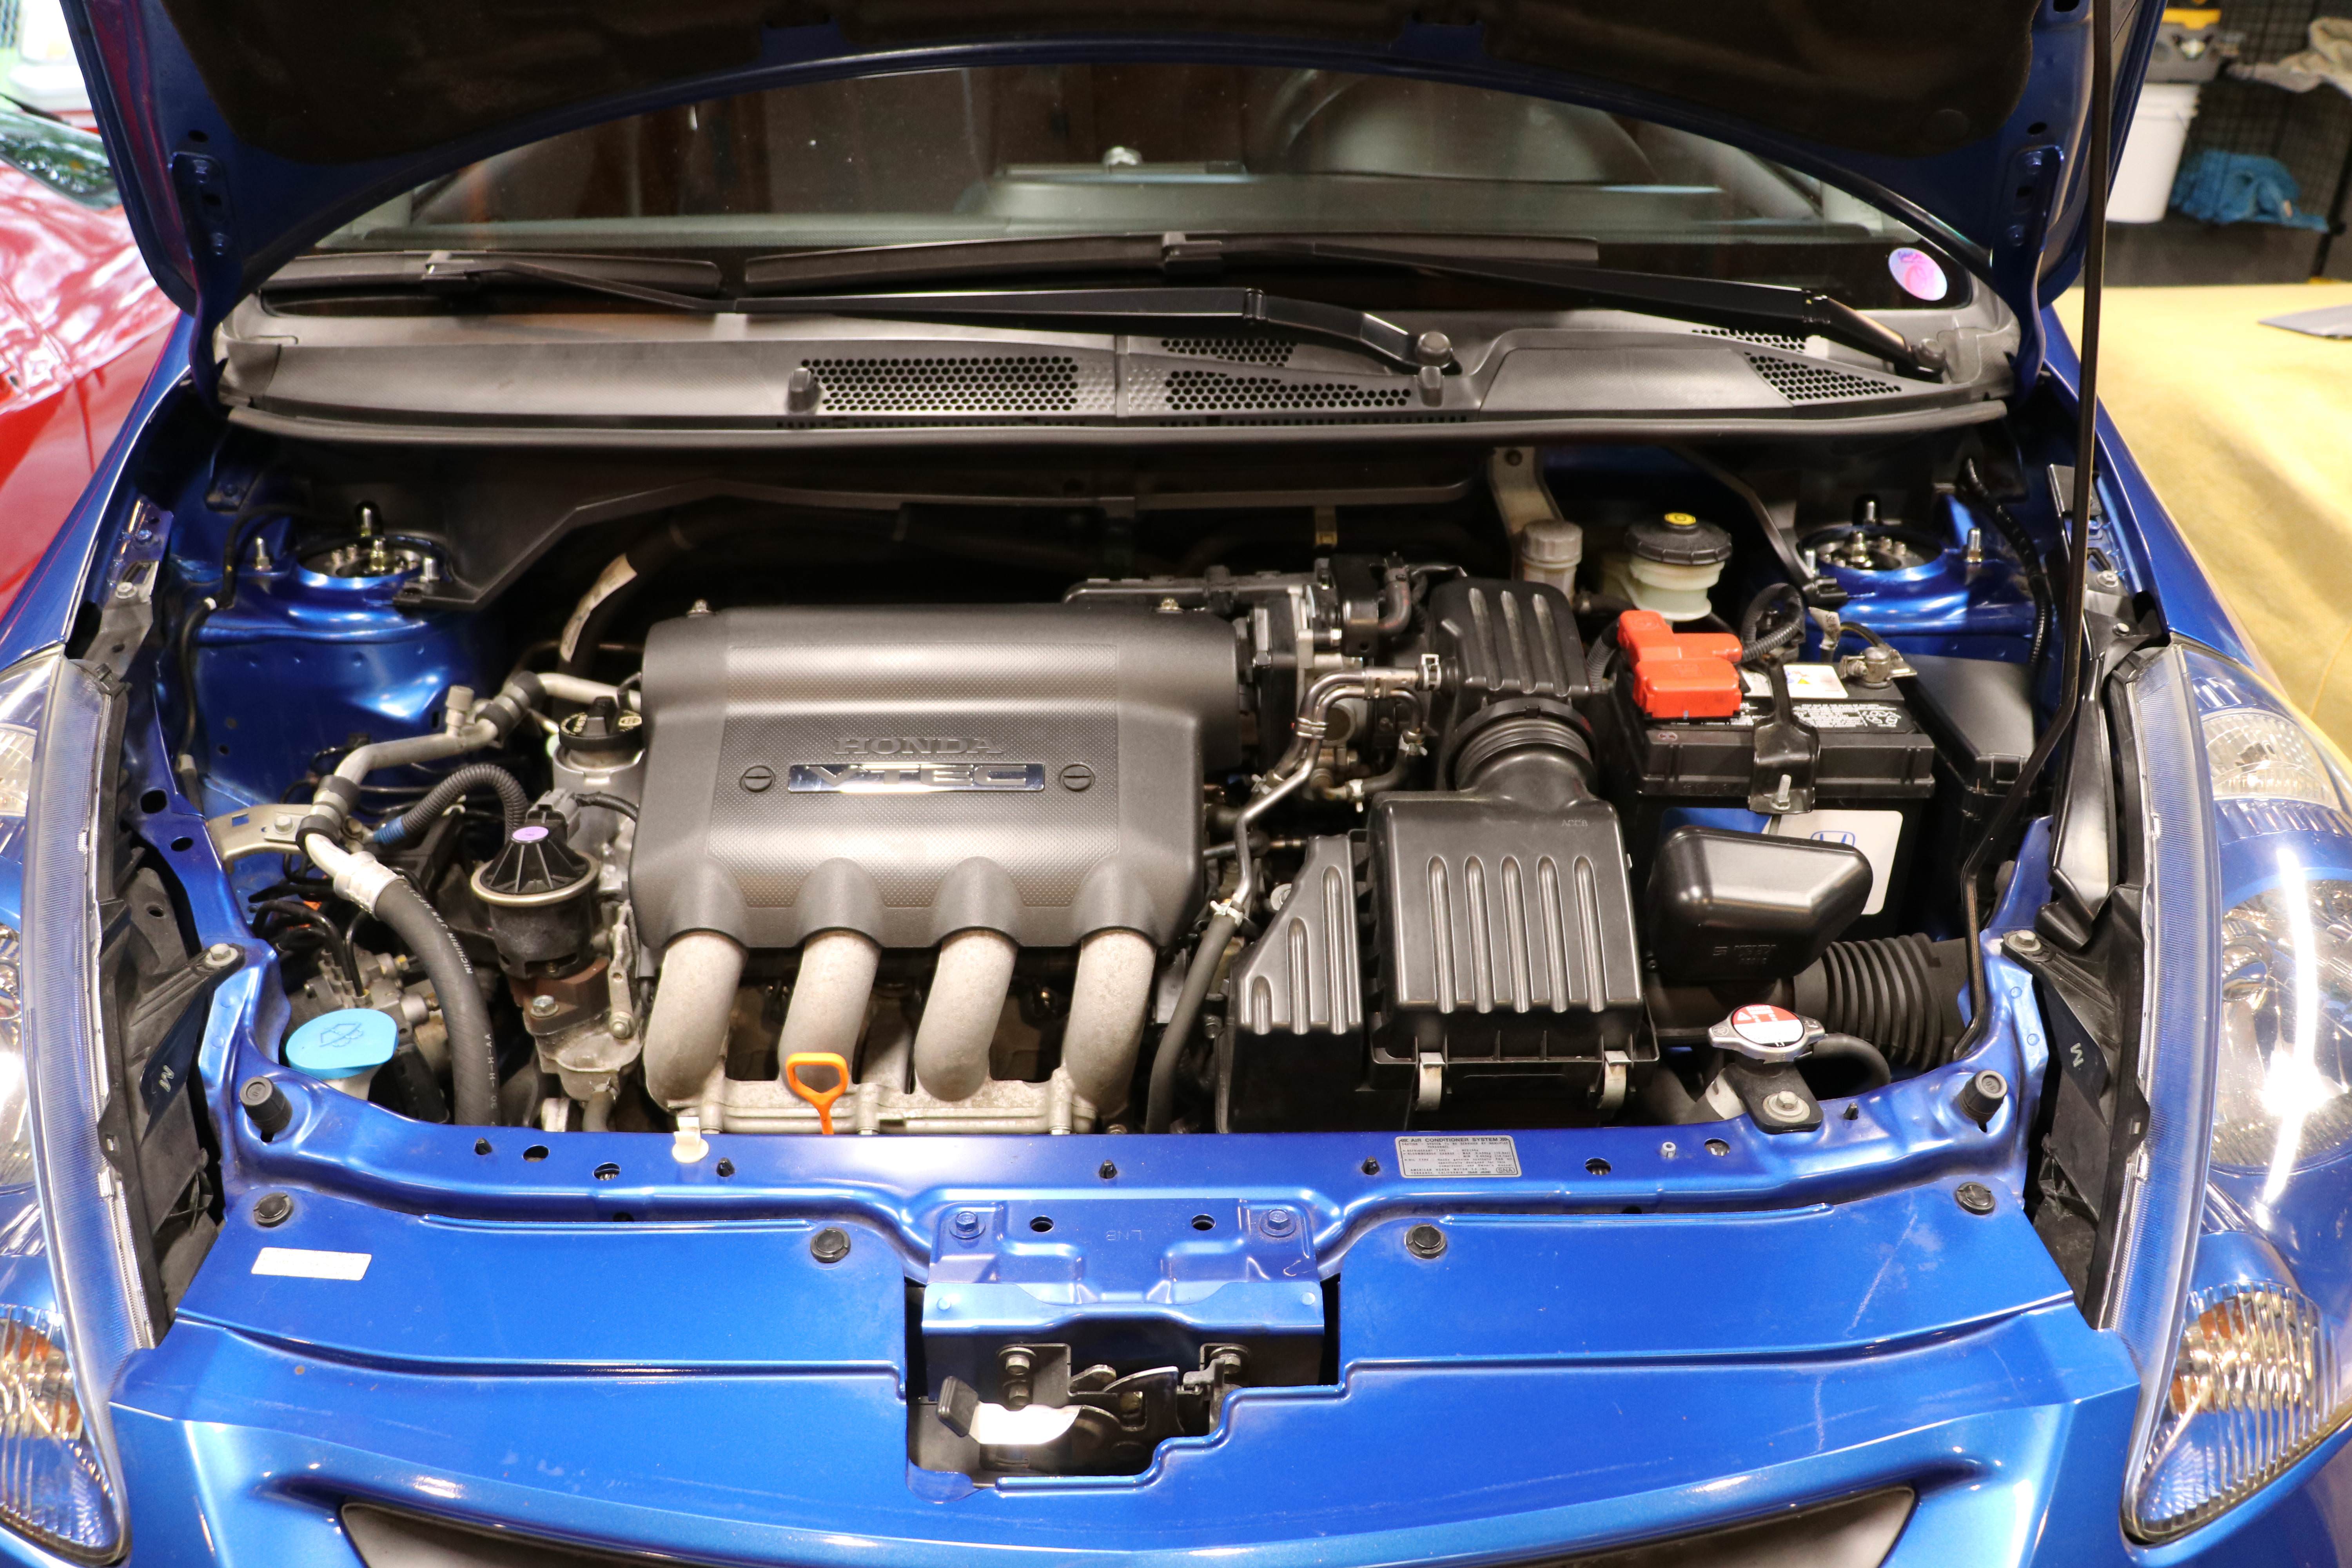
Now the fun part!
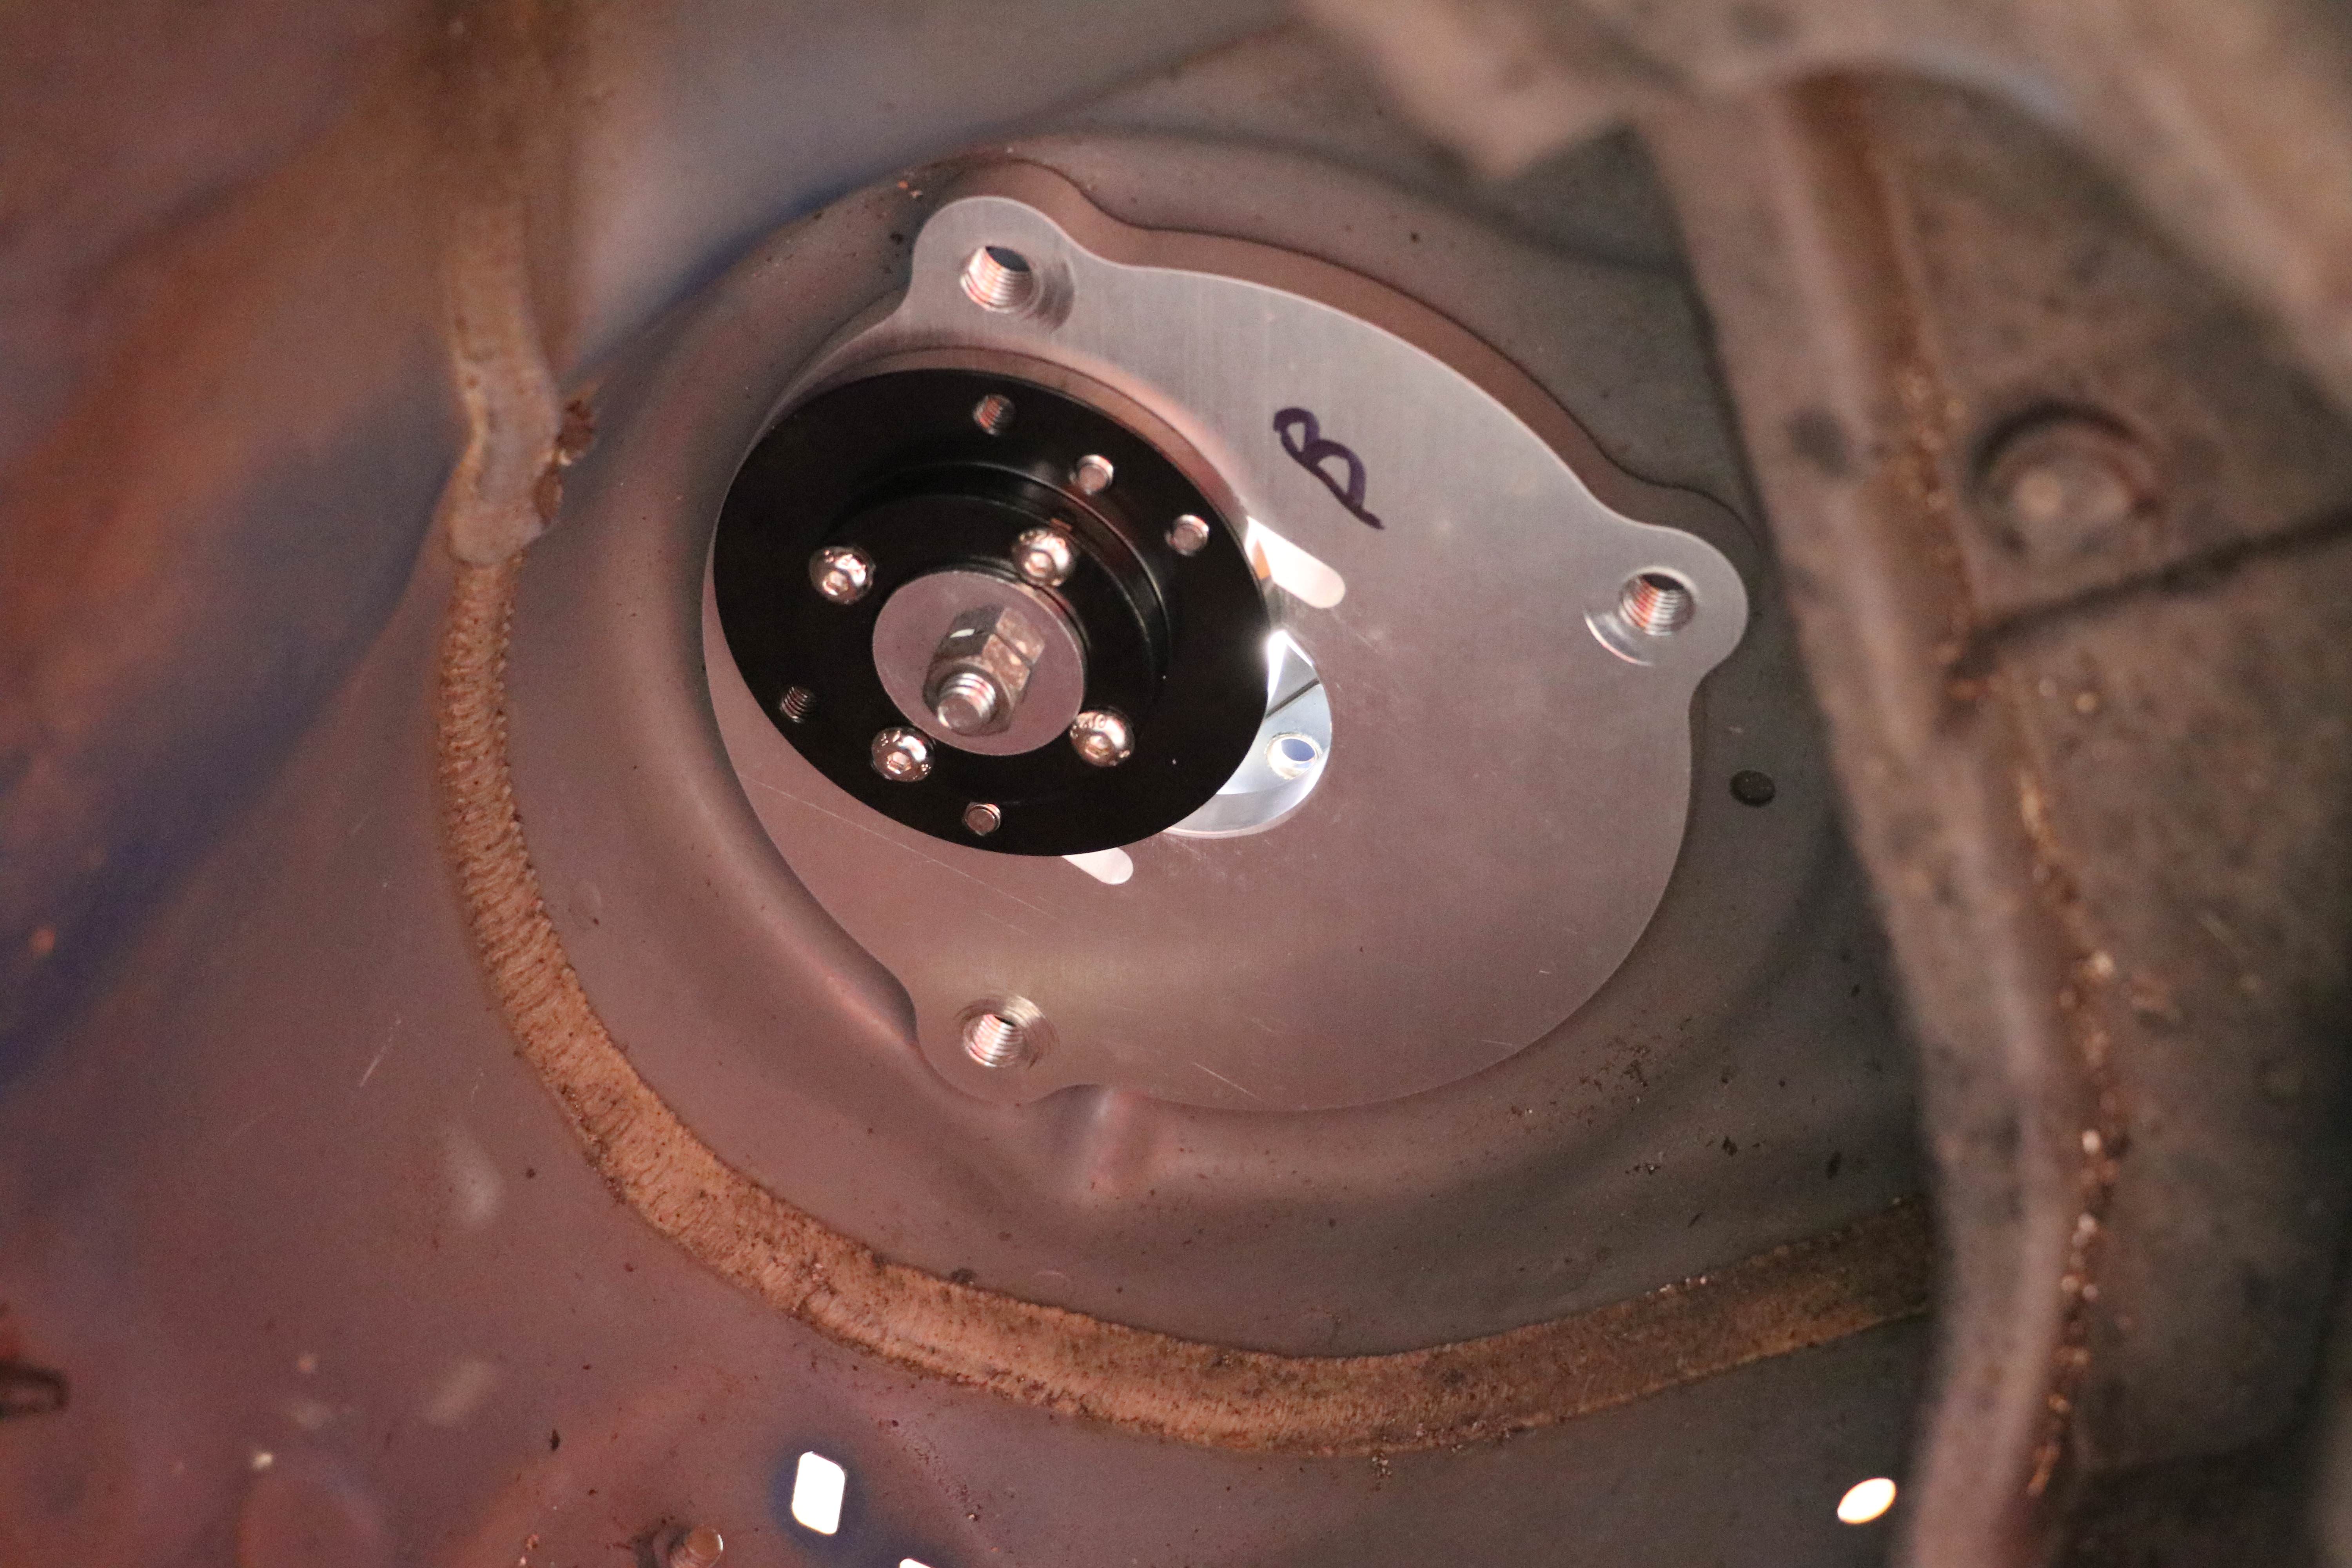
Assemble the coilovers with the TCS provided castor/camber plates with new bearings.

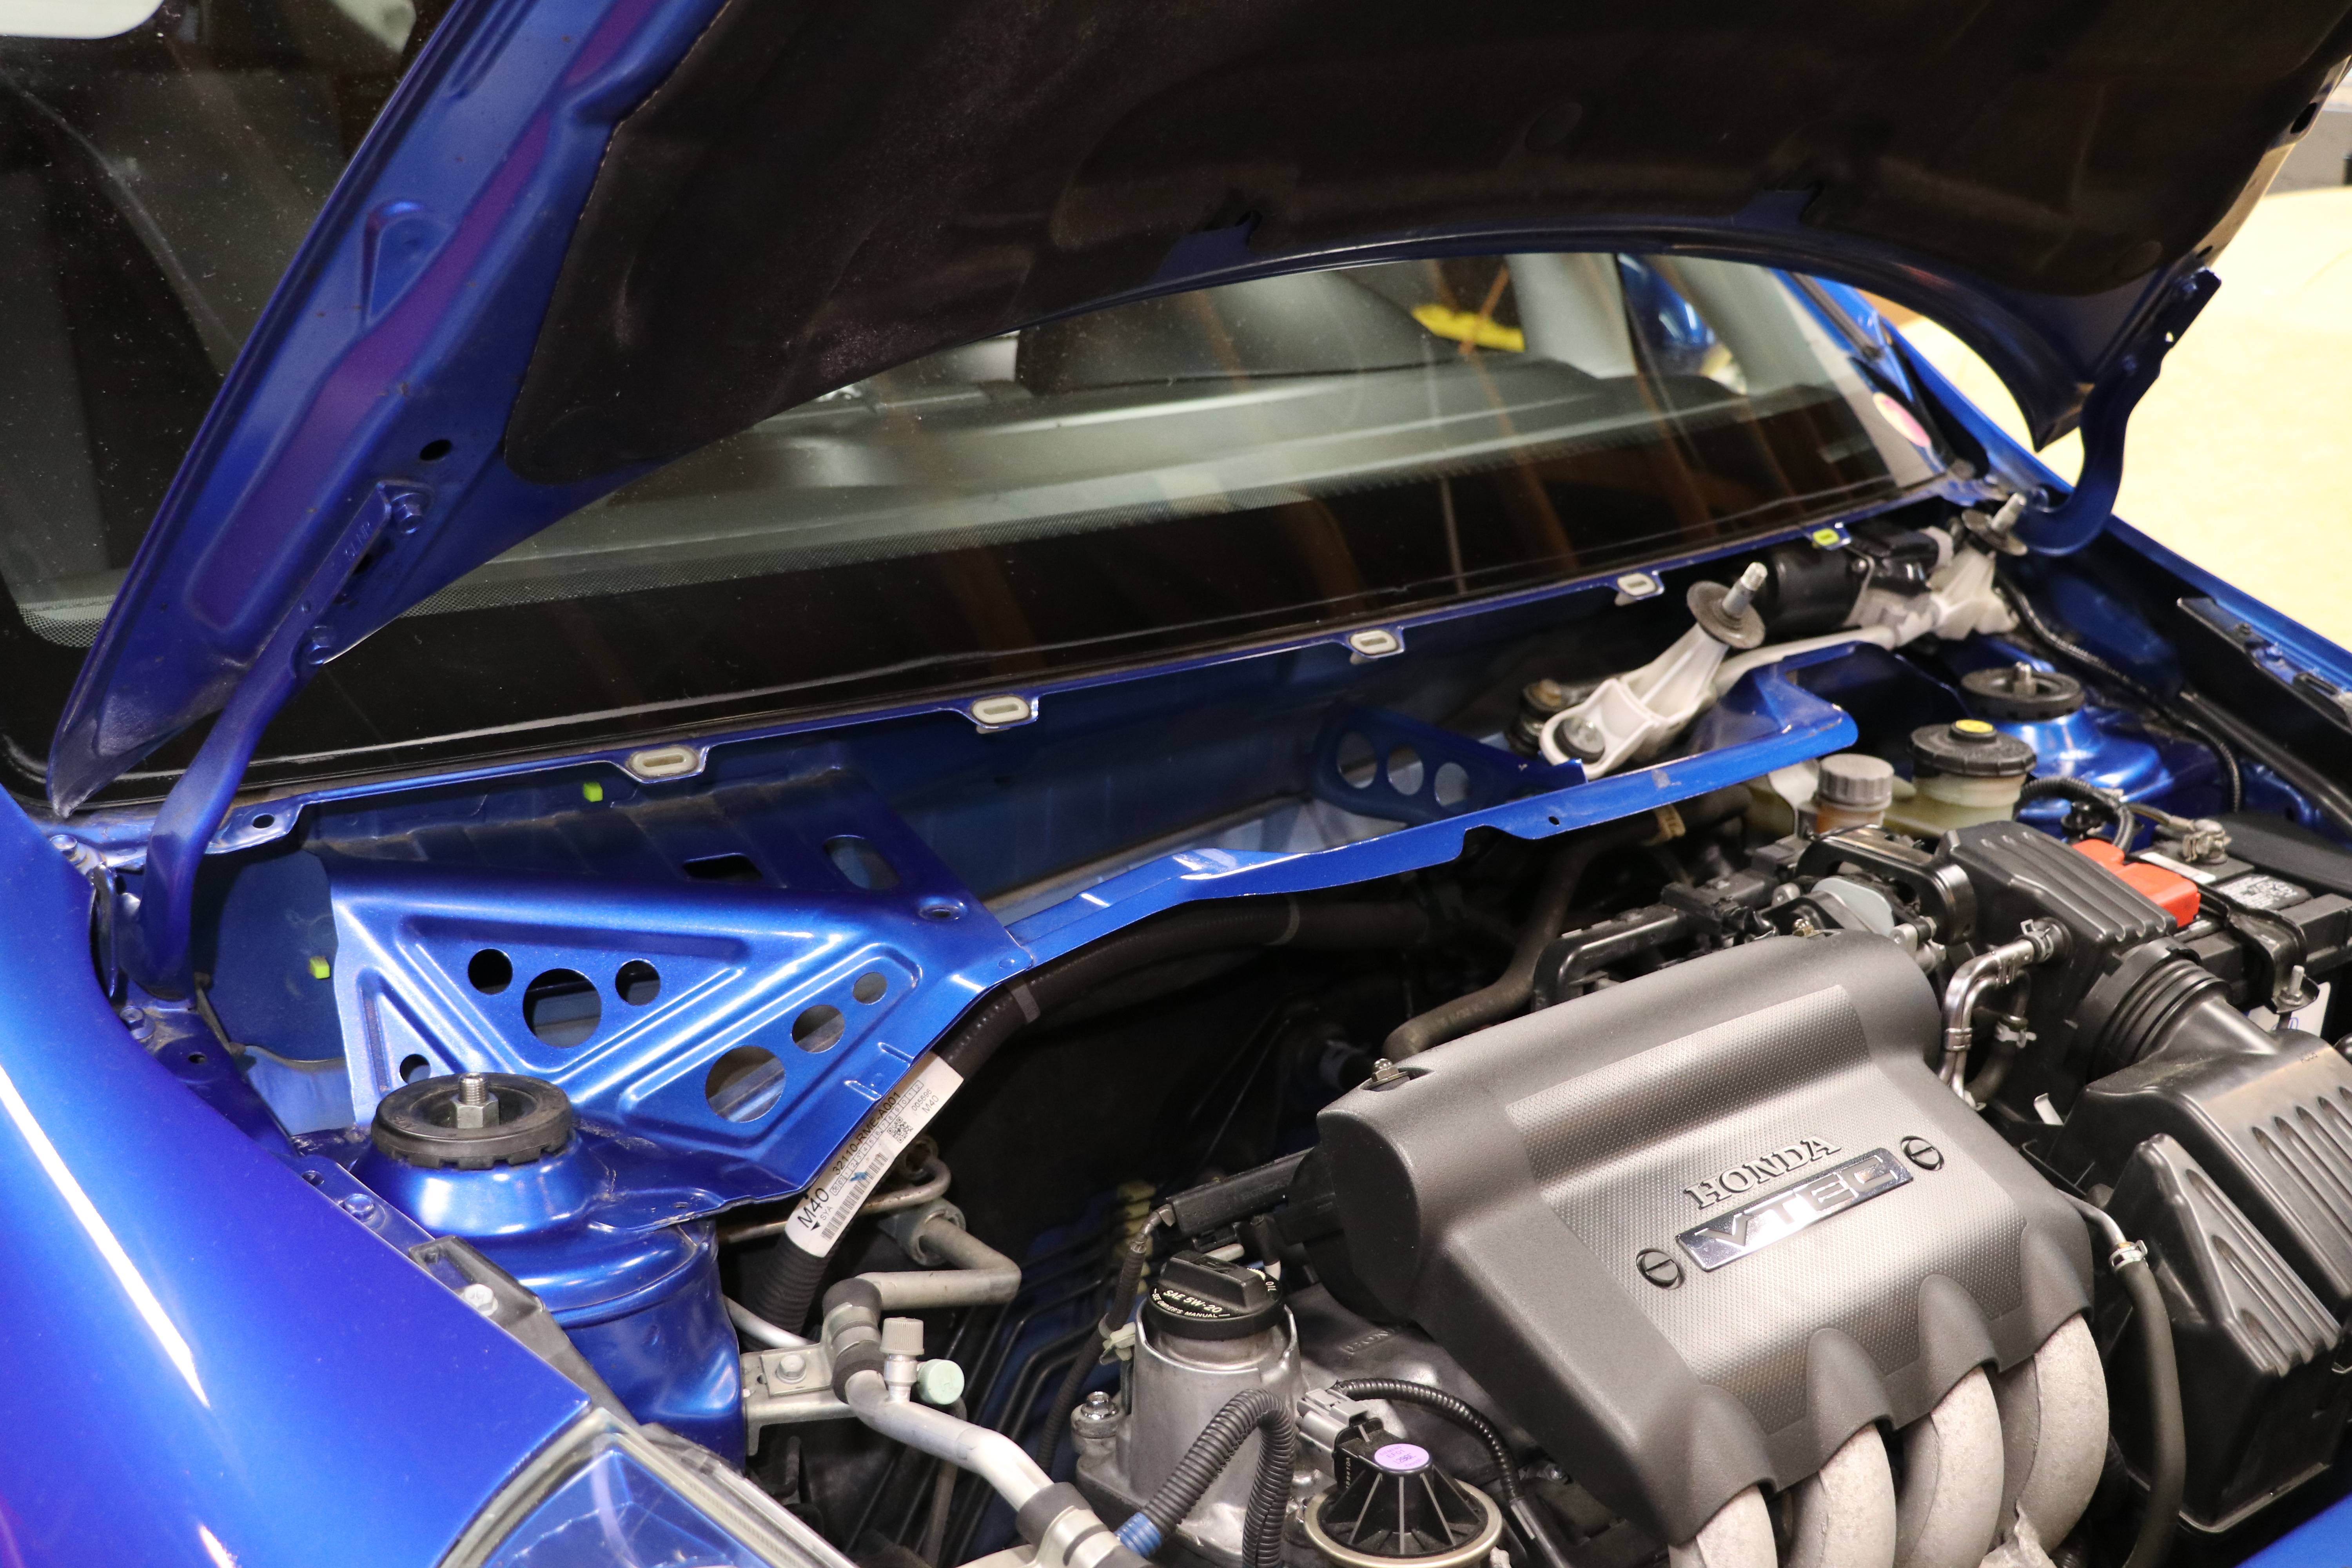
Reinstall all the stuff you removed.
You will need to file or dremel recesses for the studs to make a clean OEM look.

Like nothing happened....
Assemble the coilovers with the TCS provided castor/camber plates with new bearings.
Reinstall all the stuff you removed.
You will need to file or dremel recesses for the studs to make a clean OEM look.
Like nothing happened....
Thread Starter
|
Member
Joined: Sep 2017
Posts: 27
From: Knoxvegas, TN
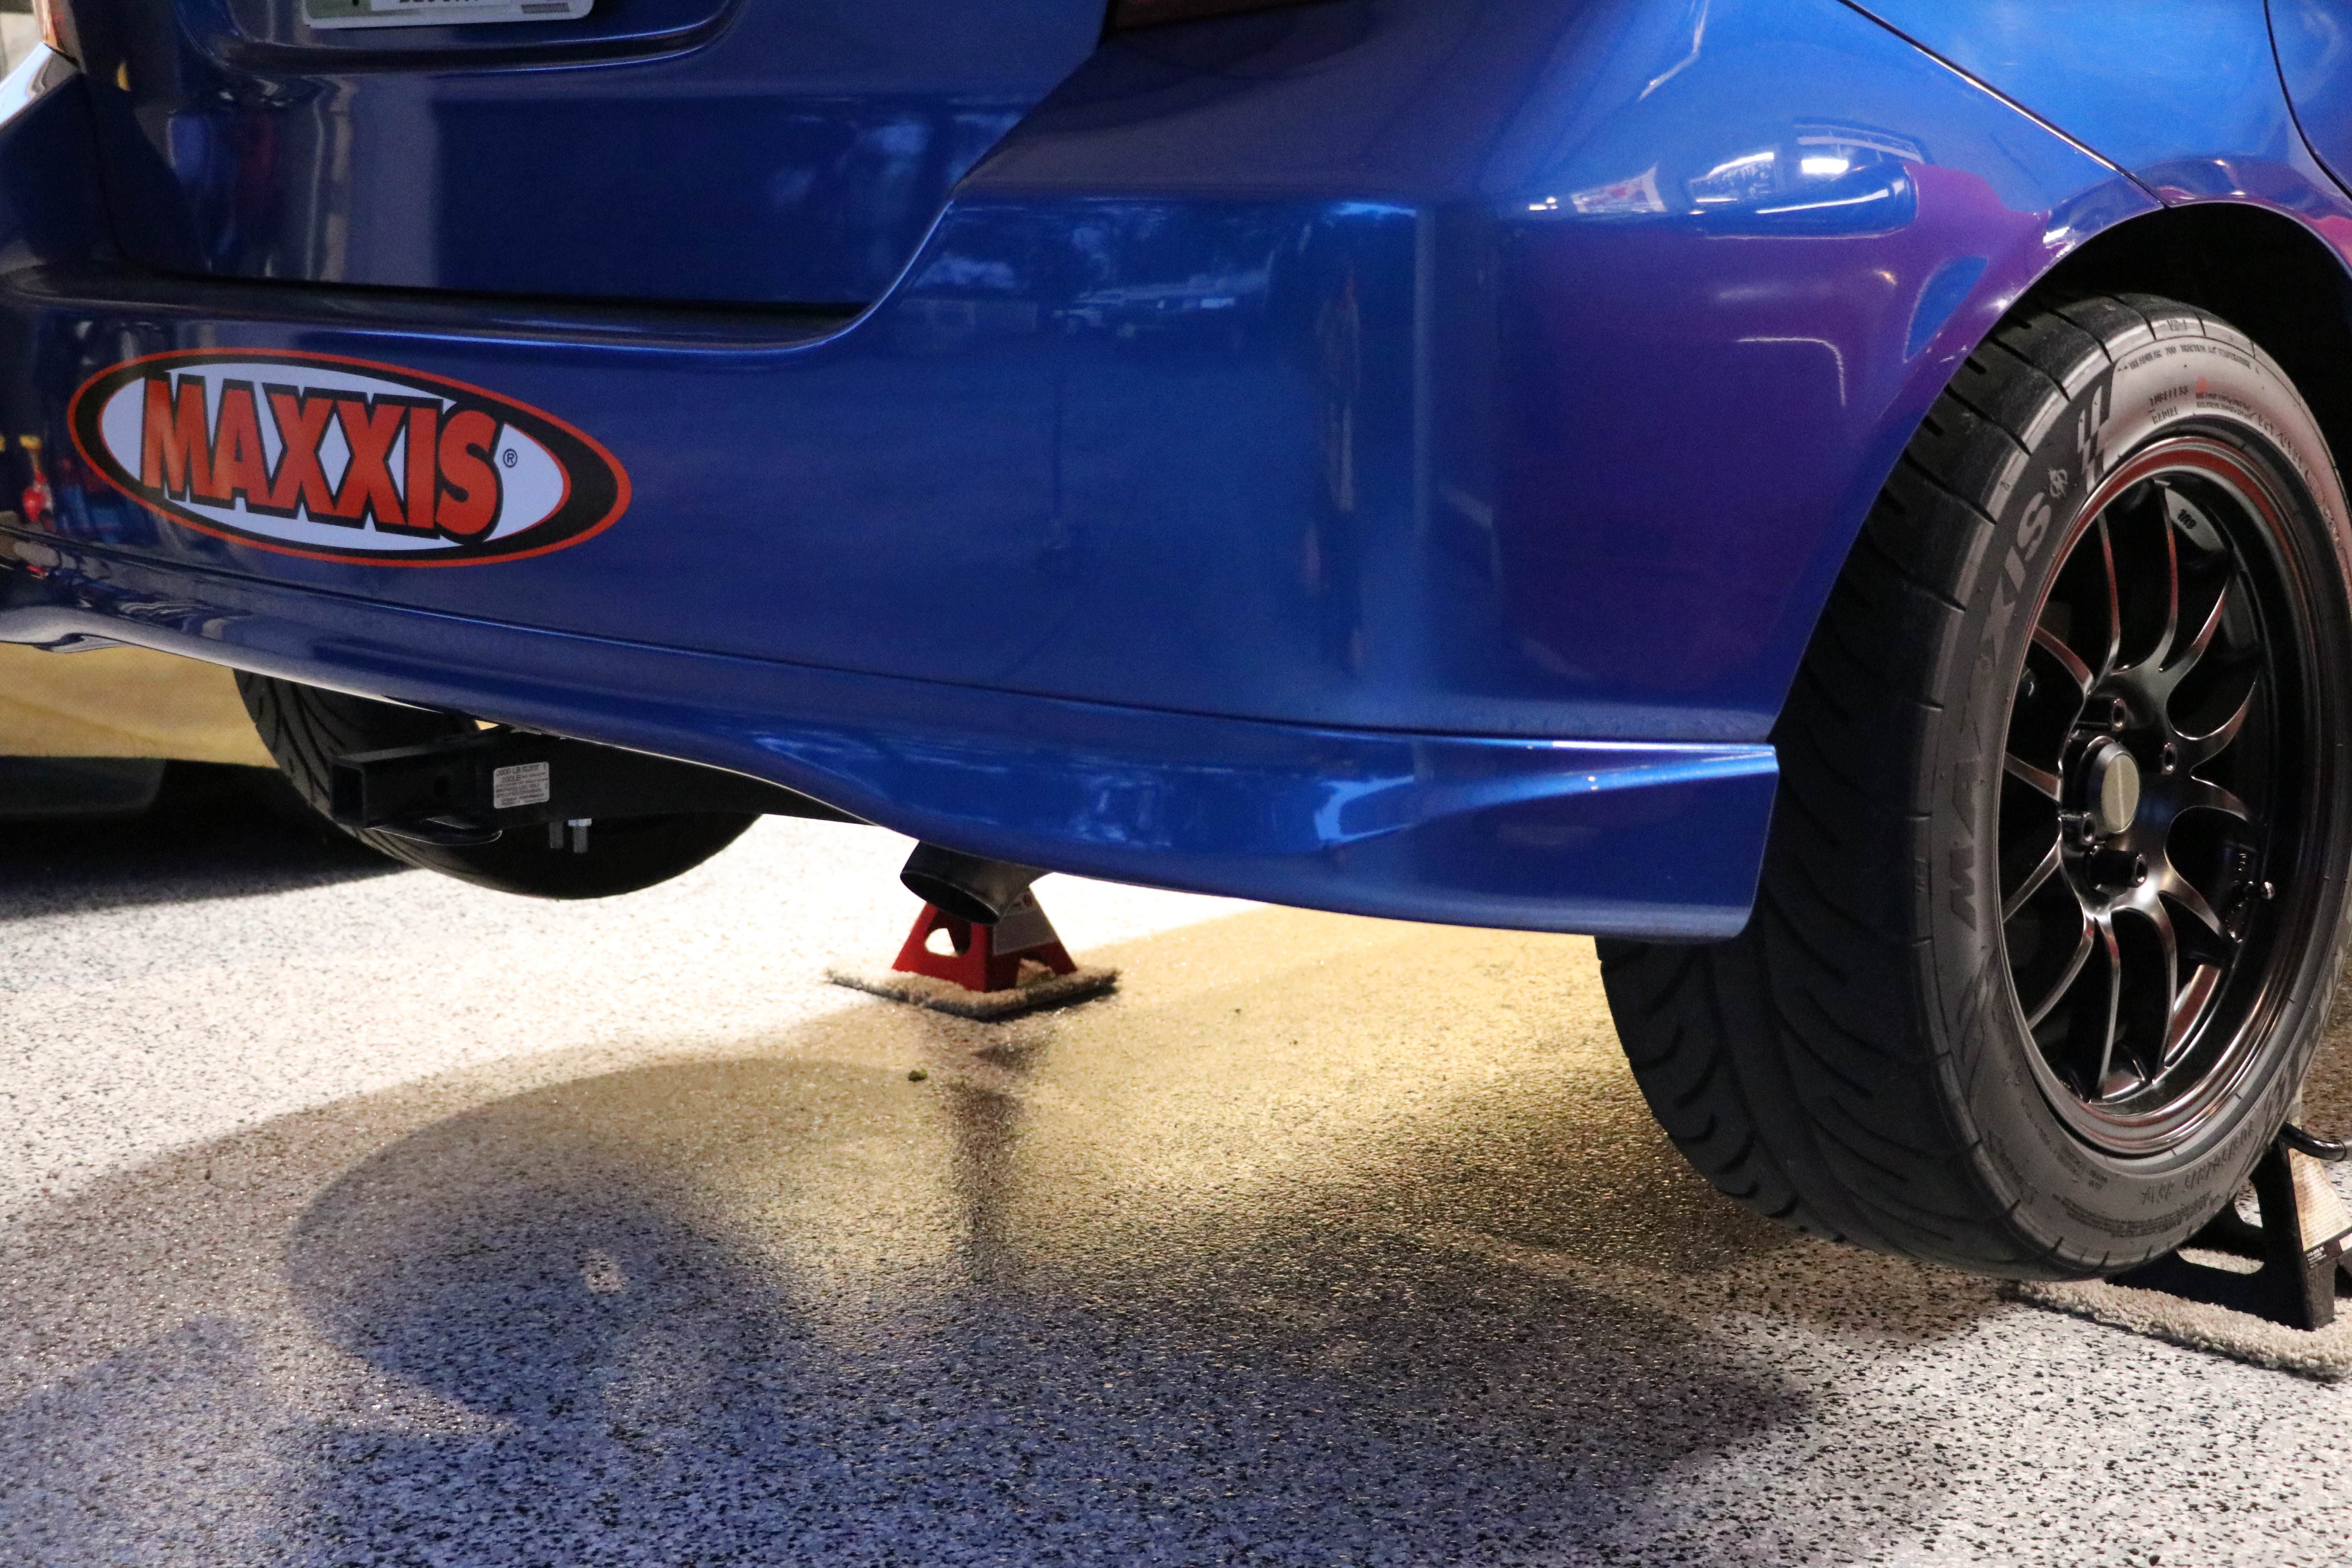
One thing I noticed at Mid-Ohio was I could barley hear the quiet little motor over wind noise and was missing shift points. Especially if other traffic was near by, I would find myself tagging the rev-limiter. So, while the Fit was on stands, I installed this simple muffler delete. Another custom piece by Seamus at TCS that use the factory style ball flange/gasket and spring bolts. Took two minutes to install and actually sounds awesome. I originally only planned to use it at the track; but, there is no noticeable drone and its quiet at low rpm so I haven't removed it.
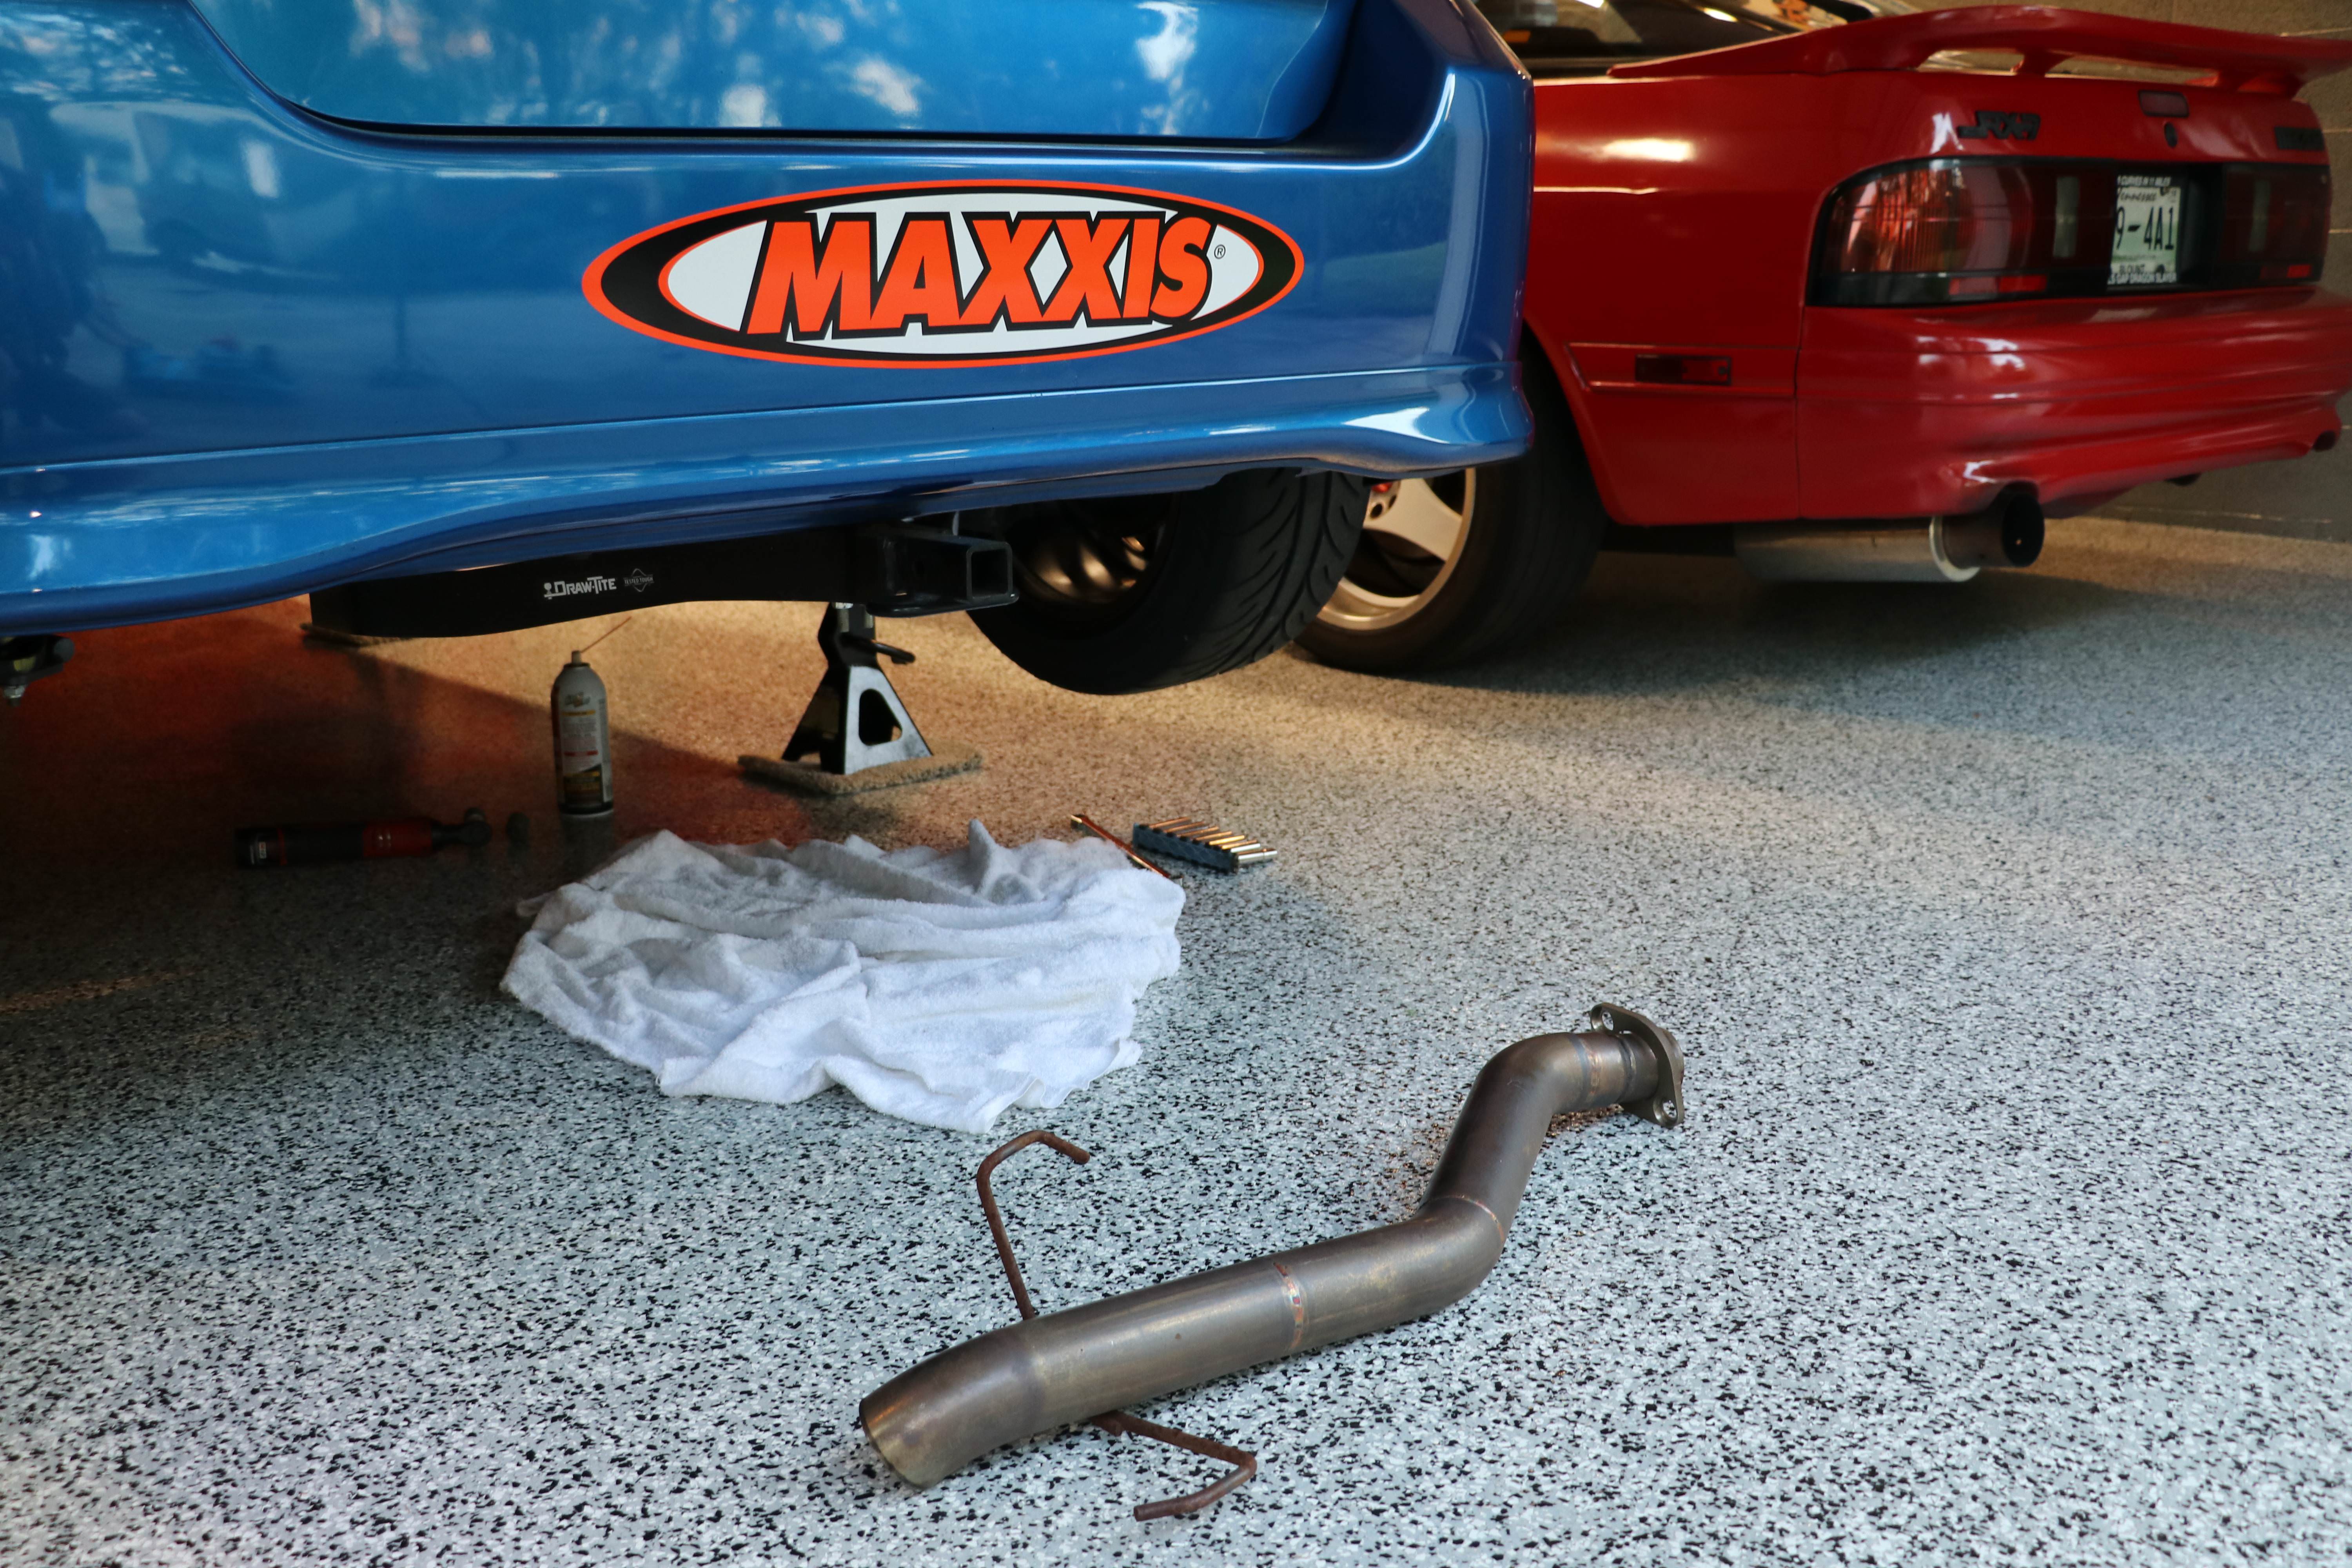
I tried to weight it but it wouldn't register on my scale, lol.
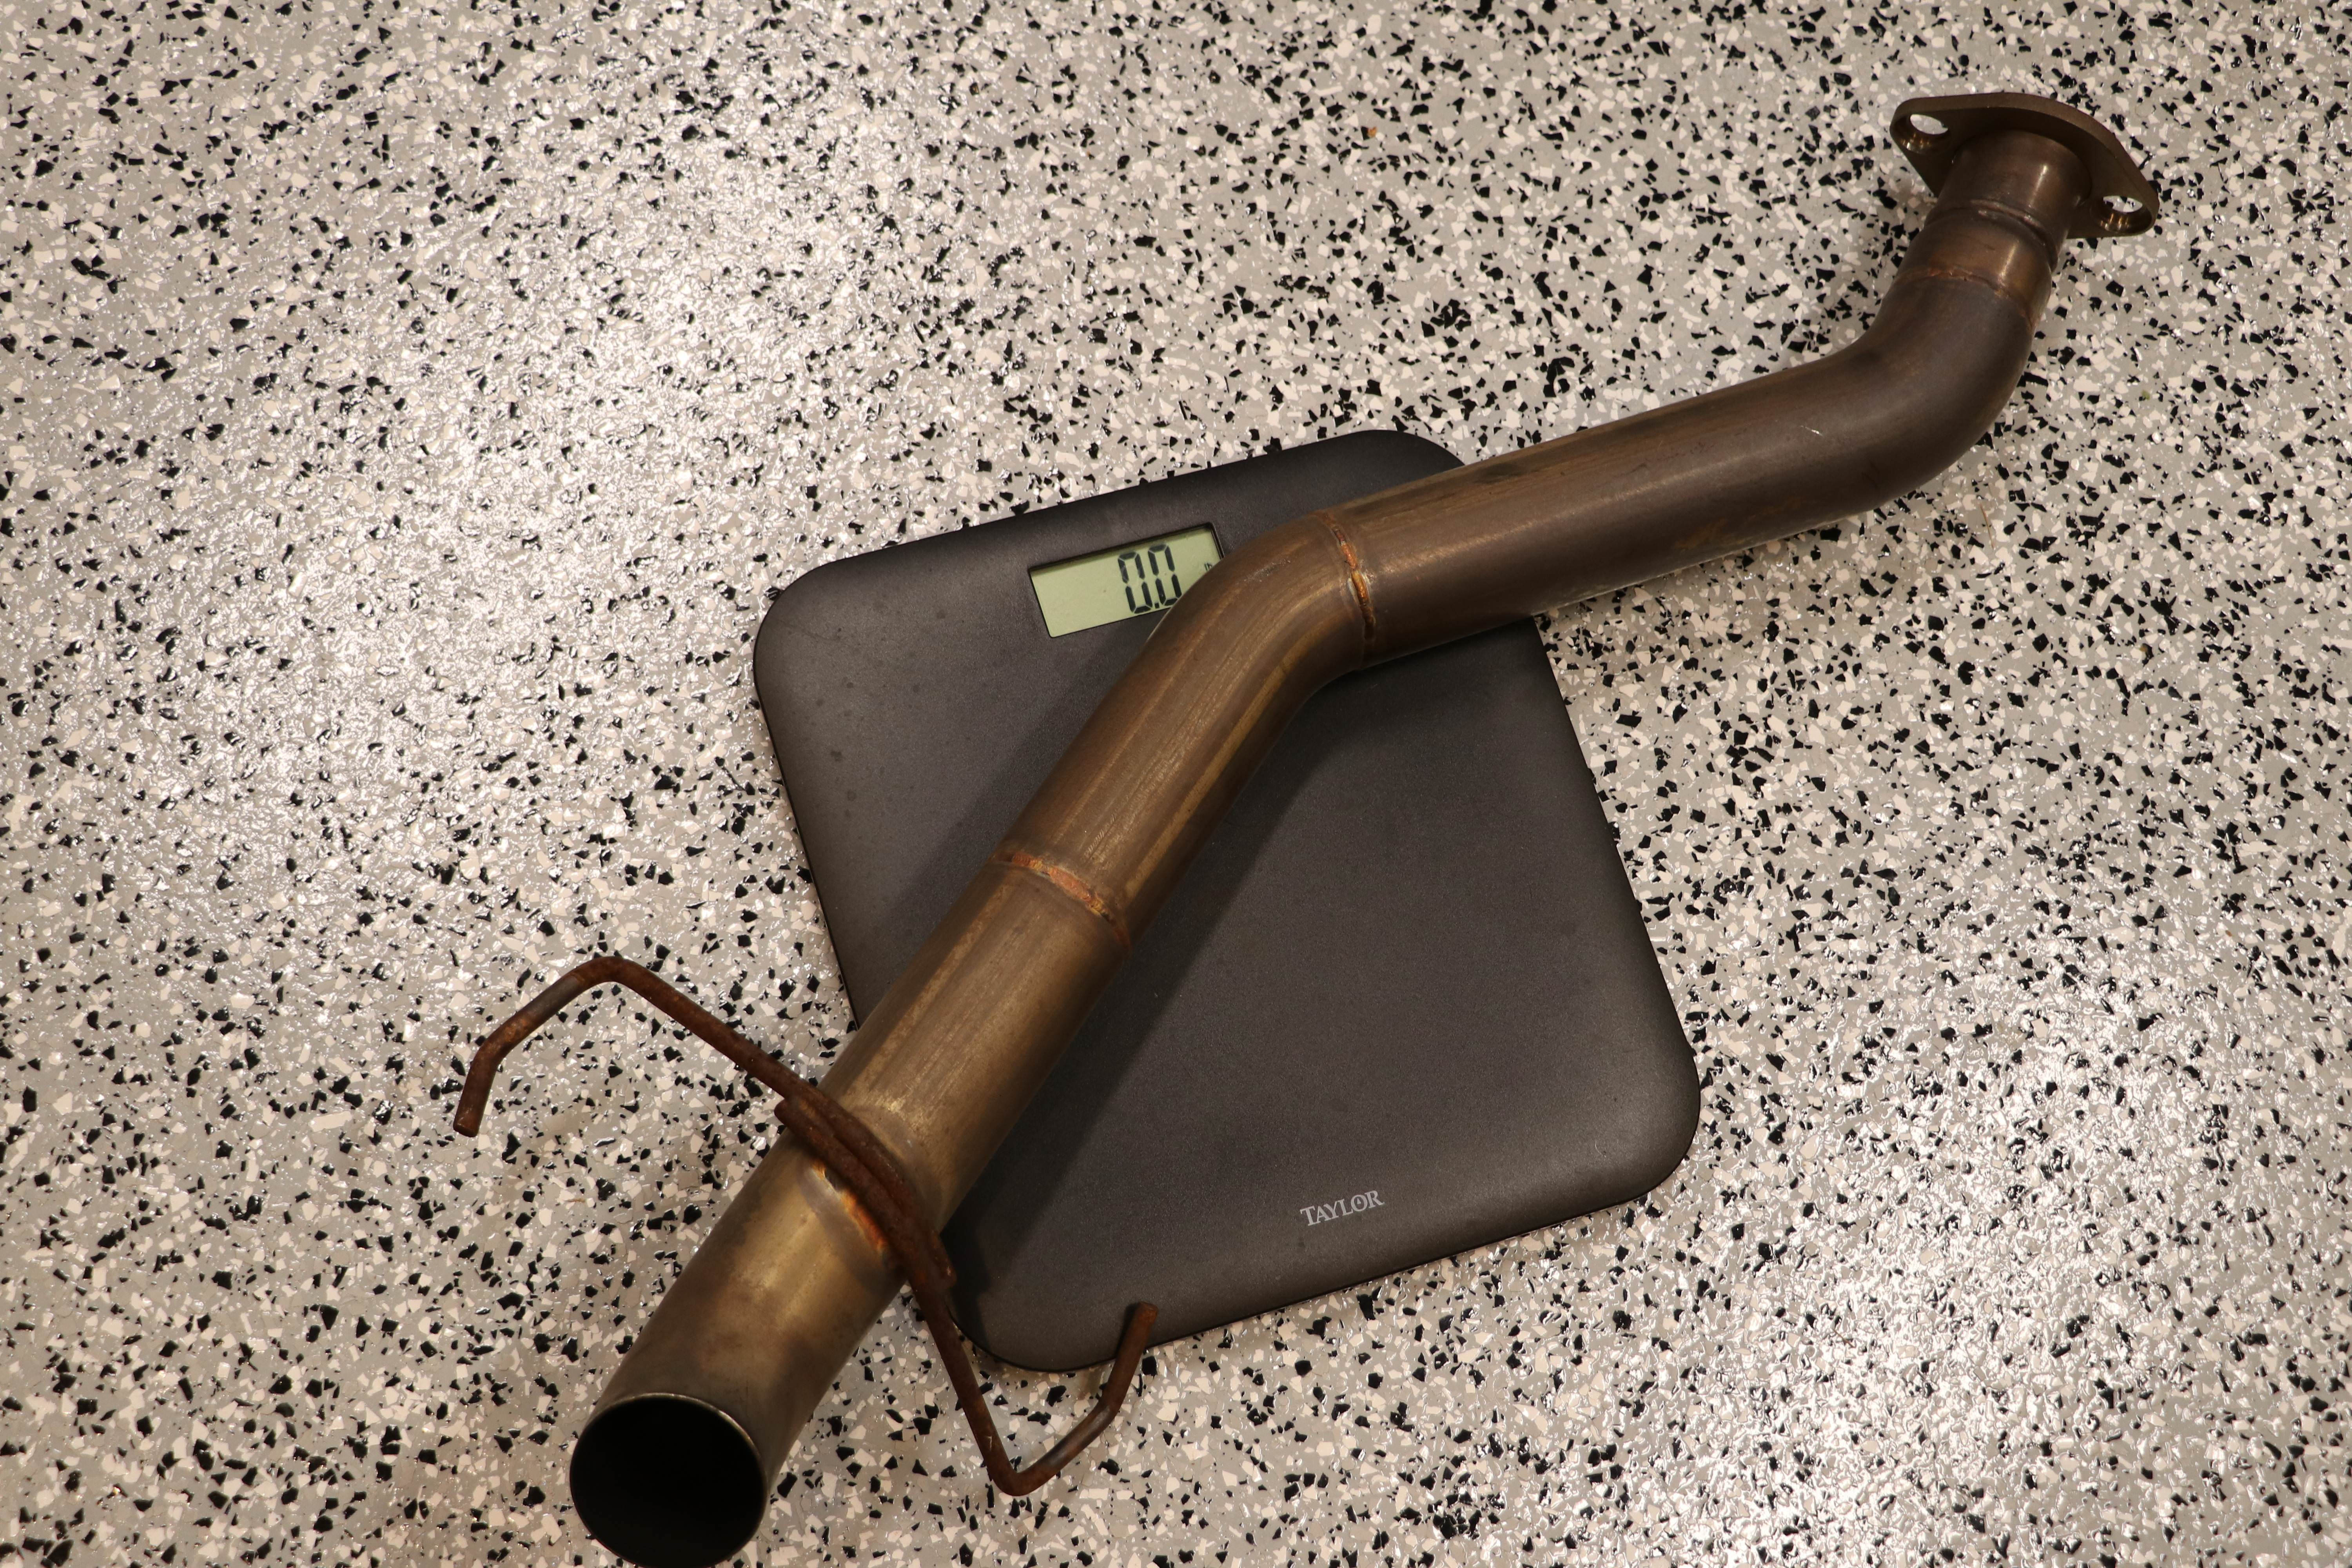
It fits up high and clean...
I tried to weight it but it wouldn't register on my scale, lol.
It fits up high and clean...
Thread Starter
|
Member
Joined: Sep 2017
Posts: 27
From: Knoxvegas, TN
With all that completed I did a quick height adjustment and re-corner balance before heading out for an alignment.
That is a really good result for a FWD car with less than 1/4 tank.
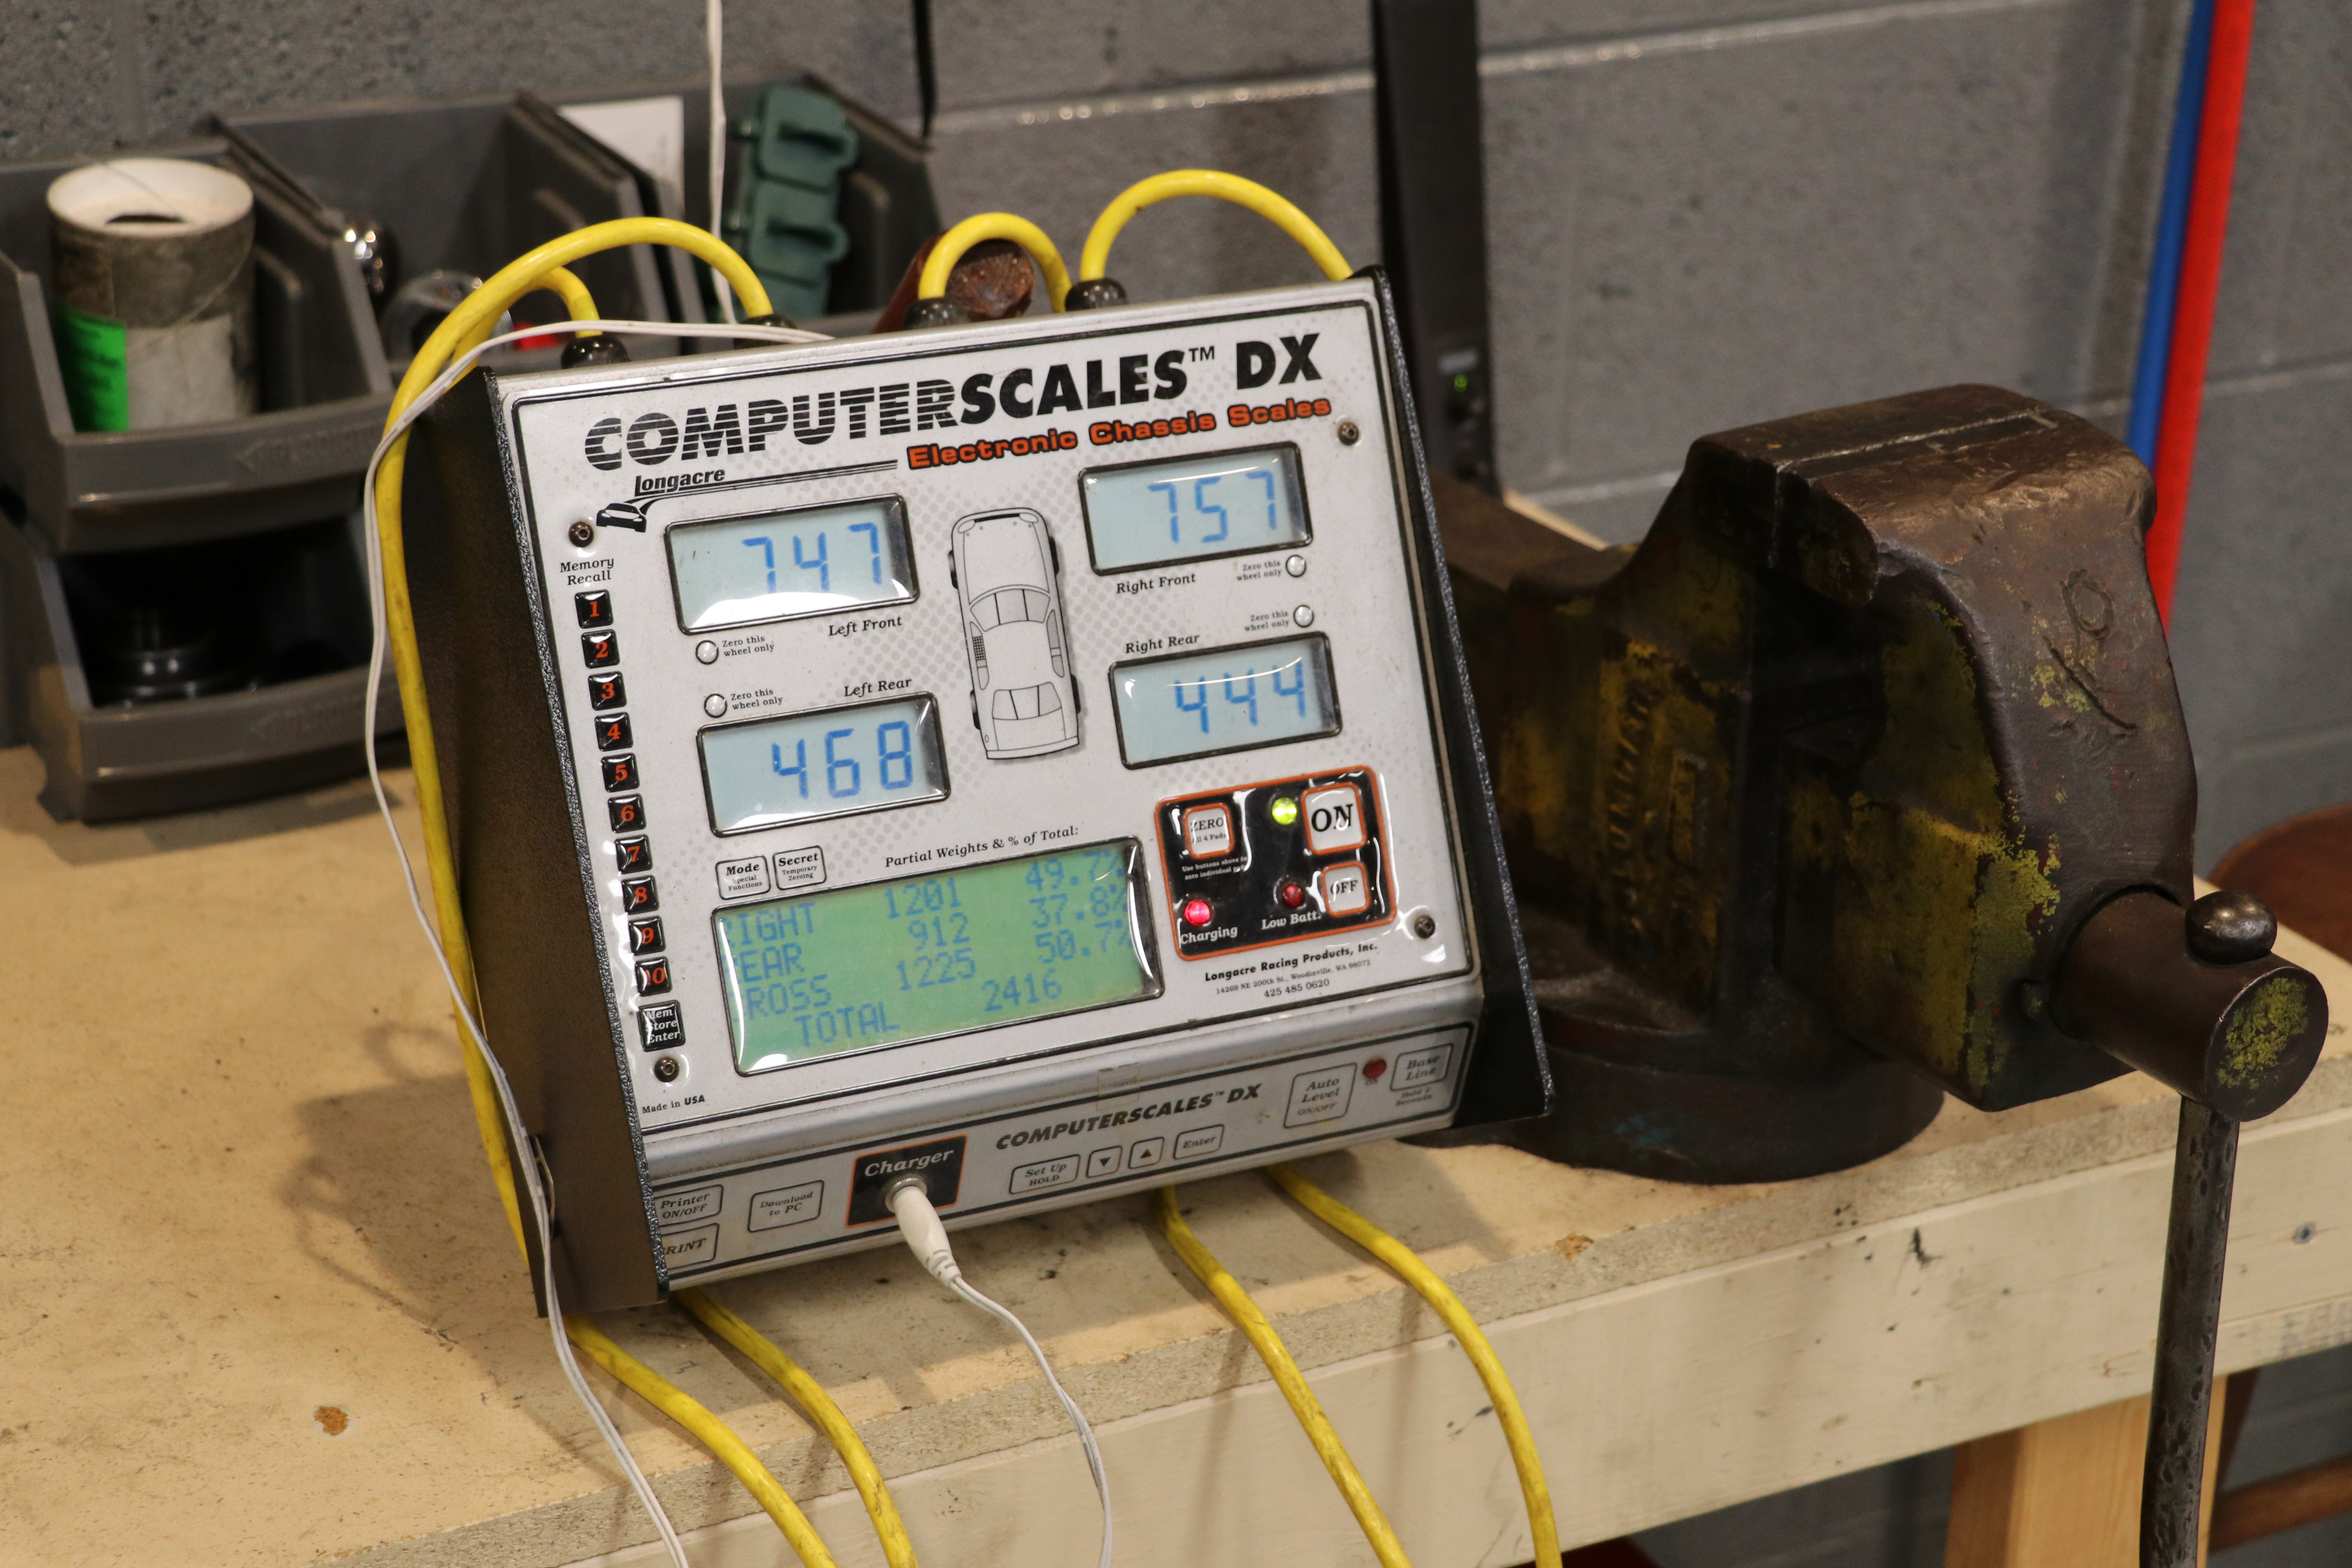
I took the Fit up for a quick shake down and then re-torqued the top-hats and everything else I touched.
Now it was time to hit the road for Gridlife Midwest Festival!!!
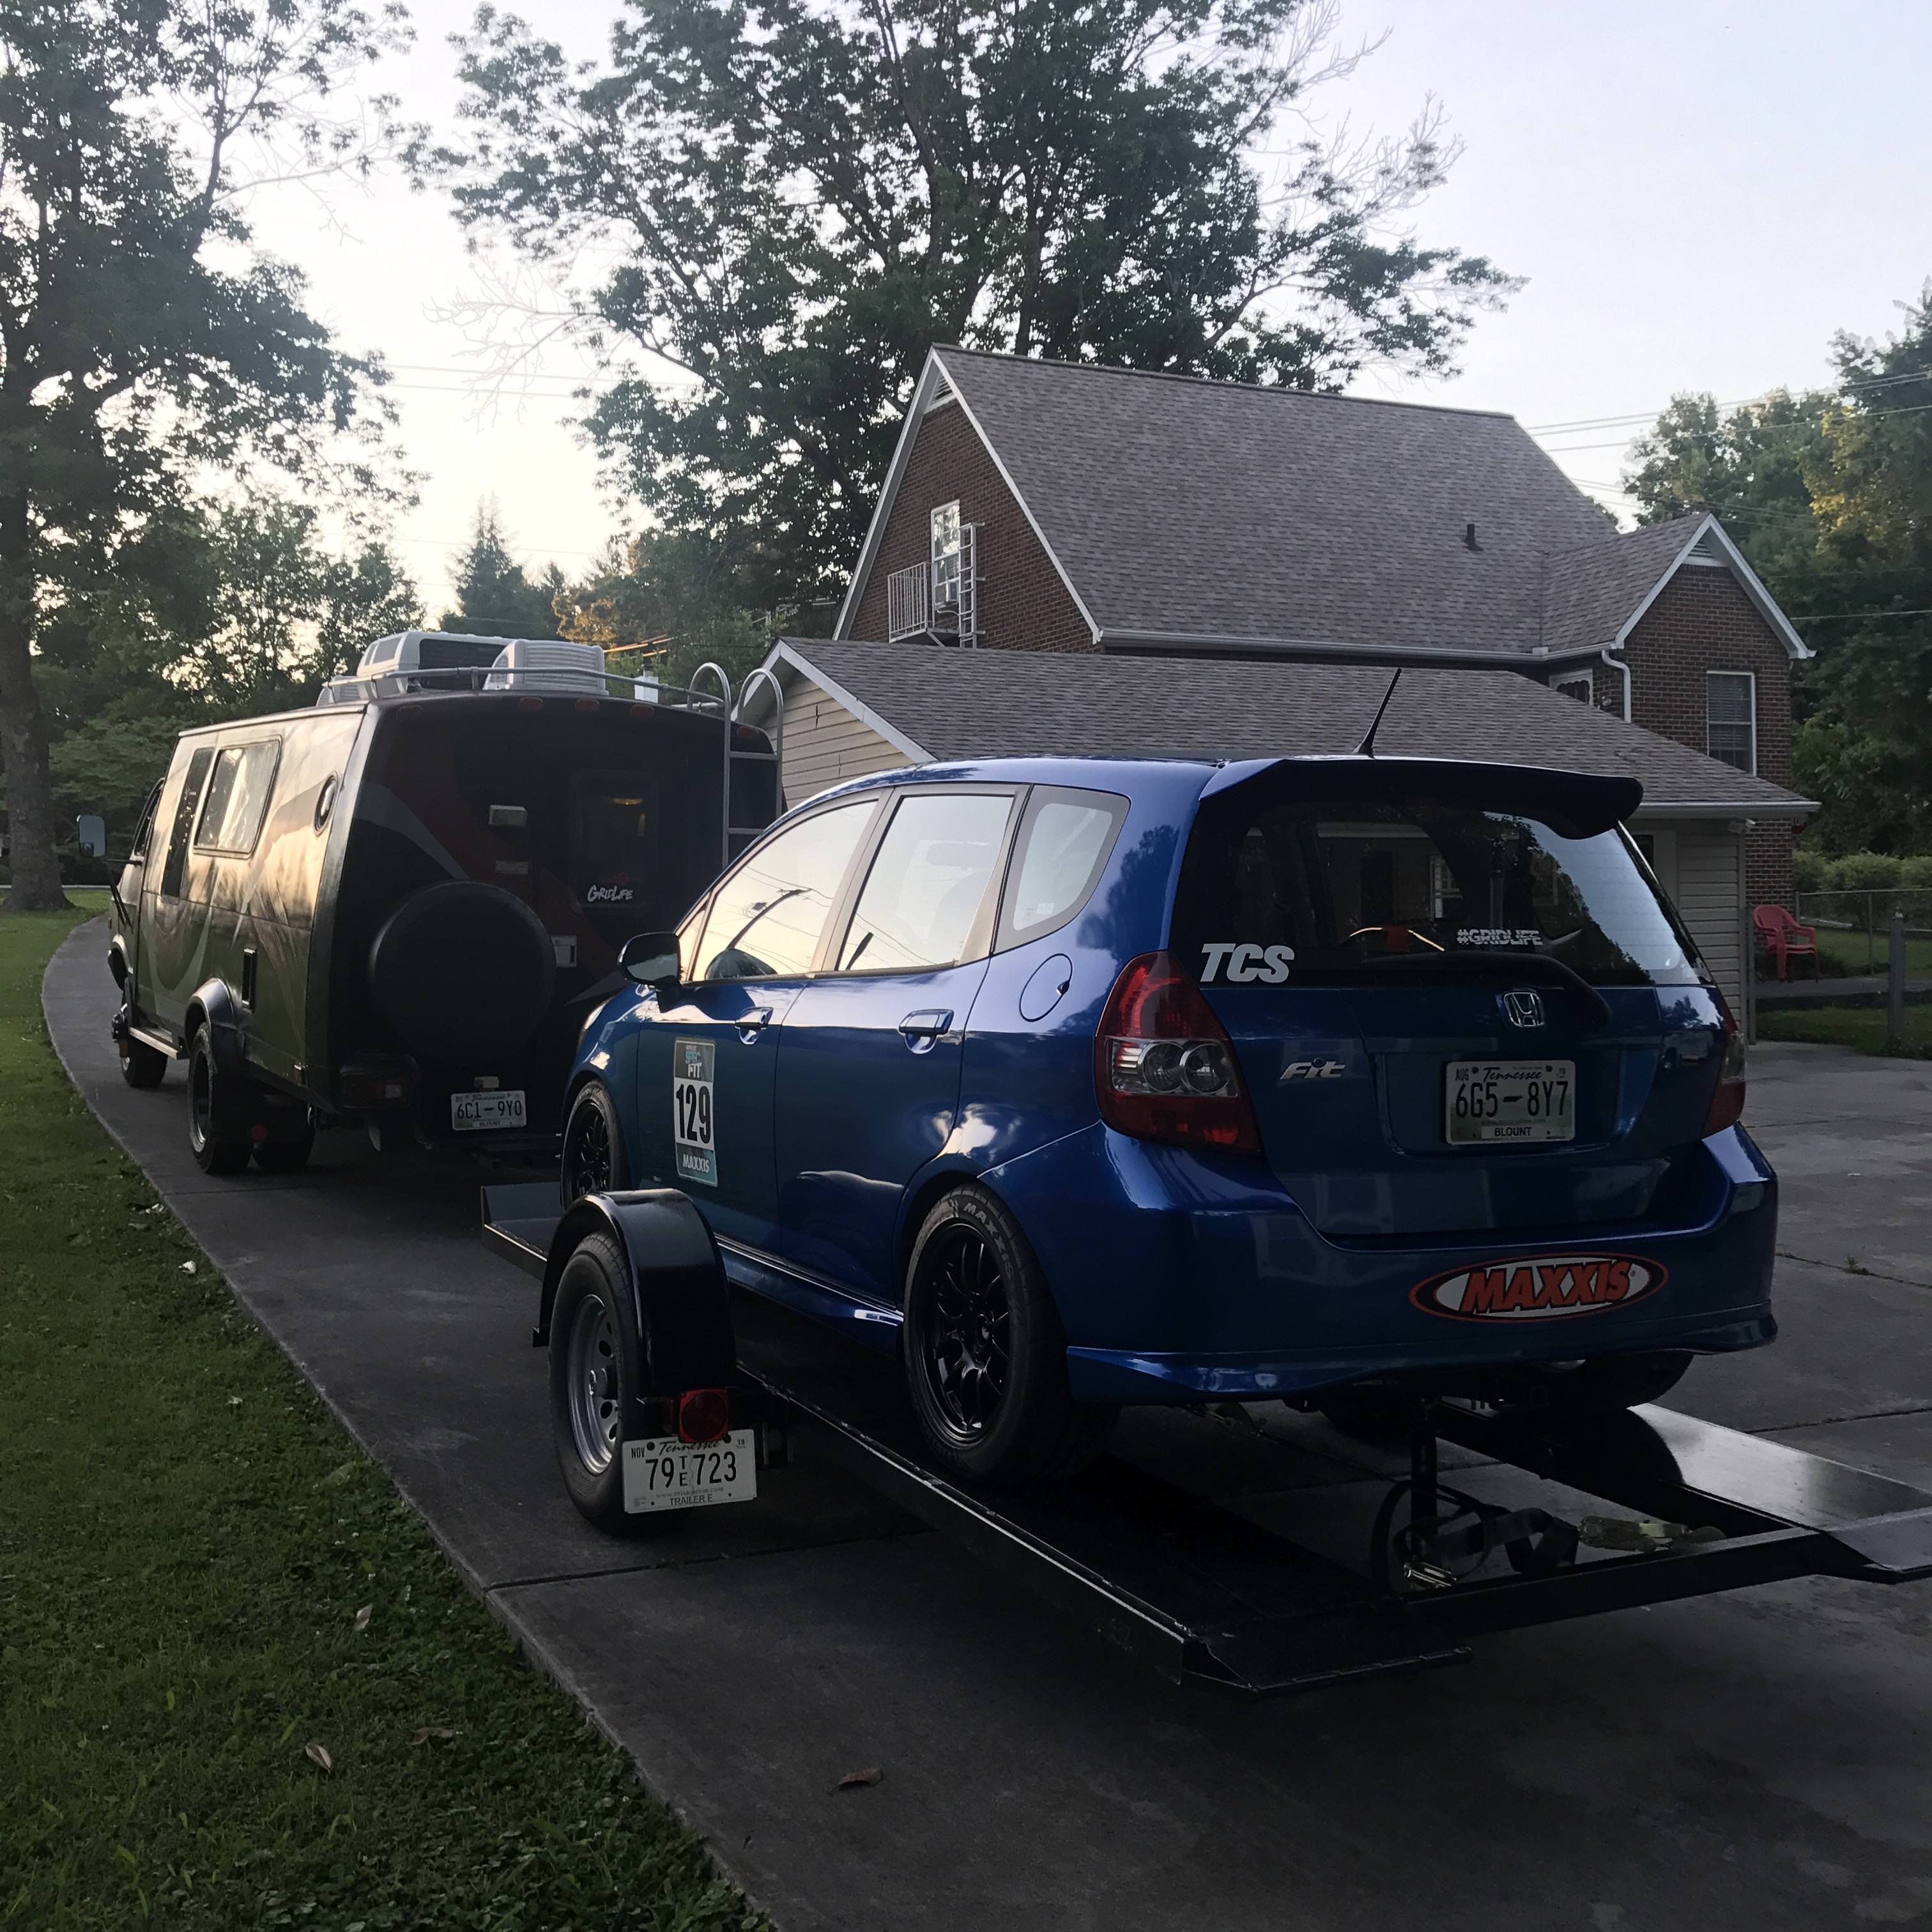
.......Full event report soon.
That is a really good result for a FWD car with less than 1/4 tank.
I took the Fit up for a quick shake down and then re-torqued the top-hats and everything else I touched.
Now it was time to hit the road for Gridlife Midwest Festival!!!
.......Full event report soon.
Last edited by Revhappymatt; Jun 9, 2020 at 08:21 PM.
Member
Joined: Feb 2008
Posts: 4,329
From: Cleveland, GA
Wow! Great stuff! Definitely not a modification for the faint of heart.
I don't know if the plates will strengthen the shock tower or put more stress on it, but wanted to just give a heads up. Back in the day we had a few people with weld point failures on the shock towers when running coil overs with aggressive spring rates. Those plates appear to be within the weld points that were failing, so may be something you want to inspect from time to time. I can see it would be a problem that you could address easily. If my memory is correct, the problem was more common in the North where there could have been corrosion issues and definitely more pot holes to avoid.
Thanks for the update! Love to see what can be done.

