
Arrggh, A/C condenser needs replacing


Member
Joined: Feb 2009
Posts: 204
From: Santa Clarita, Ca
That's a helluva lot cheaper than the aluminum mesh they sell. It may break on a good impact but it would slow the rock down  I think it would have to be a good golf ball sized rock though...
If it's real brittle and you can snap it with your fingers then it won't be much good...if it has good elasticity it should work fine.
Let us know...And yes, McMaster Carr does rock! They have a local warehouse here in Cali and anything in stock is delivered the next day to my shop.
I think it would have to be a good golf ball sized rock though...If it's real brittle and you can snap it with your fingers then it won't be much good...if it has good elasticity it should work fine.
Let us know...And yes, McMaster Carr does rock! They have a local warehouse here in Cali and anything in stock is delivered the next day to my shop.

Guys: This stuff is not brittle... it's impossible to 'tear it' with your bare hands, and I can even fold it in half and crease it, and it won't snap. I think for this purpose it will be just fine. Not as strong as a steel mesh, but should be more than enough imho. We'll see... I will be installing it over the weekend.
It was $10 shipped for BOTH meshes...!
It was $10 shipped for BOTH meshes...!
Last edited by justintime; Apr 30, 2011 at 03:06 PM.
Member
Joined: Feb 2009
Posts: 204
From: Santa Clarita, Ca
Guys: This stuff is not brittle... it's impossible to 'tear it' with your bear hands, and I can even fold it in half and crease it, and it won't snap. I think for this purpose it will be just fine. Not as strong as a steel mesh, but should be more than enough imho. We'll see... I will be installing it over the weekend.
It was $10 shipped for BOTH meshes...!
It was $10 shipped for BOTH meshes...!
Shots of the backside of the grill would be great (providing you remove it of course).
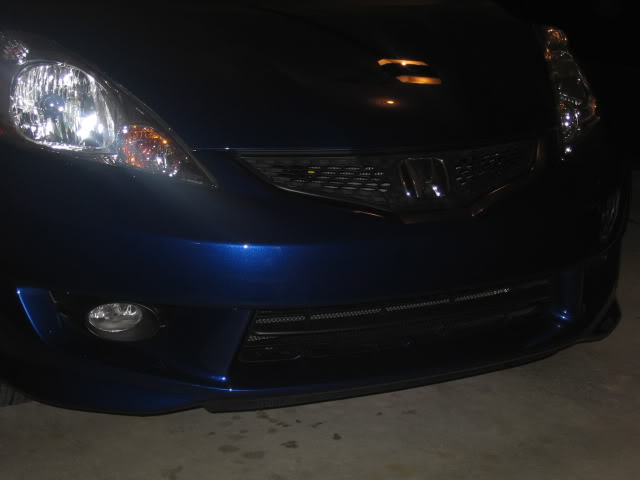
OK I went ahead and completed the mesh install using McMaster Carr's mesh. Awesome and easy!
Black plastic mesh purchased here for cheap: McMaster Carr plastic mesh 0.26" x 0.26"
You only need 1 foot, but get 2 ft in case you mess up... this stuff is cheap!
1. Open hood.
2. Remove top plastic cover (~ 8 clips or so).
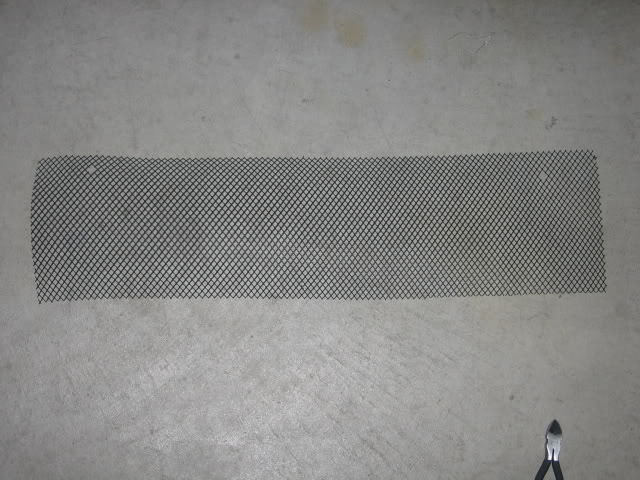
3. Cut the mesh to 8" x 32".
4. Open up 2 spots on the mesh so the bottom clips of the grill can be used to attach it. (approx 25 1/2 inches apart, maybe 26 inches.)
5. Remove the 2 clips at the bottom of grill, and put mesh in place, then put clips through mesh onto bumper base.
6. Use black zipties to contour/attach the mesh in place.
7. Replace top cover.
Total cost would about $8 shipped for the mesh and 45 mins install time.
Pics:
8x32 mesh cut to size:
open section for clip (closeup). Approx 25 1/2 inches apart, maybe 26 inches.
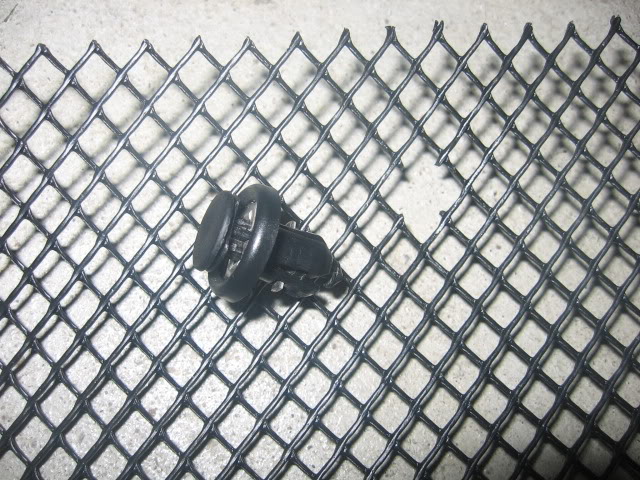
Top view, mesh fastened by clip
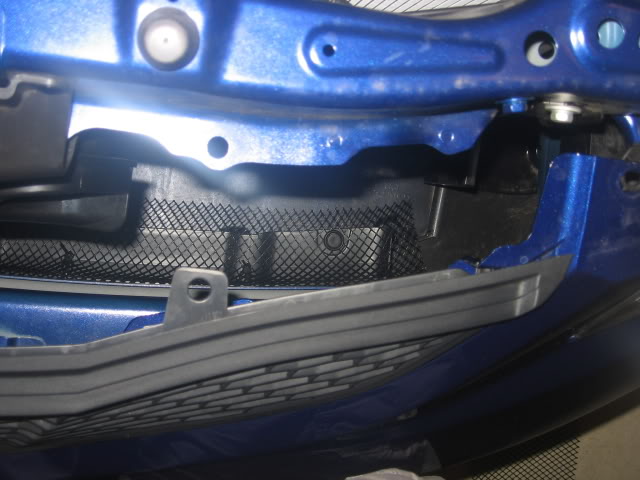
Zipties all around

All done
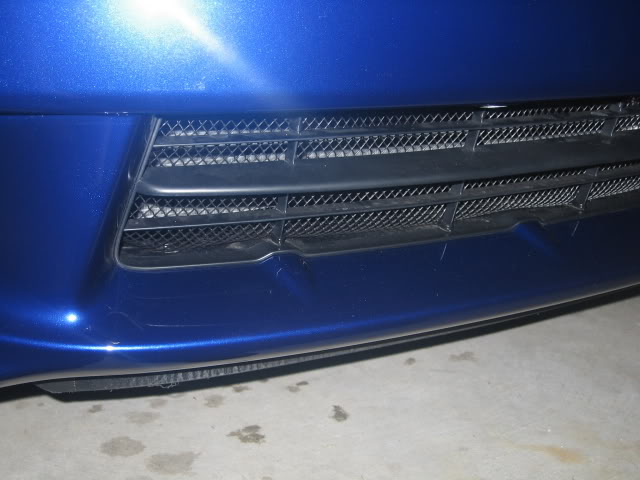
Can't see it
Black plastic mesh purchased here for cheap: McMaster Carr plastic mesh 0.26" x 0.26"
You only need 1 foot, but get 2 ft in case you mess up... this stuff is cheap!
1. Open hood.
2. Remove top plastic cover (~ 8 clips or so).
3. Cut the mesh to 8" x 32".
4. Open up 2 spots on the mesh so the bottom clips of the grill can be used to attach it. (approx 25 1/2 inches apart, maybe 26 inches.)
5. Remove the 2 clips at the bottom of grill, and put mesh in place, then put clips through mesh onto bumper base.
6. Use black zipties to contour/attach the mesh in place.
7. Replace top cover.
Total cost would about $8 shipped for the mesh and 45 mins install time.
Pics:
8x32 mesh cut to size:
open section for clip (closeup). Approx 25 1/2 inches apart, maybe 26 inches.
Top view, mesh fastened by clip
Zipties all around
All done
Can't see it
Last edited by justintime; Jun 22, 2009 at 08:20 PM.

If anyone else goes through my install, please comment on how well it works for you. Also, measure the distance between the holes for the clips... I forgot to do that. I can update the instructions above with the distance if someone chimes in.

Member
Joined: Sep 2008
Posts: 134
From: Oklahoma
I put a painted, trimmed plastic rain gutter across the 'gap' today. Zip ties to hold. The Scan Gauge water temperature stays around 179-184 degree most of the time, mostly near 179, with a/c and the outside temperature rising. On a short trip after the install the temperature was in the same range, 179-181 degrees. So far so good.
Update: 28 Jun 09 So far maximum seen is 184 degrees.
Update: 28 Jun 09 So far maximum seen is 184 degrees.
Last edited by pharmpk; Jun 28, 2009 at 12:22 PM.
Member
Joined: Aug 2008
Posts: 73
From: Davis, CA
Another victim of damaged condenser here. $700 to fix it. I'm so flipping pissed.
Looks like I'll be doing one of these grill protector DIY's. Can't view the pics while at work but I'll check them out when I get home. Need something cheap and fast.....
Glad this thread was here. A big thanks to all the contributors.
Looks like I'll be doing one of these grill protector DIY's. Can't view the pics while at work but I'll check them out when I get home. Need something cheap and fast.....
Glad this thread was here. A big thanks to all the contributors.
Member
Joined: Sep 2008
Posts: 134
From: Oklahoma
So far (just a couple of local trips with a/c) no difference. Scangauge temperature ranges between 179 and 184 (before and after).

Just ordered a couple feet. Will let you know how it goes, thanks. +1
New Member
Joined: Jun 2009
Posts: 16
From: Atlanta, GA
The measurement between the two clips is 25 1/2" on center however, for the purpose of adding mesh material, the span is slightly concave so 26" is more like what I came up with. Your pics were a great help when I tore into mine this afternoon. I just experimented with some plastic mesh I had laying around and it turned out OK. I'll probably order the mesh you recommended, looks better than what I was using. I found it easier to just remove the lower grill completely, apply the mesh, re-install. Thanks for the help...
Great, glad my pics were of some help  The mesh I recommend seems pretty damn tough for a plastic material. I've driven for a few days and see no damage. but I do see a lot of 'stuff' trapped by the mesh Including some small rocks and asphalt chips... I just kind of brushed them away to see WHAT they were when I was inspecting... bottom line, seems to be doing its job. I am sure a large enough rock at high speed will rip through it, but hey, we can't prevent every damn thing!
The mesh I recommend seems pretty damn tough for a plastic material. I've driven for a few days and see no damage. but I do see a lot of 'stuff' trapped by the mesh Including some small rocks and asphalt chips... I just kind of brushed them away to see WHAT they were when I was inspecting... bottom line, seems to be doing its job. I am sure a large enough rock at high speed will rip through it, but hey, we can't prevent every damn thing!The measurement between the two clips is 25 1/2" on center however, for the purpose of adding mesh material, the span is slightly concave so 26" is more like what I came up with. Your pics were a great help when I tore into mine this afternoon. I just experimented with some plastic mesh I had laying around and it turned out OK. I'll probably order the mesh you recommended, looks better than what I was using. I found it easier to just remove the lower grill completely, apply the mesh, re-install. Thanks for the help...
Member
Joined: Feb 2009
Posts: 204
From: Santa Clarita, Ca
I've got a lower grill on order with Bernardi Honda so I can play with different designs and not drive around with a gaping hole down below. Of course all you guys that have gone with DIY mesh are gonna be a tough sell for anything I come up with
I'm tinkering with the notion of parts that will snap right in using the lower clips and others that are basically shrouds that cover the entire condenser, well behind the grill that you won't be able to notice. There are three holes running below the condenser that will accept the same kind of clip used on the lower grill/upper grill/top shroud. The challenge will be to make them inexpensive and easy to install...
This thread has progessed well into not worrying too much if there will be interest, unfortunately so for some I kinda thought it was a bit overblown at first but realisticly, the mods you guys have done are cheap insurance and in some cases some cool looking mods...
And thanks again jimbob for tips on removing the lower grill...
I'm tinkering with the notion of parts that will snap right in using the lower clips and others that are basically shrouds that cover the entire condenser, well behind the grill that you won't be able to notice. There are three holes running below the condenser that will accept the same kind of clip used on the lower grill/upper grill/top shroud. The challenge will be to make them inexpensive and easy to install...
This thread has progessed well into not worrying too much if there will be interest, unfortunately so for some
I kinda thought it was a bit overblown at first but realisticly, the mods you guys have done are cheap insurance and in some cases some cool looking mods...And thanks again jimbob for tips on removing the lower grill...
I struggled to remove the lower grill... couldn't find anyone explaining the procedure on this forum. Any pointers, just out of curiosity please? I removed the 2 clips, and still nothing. Then I noticed some tabs, but after forcing for a while I decided to stop... I felt I was going to BREAK SOMETHING!!!
Member
Joined: Feb 2009
Posts: 204
From: Santa Clarita, Ca
I struggled to remove the lower grill... couldn't find anyone explaining the procedure on this forum. Any pointers, just out of curiosity please? I removed the 2 clips, and still nothing. Then I noticed some tabs, but after forcing for a while I decided to stop... I felt I was going to BREAK SOMETHING!!!
https://www.fitfreak.net/forums/2nd-...l-removal.html
jimbob explains it about as well it can be explained other than taking pictures and going step by step. Kinda surprised it took two days for someone to chime in so I guess it's not something that is commonly done...that or I pissed people off and they didn't want to help
New Member
Joined: Jun 2009
Posts: 16
From: Atlanta, GA
I'm tinkering with the notion of parts that will snap right in using the lower clips and others that are basically shrouds that cover the entire condenser, well behind the grill that you won't be able to notice. There are three holes running below the condenser that will accept the same kind of clip used on the lower grill/upper grill/top shroud. .
