
Arrggh, A/C condenser needs replacing

Member

Joined: Apr 2006
Posts: 831
From: Kentucky
I installed my mesh today. I used the black powder coated mesh with black zip ties and you don't even notice the mesh because its so dark.
I tried to take a pic but it was cloudy here today and the mesh was too dark to show up. I will try and take a picture later when its sunny out.
I tried to take a pic but it was cloudy here today and the mesh was too dark to show up. I will try and take a picture later when its sunny out.


Member
Joined: Feb 2009
Posts: 124
From: RTP, NC
Check for outdrive paint and the primer in a local boating supplies store or online from sources like West Marine, Overton's, and Boater's World. Here is a link to boat motor and outdrive paint, available in colors. Here is a link to zinc chromate primer.
Member
Joined: Feb 2008
Posts: 136
From: NY
The stuff used to prep powerboat aluminum outdrives for paint is zinc chromate. It may or may not be available now - I recall hearing something to the effect that the EPA wanted to retire it. For that matter, outdrive paint might be a good choice here for the final coat too - it's designed to hold up to being dragged through the water at speed. You generally won't want the antifouling paint used on boats in saltwater. It's designed to shed slowly so that barnacles can't stick to it.
Check for outdrive paint and the primer in a local boating supplies store or online from sources like West Marine, Overton's, and Boater's World. Here is a link to boat motor and outdrive paint, available in colors. Here is a link to zinc chromate primer.
Check for outdrive paint and the primer in a local boating supplies store or online from sources like West Marine, Overton's, and Boater's World. Here is a link to boat motor and outdrive paint, available in colors. Here is a link to zinc chromate primer.
The zinc chromate primer sounds promising. I was at the marine store yesterday looking for "foam applicator pads" for wax and such. Can't find them anywhere in this area. Only microfiber. Maybe it's too early in the season. Ended up buying them from Ebay.
I'll check back there for the primer.

Member
Joined: Nov 2008
Posts: 229
From: FL
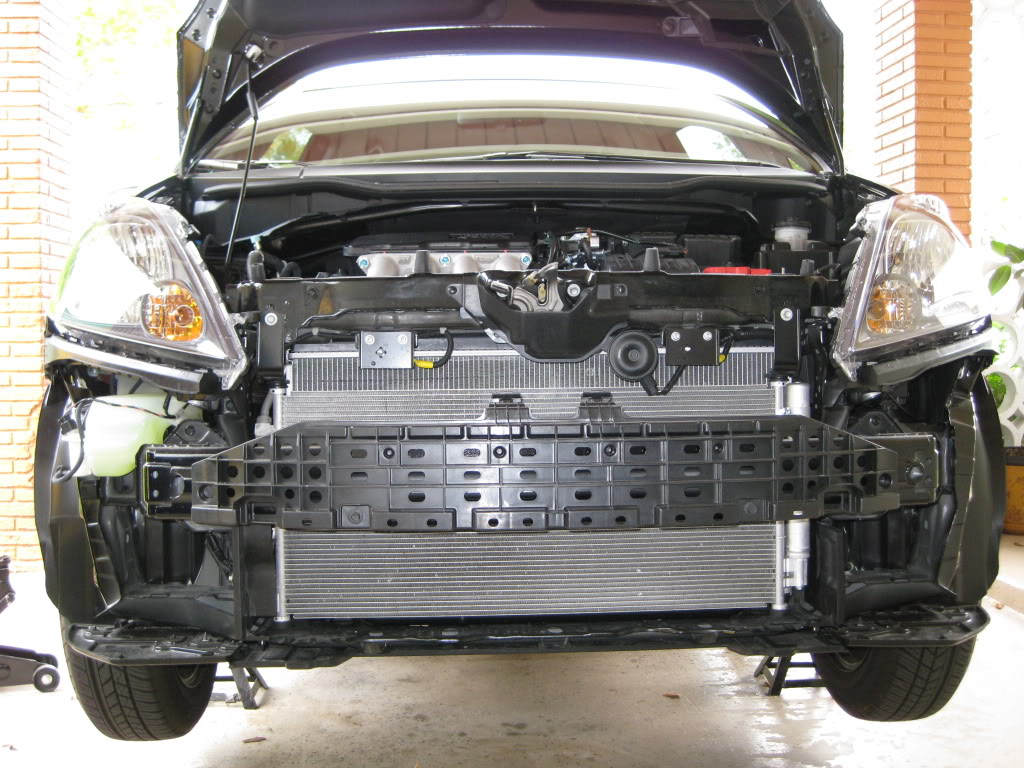
Well I got'r'done today. I should have done it while the car was on the jack stands yesterday (for the oil change) but I had to go out for dinner.
I could NOT do it without removing the bumper. I have 5,300 miles on the 09 Fit and already the condensor didn't look good.
I bought a gutter guard from Home Depot for 2 bucks. It's good enough to get the job done (I don't need something more fancy since the Fit is just my daily driver).
Here are some pics.
Member
Joined: Feb 2009
Posts: 157
From: Tampa, FL
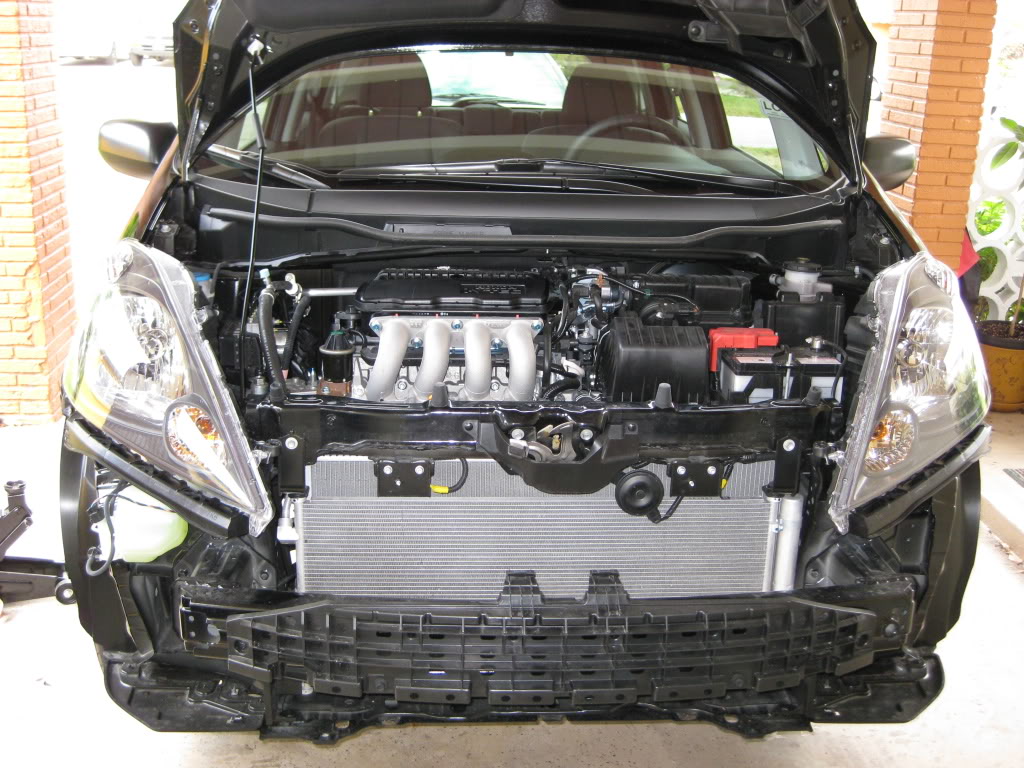
Well, you could have done it without removing the bumper. I too have the base model like you and did it with the bumper on. But I am sure I used some different techniques. Either way, the job is done and you condenser is saved. I noticed a pretty good size pit in it in one of those pics. I still can't believe how open Honda left this thing.
Member
Joined: Nov 2008
Posts: 229
From: FL
Well, you could have done it without removing the bumper. I too have the base model like you and did it with the bumper on. But I am sure I used some different techniques. Either way, the job is done and you condenser is saved. I noticed a pretty good size pit in it in one of those pics. I still can't believe how open Honda left this thing.
At first, I only removed the top radiator/ condensor cover. I guess that if I also removed the top grill (with the H logo), I would have been able to see more and reach in better, but I wanted to have this sucker on tight and it so much easier to do with the bumper off the car and resting on a towel on top of the grass.
I was not looking forward to removing the bumper at all, but I cannot imagine how "I" would have been able to make it tight, with all the right cuts in the right places without removing the bumper.
The good news is that removing the bumper is easy as removing the radiator cover. It took 3 minutes (and that's cause I went slow since I was afraid to damage it). However, on reinstall, I would recommend a second set of hands to hold the other side while you are aligning your side.


Member
Joined: Dec 2008
Posts: 354
From: Bay Area
yup. That's how I did mines. I just removed the lower grill. It's a bitch to get the bottom "clips" off, but it's almost identical to the top ones, so you can actually see the top ones as you are pushing the grill off. You have to push the grille back towards the condenser. It takes awhile, but it'll come off
Member
Joined: Apr 2007
Posts: 416
From: knoxville tn
yup. That's how I did mines. I just removed the lower grill. It's a bitch to get the bottom "clips" off, but it's almost identical to the top ones, so you can actually see the top ones as you are pushing the grill off. You have to push the grille back towards the condenser. It takes awhile, but it'll come off
Member
Joined: Dec 2008
Posts: 354
From: Bay Area
Then there are tabs that you need to press on and push the grille back at the same time. I'll see if i can take some pics of it and post it up tonight.
There are tabs on the sides and 4-5 tabs on the bottom and 5 tabs on top.
Member
Joined: Apr 2007
Posts: 416
From: knoxville tn
There are two plastic removable clips on the bottom like on the top grille that you have to pop off first.
Then there are tabs that you need to press on and push the grille back at the same time. I'll see if i can take some pics of it and post it up tonight.
There are tabs on the sides and 4-5 tabs on the bottom and 5 tabs on top.
Then there are tabs that you need to press on and push the grille back at the same time. I'll see if i can take some pics of it and post it up tonight.
There are tabs on the sides and 4-5 tabs on the bottom and 5 tabs on top.

New Member
Joined: Jan 2009
Posts: 12
From: canada
@sportMTnavi, the billet looks like a really good fix. was it custom "fitted", or did you have some work to do. if its a snap-in/bolt in, then could you provide manufacturer info, and model name/number? I do a huge amount of driving on secondary roads, and am happy to be made aware of the compressor issue 10k into ownership. many thanks

Member
Joined: Aug 2008
Posts: 364
From: baltimore, md
How did this grille install? Does it come with clips or fasteners? Is this the Mr Grille product with the metal supports between slats? BTW, very nice, though my first preference would be black. I was going to spend $40 for the black aluminum mesh delivered and insured. I think this is worth the $100 delivered, depending on how it installs. Thanks in advance for your response.


Member
Joined: Apr 2009
Posts: 26
From: Carrollton TX
I went to look at mine.. WOW it looked worse than the leaking one.
I went straight to a hardware store for the metal guttering mesh.
Looked into the plastic stuff and it was very easy to tear by two fingers stick with metal.
My 09 has 6k on it. I've damaged a condensor in the past and it doesn't take much.
If you don't want to replace it protect it.
I went straight to a hardware store for the metal guttering mesh.
Looked into the plastic stuff and it was very easy to tear by two fingers stick with metal.
My 09 has 6k on it. I've damaged a condensor in the past and it doesn't take much.
If you don't want to replace it protect it.

How did this grille install? Does it come with clips or fasteners? Is this the Mr Grille product with the metal supports between slats? BTW, very nice, though my first preference would be black. I was going to spend $40 for the black aluminum mesh delivered and insured. I think this is worth the $100 delivered, depending on how it installs. Thanks in advance for your response.
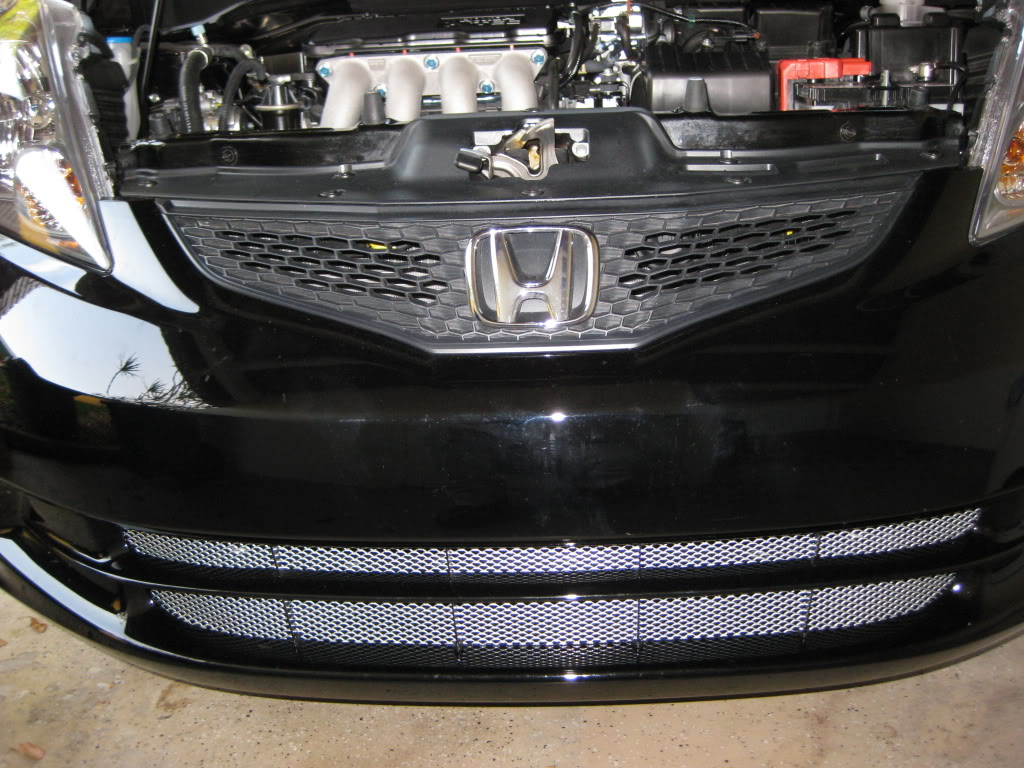
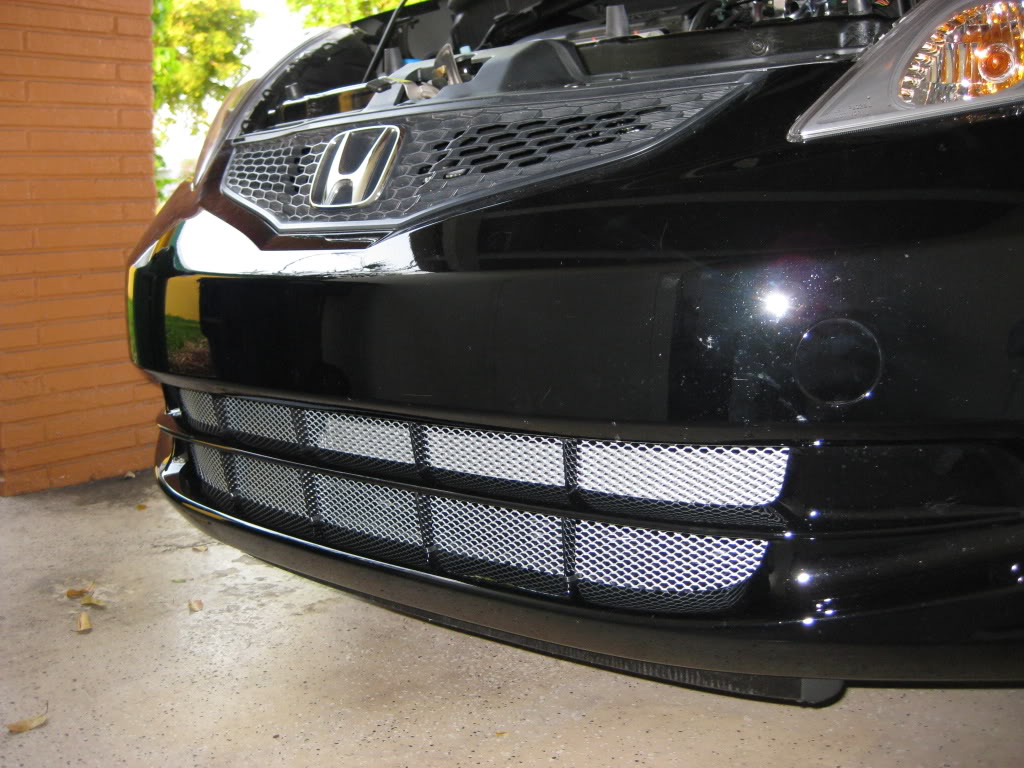
But I went to Home Depot and bought a whole bag of them. I ended up putting 8 on it.
It fastens externally over the old 'grille'.
As far as looks go -- I just washed the car today and it looks great! I'm not going to change a thing.

Member
Joined: Apr 2009
Posts: 353
From: SF Bay Area, USA

