
custom urethane motor/transmission mounts


So I ended up doing all the mounts but the passenger side. I bought Devcon's Flexane 80a in liquid form (2 part mix) for $50 and Flexane FL-10 metal primer for $20 From the local Granger. The primer will go a long way, you can do multiple cars mounts with the can. The can of urethane on the other hand does not go a long way you may get away with 2* cans but 3 would be the amount I would buy to do it again. With 3 cans you could do all 4 mounts.
DIY with pictures/material list:DIY solid motor mounts - a different approach - evolutionm.net (not me)
Using the Flexane 80a:
With the 1 can I had bought I planned to fill the rear mount and transmission mount. This pours nice but found its way through the tape at the bottom of the mount I used as a mold. By the time the product could set up and stop leaking I was left with 65% of the mount filled on both of them. Flexane is hard to get a hold of so I was forced to use 3M window weld from Autozone to fill the other 35% of the mount before it cured up. I also filled the bottom front drivers side mount with just the 3M window weld two days before.
Using the 3M window weld:
I do not recommend this stuff! You don't mix it you use a calking gun. It should work as intended but I found after 5 days of cure time it was still leaving black stuff on my glove if I touched them. I tried low heat in the oven for one day. I read that they will cure up faster in a bucket of water. I did the bucket of water for two days (on top of 2 days in the sun and 1 in the oven) and while they felt solid they would still leave your hands a mess. Use rubber gloves and make sure to pack the stuff into the mount because it is THICK and will not do it on its on like Flexane will.
Installed/Driving thoughts:
I've driven the car to work and back now for two days since the mounts were installed. Lots of vibration on warm up, some vibration all through acceleration and deceleration. The car is louder in that the exhaust and motor sound like they are in the car with you!
The good:
solid turn in
solid launches
solid up and down shifts
no more bucking between shifts from motor rock
exhaust sounds much better now?
The bad:
to much vibration for most with 80a in a street car
cabin is louder
Final thoughts:
I would buy the mounts from Inovate in the 60a If I were to do it again. after doing 80a I can tell you 60a will be plenty stiff(I thought it would be to soft for my needs). Keep in mind I did the front lower mount that is not included with the Inovate set. They do give you the passenger side mount that I didn't do though. If you are dead set on doing them yourself keep in mind that you will be spending a little over $200 with your car down for 5 days with removal/cure/install. In the end I think I've missed the goal with my car of pushing it as far as possible while keeping it 100% comfortable on the street. These ended up just a little too stiff but we'll see what the wife says.
- My advise for anyone thinking of doing them on your own on a street car would be to get the Flexane FL-20 primer for rubber to urethane and 2 cans of 60a this would be about $120. Leave the rubber in the mounts, just clean them and apply the primer. tape off one side and pour the 60a flexane in. You will be able to do the same 3 mounts that I did. This will leave you with the stock rubber in the passenger mount. This should be the perfect set of mounts for a street car IMO. I'd do this If I had a set of stock mounts but I'll be out to much money If I buy another set.
- The last piece of advice I want to share is no matter what you decide to do, be prepared to hate life getting the rear mount in and out on a manual!!! If you've seen pictures from another forum member installing the rear on his auto you will see that the outer portion that holds the eye bolt is 2 pieces. Not so with the manual one, its one piece! To get it out start by removing the 2 drivers side mounts completely then remove the 3 bolts holding the passenger mount to the body. Be sure to have a jack under the rear most part of the transmission! Don't worry about the passenger side dropping as it sits inside body of the car and can only go up. Now you will need to jack up the motor/transmission as far as possible, only now will you be able to remove the mount after 10 min of moving it every way possible until you finely get it. Getting the mount back in will be 10X as hard!!! haha
-Good luck!!!
Last edited by lcq4blackstar; May 10, 2011 at 06:05 PM.
Link to thread with info on my car and cheap place to buy the Inovate mounts if your interested in them:https://www.fitfreak.net/forums/fit-...raftwerks.html
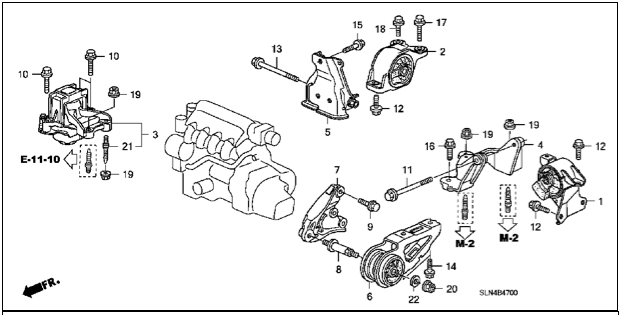
Next person who does this can you tell me if there is a shim on bolt #8 between mount #6 or not. I put everything in groups but since it was over a week It might have gotten moved? IDK but the bolt compared to the hole in the mount is a big difference and I don't remember it being like that when I took it off but I could be wrong. There isn't anything in the diagram but I'd feel better knowing for sure.
here's a question then (i posted it in the clutch hardline thread but i'll post it here):
i went to the flexane site and only saw 94a and 80a hardness... i didn't see any of the 60a mix...
second... soooo... what did you do with your stock engine mounts? (i think you said you bought an extra set to fill...)
killer work nonetheless...
i went to the flexane site and only saw 94a and 80a hardness... i didn't see any of the 60a mix...
second... soooo... what did you do with your stock engine mounts? (i think you said you bought an extra set to fill...)
killer work nonetheless...
So sorry for the long delay, I've since picked up another toy to play with
 so I've not been on these forums since I posted this how to...
I used the stock mounts in my car and just had it down for the week waiting for these to cure. As for as the 60A, its out there... try a search for "Devcon 15200 Flexane 60 liquid 500g"
Rockauto has the best prices on replacement mounts BTW.
Last edited by lcq4blackstar; Jun 13, 2011 at 02:26 PM.


Anyone know if you can remove the rear engine mount on the A/T without removing the side or transmission mounts first? I filled the transmission mount but didn't have the time and tools for the rear... would rather not take the whole thing apart again when doing the rear mount. Any help appreciated.

Thread
Thread Starter
Forum
Replies
Last Post