Honda Fit Scosche Kit Pics! It has arrived!
#41
 06-26-2007, 06:17 PM


Last edited by Oofie; 06-27-2007 at 08:07 PM.
#42
06-26-2007, 11:02 PM

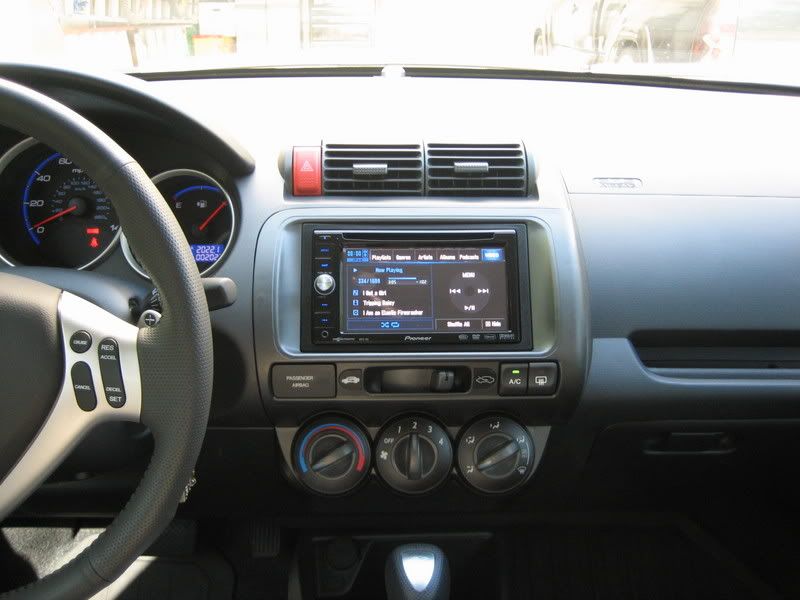
I just hooked up my Ipod to it yesterday and everything seems to work fine. I do not hear the "audio hum" that you speak of. It sounds pretty clear to me, even with the stock speakers. Once you switch to the Ipod mode through the stereo, it shows a similiar pic of the same display buttons/screen as the actual Ipod(right side of the Avic screen), so it makes it very easy to use. Here is a pic(obviously not the greatest), but it shows where the GPS antenna was mounted(right up against the winshield, in the center of the dash.
Also, to the best of my knowledge, there were no suprises as far as the installation went. My installer said he had no probs! Hope that helps!
Also, to the best of my knowledge, there were no suprises as far as the installation went. My installer said he had no probs! Hope that helps!
how do you hook up the iPod, u plug it in the AUX at the front or u have extra wire that came out from the back of the AVIC-D3???

")
#44
06-27-2007, 05:16 AM


I had the stereo shop run the Ipod cable from the back of the unit to inside the glovebox.

#46
06-28-2007, 10:23 PM
ic ic...........I know AVIC-D# have special cable to run the iPod.

#48
07-08-2007, 02:46 PM
So I got my Pioneer DEH-4900IB installed Friday June 29th with the Scoche dash kit. I love the head unit display and for the most part the dash kit worked the way it's supposed to, with the following caveates.
The guys who did the work for me were in a hurry because they were hosting a car show that afternoon, so they did in two hours what they told me would take "every minute of three hours" to do, namely install the head unit, an XM tuner, the antenna, and to fish out an aux cable I had installed from under the center console. I warned them about what CuTeBoi had said about the kit and told them that if they had any trouble they should let me know and I would point them to CuTe's thread showing how to fix. They didn't bother. You can see the results below, although not very well. Where the #1 is, the corner of the dash piece sticks out about an eigth of an inch. Where the #2 is, there is a slight gap. The #3 is to remind me to mention that the switch for the interior/exterior air source will not go all the way to the right, but only about two-thirds of the way. It does go all the way to the left for the AC.
What I mean to say by all this is that the piece didn't fit well for me either, as mentioned by several others in this thread, but since others have said that they've gotten it to fit when they take their time, I hold out hope that I can find a more detail-minded installer to take another look at this. Thanks to everyone for the info about this dash kit, and also to CuTeBoi and smeister for their threads on a number of topics that helped me go to the installer with enough knowledge to be able to speak to the installers coherently.
http://img172.imageshack.us/img172/5781/number02ho0.jpg
#49
07-08-2007, 03:26 PM

Where the #1 is, the corner of the dash piece sticks out about an eigth of an inch. Where the #2 is, there is a slight gap. The #3 is to remind me to mention that the switch for the interior/exterior air source will not go all the way to the right, but only about two-thirds of the way. It does go all the way to the left for the AC.
#50
07-08-2007, 03:26 PM
After I put my headunit and kit on with just the clips holding it in the dash everything seemed flush. Once I put on the two screws to hold the kit to the dash it didnt sit flush anymore on the left side. I reused some of the old clips which also seemed to help for some reason. The clips look identical, but the oem ones seem to grip harder.
The reason why your interior/exterior button wont go all the way to the right is because they loosened it. You need to take off your glove box and play with the cable. MY ADVICE is to unclip it behind the glove box and move the switch all the way left and make sure it is closed for inside air and then clip it back in. That should do the trick. Good luck man!
The reason why your interior/exterior button wont go all the way to the right is because they loosened it. You need to take off your glove box and play with the cable. MY ADVICE is to unclip it behind the glove box and move the switch all the way left and make sure it is closed for inside air and then clip it back in. That should do the trick. Good luck man!
#51
07-08-2007, 05:08 PM
I guess if I was brave enough to take apart the center console, I should be able to handle the glove box. It will have to wait until after I get back from a business trip, but I will give it a try. Thanks for the advice guys.
#52
07-10-2007, 04:55 PM

I did a single-DIN install myself (Pioneer Premier DEH-P880PRS), including shortening the two A/C control mounting posts as described by CuTeBoi and reusing the factory mounting clips, but I still have similar issues to numbers one and two above. Regarding number three, it sounds like when they reinstalled the fresh/recirc air shutter cable, they didn't properly position the cable sheath in its clip. You can adjust it, but you'll have to take out the glove box first by removing the two screws at the hinges.
#53
07-11-2007, 09:05 AM
Actually you do not need to remove the glove box, you can grasp at the side with it open (and empty) and put inward pressure, you should then be able to open further and let it carefully fold clear down. This is how you get in to change the cabin air filter and it also give you access to the cables, no problem. LMK if you want pics i'll do my best to get some.

Thread
Thread Starter
Forum
Replies
Last Post
Sid 6.7
Fit Interior Modifications
14
03-06-2008 04:31 PM
MirrorWorks
Fit Photos & Videos
14
11-11-2006 10:34 AM