

Raising the driver seat, anyone have suggestions?

Member
Joined: Jun 2007
Posts: 53
From: roughing it in Lake Havasu
As far as why somebody might want to raise the driver's seat is the same as why some more expensive vehicles with a high roofline also have electric height adjustment. People have different length upper bodies.
I too am curious on how to raise the seat. Has anybody got an idea of doing so with that front nearly perpendicular bolt?
As for as dying in a crash: The Fit is made to sacrifice itself by folding up, and it gets that 5 star crash rating due to all those air bags. We're pretty safe in this car, but chances are that it will be totalled even in a somewhat minor crash.
Member
Joined: Jun 2007
Posts: 53
From: roughing it in Lake Havasu
This is what I would do if I was going to raise my Fit driver's seat, inexpensively. This is to raise the driver’s seat up roughly an inch.
(Though I am 5’10”, I have a tendency to slouch in my seat. I have always tried raising my seat. Most of the time to positive effect. A few times not. Luckily it is very easy to put back stock.)
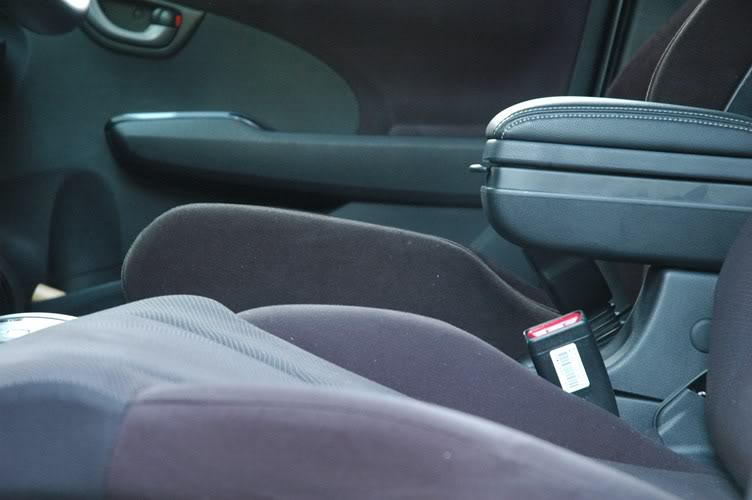
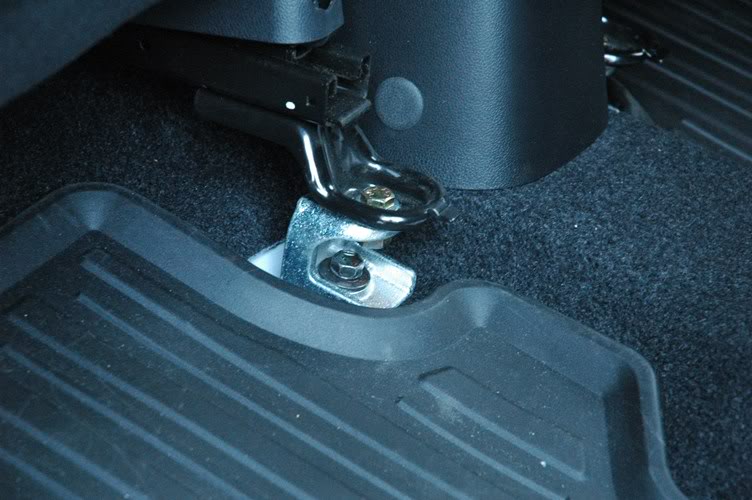
I didn’t have any precise number in mind. Roughly just an inch. As you know once you look under the seat there are three bolts that are perpendicular the you will lengthen. The front one closest to the door is at an angle and useless to use to raise the seat, so I just lifted the other three, and put a support block under the front left.
I took one of the bolts down to Lowes. On the bolt aisle, on some static displays, they had nuts that you could screw into to determine the proper threads. Then you compare the bolts to others with that thread pattern, but roughly one inch longer. So I bought 3 Ea. of the M10-1.25 x 50.. To raise the seat I purchased 6 Ea. Of some bigger nuts that were �” thick and oversized so they would easily slip over the shaft of the bolts I just bought.
On the seat I just unsnapped the covers over each bolt on all four sides. I removed each of the four stock bolts. Starting on the front inside, I replaced the stock bolt with the new longer bolt and two of the oversize nuts, used as spacers. Once you get all three of the perpendicular ones tightened, you have to deal with the front outside one. – Find a block about 1.5” tall that you can slip in under that corner of the seat and that fits snugly. Now use 3/16” guy wire to tighten down the last side. – To do this; after fitting the block in snugly behind the front corner, screw the original bolt back into the hole but w/o the seat bracket connected. Now cut off about 9” of the guy wire and wrap it around the bolt then through the hole in the bracket. Use electricians pliers to twisting the wire up as tight as you can w/o breaking it. In order to feel comfortable about the strength on this corner, Cut perhaps two or more nine inch pieces of guy wire, wrapping each around the bolt and thru the bolt hole in the bracket. The final thing to do is to snug the bolt up tight. Then the more final thing to do is to snap those covers back on all four sides.
It worked in raising my eyes to a more comfortable level. An unexpected benefit I gained was getting my arms a little closer to the steering wheel. Something the Fit badly needs.
OK. This is my first attempt at a DIY. This is to raise the driver’s seat up roughly an inch.
(Though I am 5’10”, I have a tendency to slouch in my seat. I have always tried raising my seat. Most of the time to positive effect. A few times not. Luckily it is very easy to put back stock.)
I didn’t have any precise number in mind. Roughly just an inch. As you know once you look under the seat there are three bolts that are perpendicular the you will lengthen. The front one closest to the door is at an angle and useless to use to raise the seat, so I just lifted the other three, and put a support block under the front left.
I took one of the bolts down to Lowes. On the bolt aisle, on some static displays, they had nuts that you could screw into to determine the proper threads. Then you compare the bolts to others with that thread pattern, but roughly one inch longer. So I bought 3 Ea. of the M10-1.25 x 50.. To raise the seat I purchased 6 Ea. Of some bigger nuts that were �” thick and oversized so they would easily slip over the shaft of the bolts I just bought.
On the seat I just unsnapped the covers over each bolt on all four sides. I removed each of the four stock bolts. Starting on the front inside, I replaced the stock bolt with the new longer bolt and two of the oversize nuts, used as spacers. Once you get all three of the perpendicular ones tightened, you have to deal with the front outside one. – Find a block about 1.5” tall that you can slip in under that corner of the seat and that fits snugly. Now use 3/16” guy wire to tighten down the last side. – To do this; after fitting the block in snugly behind the front corner, screw the original bolt back into the hole but w/o the seat bracket connected. Now cut off about 9” of the guy wire and wrap it around the bolt then through the hole in the bracket. Use electricians pliers to twisting the wire up as tight as you can w/o breaking it. In order to feel comfortable about the strength on this corner, Cut perhaps two or more nine inch pieces of guy wire, wrapping each around the bolt and thru the bolt hole in the bracket. The final thing to do is to snug the bolt up tight. Then the more final thing to do is to snap those covers back on all four sides.
It worked in raising my eyes to a more comfortable level. An unexpected benefit I gained was getting my arms a little closer to the steering wheel. Something the Fit badly needs.

By lhcbc, shot with FinePix2800ZOOM at 2008-04-01

By lhcbc, shot with FinePix2800ZOOM at 2008-04-01
I don't know what happened with these pictures. I'm sure somebody might know why they are smaller, below.


(Though I am 5’10”, I have a tendency to slouch in my seat. I have always tried raising my seat. Most of the time to positive effect. A few times not. Luckily it is very easy to put back stock.)
I didn’t have any precise number in mind. Roughly just an inch. As you know once you look under the seat there are three bolts that are perpendicular the you will lengthen. The front one closest to the door is at an angle and useless to use to raise the seat, so I just lifted the other three, and put a support block under the front left.
I took one of the bolts down to Lowes. On the bolt aisle, on some static displays, they had nuts that you could screw into to determine the proper threads. Then you compare the bolts to others with that thread pattern, but roughly one inch longer. So I bought 3 Ea. of the M10-1.25 x 50.. To raise the seat I purchased 6 Ea. Of some bigger nuts that were �” thick and oversized so they would easily slip over the shaft of the bolts I just bought.
On the seat I just unsnapped the covers over each bolt on all four sides. I removed each of the four stock bolts. Starting on the front inside, I replaced the stock bolt with the new longer bolt and two of the oversize nuts, used as spacers. Once you get all three of the perpendicular ones tightened, you have to deal with the front outside one. – Find a block about 1.5” tall that you can slip in under that corner of the seat and that fits snugly. Now use 3/16” guy wire to tighten down the last side. – To do this; after fitting the block in snugly behind the front corner, screw the original bolt back into the hole but w/o the seat bracket connected. Now cut off about 9” of the guy wire and wrap it around the bolt then through the hole in the bracket. Use electricians pliers to twisting the wire up as tight as you can w/o breaking it. In order to feel comfortable about the strength on this corner, Cut perhaps two or more nine inch pieces of guy wire, wrapping each around the bolt and thru the bolt hole in the bracket. The final thing to do is to snug the bolt up tight. Then the more final thing to do is to snap those covers back on all four sides.
It worked in raising my eyes to a more comfortable level. An unexpected benefit I gained was getting my arms a little closer to the steering wheel. Something the Fit badly needs.
OK. This is my first attempt at a DIY. This is to raise the driver’s seat up roughly an inch.
(Though I am 5’10”, I have a tendency to slouch in my seat. I have always tried raising my seat. Most of the time to positive effect. A few times not. Luckily it is very easy to put back stock.)
I didn’t have any precise number in mind. Roughly just an inch. As you know once you look under the seat there are three bolts that are perpendicular the you will lengthen. The front one closest to the door is at an angle and useless to use to raise the seat, so I just lifted the other three, and put a support block under the front left.
I took one of the bolts down to Lowes. On the bolt aisle, on some static displays, they had nuts that you could screw into to determine the proper threads. Then you compare the bolts to others with that thread pattern, but roughly one inch longer. So I bought 3 Ea. of the M10-1.25 x 50.. To raise the seat I purchased 6 Ea. Of some bigger nuts that were �” thick and oversized so they would easily slip over the shaft of the bolts I just bought.
On the seat I just unsnapped the covers over each bolt on all four sides. I removed each of the four stock bolts. Starting on the front inside, I replaced the stock bolt with the new longer bolt and two of the oversize nuts, used as spacers. Once you get all three of the perpendicular ones tightened, you have to deal with the front outside one. – Find a block about 1.5” tall that you can slip in under that corner of the seat and that fits snugly. Now use 3/16” guy wire to tighten down the last side. – To do this; after fitting the block in snugly behind the front corner, screw the original bolt back into the hole but w/o the seat bracket connected. Now cut off about 9” of the guy wire and wrap it around the bolt then through the hole in the bracket. Use electricians pliers to twisting the wire up as tight as you can w/o breaking it. In order to feel comfortable about the strength on this corner, Cut perhaps two or more nine inch pieces of guy wire, wrapping each around the bolt and thru the bolt hole in the bracket. The final thing to do is to snug the bolt up tight. Then the more final thing to do is to snap those covers back on all four sides.
It worked in raising my eyes to a more comfortable level. An unexpected benefit I gained was getting my arms a little closer to the steering wheel. Something the Fit badly needs.
By lhcbc, shot with FinePix2800ZOOM at 2008-04-01
By lhcbc, shot with FinePix2800ZOOM at 2008-04-01
I don't know what happened with these pictures. I'm sure somebody might know why they are smaller, below.


Last edited by lhcbc; Apr 1, 2008 at 09:58 PM.

Thx for the great writeup and pix. The only thing that troubles me about this is wiring up the one corner. Did you consider drilling a new hole in the floor and using a new bolt/nut and spacers for that corner instead? Even a a heavy self-tapping sheet metal screw and spacers would make me feel better than wire. And what do you do with the spacer on that corner when you're done with the install (it looks like you used an old fuel pump)? Does it stay in place forever?
Member
Joined: Jun 2007
Posts: 53
From: roughing it in Lake Havasu
(First, thanx Manxman for the pics info). then,
There was no way I was going to go through what it would take to miss messing up that fuel tank. I gave it much thought and here is what I concluded. The original bolts are not even rated. I replaced them with the longer 8.8 bolts in three places. I've been through a slight accident that blew the airbags and it wasn't nearly enough to break even one of those bolts. The main reason to tie that front left down is to hold it in place. But just to make everyone comfortable, all you have to do is put as many pieces of guy wire twisted to hold it in place as the owner/driver needs to feel comfortable.
I've mentioned before that the way our Fit's are able to get that 5 star safety rating is because it surrounds you in Air Bags. Then it also sacrifices itself with Crumple Zones. What this means is that the seat is not going to take any hits that you won't be protected with. The down side is that our Fit's are going to be easily totaled if you get into an accident. But, that seat won't break loose on the three 8.8 bolts versus the weak four factory bolts.
As for my "fuel pump" spacer. That's all I had laying around that would work. I'll get around to making a block of wood the right size, then paint it black, then make the replacement. I didn't realize it would show so well in the picture. Basically the only function that wiring has to do is to put pressure on that block you are using to level this last corner.
Here's an option on the "questionable" front left bolt: You could use metal strapping tape. Several layers of that would also provide adequate strength. The reason I didn't use it was because you can only adjust it as close as rhe holes are to each other. The "guy wire" has a theoretical infinite adjust so it can be tightly snugged down on your spacer block.
I hope this helps. If nothing else it will provide a start somene can improve upon. That's what I like of this sharing of ideas we have here.
Oh, I just noticed another benefit. I'm older and don't move as well as I used to. Being this much higher, I find it easier to get in and out.
Last edited by lhcbc; Apr 4, 2008 at 05:01 PM.
Member
Joined: Jun 2007
Posts: 53
From: roughing it in Lake Havasu
Honda Fit Drivers Seat 1” Height Adjustment
OK, so I thought about it some more and I determined another simple option for securing the front outside bracket.
I then bought a piece of pipe 1” x 5”. (All they had was pipe with threads on both ends. Since I always seem to cut myself when I mess with large metal threads, I cut the threads off on one side.) Then using a drill press, I drilled two oversize holes larger than the attaching bolts into the pipe. On the side that I cut the threads off of, I measured up 1” and marked the hole center of the first hole. Then I measured up 1 �” and marked the center of the second hole. I punched two holes that would leave me a little wiggle room. I blocked the seat up on this side so that my bolts had a little wiggle room I tightened down the one going into the threaded hole in the floor. Then I put the slightly smaller bolt into the hole in the seat bracket and then through the top hole in the pipe. Then I put the nut on and finished tightening both bolts.

The fat silver bolt is an M10 to thread into floor, the skinny silver bolt is an M8 along with nut are put in the top holes of the pipe and into seat bracket. Black bolt is the one that came in the bracket.

OK, so I thought about it some more and I determined another simple option for securing the front outside bracket.
I then bought a piece of pipe 1” x 5”. (All they had was pipe with threads on both ends. Since I always seem to cut myself when I mess with large metal threads, I cut the threads off on one side.) Then using a drill press, I drilled two oversize holes larger than the attaching bolts into the pipe. On the side that I cut the threads off of, I measured up 1” and marked the hole center of the first hole. Then I measured up 1 �” and marked the center of the second hole. I punched two holes that would leave me a little wiggle room. I blocked the seat up on this side so that my bolts had a little wiggle room I tightened down the one going into the threaded hole in the floor. Then I put the slightly smaller bolt into the hole in the seat bracket and then through the top hole in the pipe. Then I put the nut on and finished tightening both bolts.
The fat silver bolt is an M10 to thread into floor, the skinny silver bolt is an M8 along with nut are put in the top holes of the pipe and into seat bracket. Black bolt is the one that came in the bracket.
Last edited by lhcbc; Apr 9, 2008 at 10:04 PM.

Member

Joined: Apr 2008
Posts: 144
From: Pembroke Pines, FL
I did it. I used washers and for the angled mounts I redrilled new holes in the mounting bracket on the seat.
Member
Joined: Apr 2008
Posts: 144
From: Pembroke Pines, FL
what did you use on the front left (diagonal) bolt?


Member
Joined: Sep 2009
Posts: 697
From: USA

I have different setup in the front since I have Civic Si seats. However, you could you the same blackets as the rear but you need to redrill a hole. It is big enough.


New Member
Joined: Apr 2015
Posts: 3
From: Stony Brook NY
Please Help
Hey,
I just bought my first car which is a used 2007 Honda Fit. It was pretty great at first but after having it for a few months I have found it lacking in a few areas. I am currently in the process of fixing/resolving.
I am trying to solve the washer seat issue but I cannot get the plastic clips off to save my life. All of the posts I have read simply say snap them off. I am pretty noobish with vehicles so this is proving to be a daunting task.
Can someone give me some guidance? or perhaps a link to a video or set of pictures which describes how to do this?
New Member
Joined: Apr 2015
Posts: 3
From: Stony Brook NY
Any specific spot I am prying from? I managed to get the left driver seat off but the right driver seat is trickier because it had double hooks.

Thread
Thread Starter
Forum
Replies
Last Post
HowieD
Fit Interior Modifications
4
Aug 6, 2008 09:09 PM