
"UNIQUELY" you mods!

Nah the three hour drive was more than I expected. I can't really find anything that would be decently easy to wrap on my car. Any suggestions?


i've got my b-pillars, roof and rear wiper garnish wrapped.


My rear door pillar posts.
CarbonFiberwind-rainvisors022-1.jpg?t=1326736751
Hell'ava job on this one Doc! Like Funkster stated "The execution is awesome".  A must for this thread...
 11-01-2011, 01:34 PM
DocCCVp
Member
iTrader: (0)
Join Date: Apr 2011
Location: Central New Jersey
Posts: 31
Rep Power: 0

Step 0 - Get the materials you need. (Check out my Step 2 pic for the stuff I use)
Materials I get.. before I start.
- Base Color System (Dupont Chromium base color and medium reducer)
- Clear Coat System (House of Color UC35 Clear, Reducer, Catalyst)
- Lacquer Thinner (for cleaning)
- Paint gun (mine is a Sharpe T1, I have a tip for base and another for clear)
- Access to an Air Compressor, Air Line and Fittings for your gun of course and if youre all pro, add an Inline Moisture/Particle Filter.
- Mixing Cup with to measure the right chemical ratios.
- Paint sticks (mixing), paper filters (no dust/dried paint chips get in your spray)
- Respirator (dont want metal flecks and hardening clear coat in your lungs..)

Last edited by DocCCVp; 11-01-2011 at 02:12 PM.


 #3 (permalink)

11-01-2011, 01:38 PM
DocCCVp
Member
iTrader: (0)
Join Date: Apr 2011
Location: Central New Jersey
Posts: 31
Rep Power: 0
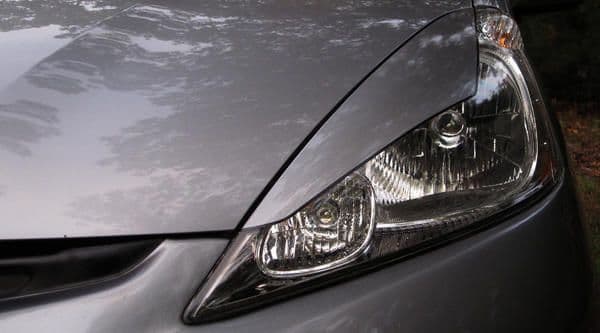
Step 1 - Vinyl Overlay: I got some external windshield visor vinyl stuff and cut out the shape I wanted. This is the best part cause you get to make them however you want! You can see that Ive use little bit of wet sand (600grit) to prep the surface of the vinyl.
Also, for those who worry about one day having to revert back to OEM for one reason or another, this is perfect because if you decide you dont want them anymore or need to trade in, all you have to do it rip off the vinyl and your headlight is 100% untouched. =)

#4 (permalink)
11-01-2011, 01:41 PM
DocCCVp
Member
iTrader: (0)
Join Date: Apr 2011
Location: Central New Jersey
Posts: 31
Rep Power: 0
Step 2 - Mask: Protect the rest of your headlight from overspray. I used a kitchen garbage bag and modify as needed.
Also in pic: materials you should get.. before start (of course).

Last edited by DocCCVp; 11-01-2011 at 01:50 PM.
#5 (permalink)
11-01-2011, 01:55 PM
DocCCVp
Member
iTrader: (0)
Join Date: Apr 2011
Location: Central New Jersey
Posts: 31
Rep Power: 0
Step 3 - Base: Mix up your ratio and spray it. Light to medium wet coats, even distance, 50% overlay, 7-9 minute wait time between.. ya know, all that good stuff.

#6 (permalink)
11-01-2011, 01:58 PM
DocCCVp
Member
iTrader: (0)
Join Date: Apr 2011
Location: Central New Jersey
Posts: 31
Rep Power: 0
Step 4 - Clear: Make it shiny.
$$$ Tip: If you want to substitute for spray clear from your local auto parts store, that stuff it pretty good too and cost way less than the full Clear Coat System. Its not as high gloss quality but you can always do a little polish and buff work and get it looking pretty good.

#7 (permalink)
11-01-2011, 02:01 PM
DocCCVp
Member
iTrader: (0)
Join Date: Apr 2011
Location: Central New Jersey
Posts: 31
Rep Power: 0
Step 5 - Become memorized by shiny things.. =o
Youll see that my headlight looks slightly wavy. Thats cause I have 3M bumper guard protection covering the headlight.. every bit of protection helps. =)

#8 (permalink)
11-01-2011, 02:05 PM
DocCCVp
Member
iTrader: (0)
Join Date: Apr 2011
Location: Central New Jersey
Posts: 31
Rep Power: 0
Step 6 - Add detail. Reinstall. Love your Fit.
Tip: I have a thin black pin stripe to edge out the eyelid. Really makes it look like its part of the body instead of the headlight, especially for light colored cars. Few bucks from any local auto parts store.
Questions, comments, requests, details, concerns, props, shout outs.. hate it? Hit me up, Ive got plenty more DIY where with this came from.
Last edited by DocCCVp; 11-01-2011 at 02:15 PM.
A must for this thread... 11-01-2011, 01:34 PM DocCCVp
Member
iTrader: (0)
Join Date: Apr 2011
Location: Central New Jersey
Posts: 31
Rep Power: 0
Points: 300, Level: 5


 Level up: 50%, 50 Points needed


 Daily Activity: 0%


Level up: 50%, 50 Points needed Daily Activity: 0% Step 0 - Get the materials you need. (Check out my Step 2 pic for the stuff I use)
Materials I get.. before I start.
- Base Color System (Dupont Chromium base color and medium reducer)
- Clear Coat System (House of Color UC35 Clear, Reducer, Catalyst)
- Lacquer Thinner (for cleaning)
- Paint gun (mine is a Sharpe T1, I have a tip for base and another for clear)
- Access to an Air Compressor, Air Line and Fittings for your gun of course and if youre all pro, add an Inline Moisture/Particle Filter.
- Mixing Cup with to measure the right chemical ratios.
- Paint sticks (mixing), paper filters (no dust/dried paint chips get in your spray)
- Respirator (dont want metal flecks and hardening clear coat in your lungs..)
Last edited by DocCCVp; 11-01-2011 at 02:12 PM.
11-01-2011, 01:38 PM DocCCVp
Member
iTrader: (0)
Join Date: Apr 2011
Location: Central New Jersey
Posts: 31
Rep Power: 0
Points: 300, Level: 5
Level up: 50%, 50 Points needed
Daily Activity: 0%
Level up: 50%, 50 Points needed Daily Activity: 0% Step 1 - Vinyl Overlay: I got some external windshield visor vinyl stuff and cut out the shape I wanted. This is the best part cause you get to make them however you want! You can see that Ive use little bit of wet sand (600grit) to prep the surface of the vinyl.
Also, for those who worry about one day having to revert back to OEM for one reason or another, this is perfect because if you decide you dont want them anymore or need to trade in, all you have to do it rip off the vinyl and your headlight is 100% untouched. =)
#4 (permalink)
11-01-2011, 01:41 PM DocCCVp
Member
iTrader: (0)
Join Date: Apr 2011
Location: Central New Jersey
Posts: 31
Rep Power: 0
Points: 300, Level: 5
Level up: 50%, 50 Points needed
Daily Activity: 0%
Level up: 50%, 50 Points needed Daily Activity: 0% Step 2 - Mask: Protect the rest of your headlight from overspray. I used a kitchen garbage bag and modify as needed.
Also in pic: materials you should get.. before start (of course).
Last edited by DocCCVp; 11-01-2011 at 01:50 PM.
#5 (permalink)
11-01-2011, 01:55 PM DocCCVp
Member
iTrader: (0)
Join Date: Apr 2011
Location: Central New Jersey
Posts: 31
Rep Power: 0
Points: 300, Level: 5
Level up: 50%, 50 Points needed
Daily Activity: 0%
Level up: 50%, 50 Points needed Daily Activity: 0% Step 3 - Base: Mix up your ratio and spray it. Light to medium wet coats, even distance, 50% overlay, 7-9 minute wait time between.. ya know, all that good stuff.
#6 (permalink)
11-01-2011, 01:58 PM DocCCVp
Member
iTrader: (0)
Join Date: Apr 2011
Location: Central New Jersey
Posts: 31
Rep Power: 0
Points: 300, Level: 5
Level up: 50%, 50 Points needed
Daily Activity: 0%
Level up: 50%, 50 Points needed Daily Activity: 0% Step 4 - Clear: Make it shiny.
$$$ Tip: If you want to substitute for spray clear from your local auto parts store, that stuff it pretty good too and cost way less than the full Clear Coat System. Its not as high gloss quality but you can always do a little polish and buff work and get it looking pretty good.
#7 (permalink)
11-01-2011, 02:01 PM DocCCVp
Member
iTrader: (0)
Join Date: Apr 2011
Location: Central New Jersey
Posts: 31
Rep Power: 0
Points: 300, Level: 5
Level up: 50%, 50 Points needed
Daily Activity: 0%
Level up: 50%, 50 Points needed Daily Activity: 0% Step 5 - Become memorized by shiny things.. =o
Youll see that my headlight looks slightly wavy. Thats cause I have 3M bumper guard protection covering the headlight.. every bit of protection helps. =)
#8 (permalink)
11-01-2011, 02:05 PM DocCCVp
Member
iTrader: (0)
Join Date: Apr 2011
Location: Central New Jersey
Posts: 31
Rep Power: 0
Points: 300, Level: 5
Level up: 50%, 50 Points needed
Daily Activity: 0%
Level up: 50%, 50 Points needed Daily Activity: 0% Step 6 - Add detail. Reinstall. Love your Fit.
Tip: I have a thin black pin stripe to edge out the eyelid. Really makes it look like its part of the body instead of the headlight, especially for light colored cars. Few bucks from any local auto parts store.
Questions, comments, requests, details, concerns, props, shout outs.. hate it? Hit me up, Ive got plenty more DIY where with this came from.
Last edited by DocCCVp; 11-01-2011 at 02:15 PM.

Agreed, pinstripe sealed the deal
Dayum, J' your retros a killin' me. I'm jealous
BB, in pieces

Saw this, and couldn't help think of my "Carbonitis Fiberitis" suffering friends.
 ]
]
.............When the wheels arrived were were blown away by the precision and complexity of what was accomplished. Four times no less. While most people are satisfied with carbon fiber lips on wheels or carbon fiber layering on wheel faces at best, this was far different. Carbon fiber was layered front to back on the wheel. The entire spokes on both sides were covered with carbon. Even the recesses where the lug nuts reside were covered in carbon fiber all the way down to the bottom. The entire barrel internally was also covered in carbon. The end result is the most complete conversion we've ever seen of any wheel and done with a level of craftsmanship that nobody could believe. JUST WATCH THE VIDEO.
I was shocked when Carbon Dry showed me they were converting Rolexs and the bands to dry carbon in this way. Now I understand how they can do it after seeing just how detail oriented their work is.............
link ---> Carbon Dry Protec GT-R Wheels - NAGTROC - The Nissan GT-R Owners Club
So who's going to do it first?
].............When the wheels arrived were were blown away by the precision and complexity of what was accomplished. Four times no less. While most people are satisfied with carbon fiber lips on wheels or carbon fiber layering on wheel faces at best, this was far different. Carbon fiber was layered front to back on the wheel. The entire spokes on both sides were covered with carbon. Even the recesses where the lug nuts reside were covered in carbon fiber all the way down to the bottom. The entire barrel internally was also covered in carbon. The end result is the most complete conversion we've ever seen of any wheel and done with a level of craftsmanship that nobody could believe. JUST WATCH THE VIDEO.
I was shocked when Carbon Dry showed me they were converting Rolexs and the bands to dry carbon in this way. Now I understand how they can do it after seeing just how detail oriented their work is.............
So who's going to do it first?
Saw this, and couldn't help think of my "Carbonitis Fiberitis" suffering friends.
link ---> Carbon Dry Protec GT-R Wheels - NAGTROC - The Nissan GT-R Owners Club
So who's going to do it first?
link ---> Carbon Dry Protec GT-R Wheels - NAGTROC - The Nissan GT-R Owners Club
So who's going to do it first?
You gonna do them in real cf, or wrap them in cf vinyl? I've been looking into doing a wrap... Maybe if I get some new rims I'll have the time to wrap the stockies.

It's about being different. And like I said, it wouldn't be on dailies just a fun project to see if I could do it.

If I do it I will wrap them in cf vinyl.
You going to paint penises on your car to be different too?
