Unofficial Honda FIT Forums
  • LOG IN
  • REGISTER
  • Forums
    • Welcome To FitFreak
      • Fit Freak Newbie / FAQs
      • Site Feedback and Suggestions
    • The Honda Fit and Jazz Forums
      • General Fit Talk
      • 1st Generation (GD 01-08)
      • 2nd Generation (GE 08-13)
      • 3rd Generation (2015+)
      • Fit Photos & Videos
      • Car Shows, Events, and Racing
      • Other Car Related Discussions
      • Off Topic Discussion
    • Buy, Sell, Trade, Product Market Research and Group Buys
      • For Sale / Want To Buy / Classified Ads for USED Fit Items
      • FIT-Vendor Sponsored Group Buys and Sales
      • Gauge Interest in a Fit Product or Group Buy
      • Merchant Group Buys and New Product Sales
      • General For Sale Section
    • Fit Modifications
      • General Fit Modifications Discussion
      • Fit DIY: Repair & Maintenance
      • Fit Engine Modifications, Motor Swaps, ECU Tuning
      • Fit Exterior Modifications & JDM Styling
      • Fit Interior Modifications
      • Fit I.C.E.
      • Fit Wheels & Tires
      • Fit Suspension & Brake Modifications
      • Fit Interior & Exterior Illumination
    • Honda Dealer and Honda USA Discussions
      • Honda Fit Dealer Representatives
      • Honda Fit Dealer Reviews
    • Vendor Marketplace Forums
      • FIT Vendor General Discussion Area
      • FIT-Vendor Sponsored Group Buys
      • Tire, Wheel, Brake & Suspension
    • Fit Forums & Clubs
      • America East
      • America Central
      • America West
      • Canada Fit Forums & Clubs
      • Mexico Fit Forums & Clubs
      • European Fit Forums & Clubs
      • Asia Fit Forums & Clubs
  • Marketplace
    • Vendor Directory
    • Become a Vendor
  • New Posts
  • Tools
    • Car Payment Calculator
    • Tire Rim Calculator
    • Recalls
    • Technical Service Bulletins (TSBs)
    • Members List
    • Live Feed
  • Gallery
  • View Dark Mode
    • Please register or login to enable Dark Mode.
  • Log In
  • Register
Unofficial Honda FIT Forums
    • Threads
      • Advanced
Dark Mode

Please register or login to enable Dark Mode.

Log In

Forgot your Password?

By logging into your account, you agree to our Terms of Use and Privacy Policy, and to the use of cookies as described therein.
  • Recent
  • Commented
  • Albums
  • My Pictures

Pyts's Photos

View Profile
Sort:
Commented
  • Most Recent
  • Most Comments
  • Albums
  • Photos
0 2022/01/09 14:09:37 Pyts
Here it is, hand tightened, as promised.
0 2022/01/09 14:08:40 Pyts
0 2022/01/09 14:06:04 Pyts
0 2022/01/09 14:03:35 Pyts
Now you can lift straight up and free your door panel, but bear in mind that the door handle is still running through it. I'll show you in the next pic how I oriented the handle to get it through the panel without scratching anything.
0 2022/01/09 14:01:02 Pyts
Spot #6, the final clip!
0 2022/01/09 13:59:57 Pyts
Spot #5 rear lower
Spot #5 rear lower
0 2022/01/09 13:58:36 Pyts
Spot #4 front upper
Spot #4 front upper
0 2022/01/09 13:57:46 Pyts
Spot #3, front middle
0 2022/01/09 13:56:43 Pyts
Spot #2 Just above the speaker
0 2022/01/09 13:56:06 Pyts
Now we start AT THE BOTTOM popping out door panel clips. If you're following along with print-outs from the manual (as you should be!) you'll notice that I'm not using the pry tool where the manual said the clip was. I'll follow with more similar images of where I pried that actually removed the clips. *** None of them broke despite the fact that my tool never caught the actual clips while prying. They just popped right out when I pried in this and the following spots
0 2022/01/09 13:50:47 Pyts
The handle comes out and just hangs. No need to detatch the cables that operate the door latch.
0 2022/01/09 13:49:07 Pyts
This image shows the clips holding in the door handle as well as the slots they fit into. Mind you, I had to remove the panel in order to take this image. We're not there yet, I just wanted yuh to see!
0 2022/01/09 13:46:11 Pyts
Here's a pic of the front clip that holds in the arm rest fascia panel. Remember, start from the back and work your way up to this guy.
0 2022/01/09 13:43:13 Pyts
Now we come back to the door handle whose screw we already removed. Slide it to the right (toward the car) and pull it out towards you. It'll come out easily. I'll attach an image of the clips that hold it in place so that you can understand what's holding it in and how not to break it.
0 2022/01/09 13:38:29 Pyts
Disconnect this connector going to the power lock and window controls. Suppress the plastic tab located where my finger is and pull it out (Don't break anything!)
*** The connector will come unclipped and be able to be backed out a little. Mine did not come out all the way due to lack of slack in the harness, and that's fine. We'll address it soon enough, just make sure it's unclipped and backed out enough so that it doesn't re-seat ***
Disconnect this connector going to the power lock and window controls. Suppress the plastic tab located where my finger is and pull it out (Don't break anything!) *** The connector will come unclipped and be able to be backed out a little. Mine did not come out all the way due to lack of slack in the harness, and that's fine. We'll address it soon enough, just make sure it's unclipped and backed out enough so that it doesn't re-seat ***
0 2022/01/09 13:31:03 Pyts
With the fascia removed we can now begin removal of the door panel, but hey, follow the steps!!
0 2022/01/09 13:27:37 Pyts
Here's a shot with the panel removed showing 2 of the 3 clips. The third I'll show in the next pic.
Note position of the screwdriver I'm using. The clips are pushed up just as shown while pulling the left side of the fascia toward you
Here's a shot with the panel removed showing 2 of the 3 clips. The third I'll show in the next pic. Note position of the screwdriver I'm using. The clips are pushed up just as shown while pulling the left side of the fascia toward you
0 2022/01/09 13:15:19 Pyts
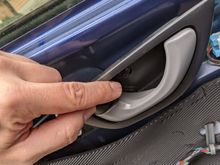
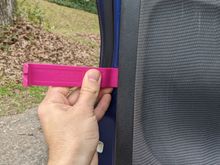
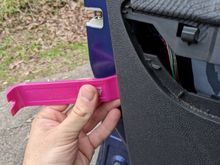
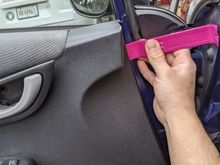
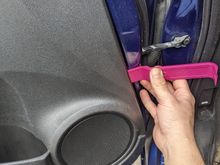
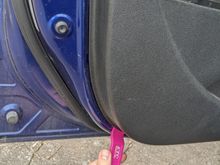
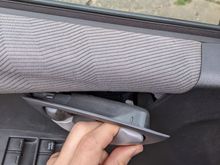
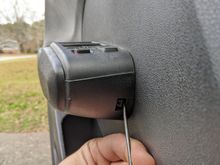
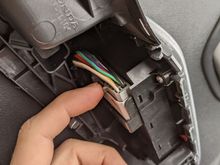
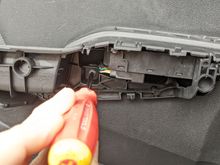
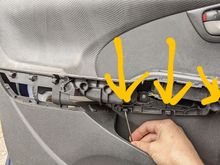
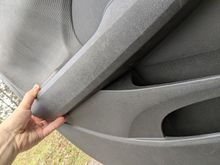
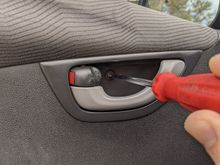
Step two is removing this fascia panel from the arm rest. There's 3 clips on it that get pushed in one at a time with a flat head screwdriver while you simultaneously grasp (as shown above) the left side of the fascia and pull it towards you. Start with the rearmost clip, push it up, hold, and with your left hand pull the fascia gently toward you
0 2022/01/09 13:10:11 Pyts
Step one! Remove screw from door handle. Using my trusty PB Swiss #2 phillips driver (PB, send me free stuff)
0 2022/01/09 13:06:36 Pyts
0 2022/01/09 13:06:11 Pyts
Driver's door interior panel!
0 2022/01/09 13:05:34 Pyts
The sectional dividers were welded to the internal pipes and crammed into place. No welds connecting them to the body of the muffler. I'm not certain if that's necessary for this method of construction, but regardless I see it as potential for vibration/noise
0 2021/12/31 12:13:01 Pyts
0 2021/12/31 12:11:54 Pyts
0 2021/12/31 12:11:25 Pyts
0 2021/12/31 12:11:09 Pyts
0 2021/12/31 12:10:32 Pyts
0 2021/12/31 12:10:09 Pyts
Cylinder again showing SOME old crosshatching
0 2021/12/29 16:49:36 Pyts
Cylinder!
Cylinder!
0 2021/12/29 16:47:41 Pyts
Here's a pic of the rod with focus on wear where it rides the crankshaft. It has light drag left and right play while assembled, no up n down.. I'd love to figure a way to make it fit better or replace it. Will be reading, forgive my ignorance!
0 2021/12/29 16:41:10 Pyts
Here's the crank again with one piston removed. had to hammer out the little tabs on the bolts that joined the piston rod around it. Etched the bolts first for later tightening :}
0 2021/12/29 16:37:02 Pyts
And here's the crank! Note the little threaded studs sticking down. My best guess is that they churn up oil to get it onto stuff, cuz I don't think oil quite reaches the crank when filled appropriately.
0 2021/12/29 16:35:04 Pyts
Here's the oil pan!
Here's the oil pan!
0 2021/12/29 16:34:05 Pyts
Here we see the block and pistons! Strikingly simple and likely pretty underwhelming to others. I've replaced a cylinder head before on a car, but never pulled a piston. This seemed like a good opportunity to demystify stuff!
0 2021/12/29 16:21:56 Pyts
Here's the underside of what is essentially the cylinder head. The left reed seemed pretty flat against the head. I intend to find out all I can on setting this back up as intended, but at present it's a mystery.
0 2021/12/29 16:06:55 Pyts
I took off what I only know to refer to as a valve cover and was greeted by this! It's got reeds in it! I'm not exactly sure of operational theory here, so if anyone knows I'd love to learn.
0 2021/12/29 16:02:00 Pyts
0 2021/12/29 15:54:31 Pyts
0 2021/12/29 14:57:01 Pyts
Like this one!
Like this one!
0 2021/12/12 05:22:12 Pyts
First
Page
12 of 18
Last
Go To
Page
  • 1
  • ...
  • 10
  • 11
  • 12
  • 13
  • 14
  • ...
  • 18
12 of 18
Go To GO
Go to page of 18 pages
  • 1
  • ...
  • 10
  • 11
  • 12
  • 13
  • 14
  • ...
  • 18

Top
Unofficial Honda FIT Forums
  • Contact Us
  • FAQ
  • Archive
  • Advertising
  • Cookie Policy
  • Privacy Statement
  • Terms of Service
  • Your Privacy Choices
  • Manage Preferences

© 2026 MH Sub I, LLC dba Internet Brands


When you click on links to various merchants on this site and make a purchase, this can result in this site earning a commission. Affiliate programs and affiliations include, but are not limited to, the eBay Partner Network.