
Happy Left Elbows for Everyone- $19.95


Happy Left Elbows for Everyone- $19.95
As member wdb described in another thread on this forum, a minor design flaw in the Fit is the fact that the only place for your left elbow is the giant hole that is the door pull well in the driver's door. After a long drive, my elbow is actually painful. wdb solved his problem by filling the rear half of the door pull well with a wad of soft material just stuffed in the hole. It was cheap, it makes him happy, and that's OK. Here is a slightly more expensive and better looking solution to the problem.
The "Arm Restler" is an arm rest designed to go on the top of the window sill, and it works well for people who want to rest their elbow high on the edge of the window. But it also works perfectly to cover and pad the rear half of the door pull hole. Click on this link to see the device, and the source for it. Service from this supplier is fast, and they have a HUGE amount of high quality, fairly priced, car products: http://www.autosportcatalog.com
Type in Arm Restler in the search box on the site.
So here is my adaptation of this arm rest:
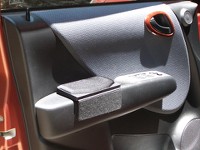
Here's how it looks after completion:

1. Buy some Industrial Strength Velcro from your local Ace Hardware store. It is 2" wide X 4 feet long, price is about $13.00. You will only need about 9" of the hook and the loop sides for this application, but you will be glad to have the rest of it for other projects. The adhesive is REALLY strong, but if you have to remove it from the door of your Fit, it comes off without leaving any residue.
Start by covering the smooth side of the thin, flexible plastic side of the arm rest with the soft loop side of the Velcro. Clean the plastic with alcohol first before applying the Velcro. Then use the alcohol to clean the underside of the padded arm rest around the LEFT half of the rest as you look at the ARM RESTLER logo.
2. Cover the entire back side of the thin, flexible plastic side of the arm rest (not the padded rest itself) with the soft, "loop" side of the Vecro. Now, turn the whole thing so that you are looking at the padded upper side, and can read the Arm-Restler logo, and turn it upside down so that the logo is on your right and you are looking at the under side. Now attach a 2" wide strip of the soft loop side of the Velcro so that one end of your cut strip is positioned at the base of the flexible side where it joins the arm rest. measure in 1/2" to the left of the right edge of the arm rest, and apply the hook strip to the bottom of the rest.
3. Now cut strips of the stiff, hook side of the Velcro to match the length of the two strips you have already attached to the two sides of the rest. Leave the plastic liner cover on the adhesive back side, and attach the hook strips to the loop strips that are already attached to the side and underside of the rest.
4. Now use alcohol to clean the top of the door arm rest surface to the left, or rear, of the door pull well, and also clean the side of the door over the length of the arm rest pad to be added to the door (an area about 2" wide X 7" long on the side of the door).
5. Remove the plastic liner covering the adhesive of the Velcro on both sides of the arm rest, and while holding the rest so that the "Arm-Restler" logo is upside down and facing away from you, hold the edge under the logo against the side of the door. Lower the rest slowly until it is near the horizontal surface of the door arm rest surface.. Put the first three fingers of your right hand into the door pull well and rest the ring finger against the right side of the well. Now lower the arm rest pad along the side of your index finger until the padded arm rest fully contacts the horizontal surface of the door. Make sure that the edge of the padded rest that is away from you contacts the vertical side of the door. Press down hard over the entire surface of the are rest padded surface. Now press the side of the arm rest nearest to you against the side of the door firmly to attach the Velcro adhesive to the side of the door.
You are done. Whenever you desire, you can peel away the side of the rest and then lift up to completely remove the rest. Otherwise, the rest will not move even in spirited driving. The gel pad of the rest is EXTREMELY comfortable for your left elbow.
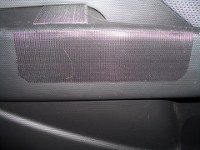
Here is a view of the placement of the hook Velcro on the door surfaces:
Here is a view of the felt lined lide of the arm rest that faces into the car. This is jet black synthetic felt that normally slides against the window glass as it goes up and down when the arm rest is used on the window sill as it was originally designed to do.

This works great, is very comfortable, and can be removed for any reason at any time. When in use, it does not move at all, and does not rattle. The white "Arm-Restler" logo can be toned down with a black, indelible "Sharpie" or other brand felt tip marker.


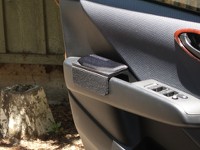
A few more shots with natural light-
The "Arm Restler" is an arm rest designed to go on the top of the window sill, and it works well for people who want to rest their elbow high on the edge of the window. But it also works perfectly to cover and pad the rear half of the door pull hole. Click on this link to see the device, and the source for it. Service from this supplier is fast, and they have a HUGE amount of high quality, fairly priced, car products: http://www.autosportcatalog.com
Type in Arm Restler in the search box on the site.
So here is my adaptation of this arm rest:
Here's how it looks after completion:

1. Buy some Industrial Strength Velcro from your local Ace Hardware store. It is 2" wide X 4 feet long, price is about $13.00. You will only need about 9" of the hook and the loop sides for this application, but you will be glad to have the rest of it for other projects. The adhesive is REALLY strong, but if you have to remove it from the door of your Fit, it comes off without leaving any residue.
Start by covering the smooth side of the thin, flexible plastic side of the arm rest with the soft loop side of the Velcro. Clean the plastic with alcohol first before applying the Velcro. Then use the alcohol to clean the underside of the padded arm rest around the LEFT half of the rest as you look at the ARM RESTLER logo.
2. Cover the entire back side of the thin, flexible plastic side of the arm rest (not the padded rest itself) with the soft, "loop" side of the Vecro. Now, turn the whole thing so that you are looking at the padded upper side, and can read the Arm-Restler logo, and turn it upside down so that the logo is on your right and you are looking at the under side. Now attach a 2" wide strip of the soft loop side of the Velcro so that one end of your cut strip is positioned at the base of the flexible side where it joins the arm rest. measure in 1/2" to the left of the right edge of the arm rest, and apply the hook strip to the bottom of the rest.
3. Now cut strips of the stiff, hook side of the Velcro to match the length of the two strips you have already attached to the two sides of the rest. Leave the plastic liner cover on the adhesive back side, and attach the hook strips to the loop strips that are already attached to the side and underside of the rest.
4. Now use alcohol to clean the top of the door arm rest surface to the left, or rear, of the door pull well, and also clean the side of the door over the length of the arm rest pad to be added to the door (an area about 2" wide X 7" long on the side of the door).
5. Remove the plastic liner covering the adhesive of the Velcro on both sides of the arm rest, and while holding the rest so that the "Arm-Restler" logo is upside down and facing away from you, hold the edge under the logo against the side of the door. Lower the rest slowly until it is near the horizontal surface of the door arm rest surface.. Put the first three fingers of your right hand into the door pull well and rest the ring finger against the right side of the well. Now lower the arm rest pad along the side of your index finger until the padded arm rest fully contacts the horizontal surface of the door. Make sure that the edge of the padded rest that is away from you contacts the vertical side of the door. Press down hard over the entire surface of the are rest padded surface. Now press the side of the arm rest nearest to you against the side of the door firmly to attach the Velcro adhesive to the side of the door.
You are done. Whenever you desire, you can peel away the side of the rest and then lift up to completely remove the rest. Otherwise, the rest will not move even in spirited driving. The gel pad of the rest is EXTREMELY comfortable for your left elbow.
Here is a view of the placement of the hook Velcro on the door surfaces:

Here is a view of the felt lined lide of the arm rest that faces into the car. This is jet black synthetic felt that normally slides against the window glass as it goes up and down when the arm rest is used on the window sill as it was originally designed to do.

This works great, is very comfortable, and can be removed for any reason at any time. When in use, it does not move at all, and does not rattle. The white "Arm-Restler" logo can be toned down with a black, indelible "Sharpie" or other brand felt tip marker.
A few more shots with natural light-


Last edited by manxman; Jun 29, 2008 at 06:55 PM.

Thread
Thread Starter
Forum
Replies
Last Post
BraytonAK
2nd Generation (GE 08-13)
6
Jun 21, 2010 07:52 AM