DIY on Installing Xenith Xenons HID Kits
#1
 11-29-2007, 05:03 AM


DIY on Installing Xenith Xenons HID Kits
The title said it all. After looking around the forums and many requests, I decided to show how to install Xenith Xenons on our car and where to run the cables and also place the ballast and everything else. So follow these easy step, and you will have a clean set up of Xenith Xenons HID Kit installed. 
Required Tools:
-Flat head
-Philip screw driver
-10mm & 12 mm sockets
-10mm wrench
-zip ties
-ice cold drink
Time: 1 to 2 hours (it depend to you)
Step one: Removing the bumper
You are require to remove your bumper to install the ballast and bulbs.
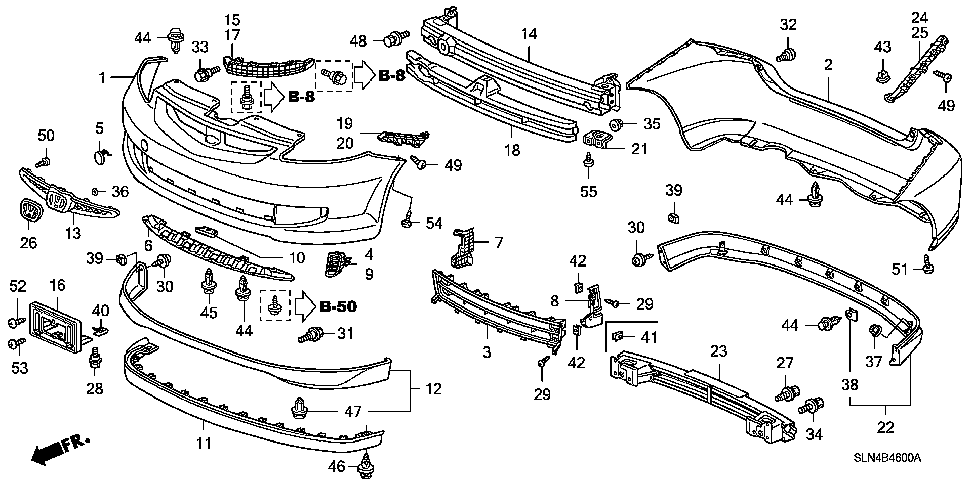
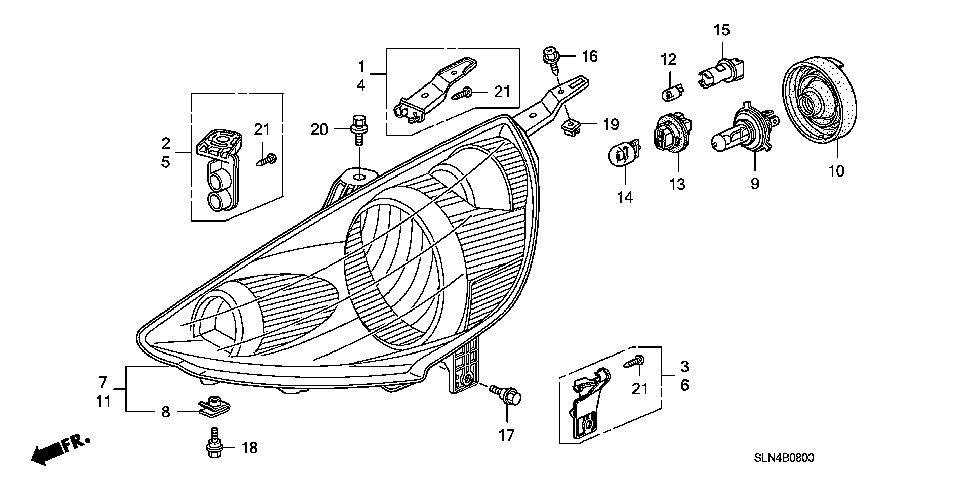
When open your hood there are 4 black body clips (#44 on the parts layout) that hold the upper part of your bumper, using the flat head you can pop them out.
Now there 4 more body clips ( these are longer and bigger) on the bottom and two screws w/ washer also(#54 on the parts layout), use philip head to take them out.
Now there are two more screws one each side from the wheel wells, use a philip head to unscrew them.
Now removing the bumper itself is fairly easy, first from the side (fender) pull it out and if you get suck around the headlights area, use the flat head to unlock these black taps that is holding the bumper and the headlight together. But usually if you pull the side it will unlock itself. Do the same thing on the other side.
Now the side are off, now pull out the bumper from the center. The bumper will come right off. You will see the fog lights wires. To unhook them use a flat head and push outwards.
Now the bumper will completely come off.
Step 2: Removing the head units
There four 10mm bolts (#16, 17, 18 on the part layout)( #18 is horizontal) that hold the headlights to the cars, unscrew them.
On the driver there is plastic shield, use the flat head to unclip the clips and remove the shield.
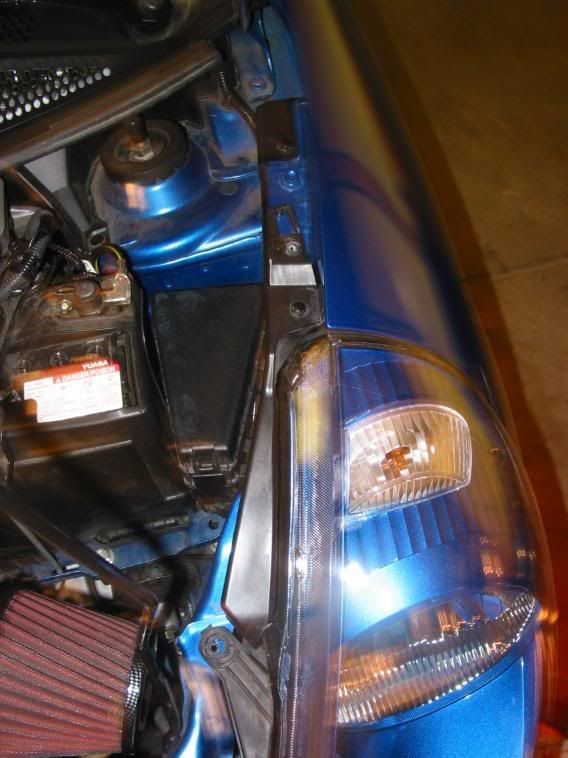
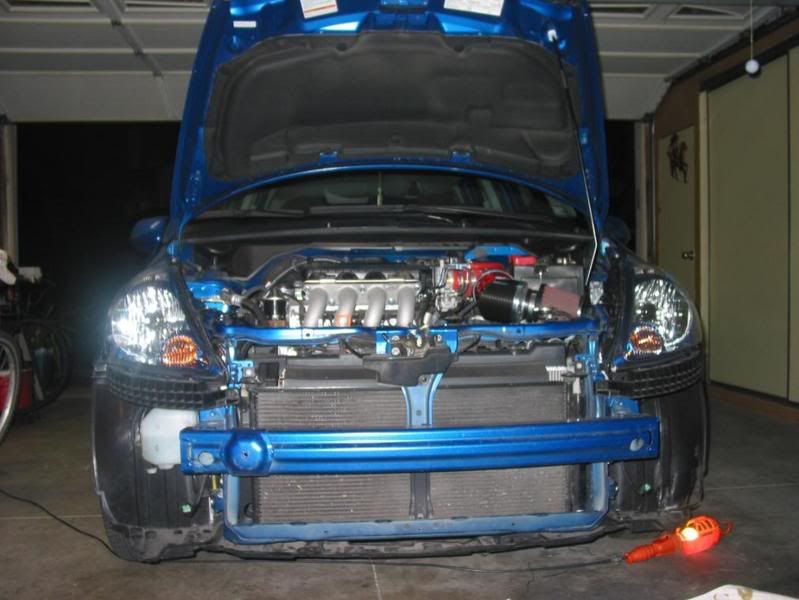
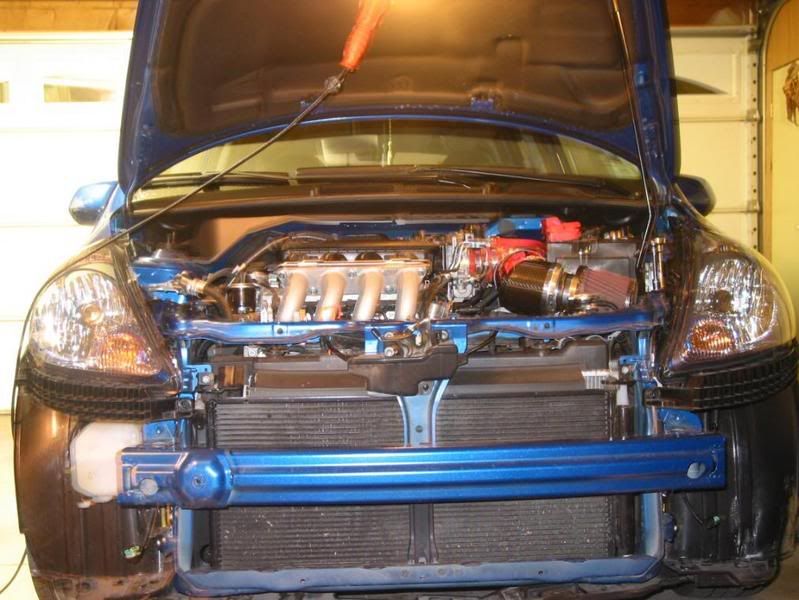
Now your Fit should look like this.
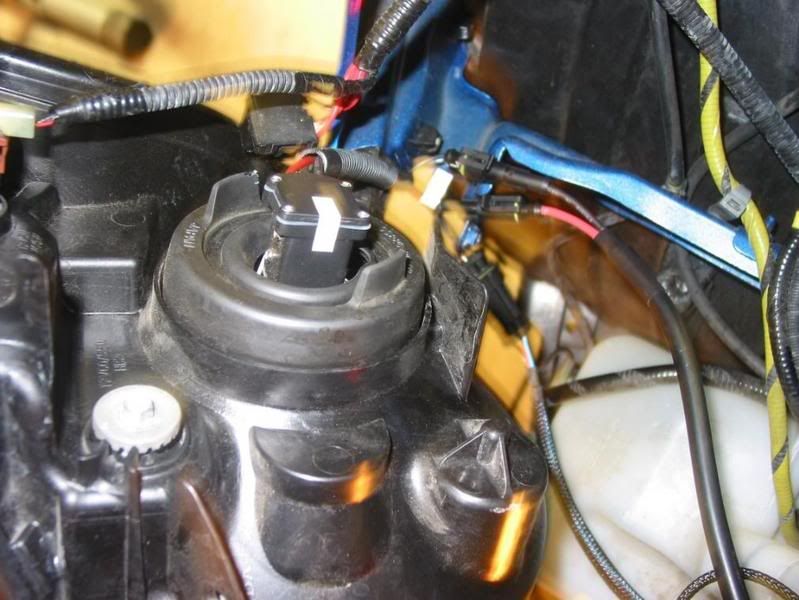
Step 4 installing the ballast.
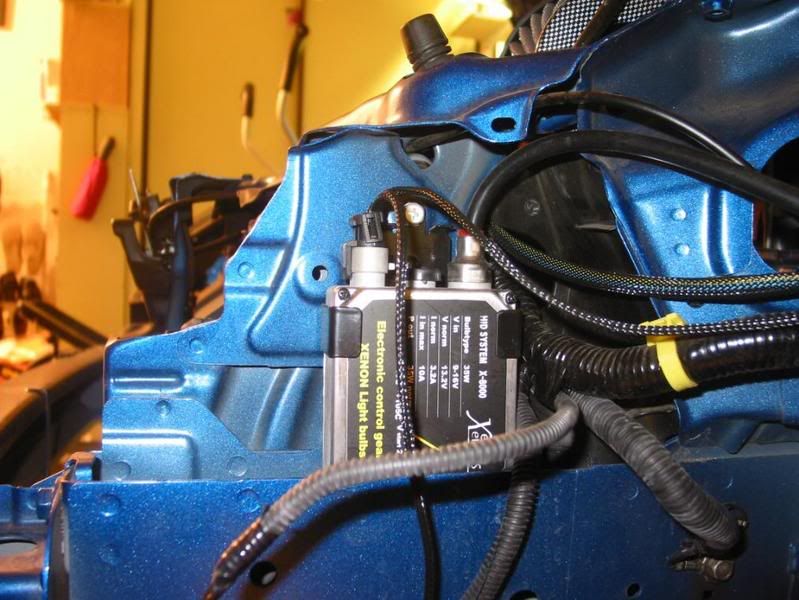
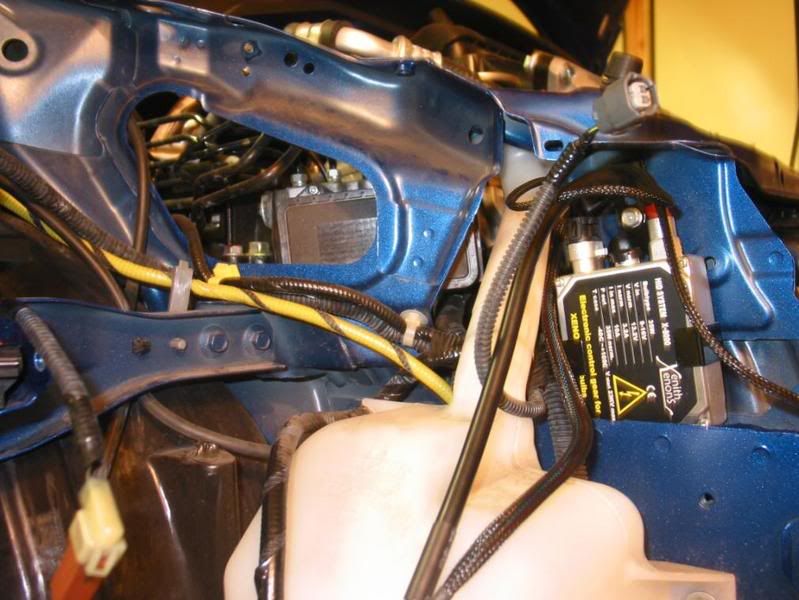
If you look on the side, after removing the headlights, you will have an open area and there are two holes, use the upper one to mount the ballast. But before you mount the ballast to the car, take out the ballast holder and turn holder around, so when you mount the ballast, all of the plugs and cables are facing upward. Screw it on tight and you be fine, it wont move and shake.
This is the driver side.
This is the passenger side.
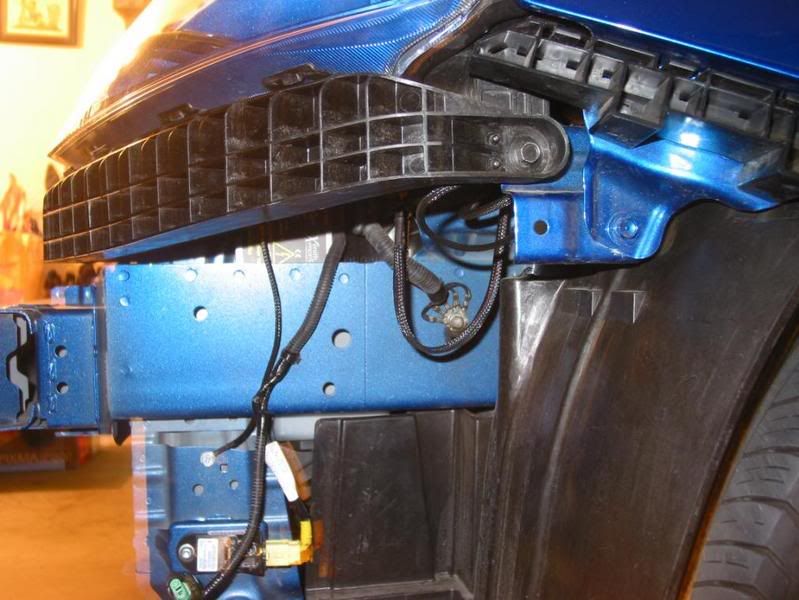
Step 4 The installing the cables
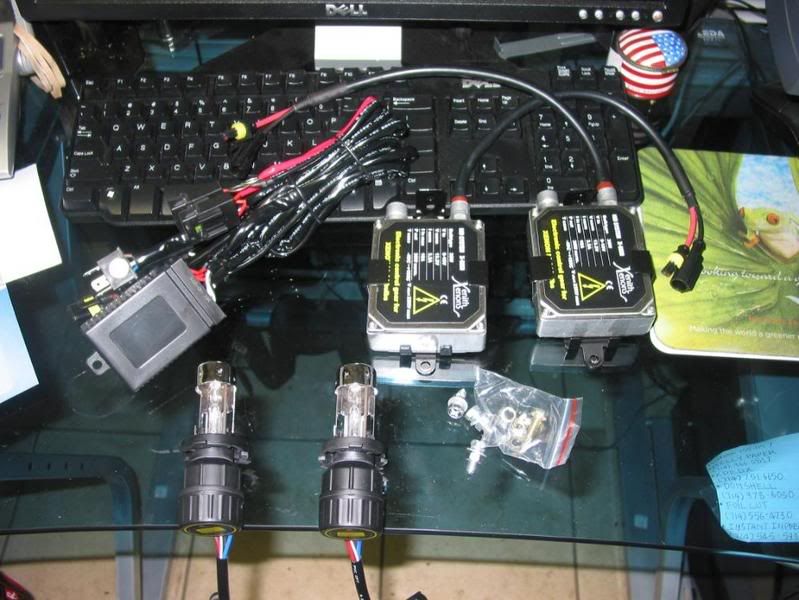
If you just recently brought the HID Kit from XX you may have the newer and improved cable w/ one ground and cover by black rubber/ silicon pipe, which I personally like this one better then the early ones. So first w/ the fuse box, stuff it inside where there is thick cable on the driver side.
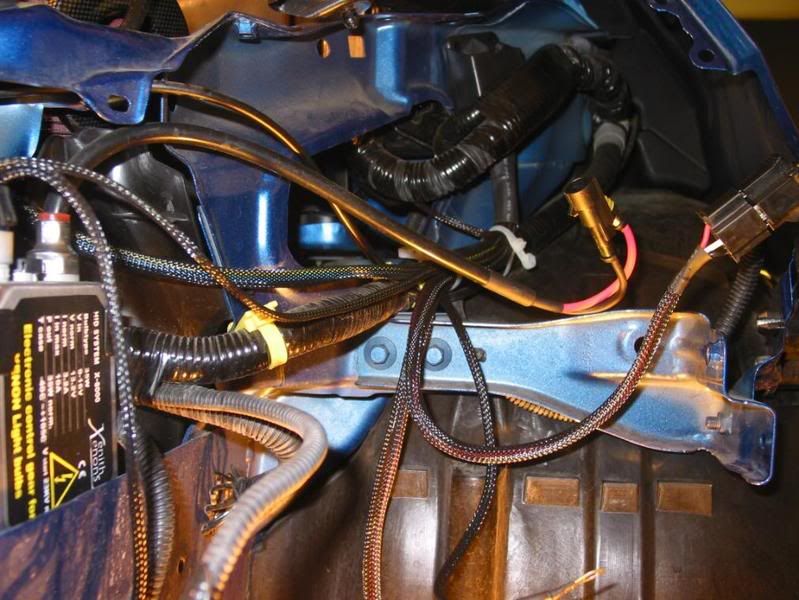
Once you stuff the fuse box, zip ties the cable to the thick cable.
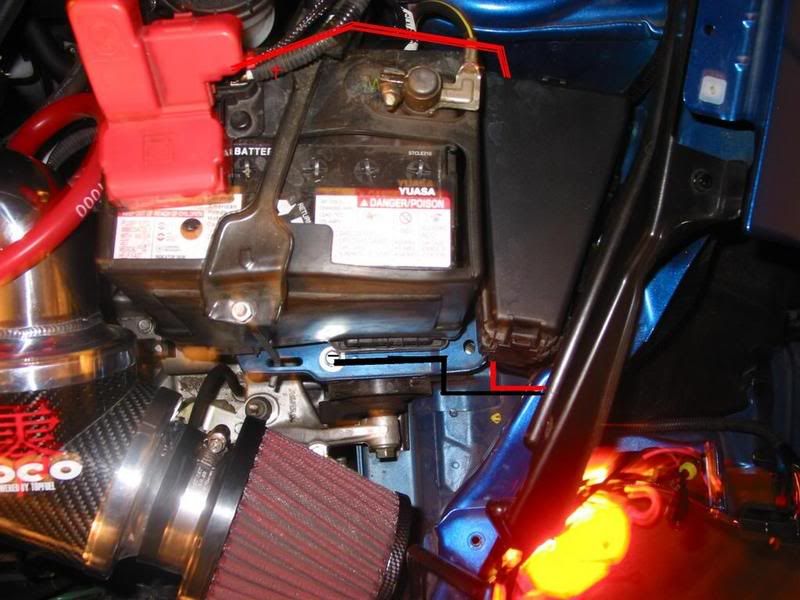
The red and ground go through the open on to other side where the battery and fuse box is. ( follow the red line for the + and black/ground)
The red cable can go underneath the the fuse box, by lifting up the fuse box. To lift the fuse box, unclipping the clips on the right hand side. For the ground cable you can connect it to a 12mm bolt find right next to the battery
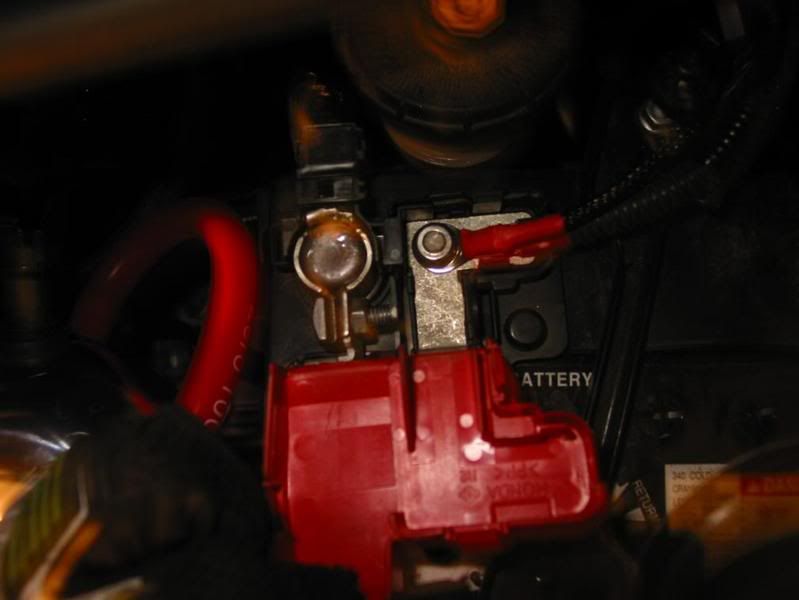
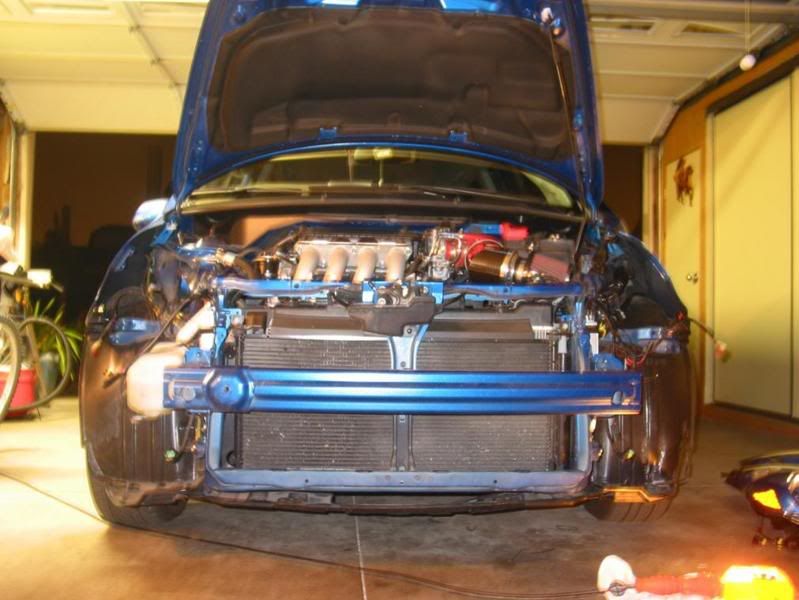
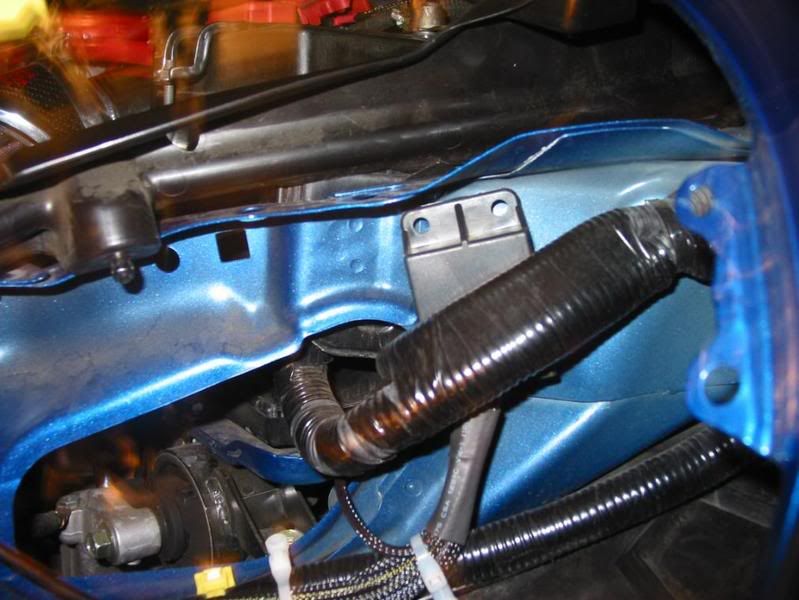
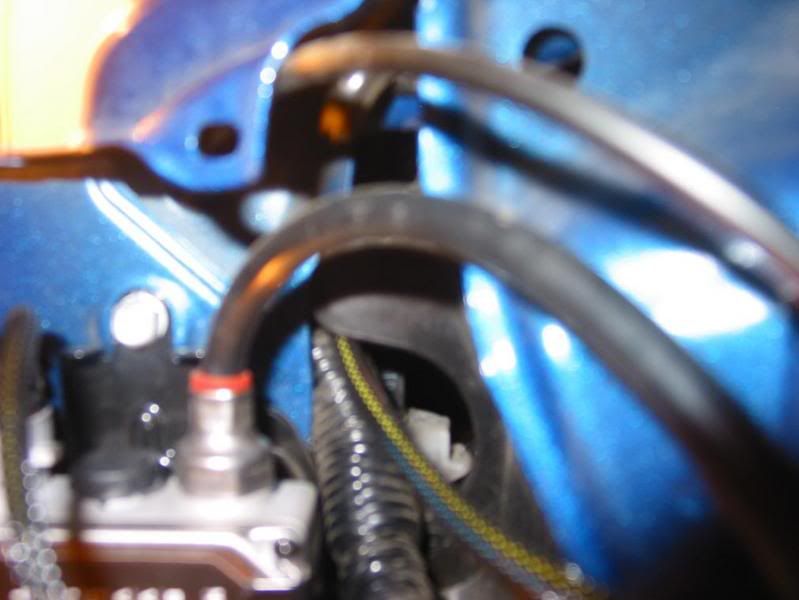
After connecting the red cable to the battery and the ground to the 12mm bolt, it time to run the cable across to the other side and best place to run the cable is the beam right above the radiator, push the hid cable into other cable to keep in place.
It is hollow from the inside.
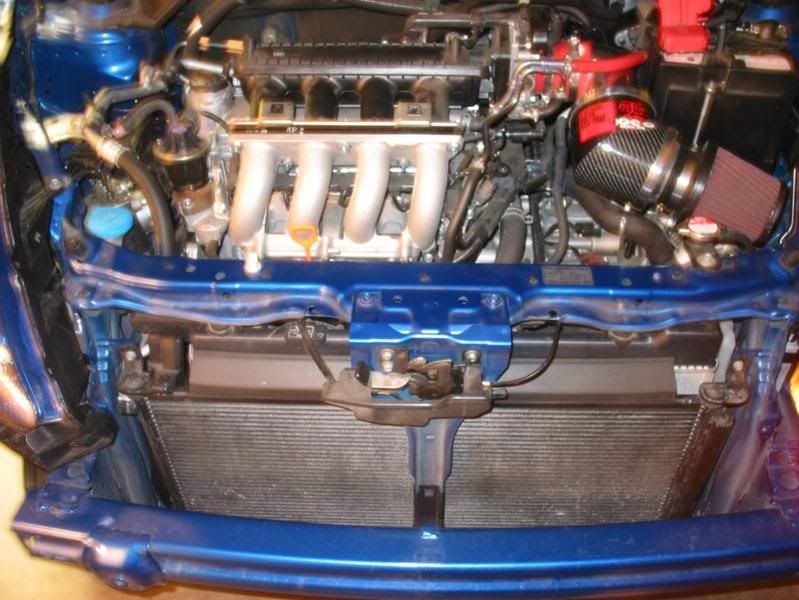
Once run the cable across, connect the cable to the ballast and we are done installing the cable part.
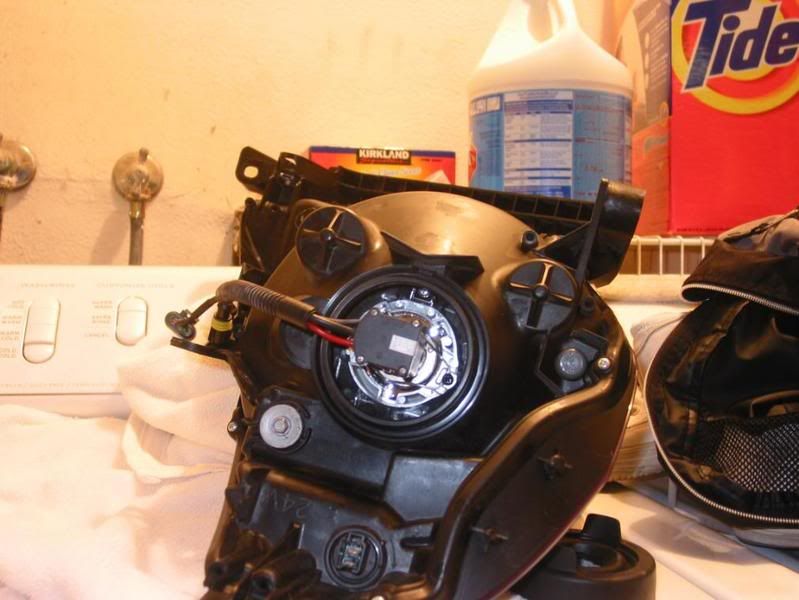
Step 5 Installing the bulb (H4)
Now we are looking at the headlight itself. To remove the stock bulb, first take off the rubber seal and unhook the lock that hold the bulb. And take out the bulb, before installing the new bulbs, you need to cut off a little bit of the rubber seal to allow the new bulbs to fit. Cut the inner part of rings off and try is out. You shouldn't worry about water lacking through, because the design of the headlight doesn't let water come in that area. But if you cut off the inner part only, it should still provide protection.

Step 6
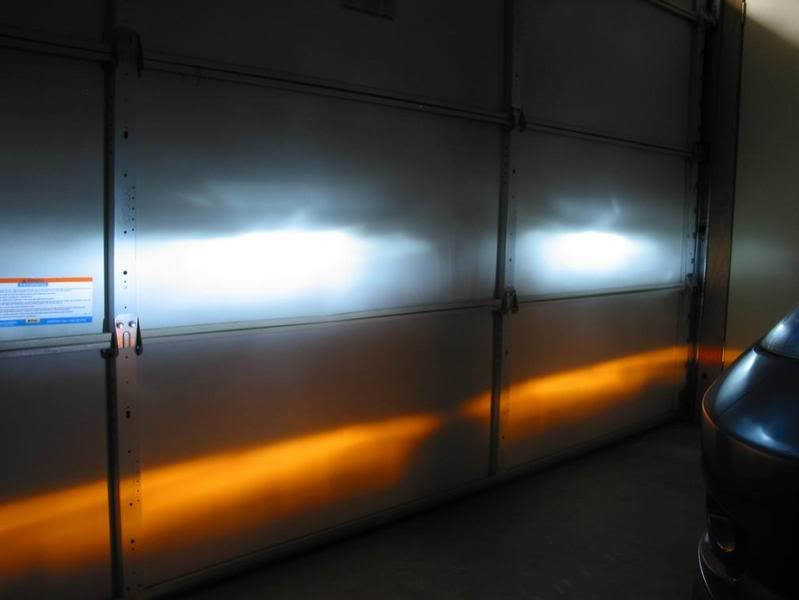
Now connect all the cables and place the headlights back w/ the new bulbs. and screws all the bolts back on to the head units, and before putting back on the bumper, you need to test out the bulbs. So for testing turn on your car, switch on the light to the first one then to the second one, check if both side are lite up and now try the high beam, For new HID there is 15 min break in period, so drive around your neighborhood, remember your bumper is still off.
So now you have HID light on your Fit and also clean set up too. So no one know that you have HID in till you turn on your lights I have installed XX kit on few Fit and other car, and they love the kit. Like some other FitFreaker have said before XX kit are made for are car. So I hope this DIY help you out on your new HID kit from XX and where to place the ballast and run a clean set up. If any one have any ??? or need help on installing the kit, just hit me up. Thanks to George for providing great Kit and KoolKevin for providing the information. Hit up George from Xenith Xenons if want some HID now after reading my DIY. 
Required Tools:
-Flat head
-Philip screw driver
-10mm & 12 mm sockets
-10mm wrench
-zip ties
-ice cold drink
Time: 1 to 2 hours (it depend to you)
Step one: Removing the bumper
You are require to remove your bumper to install the ballast and bulbs.
When open your hood there are 4 black body clips (#44 on the parts layout) that hold the upper part of your bumper, using the flat head you can pop them out.
Now there 4 more body clips ( these are longer and bigger) on the bottom and two screws w/ washer also(#54 on the parts layout), use philip head to take them out.
Now there are two more screws one each side from the wheel wells, use a philip head to unscrew them.
Now removing the bumper itself is fairly easy, first from the side (fender) pull it out and if you get suck around the headlights area, use the flat head to unlock these black taps that is holding the bumper and the headlight together. But usually if you pull the side it will unlock itself. Do the same thing on the other side.
Now the side are off, now pull out the bumper from the center. The bumper will come right off. You will see the fog lights wires. To unhook them use a flat head and push outwards.
Now the bumper will completely come off.
Step 2: Removing the head units
There four 10mm bolts (#16, 17, 18 on the part layout)( #18 is horizontal) that hold the headlights to the cars, unscrew them.
On the driver there is plastic shield, use the flat head to unclip the clips and remove the shield.
Now your Fit should look like this.
Step 4 installing the ballast.
If you look on the side, after removing the headlights, you will have an open area and there are two holes, use the upper one to mount the ballast. But before you mount the ballast to the car, take out the ballast holder and turn holder around, so when you mount the ballast, all of the plugs and cables are facing upward. Screw it on tight and you be fine, it wont move and shake.
This is the driver side.
This is the passenger side.
Step 4 The installing the cables
If you just recently brought the HID Kit from XX you may have the newer and improved cable w/ one ground and cover by black rubber/ silicon pipe, which I personally like this one better then the early ones. So first w/ the fuse box, stuff it inside where there is thick cable on the driver side.
Once you stuff the fuse box, zip ties the cable to the thick cable.
The red and ground go through the open on to other side where the battery and fuse box is. ( follow the red line for the + and black/ground)
The red cable can go underneath the the fuse box, by lifting up the fuse box. To lift the fuse box, unclipping the clips on the right hand side. For the ground cable you can connect it to a 12mm bolt find right next to the battery
After connecting the red cable to the battery and the ground to the 12mm bolt, it time to run the cable across to the other side and best place to run the cable is the beam right above the radiator, push the hid cable into other cable to keep in place.
It is hollow from the inside.
Once run the cable across, connect the cable to the ballast and we are done installing the cable part.
Step 5 Installing the bulb (H4)
Now we are looking at the headlight itself. To remove the stock bulb, first take off the rubber seal and unhook the lock that hold the bulb. And take out the bulb, before installing the new bulbs, you need to cut off a little bit of the rubber seal to allow the new bulbs to fit. Cut the inner part of rings off and try is out. You shouldn't worry about water lacking through, because the design of the headlight doesn't let water come in that area. But if you cut off the inner part only, it should still provide protection.
Step 6
Now connect all the cables and place the headlights back w/ the new bulbs. and screws all the bolts back on to the head units, and before putting back on the bumper, you need to test out the bulbs. So for testing turn on your car, switch on the light to the first one then to the second one, check if both side are lite up and now try the high beam, For new HID there is 15 min break in period, so drive around your neighborhood, remember your bumper is still off.
So now you have HID light on your Fit and also clean set up too. So no one know that you have HID in till you turn on your lights
I have installed XX kit on few Fit and other car, and they love the kit. Like some other FitFreaker have said before XX kit are made for are car. So I hope this DIY help you out on your new HID kit from XX and where to place the ballast and run a clean set up. If any one have any ??? or need help on installing the kit, just hit me up. Thanks to George for providing great Kit and KoolKevin for providing the information. Hit up George from Xenith Xenons if want some HID now after reading my DIY.
Last edited by azncarbos; 06-05-2008 at 12:41 AM.

#5
11-29-2007, 03:34 PM
great writeup peter.You beat me to it, i couldn't find a fitfreak that wanted hid's installed for em quick enough. BTW I swear it sounds like WORD FOR WORD of what i told u over the phone LOLLZZ. Where'z my credit! =]
#8
11-29-2007, 10:31 PM
") But thanks u were big help.
But thanks u were big help. I have been getting call from the random ppl about the installing the HID.
quangalang: Thanks man, I havent any problem w/ glare at all and i have 8k
kelsodeez : This way you can explore ur car. LoL
 Plus i try the fender lining and didnt really like that way.
LDO: hahaha For sure man, I have order them and they are coming in mon or tue. weekday work for you????
kingsfit: thanks, hey you should come out to are meet sometime
we meeting up tomorrow at the tustin legacy
Last edited by azncarbos; 11-30-2007 at 01:49 AM.
#9
11-29-2007, 10:37 PM
)
#11
12-01-2007, 03:18 AM
Join Date: Aug 2007
Location: Irvine, California
Posts: 270
Great writeup Peter, thanks for taking the time and getting this done like you said Good man!!
Good man!!

#13
12-01-2007, 11:32 AM
The intake is the top fuel power chamber
here link:
https://www.fitfreak.net/forums/fit-...er-intake.html
here link:
https://www.fitfreak.net/forums/fit-...er-intake.html
#14
01-12-2008, 05:58 AM

one simple question.
when u press the panic button on your key remote, does your hid kit or any hid kits out there know not to turn on?? is it that simple to just plug everything and performs without damaging it with the alarm setting the headlights on?
or is there a wire to adjust our cars to not set off during a break in/panic button
#15
01-12-2008, 11:35 PM
one simple question.
when u press the panic button on your key remote, does your hid kit or any hid kits out there know not to turn on?? is it that simple to just plug everything and performs without damaging it with the alarm setting the headlights on?
or is there a wire to adjust our cars to not set off during a break in/panic button
when u press the panic button on your key remote, does your hid kit or any hid kits out there know not to turn on?? is it that simple to just plug everything and performs without damaging it with the alarm setting the headlights on?
or is there a wire to adjust our cars to not set off during a break in/panic button
The kit is plug and play, but on my panic, the HID dose go off and even before my HID, my headlight went off when I press the panic button, it can be change it just the fuse and sometime depen on where you got your car too and how dealer installed the alarm, like my buddy only his fog light go off when the panic button is press and that was a stock alarm.

#17
01-15-2008, 01:24 AM
Taking a picture of the HID to judge the glare, there is no point to it b/c the brightness of the HID will cause camera to capture the flare of the HID, not the actually light, it best off to see them in person, plus the Xenith Xenons kit produce lil to none glare, you can ask a lot of fit owner that have xenith xenons kit, alot of them had no problem w/ glare, I have installed these kit on a lot car from our fit to xa to honda pilot, none had any problem w/ glare.
#19
02-27-2008, 01:24 AM
Yes but you can mount the ballest lower...using the provide bolts you can mount any around this area (the picture below)...if i remember h11 kit is direct plug so you dont run wires to the battery..correct me if i'm wrong...I'm going to check this weekend b/c i'm installing h11 kit on the another car i can confirms it....
#20
02-27-2008, 02:55 AM
Join Date: Aug 2007
Location: Irvine, California
Posts: 270
Thanks for answering all the questions Peter, your help is greatly appreciated  .
.
If you guys have any other questions, feel free to PM me as well. Don't bombard Peter with all those questions! I am willing to share the load haha.
And yes, Peter is right. Using a camera to capture the light or the "glare" of HIDs is stupid because blue light is going to look like it shoots out more glare because it's easier to see the blue hue around the headlights compared to the yellowish white hue you see on halogens.
. If you guys have any other questions, feel free to PM me as well. Don't bombard Peter with all those questions! I am willing to share the load haha.
And yes, Peter is right. Using a camera to capture the light or the "glare" of HIDs is stupid because blue light is going to look like it shoots out more glare because it's easier to see the blue hue around the headlights compared to the yellowish white hue you see on halogens.